STRUCTURE SENSOR & DEMO APPS TUTORIAL
|
|
|
- Duane Snow
- 6 years ago
- Views:
Transcription
1 STRUCTURE SENSOR & DEMO APPS TUTORIAL

2 1 WELCOME TO YOUR NEW STRUCTURE SENSOR Congrats on your new Structure Sensor! We re sure you re eager to start exploring your Structure Sensor s capabilities. And to help you get the most out of your experience, we ve put together this quick start guide to help familiarize you with this advanced accessory. WHAT S INCLUDED IN THE BOX Your Structure Sensor should arrive with the following: One Structure Sensor One data cable with Apple Lightning connector One AC battery charger One screwdriver Four M1.6 screws One user manual Your ipad attachment bracket will arrive in a separate box/package. CHARGING YOUR STRUCTURE SENSOR Charging your Structure Sensor s internal battery is simple. Simply connect the supplied AC charger to the round port on the side of the Structure Sensor, and then plug the other end into any standard 2-pronged wall outlet as found in the United States (if you re outside of the US or Canada, you will need to use an appropriate adaptor).

3 2 An LED indicator on the Structure Sensor s glass face will pulse when your Structure Sensor s battery is charging. As soon as your battery is completely charged, the LED indicator will stop pulsing and instead will stay on until you disconnect the AC charger. CONNECTING YOUR STRUCTURE SENSOR TO YOUR IPAD Step 1 Attaching your Structure Sensor to the bracket From top to bottom: ipad (4 th Generation) precision bracket with aluminum latch; ipad Air 3D printed temporary bracket; ipad mini with Retina display 3D printed temporary bracket Your Structure Sensor has arrived with one of three available brackets to connect it to different Apple ipad models (the currently available brackets are for the ipad [4 th Generation], ipad Air and ipad mini with Retina display).


4 3 Using the supplied screwdriver and 4 screws, attach the Structure Sensor to the supplied bracket. Place the Structure Sensor in front of the bracket, and then use the supplied screwdriver and 4 screws to attach the two together. The data and charging ports on the Structure Sensor should be facing to the left as you look at the Structure Sensor and bracket. The proper orientation for the Structure Sensor is to have the two data ports facing to the long side of the bracket.


5 4 Step 2 Attaching the Structure Sensor and bracket to your ipad If you have received a temporary 3D printed bracket, simply slide the bracket plus Structure Sensor onto the top of your ipad. Make sure that the hole in the bracket is centered around the ipad camera. Left: Sliding the bracket onto an ipad Air. Right: The bracket firmly seated. Left: The bracket firmly seated on the ipad Air. Right: The bracket s ipad camera opening.


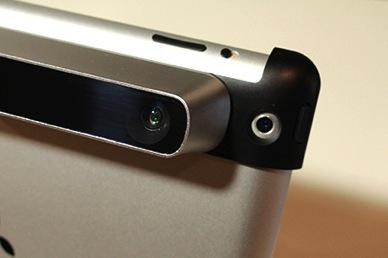
6 5 If you have received the final precision bracket with aluminum latch, start by sliding the bracket plus Structure Sensor onto the top of your ipad, making sure that the aluminum latch is in its open position. Left: Sliding the bracket on an ipad (4 th Gen). Right: The bracket firmly seated. Left: Sliding the bracket on an ipad (4 th Gen). Right: The bracket firmly seated. The bracket s ipad camera opening centered around the ipad camera.


7 6 As soon as the bracket is firmly seated on top of your ipad, and you have ensured that the hole in the bracket is centered around the ipad camera, close the latch by pressing down on it with your thumb. Step 3 Attaching the Lightning cable to your Structure Sensor and ipad Connect the supplied Lightning cable by connecting it to your Structure Sensor first. The wide end of the cable connects to your Structure Sensor, and the goldcolored pins should be facing up as you press it firmly into the Structure Sensor.


8 7 Next, connect the other end of the cable with the Apple Lightning connector into your ipad. Your Structure Sensor is now fully charged and connected to your ipad!

9 8 USING YOUR STRUCTURE SENSOR FOR THE FIRST TIME Using The Viewer Demo App The first demo app to try when you first attach your Structure Sensor to your ipad is the Viewer demo app. Viewer provides a simple view of what the Structure Sensor sees alongside what your ipad s color camera sees. Here is what Viewer s output looks like: The Structure Sensor s output is on the left. The ipad s color camera output is on the right. Using The Object Scanner Demo App The Structure Sensor also arrives with a simple 3D scanning app called Object Scanner. It s easy to start getting great looking scans quickly and consistently if you learn just a few simple things about using this app. Finding Suitable Objects A great first test for the Object Scanner demo app is to try scanning another person from the shoulders up to the top of the head. The Object Scanner demo app works best for scanning objects the size of a medium-sized stuffed animal up to a human bust. Smaller items will lack detail and may challenge object tracking. Larger objects may be difficult to capture in their entirety. The Object Scanner demo app may have difficulty capturing black surfaces and shiny surfaces. In addition, the Object Scanner demo app will have difficulty capturing intricate features, such as hairs, wires or other fine objects Occipital, Inc.

10 9 Setting Up Objects To Scan For the best quality scan, please follow these general guidelines: Stand about 1 meter (or 3 feet) away from the object or the person Make sure that you have an unimpeded 360-degree path around the object or person so that you may capture an entire scan easily For objects, placing them at a standard tabletop height allows for the best combination of scanning quality and ease For objects, placing them on a smooth, flat surface ensures that the Object Scanner demo app will consistently capture great scans The Structure Sensor works best indoors or outside of direct sunlight Positioning the Scan Area Cube When you first open the Object Scanner demo app and connect your Structure Sensor to your ipad, you will see a large transparent cube appear on your screen. The bottom of this cube has an orange square. The orange square will automatically snap itself to flat surfaces such as floors or walls so that your scan is positioned on a flat plane. Alternatively, if you point the Structure Sensor towards a person, the transparent cube will position itself around their upper torso and head for a bust scan. The transparent cube and orange square determine what objects or people the Object Scanner demo app will capture.


11 10 To scan an object, start by standing about a meter (about 3 ) away from the object. Then, center the object within the transparent cube. Once the object is within the cube, you will see that the orange square will now adjust itself to fit over the object you plan to scan. When placed on an object or person, the transparent cube and orange square show what will be captured once the blue Scan button is pressed. If parts of the object you plan to scan are not covered in orange, you are standing too close. Back up until those parts are covered. In this picture, the Structure Sensor is too close to the subject to be scanned, as it does not fit entirely in the transparent cube.


12 11 Using the Pinch Gesture Because the cube determines what will be captured by the Object Scanner demo, it is important to make sure the cube is the right size for the object to be scanned. The size of the transparent cube can be easily adjusted using the typical ipad pinch gesture. Push your thumbs together on your ipad screen to make the cube smaller, and pull them apart to make it bigger. If the cube is too small to contain the object you plan to scan, you can expand the cube by pulling your thumbs apart on your ipad screen. You may also try to move backwards so that you are further from the object you plan to scan. Although the Structure Sensor is a reasonable distance away from the object to be scanned, the scan area cube is too small. Put both thumbs on the touch screen and move them apart to make the scan area cube larger.


13 12 If the cube is too large for the object you plan to scan, then your scan will be of poor quality and you may potentially capture objects in your scan that you do not want. You can shrink the cube by pushing your thumbs together on your ipad screen. You may also try to move closer so that you are nearer to the object you plan to scan. Although the Structure Sensor is a reasonable distance away from the object to be scanned, the scan area cube is too large. Put both thumbs on the touch screen and move them together to make the scan area cube smaller. For the highest quality scans, pinch to shrink the cube so it is just a bit bigger than the object within it that you plan to scan. The size of the scan area cube is just about right to begin scanning this teddy bear.

14 13 Scanning the Object To begin your scan, press the blue Scan button. Once you have started, move around the object to capture it. If you notice that there is a hole in the model, you can go back during the same scan to see if the Object Scanner demo app can fill it in. If you have made a mistake during your scan, you can press the red reset button with the circular arrow on it to restart your scan. Click the Done button when your scan is complete. As soon as you start scanning, you will see your 3D model appearing on top of your subject in real time. As you continue your scan, you can go back and fill in holes and other problem areas to improve your 3D model.

15 14 Maintaining Tracking On your first few scans, you may notice that the Object Scanner demo app loses track of the object. A warning note will appear on your screen: On rare occasions, the Object Scanner demo app will lose tracking of the object or person you are scanning. You will see this error message if that happens. Try to rematch the scan to the object you are scanning to restart object tracking. If that doesn t work, try your scan again. If you consistently get object tracking errors during a scan of the same object, that object may not be suitable for scanning.

16 15 Viewing Your Completed Scan To view your scan, click the done button. A review screen will appear. You can use your finger to drag the model around to see all sides of it. Once you click the Done button, you will automatically be taken to this screen. Use your finger to drag the model around to see it from all angles. You can also click X-Ray View to see the underlying mesh of the model that you have captured. When you click the X- Ray View button, the underlying mesh will appear. Click the link in the upper right hand corner to export an.obj file. To share or export a scan, click the link in the upper right hand corner. Click this to an.obj file of your scan to yourself or a friend. Click the Back link to reset the app so you can start your next scan.
17 16 MORE APPS ARE COMING SOON! At Occipital, we re planning on releasing more demo apps and complete apps to expand the functionality of your Structure Sensor. In addition, developers worldwide are now using the Structure SDK to create more great apps, too. We ll be sure to keep you posted whenever new apps are available for your Structure Sensor. And, if you re a developer, we re always here to help you build your own great app for the Structure Sensor! NEED MORE HELP USING YOUR STRUCTURE SENSOR? We re always ready to help answer any questions or comments you might have about your Structure Sensor. Contact us at structure@occipital.com anytime! If you re a developer, you should have received an invitation to our developer forums. If you have not received this invite, contact us at structure@occipital.com. FOLLOW OCCIPITAL AND THE STRUCTURE SENSOR On Twitter On Facebook On YouTube On the Internet and Tutorial Version 1.1 (March 5, 2014)
STRUCTURE SENSOR QUICK START GUIDE
 STRUCTURE SENSOR 1 TABLE OF CONTENTS WELCOME TO YOUR NEW STRUCTURE SENSOR 2 WHAT S INCLUDED IN THE BOX 2 CHARGING YOUR STRUCTURE SENSOR 3 CONNECTING YOUR STRUCTURE SENSOR TO YOUR IPAD 4 Attaching Structure
EmagiKit. Privacy Pod Plus. Quiet. Easy. Affordable. INSTRUCTIONS ASSEMBLY
 EmagiKit Privacy Pod Plus Quiet. Easy. Affordable. INSTRUCTIONS ASSEMBLY DIMENSIONS AND COMPONENTS 47 47 Ceiling Unit 2-B 2-L 2-R Glass Door Corner Trim Door Handle 90 Adjustable Height Work Surface 1-B
Iphone 5 Glass/Lcd REPAIR GUIDE. Version Edition
 Iphone 5 Glass/Lcd REPAIR GUIDE Version 1 2016 Edition IPhone 5 Glass/LCd REPAIR GUIDE RiAna Soto Repair Training Specialist rsoto@cellairis.com FOR EVERY REPAIR MAKE SURE TO COMPLETE, INITIAL, AND HAVE
Start or stop video recording. Camera/ Video switch
 Camera 9 At a glance If you have an ipad 2 or later, you can take both still photos and videos. In addition to the isight camera on the back, there s a FaceTime camera on the front for FaceTime calls and
Pi-Cars Factory Tool Kit
 Pi-Cars Factory Tool Kit Posted on January 24, 2013 Welcome to the factory: Welcome to where you will learn how to build a Pi-Car, we call it the Pi-Cars Factory. We hope that this page contains all you
Before using the Device. Using your Drifta. Connecting to a PC
 Quick Guide v1.0 Introduction Welcome to the exciting world of DStv Mobile. With your Drifta DStv Mobile Decoder, you will be able to connect to DVB-H broadcast mobile TV and have access to DStv Mobile
Quick Start Guide.indd 1 05/11/15 10:07
 015-10-19 Quick Start Guide.indd 1 05/11/15 10:07 1 WELCOME TO TRACKMAN Congratulations on the purchase of your TrackMan 4. This guide shows you what your TrackMan can do, helps you set it up, and gets
1. ASSEMBLING THE PCB 2. FLASH THE ZIP LEDs 3. BUILDING THE WHEELS
 V1.0 :MOVE The Kitronik :MOVE mini for the BBC micro:bit provides an introduction to robotics. The :MOVE mini is a 2 wheeled robot, suitable for both remote control and autonomous operation. A range of
Photo Editing in Mac and ipad and iphone
 Page 1 Photo Editing in Mac and ipad and iphone Switching to Edit mode in Photos for Mac To edit a photo you ll first need to double-click its thumbnail to open it for viewing, and then click the Edit
iphone 6 Chargeport REPAIR GUIDE Version Edition
 iphone 6 Chargeport REPAIR GUIDE Version 1 2016 Edition IPHONE 6 CHARGEPORT REPAIR GUIDE LCD AND DIGITIZER REPLACEMENT RiAna Soto Repair Training Specialist rsoto@cellairis.com FOR EVERY REPAIR MAKE SURE
Installation guide. Activate. Install your TV. Uninstall. 1 min 10 mins. 30 mins
 Installation guide 1 Activate 2 Uninstall 3 Install your TV 1 min 10 mins 30 mins INT This guide contains step-by-step instructions on how to: 1 Activate Before we do anything else, reply GO to the text
7878 K940. Checkpoint Antenna. Kit Instructions. Issue B
 7878 K940 Checkpoint Antenna Kit Instructions Issue B Revision Record Issue Date Remarks A July 7, 2009 First issue B Nov2013 Revised the Checkpoint installation procedures for 7878 and 7874 scanners Added
QUANTUM Qflash MODEL T OPERATING INSTRUCTIONS
 QUANTUM Qflash MODEL T OPERATING INSTRUCTIONS 1.0 DESIGNATIONS 1. Removable Reflector, two positions Normal and Wide angle. 2. Flash-tube 3. Bounce Head, Rotates 180º 4. Swivel Head, Rotates ± 90º 5. Sensor
IPhone 7 Plus Digitizer/LCD REPAIR GUIDE. Version Edition
 IPhone 7 Plus Digitizer/LCD REPAIR GUIDE Version 1 2016 Edition IPhone 7 Plus Digitizer/LCD REPAIR GUIDE LCD AND DIGITIZER REPLACEMENT RiAna Soto Repair Training Specialist rsoto@cellairis.com FOR EVERY
Shepherd 210A Fingerprint Door Lock Installation Manual V1.1
 Shepherd 210A Fingerprint Door Lock Installation Manual V1.1 Hongda USA Inc. 2505 Technology Dr. #2-6A, Hayward, CA 94545, USA Phone: (510) 887-5682 Fax: (510) 372-0487 Email: info@hongdausa.com Website:
Installation guide. Activate. Install your Broadband. Install your Phone. Install your TV. 1 min. 30 mins
 Installation guide 1 Activate Install your Broadband Install your TV 4 Install your Phone 1 min 0 mins 0 mins 5 mins INT This guide contains step-by-step instructions on how to: 1 Activate Before we do
ES3640e MFP Technician s Installation Guide
 Technician s Installation Guide Configuration A with High Capacity Feeder HCF.jpg Configuration B with Second Tray and Cabinet cab.jpg With optional Finisher: ES3640e MFP 01_Finis her.jpg 1 Warning Icon.jpg
BITCRAFT: GETTING STARTED
 BITCRAFT: GETTING STARTED 1 SETTING UP THE MOD 2 IN ORDER TO SIMPLIFY THE SET-UP PROCESS, we ve made the bitcraft mod available on a platform designed to make modding Minecraft simple, called Technic Launcher.
POCKET READER AND POCKET READER EX. Operator s Manual
 POCKET READER AND POCKET READER EX Operator s Manual Contents Scanner Function Index. 2 I. Batteries Installation...3 For Best Results Recommended Batteries..4 Optional AC/DC Power Adapter EX Model only
CP7039+CP3039 User Manual
 CP7039+CP3039 User Manual TX:CP7039 RX:CP3039 Antenna Antenna WIFI indicator Low battery indicator WIFI indicator Low battery indicator OLED display screen Audio in OLED display screen Reset Key Mini Hdmi
Written By: Brett Hartt
 ipad 3 4G LCD Replacement Removing the LCD Written By: Brett Hartt ifixit CC BY-NC-SA www.ifixit.com Page 1 of 25 INTRODUCTION The third generation ipad loses a lot of luster when its gorgeous retina display
DVBCommunity - cообщество профессионалов ЦТВ CP7039+CP3039 User Manual
 CP7039+CP3039 User Manual TX:CP7039 RX:CP3039 Antenna Antenna WIFI indicator Low battery indicator WIFI indicator Low battery indicator OLED display screen Audio in OLED display screen Reset Key Mini Hdmi
Rachel
 http://gmv.cast.uark.edu A Method Store for Advanced Survey and Modeling Technologies Mon, 01 Apr 2013 03:29:18 +0000 en-us hourly 1 http://wordpress.org/?v=3.5.1 http://gmv.cast.uark.edu/scanning/guide-to-leveling-andaligning-the-breuckmann-tripod-and-smartscan-he-for-calibration/
2004-(Z Series) HDILA Lamp Replacement Procedure Quick Step Guide
 HDILA Lamp Replacement Procedure Quick Step Guide") 2004-(Z Series) HDILA Lamp Replacement Procedure Quick Step Guide How To Determine If The Lamp Requires Replacement? After 30 seconds of turning on the TV The POWER LED and LAMP LED rapidly blink together
2004-(Z Series) HDILA Lamp Replacement Procedure Quick Step Guide How To Determine If The Lamp Requires Replacement? After 30 seconds of turning on the TV The POWER LED and LAMP LED rapidly blink together
ANATOMY OF A BIT TM how you can tell top from bottom. four on the floor!
 CRAWLY CREATURE BASICS 1 Learn BITSNAP ANATOMY OF A BIT TM how you can tell top from bottom. TOP BOTTOM BIT FEET 2 which COLOR-CODED BY FUNCTION Bits TM are grouped into four different categories, are
Scanner Parts. Scanner Specifications. General. Mechanical. Epson Perfection V200 Photo. P Power/ ] Start button Status light. { Copy button.
![Scanner Parts. Scanner Specifications. General. Mechanical. Epson Perfection V200 Photo. P Power/ ] Start button Status light. { Copy button.](/thumbs/73/68379766.jpg "Scanner Parts. Scanner Specifications. General. Mechanical. Epson Perfection V200 Photo. P Power/ ] Start button Status light. { Copy button.") Scanner Parts { Copy button Scan to E-mail button a b P Power/ ] Start button Status light c e d a Scan to PDF button Film holder Scanner Specifications General Scanner type Flatbed color Photoelectric
Scanner Parts { Copy button Scan to E-mail button a b P Power/ ] Start button Status light c e d a Scan to PDF button Film holder Scanner Specifications General Scanner type Flatbed color Photoelectric
FlexFrame - Storage Components and Skins
 FlexFrame - Storage Components and Skins 1/4 Square Drive Ball-Point Hex-Bit Socket 1/8 Short Hex, 1-1/2 Overall Length McMaster Part # 54075A44 Table of Contents Topic Page Storage Components 2 General
TM Quick Start Guide
 TM Quick Start Guide Contacting Pazzles By Phone In the US: 866-729-9537 International: +1-208-922-3558 Phone Hours: Mon - Fri, 9am - 5pm Mountain Time By Email Customer Service: Technical Support: Sales:
QUANTUM Qflash T2 / X2 OPERATING INSTRUCTIONS
 QUANTUM Qflash T2 / X2 OPERATING INSTRUCTIONS 1.0 DESIGNATIONS T2 AND X2 1. Removable Reflector, two positions Normal and Wide angle. 2. Flash-tube 2A. Modeling Lamp (for Model X2 only) 3. Bounce Head,
PC: A. Place the Microtek CD-ROM into the CD- ROM drive. B. Follow the on-screen instructions to install the driver and software.
 Start Here Installing your Microtek ScanMaker s450/s350 Step 1: Unpack Contents Unpack your scanner package and check for major components. 1 1. Scanner with built-in transparency adapter 2. Software CD
FLATFROG MULTITOUCH 3200
 FLATFROG MULTITOUCH 3200 Quick Assembly Guide Document Number LZN 100013 R1B Issue 2012-07 Industrial Design Casing Parts List b a Package contents Industrial design casing. The following items are included:
INSTALLATION INSTRUCTIONS HEAVY DUTY TILT WALL MOUNT Model: PPH-2000
 INSTALLATION INSTRUCTIONS HEAVY DUTY TILT WALL MOUNT Model: PPH-2000 Specifications: Accomodates Akira and Orion 84" displays without interface bracket; accomodates other large flat panel displays with
Sunglass Selfi Illustration
 Sunglass Selfi Illustration www.orchardviewcolor.com theresa@orchardviewcolor.com @tjsorchard Mobile App Illustration with Adobe Capture & Adobe Draw In this hands on creative lab you will illustrate a
understanding sensors
 The LEGO MINDSTORMS EV3 set includes three types of sensors: Touch, Color, and Infrared. You can use these sensors to make your robot respond to its environment. For example, you can program your robot
AUTO STABILIZING AND LEVELLING SYSTEM
 Installation Manual Make sure the caravan is parked in a safe place. Make sure the caravan brake is on. Remove all 4 corner steady legs from the caravan. Remove the corner steady legs by removing the 3
TIP FOR GETTING STARTED
 Tip for getting started TIP FOR GETTING STARTED Be careful not to drill into any electrical wires, ductwork, plumbing or other damagable components. If you have any questions on the locations of these
Motorized or Crank Operated Fortress Zipper Track Shade with Housing and Side Track Installation Instructions
 Motorized or Crank Operated Fortress Zipper Track Shade with Housing and Side Track Installation Instructions Tools Needed Drill 3/8 Metal Drill Bit ¼ Masonry Drill Bit Measuring Tape Pencil 4 Level Phillips
Elara NanoEdge Fixed Frame Screen User Guide
 Elara NanoEdge Fixed Frame Screen User Guide INTRODUCTION INTRODUCTION WARNING This product may contain sharp edges, please handle with care. Protective gloves are recommended. A minimum of two people
Mighty Mo GX Series Cabinet Installation Guide. OR Rev /11
 Mighty Mo GX Series Cabinet Installation Guide OR-71601787 Safety and Warning ATTENTION The exclamation point within an equilateral triangle is intended to alert the user to the presence of important operating
How to Join Instagram
 How to Join Instagram Instagram is a growing social network based on still images and short videos. It is used on phones but you can watch Instagram videos and leave comments at http://instagram.com. Here
TrainSpeed1. Single train speed indicator. Model Railroad Speedometer Operating Manual
 TrainSpeed1 Single train speed indicator Model Railroad Speedometer Operating Manual TCS Inc. 215-453-9145 Main Number 215-257-0735 Tech Number www.tcsdcc.com SKU: 1547 TrainSpeed Operating Instructions
PHYSICS 220 LAB #1: ONE-DIMENSIONAL MOTION
 /53 pts Name: Partners: PHYSICS 22 LAB #1: ONE-DIMENSIONAL MOTION OBJECTIVES 1. To learn about three complementary ways to describe motion in one dimension words, graphs, and vector diagrams. 2. To acquire
Written By: Brett Hartt
 Replace the battery in your ipad 3 4G. Written By: Brett Hartt ifixit CC BY-NC-SA www.ifixit.com Page 1 of 36 INTRODUCTION When your ipad can't stay awake for longer than a few hours, it is time to replace
Written By: Brett Hartt
 Replacing the Wi-Fi antenna in the third generation ipad Written By: Brett Hartt ifixit CC BY-NC-SA www.ifixit.com Page 1 of 31 INTRODUCTION Wireless internet is awesome. A third generation ipad without
LAN Locker Adjustable Shelves
 Adjustable Shelves LAN LOCKER ADJUSTABLE SHELVES * Adjustable Shelves are available for LAN LOCKER widths: 24, 30, 48, 60, and 72. * When installing more than one Adjustable Shelf, it is recommended that
T-5 Floor Model SunLite Garden Assembly Instructions
 T-5 Floor Model SunLite Garden Assembly Instructions The Floor Model Light Garden can be used alone or as a base for our popular Tabletop Light Garden (sold separately). Assembly takes less than an hour
Print Head Installation Guide
 Print Head Installation Guide MCS Raptor 6 (MCS Eagle AMS Software) is copyright of MCS Incorporated. 2015 MCS Incorporated. 1 Contents Tools... 4 Warnings... 4 Introduction... 4 Section One - Pillar Installation...
Wall Mount Assembly and Mounting Guide (55 /84 )
") Microsoft Surface Hub Wall Mount Assembly and Mounting Guide (55 /84 ) For mounting on a wall with wood studs These instructions assume wood-stud wall construction with 2-by-4 studs spaced 16 inches apart,
Microsoft Surface Hub Wall Mount Assembly and Mounting Guide (55 /84 ) For mounting on a wall with wood studs These instructions assume wood-stud wall construction with 2-by-4 studs spaced 16 inches apart,
TrainSpeed 4. Four separate train speed indicators. Model Railroad Speedometer Operating Manual
 TrainSpeed 4 Four separate train speed indicators Model Railroad Speedometer Operating Manual TCS Inc. 215-453-9145 Main Number 215-257-0735 Tech Number www.tcsdcc.com SKU: 1548 TrainSpeed Operating Instructions
Monitor mount for 2017 P-series Dell monitors. Installation guide
 Monitor mount for 2017 P-series Dell monitors Installation guide Notes, cautions, and warnings NOTE: A NOTE indicates important information that helps you make better use of your product. CAUTION: A CAUTION
2YEAR. Fit Series Assembly Instructions. Inversion Tables WA R R A N T Y
 Fit Series Assembly Instructions Inversion Tables R TEETER HANG UPS 2YEAR WA R R A N T Y * Inversion Table images may vary slightly from your model. The Fit-100 is shown here. BEFORE YOU BEGIN: Review
Standard Nagel M2 Bookletmaker Operators Manual
 1-800-543-5454 (801) 927-3026 Standard Nagel M2 Bookletmaker Operators Manual Read this manual, and thoroughly familiarize yourself with its contents before operating or servicing the equipment TABLE OF
SuperTrack Parts List
 SuperTrack Parts List [indicates number for 6 lane tracks] SuperTrack Installation Instructions www.supertimer.com 1-800-654-2088 1 Track Instruction Manual (this booklet) 2 Start sections [3] Start Gate
WiFi Photo & Document Scanner User Guide
 WiFi Photo & Document Scanner User Guide CONTENTS Safety precautions What s in the box Product diagram Operation / charge the battery Download and install iscan Air App FREE Connect to a WiFi network Scan
A Quick Guide to ios 12 s New Measure App
 A Quick Guide to ios 12 s New Measure App Steve Sande For the past several years, Apple has been talking about AR augmented reality a lot. The company believes that augmented reality, which involves overlaying
Getting started with AutoCAD mobile app. Take the power of AutoCAD wherever you go
 Getting started with AutoCAD mobile app Take the power of AutoCAD wherever you go Getting started with AutoCAD mobile app Take the power of AutoCAD wherever you go i How to navigate this book Swipe the
Charisma SEG Slim Profile Light Box - XSL Series
 Page - Assemble the Frame First start by assembling corners. There are three (3) brackets per corner. All extrusion sections are numbered to identify which pieces go together, with, 2 with 2, etc. Insert
Roomba 500 Series Servicing and Repair Guide. Chapter 3: How to Open Up Roomba
 Roomba 500 Series Servicing and Repair Guide Chapter 3: How to Open Up Roomba 1 This repair guide explains how to perform general disassembly on the Roomba 500 series robot vacuum. It is suggested to consult
Sense. 3D scanning application for Intel RealSense 3D Cameras. Capture your world in 3D. User Guide. Original Instructions
 Sense 3D scanning application for Intel RealSense 3D Cameras Capture your world in 3D User Guide Original Instructions TABLE OF CONTENTS 1 INTRODUCTION.... 3 COPYRIGHT.... 3 2 SENSE SOFTWARE SETUP....
Removing and Replacing the Y-truck
 Service Documentation Removing and Replacing the Y-truck To remove and replace the Y-truck you will need the following tools: 4mm Allen wrench 12mm stamped flat wrench #2 Phillips screwdriver (magnetic
Before Assembling the Storage Wall
 Chapter 1 Assembling the Lista Storage Wall Lista provides two types of standard Storage Walls: B251 and B255. The design, construction, assembly, and quality are identical for both types, however, B251
Installing the Quilter s Cruise Control TM. Cruising with the Quilter s Cruise Control TM
 TM User s Manual This user s manual is for the Quilter s Cruise Control TM with Optical Encoders, and will help you install your unit on your short-arm quilting frame system properly. Installing the Quilter
broadcast without limits. user manuel
 broadcast without limits. user manuel TRANSMITTER FS-7039 RECEIVER FS-3039 Freestream App Installation Easily download the Freestream app within the App Store or Google Play. System Requirements: ipad
Wireless Handy Scanner
 User Guide Works with iscanair Go Scanner App Wireless Handy Scanner For smartphones, tablets, and computers Wi-Fi 802.11g/n supported All trademarks are the property of their respective owners and all
WARNING: Prior to installation, turn the power off to the vending machine and unplug it from its power source. Also, make sure to level the machine.
 Installation of Gum and Mint Tray for National 147, 157, 167 Important Note: Please read all instructions thoroughly before continuing with installation of kit. If you are having problems installing the
AUDI A8 D3 REPLACING THE OUTSIDE DRIVER DOOR HANDLE
 AUDI A8 D3 REPLACING THE OUTSIDE DRIVER DOOR HANDLE The keyless entry system in the D3 is a great feature. If you have the car key fob in your pocket, putting your hand under the door handle will unlock
Lunette 2 Series. Curved Fixed Frame Projection Screen. User s Guide
 Lunette 2 Series Curved Fixed Frame Projection Screen User s Guide Important Safety and Warning Precautions Please follow these instructions carefully to ensure proper maintenance and safety with your
Build your own. Stages 7-10: See Robi s head move for the first time
 Build your own Pack 03 Stages 7-10: See Robi s head move for the first time Build your own All rights reserved 2015 Published in the UK by De Agostini UK Ltd, Battersea Studios 2, 82 Silverthorne Road,
STOP! READ THIS FIRST
 STOP! READ THIS FIRST 1 Getting Started With Your Meistergram Embroidery System (the quick guide) Thank you for choosing Pantograms for your embroidery system provider. We encourage you to read the following
User Guide. Version 1.0 POWER
 User Guide POWER Version 1.0 www.focusrite.com TABLE OF CONTENTS OVERVIEW.... 3 Introduction...3 Product Compatibility...3 Features.................................................................... 4
Panorama TELEPACK 608
 Quick Reference Guide Datascope Panorama TELEPACK 608 SpO 2 Panorama_Telepk QRG_0003_rB.indd 1 Note: The Panorama Telepack SpO 2 Quick Reference Guide is not intended as a replacement to the Operating
UPLIFT 2-Leg Height Adjustable Standing Desk
 UPLIFT -Leg Height Adjustable Standing Desk Also watch our assembly video http://bit.ly/9ywwh DIRECTIONS FOR ASSEMBLY AND USE TABLE OF CONTENTS PAGE Safety and Warnings Usage Parts List Assembly Instructions
Installing flat panels on the MPL15 wall mount
 Installing flat panels on the MPL15 wall mount The MPL15 (DS-VW775) is a full-service video wall mount that can accommodate tiled LCD panels with up to a 400 x 400 mm VESA pattern in portrait and landscape
Written By: slimchance2001
 Written By: slimchance2001 ifixit CC BY-NC-SA www.ifixit.com Page 1 of 10 INTRODUCTION Like a lot of LG devices I wasn't able to find a teardown guide for general knowledge, and if i needed to replace
User Manual. This User Manual will guide you through the steps to set up your Spike and take measurements.
 User Manual (of Spike ios version 1.14.6 and Android version 1.7.2) This User Manual will guide you through the steps to set up your Spike and take measurements. 1 Mounting Your Spike 5 2 Installing the
MAXISPACE T01-B INSTALLATION INSTRUCTIONS MIRRORED CABINET K-96106T-R/K-96106T-L/K-96107T
 MAXISPACE INSTALLATION INSTRUCTIONS MIRRORED CABINET K-96106T-R/K-96106T-L/K-96107T BEFORE YOU BEGIN Please read these instructions carefully to familiarize yourself with the required tools, materials,
How to install an aftermarket stereo/navigation
 How to install an aftermarket stereo/navigation As most of you know, the 2002 (and others) Sport Trac has the 1 ½ DIN radio. This makes for some narrow choices when putting in a radio with navigation.
GYPSY GYPSY. Quick Start Guide. Guide Rapide GET STARTED:
 GYPSY Quick Start Guide GYPSY Guide Rapide GET STARTED: Be sure to download the latest updates and claim your Cricut rewards points! Visit www.provocraft.com/gypsy STYLUS PEN ZOOM (IN AND OUT) MENU BUTTON
Getting started 1 System Requirements... 1 Software Installation... 2 Hardware Installation... 2 System Limitations and Tips on Scanning...
 Contents Getting started 1 System Requirements......................... 1 Software Installation......................... 2 Hardware Installation........................ 2 System Limitations and Tips on
Powerbook G3 Lombard (1999) USB Repair Manual
 USB Repair Manual") Powerbook G3 Lombard (1999) USB Repair Manual Copyright 2003 Powerbookmedic.com. All rights reserved. Any portion of this manual may not be copied, reproduced, or distributed without the express written
Powerbook G3 Lombard (1999) USB Repair Manual Copyright 2003 Powerbookmedic.com. All rights reserved. Any portion of this manual may not be copied, reproduced, or distributed without the express written
Build your own. Stages 47-50: Continue building up Robi s left leg
 Build your own Pack 13 Stages 47-50: Continue building up Robi s left leg Build your own All rights reserved 2016 CONTENTS Published in the UK by De Agostini UK Ltd, Battersea Studios 2, 82 Silverthorne
TeamBoard Instructional Video Transcript Mecklenburg County Courthouse
 We are here today to do some training on a TeamBoard interactive whiteboard. What it is, is just your standard whiteboard that you have in every conference room. What we ve done is that this now links
VEX IQ Troubleshooting Flowchart Controller & Controller Battery
 Controller & Controller Battery Controller Power/Link Charge/Game Does the Controller turn on When on, the Power/Link LED will be green or red. Unscrew the battery door of the Controller and ensure both
Quick Start Guide. Contents
 1 Quick Start Guide Contents Powering on the Machine Login/Password Entry Jaw Set Up High Security Cut by Code High Security Jaw Set Up Edge Cut Cut by Code Edge Cut Cut by Decode Cutter Replacement Tracer
TRIMLINE CANOPY 10' x 20'
 TRIMLINE CANOPY 10' x 20' Instructions for Assembly Video instructions are available on our website! Go to: flourishdisplays.com/instructions or scan this code with your QR Code Reader App for a direct
English RACON SERIES II RADIO CONTROL SERVICE MANUAL
 English 22.2.2007 RACON SERIES II RADIO CONTROL SERVICE MANUAL Read the instructions supplied with the product before installation and commissioning. Keep the instructions in a safe place for future reference.
Build your own. Pack. Stages 19-22: Continue building Robi s left arm
 Build your own Pack 06 Stages 19-22: Continue building Robi s left arm Build your own All rights reserved 2015 Published in the UK by De Agostini UK Ltd, Battersea Studios 2, 82 Silverthorne Road, London
Rockwell Automation PowerFlex 755 Disassembly
 Rockwell Automation PowerFlex 755 Disassembly Disassembling a 1HP Rockwell Automation PowerFlex 755 VFD. Written By: Alex Nolan ifixit CC BY-NC-SA www.ifixit.com Page 1 of 12 INTRODUCTION This guide outlines
Installation Instructions
 Installation Instructions Optima LED 8 Double-Sided StretchLite Perimeter Lit Graphic Display Line Voltage Connector Optima LED DS5 (Double-sided StretchLite Graphic Display) with Graphics Corner Bracket
Standard Operating Procedure
 RIT MULTIDISCIPLINARY SENIOR DESIGN 2010 Standard Operating Procedure Baja Water Propulsion Test Stand This SOP specifies how to assemble, use, troubleshoot, and disassemble the water propulsion system
XT-4015 Disassembly Assembly Guide
 XT-4015 Disassembly Assembly Guide Main Unit Disassembly Remove the two screws that in the back of main unit from base as shown. Remove the two screws by turning the main unit to the other side while removing
ipad 3 4G Home Button Assembly Replacement
 ipad 3 4G Home Button Assembly Replacement Replace the home button assembly in your ipad 3 4G. Written By: Brett Hartt ifixit CC BY-NC-SA www.ifixit.com Page 1 of 29 INTRODUCTION Use this guide to replace
Proximity-Sensor Counter Installation Instruction Model: MRC-PRO
 Proximity-Sensor Counter Installation Instruction Model: MRC-PRO NYS DOT Approval SYSDYNE CORP. 1055 Summer St. 1 st Floor Stamford, CT 06905 Tel: (203)327-3649 Fax: (203)325-3600 Contents: Introduction...
ipad 3 4G Home Button Control Board Replacement
 ipad 3 4G Home Button Control Board Replacement Replace the home button control board in your ipad 3. Written By: Brett Hartt ifixit CC BY-NC-SA www.ifixit.com Page 1 of 28 INTRODUCTION This guide will
Maintenance Information
 47104302 Edition 1 November 2012 Cordless Drill/Driver QX Series Maintenance Information Save These Instructions Tool Diagnosis 1. Before servicing this unit, you will need a fully charged battery of known
General Workflow Instructions for capturing 360 images using Theta V, editing in Photoshop, and publishing to Google StreetView
 General Workflow Instructions for capturing 360 images using Theta V, editing in Photoshop, and publishing to Google StreetView This document attempts to give step-by-step instructions for capturing and
Insolroll Clutch Operated Shades Installation Instructions Installation Instructions
 All clutch operated shades are shipped fully assembled and ready for installation. Mounting screws are not provided. Screws for chain guide installation to meet the child safety standards are provided.
FD 125 Large-Format Card Cutter
 FD 125 Large-Format Card Cutter 3/201 OPERATOR MANUAL Page 2 Table of Contents SAFETY PRECAUTIONS... 4 Introduction... 5 Specifications... 5 Accessories... 5 Major Components and Assemblies... 6 Control
Start Here. Installing your Microtek ScanMaker i280
 Start Here Installing your Microtek ScanMaker i280 Step 1: Unpack Contents Unpack your scanner package and check for major components. 1. ScanMaker i280 scanner 2. Hi-Speed USB cable 3. Software CDs/DVDs
ABM International, Inc.
 ABM International, Inc. Lightning Stitch required 1 1.0: Parts List head and motor assembly (Qty. 1) Reel stand (Qty. 1) Needle bar frame clamp (Qty. 1) Motor drive (Qty. 1) 2 Cable harness with bracket