T R U E. Start by building the example boat, then turn it into your own unique design.
|
|
|
- Janice Walton
- 5 years ago
- Views:
Transcription


1 T R U E Start by building the example boat, then turn it into your own unique design. For use with TeacherGeek Build-a-Boat Activity, or Maker Cart. To find documents and activity materials, click here.
2 Page 2

 #10 4 - Nuts #10 10 - Toothpicks 1 - Hub")


3 These are the TeacherGeek components for the example Boat, and extras to turn it into your own unique design. 2 - Blocks 4 - Dowels 300mm (12 ) 3 - Connector Strips 4-25mm Screws 25mm (1 ) # Nuts # Toothpicks 1 - Hub Cover 1 - Hub Base 1 - Hub Screw #6 4 - Zip Ties 1 - Motor 1.5V-3V 1 - Motor Mount 1 - Battery Holder w/ switch & leads Components available in products for the TeacherGeek Build-a-Boat or Maker Cart. To find documents and activity materials, click here. Page 3


4 Multi-Cutter Tools available at Demco. Screwdriver Hammer You will need these non-teachergeek supplies: Tape Masking, Painter s, Duct Any kind of tape will work. Scissors For cutting blade materials out of recycling materials. Safety Goggles Should be worn during the activity. Propeller blades spin very fast. 2 - AA Batteries Recycling Materials Blades can be made from cardboard, chipboard, clean food packaging, plastic, etc. They should not be made from metal or anything sharp. Floating Materials Find materials that float. You ll get to add these to your design to create a working boat. Page 4


5 Cut two 8cm dowels. 8cm Push or tap the 8cm dowels half way through a block. block 8cm Quick Tip Use a tapping block and hammer. It will things much easier. Page 5


6 Cut a connector strip in half. Push or tap the connector strip halves onto the dowels from Step 2. half connector strips Push or tap the 10cm dowel through the center hole of the block. Cut a 10cm dowel. 10cm 10cm Page 6


7 Push the outside hole of a block onto the dowel. Push the motor into the mount as shown. This is what it should like Attach the motor mount with a 25mm screw and nut. 25mm screw nut Almost there! Now, let s add the prop blades Page 7
 Cut the both ends")

8 For this part of the build guide, you will need: Tape (any kind will work) Recycling Materials Mini Motor Hub Base & Cover Hub Screw Toothpicks (or skewers) Cut the both ends off the toothpicks. Measure and cut three 3cm x 6cm strips of recycling materials. Skewers Option Cut to size and cut off the pointed ends of skewers. 6cm 3cm These will be your blades. Page 8


9 Lay a piece of tape (sticky side up) and lay a toothpick in the middle. Place the blade on one half of the tape. 3cm sticky side up 6cm Fold over the tape (around the toothpick and blade). Measure 15mm from the end of blade and cut. Make sure the tape is creased tight around. Congratulations! You made your first prop blade. Now, make two more. You should have three when you are finished. Page 9


10 Safety First If you re not already, wear eye protection during these steps and when operating your Boat. Screw the cover to the base using a hub screw. Quick Tip Hold the base with pliers when turning in the screw. hub screw Loosen the screw ½ turn. cover base Front View Push the blade ends into the hub. When set, retighten the screw. Once you have your hub assembled, push it onto your motor as shown on the left. Page 10


11 Put the zip tie through the battery holder and one of the holes on the frame. Tighten and trim zip ties. Right! Wrong Quick Tip Zip ties can be tricky. Make sure you put them on the right way. Page 11


12 Connect the motor to the battery holder. Put the battery holder wires through and wrapped around the motor terminals. Caution: No Short Circuiting Do not let the wires cross or touch the silver metal part of the motor. Insert two AA batteries in the battery holder. Use the metal lever to turn your propeller on and off. Page 12
 to your design to make your boat float. Quick Tip Cut slits in your noodles to slide the frame into.")

13 Add floating materials (foam trays, pool noodles, plastic bottles, food containers, etc.) to your design to make your boat float. Quick Tip Cut slits in your noodles to slide the frame into. Add a Rudder Use the water s current to your advantage and help push your boat along. Good News Your example Boat is finished. Bad news, the example isn t the best design, you can make it better. Find out how on the next page. Page 13


14 Try Changing Blade Shape & Size Blade designs come in all shapes and sizes. Try adding to your blades by taping on extra pieces or cutting them down into new shapes. Or try using only two blades or six! Try Changing Blade Angle A. Loosen the hub screw a half turn. B. Change the blade angle using the protractor as shown. C. Tighten the screw again. Design an Underwater Propeller Use what you ve learned about propellers pushing air, and design a boat that uses a propeller to push water. Quick Tips Dowels swell when wet. Use a smaller blade design. Click here to find documents. Page 14
Start by building the example racer, then turn it into your own unique design.
 Start by building the example racer, then turn it into your own unique design. For use with TeacherGeek Air Racer Activity Pack, or Maker Cart. To find documents and activity materials, click here. Page
100mm (3in) Slide Stop Cut to 6mm (1/4in) Sections. Quantity: mm (10in) Skewers Quanity: 10. Material to Lift. Material for Blades.
 Slide Stop Cut to 6mm (1/4in) Sections. Quantity: mm (10in) Skewers Quanity: 10. Material to Lift. Material for Blades.") Wind Lift Page 1 The Activity This guide will take you through the process of creating a wind powered lift. You ll start by creating the stand. The lift mechanism, hub and blades are then added. Before
Wind Lift Page 1 The Activity This guide will take you through the process of creating a wind powered lift. You ll start by creating the stand. The lift mechanism, hub and blades are then added. Before
Download classroom documents at teachergeek.com/learn. For use with TeacherGeek Judo-Bot Activity Pack, or Maker Cart available at teachergeek.com.
 Download classroom documents at teachergeek.com/learn For use with TeacherGeek Judo-Bot Activity Pack, or Maker Cart available at teachergeek.com. Page 1 Below is the list of ingredients you ll need for
ELECTRIC RACER BASIC BUILD
 Page 1 Name: Set: Date: This guide will take you through the process of creating a basic electric racer. After you finish this build, you should be able to experiment, design and engineer your own racer.
Easy Engineering Guide
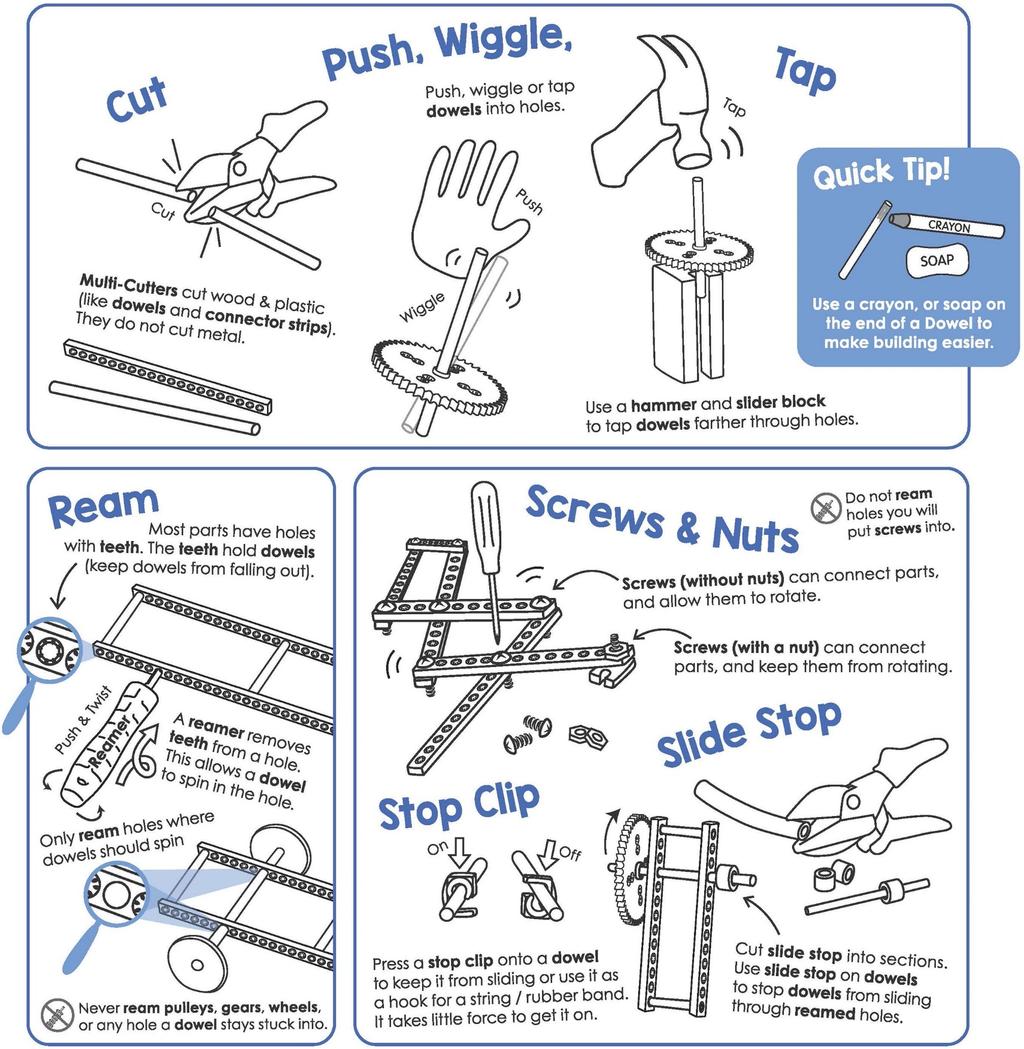
 Index: Unleash Your Creativity! Page 1: The Basics Page 2: Sorting Dowels Page 3: Measuring and Cutting Page 4: Dowels and Holes (Reaming Holes) Page 5: Reaming, Screws, Slide-Stop Material Page 6: Hydraulics/Pneumatics
Hydraulics are AMAZING! Use the power of water to control a machine. This guide will help you create your own Advanced Hydraulic Arm.
 Hydraulics are AMAZING! Use the power of water to control a machine. This guide will help you create your own Advanced Hydraulic Arm. Perfect for Grades: 7+ Difficulty: Advanced Download Documents at teachergeek.com
Wind Pump Construction
 What Will You Need? Page 1 The following components can be found in your kit, and are needed to build one wind pump: 50 Tooth Gear* 40 Tooth Gear* 20 Tooth Gear* 10 Tooth Gear* Wheel Hub 300mm (~12in)
* Drill and 3/32" drill bit: for drilling holes in the factory plastic upper for the screws to secure the brackets (factory upper installation only)
") * Two slider windows (four sliders windows for the 4-door kit) * Four brackets to secure the windows to the upper door frames (8 brackets for the 4-door kit) * Weatherstrip to seal the windows to the half
* Two slider windows (four sliders windows for the 4-door kit) * Four brackets to secure the windows to the upper door frames (8 brackets for the 4-door kit) * Weatherstrip to seal the windows to the half
The Useless Machine. DIY Soldering Edition. Instruction Guide v0004
 The Useless Machine DIY Soldering Edition Instruction Guide v0004 TM For the best outcome, follow each step in order. We recommend reading this guide entirely before you get started. Tools required: Soldering
Science Olympiad Optics LSS Tips and Tricks Alan Chalker September 2011
 Science Olympiad 2011-2012 Optics LSS Tips and Tricks Alan Chalker alan@chalker.org September 2011 NOTE: COMPETITORS ARE NOT REQUIRED TO BUILD AN LSS. EVENT SUPERVISORS WILL PROVIDE ONE DURING THE COMPETITION.
Paper Pinwheel. Supplies
 Paper Pinwheel 1. Draw some lines. Measure and cut a square piece of paper.» Use the ruler and pen to draw lines from each corner of the paper towards the center. These lines should be half the size of
Wind Turbine Experimenter s Kit User Guide
 Wind Turbine Experimenter s Kit User Guide 42284 V0116 Cautionary and Warning Statements This kit is designed and intended for educational purposes only. Use only under the direct supervision of an adult
Catch The Bug. Body Build. Where are we? Process # You are. here.
 Catch The Bug Body Build Process # 1 Where are we? 1) Body Build- The mechanical part of the bug is constructed. 2) Electronics Lab- Bug Experiments teach the fundementals of electronics. 3) Final Wiring-
/ Rudder Installation Guide
 / Rudder Installation Guide Parts List Part # Part Description Qty Part # Part Description Qty 1030 Plastic Bead 1 1195 Rope; 1/8" Black Nylon 1 @ 9 1044 1/4-20 x 5/8" Pan Head Bolt 2 1353 Sliding Track
TeacherGeek Launcher Example Build
 LAUNCHER EXAMPLE BUILD TeacherGeek Launcher Example Build TeacherGeek, 2011 LAUNCHER EXAMPLE BUILD TeacherGeek 2 LAUNCHER BASE PARTS A B D F E C G LAUNCHER EXAMPLE BUILD TeacherGeek 3 ASSEMBLING THE LAUNCHER
K-Jetronic (CIS) Barb Insertion Tool Instructions
 Barb Insertion Tool Instructions") K-Jetronic (CIS) Barb Insertion Tool Instructions Rev. J Effective: 04-AUG-2018 Unobt ainium Supply Co. 523 Longley Rd Groton, MA 01450 978.448.2110 www.unobtainiumsupply.com Contents K-Jetronic (CIS)
K-Jetronic (CIS) Barb Insertion Tool Instructions Rev. J Effective: 04-AUG-2018 Unobt ainium Supply Co. 523 Longley Rd Groton, MA 01450 978.448.2110 www.unobtainiumsupply.com Contents K-Jetronic (CIS)
RPS. XR Front Drive Updates CORPORATION
 FACTORY CAT 1. To start a replacement of the XR Front Wheel Drive, make sure the machine is on level ground with the rear wheels chocked and always disconnect the batteries. 2. Locate the Positive and
INSTALL/REMOVAL INSTRUCTIONS: WINDOW REGULATOR
 REMOVAL/INSTALL OF WINDOW REGULATOR (741-584) Ford Focus 2000-2007 General Tech Tips: Use painter s tape rather than duct tape to secure window. It will not damage paint or leave sticky residue. A plastic
The Useless Machine. Parts Only - Build Guide v0001
 TM The Useless Machine Parts Only - Build Guide v0001 For the best outcome, follow each step in order. We recommend reading this guide entirely before you get started. Tools required: One phillips screwdriver,
OpenROV. Guide 3 - Electronics. We will now move to the assembly of the electronics that will control the ROV. Written By: OpenROV
 OpenROV Guide 3 - Electronics We will now move to the assembly of the electronics that will control the ROV. Written By: OpenROV 2017 openrov.dozuki.com Page 1 of 33 INTRODUCTION We will introduce soldering
LIGHT BEAM ANTENNA MaxRange Antenna Series Assembly Instructions MaxRange Plus Digital / High Definition Television Antennas
 LIGHT BEAM ANTENNA MaxRange Antenna Series Assembly Instructions MaxRange Plus Digital / High Definition Television Antennas Assembly Instructions 1 MaxRange Plus Antenna These instructions will lead you
Pet Door Panel Installation Manual
 Pet Door Panel Installation Manual 400-558-1 1 4/3/03, 3:26 PM Components: Pet Door Panel Panel Latch Assembly Foam Weather-stripping Glass Sweep (4) Binding Posts (6) #6 x 1/2 Sheet Metal Screws (4) 8-32
LIGHT BEAM ANTENNA MaxRange Antenna Series Assembly Instructions MaxRange Ultra Digital / High Definition Television Antennas
 LIGHT BEAM ANTENNA MaxRange Antenna Series Assembly Instructions MaxRange Ultra Digital / High Definition Television Antennas Assembly Instructions 1 MaxRange Ultra Antenna These instructions will lead
Explorer Wiring Kit (assembled)
") Explorer Wiring Kit (assembled) For Vintage, Firestorm & Standard Series Please Read All Instructions Before Beginning. Tools you will need: Soldering Iron (35 watt preferably) Solder Wet Sponge Wire Clippers
Explorer Wiring Kit (assembled) For Vintage, Firestorm & Standard Series Please Read All Instructions Before Beginning. Tools you will need: Soldering Iron (35 watt preferably) Solder Wet Sponge Wire Clippers
Hardware Installation. Do this first:
 1 Do this first: Hardware Installation Need some help? Here s what you ll need: 4 AA Batteries Phillips screwdriver Visit us online. support.remotelock.com We re here to help. 1 (877) 254 5625 support@remotelock.com
INSTALL/REMOVAL INSTRUCTIONS: WINDOW REGULATOR
 REMOVAL/INSTALL OF WINDOW REGULATOR (740-666) Lincoln Town Car 1990 94 General Tech Tips: Use painter s tape rather than duct tape to secure window. It will not damage paint or leave sticky residue. A
Large Wood Windmill Assembly Instructions
 CROW S NEST (TOP VIEW) TOWER (SIDE VIEW) 0 QTY 2 2 ITEM QTY 2 QTY QTY 8 QTY 8 QTY 4 TOP TOP TOP 47 9 QTY 4 QTY 4 QTY 4 QTY 4 QTY 4 ITEM 6 ITEM 7 ITEM 8 ITEM 3 ITEM 9 ITEM 4 ITEM 2 ITEM 5 47 Leg QTY 4 42.5
Super Sky Surfer 2000 Assembly Instructions
 Super Sky Surfer 2000 Assembly Instructions Note: Plug and Play version of the Sky Surfer comes with fuselage pre-glued and motor/servos installed. If you wish to route antennas or wires through the tail,
Standard Kit #1 (3-way switch)
") Standard Kit #1 (3-way switch) Please Read All Instructions Before Beginning. Tools you will need: Soldering Iron (35 watt preferably) Solder Wet Sponge Wire Clippers 3/8 Drill Bit 1/4 Drill Bit Variable
Standard Kit #1 (3-way switch) Please Read All Instructions Before Beginning. Tools you will need: Soldering Iron (35 watt preferably) Solder Wet Sponge Wire Clippers 3/8 Drill Bit 1/4 Drill Bit Variable
Cook's Corner Kitchen Assembly Instructions
 Assembly Instructions 00 Melissa & Doug, LLC All rights reserved 0 We care about your comments Please call us! -800-84-948 www.melissaanddoug.com PARTS D A E I ( pieces) Q N B F J R ( pieces) S ( pieces)
Modular ottoman. assembly instructions
 Modular ottoman assembly instructions Smooth & Wrinkle-Free Fabric Covers: In addition to these printed instructions, you may want to watch our beauty tips videos on the customer service page of our website.
Spiderbeam Balun Construction Guide
 BALUN CONSTRUCTION GUIDE Ver. 1.0 1 The components of the Balun Kit are in a plastic bag. Most of the components are inside the plastic case of the balun. The aluminum U-profile and the RG-142 Teflon Coax
Revolution 3D-mini ARF
 Revolution 3D-mini ARF 1 Included Hardware 4 Dubro Micro Control Horns #DUB848 2.32 x 18" Linkage Wire (Music Wire) 1 1.5 x 1.25 x 1/8 Balsa Ply (for motor mount) 1 5" piece of Velcro (Optional recommended,
Die Cutting an Introduction
 Die-cutting Exam expectations Die-cutting is a regular topic in the examination paper. Although the question only attracts a small numbers of marks it is an area which few candidates score. Die Cutting
THE GREEN CLUB PROJECT
 tennis ball end cap finishing tape THE GREEN CLUB PROJECT duct tape How to make the ultimate recycled juggling club at home. BY JONATHAN POPPELE 16 or 20 oz bottle club body hardwood dowel collar finishing
WOLF PUP LOOM TM & WOLF PUP LT LOOM TM
 WOLF PUP LOOM TM & WOLF PUP LT LOOM TM Assembly Instructions FL3000 FL3006 FL3009 WOLF PUP WOLF PUP LT Find out more at schachtspindle.com Schacht Spindle Company 6101 Ben Place Boulder, CO 80301 p. 303.442.3212
WARNING: Prior to installation, turn the power off to the vending machine and unplug it from its power source. Also, make sure to level the machine.
 Installation of Gum and Mint Tray for National 147, 157, 167 Important Note: Please read all instructions thoroughly before continuing with installation of kit. If you are having problems installing the
Assembly Instructions Please keep for future reference Inspire 40
 Assembly Instructions Please keep for future reference Inspire 40 Version 3 : 28/07/2014 Important - Please read these instructions fully before starting assembly ALR2902 Safety and Care Advice Important
ClearSpan Hydroponic Table Kit
 ClearSpan Hydroponic Table Kit Hydroponic Table Kit (The 109314 (4' x 16') model is shown.) Designed to grow healthy plants without soil using mineral-nutrient solutions. 2009 ClearSpan All Rights Reserved.
Cautionary and Warning Statement. How a Trebuchet Works. Materials Included. Items Required (not included) Building the Base.
 Building the Base.") Cautionary and Warning Statement This kit is designed and intended for educational purposes only. Use only under the direct supervision of an adult who has read and understood the instructions provided
Cautionary and Warning Statement This kit is designed and intended for educational purposes only. Use only under the direct supervision of an adult who has read and understood the instructions provided
Plug-n-Show Stake Down Pixel Tree Kit 16 strips of 25 pixels Assembly Instructions
 www.lightorama.com Plug-n-Show Stake Down Pixel Tree Kit 16 strips of 25 pixels Assembly Instructions Read all instructions before you start Kit assembly! STEP 1. Check that all parts are included Parts
INSTALL/REMOVAL INSTRUCTIONS: WINDOW REGULATOR
 REMOVAL/INSTALL OF WINDOW REGULATOR (741-845) Chevrolet S10 Blazer/Pickup, GMC S15 Jimmy/Pickup 1995 2004, Oldsmobile Bravada 1996 2001, GMC Envoy 1998 2000, Isuzu Hombre 1998 2000 General Tech Tips: Use
Standard Kit #1 (5-way switch)
") Standard Kit #1 (5-way switch) Please Read All Instructions Before Beginning. Tools you will need: Soldering Iron (35 watt preferably) Solder Wet Sponge Wire Clippers 3/8 Drill Bit 1/4 Drill Bit Variable
Standard Kit #1 (5-way switch) Please Read All Instructions Before Beginning. Tools you will need: Soldering Iron (35 watt preferably) Solder Wet Sponge Wire Clippers 3/8 Drill Bit 1/4 Drill Bit Variable
INSTALL/REMOVAL INSTRUCTIONS: WINDOW LIFT MOTOR
 REMOVAL/INSTALL OF WINDOW LIFT MOTOR (655-1503) Chevrolet S10 Blazer/Pickup, GMC S15 Jimmy/Pickup 1995 2004, Oldsmobile Bravada 1996 2001, GMC Envoy 1998 2000, Isuzu Hombre 1998 2000 General Tech Tips:
EmagiKit. Privacy Pod Plus. Quiet. Easy. Affordable. INSTRUCTIONS ASSEMBLY
 EmagiKit Privacy Pod Plus Quiet. Easy. Affordable. INSTRUCTIONS ASSEMBLY DIMENSIONS AND COMPONENTS 47 47 Ceiling Unit 2-B 2-L 2-R Glass Door Corner Trim Door Handle 90 Adjustable Height Work Surface 1-B
E-AERO EPP PITTS KIT From BP HOBBIES. Parts Included in kit
 E-AERO EPP PITTS KIT From BP HOBBIES Parts Included in kit Thank you for purchasing the BP Hobbies/E-aero EPP Pitts. Please take the time to read through the instruction manual before beginning the build.
The Portable Open Source 3D Printer
 http://web.archive.org/web/201502142011/http://www.tantillus.org/build_3.html Page 1 of 12 captures 12 Oct 12 - Feb 15 The Portable Open Source 3D Printer Home Start Case X/Y Axis Extruder Z Axis Electronics
Spring. Instructions for assembly
 Spring Instructions for assembly The parallel countermarch system... 1 Spring assembly tips and information... 3 Assembly of the Spring... 5 Maintenance... 17 Version: Spring-V5 The parallel countermarch
MOTOR & BULK HEAD. A Manual for Repair and Maintenance Technicians
 MOTOR & BULK HEAD A Manual for Repair and Maintenance Technicians CAUTION This manual is designed to help technicians who are already experienced in workshop procedures and know how to handle tools. Only
LOVELAND BRAND SHARPING LEVERS
 LOVELAND BRAND SHARPING LEVERS GENERAL INFORMATION Sharping levers are used on folk harps to facilitate key changes. Installing a lever over a string allows you to raise the pitch of that string one-half
Designed by Melissa DiRenzo thesweetescape.ca
 instructions Designed by Melissa DiRenzo thesweetescape.ca YOU WILL NEED 3 -diameter foam ball Christmas sweater Hot glue gun and glue sticks 3/8 -wide satin ribbon Elastic thread: metallic Note: A child
Depending on the size you ordered you will have either 5 Foot sections which will build the 10 Foot frame or 6 Foot sections which will build the 12
 XL Quilting Frame 1 Depending on the size you ordered you will have either 5 Foot sections which will build the 10 Foot frame or 6 Foot sections which will build the 12 Foot frame Printed 2 June 2014 Updated
BIGBOT ASSEMBLY INSTRUCTIONS. 1/18/2017 V0.5
 BIGBOT ASSEMBLY INSTRUCTIONS www.bigbot-3d.com 1/18/2017 V0.5 FOREWORD: PLEASE TAKE CARE WHEN HANDLING THE GANTRY. THE ASSEMBLY SHOULD BE HANDLED ONLY BY THE ALUMINUM FRAME, AND AVOID TOUCHING OR LIFTING
Signal Mirror Installation Instructions Toyota Tacoma
 Signal Mirror Installation Instructions 2005-2015 Toyota Tacoma THE safety accessory of the 21 st Century. P/N 210-0115-0 Rev. A4 (3/11/15), BTV 2005 Muth Mirror Systems, LLC Page 3 of 12PplPage 3 of 12
FACTORY CAT TOMCAT CORPORATION
 FACTORY CAT RPS TOMCAT CORPORATION Artificial Turf and Carpet Sweeping Install Kit #349-641 & #349-642 1. Detach batteries so that there is no power running through the machine before starting. 2. Start
Brook sectional corner. assembly instructions
 Brook sectional corner assembly instructions Smooth & Wrinkle-Free Fabric Covers: In addition to these printed instructions, you may want to watch our beauty tips videos on the customer service page of
4. Z-axis assembly. 4. Z-axis assembly. Written By: Josef Prusa manual.prusa3d.com Page 1 of 18
 4. Z-axis assembly Written By: Josef Prusa 2017 manual.prusa3d.com Page 1 of 18 Step 1 Get the necessary tools 13/17mm spanners 3.6mm flathead screwdriver Needle-nose pliers 2.5 and 1.5mm Allen key Step
ELIZABETH 30 SPINNING WHEEL
 INSTRUCTIONS ELIZABETH 30 SPINNING WHEEL Single and Double Treadle Ashford Handicrafts Ltd. Factory and Showroom: 415 West Street, PO Box 474, Ashburton, New Zealand Telephone 64 3 308 9087 Facsimile 64
Sound 1. Tinkering with a Shrink-Wrapped Drum Set and a Torsion Drum
 Sound 1 Tinkering with a Shrink-Wrapped Drum Set and a Torsion Drum Figure 1-1. Your own percussion section Sound is great to tinker with. It s rare to find a kid who doesn t enjoy making noise. Kids have
Installing Cliffy's AFM mothership protectors
 Installing Cliffy's AFM mothership protectors These instructions tell you what needs to be removed and done to install Cliffy's two new AFM protectors. The front edge protector for the moving target bank
Ribcage Installation. Part 2 - Assembly. Back-Bone V1.06
 Ribcage Installation Part 2 - Assembly Back-Bone V1.06 Contents Section 1 Before You Get Started... 2 Included With Your Kit:... 2 Figure: A... 3 CAUTION!... 4 Note:... 4 Tools Required... 5 Section 2:
PORTA-DOCK, INC. AP17 APD DS 4 X 16 T12 AW17 CPD DS 4 X 16 T12
 Page 1 of 7 PORTA-DOCK, INC. AP17 APD DS 4 X 16 T12 AW17 CPD DS 4 X 16 T12 *For Beige Decking Add the Letter B to Model* Thank you for purchasing out product! *Please read these instructions and follow
TOYOTA COROLLA EC REARVIEW MIRROR Section I Installation Preparation
 Section I Installation Preparation Part Number: PT374-02030 Section I Installation Preparation Kit Contents Item # Quantity Reqd. Description 1 1 AD Mirror Assembly w/compass & Maplights 2 1 Hardware Bag
INSTALLATION INSTRUCTIONS
 INSTALLATION INSTRUCTIONS Accessory CARGO NET P/N 08L96-TR0-100 Application 2012 CIVIC 2 AND 4-DOOR Publications No. AII 45607 Issue Date APR 2011 PARTS LIST Accessory User s Information Manual Cargo net
INSTALL/REMOVAL INSTRUCTIONS: WINDOW REGULATOR
 REMOVAL/INSTALL OF WINDOW REGULATOR (741-768) Jeep Cherokee 1997 2001 General Tech Tips: Use painter s tape rather than duct tape to secure window. It will not damage paint or leave sticky residue. A plastic
OPERATOR S MANUAL FOR MODEL BLADE GRINDER
 OPERATOR S MANUAL FOR MODEL 88-021 BLADE GRINDER Table of Contents Page Blade Grinder Safety and User Instructions 2 Unpacking the Grinder 5 Assembling the grinder 6 Adjusting the grinding angle 8 Adjusting
re3d Assembling Gigabot: "Flatpack"
 re3d Assembling Gigabot: "Flatpack" Your Gigabot was assembled, calibrated, tested, and taken apart for shipping purposes. All you need to do is reassemble it, and you're ready to go! Written By: Chris
INSTALL/REMOVAL INSTRUCTIONS: WINDOW REGULATOR
 REMOVAL/INSTALL OF WINDOW REGULATOR (741-870) Ford Windstar 1995 2003, Ford Freestar 2004 2006 & Ford Monterey 2004 2006 General Tech Tips: Use painter s tape rather than duct tape to secure window. It
ALBATROSS by CRASHTESTHOBBY.COM
 ALBATROSS by CRASHTESTHOBBY.COM The Albatross is a unique slow flyer designed to put its nose on the horizon and level its own wings without a pilot. It is very quiet and designed to use inexpensive electronics.
34" PELICAN by CRASH TEST HOBBY
 34" PELICAN by CRASH TEST HOBBY The Pelican is a 34" trainer that can level its own wings and put its nose on the horizon once trimmed and balanced. It can handle more wind than most EZ flying planes in
INTRODUCTION TO WEARABLES
 Table of Contents 6 7 8 About this series Getting setup Making a circuit Adding a switch Sewing on components Complete a wearable circuit Adding more LEDs Make detachable parts......6.7.8 About this series
DIY Eliza: Instructions
 Make sure you first download from Redlightsonthebrain the list of things required for a DIY Eliza. 1. Take your bucket, ruler and marking pen. We will put on all the markings before we start cutting the
Signal Mirror Installation Instructions Honda Odyssey
 Signal Mirror Installation Instructions 2005-2009 Honda Odyssey THE safety accessory of the 21st Century. P/N 210-0122-0 Rev. A4 (6/9/09), BTV 2006 Muth Company, LLC PROFESSIONAL INSTALLATION RECOMMENDED
Electrical Construction Name:
 Tools of the Trade The following are common tools that are used in the electrical industry. This hand-out is to help familiarize you with the tools, the terminology, and their use. Retractable Steel tape
BABY WOLF LOOM. Assembly Instructions for Knocked-Down Looms
 BABY WOLF LOOM Assembly Instructions for Knocked-Down Looms BEFORE YOU BEGIN Please read through the directions before beginning to assemble your loom. Unpack the loom parts carefully. Do not throw away
SCHACHT STANDARD FLOOR LOOMTM
 SCHACHT STANDARD FLOOR LOOMTM FL3109 FL3111 FL3113 FL3115 FL3121 FL3123 FL3125 FL3127 FL3310 FL3312 FL3314 FL3316 FL3322 FL3324 FL3326 FL3328 Assembly instructions LOW CASTLE LOOM IN MAPLE Find out more
American Morse Equipment
 American Morse Equipment Thank you for purchasing an American Morse Porta Paddle-II Kit. We redesigned the original Porta Paddle for ease of assembly & provide all parts finished and ready for assembly,
Crewel Embroidery Instructions Design: Motley Mums (Version 1, 2, 3, & 4)
") Crewel Embroidery Instructions Design: Motley Mums (Version,,, & 4) What you ll need: 9" x 9" Linen (Version : Sky Blue plain weave; Version : Natural plain weave; Version : Oyster White twill, Version
Crewel Embroidery Instructions Design: Motley Mums (Version,,, & 4) What you ll need: 9" x 9" Linen (Version : Sky Blue plain weave; Version : Natural plain weave; Version : Oyster White twill, Version
Installation Instructions for FC2 & FC15 Forward Controls for the Super Magna
 Installation Instructions for FC2 & FC15 Forward Controls for the Super Magna It is highly recommended that you use a thread lock compound such as Loctite brand on all threads to keep them from vibrating
uin RC FPRC ZERO Specificationss Empty Weight
 Flying Pengu uin RC FPRC ZERO Specificationss Wing Span 42.75 (1085 mm) Fuselage length 30.5 ( 775 mm) Empty Weight 9.5 10 oz. (150 160g) Estimated Flying Weight 20 255 oz. (320 400g) Wing Area: 151 sq.
Instruction Manual 3 BLADE CLASSIC. Scan the QR code with a mobile device to view the installation video.
 Instruction Manual 3 BLADE CLASSIC Scan the QR code with a mobile device to view the installation video. www.max-prop.com 1) INTRODUCTION: Thank you for having chosen a MAX PROP automatic feathering propeller
STAGE PAGE. 6 The left front door interior The right front wheel The right front seat back The right front wheel 37
 Pack 2 STAGE PAGE 6 The left front door interior 25 7 The right front wheel 29 8 The right front seat back 33 9 The right front wheel 37 10 The right front door 41 11 The right front door window 45 12
GRIM REAPER Building Instructions by CRASHTESTHOBBY.COM
 GRIM REAPER Building Instructions by CRASHTESTHOBBY.COM The Reaper is one of the toughest planes on the planet. The Grim Reaper is our club's favorite combat plane. It is also used for FPV. It has an amazing
SCULL HANDLES AND GRIPS INSTRUCTION BOOKLET
 SCULL HANDLES AND GRIPS INSTRUCTION BOOKLET Contents Section I: Scull Grip Replacement: Fixed Handle or 10 cm Length Adjustment System Refer to this section if you need to replace the grips on your fixed
ClearSpan End Frame Kit 30' Wide x 11' High
 ClearSpan End Frame Kit 30' Wide x 11' High Diagram shows the end frame kit for an end wall without a door. (Door and end panel are purchased separately.) Rafter and mounting feet shown in the above diagram
JK Front Crusher Flares
 INSTALLATION INSTRUCTIONS INST-17-03-030_A JK Front Crusher Flares IMPORTANT: Thank you for purchasing this Poison Spyder product. Please read through this entire document before proceeding with installation.
Two Piece Chaise Install Process
 Two Piece Chaise Install Process Carefully cut the original sling material to be replaced down the middle with scissors or a box cutter. Before beginning be sure to have the following items at hand: Chair
INS TRUC T I ON M A NU A L
 INS TRUC T I ON M A NU A L Packing list: 1: PP F6F fuselage *1 2: Carbon tube 5*5*940mm *1 3: Pull rod *4 4: Motor mount *1 5: Quick rod adjuster *4 6: Hinge *4 7: M3 screws *4 8: Hook and loop tape *1
RAMPAGE P R O D U C T S. INSTALLATION INSTRUCTIONS BRONCO ZIPPER FASTRACK TOP PART #984xx BRONCO TOOLS REQUIRED
 RAMPAGE P R O D U C T S 84 (+/- 1/4 ) INSTALLATION INSTRUCTIONS BRONCO ZIPPER FASTRACK TOP PART #984xx BRONCO 1966-1977 TOOLS REQUIRED 3/8 WRENCH 7/16 WRENCH ½ WRENCH #2 PHILLIPS SCREWDRIVER 1/8 DRILL
3 D Printer Enclosure Assembly Instructions
 3 D Printer Enclosure Assembly Instructions Tools Required: 2.5 mm Allen wrench (included) Phillips screwdriver Adjustable Wrench Parts Included: Plexiglas Back with fan and filters installed (29.5 x 35.5
John Deere ME5 Row Unit Kit Installation Manual Kit Number
 John Deere ME5 Row Unit Kit Installation Manual Kit Number 768503 955422_01 11/15 1 System Hardware Part Number Description Quantity 768503 John Deere ME5 SpeedTube Row Unit Kit 1 per row The Row Unit
The Mind Project s Iris 1 Robotic Arm. Assembly instructions Step 1
 The Mind Project s Iris 1 Robotic Arm Assembly instructions Step 1 Packing list Below you will find pictures and descriptions of each part. It may be helpful to take each piece out of the bag and place
ASHFORD COUNTRY SPINNER 2
 INSTRUCTIONS ASHFORD COUNTRY SPINNER 2 CS110618V8 Ashford Handicrafts Limited Factory and Showroom: 415 West Street PO Box 474, Ashburton 7700 New Zealand Telephone 64 3 308 9087 Facsimile 64 3 308 8664
Electric Mid-Drive. Installation and Assembly Instructions for Catrike 26 and 700c
 Electric Mid-Drive Installation and Assembly Instructions for Catrike 26 and 700c copyright 2009, EcoSpeed LLC http://www.ecospeed.com/docs/emd22_assy_rev1.01 Revision 1.01 p/n 7-10-22 1 2 Electric Mid-Drive
INSTALL/REMOVAL INSTRUCTIONS: WINDOW REGULATOR
 REMOVAL/INSTALL OF WINDOW REGULATOR (741-526) Jeep Liberty 2002 2006 General Tech Tips: Use painter s tape rather than duct tape to secure window. It will not damage paint or leave sticky residue. A plastic
EASY POOL STEP (NE113)
") EASY POOL STEP (NE113) FOR USE WITH: EASY POOL STEP (NE113) (1 CARTON) EASY POOL STEP WITH OUTSIDE LADDER (NE126) EASY POOL STEP ENTRY SYSTEM (NE138) (With Gate) (4 CARTONS) Above are the options available
EASY POOL STEP (NE113) FOR USE WITH: EASY POOL STEP (NE113) (1 CARTON) EASY POOL STEP WITH OUTSIDE LADDER (NE126) EASY POOL STEP ENTRY SYSTEM (NE138) (With Gate) (4 CARTONS) Above are the options available
MAT MASTER TM SYSTEMS
 FrameCo MAT MASTER TM SYSTEMS #14225 BEVEL MOUNT CUTTERS Welcome and thank you for purchasing a FrameCo Mat Master System. Through these instructions we will endeavour to show you the benefits of the system
Terrific Papers Creative Project Instructions
 Origami flowers You ll need: two sheets of Terrific Papers in the design of your choice, glue or a glue gun, small-diameter dowel, florist s tape, green construction paper, and scissors Note: Each flower
TeacherGeek Sumo Bot Vehicle Application Guide
 SUMO BOT VEHICLE EXAMPLE BUILD TeacherGeek Sumo Bot Vehicle Application Guide TeacherGeek, 011 SUMO BOT VEHICLE EXAMPLE BUILD TeacherGeek TeacherGeek s Sumo Bot Vehicle Activity is the perfect way to encourage
INSTALL/REMOVAL INSTRUCTIONS: WINDOW REGULATOR
 REMOVAL/INSTALL OF WINDOW REGULATOR (748-569) Jeep Liberty 2002 2006 General Tech Tips: Use painter s tape rather than duct tape to secure window. It will not damage paint or leave sticky residue. A plastic