CREATING ARTWORK TUTORIAL
|
|
|
- Warren Pope
- 5 years ago
- Views:
Transcription


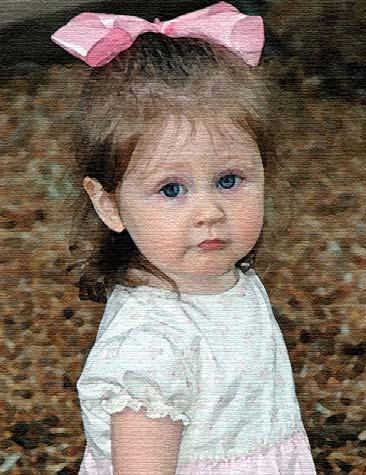
1 CREATING ARTWORK TUTORIAL Sometimes a photograph can be made interesting by changing it from being just a portrait or landscape into an imitation art work. This is a picture of my niece at her recent graduation. It was scanned into the computer from a portrait taken at the ceremony and saved as a.tif image. Opening it in Elements 4 I chose Filter>Artistic>Watercolor as shown below. Make sure the settings are as shown on the sliders for maximum clarity. We now need to create the appearance that the photograph was painted on a canvas and to do this we can go to: Filter>Texture>Texturizer and choose canvas from the dropdown menu as shown below. Brush Detail = 12 Shadow = 0 Texture = 2 Set the relief or coarseness of the canvas around 2 or 3 for subtle effect, and the scaling around 100 for the canvas weave. You can play with these for varying effects

2 To finish off the illusion you can add a frame by going to style and effects in the pallet bin, choosing frames and from the drop down list choose spatter. Double click on this and the frame will be applied as a separate layer, see below: When you are satisfied go to Layer>flatten image and when the message box appears asking if you want to Discard Hidden Layers click OK. The original and interfered pictures are shown on the next page for comparison. The same steps were taken with picture 2 to show a similar result. This effect is not always the result you want and sometimes the original picture is the best! Note this is for a watercolor effect. Photographs can also be changed into oil paintings and this will be discussed next


3 PICTURE 1 PICTURE 2-3-

4 The oil painting effect is usually better with landscapes as differences in paint daubs are more acceptable on scenery than on faces! This is the photograph I am going to interfere with. It is a typical scene of a mountain range taken from a meadow in a valley below. In the last exercise I applied each effect separately, i.e. watercolor, then save, texture, then save, to get the final result. Elements has a handy feature where you can add each effect and build up the picture you want before saving. The only drawback is all filters are applied at once in one layer. There are several ways of doing this and I have my own way of creating the oil painting effect and there is a way that experts (well one in particular) do it. I will leave you to decide which you prefer. For this demonstration I am going to change the mountain vista above into an oil painting both ways, my way and the expert s way. MY WAY After opening the photograph in Elements I go to Enhance>Adjust Color>Adjust hue and saturation and with the choice set at master I increase the saturation I increase the saturation to 60 to enhance the colors especially the blue sky (as recommended by the experts, (I am not so sure about this). The rational being when applying the paint daub effect colors tends to become slightly muted. Increasing the saturation prior to modifying helps maintain the colors

5 I then go to Filter>Filter Gallery and the following screen appears: Filter attributes Pallet Bin Filters Filter Gallery New Effect Layer Unlike the way I manipulated the first images I now have a filter gallery down the left hand side of my image with the filters I have used previously and in the middle is the normal pallet bin. Step One Opening the artistic pallet and check paint daubs. I set the brush size to 4, sharpness to 3 and the brush type to Wide Sharp. Step Two Now I click on the new effects layer icon (small icon next to trash can icon at the bottom of the filter gallery), select Texture>Texturizer and in the drop down menus in the filter gallery select canvas with a scaling value of 85 and a relief setting of 4. Set the light for top
6 The picture now takes on a canvas like texture which coupled with the paint daubs looks reasonably like an oil painting. It should be noted that in the filter gallery are a series of boxes with numerous filters, if the box on the left side is blank they are not applied, if there is an eye (similar to the eye on layers for viewing or not) then the filter is applied to the picture. By clicking on these you can see not only the effect that filters have on the picture but also the settings for the filter in the attributes area and you can adjust these if necessary. This is a very simplistic way of creating the oil painting but very simple. The end result looks like this: THE EXPERTS WAY Now the experts follow the same procedure but after increasing the hue saturation as mentioned in the first example and opening the filter gallery they do the following: Step One Distort>Glass, use settings distortion+3, smooth + 3, scaling = 65%
7 Step Two Click on the new effects icon, select artistic>paint daubs use brush size=4, sharpness = 1, brush type= simple. Step Three Click on the new effects icon, select brush strokes>angle strokes use direction balance 46, stroke length 3, sharpness 1. Step Four Click on the new effects icon and select texturize, use canvas with scaling at 65%, relief = 2, light at top left. Now click on OK to apply these four filters to the picture. Step Five Duplicate this filter layer by selecting the layer and going to the layer menu and under new choose Layer via Copy. Go to the Enhance menu and under adjust color, choose remove color. In the layers pallet change the layer blend mode to Overlay. Step Six Go to the Filter menu and under stylize choose emboss. In the emboss dialog box set the angle to 135º the height to 1 pixel and the amount to 500%. Then go to the layers pallet and lower the opacity to 40%. Flatten the layers. The result is shown below. There is a definite raised surface in way of the mountains similar to a real oil painting where the thickness of the paint gives an almost three dimensional look

8 . I personally think that increasing the saturation to enhance the sky gives a rather artificial look to the sky and prefer this result using my simple way without saturation

9 LINE ART There is another artistic effect which I like very much which is the line art technique. When you have a picture of a monument, stately home etc. it sometimes is very attractive to make the picture look like a line drawing. In this exercise I will attempt to make London s Tower Bridge into a line art drawing. Here is the original picture: The first thing I want to do is remove some of the superfluous buildings that show between the towers. Just for interest the bridge was built between 1886 and 1894 having been delayed some two years because of bureaucratic wrangling (sound familiar to Bay Area residents?) at a cost of 1 million (about $1.8 million at today s exchange rate!) and although most people assume it is built from stone it is actually a steel bridge clad in stone and granite for decoration. We all know how to remove the buildings using the clone tool so I won t go into that but for this exercise it is not necessary to be too particular about matching the sky color exactly as we are going to remove all color when converting to a line art picture
10 After removing the buildings we have a picture like this: We now go to the Layers menu and under New choose Layer via Copy (or press control-j) to create a duplicate background layer. This is done in case at a later date you might want to introduce some color to your picture. While in this duplicate layer go to the Filter menu and under Stylize chose find edges. There are no options in this tool, Elements finds the edges automatically. See picture below. Then go under the Enhance menu, under adjust color choose Remove Color (Shift-Control U) to remove all color from this duplicate layer. Note: Applying the Find Edges filter usually introduces lots of highly saturated patches of color (see next picture) so you must remove all color

11 You can see from the Undo History pallet, cloning, the layer via copy and the Filter applied. You should also notice the spots of saturated color that must be removed using the remove color tool as previously described. Once the color has been removed it is necessary to remove some of the leftover noise and unnecessary detail created by the Find Edge filter. This is done by bringing up the levels dialog. You can either go Enhance>Adjust Lighting>Levels or press Control-L. See picture below

12 For this picture the Input level was about 255 and the highlight input levels slider was adjusted to about 200. Again in the history pallet you can see all the actions that have been taken. Below is the picture after the levels were adjusted and the noise removed
 from one thing to another, a cat into a tiger for instance.")
13 The picture as shown makes a very interesting print and should you have artistic tendencies you could print it out and use it for a template for a watercolor. However there is another trick which is to make a photo to line art morph. Morphing is the art of changing a photograph (or picture) from one thing to another, a cat into a tiger for instance. It is also used in animation to do a similar function, (see the photograph on the family page at my website To create a morph picture of the bridge make sure the black and white layer (layer 1) is active and clicks on the Create new layer icon at the top of the pallet and ensures that the new layer 2 is beneath the black and white layer. Make the line layer active and choose Group with previous from the layer menu (or press control-g) to group the line layer with the blank layer below it. This will make the line layer transparent and hide it on the screen. The original color picture will be showing. See next picture
 and then press G + Enter to bring up the Gradient Picker.")
14 Note in this picture the last action (hi-lighted) is group with previous, the line layer is active and because of the grouping it is it is hidden and the original background is showing. Make sure your foreground color is set to black ( press D will do this) and then press G + Enter to bring up the Gradient Picker. Select the Foreground to Transparent gradient, (it s second from the left in the Picker), open edit if you like and set the slider to about 22% and click OK. Now make layer 1 (the transparent layer) active. Now click on the right hand edge of the picture around the middle and a small crosshair appears. Drag this horizontally across the picture to the left hand side. As you drag across the gradient reveals the upper layer with the light side of the gradient whilst the darker part of the gradient (the 22%) remains as the background picture. The picture should look like the one shown next

15 You now have the stone façade on the left side of the picture and the steel skeleton revealed on the right hand side. There was a reason behind the history lesson! This very briefly is creating art work in Elements. If you check out the artistic filters you will find many options for artwork, play with them and you will be amazed at what you can accomplish. I hope you enjoyed reading this and hopefully trying out some of these yourselves. If you would like copies of any of the stock photos I have used please me and I would love to display any of your efforts on the website
Painting Special Effects on Photographs
 TUTORIAL 7 Painting Special Effects on Photographs In this tutorial you will learn how to transform a photo into a striking color composition with paintbrushes, masks, blending modes, color, and paper
WORN, TORN PHOTO EDGES EFFECT
 Photo Effects: CC - Worn, Torn Photo Edges Effect WORN, TORN PHOTO EDGES EFFECT In this Photoshop tutorial, we ll learn how to take the normally sharp, straight edges of an image and make them look all
Creating Pastel Images and other effects in Photoshop
 Creating Pastel Images and other effects in Photoshop Martin Addison 2015 Creating pastel images Page 1 Martin Addison FRPS Using White Layers in Photoshop 1. Create a new empty Layer 2. Edit> Fill 3.
How to use Photoshop to turn a photo into a realistic painting Create a digital painting, complete with canvas texture.
 How to use Photoshop to turn a photo into a realistic painting Create a digital painting, complete with canvas texture. BY LESA SNIDER 141 CREATE TURN A PHOTO INTO A REALISTIC PAINTING One of the most
Adobe Photoshop CC 2018 Tutorial
 Adobe Photoshop CC 2018 Tutorial GETTING STARTED Adobe Photoshop CC 2018 is a popular image editing software that provides a work environment consistent with Adobe Illustrator, Adobe InDesign, Adobe Photoshop,
11 Advanced Layer Techniques
 11 Advanced Layer Techniques After you ve learned basic layer techniques, you can create more complex effects in your artwork using layer masks, path groups, filters, adjustment layers, and more style
A quick note: We hope that you will find something from the Tips and Tricks that will add a little pizazz to your yearbook pages!
 A quick note: The following pages are tips and tricks for Basic Photoshop users. You may notice that some instructions indicate that non-awpc fonts were used, and that some colors were created using the
Adobe Photoshop CS5 Tutorial
 Adobe Photoshop CS5 Tutorial GETTING STARTED Adobe Photoshop CS5 is a popular image editing software that provides a work environment consistent with Adobe Illustrator, Adobe InDesign, Adobe Photoshop
Photoshop & Illustrator
 Week 6 Lesson 6 : Utilize Filters Effect Applying filters Creating and editing Smart Filters Hiding, copying, and deleting Smart Filters Working with the Smart Filter mask More filter techniques Photoshop
The original photo. The final result.
 giving a photo painted edges In this Adobe Photoshop tutorial, we re going to combine a couple of different effects. First, we ll give the photo easy-tocreate painted edges, and then we ll make it look
Adobe PhotoShop Elements
 Adobe PhotoShop Elements North Lake College DCCCD 2006 1 When you open Adobe PhotoShop Elements, you will see this welcome screen. You can open any of the specialized areas. We will talk about 4 of them:
Digital Design and Communication Teaching (DiDACT) University of Sheffield Department of Landscape. Adobe Photoshop CS5 INTRODUCTION WORKSHOPS
 University of Sheffield Department of Landscape. Adobe Photoshop CS5 INTRODUCTION WORKSHOPS") Adobe INTRODUCTION WORKSHOPS WORKSHOP 1 - what is Photoshop + what does it do? Outcomes: What is Photoshop? Opening, importing and creating images. Basic knowledge of Photoshop tools. Examples of work.
Adobe INTRODUCTION WORKSHOPS WORKSHOP 1 - what is Photoshop + what does it do? Outcomes: What is Photoshop? Opening, importing and creating images. Basic knowledge of Photoshop tools. Examples of work.
Using Adobe Photoshop
 Using Adobe Photoshop 6 One of the most useful features of applications like Photoshop is the ability to work with layers. allow you to have several pieces of images in the same file, which can be arranged
Learning Photo Retouching techniques the simple way
 Learning Photo Retouching techniques the simple way Table of Contents About the Workshop... i Workshop Objectives... i Getting Started... 1 Photoshop Workspace... 1 Setting up the Preferences... 2 Retouching
Photoshop Filters. Applying Filters from the Filter Menu
 Photoshop Filters Filters are easy to learn and use, and yet are one of Photoshop s most powerful features. When used properly, they can recreate a number of photographic and artistic effects, can enhance
Pacific New Media David Ulrich
 Pacific New Media David Ulrich pacimage@maui.net www.creativeguide.com 808.721.2862 Digital Imaging Workflow in Adobe Photoshop All color and tonal correction editing should be done in a non-destructive
PICTURE AS PAINT. Most magazine articles written. Creating a seamless, tileable texture in GIMP KNOW-HOW. Brightness. From Photo to Tile
 Creating a seamless, tileable texture in GIMP PICTURE AS PAINT Graphic artists often face the problem of turning a photograph into an image that will tile over a larger surface. This task is not as easy
Retouching Portraits in Photoshop
 Retouching Portraits in Photoshop I Removing Blemishes When removing blemishes, acne or other imperfections on the skin, our goal is to maintain as much of the original skin texture as possible. That way,
Digital Painting from Poser Renders
 Página 1 de 12 Digital Painting from Poser Renders Author: momodot Printable Version Step 1: Setting-up Step 2: "Drawing" Step 3: Simplify Step 4: "Painting" Step 5: Glaze Step 6: Flatten Step 7: Texture
FLAMING HOT FIRE TEXT
 FLAMING HOT FIRE TEXT In this Photoshop text effects tutorial, we re going to learn how to create a fire text effect, engulfing our letters in burning hot flames. We ll be using Photoshop s powerful Liquify
Extreme Makeovers: Photoshop Retouching Techniques
 Extreme Makeovers: Table of Contents About the Workshop... 1 Workshop Objectives... 1 Getting Started... 1 Photoshop Workspace... 1 Retouching Tools... 2 General Steps... 2 Resolution and image size...
Now we ve had a look at the basics of using layers, I thought we d have a look at a few ways that we can use them.
 Stone Creek Textiles stonecreektextiles.co.uk Layers Part 2 Now we ve had a look at the basics of using layers, I thought we d have a look at a few ways that we can use them. In Layers part 1 we had a
Lesson 16 Text, Layer Effects, & Filters
 Lesson 16 Text, Layer Effects, & Filters Digital Media I Susan M. Raymond West High School In this tutorial, you will: Create a Type Layer Add and Format Type within a Type Layer Apply Layer Effects Apply
PHOTOSHOP DESIGN EFFECTS FOR INTERMEDIATE TO ADVANCED USERS
 PHOTOSHOP DESIGN EFFECTS FOR INTERMEDIATE TO ADVANCED USERS Copyright 2012, National Seminars Training Introduction This class is all about design effects in Adobe Photoshop. For example, let s say that
Photoshop Elements 3 Layers
 Photoshop Elements 3 Layers One of the most powerful features of modern imaging software is the ability to work with layers. If an image is made of layers, we can work on the part that is in one layer
The original image. As I said, we ll be looking at a few different variations on the effect. Here s the first one we ll be working towards:
 DIGITAL PIXEL EFFECT In this Photoshop tutorial, we re going to look at how to create a digital pixel effect, which is often used in ads that sell anything to do with digital. We re going to first pixelate
Exploring Photoshop Tutorial
 Exploring Photoshop Tutorial Objective: In this tutorial we will create a poster composed of three distinct elements: a Bokeh, an image and title text. The Bokeh is an effect which is sometimes seen in
By Washan Najat Nawi
 By Washan Najat Nawi how to get started how to use the interface how to modify images with basic editing skills Adobe Photoshop: is a popular image-editing software. Two general usage of Photoshop Creating
Creating a Watercolor Painting From a Photo. Open the photo you want to appear to be a watercolor painting. I am using the photo below:
 Creating a Watercolor Painting From a Photo Open the photo you want to appear to be a watercolor painting. I am using the photo below: Make any adjustments as needed like cropping the photo before preceding
ADOBE PHOTOSHOP CS TUTORIAL
 ADOBE PHOTOSHOP CS TUTORIAL A D O B E P H O T O S H O P C S Adobe Photoshop CS is a popular image editing software that provides a work environment consistent with Adobe Illustrator, Adobe InDesign, Adobe
Rendering a perspective drawing using Adobe Photoshop
 Rendering a perspective drawing using Adobe Photoshop This hand-out will take you through the steps to render a perspective line drawing using Adobe Photoshop. The first important element in this process
Photoshop Textures Assignment # 2
 Photoshop Textures Assignment # 2 Objective: Use Photoshop to create unique texture from scratch that can be applied to backgrounds, objects, tetx and 3D objects to create new and exciting compositions.
ADD A REALISTIC WATER REFLECTION
 ADD A REALISTIC WATER REFLECTION In this Photoshop photo effects tutorial, we re going to learn how to easily add a realistic water reflection to any photo. It s a very easy effect to create and you can
ADJUSTMENT LAYERS TUTORIAL
 ADJUSTMENT LAYERS TUTORIAL I briefly showed layers in the original layers tutorial but there is a lot more to layers than discussed there. First let us recap the premise behind layers. Layers are like
Advanced Photography. Topic 3 - Photoshop Filters. Learning Outcomes
 Topic 3 - Photoshop Filters Learning Outcomes In this lesson, we're going to take a look at some techniques that make use of some of the more practical filters. We are also going to learn how to convert
Adobe Illustrator Craft a Dramatic Vector Landscape Environment
 Adobe Illustrator Craft a Dramatic Vector Landscape Environment This tutorial will show the intermediate Adobe Illustrator artist how to make a dramatic landscape environment. You should have a basic understanding
ADOBE PHOTOSHOP CS 3 QUICK REFERENCE
 ADOBE PHOTOSHOP CS 3 QUICK REFERENCE INTRODUCTION Adobe PhotoShop CS 3 is a powerful software environment for editing, manipulating and creating images and other graphics. This reference guide provides
Stone Creek Textiles. Layers! part 1
 Stone Creek Textiles Layers! part 1 This tutorial is all about working with layers. This, to my mind, is one of the two critical areas to master in order to work creatively with Photoshop Elements. So,
Reveal the mystery of the mask
 Reveal the mystery of the mask Imagine you're participating in a group brainstorming session to generate new ideas for the design phase of a new project. The facilitator starts the brainstorming session
Introduction to Photoshop
 Introduction to Photoshop Instructional Services at KU Libraries A Division of Information Services www.lib.ku.edu/instruction Abstract: This course covers the basics of Photoshop, including common tools
How to Make Instagram Filters in Photoshop: Earlybird
 How to Make Instagram Filters in Photoshop: Earlybird JANUARY 9, 2013 BY MELANIE MAYNE Cell phone cameras and apps like Instagram have made it possible for anyone to practice and enjoy the art of Photography.
Chapter 8. Working with Transparency, Effects, and Graphic Styles and Recoloring Artwork Delmar, Cengage Learning
 Chapter 8 Working with Transparency, Effects, and Graphic Styles and Recoloring Artwork 2011 Delmar, Cengage Learning Objectives Use the Transparency panel and the Color Picker Recolor artwork Apply effects
Adobe Photoshop CS5 Layers and Masks
 Adobe Photoshop CS5 Layers and Masks Email: training@health.ufl.edu Web Page: http://training.health.ufl.edu Adobe Photoshop CS5: Layers and Masks 2.0 Hours The workshop will cover creating and manipulating
In Photoshop you can change the size of an image by going to:
 Change an images size In Photoshop you can change the size of an image by going to: Image Image Size and change the dimensions of the pictures in pixels. Once you adjust the top number the bottom number
IMAGE CORRECTION. You can find this and more information with video tutorials at
 IMAGE CORRECTION You can find this and more information with video tutorials at http://www.adobe.com/support/photoshop/ P H O T O S H O P T O O L S CLONE STAMP TOOL The Clone Stamp tool paints one part
photoshop filters kelly ludwig assistant professor
 photoshop filters kelly ludwig assistant professor sharpening images reducing noise correcting distortions in images practical filters There are over 100 filters that ship with Photoshop and they're all
Photoshop CC Editing Images
 Photoshop CC Editing Images Rotate a Canvas A canvas can be rotated 90 degrees Clockwise, 90 degrees Counter Clockwise, or rotated 180 degrees. Navigate to the Image Menu, select Image Rotation and then
ITEC185 INTRODUCTION TO DIGITAL MEDIA
 1 ITEC185 INTRODUCTION TO DIGITAL MEDIA ADOBE PHOTOSHOP ITEC185 - Introduction to Digital Media ITEC185 - Introduction to Digital Media 2 What is Adobe Photoshop? Photoshop is the leading professional
PhotoFiltre DEPARTMENT OF EDUCATION
 DEPARTMENT OF EDUCATION PhotoFiltre Updated on 20 February 2010 This resource is part of the resource collection available through the ecentre for teachers. www.ecentre.education.tas.gov.au PhotoFiltre
METAL TEXT EFFECT. Step 1: Create A New Document. Step 2: Fill The Background With Black
 METAL TEXT EFFECT In this text effects tutorial, we ll learn how to easily create metal text, a popular effect widely used in video games and movie posters! It may seem like there s a lot of steps involved,
GRINDHOUSE MOVIE POSTERS
 Follow the instructions below to create a grindhouse style movie poster for your short film. You can also see a detailed video tutorial here: http://www.youtube.com/watch?v=-drhbfvhft0 GOOD LUCK!! CREATING
Key Terms. Where is it Located Start > All Programs > Adobe Design Premium CS5> Adobe Photoshop CS5. Description
 Adobe Adobe Creative Suite (CS) is collection of video editing, graphic design, and web developing applications made by Adobe Systems. It includes Photoshop, InDesign, and Acrobat among other programs.
Photoshop: a Beginner s course. by: Charina Ong Centre for Development of Teaching and Learning National University of Singapore
 Photoshop: a Beginner s course by: Charina Ong Centre for Development of Teaching and Learning National University of Singapore Table of Contents About the Workshop... 1 Prerequisites... 1 Workshop Objectives...
HOW TO CREATE A SUPER SHINY PENCIL ICON
 HOW TO CREATE A SUPER SHINY PENCIL ICON Tutorial from http://psd.tutsplus.com/ Compiled by INTRODUCTION The Pencil is one of the visual metaphors most used to express creativity. In this tutorial,
Doing More with Photoshop
 Doing More with Photoshop Topic 7 Layer Masks Learning Outcomes In this lesson, we will take a look at layer masks in Photoshop. By the end of this lesson, you will have a good understanding of what layer
Introduction to Layers in Photoshop. Layers palette
 Layers: Are an essential element of Photoshop and a tool of every digital darkroom. Allow you to optimize one part of your photograph without affecting other parts. Allow an Undo of everything from minor
PS COMP LAYER VARIATIONS
 GRC 101 INTRODUCTION TO GRAPHIC COMMUNICATIONS PS COMP LAYER VARIATIONS Information Sheet No. 511 Layers in Photoshop let you work with different image elements. Layer Comps in Photoshop CS, on the other
Duplicate Layer 1 by dragging it and dropping it on top of the New Layer icon in the Layer s Palette. You should now have two layers rename the top la
 50 Face Project For this project, you are going to put your face on a coin. The object is to make it look as real as possible. Though you will probably be able to tell your project was computer generated,
Contents: Bibliography:
 ( 2 ) Contents: Sizing an Image...4 RAW File Conversion...4 Selection Tools...5 Colour Range...5 Quick Mask...6 Extract Tool...7 Adding a Layer Style...7 Adjustment Layer...8 Adding a gradient to an Adjustment
Browse: Home / Photoshop CS5 Digital Painting Tutorial Photoshop CS5 Digital Painting Tutorial
 Browse: Home / Photoshop CS5 Digital Painting Tutorial Photoshop CS5 Digital Painting Tutorial By Armand Niculescu on May 10, 2010 http://www.twin-pixels.com/photoshop-cs5-digital-painting-tutorial/ One
Project 25 Page 1 ` JAZZ POSTCARD
 Project 25 Page 1 ` JAZZ POSTCARD Reset all tools! Create the Background 1. Create a new RGB document, 4.25 in. wide by 5.75 in. high at 100 dpi with a white background. 2. Click the foreground color swatch
GETTING STARTED. 0 P a g e B a s i c s o f A d o b e P h o t o s h o p A g a P r i v a t e I n s t i t u t e f o r c o m p u t e r s c i e n c e
 GETTING STARTED 0 P a g e B a s i c s o f A d o b e P h o t o s h o p Adobe Photoshop: is a popular image editing software that provides a work environment consistent with Adobe Illustrator, Adobe InDesign,
How to create beautiful B&W images with Adobe Photoshop Elements 12
 How to create beautiful B&W images with Adobe Photoshop Elements 12 Whether it s an Instagram snap or a film portrait, black and white photography is never out of style. Today, there are a number of ways
Using layer masks to remove backgrounds with Photoshop CS5 and CS6
 Using layer masks to remove backgrounds with Photoshop CS5 and CS6 Use layer masks to combine these pictures into this You will learn: 1. Layers and layer masks 2. Brushes 3. Layer styles 4. Type tool
Using GIMP to Create an Artistic Regional RPG Map Part 2
 Using GIMP to Create an Artistic Regional RPG Map Part 2 This tutorial series is an updated and revised edition of an original tutorial created by RobA for the Cartographer s Guild (www.cartographersguild.com).
HIGH KEY GLOW EFFECT IN PHOTOSHOP
 HIGH KEY GLOW EFFECT IN PHOTOSHOP In this Photoshop tutorial, we ll learn how to create a high key glow effect, which is a fancy way of saying we ll be applying a glow only to the highlights in an image.
PhotoFiltre. Reverse foreground/background colors. Background & foreground colors. Set default foreground/background colors. Color choice palette
 PhotoFiltre BASIC TOOLS PALETTE Background & foreground colors Reverse foreground/background colors Set default foreground/background colors Color choice palette Toggle through color choice palettes Selection
Creating Photo Borders With Photoshop Brushes
 Creating Photo Borders With Photoshop Brushes Written by Steve Patterson. In this Photoshop photo effects tutorial, we ll learn how to create interesting photo border effects using Photoshop s brushes.
Central Photography [INSTAGRAM EFFECTS]
![Central Photography [INSTAGRAM EFFECTS]](/thumbs/96/129260346.jpg "Central Photography [INSTAGRAM EFFECTS]") 1 1. Open Photoshop. 2. Go to File/New (Ctrl+N). 3. Name your file. 4. Set the Width to 11 inches. 2 5. Set the Height to 8.5 inches. 6. Set your Resolution to 200 pixels/inch. 7. Set your Background Contents
1 1. Open Photoshop. 2. Go to File/New (Ctrl+N). 3. Name your file. 4. Set the Width to 11 inches. 2 5. Set the Height to 8.5 inches. 6. Set your Resolution to 200 pixels/inch. 7. Set your Background Contents
LAYERS, THE HEART OF PHOTOSHOP AND ELEMENTS
 LAYERS, THE HEART OF PHOTOSHOP AND ELEMENTS In Adobe Photoshop and Photoshop Elements the layers feature is probably the most useful and underused feature in the programs. At this time we will concentrate
Photoshop 1. click Create.
 Photoshop 1 Step 1: Create a new file Open Adobe Photoshop. Create a new file: File->New On the right side, create a new file of size 600x600 pixels at a resolution of 300 pixels per inch. Name the file
Adobe Illustrator. Mountain Sunset
 Adobe Illustrator Mountain Sunset Adobe Illustrator Mountain Sunset Introduction Today we re going to be doing a very simple yet very appealing mountain sunset tutorial. You can see the finished product
Unit 7 : Image Painting, Editing and Layers
 Unit 7 : Image Painting, Editing and Layers Introduction This Unit describes about various painting tools; such as selection, cropping and measuring tools, retouching, drawing and type tools, Navigation
 Retouching Your Images: Have you ever seen an amazing photo but could never figure out how it was taken? A good photographer can accomplish this. And if not, has tools for correcting many kinds of imperfections,
Part 2 Highlights and Shadows
 Part 2 Highlights and Shadows 1) Open your completely colored.cpt file from your student folder. You will now add light and shading to create a detailed, finished looking composition. 2) Look at the tabbed
VECTOR PAINTINGS - User Guide VECTOR PAINTINGS. For Adobe Photoshop Elements 2019, 2018, 15, 14, 13, 12, 11. User Guide
 VECTOR PAINTINGS For Adobe Photoshop Elements 2019, 2018, 15, 14, 13, 12, 11 User Guide CONTENTS 1. THE BASICS...1 1.1. About the effects...1 1.2. How the actions are organized...1 1.3. Downloading and
Preparing Images For Print
 Preparing Images For Print The aim of this tutorial is to offer various methods in preparing your photographs for printing. Sometimes the processing a printer does is not as good as Adobe Photoshop, so
How to Create a Landscape Wallpaper for your Desktop
 How to Create a Landscape Wallpaper for your Desktop Why not create a vector landscape wallpaper? In this simple tutorial, you will learn how to create an eye-appealing wallpaper quickly and effectively.
Organizing artwork on layers
 3 Layer Basics Both Adobe Photoshop and Adobe ImageReady let you isolate different parts of an image on layers. Each layer can then be edited as discrete artwork, allowing unlimited flexibility in composing
GIMP (GNU Image Manipulation Program) MANUAL
 MANUAL") Selection Tools Icon Tool Name Function Select Rectangle Select Ellipse Select Hand-drawn area (lasso tool) Select Contiguous Region (magic wand) Selects a rectangular area, drawn from upper left (or lower
Selection Tools Icon Tool Name Function Select Rectangle Select Ellipse Select Hand-drawn area (lasso tool) Select Contiguous Region (magic wand) Selects a rectangular area, drawn from upper left (or lower
Darkroom Effects. Solarization. Bleach Bypass
 Darkroom Effects Solarization A popular technique with surrealists like May Ray, solarization is achieved in the darkroom by exposing a developing image to a flash of light. Darkroom solarization is difficult
Web Graphics Chapter 7 Review
 Web Graphics Chapter 7 Review Name Date 1. The Add Layer Mask button is located on/in the. a. Toolbox b. Layers palette c. Mask palette d. History palette 2. How many color adjustments commands are available
Realistic Skin Smoothing
 TIP SHEET #7 Realistic Skin Smoothing I think it s fair to say when it comes to retouching techniques, the number of different ways to smooth skin is seemingly endless. From blurring techniques through
All Creative Suite Design documents are saved in the same way. Click the Save or Save As (if saving for the first time) command on the File menu to
 command on the File menu to") 1 The Application bar is new in the CS4 applications. It combines the menu bar with control buttons that allow you to perform tasks such as arranging multiple documents or changing the workspace view.
1 The Application bar is new in the CS4 applications. It combines the menu bar with control buttons that allow you to perform tasks such as arranging multiple documents or changing the workspace view.
Using Photoshop Elements
 Using Photoshop Elements Created By: Rick Williams August 2004 Table of Contents Photoshop Element Tools...Page 1 Tool Descriptions... Page 3 Starting Photoshop Elements... Page 7 Resizing an Image...
Photoshop CS2. Step by Step Instructions Using Layers. Adobe. About Layers:
 About Layers: Layers allow you to work on one element of an image without disturbing the others. Think of layers as sheets of acetate stacked one on top of the other. You can see through transparent areas
Painting with Pixels SETTING UP
 Painting with Pixels These notes have been prepared using Photoshop CC 2015.5.0, a Windows PC and a tablet such as Wacom Intuos. A tablet of some sort is virtually mandatory as the brush strokes are supposed
This tutorial will show you how to use artistic grunge overlays to transform your photos into works of art.
 ARTISTIC GRUNGE OVERLAYS For all photo editing software that supports PNG files If you have any questions, please feel free to contact me at kim@photosbykimhill.com. This tutorial will show you how to
How to blend, feather, and smooth
 How to blend, feather, and smooth Quite often, you need to select part of an image to modify it. When you select uniform geometric areas squares, circles, ovals, rectangles you don t need to worry too
Create a Multicolored Splashed Text Effect in Adobe Illustrator
 Create a Multicolored Splashed Text Effect in Adobe Illustrator by Diana Toma17 Nov 2014 What You'll Be Creating In this tutorial you will learn how to create a multicolored splashed text effect in Adobe
Tips & Techniques - Materials
 Tips & Techniques - Materials Materials: How to Create a Spherical Map With Corrections For Distortion Download: Project Works with: GO, SE, XL Requires: Version Special Notes: Special Thanks to Chris
Compiled by <<coldbing>> FIRE EFFECTS
 FIRE EFFECTS Compiled by Step 1 - New Document Make a new document. Fill it with black. Then make a new layer, and type out (or whatever) you want to set on fire in white. Step 2 - Windy Go
GIMP Layers. Creating a Blank Image
 GIMP Layers One of the most powerful features of modern imaging software is the ability to work with layers. If an image is made of layers, we can work on the part that is in one layer without affecting
XXXX - ILLUSTRATING FROM SKETCHES IN PHOTOSHOP 1 N/08/08
 INTRODUCTION TO GRAPHICS Illustrating from sketches in Photoshop Information Sheet No. XXXX Creating illustrations from existing photography is an excellent method to create bold and sharp works of art
SAVING, LOADING AND REUSING LAYER STYLES
 SAVING, LOADING AND REUSING LAYER STYLES In this Photoshop tutorial, we re going to learn how to save, load and reuse layer styles! Layer styles are a great way to create fun and interesting photo effects
Pretty Plaids (Photoshop Elements)
") Pretty Plaids (Photoshop Elements) Tip of the Week by Jenny Binder on January 11, 2010 Most digital scrapbookers, at some point, want to try their hand at making their own paper. This can be a fun venture,
Pretty Plaids (Photoshop Elements) Tip of the Week by Jenny Binder on January 11, 2010 Most digital scrapbookers, at some point, want to try their hand at making their own paper. This can be a fun venture,
Adobe Photoshop CS2 Workshop
 COMMUNITY TECHNICAL SUPPORT Adobe Photoshop CS2 Workshop Photoshop CS2 Help For more technical assistance, open Photoshop CS2 and press the F1 key, or go to Help > Photoshop Help. Selection Tools - The
Tablet overrides: overrides current settings for opacity and size based on pen pressure.
 Photoshop 1 Painting Eye Dropper Tool Samples a color from an image source and makes it the foreground color. Brush Tool Paints brush strokes with anti-aliased (smooth) edges. Brush Presets Quickly access
Teach Yourself Adobe Photoshop Topic 9: Photo Retouching Part 2
 http://www.gerrykruyer.com Teach Yourself Adobe Photoshop Topic 9: Photo Retouching Part 2 In the last week s lesson, you repaired damaged areas of an image, removed unwanted parts of an image, cloned
Editing Using Photoshop CS5
 The Photoshop CS4 Editing Workspace - shown is the document (image) window, ToolBox, Info, Navigator, History, Adjustments and Layers Palettes, Windows Menus and Options Bar (on top). USING THE LAYERS