ZView ver.2 DR Console Software. User Manual. (for HUMAN) Manual Version : 2.1 Revision : 002
|
|
|
- Rafe Tate
- 6 years ago
- Views:
Transcription


1 ver.2 DR Console Software User Manual (for HUMAN) Manual Version : 2.1 Revision : 002
2 Table of Contents 1. Introduction Purpose System requirements Workstation Monitor Installation & Delete software Software configuration Worklist Browser Review Config Option Mode Operation Zview Login Worklist Main Menu Search option Refresh condition New SET List Manual Input Browser Patient List Study List Thumbnail Command Button Review Stand & Table
3 Generator Examined Part View Position Image Parameter Process Detector Status Study Re exposure R, L, MARK, TEXT TOOLS ICON TOOLS ICON in Review mode TOOLS Menu Pop-up Menu Configuration Default Setting Storage Setting Annotation Management Worklist Item Management DICOM MWL(Modality Worklist Server Setting ) DICOM Storage DICOM Print Option software & function Viewsub feelview Appendix I : Simple Workflow
4 1. Introduction Zview is the name of the digital radiography of Atlaim Co. Ltd. Zview is the DR control software that acquires image from the DR detector like flat panel, processes rapidly for clinical application, and provides DICOM services for the integration with PACS system. This manual explains how to install and operate Zview software. (manufacture : Atlaim Co., LTD.) 2. Purpose is the operation console system software integrated with ATLAIM detectors or X-ray generator, based on FS-MLW (Faster Specialized Multi Layered Wavelet) technology. is the product developed for the operator, designed at the clinical hospital through many years of clinical tests, and finished by service engineers. is the embedded software based on feel-tk enable to remove noise and various artifacts and much clearer body tissue. The embedded calibration function makes it possible to set the basic calibration data (offset image and gain image). It can also process progressive defect by providing defect view. is distributed and being used at the clinical fields after verifying software on distributed worldwide. It is easy to use console system s software just by changing the type of the detector which DR makers want. Integrating the X-ray s generator operation panel, the total DR system inside the software makes it possible to control APR, AEC, Ready/Exposure with ease. is integrated with various X-ray generators, supports APR function, which enables to work as existing operation panel with just one console software. 4
5 3. System requirements 3-1. Workstation Processor: Intel Pentium Intel Duo Core/Core 2 Duo or compatible AMD Dual Core Processor or later RAM : 2GB RAM HDD: At least 40GB hard disk (if possible, over 7,200 RPM). For data backup and reliability, we recommend two separate HDDs physically-1 st HDD: System and Software, 2 HDD: Image Data Storage, not separating the partition logically with just one HDD. Network Card : 10/100/1000Mbps Ethernet Network Card Video graphic adapter: at least over 1280 X 900 pixels, color resolution-true Color mode(no shard memory), DVI interface connector Operating System : Windows XP prof.(at least SP3), Windows 7 Home Premium/Professional. (at least SP 1) Need I/O : 1 Parallel port(synchronize Detector & X-ray Generator & Software), 1 Serial port(in case Control of X-ray generator), 1 USB port(software Lock-Key) 3-2. Monitor Over 19 inch (23 inch recommended) Brightness : over 300cd/m 2 Contrast Ratio : over DC 8000:1 Response time : over 5 ms 1600X1200 or 1920X1280 recommended (at least over 1280 X 900) 4:3, 16:9. 16: 10 ratio supported. High fidelity of grayscale and optimized luminance distribution If you want to use high-resolution monitor, we recommend medical LCD monitor (B/W or color). There is no problem because the present software was made based on gray color when you want to use black and white monitor. For image quality control, we recommend the below among medical monitors. It is because it needs to adjust the image at the same brightness for diagnosis after taking X-ray. Most of monitors are made according to each country s medical standard so that there is no problem to use them. 5
6 4. Installation & Delete software Note If you want to install on you new PC or reinstall after removing the old version, you should call and contact service engineer. 6

7 5. Software configuration 5-1. Worklist Through DICOM Worklist, you can input the patient information, integrated with hospital information system (HIS) or input the patient information manually. 7
8 5-2. Browser It shows the list of stored images after acquisition. You can open the images to edit, to send to the PACS server, and to print out. 8

9 5-3. Review You can take images according to the information selected from the Work list and edit after retrieving images stored in the browser. There are the generator tab for controlling the generator and the process tab for editing images. 9

10 5-4. Config You can do configuration for functions and information for ZVIEW 10


11 5-5. Option Mode View Sub (option) 11
12 Feel VIEW (option) 12
 and password from the login screen and click OK to start the program.")
13 6. Operation Zview 6-1. Login The program starts. From the desktop, double-click Zview icon to execute the program. Put the operator name (or ID) and password from the login screen and click OK to start the program. Check the connection status with detector and generator after login and Put the color value connected with each part of the screen. Note -There is the difference according to the user level like company, or company name or supervisor. -You can ordinary user account or ordinary manager account at the hospital. The supervisor account is for A/S engineers. -The screen may look still temporarily due to the connection to the equipments after login. 13

14 6-2. Worklist You can retrieve the study from the Worklist and display on the screen. You can also input manually. You can move to the study mode by doubleclicking the patient information of the list or clicking the study button Main Menu 1 EXAM: Move the studies selected from the list to the EXAM mode. 2 DELETE: Delete the selected study lists. 3 REFRESH: Renew the list when DICOM worklist supported. 4 ER: This is for emergency study. 5 CODE : Setting RIS code and View position. Note - In the case of ER, you need to set ER001 special code in the code manager in advance to move to the study mode after creating ID, password and so on automatically. Here you input the study body part, study conditions and so on for the study settings. 14
15 Search option You can set the item to display in the list. With the patient information (ID, Name, Access No.), you can display the specific patient or the patient satisfying special conditions with the items like Schedule, Modality and State Refresh condition You can set the cycle to retrive the patient information when the worklist server is is able to be connected. AUTO renews the list automatically according to the time cycle as above. If you want to refresh manually, click the AUTO button again and the push the FRESH button at New SET Press this function to modify or add the various setting value (Body part, View position, X-ray exposure condition, Image processing parameter, Annotation etc) Refer to part of Generatort List It displays the list corresponding to the conditions set in the Option. Double-click the right button of the mouse from the work list to show popup menu. 15

16 1 Reserve (X) : Change the selected list to Reserve mode due special reasons. 2 Show : Search study lists satisfying selected study conditions. A. All : Display all study lists. B. R : Display the list not examined yet. C. X : Display list changed to Reserve forcibly. D. Y : Display the examined list. 3 Search Option: Show or hide search options of the worklist. 4 Code Manager: For the RIS code of selected studies, it displays the code manager on the screen to select the view position. Please refer to 8. TOOLS 의 code manager for its usage. 16

 at least one time. B.")
17 Manual Input You can create new patient information by putting them. 1 Manual Input A. You input ID, Name, ACC. No. and so on. You need to input at least ID and name. When you enter after inputting Patient ID, other information is entered automatically before entering patient information(id, Name, Age, etc) at least one time. B. You can select the type of the anatomy as below. 17

18 C. If the favorite study lists are inputted in advance in the special code, you can automatically check study lists in the study list by selecting the code next to the special code. If you want to add the study list here, click the special code to check the study list and then push the ADD button to add. D. If you want to change or create the special code on the worklist screen, rightclick from the Study list to execute the Code manager. E. You can create Date of Birth and the age in the DICOM file by putting them. F. If you do not change as default, there is no value at the patient s birth date field ( ) of the DICOM file. G. If you put the patient age, it inputs the age only in the DICOM file. H. You can specify the age by year, month, and date unit. Note Be careful not to input the Date of Birth and the Pat Age separately. It may cause that the date of birth and age become different in the DICOM file. 18

19 2 Study List A. ADD : Add the inputted study information to the study list. B. DEL : Delete the wrong list. C. UP/DOWN : You can order when changing the sequence of the selected study lists. 3 OK : Add the inputted study information to the Study list. 4 CANCEL : Reset the inputted study information. 5 STUDY : Change to the Study mode for inspecting as inputted study information. 19
20 6-3. Browser The browser mode works as database viewer in order to review saved image data. In this mode, you can query in various ways, x-ray again, and change the sequence of the image. You can also send to PACS or backup and restore. It is very useful management tool. Note If you execute the browser mode, you can not see the image on the image display list at the early stage. That is because it is not selected from the list of Patient/study/series. Therefore, you need to select to display from the list of Patient/study/series. 20

21 Main Menu 1 OPEN : Open all images of the selected patient. 2 EXPOSURE : Change to study mode for reexamination of the selected studies. 3 MERGE : Merge different studies. For example, the case happens that the different patient image is in the selected patient image folder or one patient s image is to merge after ER. A. First select the patient to merge. B. Click the MERGE button (from the main menu). C. It shows the above pop-up after that. D. Select the patient to merge according to the option or the patient list. E. Select the study list of the selected patient and then click the merge button. F. It merges all Study list. 21

22 4 ANALYSIS: This function is displayed about the entire analysis of radiography history as checking it at the s/w installation. As above, analysis window is displayed. This content includes the entire information of the applicable year by month. Press the Total after Selecting the applicable year and the data of the applicable year is displayed. And press the Search to display the data after setting date. Follows the below to print out the analysis data. 22


23 A. Press Print Setup B. Press the red box and go to pre-view window C. Press the printer icon to print out in pre-view window 23
24 Patient List It displays Patient ID, name, sex, date of birth, study date and so on. If you select the list, study, series, and images are displayed on the below screen. If you double click the item, you can check all the images for the patient on the review screen. 1 EDIT You can change the patient information as below. Check the account to know who modified it. 2 DEL You can delete the selected patient information. In this case, also check the account. 24
25 Study List This shows the study list of the patient selected from the patient list. Patient ID, study ID, accession number, study date & time, study description and so on are displayed. If you choose one of them, the series and images appear. Double clicking the item, you can check images included in the study selected on the review screen. The EDIT and DEL allow only company and supervisor user. 1 EDIT You can change the patient information as below. Check the account to know who modified it. 2 DEL You can delete the selected patient information. In this case, also check the account. 25

26 Thumbnail This shows the thumbnail images of the selected study. Left-click to show the pre-view image. 1 Invert Sel. A. Invert the selection of the image from the image list. Cancel the selected image and choose the unselected image. B. With Inver Sel. Checked, if you select the patient list, study list and series list, the basic image is displayed without yellow box. C. If it does not work normally after opening images, check whether or not the yellow box is on the image. 2 OPEN : Open selected images. 3 EXPAND : You can watch all images by pushing EXPAND button when there are too many thumbnail images. 26

27 4 The EDIT button is for changing the study information. Check the account to know who modified it. 5 The ACCEPT activate the rejected image and accept the rejected image in the software. 6 Image Sequence change: You can change the sequence of the image by drag & drop. 27
28 Click after checking the message. Note This function works only at the same series so that you need to change the sequence at the selected series after choosing one. You can also do on the thumbnail screen when not expanding. 28
 from the image")
 Print You can print out")
29 Command Button Send You can send images selected (with yellow box) from the image list to PACS server selected on the right side. (Refer to PACS of configuration for setting PACS server) Print You can print out the selected image (with yellow box) form the image list. File Export You can save the selected images in file. 29

30 CD Backup You can back up the selected images in CD/DVD with image viewer (so called CDPublisher) Backup You can back up the selected images in the folder. Back up has two options to save or export the data from the console PC. one is saved in selected drive without viewing S/W. Another is saved with viewing S/W like CD Write backup. 30


31 How to back up in CD-ROM a. Insert the empty CD to CDROM Drive b. Select the backup path to CDROM Drive c. Press Backup start d. Press yes as below Restore It restores backup images. The Restore function can work as DICOM import. You use this function when you register DICOM files from other sources to the DR-console software. 31
32 6-4. Review Under the REVIEW mode, you can use the EXPOSURE screen for examining in the worklist and also REVIEW mode for checking and editing images in the browser. [From WORKLIST/BROWSER to EXPOSER] Note [REVIEW mode ] The difference is whether or not it acquires additional images. In the case that study mode is taken in the Review mode, it is to expose the acquired images again. 32
![[Review Mode] [Exposure](/docs-images/80/80694625/images/33-0.jpg "Mode] 6-4-1.")

33 [Review Mode] [Exposure Mode] Stand & Table Select the equipments for studying under study mode. 33
34 Generator You can manipulate by pushing the Generator button when the generator integrated. You can change dosage and also AEC environment when AEC supported. Note The condition values displayed on the screen are shown in the support type of the generator so that it does not display all condition values. 34

35 1 Examined Part Exam Type According to the equipment type (STAND/TABLE/UNIVERSAL), the body part embedded in the equipment will be displayed Up It moves the location of the body part selected from the list to the upper side. Down It moves the location of the body part selected from the list to the lower side Body Part Name It displays the name of the body part selected from the list or it can input the new body part to add. ADD It adds new body part items to the list through input window 35
36 Delete It deletes the item of the body part selected from the list. Edit It changes the name of the body part selected from the list. 2 View Position View Position It displays all view positions corresponding to the body part selected from Study type list Up It moves the location of the view position selected from the list to the upper side. Down It moves the location of the view position selected from the list to the lower side. Marker You can select whether you display laterality on the image or not, and the contents/position/font size of the items to display. Label You can select whether you display View Position on the image or not, and the contents/position/font size of the items to display. Annotation You can select whether you display Patient Direction on the image or not, and the contents/position/font size of the items to display. Flip Horz You can select whether you automatically apply Mirror function (The right part and left part of the image are inverted) or not. 36
37 Flip Vert You can select whether you automatically apply Flip function (The upper part and lower part of the image are inverted) or not. SID You can select the x-raying distance (The distance between the tube and the detector). Cross This is for processing the cross line when using Trixell s detector. Rotate In the case that the detector top s position does not match according to the Bucky s configuration, you can rotate after image acquisition. You can also rotate partially on examined part & View position screen. You can choose 0, 90, 180, and 270. The default value is 0. View Position Name It displays the name of View position selected from the list. Description It displays the description of View position selected. Patient Orientation You can select Patient Orientation in DICOM format. View Code Sequence You can select View position in DICOM format. None RIS Code You can input original hospital code to integrate with Worklist. WW You can select the window width value to apply in displaying images. 37
38 WL You can select the window level value to apply in displaying images. Add You can add newly created view position items to the list. Delete You can delete view position items selected from the list. Edit You can modify the contents of view position items selected from the list. 3 Image Parameter Patient Size You can select the patient size. Shutter You can select the size of the part to save from images. X-Ray Parameters You can set the condition for x-raying from the Generator. 1. kvp 2. ma 3. mas 4. Focal Spot : Large / Small 5. Mode : ma/ms, mas, AEC Enhance Parameters You can set values for image processing. - Par : Selects Parameter files for image processing. 38

39 Process You can process displayed images by opening the Par file, applying the parameter, and changing the details. For setting the parameter file, refer to the


40 Image Processing Parameter setting You can save parameter files for image processing. P/S/M/L buttons make it possible to select the parameter file chosen in advance according to the patient condition. If it is not set yet, it is displayed as blank. Note Edge Enhancement adjustment You need to set for image processing. If the file is not in the pre-set route, all execution buttons for the below processing will get disabled. This is for highlighting the edge of the image (separately with other parameters). As shown in the below images, it is used to watch the detailed part of the bone tissue. edge enhancement = 2 edge enhancement = 7 Contrast adjustment Enhancement This is for highlighting the contrast of the image. It is related to latitude. If highlighted too much, it looks hard. As shown in the below images, C- spine s part is highlighted compared to the surrounding tissue. 40


41 Contrast enhancement = 2 Contrast enhancement = 7 Latitude adjustment As the value gets higher, the lower part of the image is highlighted and the image gets thicker. It shows more realistic image for the twodimensional image. Please refer to the below. Latitude = 2 Latitude = 7 41
42 It executes image processing. The modified Edge enhance, Contrast factor and Image latitude of the parameters for image processing are saved. The saved parameters will process the same study part. You can initialize to the original values of parameters. You can save LUT files, PAR files, and their routes for image processing. For selected study part, it is processed by the saved route. You can go back to raw image that is is not processed. In other words, when displaying image data acquired from the detector, the part shown by the shutter is displayed as raw data if the shutter exists in the review mode Detector Status : When detector is ready for exposure, R mark is changed to yellow color. In review mode, R mark is fixed to gray color. ; When acquiring the image, E mark is changed to green color and acquires the data. 42


43 Study A Button this function moves to the next study automatically. Also it is possible to select the view position by user in auto mode. As following the window, use to add or modify the view sequence Re exposure If a saved image is under X-ray exposure or mismatch position, you can do re exposure x-ray using this button. After clicked this button, the console software do wait until X-ray exposure. If your system is integrated X-ray generator, the console viewer is changed to exposure mode. Otherwise, the console viewer is not changed. 43
44 After acquisition of new image, you must select accept or not for new image. Note If you do accept new image, You must choose carefully because the system delete old image. 44
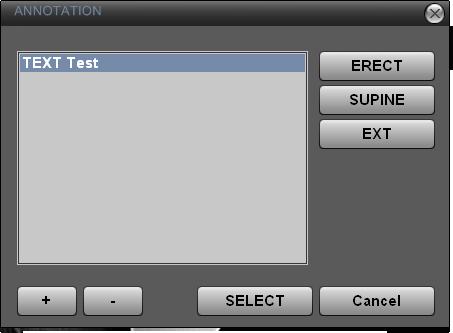
45 R, L, MARK, TEXT You can input the annotations on the screen. In the case of AP/PA/LAT, just click the mark to input on the screen. If you want to make a new mark, push + button. Checking Insert mark and pushing OK button just adds to the MARK list. But, if you do the above process with Insert mark unchecked, it adds to the list and also shows the mark in the image part. SELECT button shows the mark of the list on the screen. The following two photos are for adding Text and the process is the same as MARK. 45

46 46

47 TOOLS ICON Under the Review mode, you can edit images with Tools icon when the image is displayed on the screen. Layout 1 X 1 Displays the big image without any split. Layout Custom The operator can select how to split. Basically 1X2, 2X1, 2X2 are included. If you select Custom, you can input the layout as you want. Input the row and column to add and push Add button. 47
.")

48 WL Reset Changing the Window width/level initializes to the original value of acquired image. Image Reset Initializes the image (cancelling ROI rectangle and processing). Panning If you put your mouse pointer on the image and left click, you can move the image as the mouse pointer moves. Zoom In/Out If you put your mouse pointer on the image and left click, you can zoom out by moving to the upper side and zoom in by moving to the lower side. 48
49 Magnify Glass It can magnify/make smaller any screen area. If you move the mouse to the left upper side, pushing the Shift key, the screen will get smaller. Moving to the right upper side makes it larger. If you move to the upper side, pushing the control key, the image magnification ratio will get smaller. Moving to the lower side makes it larger. Fit Image It fits the image to the screen size. ROI Ellipse It selects the area to store in the form of circle or in the oval form. The outside of the area looks black. ROI Rectangle It selects the area to store in the rectangle. The outside of the area gets removed. Print It prints the image selected with DICOM printer.(only DICOM printer) Clicking the icon shows the below preview. 49

50 A. The frame will change with aspect ration according to the size of the film. B. You can check the present page/total page status. C. When you can not print in one screen, you can check the previous page or next page. D. If you change film orientation, film size, layout, and so on, the screen is updated accordingly. Save It saves the present image. 50

51 Save & Send It saves and sends the present images. In image acquisition mode, it displays the Worklist screen after saving or sending the present images and then finishing the study. Close Study Cancel Here 4 modes are supported. 1 Save an image: It saves the present image. 2 Save and send an image : It saves and sends the present image. 3 Save an image and send all images : It saves the present images and sends all images displayed in the thumbnail 4 Only send images : It sends all images displayed in the thumbnail without storage. In examination mode, it cancels to use images (not save images) and gets ready for another. In the Review mode, it displays the review screen. Reject function does not use the image without deletion and the image is displayed with Reject message. 51

52 Mirror It changes right and left. Flip It changes up and down. Rotate CCW It rotates the image 90 counter clockwise. Rotate CW It rotates the image 90 clockwise. Whole Spine It can create new merged image that do stitch 2-4 images by method of manual or semi auto. Sometimes this functions is called name Stitching. 52
 (ex. Using X marker on the images by merge button) A.")
53 1. The first step, you should selected images to stitch in review mode.. 2. The method of using Merge button(semi auto) (ex. Using X marker on the images by merge button) A. Select ZOOM ratio. 53

54 C E B D F G B. Select position. C. Check a Set 1st point. D. Click the left button of mouse on the stitching pointer in the upper image. E. Check a Set 2nd point. F. Click the left button of mouse on the stitching pointer in the below image. G. Push the Merge button. After push the button, it is created new stitched image. H. Push the Save or Cancel. I. After push the save button, you wait until display the processed image. The processing time is different by PC performance. J. This function is only support in the case of stitching of Two images. If the counter of your select images is over 3 image, this merge function is disable. 54


55 The image after push the Merge button. After push the save button 55

56 3. The method of manual stitching A. Select moving image. As selecting image, The selected image number is active. B. Move the image with clicking left mouse button. C. If you cannot move at the exact point, you should move at the near point by mouse. And you can move at the exact point by using bellow option D. Push the Save or Cancel. 4. Options button. B A A. Left, Right, Up, Down : Move unit of 10 pixel selected image. B. Other i. Fine Tuning : Move unit of 1 pixel as push the Left, Right, U p, Down. ii. Fix Horizontally : iii. Fix Vertical : iv. Fix Image : Fixed image for check the stitched image after moving image. Note When stitching images, there are two methods to merge the image. One is the raw images to use, another is the processed images to use. 56
57 TOOLS ICON in Review mode Measurement Angle Measurement Length Invert(Pixel gray value) Line Profile(Histogram) New SET Code Manger DICOM Storage Sending Status DICOM Printing Status Default mode mouse 57

58 TOOLS Menu Under the Review mode, you can use below functions by clicking the TOOLS button. Image Open You can watch DICOM files from outside, not DICOM files stored in Zview. You can use basic functions like watching images and window width/level. Tool Histogram The histogram means the line profile here. If you draw a strait line on the image, you can see the distance and various values related to the line as below. 58


59 Measure Angle You can measure the angle on the image. Measure Line You can measure the line on the image. Invert You can invert (negative) the pixel s value for each image. You go back to the original status by pushing again. Length Calibration - This is for setting pixel spacing value of the detector at one s discretion. - After x-raying, measure the pixel spacing value to compare with the real value and then input the real number. This is the calibration for 59
60 the real distance when the real distance is different from that of the image taken. 1. Select Menu-Tool-Length calibration. 2. Check the distance on the image or the real distance and draw the line as long as the distance. 3. The screen as below will appear if you finish measuring the distance. 4. Measure displays the measured distance on the image. 5. Put the real distance in Real (Unit: mm). 6. Pixel Spacing value computed in Stand (selected Bucky) is displayed. 7. Reset disregards computed pixel spacing value and calls pixel spacing value (original value when installed) saved in Aceview.ini file to display. 8. Save saves the present pixel spacing value and closes the screen. 9. Cancel cancels the present work and closes the screen. Note It is very useful to do this measurement when installing first. Generally, the engineers do length calibration in installing. 60
61 Send Status It displays DICOM file transfer QUE being transmitted to Network through DICOM storage service. The list will be deleted after transmitting images is over. If the program is closed with transmission not finished, the warning sign appears to inform that QUE images remain and asks how to process. Print Status It displays DICOM file transfer QUE being transmitted to Network through DICOM print service. The list will be deleted after transmitting images is over. Other functions are similar to Send status. Check Exposure Count It displays exposure count until now after initial installation. Configuration, Study Part & View Position will be explained later. 61

62 Code Manager It matches View position items with RIS code. 1 Code : It shows all inputted RIS codes. A. Add : Registers inputted codes. B. Edit : Edits selected codes. C. Del. : Deletes selected codes. 2 Item : It shows all view positions matching with RIS codes. selected. A. Up : Gets the sequence of the selected item upper. B. Down : Gets the sequence of the selected item lower. C. Add : Adds items selected from View position to Item. D. Delete : Deletes items selected from Item. 3 Del. All Code : It deletes all RIS codes. 4 Load : It inputs RIS codes through Excel file. A. The file created in Microsoft Office Excel 2003 is readable. B. Tab name should be Code and RIS code should be inputted in the second column. 5 OK : It closes Code Manager. 62
63 Change Operator It changes the operator. Refresh image Refresh offset It gets new standard image (Offset Image). It saves the present standard image (Offset Image) with different name. About It displays the program version and software serial number. 63


64 Pop-up Menu Under the Review mode or Exposure mode, if you right click on the image, the pop-up menu appears as follows. Shutter size application You can apply each shutter size. Custom If you want to add the shutter size, use the above Edit tool. The unit is inch here. 64
65 Delete Image You can delete the present image. Processing This is the shortcut that you can do image processing with originally set parameters again without going to the process tab when images look different from saved ones due to the initialization or other reasons in processing images. 65

66 6-5. Configuration This is for setting the whole system. You can set various networking services, system, and data format Default Setting It sets the user list, hospital name, and date. Operator List You can create the operator list. Add: Adds new operators. Input the name of the new operator at the bottom of the window and then click Add. Modify: Changes the selected operator information. Delete: Deletes the selected operator. Delete All : Deletes all registered operators. Information You can input the hospital name. Date Format You can select the date format. Modality You can select equipments to connect. - Stand : Stand only type - Table : Table only type - Full : Stand + Table type 66

67 Storage Setting You can select image storage route and backup route, and set the automatic deletion function. Image Save Path You can select the route to save images. Here storage route means the path for saving processed images as well as raw images acquired from the detector. DICOM Save Option - You can select the type of the modality when saving images in DICOM format. - You can select the bit number of the image. Image Auto Delete You can select whether you use the automatic image deletion function or not and conditions. Delete by Space: Deletes if the space is less than the set percentage. Delete by Date: Deletes older images than the selected date from x-ray day. Note If the disk is full, you can not x-ray and save images. Therefore, we recommend the partial setting. Once set, it deletes automatically so that you need to manage backup schedule in advance. 67
68 Database It provides functions for managing database. - Compress : compress database. - Backup : Backup database. - Restore : Restore database Annotation Management You can select the information to display on the image. Patient Information : Patient ID, name, sex, date of birth Acquisition date & time : Study date, operator name Hospital Information : Hospital name X-Ray Parameters : X-Ray exposure conditions (kv, mas, Time) Anatomical Information : Laterality & View Position. Series Information : Series No, Image No, Acquisition No. Full Displays all information on the image. None Does not display any information on the image. Custom Displays information that the operator selects at discretion. 68

69 Worklist Item Management You can select the item to display in the worklist. Select the item to add from the Worklist All Item and push > button. For changing the sequence, use the up and down buttons. 69
 You can set the server s environment and client s environment for using DICOM Modality Worklist service.")
70 DICOM MWL(Modality Worklist Server Setting ) You can set the server s environment and client s environment for using DICOM Modality Worklist service. Server You can set the server s environment, providing DICOM Modality Worklist service. AE Title IP Port Test You can check the server works normally. 70
71 DICOM Storage This is to set the server s environments for DICOM transmission. List 1 Name : Displays the server name. The same name as Server AE will be displayed. 2 Server AE : Displays the server s AE title. 3 Server IP : Displays the server IP. 4 Server Port : Displays the server port. 5 Client AE : Displays client s AE title. 6 Client Port : Displays client port. Insert It adds new PACS server (DICOM Storage SCP). 71

72 Delete It deletes the setting of the server selected. Modify It changes the setting of the server selected. Select You can select the setting of the server to access to among various server settings. If you want to select with the mouse, the check box will change into checked after the message connected appears from the bottom DICOM Print You can set the server s environment for DICOM Print. List Name : Displays the laser printer name. The same name as Server AE will be displayed. Laser Imager AE : Displays the laser printer s AE title. Laser Imager IP : Displays the laser printer IP. Laser Imager Port : Display the laser printer port. Host AE : Displays host s AE title Print Model : Displays the print model. 72
73 Insert You can add new printer s setting. Delete You can delete the setting of the printer selected. Modify You can change the setting of the printer selected. Select You can select the setting of the printer to access to among various server settings. Print Setting You can set the film and printer. Medium Type : Selects the type of film. Film Orientation : Selects the direction of film. Film Size : Selects the size of film. Smoothing : Selects the process type of printer. Boarder Density : Selects the boarder density of film. Min Density : Selects the minimum density area of film. Max Density : Selects the maximum density area of film. Overlay information You can choose the information to be displayed with images on film. 73

74 7. Option software & function 7-1. Viewsub The viewsub is synchronized with main console software(). And the viewsub can see the preview image after X-ray exposure and control a connected X-ray generator on the other touch monitor. The Viewsub is a optional software or function and can be used properly as interfaced X-ray generator. The lists on the Exam list and main console are synchronized with each other. 74

75 After X-ray exposure, you can see the image as upper figure. You should push the one button of SAVE, CANCEL. If you don t push one button of SAVE and CANCEL, the cannot operate next step. 75

76 7-2. icdview icdview is the software for detail viewing on the medical or high resolution monitor. As installation of icdview, you must be installing in same PC of console software. This function is a optional functions. If you want to this option, you should order to your account sale man. 76
77 Menu Images Default Change default mode Prev. Image Previous image or previous page Next Image Next image or next page ZOOM Image If you put your mouse pointer on the image and left click, you can zoom out by moving to the upper side and zoom in by moving to the lower side. Pan Image If you put your mouse pointer on the image and left click, you can move the image as the mouse pointer moves. Magnify Glass It can magnify/make smaller any screen area. If you move the mouse to the left upper side, pushing the Shift key, the screen will get smaller. Moving to the right upper side makes it larger. If you move to the upper side, pushing the control key, the image magnification ratio will get smaller. Moving to the lower side makes it larger. Reset Reset image. Rotate Rotate L It rotates the image 90 counter clockwise. Rotate R It rotates the image 90 clockwise. 77
78 Mirror It changes right and left. Flip It changes up and down. Layout 1 X 1 Displays the big image without any split. 1 X 2 Split 1 X 2 2 X 2 Split 2 X 2 Measure Line You can measure the length on the image. Angle You can measure the angle on the image. Report Create/Edit You can make a report for selected study. 78

79 1 Save : Save a report data. 2 Print : Print a report. 3 OK : Exit report mode. 4 Edit Preform : Edit preform. 79

80 1 OK : Exit mode of edit Preform. 2 Add : Add content of each items 3 Delete : Delete selected title. 4 Edit : Save content of modified items. 80

81 Appendix I : Simple Workflow 81

82 DICOM Option A. Browser Mode Update DICOM Query and Retrieve SCU * This DICOM Q/R function is a optional Function. And then if you want to use this function, you should order to your account sale man. 82

.")
83 Config : Configuration of Setup Remote destination or Retrieve Destination. You should ADD/Modify/Remove information of Remote or Retrieve destination. After installation Zview, Zview is set automatically for the Retrieve destination. At this time, the retrieve destination is local host (Zview). Select query and retrieve destination. 83
84 Search option Result for listing. You should select study or series. Command add queue or retrieve - Add Queue : Add Queue for selected study or series - Add Queue & Retrieve : Add queue and command retrieve for selected study or series - Retrieve : Command retrieve for selected queue on lists. - Select All : Select all on queue lists. - Clear : Delete all queue lists. * After retrieve, this function is registered in the DB of the Zview. And you will see the retrieved images on Zview. But the Zview is not registered in the DB for all DICOM image. The Zview in registered in the DB for only 16Bit (9 16 bit) monochrome 2 DICOM images. 84

85 B. Config Mode Update * In this update, Zview add DICOM Service ( DICOM storage commitment SCU, DICOM Modality Performed Procedure Step SCU, DICOM Query and Retrieve SCU ). 85
User Manual Veterinary
 Veterinary Acquisition and diagnostic software Doc No.: Rev 1.0.1 Aug 2013 Part No.: CR-FPM-04-022-EN-S 3DISC, FireCR, Quantor and the 3D Cube are trademarks of 3D Imaging & Simulations Corp, South Korea,
ECOVIEW 9 / ECOVIEW 9 PLUS Digital Radiographic System
 Co., LTD. 3F, Urbanlight B/D, 630, Eonju-ro, Gangnam-gu, Seoul, Korea 135-832 Factory at 621-14, Dochun-dong, Gwangsan-gu, Gwangju, Korea 506-301 TEL. : +82-70-7510-3400 FAX. : +82-70-8630-3420 sales@ecoray.kr
ECOVIEW 9 / ECOVIEW 9 PLUS Digital Radiographic System
 ECORAY Co., LTD. 3F, Urbanlight B/D, 630, Eonju-ro, Gangnam-gu, Seoul, Korea 135-832 Factory at 621-14, Dochun-dong, Gwangsan-gu, Gwangju, Korea 506-301 TEL. : +82-70-7510-3400 FAX. : +82-70-8630-3420
COST EFFECTIVE FLAT PANEL DIGITAL RADIOGRAPHY UPGRADE SOLUTIONS
 COST EFFECTIVE FLAT PANEL DIGITAL RADIOGRAPHY UPGRADE SOLUTIONS DRive is a digital imaging DR hardware & Software solution designed for General Radiography of anatomy. It intended to replace film/screen
Copyright 2014 SOTA Imaging. All rights reserved. The CLIOSOFT software includes the following parts copyrighted by other parties:
 2.0 User Manual Copyright 2014 SOTA Imaging. All rights reserved. This manual and the software described herein are protected by copyright laws and international copyright treaties, as well as other intellectual
IDEXX-PACS * 4.0. Imaging Software. Quick Reference Guide
 4 IDEXX-PACS * 4.0 Imaging Software Quick Reference Guide Capturing Images Before you begin: Adjust the collimation properly. Make sure the body part you are imaging matches the exam type you have selected.
ISCapture User Guide. advanced CCD imaging. Opticstar
 advanced CCD imaging Opticstar I We always check the accuracy of the information in our promotional material. However, due to the continuous process of product development and improvement it is possible
SmartRAD. Advanced Digital Radiography System
 SmartRAD Advanced Digital Radiography System SmartRAD Expanding The Horizons Of Digital Radiography CMT introduces the SmartRAD Digital Radiography system, featuring an integrated flat panel digital detector
CHAPTER1: QUICK START...3 CAMERA INSTALLATION... 3 SOFTWARE AND DRIVER INSTALLATION... 3 START TCAPTURE...4 TCAPTURE PARAMETER SETTINGS... 5 CHAPTER2:
 Image acquisition, managing and processing software TCapture Instruction Manual Key to the Instruction Manual TC is shortened name used for TCapture. Help Refer to [Help] >> [About TCapture] menu for software
IMPAX 6 DISPLAY TOOL LIST
 IMPAX 6 DISPLAY TOOL LIST IMPAX 6.0 TOOLS INDEX A Advance by Image Allows you to scroll from one image or frame to the next Advance by Page Pages through images in a large series, one screen at a time
Get more from your images with Symphony Image Processing
 DIRECT RADIOGRAPHY The user-friendly DelWorks image acquisition and processing software provides a wide range of tools for a variety of image enhancements. Its user interface simplifies every step of the
4.0 How to Turn On the Selenia Dimensions
 Chapter 2 System Controls and Indicators How to Turn On the Selenia Dimensions 4.0 How to Turn On the Selenia Dimensions 4.1 Preparation 1. Reset all three Emergency Off switches. Emergency Off Switches
Get more from your images with Symphony Image Processing
 DIRECT RADIOGRAPHY The user-friendly DelWorks image acquisition and processing software possesses a wide range of tools for a variety of image manipulations. Its user interface simplifies every step of
DigiMam Conformance Statement for DICOM V3.0
 DigiMam Conformance Statement for DICOM V3.0 Copyright 2004 by I.M.S. s.r.l. DOCUMENT VERSIONS Version Date Author Changes 1.00 15-Feb-05 IMS s.r.l. First Version DOCUMENT VERSIONS Page 2 of 29 TABLE OF
PLD5600A High Frequency Digital Gastrointestinal &DR System(630mA)
") PLD5600A High Frequency Digital Gastrointestinal &DR System(630mA) Application: Full support perspective, gastrointestinal spot film, GI (barium meal, barium enema), orthopedic photography, pediatrics
PLD5600A High Frequency Digital Gastrointestinal &DR System(630mA) Application: Full support perspective, gastrointestinal spot film, GI (barium meal, barium enema), orthopedic photography, pediatrics
OPERATION MANUAL MIMAKI ENGINEERING CO., LTD.
 OPERATION MANUAL MIMAKI ENGINEERING CO., LTD. http://www.mimaki.co.jp/ E-mail:traiding@mimaki.co.jp D200674 About FineCut for CorelDRAW Thank you very much for purchasing a product of Mimaki. FineCut,
User Guide of ISCapture
 User Guide of ISCapture For Windows2000/XP/Vista(32bit/64bit)/Win7(32bit/64bit) Xintu Photonics Co., Ltd. Version: 2.6 I All the users of Xintu please kindly note that the information and references in
Optika ISview. Image acquisition and processing software. Instruction Manual
 Optika ISview Image acquisition and processing software Instruction Manual Key to the Instruction Manual IS is shortened name used for OptikaISview Square brackets are used to indicate items such as menu
Progeny Imaging. User Guide V x and Higher. Part Number: ECN: P1808 REV. F
 Progeny Imaging User Guide V. 1.6.0.x and Higher Part Number: 00-02-1598 ECN: P1808 REV. F Contents 1 About This Manual... 5 How to Use this Guide... 5 Text Conventions... 5 Getting Assistance... 6 2 Overview...
Operation Manual. Canon CXDI-1 System Digital Radiography
 Canon CXDI-1 System Digital Radiography Operation Manual Before using the instrument, be sure to read this manual thoroughly. Also, read the manuals of other instruments in this system. Keep the manual
See what you need to see, and see it anywhere.
 See what you need to see, and see it anywhere. Fujifilm Computed Radiography (FCR) that makes the best use of Fujifilm s unique image processing technology has become even more convenient. In addition
TECHNICAL DATA. GIOTTO IMAGE SDL/W is pre-arranged for Full Field Digital Biopsy examination with the patient in prone position.
 Ver. 01/06/07 TECHNICAL DATA GIOTTO IMAGE SDL/W LOW DOSE, FULL FIELD DIGITAL MAMMOGRAPHY UNIT USING AMORPHOUS SELENIUM (a-se) TECHNOLOGY DETECTOR (pre-arranged for stereotactic biopsy with the same digital
Installation & User Manual Micro-Image Capture 7
 Installation & User Manual Micro-Image Capture 7 Ver1.2016 Product Warranty Quality Assurance Every Micro-Image Capture system passes quality assurance tests including focus, resolution quality and mechanical
China Resources Wandong Medical Equipment Co., Ltd. High Frequency 50kW Digital RF System - HF51-5
 China Resources Wandong Medical Equipment Co., Ltd. High Frequency 50kW Digital RF System - HF51-5 #3, No.9, Jiuxianqiaodong Road, Chaoyang District, Beijing 100015, P.R. China E-mail: international@wandong.com.cn
Contents STARTUP MICROSCOPE CONTROLS CAMERA CONTROLS SOFTWARE CONTROLS EXPOSURE AND CONTRAST MONOCHROME IMAGE HANDLING
 Operations Guide Contents STARTUP MICROSCOPE CONTROLS CAMERA CONTROLS SOFTWARE CONTROLS EXPOSURE AND CONTRAST MONOCHROME IMAGE HANDLING Nikon Eclipse 90i Operations Guide STARTUP Startup Powering Up Fluorescence
Table of Contents. Sound-Eklin rev052511
 User Manual Table of Contents Important Safety Information...1 Chapter 1: Opening TruDR...3 Chapter 2: Patient Information...4 Searching and Adding Patients...4 Editing an Existing Patient s Information...6
Digital Radiography X-Ray System. X Twin with X Mobil Roesys GmbH [rshsmi] 1/11
![Digital Radiography X-Ray System. X Twin with X Mobil Roesys GmbH [rshsmi] 1/11](/thumbs/95/124313736.jpg "Digital Radiography X-Ray System. X Twin with X Mobil Roesys GmbH [rshsmi] 1/11") Digital Radiography X-Ray System 2017 Roesys GmbH [rshsmi] 1/11 1 General specifications The system is intended to be installed with floor mounted components only. It enables spacesaving installation without
Digital Radiography X-Ray System 2017 Roesys GmbH [rshsmi] 1/11 1 General specifications The system is intended to be installed with floor mounted components only. It enables spacesaving installation without
Progeny Imaging Veterinary
 Progeny Imaging Veterinary User Guide V1.14 and higher 00-02-1605 Rev. K1 ECN: ECO052875 Revision Date: 5/17/2017 Contents 1. About This Manual... 6 How to Use this Guide... 6 Text Conventions... 6 Getting
Revosoft Operators Manual
 1 Revosoft Operators Manual Contents LAUNCHING REVOSOFT:... 2 Entering a New Patient:... 2 IMAGE VIEWER:... 6 Mouse Functions:... 6 Panning the image:... 6 Magnification:... 6 Annotations:... 7 Text and
This document contains work instructions related to utilizing the dental imaging application, XrayVision DCV, version and above.
 Apteryx Inc. 313 S. High St. Suite 200 Akron, OH 44308 330-376-0889 voice 330-376-0788 fax sales@apteryx.com www.apteryx.com XrayVision DICOM Capture View User Manual Abstract Abstract Abstract This document
DELWORKS DR MEDICAL. take the next step
 DELWORKS DR MEDICAL take the next step DELWORKS MEDICAL DR If you are thinking of taking the next step to digital radiography, consider a DelWorks Medical DR Retrofit Package, the easy and affordable way
The ideal K-12 science microscope solution. User Guide. for use with the Nova5000
 The ideal K-12 science microscope solution User Guide for use with the Nova5000 NovaScope User Guide Information in this document is subject to change without notice. 2009 Fourier Systems Ltd. All rights
KODAK Dental Imaging Software. Quick Start Guide
 KODAK Dental Imaging Software Quick Start Guide Notice Congratulations on your purchase of The KODAK Dental Imaging Software. Thank you for your confidence in our products and we will do all in our power
GXCapture 8.1 Instruction Manual
 GT Vision image acquisition, managing and processing software GXCapture 8.1 Instruction Manual Contents of the Instruction Manual GXC is the shortened name used for GXCapture Square brackets are used to
DICOM3.0 Conformance Statement
 DICOM3.0 Conformance Statement INTRODUCTION 1 IMPLEMENTATION MODEL 2 AE Specifications 3 DIRECT DIGITIZER Communication Profiles 4 Extensions/Specializations/Privatizations 5 Configuration 6 0197 Support
CT-XGEO GC FTW EN
 Samsung Electronics Co., Ltd. is a global leader in technology, opening new possibilities for people everywhere. Through relentless innovation and discovery, we are transforming the worlds of televisions,
This document contains work instructions related to utilizing the dental imaging application, XrayVision DCV, version and above.
 Apteryx Inc. 313 S. High St. Suite 200 Akron, OH 44308 330-376-0889 voice 330-376-0788 fax sales@apteryx.com www.apteryx.com XRAYVISION DCV User Guide Abstract Abstract This document contains work instructions
Motic Live Imaging Module. Windows OS User Manual
 Motic Live Imaging Module Windows OS User Manual Motic Live Imaging Module Windows OS User Manual CONTENTS (Linked) Introduction 05 Menus, bars and tools 06 Title bar 06 Menu bar 06 Status bar 07 FPS 07
Copyright Notice. Trademarks
 Copyright Notice All rights reserved. No part of this publication may be reproduced, stored in a retrieval system, or transmitted in any form or by any means, electronic, mechanical, photocopying, recording,
Planmeca Romexis. quick guide. Viewer EN _2
 Planmeca Romexis Viewer quick guide EN 10029550_2 TABLE OF CONTENTS 1 START-UP OF PLANMECA ROMEXIS VIEWER...1 1.1 Selecting the interface language... 1 1.2 Selecting images...1 1.3 Starting the Planmeca
NAOMI SYSTEM User Guide
 NAOMI SYSTEM User Guide WM_0810-04 FDA 510(k) Number K062376 This document includes the important information to ensure the safe usage of the item. Before using the system, read through this User Guide
ScanGear CS-U 5.6. for CanoScan FB1210U Color Scanner. User s Guide
 ScanGear CS-U 5.6 for CanoScan FB1210U Color Scanner User s Guide Copyright Notice Copyright 2000 Canon Inc. This manual is copyrighted with all rights reserved. Under the copyright laws, this manual may
Solutions Page Content ImagePilot. Primary keywords: Digital radiography Computed radiography Image viewing and storage
 Solutions Page Content Primary keywords: Digital radiography Computed radiography Image viewing and storage Solution Description For facilities with medium volume imaging, Konica Minolta s original all-in-one
imedviewer Operation Manual V1.4 Shimadzu Software Development Canada inc.
 imedviewer Operation Manual V1.4 Shimadzu Software Development Canada inc. 30 March, 2012 IMedViewer Operation Manual P a g e 2 Table of Contents 1 IMPORTANT USER INTERFACE CHANGE FROM PREVIOUS VERSION...
Touch Screen Technology. Classic WAIV. with Touch Screen Technology. Legendary Reputation...Sensitivity to your budget
 Touch Screen Technology Classic WAIV with Touch Screen Technology Legendary Reputation...Sensitivity to your budget Streamline Workflow For Higher Productivity And Patient Throughput. The CRescendo Classic
ThermaViz. Operating Manual. The Innovative Two-Wavelength Imaging Pyrometer
 ThermaViz The Innovative Two-Wavelength Imaging Pyrometer Operating Manual The integration of advanced optical diagnostics and intelligent materials processing for temperature measurement and process control.
USER MANUAL. ScanFlex AUTOMATED SCANNING DEVICE SCANFLEX Rev 5.0
 USER MANUAL ScanFlex AUTOMATED SCANNING DEVICE 05-12-17 SCANFLEX 3.1.4 Rev 5.0 Culturing Cells in a Mechanically Active Environment Flexcell International Corporation 2730 Tucker Street, Suite 200 Burlington,
REGIUS CONSOLE CS-3. DICOM 3.0 Conformance Statement CODE NO Manufacturer: 1 Sakura-machi, Hino-shi Tokyo , Japan
 REGIS CONSOLE CS-3 DICOM 3.0 Conformance Statement CODE NO. 0862 Manufacturer: 1 Sakura-machi, Hino-shi Tokyo 191-8511, Japan Revision History Date Version Description 1 Contents 1 INTRODCTION... 4 1.1
C506-E064. Full digital system. Printed in Japan A-NS
 C506-E064 Full digital system Printed in Japan 6295-08807-30A-NS Full digital system Highest Image Quality in Its Class Comprehensive Full-Digital System FLEXAVISION is a full-digital R/F system equipped
CR30-ORACLE CR. with Office Viewer. A Revelation in Computed Radiography. Innovations in Digital Imaging. Solution for Quantum Medical Imaging
 CR30-ORACLE CR with Office Viewer A Revelation in Computed Radiography Innovations in Digital Imaging Solution for Quantum Medical Imaging CR30-ORACLE CR with Office Viewer The CR30-ORACLE CR System Package
1 ImageBrowser Software User Guide 5.1
 1 ImageBrowser Software User Guide 5.1 Table of Contents (1/2) Chapter 1 What is ImageBrowser? Chapter 2 What Can ImageBrowser Do?... 5 Guide to the ImageBrowser Windows... 6 Downloading and Printing Images
Guidance on Using Scanning Software: Part 5. Epson Scan
 Guidance on Using Scanning Software: Part 5. Epson Scan Version of 4/29/2012 Epson Scan comes with Epson scanners and has simple manual adjustments, but requires vigilance to control the default settings
MC3 Motion Control System Shutter Stream Quickstart
 MC3 Motion Control System Shutter Stream Quickstart Revised 7/6/2016 Carousel USA 6370 N. Irwindale Rd. Irwindale, CA 91702 www.carousel-usa.com Proprietary Information Carousel USA has proprietary rights
Diagnostic Ultrasound System. Operation Note
 M5 Diagnostic Ultrasound System Table of Contents System Introduction...3 Control Panel...4 Control Panel...5 Control Panel...6 Control Panel...7 Control Panel...8 Control Panel...9 Power ON / OFF the
ImagesPlus Basic Interface Operation
 ImagesPlus Basic Interface Operation The basic interface operation menu options are located on the File, View, Open Images, Open Operators, and Help main menus. File Menu New The New command creates a
Visioneer OneTouch Scanner. Installation Guide FOR WINDOWS
 Visioneer OneTouch Scanner Installation Guide FOR WINDOWS TABLE OF CONTENTS i TABLE OF CONTENTS Getting Started with your new Scanner....................... 1 Step 1: Installing the Scanner Software.......................
DOCUMENT SCANNER INSTRUCTIONS. Space. Backup. Count Only. New File. Scanner. Feeding Option Manual Auto Semi-Auto
 E FILM F Scanner A Space Count Only New File Feeding Option Manual Auto Semi-Auto Backup DOCUMENT SCANNER INSTRUCTIONS NOTICE q Copyright 2001 by CANON ELECTRONICS INC. All rights reserved. No part of
SKF TKTI. Thermal Camera Software. Instructions for use
 SKF TKTI Thermal Camera Software Instructions for use Table of contents 1. Introduction...4 1.1 Installing and starting the Software... 5 2. Usage Notes...6 3. Image Properties...7 3.1 Loading images
SAMSUNG SMART DIGITAL RADIOGRAPHY. XGEO GU60A series REDEFINING ERGONOMICS
 SAMSUNG SMART DIGITAL RADIOGRAPHY XGEO GU60A series REDEFINING ERGONOMICS U-arm Positioner (Fully Automated) The XGEO GU60A/60A-65 is a universal, fully motorized system. Its unique U-arm rotates +120
Tour 1008 User Manual
 Tour 1008 User Manual YOUR IMAGE IS OUR BUSINESS. Important Safety Information Warning There are no user serviceable parts inside. Refer all servicing to qualified service personnel. Caution To reduce
BacklightFly Manual.
 BacklightFly Manual http://www.febees.com/ Contents Start... 3 Installation... 3 Registration... 7 BacklightFly 1-2-3... 9 Overview... 10 Layers... 14 Layer Container... 14 Layer... 16 Density and Design
User Manual Human. Acquisition and diagnostic software. Doc No.: TM-721-EN Rev Nov 2014 Part No.: CR-FPM EN
 Human Acquisition and diagnostic software Doc No.: Rev 1.2.1 Nov 2014 Part No.: CR-FPM-04-021-EN 3DISC, FireCR, Quantor and the 3D Cube are trademarks of 3D Imaging & Simulations Corp, South Korea, and
Quick Reference Guide
 siemens.com/nx3 Quick Reference Guide ACUSON NX3 Series Contents 2 System Overview 3 Getting Started 8 2D Mode and M-mode 12 Color and Spectral Doppler 24 Measurements and Calculations 38 Text, Arrows
Grubstr- 6-8 D Vörstetten Tel.: +49(0) Fax: +49(0) Steinhart Medizinsysteme GmbH
 Fax: +49(0) Steinhart Medizinsysteme GmbH") Hipax Diagnostic Workstation Table of Contents 1. PRODUCT DESCRIPTION... 2 2. HIPAX DW MODULES... 2 2.1 DW BASE MODULE... 2 2.1.1 DW BASE MODULE STANDARD (05-010)... 2 2.1.2 DW BASE MODULE LIGHT (05-020)...
Hipax Diagnostic Workstation Table of Contents 1. PRODUCT DESCRIPTION... 2 2. HIPAX DW MODULES... 2 2.1 DW BASE MODULE... 2 2.1.1 DW BASE MODULE STANDARD (05-010)... 2 2.1.2 DW BASE MODULE LIGHT (05-020)...
Windows INSTRUCTION MANUAL
 Windows E INSTRUCTION MANUAL Contents About This Manual... 3 Main Features and Structure... 4 Operation Flow... 5 System Requirements... 8 Supported Image Formats... 8 1 Installing the Software... 1-1
The Flash IIP Console is the heart of every FCR system. It s designed to maximize productivity in the busiest environments.
 Choose the FCR system that best fits your practice. The FCR XL-2. Perfect for higher-volume environments. It can process up to 94 images per hour yet it fits right into small exam rooms or offices where
Eleva Workspot 1.x - Training. Advanced User Functions. State: April 2007
 Eleva Workspot 1.x - Training Advanced User Functions State: April 2007 Purpose of this Presentation General Get an overview about all "" functions in Eleva Workspot 1.x These are available in the System
INSTRUCTION MANUAL MM-A209
 E INSTRUCTION MANUAL 9222-7300-11 MM-A209 2 BEFORE YOU BEGIN Before installing the DiMAGE Viewer software, read the data-transfer section in the camera manual. This section details how to connect the camera
Edge Blender Controller
 Edge Blender Controller Calibration Manual Version 2017 V1 Contents Contents INTRODUCTION 1 FEATURES 1 OS AND HARDWARE 1 INSTALLATION 2 INSTALLATION 2 UNINSTALLATION 4 INTERFACE 6 COMMUNICATION 7 CONFIG
Operating Procedures for MICROCT1 Nikon XTH 225 ST
 Operating Procedures for MICROCT1 Nikon XTH 225 ST Ensuring System is Ready (go through to ensure all windows and tasks below have been completed either by you or someone else prior to mounting and scanning
China Resources Wandong Medical Equipment Co., Ltd. New Oriental 1000M Digital Radiography System
 China Resources Wandong Medical Equipment Co., Ltd. New Oriental 1000M Digital Radiography System #3, No.9, Jiuxianqiaodong Road, Chaoyang District, Beijing 100015, P.R. China E-mail: international@wandong.com.cn
User Manual. Copyright 2010 Lumos. All rights reserved
 User Manual The contents of this document may not be copied nor duplicated in any form, in whole or in part, without prior written consent from Lumos. Lumos makes no warranties as to the accuracy of the
VARIOIMAGE MANUAL SCHAEF SYSTEMTECHNIK GMBH 01/2010
 VARIOIMAGE MANUAL SCHAEF SYSTEMTECHNIK GMBH 01/2010 Schaef System Engineering GmbH Falkenstraße 22 Germany - 91580 Petersaurach Tel.: +49-98 72 / 20 02 Fax: +49-98 72 / 28 23 22.01.2010 Copyright 2004
Microscopy from Carl Zeiss
 Microscopy from Carl Zeiss Contents Page Contents... 1 Introduction... 1 Starting the System... 2 Introduction to ZEN Efficient Navigation... 5 Setting up the microscope... 10 Configuring the beam path
Best choice in all DR. Jumong M. SG HealthCare Jumong M Digital radiography specifications
 Best choice in all DR Jumong M SG HealthCare Jumong M Digital radiography specifications Higher workflow efficiency Jumong M Designed for high efficiency with minimum investment Fully featured and designed
CONAXX 2. User manual. CONAXX 2 User manual. Ident. No.:
 CONAXX 2 Ident. No.: 5330-0-0002 PROTEC GmbH & Co. KG In den Dorfwiesen 14, D-71720 Oberstenfeld, Germany Telephone: +49 (0) 7062/92 55-0, E-mail: protec@protec-med.com Version 2.0.13 Issued: December
User Tool Operation Manual
 DIRECT DIGITIZER User Tool Operation Manual Version 1.21 0197 EN 08 Contents Introduction................. 7 Introduction.............................. 8 Disclaimer.............................. 8 Trademark..............................
FCR XL-2 and FCR XC-2. High-quality digital x-ray that's perfect for your private practice.
 F U J I F I L M D I G I T A L X - R A Y FCR XL-2 and FCR XC-2. High-quality digital x-ray that's perfect for your private practice. So small, yet so powerful. With a compact footprint of less than 2.5
ddraura Series Productivity meets versatility
 ddraura Series Productivity meets versatility ddraura OTC APS Easy operation The ddraura OTC with APS s touch screen console brings the control desk to the patient s side. It allows the technologist to
ENGINEERING CO., LTD.
 Software RIP RasterLinkPro5 IP Reference Guide For UJF Series For JF Series For JFX Series This guide explains about features of RasterLinkPro5 IP for the UV Inkjet printer UJF Series, JF Series and JFX
Fire CR Calibration Guide
 1 Fire CR Calibration Guide This reference guide will guide you through the steps to complete the calibration for the Fire CR.. Getting Started: 1. Click on the Opal Icon on the Desktop. Figure 1 2. Once
KM-4800w. Copy/Scan Operation Manual
 KM-4800w Copy/Scan Operation Manual NOTE: This Operation Manual contains information that corresponds to using both the metric and inch versions of these machines. The metric versions of these machines
DIGITAL-MICROSCOPY CAMERA SOLUTIONS USB 3.0
 DIGITAL-MICROSCOPY CAMERA SOLUTIONS USB 3.0 PixeLINK for Microscopy Applications PixeLINK will work with you to choose and integrate the optimal USB 3.0 camera for your microscopy project. Ideal for use
inphoto ID Canon camera control software Automatic ID photography User Guide
 inphoto ID Canon camera control software Automatic ID photography User Guide 2008 Akond company 197342, Russia, St.-Petersburg, Serdobolskaya, 65A Phone/fax: +7(812)600-6918 Cell: +7(921)757-8319 e-mail:
inphoto ID Canon and Olympus camera control software Automatic ID photography User Guide
 inphoto ID Canon and Olympus camera control software Automatic ID photography User Guide 2006 Akond company 197342, Russia, St.-Petersburg, Serdobolskaya, 65a Phone/fax: +7(812)600-6918 Cell: +7(921)757-8319
Picture Style Editor Ver Instruction Manual
 ENGLISH Picture Style File Creating Software Picture Style Editor Ver. 1.18 Instruction Manual Content of this Instruction Manual PSE stands for Picture Style Editor. In this manual, the windows used in
Version 4.2 For WINDOWS
 SIGMA Photo Pro User Guide Companion Processing Software for SIGMA Digital Cameras Version 4.2 For WINDOWS I M P O R T A N T : Please Read Before You Start Thank you very much for purchasing this SIGMA
Examion. New. Image Acquisition and Diagnostics. R a d i o D i g i t a l e. examion aqs veterinray software.
 Examion New V191303 V191304 V1913041 V191305 examion aqs veterinray software Image Acquisition and Diagnostics Z.I. de Noville-les-Bois 1 rue de la Tour (Bât. 31) B-5380 Fernelmont (Belgium) Tél. : +32
Picture Style Editor Ver Instruction Manual
 ENGLISH Picture Style File Creating Software Picture Style Editor Ver. 1.15 Instruction Manual Content of this Instruction Manual PSE stands for Picture Style Editor. indicates the selection procedure
DR Retrofit Kit Package Configuration Integrated PACS
 DR Retrofit Kit Package Configuration Integrated PACS Description: The DR Retrofit Kit - Configuration Integrated PACS makes the use of CR Cassettes/Imaging Plates or the use of analogue x-ray films, the
User Manual. 3 MegaPixel CMOS Color Camera for Light Microscopy SC30
 User Manual 3 MegaPixel CMOS Color Camera for Light Microscopy SC30 Any copyrights relating to this manual shall belong to Olympus Soft Imaging Solutions GmbH. We at Olymnpus Soft Imaging Solutions GmbH
User Guide for TWAIN / DirectX interface for GRYPHAX USB 3.0 cameras
 User Guide for TWAIN / DirectX interface for GRYPHAX USB 3.0 cameras The TWAIN & DirectX driver for PROGRES GRYPHAX USB 3.0 cameras enables user to operate with TWAIN and DirectX supported 3 rd party software
ScanGear CS-U 5.8. for CanoScan D660U Color Scanner. User s Guide
 ScanGear CS-U 5.8 for CanoScan D660U Color Scanner User s Guide Copyright Notice Copyright 2000 Canon Inc. This manual is copyrighted with all rights reserved. Under the copyright laws, this manual may
Kretztechnik AG. Voluson 730 Ultrasound System
 Kretztechnik Voluson 730 Ultrasound System DICOM Conformance Statement Rev 1.02 Voluson 730 DICOM Coformance Rev 1.02 2001-07-18 Kretztechnik AG Zipf/Austria KRETZTECHNIK AG TIEFENBACH 15 Telefon: +43
DR Retrofit Kit Package Configuration DICOM
 DR Retrofit Kit Package Configuration DICOM Description: The DR Retrofit Kit - Configuration DICOM makes the use of CR Cassettes/Imaging Plates or the use of analogue x-ray films, the use of film cassettes
Operating Manual. (Version 3.10)
") Operating Manual (Version 3.10) Thank you for purchasing this PENTAX Digital Camera. This is the manual for PENTAX PHOTO Browser 3 and PENTAX PHOTO Laboratory 3 software for your Windows PC or Macintosh
Operating Manual (Version 3.10) Thank you for purchasing this PENTAX Digital Camera. This is the manual for PENTAX PHOTO Browser 3 and PENTAX PHOTO Laboratory 3 software for your Windows PC or Macintosh
ScanGear CS-U 6.0. for CanoScan D646U Color Scanner. User s Guide
 ScanGear CS-U 6.0 for CanoScan D646U Color Scanner User s Guide Copyright Notice Copyright 2000 Canon Inc. This manual is copyrighted with all rights reserved. Under the copyright laws, this manual may
inphoto ID PS Automatic ID photography With Canon PowerShot camera User Guide
 inphoto ID PS Automatic ID photography With Canon PowerShot camera User Guide 2018 Akond company Phone/fax: +7(812)384-6430 Cell: +7(921)757-8319 e-mail: info@akond.net akondsales@gmail.com http://www.akond.net
2012 Monitored Rehab Systems E1201 Manual Kneelax. Installation and user manual
 2012 Monitored Rehab Systems E1201 Manual Kneelax Installation and user manual Table of contents CHAPTER 1 Installation Manual... 3 1.1 Install Kneelax USB driver... 3 1.2 Detect COM-port... 6 1.3 Software
Portable Digital X-ray
 Portable Digital X-ray Portable Digital X-ray Ideal choice for a complete range of radiographic procedure and eliminates the need for costly room modifications This is a complete outdoor X-ray system with