Planmeca Romexis. quick guide. Viewer EN _2
|
|
|
- Eustacia Poole
- 6 years ago
- Views:
Transcription


1 Planmeca Romexis Viewer quick guide EN _2
2
3 TABLE OF CONTENTS 1 START-UP OF PLANMECA ROMEXIS VIEWER Selecting the interface language Selecting images Starting the Planmeca Romexis Viewer Selecting other images via Viewer launcher when the Viewer is already running USING THE 2D IMAGE BROWSER Opening an image Filtering images according to the exposure date SETTING THE LAYOUT CLOSING ALL OPEN IMAGES PRINTING IMAGES USING THE VIEWING, MEASUREMENT AND ANNOTATION TOOLS Viewing tools Measuring and annotating images D MODULE Opening a 3D volume D Explorer Saving and printing 2D snapshots Adjusting levels Measuring length Measuring angle Adjusting contrast, brightness and sharpness D rendering D overlays PANORAMIC TAB Toggle zoom Define data range (area of interest) Drawing panoramic curve IMPLANT / CROSS SECTIONS TAB Adjusting cross sectional slices Adjusting axial / panoramic slices Drawing nerves Implant tools TMJ TAB Drawing PA line Quick Guide Planmeca Romexis Viewer TOC-1
4 TABLE OF CONTENTS The manufacturer, assembler, and importer are responsible for the safety, reliability and performance of the unit only if: - installation, calibration, modification and repairs are carried out by qualified authorized personnel - electrical installations are carried out according to the appropriate requirements such as IEC equipment is used according to the operating instructions. Planmeca pursues a policy of continual product development. Although every effort is made to produce up-to-date product documentation this publication should not be regarded as an infallible guide to current specifications. We reserve the right to make changes without prior notice. COPYRIGHT PLANMECA Publication number Revision 2 Released 03 April 2014 TOC - 2 Planmeca Romexis Quick Guide
. The Viewer Launcher can also be started by double-clicking the Romexis_Viewer.")

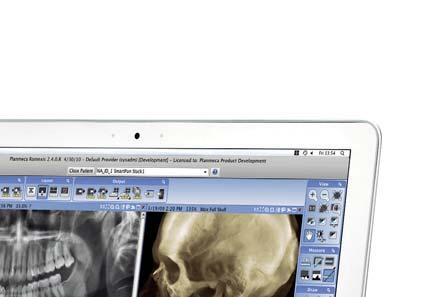
5 START-UP OF PLANMECA ROMEXIS VIEWER 1 START-UP OF PLANMECA ROMEXIS VIEWER With Windows operating system Insert the Planmeca Romexis Viewer CD into the CD drive. The Planmeca Romexis Viewer Launcher starts up automatically (if Windows autorun is enabled). The Viewer Launcher can also be started by double-clicking the Romexis_Viewer.exe file found from the root of the CD. With Mac operating system Insert the Planmeca Romexis Viewer CD into the CD drive and start the Viewer Launcher application by double-clicking the Romexis_Viewer.app file. 1.1 Selecting the interface language Select the interface language from the drop-down menu on the upper right corner of the screen Selecting images The images are listed according to the name of the patient, capture date and image type. Select the images by clicking them on the list. To select multiple images hold down the Ctrl button on your keyboard. Quick quide Planmeca Romexis Viewer 1

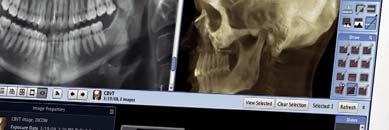
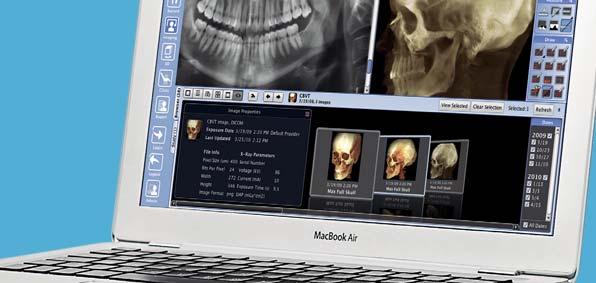
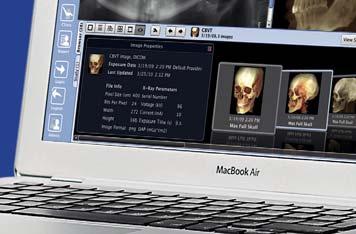
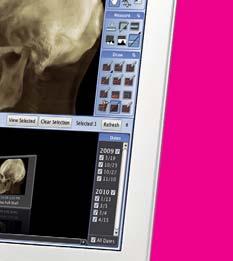
6 USING THE 2D IMAGE BROWSER 1.3 Starting the Planmeca Romexis Viewer To run the program from CD click Start Viewer. OR: To copy the program and images to the local hard disk and run the viewer from there select Install. 1.4 Selecting other images via Viewer launcher when the Viewer is already running 1. Close Planmeca Romexis Viewer from the File Menu by selecting Exit. OR: Click the red cross button on the top right corner of the Romexis Viewer window. The Viewer launcher appears on top of the screen. 2. Select the images you want to view from the list. 2 USING THE 2D IMAGE BROWSER The Image Browser shows all images of the patient grouped according to the image type (panoramic, CBCT, cephalometric, intraoral images and photos). 2.1 Opening an image Double-click the preview thumbnail of the image you want to view. OR: Click the thumbnails of the image(s) you want to view and click View Selected. 2 Planmeca Romexis Viewer Quick quide
7 USING THE 2D IMAGE BROWSER Browsing images in different browsing modes The following browsing modes are available: All image types Displays thumbnails of all image types. Image list Displays a list of all patient images. All Images Displays an overview of all patient images. Grid Displays images of the selected image type in grid format. In the grid browsing mode the maximum number of images are shown simultaneously. Film-strip Displays images from left to right in film-strip format. Carousel Displays images from left to right in a 3D carousel. 2.2 Filtering images according to the exposure date To filter /select images according to the exposure date tick the appropriate boxes in the Date field. To view all images tick the All Dates box. Quick quide Planmeca Romexis Viewer 3


8 SETTING THE LAYOUT 3 SETTING THE LAYOUT Click this button to set the layout for the displayed images. In the following window select the desired layout or create a customized one by selecting the desired number of columns and rows from the drop-down menus. 4 CLOSING ALL OPEN IMAGES To close all open images click this button. 5 PRINTING IMAGES To set the window scale for intraoral images, the margins and the page orientation click this button. In the opening window enter the appropriate values in the fields and click OK. To print currently open images click this button. The images will be printed as displayed in the layout. 4 Planmeca Romexis Viewer Quick quide
9 USING THE VIEWING, MEASUREMENT AND ANNOTATION TOOLS 6 USING THE VIEWING, MEASUREMENT AND ANNOTATION TOOLS 1. To select and activate the desired tool, click it with your mouse. 2. Click on the image in the area where you want to use the tool or for the marking to begin. 3. Keep the mouse button pressed down while moving the mouse until satisfied with the marking. 4. To deactivate the tool re-click the currently selected button or click another button. 6.1 Viewing tools Zoom in Use this button to zoom in the desired area in the image. Zoom out Use this button to zoom out in the desired area in the image. Zoom to fit Click on this button to fit open images to the window. Actual pixels Shows the image in its actual size. One image pixel equals one screen pixel. Uniform scaling Shows all images in equal size. Show overview Use this button to pan images on the screen. Flashlight Allows regional filter for gamma, contrast & brightness, invert, equalize, sharpen, and emboss. To adjust the size of the filter area or the radio buttons use the mouse wheel. To switch between different filters use the right mouse button. Flashlight setup Allows setting of gamma, contrast & brightness values. These settings are image specific. To adjust the size of the filter area or the radio buttons, use the mouse wheel. To switch between different filters use the right mouse button. Quick quide Planmeca Romexis Viewer 5
10 USING THE VIEWING, MEASUREMENT AND ANNOTATION TOOLS Magnify To take a closer look on a desired area of interest move the magnifier freely over the image. Pan (move) Move the image on the screen by clicking and dragging the selected image. Adjust contrast and brightness Click this button to open the sliders for contrast and brightness adjustment. Adjust values by moving the sliders up / down. Adjust region of interest Use this button to define the area of effect for image processing buttons and certain measurements. When defining multiple regions the active region is marked in green and the inactive regions in blue. To delete the selected region click the Delete key. 6.2 Measuring and annotating images Measure To draw a measurement line press the mouse button and hold it down while moving the mouse. To finish the line release the button. Draw arrow Click and hold down the mouse button while drawing. To finish the arrow release the mouse button. Draw rectangle Click and hold down the mouse button while drawing. To finish the rectangle release the mouse button. Draw ellipse Click on the image where you want to draw an ellipse. Hold down the mouse button while moving the mouse. To finish the ellipse release the mouse button. Draw text Click on the image where you want add a text annotation. Type the desired text in the field and click OK or press Enter on your keyboard. 6 Planmeca Romexis Viewer Quick quide
11 3D MODULE Hide annotations Click this button to hide all annotations added on the image. To re-show the annotations re-click it. Move annotations Use this button to click and drag the annotation to the desired area on the image. Delete annotations Use this button to select and delete annotations with your mouse. 7 3D MODULE 7.1 Opening a 3D volume To open a 3D volume click on the 3D module button and double-click the volume line D Explorer In the Explorer tab the 3D volume is displayed simultaneously in four different views: Sagittal (red), Coronal (green), Axial (blue) and 3D rendered view. The red, blue and green lines across the views indicate the slicing planes. To adjust the position of the volume hold down the left mouse button and move the mouse in the view. NOTE These adjustments affect all the other views except for the rendered view and are automatically adjusted correspondingly. To rotate the viewing angle hold down the right mouse button while moving the mouse. Quick quide Planmeca Romexis Viewer 7

12 3D MODULE Navigating 3D volume data in MPR slice views There are 2 modes for navigating 3D volumes described below. Enable this button for volume navigation and disable it for plane navigation. Volume navigation You can move and rotate volumes so that the orthogonal planes remain at right angles while moving/rotating the volume. This way the volume can be positioned so that the point of interest shows in other MPR views. To move the volume use the left mouse button. To rotate the volume use the right mouse button. Plane navigation With plane navigation the volume remains static while the orthogonal planes are moved and rotated inside the volume. This can be used for arbitrary oblique slicing without moving the actual anatomy. The orthogonal planes can be reoriented as follows: To move the intersection of planes click and drag on a MPR slice using the left mouse button. This way the intersection of the orthogonal planes can be positioned so that the point of interest shows in the other MPR views. To rotate around their intersection the 2 planes perpendicular to the current slice click and drag the planes on a MPR slice using the right mouse button. (In the example below the 2 planes are shown on the current slice.) 8 Planmeca Romexis Viewer Quick quide


13 3D MODULE This tool can be used for placing the planar intersection along the axis of a tooth and to rotate the planes in the Axial view while observing the tooth s anatomy in Coronal and Sagittal views. Axial Coronal Sagittal Reset orientation Resets orientation of orthognal planes to default without affecting other settings. 7.3 Saving and printing 2D snapshots 1. Click the Save 2D view button. 2. In the opening window select the appropriate options and click OK. The software will automatically generate a 2D snapshot image of the selected views and the snapshot image will open in the 2D module. 3. Next, click the Print images button. A print preview opens. 4. To print the images click the Print button at the bottom of the window. 7.4 Adjusting levels See section Adjusting levels on page Measuring length Use this button to measure length of an object in an image. 1. Click in the image where you want the measurement to begin. 2. Drag and release the mouse button where you want the measurement to end. Quick quide Planmeca Romexis Viewer 9

14 3D MODULE 7.6 Measuring angle 1. Click in the image where you want the angle to begin. 2. Drag and then release the mouse button where you want the angle to end. 7.7 Adjusting contrast, brightness and sharpness To adjust the contrast, brightness and sharpness of the coronal, sagittal and axial view use these sliders D rendering The 3D Rendering tools can be used to adjust the rendered volume. To move the rendered volume press the mouse wheel or hold down the left and right mouse buttons while dragging the image. To re-centre the rendering right-click on the new centre point Setting 3D rendering options To set rendering options click this button. The following options are available. Table 1:Rendering presets 1. MIP (Maximum Intensity Projection) 2. X-ray 3. X-ray shaded (default) 4. Shaded 5. Shiny 6. Surface 7. Black & White X-ray 8. Soft tissue To set the current rendering setting as a new custom pre-set click the Add button. The currently selected option will be shown in the thumbnail circled with white line. To delete the current custom pre-set click the Del button. To select a new default rendering, right-click on the desired mode and select Set as Default Preset. 10 Planmeca Romexis Viewer Quick quide


15 3D MODULE Setting 3D rendering contrast, brightness, cut-off threshold and transparency To adjust 3D rendering contrast, brightness, cut-off threshold and transparency move the 3D rendering sliders. Contrast Brightness Cut-off threshold Transparency Adjusting levels Click this button to adjust the levels. The opening histogram is a graphic representation of the intensity distribution in the volume. To adjust the gamma curve move the green line in the histogram. To adjust contrast and brightness move the red lines on both sides of the histogram. To scale the histogram up or down use these arrows. To restore the original scale click this button. Threshold The black line increases or decreases the threshold and consequently has the same function than the slider Set 3D Rendering Cutoff Threshold. Pseudo Colour modification The buttons left and right of the gamma value, named F and R, modify the pseudo colours. To alter and allocate the colour selection automatically for different tissues based on the curve of the histogram click the button. To modify the position and range of the specific colour manually, drag the rectangles above the histogram left or right. Quick quide Planmeca Romexis Viewer 11
16 3D MODULE To change the colours for an individual selection double-click the rectangle. To reset the pseudo colours settings click this button. From the arrow button readily available colour maps can be selected. Show/hide orientation lines Shows/hides orientation lines and measurements in rendered view only. Show/hide planes Sagittal plane (red) Coronal plane (green) Axial plane (blue) All planes The following options are also available: Show/hide volume boundaries: Show linear perspective in 3D Rendering Smoothing Applies a smoothing filter on the 3D rendering 12 Planmeca Romexis Viewer Quick quide


17 3D MODULE 7.9 3D overlays The 3D overlays menu can be used for adjusting the settings of objects superimposed to the CBCT volume. All ProFace and soft tissue objects of the patient are listed below the 3D Overlays drop-down menu. Each item has separate tools for adjusting the settings such as visibility in different views, transparency and colour. The menu can also be used to add or edit comment on the objects. If the patient has several overlay images you can scroll the list of overlays up and down using the mouse wheel to view all the overlays. To add and edit comments in the images click on the Add Comment field under the sliders and enter the comment. The comments added in the object browser will become visible in the Volumes tab list. Planmeca ProFace overlay All the ProFace overlays of the patient are by default shown in the overlay list. The ProFace overlays are listed based on their date and a thumbnail image of the ProFace image is shown. 2 - Toggles the visibility of ProFace profile lines in 2D Slice views 3 -Toggles the visibility of ProFace images in 3D rendered view Colour Sets colour for ProFace profile line in 2D Slice views Quick quide Planmeca Romexis Viewer 13

18 PANORAMIC TAB 8 PANORAMIC TAB In the 3D Panoramic tab panoramic images (also called curved reformatting) can be generated from the 3D volume data. The generated panoramic image can be adjusted and processed in multiple ways. The image range and thickness can be defined as well as the selection of the appropriate curve for the construction of the panoramic view. The displayed view can also be exported, see section 7.3 Saving and printing 2D snapshots on page 9. The images can also be printed. The Panoramic tab contains four views: Sagittal view, where the sagittal orientation of the 3D volume can be rotated. Axial view, where the axial orientation of the volume can be rotated and where the panoramic curve is defined and shown. Panoramic view, where one or more panoramic images, including 3D rendered panoramic views are shown. Moving the scroll bar on the right edge of a panoramic view adjusts the radius of the panoramic curve showing immediately in the axial view by the panoramic curve moving in or out in relation to the patient s anatomy. As the slider is released, the new layer is automatically updated to the panoramic view. 3D Rendered view NOTE To scroll through the image layers including panoramic, sagittal and axial using the mouse wheel deactivate the Zoom Mode, see section 8.1 Toggle zoom on page Planmeca Romexis Viewer Quick quide
.")
 To define the area of interest for a panoramic image click this button.")

19 PANORAMIC TAB 8.1 Toggle zoom When the Toggle Zoom button is activated the sliced views can be scaled up and down. Move the mouse pointer over the desired view and turn the mouse wheel into the appropriate direction (up to zoom in, down to zoom out). NOTE When Toggle Zoom is deactivated, scrolling the mouse wheel over a view will scroll through the image layers as do the Layer Scroll Bars on each view s right side. NOTE The rendered volume can be zoomed regardless Toggle Zoom activation. 8.2 Define data range (area of interest) To define the area of interest for a panoramic image click this button. Use the left slider to adjust the data range for the upper jaw and the right slider for the lower jaw Panoramic autofocus tool This tool automatically identifies anatomy in CBCT image and shapes the panoramic layer so that it follows anatomy in all three dimensions. This results in a clear overview of the whole denture. When used in combination with the Panoramic autofit tool, a detailed panoramic view can be easily generated. Without autofocus With autofocus NOTE When using panoramic autofocus tool the neighboring panoramic slices may seem identical. Quick quide Planmeca Romexis Viewer 15
 is placed on the dental arch. This tool works best with volumes where dental arch is present.")
20 PANORAMIC TAB Panoramic autofit tool Click on the Panoramic Autofit button. A panoramic curve (focal layer) is automatically placed on the volume. The occlusal level in the volume is automatically identified and the panoramic curve (focal layer) is placed on the dental arch. This tool works best with volumes where dental arch is present. The Panoramic Autofit tool also adjusts the maxillary and mandibular ranges of the panoramic view so that they resemble typical panoramic image dimensions. (For manual adjustment see section 8.2 Define data range (area of interest) on page 15). 8.3 Drawing panoramic curve To define a new curve, click this button. To draw the curve use the left mouse button. When finished click the right mouse button. The new panoramic view will be automatically calculated. To edit the curve, click this button. To move single points in the curve or the whole curve grab the green line of the curve with left mouse button. When finished re-click the button. To delete currently displayed panoramic curve click this button. The standard curves are not deleted. To display a list of all saved panoramic curves click this button. All draws curves are saved and named according to the date and time of creation. To recall and apply a curve click the desired entry in the list. 16 Planmeca Romexis Viewer Quick quide

21 IMPLANT / CROSS SECTIONS TAB 9 IMPLANT / CROSS SECTIONS TAB In the 3D Cross Sections / Implant tab cross sectional slices, axial slices and panoramic images can be created from the 3D data. The Cross Sections / Implant tab contains four views: Axial views Panoramic view Cross sectional slices view 3D rendered view Axial view Panoramic view Cross-sectional slices view 3D rendered view The views can be expanded by clicking the small dual arrows in the ends of the view dividers or maximized by clicking the Maximize button. Quick quide Planmeca Romexis Viewer 17

22 IMPLANT / CROSS SECTIONS TAB 9.1 Adjusting cross sectional slices To mirror the cross section click this button in the upper right corner of the cross sections view To edit the properties of the cross sections click this button in the upper right corner of the cross sections view. In the opening dialogue the distance between the slices, the width, the thickness and the number of slices can be defined. To adjust the values move the sliders up and down. Using the cross sectional scroll bar To move the cross sections move the scroll bar to the right or left. Moving the scroll bar shifts the visible slices along with the panoramic curve to the same direction. If the Cross section lines option is activated the visible slices will also shift to the axial and panoramic views. The middle section is indicated by a bright red line and ruler in the cross sections view. To move in cross sections voxel by voxel click on the arrows on both ends of the scroll bar. To move freely around cross sections drag the scroll cursor. To move in cross sections in increments of the distance between the slices, click between the scroll box and end arrows. 18 Planmeca Romexis Viewer Quick quide


23 IMPLANT / CROSS SECTIONS TAB 9.2 Adjusting axial / panoramic slices To adjust axial / panoramic slices click this button in the upper right corner of the axial view. In the opening window the distance between the slices, the thickness and the number of slices can be defined. 9.3 Drawing nerves 1. Click this button to draw a new nerve channel. 2. Select either panoramic or the cross sectional view 3. Use the left mouse button to place points for a curve depicting the nerve channel of the patient. 4. When finished click the right mouse button. The nerve channel will be displayed as a coloured line in the panoramic view and with coloured dots in the cross sectional views. To delete the currently selected nerve channel click this button. To adjust the properties of a nerve channel, select the nerve channel you want to modify and click this button. The nerve can also be opened from the Nerves list. In the opening window opens where you can name the nerve and modify its colour and diameter. Quick quide Planmeca Romexis Viewer 19
, select the nerve and click the Delete button. To change the properties of a nerve, select a nerve and click the Properties button.")
24 IMPLANT / CROSS SECTIONS TAB To display a list of all visible nerves click this button. In the opening window nerves can be deleted or their properties can be modified. To delete a nerve from the list (and the cross sectional tab), select the nerve and click the Delete button. To change the properties of a nerve, select a nerve and click the Properties button. The Nerve Properties window will appear. 9.4 Implant tools To place a pre-selected default implant into the plan click this button. The default implant can be defined in the Implant library. To draw an approximation of the implant s width and height, using the patient s anatomy as a reference for sizing click this button. Next, search the nearest matching real implant from the Implant library. To place an implant directly from the Implant Library click this button. Select the appropriate implant and press Add to add it into the plan. To delete the selected implant from the plan click this button. To display the properties of the selected implant click this button. To set the length, diameter, and colour for the selected implant enter the appropriate value on the corresponding field or select the desired colour by clicking the colour map next to the Color field. 20 Planmeca Romexis Viewer Quick quide


25 IMPLANT / CROSS SECTIONS TAB To adjust the rotation angle of the selected implant drag the Rotation Angle slider. To display a list of all implants in the current plan click this button. The name, colour, length, and diameter of the listed implants can be modified. Quick quide Planmeca Romexis Viewer 21
 line using this button. 3. Click and hold down the left mouse button in the middle of the condyle. 4. Draw the PA line by dragging with your mouse.")
26 TMJ TAB 10 TMJ TAB 10.1 Drawing PA line 1. Verify alignment of the volume using the Axial view. Use the slider on its right edge to bring condyles into view. 2. Draw right posterior anterior (PA) line using this button. 3. Click and hold down the left mouse button in the middle of the condyle. 4. Draw the PA line by dragging with your mouse. Romexis will automatically display the opposite half of the line and round its total length to nearest millimeter. 5. To finish the line, release the left button and Romexis will automatically populate the slice views. 6. To draw the left PA line click this button. 7. Repeat the steps as described above starting from step Use the View settings dialogue to adjust the number, width and spacing of the PA and lateral slices similar to other 3D modules. 9. To adjust the position of the PA lines verify that the Move / rotate volume button is disabled. 10.Use the left mouse button to move a PA line or the right mouse button to rotate. 11.To adjust the width of the slices (length of the PA line) either use the slice specific settings menu or redraw the line. 22 Planmeca Romexis Viewer Quick quide
27 TMJ TAB Draw right PA line Use to draw and define the posterior-anterior PA line for the right side slices. Draw left PA line Use to draw and define the posterior-anterior PA line for the left side slices. Synchronise sides To enable / disable synchronisation of the left PA line with the right PA line click this button. When synchronisation is enabled (default) the length of the second PA line will be automatically constrained to match the length of the first drawn line. When synchronisation is disabled each PA line can be individually defined. Quick quide Planmeca Romexis Viewer 23
28
29 Planmeca Oy Asentajankatu Helsinki Finland tel fax sales@planmeca.com
3D Viewer. user's manual _6
 EN 3D Viewer user's manual 10017352_6 TABLE OF CONTENTS 1 INTRODUCTION...1 1.1 System recommendations... 1 1.2 User requirements... 1 2 START-UP OF PLANMECA ROMEXIS VIEWER...2 2.1 Starting Planmeca Romexis
KODAK Dental Imaging Software. Quick Start Guide
 KODAK Dental Imaging Software Quick Start Guide Notice Congratulations on your purchase of The KODAK Dental Imaging Software. Thank you for your confidence in our products and we will do all in our power
IMPAX 6 DISPLAY TOOL LIST
 IMPAX 6 DISPLAY TOOL LIST IMPAX 6.0 TOOLS INDEX A Advance by Image Allows you to scroll from one image or frame to the next Advance by Page Pages through images in a large series, one screen at a time
Introduction to Autodesk Inventor for F1 in Schools (Australian Version)
") Introduction to Autodesk Inventor for F1 in Schools (Australian Version) F1 in Schools race car In this course you will be introduced to Autodesk Inventor, which is the centerpiece of Autodesk s Digital
Introduction to Autodesk Inventor for F1 in Schools (Australian Version) F1 in Schools race car In this course you will be introduced to Autodesk Inventor, which is the centerpiece of Autodesk s Digital
MEASUREMENT CAMERA USER GUIDE
 How to use your Aven camera s imaging and measurement tools Part 1 of this guide identifies software icons for on-screen functions, camera settings and measurement tools. Part 2 provides step-by-step operating
12. Creating a Product Mockup in Perspective
 12. Creating a Product Mockup in Perspective Lesson overview In this lesson, you ll learn how to do the following: Understand perspective drawing. Use grid presets. Adjust the perspective grid. Draw and
Copyright 2014 SOTA Imaging. All rights reserved. The CLIOSOFT software includes the following parts copyrighted by other parties:
 2.0 User Manual Copyright 2014 SOTA Imaging. All rights reserved. This manual and the software described herein are protected by copyright laws and international copyright treaties, as well as other intellectual
ImagesPlus Basic Interface Operation
 ImagesPlus Basic Interface Operation The basic interface operation menu options are located on the File, View, Open Images, Open Operators, and Help main menus. File Menu New The New command creates a
Photoshop CS2. Step by Step Instructions Using Layers. Adobe. About Layers:
 About Layers: Layers allow you to work on one element of an image without disturbing the others. Think of layers as sheets of acetate stacked one on top of the other. You can see through transparent areas
ADOBE PHOTOSHOP CS TUTORIAL
 ADOBE PHOTOSHOP CS TUTORIAL A D O B E P H O T O S H O P C S Adobe Photoshop CS is a popular image editing software that provides a work environment consistent with Adobe Illustrator, Adobe InDesign, Adobe
SolidWorks 95 User s Guide
 SolidWorks 95 User s Guide Disclaimer: The following User Guide was extracted from SolidWorks 95 Help files and was not originally distributed in this format. All content 1995, SolidWorks Corporation Contents
ISCapture User Guide. advanced CCD imaging. Opticstar
 advanced CCD imaging Opticstar I We always check the accuracy of the information in our promotional material. However, due to the continuous process of product development and improvement it is possible
Adobe Photoshop CS2 Workshop
 COMMUNITY TECHNICAL SUPPORT Adobe Photoshop CS2 Workshop Photoshop CS2 Help For more technical assistance, open Photoshop CS2 and press the F1 key, or go to Help > Photoshop Help. Selection Tools - The
Creo Revolve Tutorial
 Creo Revolve Tutorial Setup 1. Open Creo Parametric Note: Refer back to the Creo Extrude Tutorial for references and screen shots of the Creo layout 2. Set Working Directory a. From the Model Tree navigate
Exploring Photoshop Tutorial
 Exploring Photoshop Tutorial Objective: In this tutorial we will create a poster composed of three distinct elements: a Bokeh, an image and title text. The Bokeh is an effect which is sometimes seen in
Revit Structure 2012 Basics:
 SUPPLEMENTAL FILES ON CD Revit Structure 2012 Basics: Framing and Documentation Elise Moss autodesk authorized publisher SDC PUBLICATIONS www.sdcpublications.com Schroff Development Corporation Structural
House Design Tutorial
 House Design Tutorial This House Design Tutorial shows you how to get started on a design project. The tutorials that follow continue with the same plan. When you are finished, you will have created a
User Guide for TWAIN / DirectX interface for GRYPHAX USB 3.0 cameras
 User Guide for TWAIN / DirectX interface for GRYPHAX USB 3.0 cameras The TWAIN & DirectX driver for PROGRES GRYPHAX USB 3.0 cameras enables user to operate with TWAIN and DirectX supported 3 rd party software
Impress Guide. Chapter 4 Adding and Formatting Pictures
 Impress Guide Chapter 4 Adding and Formatting Pictures Copyright This document is Copyright 2005 2012 by its contributors as listed below. You may distribute it and/or modify it under the terms of either
Adobe Photoshop CC 2018 Tutorial
 Adobe Photoshop CC 2018 Tutorial GETTING STARTED Adobe Photoshop CC 2018 is a popular image editing software that provides a work environment consistent with Adobe Illustrator, Adobe InDesign, Adobe Photoshop,
House Design Tutorial
 House Design Tutorial This House Design Tutorial shows you how to get started on a design project. The tutorials that follow continue with the same plan. When you are finished, you will have created a
Introduction to QTO. Objectives of QTO. Getting Started. Requirements. Creating a Bill of Quantities. Updating an existing Bill of Quantities
 QTO User Manual Contents Introduction to QTO... 5 Objectives of QTO... 5 Getting Started... 5 QTO Manager... 6 QTO Layout... 7 Bill of Quantities... 8 Measure Folders... 9 Drawings... 10 Zooming and Scrolling...
Drawing with precision
 Drawing with precision Welcome to Corel DESIGNER, a comprehensive vector-based drawing application for creating technical graphics. Precision is essential in creating technical graphics. This tutorial
Welcome to Corel DESIGNER, a comprehensive vector-based package for technical graphic users and technical illustrators.
 Workspace tour Welcome to Corel DESIGNER, a comprehensive vector-based package for technical graphic users and technical illustrators. This tutorial will help you become familiar with the terminology and
Getting Started. with Easy Blue Print
 Getting Started with Easy Blue Print User Interface Overview Easy Blue Print is a simple drawing program that will allow you to create professional-looking 2D floor plan drawings. This guide covers the
Getting Started. Chapter. Objectives
 Chapter 1 Getting Started Autodesk Inventor has a context-sensitive user interface that provides you with the tools relevant to the tasks being performed. A comprehensive online help and tutorial system
Adobe Photoshop CS5 Tutorial
 Adobe Photoshop CS5 Tutorial GETTING STARTED Adobe Photoshop CS5 is a popular image editing software that provides a work environment consistent with Adobe Illustrator, Adobe InDesign, Adobe Photoshop
Getting Started. Right click on Lateral Workplane. Left Click on New Sketch
 Getting Started 1. Open up PTC Pro/Desktop by either double clicking the icon or through the Start button and in Programs. 2. Once Pro/Desktop is open select File > New > Design 3. Close the Pallet window
Part 1- Fundamental Functions
 Part 1- Fundamental Functions Note: Alt+Tab will allow you to move between programs in the docker. Shift+Tab removes right pallets Tab removes all pallets Ctrl+1= centers art board Ctrl + 0= fill window
Lesson 6 2D Sketch Panel Tools
 Lesson 6 2D Sketch Panel Tools Inventor s Sketch Tool Bar contains tools for creating the basic geometry to create features and parts. On the surface, the Geometry tools look fairly standard: line, circle,
Evaluation Chapter by CADArtifex
 The premium provider of learning products and solutions www.cadartifex.com EVALUATION CHAPTER 2 Drawing Sketches with SOLIDWORKS In this chapter: Invoking the Part Modeling Environment Invoking the Sketching
Motic Live Imaging Module. Windows OS User Manual
 Motic Live Imaging Module Windows OS User Manual Motic Live Imaging Module Windows OS User Manual CONTENTS (Linked) Introduction 05 Menus, bars and tools 06 Title bar 06 Menu bar 06 Status bar 07 FPS 07
Introduction to Photoshop
 Introduction to Photoshop Instructional Services at KU Libraries A Division of Information Services www.lib.ku.edu/instruction Abstract: This course covers the basics of Photoshop, including common tools
Impress Guide Chapter 4 Adding and Formatting Pictures
 Impress Guide Chapter 4 Adding and Formatting Pictures This PDF is designed to be read onscreen, two pages at a time. If you want to print a copy, your PDF viewer should have an option for printing two
Corel PHOTO-PAINT BERNINA Page 1 DL
 Corel PHOTO-PAINT 2018 BERNINA Page 1 Corel PHOTO-PAINT Corel PHOTO-PAINT is part of BERNINA Embroidery Software and gives users many tools for editing photos or bitmap artwork. Corel PHOTO- PAINT can
The Revolve Feature and Assembly Modeling
 The Revolve Feature and Assembly Modeling PTC Clock Page 52 PTC Contents Introduction... 54 The Revolve Feature... 55 Creating a revolved feature...57 Creating face details... 58 Using Text... 61 Assembling
ARCHICAD Introduction Tutorial
 Starting a New Project ARCHICAD Introduction Tutorial 1. Double-click the Archicad Icon from the desktop 2. Click on the Grey Warning/Information box when it appears on the screen. 3. Click on the Create
Revit Structure 2014 Basics
 Revit Structure 2014 Basics Framing and Documentation Elise Moss Authorized Author SDC P U B L I C AT I O N S Better Textbooks. Lower Prices. www.sdcpublications.com Powered by TCPDF (www.tcpdf.org) Visit
FlashChart. Symbols and Chart Settings. Main menu navigation. Data compression and time period of the chart. Chart types.
 FlashChart Symbols and Chart Settings With FlashChart you can display several symbols (for example indices, securities or currency pairs) in an interactive chart. You can also add indicators and draw on
Key Terms. Where is it Located Start > All Programs > Adobe Design Premium CS5> Adobe Photoshop CS5. Description
 Adobe Adobe Creative Suite (CS) is collection of video editing, graphic design, and web developing applications made by Adobe Systems. It includes Photoshop, InDesign, and Acrobat among other programs.
Table of Contents. Lesson 1 Getting Started
 NX Lesson 1 Getting Started Pre-reqs/Technical Skills Basic computer use Expectations Read lesson material Implement steps in software while reading through lesson material Complete quiz on Blackboard
Architecture 2012 Fundamentals
 Autodesk Revit Architecture 2012 Fundamentals Supplemental Files SDC PUBLICATIONS Schroff Development Corporation Better Textbooks. Lower Prices. www.sdcpublications.com Tutorial files on enclosed CD Visit
Geometry Controls and Report
 Geometry Controls and Report 2014 InnovMetric Software Inc. All rights reserved. Reproduction in part or in whole in any way without permission from InnovMetric Software is strictly prohibited except for
Modeling Basic Mechanical Components #1 Tie-Wrap Clip
 Modeling Basic Mechanical Components #1 Tie-Wrap Clip This tutorial is about modeling simple and basic mechanical components with 3D Mechanical CAD programs, specifically one called Alibre Xpress, a freely
Chapter 4 Adding and Formatting Pictures
 Impress Guide Chapter 4 Adding and Formatting Pictures OpenOffice.org Copyright This document is Copyright 2007 by its contributors as listed in the section titled Authors. You can distribute it and/or
Engineering Technology
 Engineering Technology Introduction to Parametric Modelling Engineering Technology 1 See Saw Exercise Part 1 Base Commands used New Part This lesson includes Sketching, Extruded Boss/Base, Hole Wizard,
Progeny Imaging Veterinary
 Progeny Imaging Veterinary User Guide V1.14 and higher 00-02-1605 Rev. K1 ECN: ECO052875 Revision Date: 5/17/2017 Contents 1. About This Manual... 6 How to Use this Guide... 6 Text Conventions... 6 Getting
Professional Desktop Scanner User s Manual. (PC version) English
 English") Professional Desktop Scanner User s Manual (PC version) English MiraScan main screen Combo Boxes (page 13) Menu Bar (page 9) Tool Bar (page 24) Job List and Command Buttons (page 22) Preview Area (page
Professional Desktop Scanner User s Manual (PC version) English MiraScan main screen Combo Boxes (page 13) Menu Bar (page 9) Tool Bar (page 24) Job List and Command Buttons (page 22) Preview Area (page
User Manual for HoloStudio M4 2.5 with HoloMonitor M4. Phase Holographic Imaging
 User Manual for HoloStudio M4 2.5 with HoloMonitor M4 Phase Holographic Imaging 1 2 HoloStudio M4 2.5 Software instruction manual 2013 Phase Holographic Imaging AB 3 Contact us: Phase Holographic Imaging
Guidance on Using Scanning Software: Part 5. Epson Scan
 Guidance on Using Scanning Software: Part 5. Epson Scan Version of 4/29/2012 Epson Scan comes with Epson scanners and has simple manual adjustments, but requires vigilance to control the default settings
Silhouette Connect Layout... 4 The Preview Window... 5 Undo/Redo... 5 Navigational Zoom Tools... 5 Cut Options... 6
 user s manual Table of Contents Introduction... 3 Sending Designs to Silhouette Connect... 3 Sending a Design to Silhouette Connect from Adobe Illustrator... 3 Sending a Design to Silhouette Connect from
User Manual Veterinary
 Veterinary Acquisition and diagnostic software Doc No.: Rev 1.0.1 Aug 2013 Part No.: CR-FPM-04-022-EN-S 3DISC, FireCR, Quantor and the 3D Cube are trademarks of 3D Imaging & Simulations Corp, South Korea,
Revit Structure 2013 Basics
 Revit Structure 2013 Basics Framing and Documentation Elise Moss Supplemental Files SDC P U B L I C AT I O N S Schroff Development Corporation Better Textbooks. Lower Prices. www.sdcpublications.com Tutorial
Mimics inprint 3.0. Release notes Beta
 Mimics inprint 3.0 Release notes Beta Release notes 11/2017 L-10740 Revision 3 For Mimics inprint 3.0 2 Regulatory Information Mimics inprint (hereafter Mimics ) is intended for use as a software interface
M a c i n t o s h. Canon Plug-in Module CS-U 3.9 for CanoScan D660U Color Image Scanner. User's Guide
 f o r M a c i n t o s h Canon Plug-in Module CS-U 3.9 for CanoScan D660U Color Image Scanner User's Guide How to Make Best Use of the Manuals When you open the box Printed Manual CanoScan D660U Getting
Managing images with NewZapp
 Managing images with NewZapp This guide is for anyone using the NewZapp Fixed editor as opposed to the Drag and Drop editor. The Image Manager is where images are uploaded and stored in your NewZapp account
TeleTrader FlashChart
 TeleTrader FlashChart Symbols and Chart Settings With TeleTrader FlashChart you can display several symbols (for example indices, securities or currency pairs) in an interactive chart. You can also add
User Manual. cellsens 1.16 LIFE SCIENCE IMAGING SOFTWARE
 User Manual cellsens 1.16 LIFE SCIENCE IMAGING SOFTWARE Any copyrights relating to this manual shall belong to OLYMPUS CORPORATION. We at OLYMPUS CORPORATION have tried to make the information contained
CONTENT INTRODUCTION BASIC CONCEPTS Creating an element of a black-and white line drawing DRAWING STROKES...
 USER MANUAL CONTENT INTRODUCTION... 3 1 BASIC CONCEPTS... 3 2 QUICK START... 7 2.1 Creating an element of a black-and white line drawing... 7 3 DRAWING STROKES... 15 3.1 Creating a group of strokes...
Learning Guide. ASR Automated Systems Research Inc. # Douglas Crescent, Langley, BC. V3A 4B6. Fax:
 Learning Guide ASR Automated Systems Research Inc. #1 20461 Douglas Crescent, Langley, BC. V3A 4B6 Toll free: 1-800-818-2051 e-mail: support@asrsoft.com Fax: 604-539-1334 www.asrsoft.com Copyright 1991-2013
Digital Portable Overhead Document Camera LV-1010
 Digital Portable Overhead Document Camera LV-1010 Instruction Manual 1 Content I Product Introduction 1.1 Product appearance..3 1.2 Main functions and features of the product.3 1.3 Production specifications.4
Progeny Imaging. User Guide V x and Higher. Part Number: ECN: P1808 REV. F
 Progeny Imaging User Guide V. 1.6.0.x and Higher Part Number: 00-02-1598 ECN: P1808 REV. F Contents 1 About This Manual... 5 How to Use this Guide... 5 Text Conventions... 5 Getting Assistance... 6 2 Overview...
On completion of this exercise you will have:
 Prerequisite Knowledge To complete this exercise you will need; to be familiar with the SolidWorks interface and the key commands. basic file management skills the ability to rotate views and select faces
Q3D. Speak to a 3D Specialist. CBCT 3D / Panoramic Imaging GENERAL DIMENSIONS. Suni Imaging Product Lines GET.
 GENERAL Q3D Q3D Ceph Exposure Time FOV Voxel Size Focal Spot Target Angle Tube Voltage Tube Current Line Voltage Warranty Panoramic CT 9 to 17 sec 9 to 17 sec 4 to 12 sec 7.7/14.5 sec 7.7/14.5 sec 4 x
Tutorial 2: Setting up the Drawing Environment
 Drawing size With AutoCAD all drawings are done to FULL SCALE. The drawing limits will depend on the size of the items being drawn. For example if our drawing is the plan of a floor 23.8m X 15m then we
Chapter 2. Drawing Sketches for Solid Models. Learning Objectives
 Chapter 2 Drawing Sketches for Solid Models Learning Objectives After completing this chapter, you will be able to: Start a new template file to draw sketches. Set up the sketching environment. Use various
Organizing artwork on layers
 3 Layer Basics Both Adobe Photoshop and Adobe ImageReady let you isolate different parts of an image on layers. Each layer can then be edited as discrete artwork, allowing unlimited flexibility in composing
ScanGear CS-U 5.6. for CanoScan FB1210U Color Scanner. User s Guide
 ScanGear CS-U 5.6 for CanoScan FB1210U Color Scanner User s Guide Copyright Notice Copyright 2000 Canon Inc. This manual is copyrighted with all rights reserved. Under the copyright laws, this manual may
Alibre Design Tutorial: Loft, Extrude, & Revolve Cut Loft-Tube-1
 Alibre Design Tutorial: Loft, Extrude, & Revolve Cut Loft-Tube-1 Part Tutorial Exercise 5: Loft-Tube-1 [Complete] In this Exercise, We will set System Parameters first, then part options. Then, in sketch
Color and More. Color basics
 Color and More In this lesson, you'll evaluate an image in terms of its overall tonal range (lightness, darkness, and contrast), its overall balance of color, and its overall appearance for areas that
Software Reference. FlexColor 4.0 for Camera Backs. by Hasselblad Imacon
 Software Reference FlexColor 4.0 for Camera Backs by Hasselblad Imacon 2 2004 Hasselblad A/S. All rights reserved., Part No 70030035 revision 1.0. The information in this manual is furnished for informational
By Washan Najat Nawi
 By Washan Najat Nawi how to get started how to use the interface how to modify images with basic editing skills Adobe Photoshop: is a popular image-editing software. Two general usage of Photoshop Creating
Copyright Notice. Trademarks
 Copyright Notice All rights reserved. No part of this publication may be reproduced, stored in a retrieval system, or transmitted in any form or by any means, electronic, mechanical, photocopying, recording,
Editing and Digitizing in EDS III
 Editing and Digitizing in EDS III Design Editing Tablet and On-Screen Digitizing Embroidery and Chenille Stitching Scanning Compatibilities Part Number 110221-01, Revision A A Saurer Group Company 1575
Manual. ZEN 2011 (blue edition)
") Manual ZEN 2011 (blue M 60-3-0043 e Printed 11.2011 ZEN 2011 (blue Legal notes Printed 11.2011 1 Legal notes Carl Zeiss draws the User's attention to the fact that the information and references contained
Manual ZEN 2011 (blue M 60-3-0043 e Printed 11.2011 ZEN 2011 (blue Legal notes Printed 11.2011 1 Legal notes Carl Zeiss draws the User's attention to the fact that the information and references contained
4) Click on Load Point Cloud to load the.czp file from Scene. Open Intersection_Demo.czp
 Click on Load Point Cloud to load the.czp file from Scene. Open Intersection_Demo.czp") Intersection 2D Demo 1) Open the Crash Zone or Crime Zone diagram program. 2) Click on to open the CZ Point Cloud tool. 3) Click on 3D/Cloud Preferences. a) Set the Cloud File Units (Feet or Meters). b)
Intersection 2D Demo 1) Open the Crash Zone or Crime Zone diagram program. 2) Click on to open the CZ Point Cloud tool. 3) Click on 3D/Cloud Preferences. a) Set the Cloud File Units (Feet or Meters). b)
Contents Foreword 1 Feedback 2 Legal information 3 Getting started 4 Installing the correct Capture One version 4 Changing the version type 5 Getting
 Contents Foreword 1 Feedback 2 Legal information 3 Getting started 4 Installing the correct Capture One version 4 Changing the version type 5 Getting to know Capture One Pro 6 The Grand Overview 6 The
1: INTRODUCTION TO AUTOCAD
 AutoCAD syllabus 1: INTRODUCTION TO AUTOCAD Starting AutoCAD AutoCAD Screen Components Drawing Area Command Window Navigation bar Status bar Invoking Commands in AutoCAD Keyboard Ribbon Application Menu
Siemens NX11 tutorials. The angled part
 Siemens NX11 tutorials The angled part Adaptation to NX 11 from notes from a seminar Drive-to-trial organized by IBM and GDTech. This tutorial will help you design the mechanical presented in the figure
Microscopy from Carl Zeiss
 Microscopy from Carl Zeiss Contents Page Contents... 1 Introduction... 1 Starting the System... 2 Introduction to ZEN Efficient Navigation... 5 Setting up the microscope... 10 Configuring the beam path
Toothbrush Holder. A drawing of the sheet metal part will also be created.
 Prerequisite Knowledge Previous knowledge of the following commands is required to complete this lesson; Sketch (Line, Centerline, Circle, Add Relations, Smart Dimension,), Extrude Boss/Base, and Edit
USING BRUSHES TO CREATE A POSTER
 11 USING BRUSHES TO CREATE A POSTER Lesson overview In this lesson, you ll learn how to do the following: Use four brush types: Calligraphic, Art, Bristle, and Pattern. Apply brushes to paths. Paint and
Working With Drawing Views-I
 Chapter 12 Working With Drawing Views-I Learning Objectives After completing this chapter you will be able to: Generate standard three views. Generate Named Views. Generate Relative Views. Generate Predefined
MC3 Motion Control System Shutter Stream Quickstart
 MC3 Motion Control System Shutter Stream Quickstart Revised 7/6/2016 Carousel USA 6370 N. Irwindale Rd. Irwindale, CA 91702 www.carousel-usa.com Proprietary Information Carousel USA has proprietary rights
The ideal K-12 science microscope solution. User Guide. for use with the Nova5000
 The ideal K-12 science microscope solution User Guide for use with the Nova5000 NovaScope User Guide Information in this document is subject to change without notice. 2009 Fourier Systems Ltd. All rights
06/17/02 Page 1 of 12
 Understanding the Graphical User Interface When you start AutoCAD, the AutoCAD window opens. The window is your design work space. It contains elements that you use to create your designs and to receive
House Design Tutorial
 Chapter 2: House Design Tutorial This House Design Tutorial shows you how to get started on a design project. The tutorials that follow continue with the same plan. When you are finished, you will have
Creo Parametric Primer
 PTC Creo Parametric - Primer Student and Academic Editions 02 Helpful hints are enclosed in red brackets or round bubbles like this one! Creo Parametric Primer THIS VERSION OF THE CREO PRIMER HAS BEEN
CREO.1 MODELING A BELT WHEEL
 CREO.1 MODELING A BELT WHEEL Figure 1: A belt wheel modeled in this exercise. Learning Targets In this exercise you will learn: Using symmetry when sketching Using pattern to copy features Using RMB when
House Design Tutorial
 Chapter 2: House Design Tutorial This House Design Tutorial shows you how to get started on a design project. The tutorials that follow continue with the same plan. When you are finished, you will have
NAOMI SYSTEM User Guide
 NAOMI SYSTEM User Guide WM_0810-04 FDA 510(k) Number K062376 This document includes the important information to ensure the safe usage of the item. Before using the system, read through this User Guide
Tiling. 1. Overlapping tiles with fixed number of tiles. Tutorial
 Tutorial Tiling Software version: Asanti 3.0 Document version: April 3, 2017 This tutorial demonstrates how to use tiling within Asanti. Download the Asanti Sample Files via the Asanti Client (Help > Asanti
Importing and processing gel images
 BioNumerics Tutorial: Importing and processing gel images 1 Aim Comprehensive tools for the processing of electrophoresis fingerprints, both from slab gels and capillary sequencers are incorporated into
for Solidworks TRAINING GUIDE LESSON-9-CAD
 for Solidworks TRAINING GUIDE LESSON-9-CAD Mastercam for SolidWorks Training Guide Objectives You will create the geometry for SolidWorks-Lesson-9 using SolidWorks 3D CAD software. You will be working
Quick Start for Autodesk Inventor
 Quick Start for Autodesk Inventor Autodesk Inventor Professional is a 3D mechanical design tool with powerful solid modeling capabilities and an intuitive interface. In this lesson, you use a typical workflow
Getting started with. Getting started with VELOCITY SERIES.
 Getting started with Getting started with SOLID EDGE EDGE ST4 ST4 VELOCITY SERIES www.siemens.com/velocity 1 Getting started with Solid Edge Publication Number MU29000-ENG-1040 Proprietary and Restricted
A Quick Spin on Autodesk Revit Building
 11/28/2005-3:00 pm - 4:30 pm Room:Americas Seminar [Lab] (Dolphin) Walt Disney World Swan and Dolphin Resort Orlando, Florida A Quick Spin on Autodesk Revit Building Amy Fietkau - Autodesk and John Jansen;
AEROPLANE. Create a New Folder in your chosen location called Aeroplane. The four parts that make up the project will be saved here.
 AEROPLANE Prerequisite Knowledge Previous knowledge of the following commands is required to complete this lesson. Sketching (Line, Rectangle, Arc, Add Relations, Dimensioning), Extrude, Assemblies and
Quick Operation Guide
 Quick Operation Guide Power ON Mounting specimens Set the specimen on the sample holder, and install the sample holder to the holder frame. Attach the holder frame to the XY stage. Type of holder Main
All Creative Suite Design documents are saved in the same way. Click the Save or Save As (if saving for the first time) command on the File menu to
 command on the File menu to") 1 The Application bar is new in the CS4 applications. It combines the menu bar with control buttons that allow you to perform tasks such as arranging multiple documents or changing the workspace view.
1 The Application bar is new in the CS4 applications. It combines the menu bar with control buttons that allow you to perform tasks such as arranging multiple documents or changing the workspace view.