Contents. User Manual. Topaz ReMask. 13. Recovery (Foreground) Desaturation (Foreground) 16
|
|
|
- Ashley Henderson
- 6 years ago
- Views:
Transcription

1
2 Contents I. Installation A. How to Install 3 B. Entering Your Key 3 C. Host-Specific Installation 3 1. Paint Shop Pro 4 II. Uninstalling A. How to uninstall 5 III. Introduction A. Masking Unveiled 6 1. What is Masking? 6 2. Benefits of Masking? 6 3. When is Masking Needed? 6 4. Why Use ReMask 4? 6 5. How Does ReMask 4 Work? 6 B About 7 2. Primary Functions of ReMask 7 C. New ReMask Features 8 III. Work Area A. Interface 9 B. Preview 11 C. Tri-Map Technology 13 D. Tools Zoom General Basic Brushes Topaz Magic Brush Fills Resets Compute Single-Color Selection Brush Color Range Dual-Color Selection Brush Mask Hardness Mask Strength Recovery (Foreground) Desaturation (Foreground) 16 A. Menu Preferences Enable High-Quality Compute Enable Sticky Brush Mode Enable Auto-Create Layer Enable Use Layer Mask Enable Tooltips Enable Auto-Update ate Enter Key Set Background Layer Save Trimap/mask Load Trimap/mask What s This? User Guide Tutorials Tech Support Product Info About 20 IV. Work Flow A. Sample Project #1 21 B. Sample Project #2 28 C. Sample Project #3 38 D. Refining Tips 47 E. Merging & Blending 50 V. Additional Resources A. Glossary 54 B. FAQ s 56 C. Shortcut Keys 58 D. Connect 60 E. Company Info 61 2

3 Installation is a plug-in, which means it won t run by itself and requires a compatible host editor. Installation 1. Exit Photoshop or any other image editing program if it is open. 2. Open the.dmg or.exe file, doubleclick on the installer and then follow the on-screen instructions. Entering your license key 1. To activate the program, open ReMask and select Menu-> Enter Key (bottom left corner). 2. Enter or copy & paste your 30-digit license key to start your trial or activate the program. (Be sure that you have not copied any extra spaces). 3. If you are running trial mode, to switch to the full version all you need to do is enter your full license key. You do not need to uninstall the current software as the only difference between the full and trial version is the key used to activate the program. Mac Dmg Windows Exe 3. After installation is complete, open Photoshop and ReMask will be located in the Filter menu. 4. See our FAQ s (page 56) for additional support. To install ReMask on a second computer, you will need to download from topazlabs.com/downloads and then enter your license key. 3 Please see our knowledge base at topazlabs.com/support should you need any additional installation assistance not answered in the FAQ s. Important Note: While the Topaz plug-ins work in a variety of host editors, ReMask is not compatible with Lightroom, Aperture or iphoto, as it requires layers and transparency to function. Therefore, ReMask will not appear in the external editor Fusion Express. Before After The Topaz plug-ins require that your image be 8bit or 16bit and in RGB mode. The plug-in will be greyed out in the Filter menu if your image is not in this mode. To change it, in Ps go to Image-> Mode.


4 Installation How to install in Corel Paintshop Pro 1. First launch PaintShop Pro. 2. Go to Menu file -> Preferences -> File Locations. Select Plug-ins from the File Types list and click Add. 3. Choose C: \ Program Files \ Topaz Labs \ Topaz Re- Mask plug-ins and click OK is now available to use. Simply go to Effects -> Plug-ins and select 4.
 3. Locate the file and move it to the trash. You will need to enter your system password to OK this change. 3. Select Programs, then Uninstall a Program.")

5 Uninstalling To uninstall follow these instructions: Mac 1. Quit Photoshop (or other editing program). 2. Navigate to Macintosh HD -> Library -> Application Support -> Topaz Labs. *To find this, go to your desktop and click on Go-> Computer (top menu) 3. Locate the file and move it to the trash. You will need to enter your system password to OK this change. 3. Select Programs, then Uninstall a Program. 4. Select and click remove. Windows 7 * 1. Quit Photoshop (or other editing program). 2. Click on the Start Menu and select Control Panel -> Programs -> Programs and Features. 3. Select and click uninstall. 4. Navigate to your Photoshop plug-ins folder located at: Applications -> Photoshop -> Plug-ins 5. Locate any leftover files and move them to the trash. *Please note that if you also have the 64-bit version of ReMask installed, then you will need to first uninstall this version before you can uninstall the regular version. 5 Windows XP * 1. Quit Photoshop (or other editing program). 2. Click on the Start Menu and select Control Panel. 3. Double-click on Add / Remove programs. 4. Select and click remove. Before Windows Vista * 1. Quit Photoshop (or other editing program). 2. Click on the Start Menu and select Control Panel. After

6 Introduction Masking Unveiled What is Masking? Masking is the process of isolating a subject or specific image elements that you wish to preserve, then erasing everything else that you do not want. It is also referred to as extraction or cutouts. What are the benefits of masking? Masking allows you to take the desired subject and elements & cut them out and then merge them into another image scene or background. Masking makes it easy to change the theme, scene or setting of your digital photography subjects. Masking is not just for creating composite images; it also makes it possible to adjust only parts of the image. For example, selectively increasing saturation, contrast, brightness, etc. (also called selective adjustments). How Does 4 Work? streamlines the masking process using a new innovative tri-map technique. The tri-map is made up of three tones: green, red and blue. Users are able to quickly define the elements in their image that they want to keep using green; elements that they want to cut using red; and elements that they want 4 to compute using blue. Selections are made using the brush tools and then 4 is able to analyze the user-made selections and isolate the image subject with precision. 6 When do I need to mask? Masking your digital images is ideal when you want to remove backgrounds and unwanted detail elements or to protect an area of your image from adjustments. Why do I need 4? 4 features easy to use, intuitive tools that will save you time and money by simplifying the masking process. With 4 you can eliminate the busy work of using masks, paths, layer adjustments, selections and eraser tools to isolate a subject in your image. ReMask Tri-Map For video tutorials and other helpful resources please visit us at: blog.topazlabs.com/tutorials & youtube.com/topazlabs


7 Introduction About is a masking and extraction tool that makes it easy to extract elements from your digital images. Isolating an object from a background is typically a difficult and time-consuming task, however ReMask simplifies the process with its intuitive tools to help you quickly make extractions. ReMask makes merging multiple image elements seamless, giving you ultimate control over creating and refining your image scenes. Primary Functions of : 1. Simplified and lightning-fast masking and extraction. 2. Easily extract highly intricate image details and transparent objects as well. 3. Precise cutting for delicate and complex images like hair, fur and tr ansparent objects (i.e. wedding veils). 4. Preserve edges and other intricate image details. 5. Make a believable composite that smoothly blends multiple images together With you can: Easily extract intricate image details Quickly isolate areas for selective adjustments Make unique compositions Replace backgrounds Selectively blur only the background for a simulated bokeh effect Creatively emphasize the subject easily and naturally 7 Before To connect with other Topaz users, sign up with the Topaz Forum online at: After


8 Introduction New ReMask 4 Features 4 Features 1. Updated user interface. With a new and polished design, ReMask is now more intuitive and easier to use. 2. Edge Shift detection. This new refining adjustments lets you shift the mask edge by a few pixels in either direction. 3. New names for brushes. The brushes from older versions have been renamed as follows: Basic brush is now Primary brush Single Color Selection brush is now Color Range brush Dual Color Selection brush is now Transparency brush Before 8 4. Speed Boost. Improved and faster speed with the High Quality Foreground Recovery algorithm. The Low Quality option has been obsoleted. After View additional tips and learning resources on our blog at blog.topazlabs.com

9 Work Area Interface (Main View) The 4 interface is straightforward, simple and very easy to use. You ll be a pro after experimenting for a bit. In order to make sense of the program features and the function of the tools, we have divided the interface into five sections: 9

10 Work Area Preview Navigator 2. Editing Parameters 3. Editing Views 4. Preview Window 5. Split Screen Views Displays the region of the preview image you are currently focused on. Displays all of the tools that you will need to successfully create your mask. Displays editing views used during the masking process. Displays the preview of each editing view. Single, double and quad screen options. Also new option to use checkerboard or color background (Keep and Cut views only).
 and hold the left mouse button on the preview image and drag it around.")
11 Work Area Preview Section The Preview section is the big image on the right that shows you the processed preview of the image. To pan the preview image, select the hand tool (press H ) and hold the left mouse button on the preview image and drag it around. You can also pan your preview image by holding the spacebar key and moving your mouse or by using the red selection box in your preview navigator. 11
, remove (red) and compute (blue). 1.")
 The blue painted area represents the part of the image that you want to compute.")
12 Work Area Tri-Map Technology uses tri-map technology to create your extraction. Using the green, red and blue primary brush tools, you will define the areas that you want to keep (green), remove (red) and compute (blue). 1. Red Area The red area represents the part of the image that you want to remove. 2. Blue Area (Outline) The blue painted area represents the part of the image that you want to compute. When you process your image, 4 will analyze this area to help extract the unwanted background from the desired image subject Green Area The green area represents the part of the image that you want to keep.

13 Work Area Views ReMask 4 gives you five views for viewing your image in the preview section while creating your mask. It also includes split screen capabilities, which allows the users to edit in a single, double or quadruple view. Tri-Map Mask 13 Original Keep

14 Work Area Tools Primary Brushes The primary (or basic) brush tools allow you to select the elements in the image t hat you want to keep (green), remove (red) and compute (blue). The primary brushes will turn into the Topaz Magic brush after you select Compute. Brush sizes range from Color Range Brushes These brushes allow you to brush out the foreground or background area in your image, based on the color selected and the setting of the Color slider. 14 Topaz Magic Brush The Topaz Magic Brush tool (which becomes available after you select Compute Mask ) allows you to make intricate detail eliminations and recoveries to selected parts of your image. It will only affect the blue area of your initial tri-map. It will not change your original red and green selections. Color Range The Color Range slider allows you to determine the spectrum of shades affected within the image based on the main color selection. Transparency Brush This brush allows you to define two colors (keep/ green and remove/red) to target at once. The Transparency brush is key for images where transparency is a factor because it will allow users to select a foreground color, such as the white of a wedding veil, and a background color to be removed from behind the veil. ->
 tool allows you to select a certain area of your image to mask without affecting the areas outside of that boundary.")

15 Work Area General Tools The general tools include: undo, redo, zoom, selection and the hand tool. The selection (square marquee) tool allows you to select a certain area of your image to mask without affecting the areas outside of that boundary. Foreground Color Background Color 15 Compute The Compute Mask tool is what will analyze the tri-map selections you made and create your image mask. Fills The fill tools allow you to fill all of your image or just a portion of your image with the selected color. The Compute Mode gives you the option of selecting speed or quality when it comes to processing larger images only. (Change this in your preferences menu by checking Enable High Quality Compute.) Adjusting the quality settings will have no affect whatsoever on small images. Reset The reset tools allow you to reset your entire image to the selected tri-map color. Using this feature will erase any previous selections made.
16 Work Area Please note: After you make your tri-map selections you will need to click on Compute Mask for your selections to be analyzed and your mask created. After you do that you can make any additional changes or refinements to your mask and then click on OK to fully process your image and save your mask back to your host program. Failure to click on Compute Mask before you select OK will result in your selections being lost. Refining Adjustments The refining adjustments will appear only after you press Compute to create your mask. Edge Hardness Determines how hard your mask is applied to subject edges in your image. The higher the parameter the harder your edges will be. The lower the parameter, the softer (more feathered) your edges will be. Mask Strength Determines the brightness of the mask. Increasing this parameter will give you more detail by making the weaker mask details stronger. Edge Shift Shifts the mask edge by one pixel in either direction. 16 Recovery (Foreground Color) Revives the color of your foreground in weaker / more transparent areas. Desaturation (Foreground Color) Desaturates the edges of your mask (in weaker / more transparent areas) to help with color contamination and bleeding.
.")

17 Work Area Menu You can access s menu by clicking on the Menu button at the bottom of the interface. 17 Enable Brush on Original Image Allows you to draw on the original image (you will not see anything changed on the original image). When this option is turned OFF, drawing on the original image will force switch the view to Trimap view. Preferences Select this to enable or disable the program tool tips or the Auto-Update feature. Visit the Topaz Labs Blog which features the latest Photography, software and design information including tutorials, videos, and thoughts about both Topaz and non-topaz topics. Enable Sticky Mode for f/b brushes Allows you to enable the sticky mode for your foreground/background (f/b) brushes. Enable Zoom with Mouse Wheel (Mac users only) Allows user to zoom in using their mouse. May be turned off for Mac users with Apple Magic Mouse.


18 Work Area wenable Auto-Create Layer Automatically creates a new image layer for you in Photoshop. Enable Use Layer Mask Automatically saves your ReMask extraction back to a layer mask. Set Background Color Use Set Background Color option in the menu to change the background color on your mask for better visibility with several different color palette options. Enable Tooltips Allows you to enable or disable the pop up tips during your workflow Enable Auto-Update Allows ReMask to automatically check for and download available updates. Check for Update Checks for available updates. Enter Key Select this to enter your trial or purchased license key. 18 NEW! You may also find the background color selection option in the upper right corner of the interface next to the single, double, and quad screen view options (will only be available while in Keep or Cut view modes).


19 Work Area Save Trimap/Mask Select this feature to save your trimap/mask currently in progress in order to resume editing at a later time. The file will be saved as a tiff. You can name the file and save it to any safe location on your computer. Your saved trimap/mask will appear in this format: Before 19 Load Trimap/Mask Select this feature to load a previously saved trimap/ mask to continue editing on. You must have the original image that pairs up with the selected mask in order to load it or else you will receive this message: After


20 Work Area What s This? Select this (or click F1) then click on a feature in the Simplify interface to learn more about it. Users Guide Select it for quick access to this user guide. Tutorials Takes you to the tutorials page where you can access additional written and video tutorials to help you with your ReMask workflow. Tech Support Brings you to the Topaz Labs support page where you can request assistance from our support specialists, contact our customer service team, retrieve lost license keys, or browse through our Knowledge Base. Product Info Select this to go to the web page to learn more about the plug-in. About Select this to see what version of ReMask you currently have. Before 20 To keep up-to-date with the latest product information, special offers, new releases and update notifications, sign up for the Topaz Monthly Newsletter online at: After

21 Sample Project #1 Beginner Masking Tutorial In this sample project we will walk you through a basic background replacement workflow, step-by-step, to help you become more familiar with the ReMask 4 program. You can see in the Before and After shots that the original image background has been cut out. The parrots have been precisely extracted and we were able to add in a new, more deserving background to liven up the shot. For this example we will be using this image of two parrots shot against a simple, black background and putting them somewhere more eye-catching. By masking out the background and adding in a tropical one we can bring new life to this image! In the following steps, we will show you how to achieve these same optimal results with your own photos. So let s get started Before After
 and navigate to Menu-> Preferences. Make sure you have Auto- Create-Layer enabled.")

. 22 4.")
22 1. Open an image file in Photoshop or whichever host edtior you are using that supports layers. 2. Open ReMask (from the Filter Menu) and navigate to Menu-> Preferences. Make sure you have Auto- Create-Layer enabled. You may also choose to have Auto-Create-Mask checked. Exit out of the program and re-enter for these changes to take effect. 3. Re-open ReMask and you ll notice that it automatically loads to Tri-map view and your image will be filled with green. 5. Using the Blue Primary Brush, outline the edges of your subject that you would like to mask (the blue will be the portion of your image that ReMask will analyze) Select the Blue Primary Brush tool and use the brush size slider to select your desired brush size or use the [, ] keys to adjust the size. You may also choose to zoom in closer using the + key.


23 6. Use the red Fill tool to fill the outside of your blue selections with red. (The red will be the portion of your image that will be cut.) Here is what your tri-map will turn to after you press Compute (this is Mask mode). Important: After computing your mask, you do not just want to press OK. It is important to make additional refinements to the mask to get the best results.. 23 Your tri-map is now complete and ready to be processed! 7. Click on the Compute button to compute your trimap and create your mask. After computing your tri-map selections you will notice a new toolset that will appear under your brushes. This toolset is used for refining your mask. The Topaz Magic brush will also be available now. Please see page 16 of the user guide for a definition of what each slider does.

24 8. You can begin refining your image using any of the views in the tabs at the top of your interface. 9. For refinements we also recommend viewing the image in split or quad view mode. 10. When refining, you want to check for areas of gray in the Mask view mode. You can see below that the gray areas in the Mask view mode translate over to Keep mode as areas of jagged, unwanted pixels. Mask Keep Use the keys 8, 9 and 0 to switch between single, double and quad screen displays. 24 Use the keys 1, 2, 3, 4 and 5 to switch between the 5 different view modes. To change the color of the background in Keep and Cut mode, press CTRL/CMD + B to bring up the color palette.
, use the Red Primary brush and dab on the gray pixels...you ll see that they dissapear with each click. 13.")
25 11. To fix this, you ll want to work with your Primary (basic) brushes with the Magic Brush enabled. 12. For gray areas in the background (black part of mask), use the Red Primary brush and dab on the gray pixels...you ll see that they dissapear with each click. 13. Do the same with the green primary brush, dabbing areas of gray in the foreground (white part of mask). 14. Be sure that you do not break the blue boundary. It helps to be in quad view mode for this so that you can view your tri-map as you make additional refinements Tri-map Mask If you accidentally break the blue boundary, you can always paint it back in. 25 Image Keep Use the Q & W shortcut keys to switch back and forth between Green Primary and Red Primary brushes. Use a brush size set a 1-5 for refinements in small areas.


26 15. You may also choose to use the Adjustment sliders to make additional refinements as desired. For this image we will not make any adjustments to the Mask Adjustment sliders so that we keep the shape of the birds nice and feathery. We will however, slightly increase the Recovery slider under the Color option. This will restore the color around the edges of our subject. 16. Once happy with the selections and after a final check of our mask, click OK to process the changes and save the masked image back to Photoshop. 17. Back in Photoshop we can now add in a new background to finish our image transformation. 18. Open the background you wish to use. 19. Now navigate back to your masked image, making sure the masked layer is selected. 20. Press Ctrl/Cmd + A to select the image (you ll see marching ants appear aroun d the boundary). 21. Press Ctrl/Cmd + C to copy this selection. 22. Now navigate back to your background image and press Ctrl/Cmd + V to paste that selection. 23. Press Ctrl/Cmd + T to transform it to fit in with the background. Background Image (Photo Elan Star) Masked image back in Photoshop 26


27 Before 27 After Use the dodge & burn tools to lighten or darken the subject s edges, depending on the background used. Since the birds were extracted from a black background, the dodge tool was used to lighten the edges around the birds where minor black bleeding was apparent on a lighter background. You may also choose to zoom in and erase or smooth any leftover flaws. After In addition, to help the subject blend in with its background, you may need to adjust the temperature and tone. Programs such as Topaz Adjust and Lens Effects are great for this.
28 Sample Project #2 Masking a Tree with the Color Range Brushes In this workflow we will look at another way to tackle the masking process. This workflow makes use of ReMask 4 s Color Range Brushes, which come in handy for tricky projects like trees, which contain many branches and leaves and are typically harder to mask. You can see in the Before and After shots on this page and the next that the even the most intricate details of the tree have been isolated and the old background removed. In the following steps, we will show you how to achieve these same creative results with your own photos, following this model - which uses color sampling. 28 Before
29 29 After
30 1. Open an image file. 2. Go to Filter -> Topaz Labs and select ReMask 4. When ReMask 4 loads it will automatically open to the Tri-map view and your image will be filled with green. 3. Go to the Fill section of your tool panel and click on the Blue button. Click on the image to fill it with blue. Using the Color Range brushes we will add our Green (keep) and Red (remove) selections. 30

31 3. Click on the Red Color Range Brush. This will automatically activate the color picker. Using the color picker, select part of the background color from within the image to be removed. You may choose to increase the Color Range slider to increase the range of the selected color that will be affected in the image. Begin to brush over the image, turning the selected color red. 4. Repeat this process, selecting different colors in the background (adjusting the Color Range if necessary) and then brush it out. Once a good portion of the background is selected in Red, we can move on to our Green (keep) selections. 5. Click on the Green Color Range Brush to activate the color picker. Then we will select a color from within the tree to be kept. Brush over the tree until it is mostly covered. 31 After Red Color Range Brush After Green Color Range Brush You may also opt to brush in the majority of the sky using the Red Primary brush, and then use the Red Color Range brush to brush in red closer to the boundaries of the branches. When working with the Color Range Brushes, do not zoom in and try to be 100% exact. If you try to get the mask perfect, it may not look good after you compute it. As long as there s some indication of what to keep in thinner, tighter areas, the program will know what to do.

32 You can repeat this process as few or as many times in your workflow as you would like. The more colors that are in your image then the more you will want to sample. More color selections will also give you better and more precise results once you have computed your tri-map, although being 100% precise isn t necessary. Once the Red and Green selections are made using the Single-Color Selection brushes, we have our completed tri-map. 6. Click on the Compute Mask button (or Enter key) to allow ReMask to analyze the selections and create the tri-map. As you can see, ReMask did quite a good job extracting the tree from its background: Mask 32
 to help you better detect the parts of the sky that might be bleeding through still.")
33 7. For refinements, use the Primary Green and Red brushes to make your selections more accurate. In Keep mode, change the background color to a dark red (or other color) to help you better detect the parts of the sky that might be bleeding through still. To fix bleeding areas of sky, zoom in really close and decrease your brush size to 5 or less. Using the red primary brush, dab areas where you see sky seeping through to eliminate it from what is being kept. Keep 33

34 8. Do the same with the Green and Blue Primary brushes for areas of the tree that have been left out. It helps to be in double or quad view mode for this so that you can refer back to the original image to detect if any part of the tree is missing. Below you can see where there s a disconnection of the white area in the mask, where there should be a full branch. It s easiest to refer back to the original image and using your Primary Blue brush, click on the original image where the part of the branch is missing in your mask and it will re-compute. If the area doesn t entirely come back, use the Green Primary brush and dab the missing area with short brush strokesw. *Before dabbing with green, make sure there is blue underneath it (not red). Refer back to the trimap to ensure this. Image Mask 34 Use the hand tool (H or spacebar) to pan around your image during the refinment process. Switch between the green, red and blue primary brushes using the Q, W and E keys. Before dabbing in green, be sure there is a blue compute underneath the area you want to keep (not red). If you find that part of the tree is red, first brush over it with blue, then dab it with green to recompute and refine that selection.

35 Referring to the tri-map where branches or parts of the image may be missing will help you during the refinement process. As you can see below, the branches are disconnected because there is no green in that area that tells the program to keep it (not as noticeable when zoomed out, but if being printed larger, this would be a problem). 9. Make any additional adjustments to the details and colors you would like to preserve in your image. If you notice any bleeding of the sky coming through around the branches, increase the Color Recovery slider (under Adjustments) and you ll notice it diminish. You may also choose to shift the Edge Mask one way or the other, but make sure to zoom to Fit so you can see what it does to the entire image. Dab (not draw) with green so that the program knows to keep this area. 35

36 Another way to make refinements is to switch to Cut view mode (shortcut key 5). As you can see below, it s now easier to identify what parts of the tree s branches still need work. Again, use the green and blue primary brushes to compute and keep. 10. Make any additional refinements to the details and colors you would like to remove from your image and save the Mask if you d like (Menu-> Save TriMap). 11. When you are finished making refinements, press OK to return the mask back to your host editor. Cut 36

. We are now going to edit the background (not the tree). 4. Open Topaz Lens Effects. 5.")
37 The After image was achieved with the following steps: (see steps on page 26 for how to place your masked image onto a new background). 1. Bring the extracted tree into Topaz Clarity. Increase the micro, low and medium contrast sliders. Also increase the midtones and shadows sliders. Decrease the highlights and high contrast sliders as desired. Before After 2. Now bring the extracted tree into Topaz Clean and apply a Crisp Edge preset to help distinguish the texture in the tree s branches and leaves. 3. Back in Photoshop select the background layer (the original image you worked with). We are now going to edit the background (not the tree). 4. Open Topaz Lens Effects. 5. Expand the Dual Tone filter collection and apply a desired preset. 6. Press Apply and then expand the Toy Camera list. Apply the Awesomeness I or II preset. 7. Expand the panel on the right side of the screen and reduce the camera shake to zero. 8. Press Apply (not OK). 9. Still in Lens Effects, navigate to the Vignette section and apply a vignette to your preferences. 10. Press OK to return back to your host editor. 37
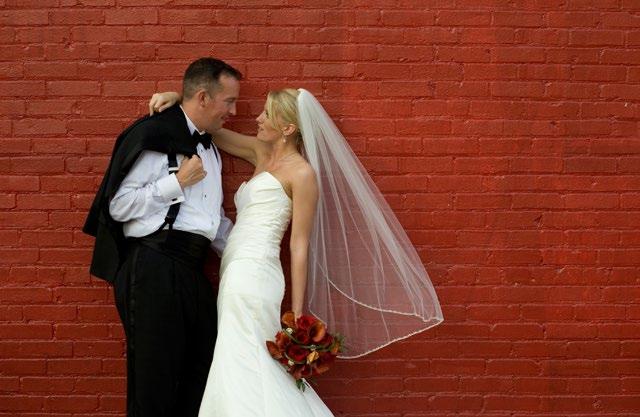
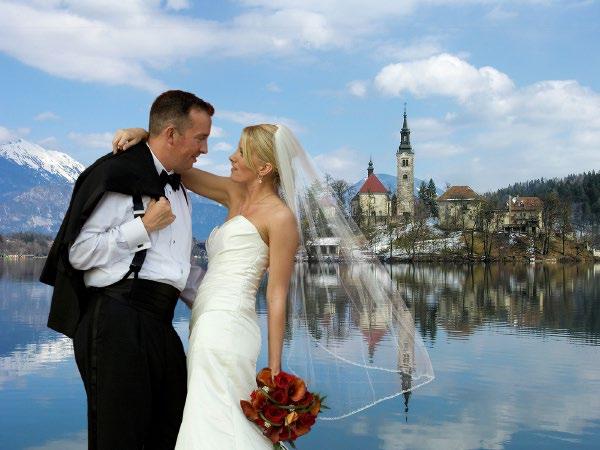
38 Sample Project #3 Using the Transparency Brush In this workflow we will look at another way to tackle the masking process. This workflow makes use of ReMask 4 s Transparency brush, which comes in handy for tricky and delicate transparency projects like wedding veils. You can see in the Before and After shots that the even delicate features of the bride s veil have been preserved and the red bricks have been removed. In the following steps, we will show you how to achieve these same creative results with your own photos following this model. This workflow focuses on two parts: 1. The basic tri-map creation to get the main extraction of the couple from the background. 2. The transparency focus to preserve the bride s veil while removing the red brick background. 38 Before
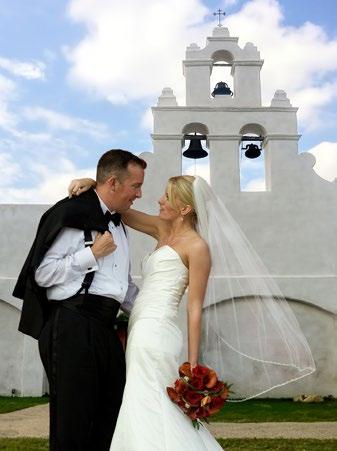

39 39 After
40 1. Open an image file. 2. To begin the masking process open 4. When ReMask 4 loads it will automatically open to the Tri-map view and your image will be filled with green. 3. Outline your subject using the blue primary brush. For this example a thin blue line was drawn. Tip: Use the zoom buttons (-, +) and hand tool (spacebar or H) to pan around the image when working with a smaller brush size. You may also choose to use the preview navigator to maneuver around the image. 4. Next, use the red Fill tool to fill the background with red (cut). 5. Click on the Compute button to compute your trimap and create your mask. 40

41 Viewing the mask, there a few areas of the it that need to be cleaned up. You can fix gray areas using refinment techniques as described in the previous two tutorials by zooming in and working in quad view mode. For areas of gray in the mask s background (black), dab with the red primary brush. For areas of gray in the mask s foreground (white), dab with the green primary brush (don t worry about the veil just yet). v Mask 41

42 Now that the basic tri-map extraction and initial refinements have been completed, we can begin working on isolating the bride s veil and separating it from the bricks. 12. Start by selecting the basic blue brush tool and brush over the bride s veil as shown in below. 13. Select your Transparency brush. 42 When working with an extensive mask, it is wise to save it during your session so you don t lose your work. Simply go to Menu-> Save TriMap. To avoid having to continuously sample colors, go to Menu-> Preferences and check Enable Sticky Mode for f/b (foreground/background) brushes.

43 13. Select your Transparency brush. You will see a green color picker appear. Once you select a color from the foreground, a red color picker will then appear for you to select a color from the background. 14. When selecting the keep and remove colors, be sure to select the true color values. Instead of clicking on the white in the veil, which is contaminated from the red of the background, click on the whitest portion of the bride s dress. 15. The red background is vibrant and pretty consistent so we can click just about anywhere in the image to select it. Just make sure that you do not select a light value of red in the highlights of the bricks or else this may interfere with the veil. 16. Begin brushing over the veil...the yellow dots that appear represent transparency. 43

44 16. After we have finished brushing the keep and remove selections in the brides veil click on the Compute button to allow ReMask to analyze the new tri-map and create the extraction. 17. Use the Adjustments sliders as desired to refine your mask even further. Once the mask refinements are complete, click OK to process the image and save it back in Photoshop. From there we can add in a new background or make any additional image enhancements. Image Keep 44
45 45 Before
46 46 After


 down the refinement area.")
47 Refining Tips After creating the tri-map, there are several tools available for refining. Refining allows you to further clean up your extraction to help ensure the best, most natural looking image possible. restore those details. Use the Adjustment tools, such as the Color Recovery and Edge Hardness to further refine your mask. Please note: Before you can access and use the refining tools you will need to create and compute the tri-map. 47 For areas that have patches of the background leftover (or patches of the foreground missing) you will want to use the Magic Brush. Select the red Primary brush and then select a small brush size and then make short strokes (or click) down the refinement area. Each time you make a stroke, your image will automatically update reflecting that refined selection. Select the green brush and recover detail lost by making small strokes down the over processed area to


.")
48 Merging & Blending Masking is the hard part, but merging and blending are also key parts in making your two (or more) images look like they were made for each other. In this section, we will show you how to take your newly masked image and create a whole new scene with a new background. To connect with other Topaz users, participate in Topaz Contests and to see the latest tips, tricks and tutorials sign up for the new Topaz Forum online at: Please note: adding new backgrounds is done in Photoshop (or other editing program). This is a quick overview; for additional, more in-depth information please refer to your Photoshop user guide. 48 Masked Image (photo Gary Lamott) Background Image (photo Gary Lamott) New creation

49 Merging We will cover two different ways of merging your images. The first way to merge your two images is by manually dragging the new background image into the project file that has your mask in it. To do this go to File -> Open and select the background image you want and then click OK to open it in Photoshop. You will also want to make sure to unlock the layer if it is locked before you try moving it. Using your selection tool (V, Escape) and making sure your masked layer is selected, click on the masked image and drag it over to your background layer. Make sure the masked layer is selected in your layers panel or else you won t be able to drag it over. 49


50 Another way to place a your masked image onto a new background is to navigate to your masked image, making sure the layer is selected. Next, move to your background layer and press Ctrl/ Cmd + V to paste it. Press Ctrl/Cmd + A to select the layer and Ctrl/Cmd + C to copy it. You ll notice marching ants appear around the boundaries. Press Ctrl/Cmd + T to re-size the selection, holding the shift key down or click on chain in upper menu to maintain proportions while re-sizing. Press Enter when finished with the transformation. 50
 and then press Ctrl/Cmd + T again to resize. Go to Select-> Inverse to invert that selection.")
 to erase the water from the lighthouse, bringing in darker water from the background.")
51 You may also choose to resize the background image. To do this, make sure the background image is selected in your layers panel. If it s locked, you ll need to duplicate that layer (Ctrl/Cmd + J) and then press Ctrl/Cmd + T again to resize. Go to Select-> Inverse to invert that selection. Now you can begin erasing (for un-straight edges use the Quick Selection tool to create a boundary). 51 The lighting is off as the image of the lighthouse was taken at an earlier time of the day. Since the image of the moon has darker water, use the eraser tool (E) to erase the water from the lighthouse, bringing in darker water from the background. To avoid erasing the rocks, use the retangular marquee tool to drawn a box around it When you re done, press Ctrl/Cmd + D to remove the marquee selection.
52 We now need to darken the lighthouse. The yellow tone is nice and compliments the purple sky, however the lighting is too bright and looks unnatural. Open Topaz Adjust and expand the exposure panel on the right side where you can decrease the brightness. You may also choose to decrease (or increase) the saturation, change the temperature or anything else that you think will help the image blend into its background. Back in Photoshop, use the burn tool ( the highlights. (O) set to 52 Since we want this late-day image to blend in with the twilight one, we ll want to reduce the highlights by darkening them with the burn tool. You may also choose to do this for midtones at a reduced exposure. Finally, you may choose to work with the background image as well. Since the background image was taken at night with a high ISO, Topaz DeNoise was used to eliminate the noise artifacts. Adjust was then used to brighten the image a tad bit and give it a cooler temperature. After

53 Blending Blending makes the transition of your masked image into your new background image seamless. There are many ways and various tools that you can use to do this. We will review just a few. If desired, you can incorporate the use of any of the basic Photoshop tools including: Blur Tool - Blurring softens edges and blend transitional areas. Sharpen -Sharpening increases contrast in the painted areas. Smudge - Smudging blends the pixels where you paint simulating the action of dragging a finger through wet paint. Dodge Tool - Dodging lightens areas lighter and harden edges Burn Tool - burning darkens areas darker and harden edges, Sponge Tool - changes the level of saturation of colors for an area of an image. You can also use the tools under Photoshop s Modify option to finesse the border of your masked image. You will first need to make a selection around the part of the image you want to work on before you can access the Modify menu options. Border - Takes the border of your selection and turns it into a two lined selection with soft edges. Smooth - Smooths out corners and jagged lines. Expand - Enlarges the selection. Contract - Reduces the selection. Feather - Feathering gives a smoother fill around the edges of your masked image. 53 Another option for blending and matching colors within your masked image and your background image for a smoother transition would be to use Topaz Adjust to enhance the image exposure, color and saturation.
54 Glossary 50% Gray The undefined area that the computer (Topaz Mask) will need to figure out. Achromatic - Without color. Action A recorded task that works as an automated memory of the enhancement and adjustment steps executed on an image. Once an Action has been recorded it can be invoked and reapplied to other images without manually making the changes. Adjustment Layer A layer that allows you to adjust the look of an original image with out making it permanent. With adjustment layers you can make various changes to a layer without damaging it and go back and readjust it at anytime. Algorithm Any bit of code or programming that defines a process. Alpha Channel Photoshop alpha channels are masks through which you can apply effects. The alpha channel is an 8-bit channel, which means it has 256 levels of gray from 0 (black) to 255 (white). An alpha channel lets you save and load selections. Color bleed (color contamination) - the transfer of color between nearby objects, caused by the colored reflection of indirect light. Color Decontamination - reduces color cast on the edges of a selection. Color channel The visual component of a color digital image that represents all the pixels in that picture made up of a specific primary color. For example, in a typical digital photo, the primary colors of red, green and blue (from the RGB color model) create all the colors in that photo, which may be represented by three color channels, each of red, green or blue. Desaturate - Decreasing the intensity of a color (hue). Diameter (brush) - Controls the size of the brush. Download The process of transmitting or transferring data from one device to another. Export Outbound data transfer in a format that can be used by other programs. 54 Black Area - The masked area, which indicates the portion of the image that you wish to get rid of. Filter Adjustment Allows you to shift the overall color in an image. Blue Area - The undefined area that the computer (Topaz Mask) will need to figure out. Green Area (Tri-map View) - The active area, which indicates the portion of the image that you wish to keep. Chroma - Purity or intensity of color. CMYK Cyan, magenta, yellow, and black. A color model commonly used for 4-color printing by printers to define and mix all of the colors they are capable of outputting. Gradient - The gradient tool creates a gradual blend between multiple colors. Hardness (brush) - Controls the size of the brush s hard center.
55 Glossary Import Inbound data transfer into a file or document. Layer Mask An editable selection, attached to a layer that tells Photoshop how to deal with the layer that it is attached to. It enables us to get rid of a part of the layer but with the possibility to go back and edit the result at any time (also called nondestructive editing). It in fact blocks part of the layer from appearing, as if erased, while still being there. Layer Masks provide extra flexibility to your Photoshop layers. Quick Mask - Allows you to paint on your selection (or the masked area). Then once you have your selection, you can delete it, recolor it, mask it, etc. Red Area - The masked area, which indicates the portion of the image that you wish to get rid of. Refine Improve (something) by making small changes to make it more subtle and accurate. Non-Destructive Editing - A form of editing where the original content is not modified in the course of editing - instead the edits themselves are edited. This allows for easy adjustments and images effects at a later time making photo editing quick and flexible. Opacity The amount of transparency a layer has. Pan and Zoom - A useful function that allows users to magnify the captured image in the preview and then, by using the cursor, to move or pan around the image. Typically Pan and Zoom allows users to magnify the image 2x or 4x time. By magnifying the images and zeroing in on a specific section, you can see details not visible when the entire image is sized to fit the preview. Photo-editing or Imaging software Programs in which you can alter your photos and / or create digital images. Depending on the software, you can improve exposure, color and other attributes of your picture, paint on it, add type, apply special effects, remove noise, resize it, combine it with other pictures, prepare it for or posting on the web, output it to a printer or do any number of other manipulations or edits. Plug-in - Computing (of a module or software) able to be added to a system to give extra features or functions. RGB Red, Green, Blue. The color model that is used in digital cameras and by computer monitors. Saturate - Increasing the intensity of a color (hue). Tri-Map User-generated mask map with three tones: white (keep), black (remove) and gray (compute) - Mask View or Green (keep), Red (remove) and blue (compute) - tri-map view. Transparency - in reference to a portion of an image that is completely invisible (as it has been removed). White Area (Mask View) - The active area, which indicates the portion of the image that you wish to keep. 55
56 Frequently Asked Questions I need a 4 trial key. Visit for a trial key. If you need more time to evaluate, please contact us at: for an extended trial key. I can t find 4 in the Photoshop Filters menu. For Windows: 1. Please go to your preferences menu in Photoshop and select Plug-ins. 2. Check/enable the Additional Plug-ins Folder option then click Choose. 3. After that, please navigate to: C: \ Program Files and select the Topaz Labs folder. 4. Then click Choose (or it may say Save/OK) to save this back to Photoshop. 5. Click OK to save your changes, then restart Photoshop. Once Photoshop opens, go to your Filter menu and you should be able to access Topaz. For Mac: 1. Please go to your preferences menu in Photoshop and select Plug-ins. 2. Check/enable the Additional Plug-ins Folder option then click Choose. 3. After that, please navigate to: Computer -> Macintosh HD -> Library -> Application Support and select the Topaz Labs folder. 4. Then click Choose (or it may say Save/OK) to save this back to Photoshop. 5. Click OK to save your changes, then restart Photoshop. Once Photoshop opens, go to your Filter menu and you should be able to access Topaz. If I use the 30-day trial version will I need to uninstall the trial version before I upgrade to a full version? No, there is no difference between the trial and full version, except for the license key used to activate the program. To take yourself off trial mode, simply enter your full license key under Menu-> Enter Key. Do you have any other ReMask tutorials? Yes, we have plenty of tutorial videos on our YouTube channel at youtube.com/topazlabs. Also be sure to check out our tutorials page at blog.topazlabs.com/ tutorials When I fill my red (cut) areas on my tri-map the whole image filled with red. There is most likely a gap somewhere in blue (compute) outline. The blue outline acts like a barrier in order to ensure accurate masking results. Use your undo button to go back a step then zoom in and pan your image to find the opening in your blue outline. Once you locate it, select your blue brush tool and close it off. Then you can select your red flood fill tool and fill in the parts of your image that you would like to cut. I get the error: You have not selected Compute Mask to compute your selections. Please click OK to go back and select Refine Mask. To exit without making changes to your image please select cancel. This is because your tri-map selections have not been analyzed. You will need to click on the Compute but- 56
57 Frequently Asked Questions ton in order to create your mask. After that you can select OK and process your entire image. Why doesn t ReMask appear in Lightroom/iPhoto/Aperture/Fusion Express? is not compatible with these specific programs, as it requires a host editor that supports layers and transparency. If you do not own a host editor that supports layers (e.g. Photoshop, PaintShop Pro), we offer a standalone editor, PhotoFXlab, that will allow you to use ReMask and can be accessed as an external editor in Lr, iphoto & Aperture. How do I place my masked subject on a new background? Once you have extracted your subject and are back to your host editor, open up the background you wish to place the object on. Go back to your masked image and make sure the masked layer is selected in the layers panel and then press cmd/ctrl + A to select, and cmd/ ctrl + C to copy that selection. Now switch back to your background and press ctrl/cmd + V to paste that selection. To resize, press ctrl/cmd + T and hold down the Shift key to maintain proportions. Are upgrades free? How do I upgrade my software? Yes, with Topaz Labs upgrades for exisiting purchased products are complimentary. To upgrade, all you need to do is download the updated software from our downloads page at topazlabs.com/downloads and your license key will work with the upgraded version. If using PhotoFXlab or Fusion Express, you ll need to update those programs as well from our downloads page. Please make sure that you are exited out of all host editors before installing the software. How many computers may I install the software on? You may install the purchased software on up to two computers at a time. Simply download the software from our downloads page to put it on another computer and use the same license key to activate it. I have a question not listed here. If you are not able to find the answer here then please visit our knowledge base where you can also submit a support ticket for additional assistance: 57 Can I save my tri-map for future use? Yes, simply go to Menu-> Save TriMap/Mask. When you want to re-load it, go to Menu-> Load TriMap/Mask
58 Shortcut Keys 4 uses some shortcut keys to speed up your workflow. Many of these keys are similar to those in Photoshop. The following keys work at all times. Action MAC Shortcut PC Shortcut Undo CMD + Z CTRL + Z Redo CMD + Shift + Z CTRL + Shift + Z Primary Keep Brush (Green) Q Q Primary Cut Brush (Red) W W Primary Compute Brush (Blue) E E Color Range Brush (Green) A A Color Range Brush (Red) S S Transparency Brush Z Z Green Fill R R Red Fill T T Blue Fill Y Y Increase Brush Size ] ] Decrease Brush Size [ [ Zoom In + + Zoom Out - - Zoom to Fit Cmd + 0 (zero) Ctrl + 0 Zoom to 100% Cmd + Alt + 0 Ctrl + Alt + 0 Action MAC Shortcut PC Shortcut Hand Tool H or spacebar H or spacebar Marquee Tool M M Remove Marquee CMD + D CTRL + D Menu O O View Original Image 1 1 View Tri-Map 2 2 View Mask 3 3 View Keep 4 4 View Cut 5 5 Compute Mask for tri-map Enter Enter Process whole image (OK) CMD + Enter CTRL + Enter Draw Straight Lines Shift + left mouse click Shift + left mouse click Single Screen View 8 8 Double Screen View 9 9 Quad Screen View 0 0 Set background color Cmd + B Ctrl + B Save TriMap/Mask Cmd + S Ctrl + S Load TriMap/Mask Cmd + L Ctrl + L 58


 R T Y M H")
59 Shortcut Keys Ctrl/Cmd + B Q W E A S Z Enter Ctrl/Cmd + Z (Undo) R T Y M H or spacebar

60 Connect with Topaz Follow us on Twitter for notifications of recent news and easily get in touch with us whenever you feel like it! Find us on our Facebook page and network with other Topaz users! Participate in the entirely user-led Topaz Flickr group for a helpful and highly active community for Topaz Photoshop plug-ins! Subscribe to our YouTube channel to keep up with any newly released product video tutorials! 60 Check out our blog for tutorials, tips and updates from Topaz Labs! And don t forget to check out our other social media outlets including: Instagram (@topazlabs), Pinterest, LinkedIn and Google+!
TOPAZ ReMask V3 QUICK START GUIDE
 TOPAZ ReMask V3 QUICK START GUIDE Introduction Topaz ReMask is a masking solution that offers professional results while cutting down on masking and extraction time. It is designed to tackle some of the
Veil & Transparency Masking Tutorial
 In this tutorial we will look at another way to tackle the masking process. This workflow makes use of ReMask 3 s new Dual-Color Selection brush, which comes in handy for tricky and delicate transparency
TOPAZ LENS EFFECTS QUICK START GUIDE
 TOPAZ LENS EFFECTS QUICK START GUIDE Introduction Topaz Lens Effects is designed to give you the power to direct and focus your viewer s eyes where you want them. With Lens Effects, you get advanced technology
ReMask 2 TOPAZ REMASK 2. How It Works
 TOPAZ REMASK 2 Having a thorough understanding of the new Topaz and how it works will allow you to use the program and its tools most effectively. This will help you achieve optimal results with every
Workflow. Sample Project
 Workflow Sample Project In this tutorial, we will walk you through a sample project, step-by-step, to help you become more familiar with the Clean program focusing on using a combination of presets and
Contents. User Manual. Topaz Simplify I. Installation A. How to Install.3 B. Host-Specific Installation 4 D. Uninstalling.6
 Contents I. Installation A. How to Install.3 B. Host-Specific Installation 4 D. Uninstalling.6 II. Introduction A. 7 1. About 7 2. Primary Functions 7 B. New Features 9 III. Work Area A. Interface.9 B.
Topaz Labs DeNoise 3 Review By Dennis Goulet. The Problem
 Topaz Labs DeNoise 3 Review By Dennis Goulet The Problem As grain was the nemesis of clean images in film photography, electronic noise in digitally captured images can be a problem in making photographs
Workflow. Sample Project
 Workflow Sample Project In this tutorial, we will walk you through a sample project, step-by-step, to help you become more familiar with the DeJPEG program focusing on using the default presets. We will
User Manual. Topaz Simplify 4
 Topaz Simplify 4 I. Installation A. How to Install 3 B. Plugin Compatibility 3 C. Host-Specific Installation 3 1. Photoshop 3 2. Lightroom 4 3. PaintShop Pro 4 4. PhotoPlus 5 D. Uninstalling 5 E. License
Adobe Photoshop CS5 Tutorial
 Adobe Photoshop CS5 Tutorial GETTING STARTED Adobe Photoshop CS5 is a popular image editing software that provides a work environment consistent with Adobe Illustrator, Adobe InDesign, Adobe Photoshop
IV. FAQ. V. Connect. VI. Contact
 I. Installation A. How to Install... 3 B. Plugin Compatibility... 3 C. Host-Specific Installation... 3 1. Photoshop... 3 2. Lightroom... 4 3. PaintShop Pro... 4 4. PhotoPlus... 5 D. Uninstalling... 5 E.
Using Photoshop Elements
 Using Photoshop Elements Created By: Rick Williams August 2004 Table of Contents Photoshop Element Tools...Page 1 Tool Descriptions... Page 3 Starting Photoshop Elements... Page 7 Resizing an Image...
Workflow. Sample Project. In this tutorial, we will walk you through a second Clean workflow to show you how easy it is to instantly clean up skin.
 Workflow Sample Project In this tutorial, we will walk you through a second Clean workflow to show you how easy it is to instantly clean up skin. Before Topaz Clean After Topaz Clean Please visit the Topaz
Contents. User Manual. 2. What s This? User Guide Tech Support Product Info Detail Gallery About 20
 Contents I. Installation A. How to Install 3 B. Entering Your Key 3 C. Host-Specific Installation 3 1. Paint Shop Pro 4 2. Photo Impact 5 3. Irfanview 6 II. Introduction A. Enhanced Photography 7 1. Edge
Extreme Makeovers: Photoshop Retouching Techniques
 Extreme Makeovers: Table of Contents About the Workshop... 1 Workshop Objectives... 1 Getting Started... 1 Photoshop Workspace... 1 Retouching Tools... 2 General Steps... 2 Resolution and image size...
Adobe Photoshop CC 2018 Tutorial
 Adobe Photoshop CC 2018 Tutorial GETTING STARTED Adobe Photoshop CC 2018 is a popular image editing software that provides a work environment consistent with Adobe Illustrator, Adobe InDesign, Adobe Photoshop,
Topaz Detail V3 User Manual
 V3 User Manual The most controllable detail enhancement tool avaliable to selectively control three levels of detail and sharpening within images with absolutely no leftover artifacts or halos. Contents
Contents. User Manual
 Contents I. Installation A. How to Install 3 B. Entering Your Key 3 C. Host-Specific Installation 3 1. Paint Shop Pro 4 2. Photo Impact 5 3. Irfanview 6 D. Uninstalling 7 II. Introduction A. 8 1. Primary
Photoshop CC Editing Images
 Photoshop CC Editing Images Rotate a Canvas A canvas can be rotated 90 degrees Clockwise, 90 degrees Counter Clockwise, or rotated 180 degrees. Navigate to the Image Menu, select Image Rotation and then
PHOTOSHOP TUTORIAL: DIGITAL DARKROOM TECHNIQUES
 PHOTOSHOP TUTORIAL: DIGITAL DARKROOM TECHNIQUES STEP BY STEP TRAINING Learn by doing step by step exercises. Includes downloadable class files that work on Mac & PC. EDITION 1 Copyright Info Published
User Manual. Topaz Glow 2
 Topaz Glow 2 1 Topaz Glow 2 I. Installation A. How to Install 3 B. Plugin Compatibility 3 C. Host-Specific Installation 3 1. Photoshop, PSE, PSCC 3 2. Lightroom 4 3. PaintShop Pro 4 4. PhotoPlus 5 V. Additional
Workspace. Workspace
 Workspace Workspace AKVIS SmartMask is a plug-in to a photo editor. To call AKVIS SmartMask plugin, select the command Filter > AKVIS > SmartMask in Adobe Photoshop ; in Corel (Jasc) Paint Shop Pro it
Tree Masking Tutorial
 ReMask 3 In this tutorial we will look at another way to tackle the masking process. This workflow makes use of ReMask 3 s new Single Color Selection brushes, which come in handy for tricky projects like
Module All You Ever Need to Know About The Displace Filter
 Module 02-05 All You Ever Need to Know About The Displace Filter 02-05 All You Ever Need to Know About The Displace Filter [00:00:00] In this video, we're going to talk about the Displace Filter in Photoshop.
Contents. User Manual. Topaz DeJPEG
 Contents I. Installation A. How to Install 3 B. Entering Your Key 3 C. Host-Specific Installation 3 1. Paint Shop Pro 4 2. Photo Impact 5 3. Irfanview 6 II. Introduction A. JPEG Artifacts 7 1. What are
Using Adobe Photoshop
 Using Adobe Photoshop 8 In the last section we looked at adjusting colours to improve your image. In this section we ll look at various ways of touching up your images to fix problems with the images or
Introduction to Photoshop
 Introduction to Photoshop Instructional Services at KU Libraries A Division of Information Services www.lib.ku.edu/instruction Abstract: This course covers the basics of Photoshop, including common tools
Learning Photo Retouching techniques the simple way
 Learning Photo Retouching techniques the simple way Table of Contents About the Workshop... i Workshop Objectives... i Getting Started... 1 Photoshop Workspace... 1 Setting up the Preferences... 2 Retouching
UNDERSTANDING LAYER MASKS IN PHOTOSHOP
 UNDERSTANDING LAYER MASKS IN PHOTOSHOP In this Adobe Photoshop tutorial, we re going to look at one of the most essential features in all of Photoshop - layer masks. We ll cover exactly what layer masks
Using Adobe Photoshop
 Using Adobe Photoshop 8 In the last section we looked at adjusting colours to improve your image. In this section we ll look at various ways of touching up your images to fix problems with the images or
ADOBE PHOTOSHOP CS TUTORIAL
 ADOBE PHOTOSHOP CS TUTORIAL A D O B E P H O T O S H O P C S Adobe Photoshop CS is a popular image editing software that provides a work environment consistent with Adobe Illustrator, Adobe InDesign, Adobe
Tablet overrides: overrides current settings for opacity and size based on pen pressure.
 Photoshop 1 Painting Eye Dropper Tool Samples a color from an image source and makes it the foreground color. Brush Tool Paints brush strokes with anti-aliased (smooth) edges. Brush Presets Quickly access
Contents. Introduction
 Contents Introduction 1. Overview 1-1. Glossary 8 1-2. Menus 11 File Menu 11 Edit Menu 15 Image Menu 19 Layer Menu 20 Select Menu 23 Filter Menu 25 View Menu 26 Window Menu 27 1-3. Tool Bar 28 Selection
Topaz DeJPEG. v3.0. User Manual
 v3.0 Contents Topaz DeJPEG I. Installation A. How to Install 3 B. Entering Your Key 3 C. Host-Specific Installation 3 1. Paint Shop Pro / Photo Impact 4 2. Irfanview 5 II. Introduction A. JPEG Artifacts
Selective Editing in Camera Raw 5
 Selective Editing in Camera Raw 5 The editing tools that you saw in the last chapter are global editing tools. That is, they affect all parts of the image. So, when you choose to, for example, brighten
BRUSHES AND LAYERS We will learn how to use brushes and illustration tools to make a simple composition. Introduction to using layers.
 Brushes BRUSHES AND LAYERS We will learn how to use brushes and illustration tools to make a simple composition. Introduction to using layers. WHAT IS A BRUSH? A brush is a type of tool in Photoshop used
Adobe Photoshop CC update: May 2013
 Adobe Photoshop CC update: May 2013 Welcome to the latest Adobe Photoshop CC bulletin update. This is provided free to ensure everyone can be kept upto-date with the latest changes that have taken place
Transforming Your Photographs with Photoshop
 Transforming Your Photographs with Photoshop Jesús Ramirez PhotoshopTrainingChannel.com Contents Introduction 2 About the Instructor 2 Lab Project Files 2 Lab Objectives 2 Lab Description 2 Removing Distracting
Using Adobe Photoshop
 Using Adobe Photoshop 4 Colour is important in most art forms. For example, a painter needs to know how to select and mix colours to produce the right tones in a picture. A Photographer needs to understand
IMAGE CORRECTION. You can find this and more information with video tutorials at
 IMAGE CORRECTION You can find this and more information with video tutorials at http://www.adobe.com/support/photoshop/ P H O T O S H O P T O O L S CLONE STAMP TOOL The Clone Stamp tool paints one part
Digital Design and Communication Teaching (DiDACT) University of Sheffield Department of Landscape. Adobe Photoshop CS5 INTRODUCTION WORKSHOPS
 University of Sheffield Department of Landscape. Adobe Photoshop CS5 INTRODUCTION WORKSHOPS") Adobe INTRODUCTION WORKSHOPS WORKSHOP 1 - what is Photoshop + what does it do? Outcomes: What is Photoshop? Opening, importing and creating images. Basic knowledge of Photoshop tools. Examples of work.
Adobe INTRODUCTION WORKSHOPS WORKSHOP 1 - what is Photoshop + what does it do? Outcomes: What is Photoshop? Opening, importing and creating images. Basic knowledge of Photoshop tools. Examples of work.
Adobe Photoshop CS5 Layers and Masks
 Adobe Photoshop CS5 Layers and Masks Email: training@health.ufl.edu Web Page: http://training.health.ufl.edu Adobe Photoshop CS5: Layers and Masks 2.0 Hours The workshop will cover creating and manipulating
Using Adobe Photoshop
 Using Adobe Photoshop 6 One of the most useful features of applications like Photoshop is the ability to work with layers. allow you to have several pieces of images in the same file, which can be arranged
Editing Using Photoshop CS5
 The Photoshop CS4 Editing Workspace - shown is the document (image) window, ToolBox, Info, Navigator, History, Adjustments and Layers Palettes, Windows Menus and Options Bar (on top). USING THE LAYERS
By Washan Najat Nawi
 By Washan Najat Nawi how to get started how to use the interface how to modify images with basic editing skills Adobe Photoshop: is a popular image-editing software. Two general usage of Photoshop Creating
Lesson 16 Text, Layer Effects, & Filters
 Lesson 16 Text, Layer Effects, & Filters Digital Media I Susan M. Raymond West High School In this tutorial, you will: Create a Type Layer Add and Format Type within a Type Layer Apply Layer Effects Apply
Challenge Image: Blur the Background
 Challenge Image: Blur the Background Challenge Image: Blur the Background In this lesson, we re going to work on a challenge image that was submitted by a Masters Academy member. The image features a little
Photo Editing in Mac and ipad and iphone
 Page 1 Photo Editing in Mac and ipad and iphone Switching to Edit mode in Photos for Mac To edit a photo you ll first need to double-click its thumbnail to open it for viewing, and then click the Edit
Adobe PhotoShop Elements
 Adobe PhotoShop Elements North Lake College DCCCD 2006 1 When you open Adobe PhotoShop Elements, you will see this welcome screen. You can open any of the specialized areas. We will talk about 4 of them:
How to blend, feather, and smooth
 How to blend, feather, and smooth Quite often, you need to select part of an image to modify it. When you select uniform geometric areas squares, circles, ovals, rectangles you don t need to worry too
Rendering a perspective drawing using Adobe Photoshop
 Rendering a perspective drawing using Adobe Photoshop This hand-out will take you through the steps to render a perspective line drawing using Adobe Photoshop. The first important element in this process
Photoshop Elements Hints by Steve Miller
 2015 Elements 13 A brief tutorial for basic photo file processing To begin, click on the Elements 13 icon, click on Photo Editor in the first box that appears. We will not be discussing the Organizer portion
Improve your photos and rescue old pictures
 PSPRO REVISTED Nov 5 2007 Page 1 of 7 Improve your photos and rescue old pictures This guide gives tips on how you can use Paint Shop5 and similar free graphic programmes to improve your photos. It doesn
5 Masks and Channels
 5 Masks and Channels Adobe Photoshop uses masks to isolate and manipulate specific parts of an image. A mask is like a stencil. The cutout portion of the mask can be altered, but the area surrounding the
Unit 7 : Image Painting, Editing and Layers
 Unit 7 : Image Painting, Editing and Layers Introduction This Unit describes about various painting tools; such as selection, cropping and measuring tools, retouching, drawing and type tools, Navigation
An Introduction to Photoshop 6. Photoshop. retouching applications. images, Lightweight version: Photoshop Elements
 An Introduction to Photoshop 6 Gustav Taxén gustavt@nada.kth.se 2D1640 Grafik och Interaktionsprogrammering VT 2006 Photoshop One of the world s best known image retouching applications Current version
Photoshop Blending Modes
 Photoshop Blending Modes https://photoshoptrainingchannel.com/blending-modes-explained/#when-blend-modes-added For those mathematically inclined. https://photoblogstop.com/photoshop/photoshop-blend-modes-
Adobe Photoshop. How To Get Started With Adobe InDesign CC: 10 Things Beginners Want To Know How To Do TO START: 1) ZOOM, MOVE, RETOUCH (05:11)
 ZOOM, MOVE, RETOUCH (05:11)") Adobe Photoshop How To Get Started With Adobe InDesign CC: 10 Things Beginners Want To Know How To Do Video By Terry White Tutorial Sheet by Juliet Davis TO START: Open the tutorial in YouTube, download
Adobe Photoshop How To Get Started With Adobe InDesign CC: 10 Things Beginners Want To Know How To Do Video By Terry White Tutorial Sheet by Juliet Davis TO START: Open the tutorial in YouTube, download
COLORIZING IMAGES WITH GRADIENT MAPS
 COLORIZING IMAGES WITH GRADIENT MAPS In this Photoshop tutorial, we ll learn how to add complex colorizing effects to images using custom gradients! Specifically, we ll look at the Gradient Map image adjustment
Contents Foreword 1 Feedback 2 Legal information 3 Getting started 4 Installing the correct Capture One version 4 Changing the version type 5 Getting
 Contents Foreword 1 Feedback 2 Legal information 3 Getting started 4 Installing the correct Capture One version 4 Changing the version type 5 Getting to know Capture One Pro 6 The Grand Overview 6 The
SAVING, LOADING AND REUSING LAYER STYLES
 SAVING, LOADING AND REUSING LAYER STYLES In this Photoshop tutorial, we re going to learn how to save, load and reuse layer styles! Layer styles are a great way to create fun and interesting photo effects
Introduction to Photoshop Elements
 John W. Jacobs Technology Center 450 Exton Square Parkway Exton, PA 19341 610.280.2666 ccljtc@ccls.org www.ccls.org Facebook.com/ChesterCountyLibrary Introduction to Photoshop Elements Chester County Library
32 Float v3 Quick Start Guide. AUTHORED BY ANTHONY HERNANDEZ (415)
") 32 Float v3 Quick Start Guide 32 Float v3 Trademark/Copyright Information Copyright 2013 by United Color Technologies, LLC. All rights reserved. Unified Color Technologies, BeyondRGB, and HDR Expose are
32 Float v3 Quick Start Guide 32 Float v3 Trademark/Copyright Information Copyright 2013 by United Color Technologies, LLC. All rights reserved. Unified Color Technologies, BeyondRGB, and HDR Expose are
Color Correction and Enhancement
 10 Approach to Color Correction 151 Color Correction and Enhancement The primary purpose of Photoshop is to act as a digital darkroom where images can be corrected, enhanced, and refined. How do you know
Photoshop Filters. Applying Filters from the Filter Menu
 Photoshop Filters Filters are easy to learn and use, and yet are one of Photoshop s most powerful features. When used properly, they can recreate a number of photographic and artistic effects, can enhance
Types of Mask. Layer masks
 Photoshop Layer Mask Features Non destructive (does not delete pixels) until applied Uses brush tool which is configurable Can be added to any layer (except Background unless double click to unlock) including
The toolbar in Pixlr Editor always appears on the left-hand side, although you can drag it anywhere you like.
 The toolbar in Pixlr Editor always appears on the left-hand side, although you can drag it anywhere you like. Crop (Shortcut: C) Reframe your entire canvas to a desired size and remove everything else.
15 Photoshop Tips. Changing Photoshop rulers from inches to picas
 5 Photoshop Tips Changing Photoshop rulers from inches to picas What s the difference between inches and picas? a 6x inch RGB JPEG file is.9 MB a 6x pica RGB JPEG file is. MB a 6x inch RGB TIFF file is.
Photoshop: Manipulating Photos
 Photoshop: Manipulating Photos All Labs must be uploaded to the University s web server and permissions set properly. In this lab we will be manipulating photos using a very small subset of all of Photoshop
An Introduction to Layers, Masks and Channels in Photoshop
 An Introduction to Layers, Masks and Channels in Photoshop Roy Killen, GMAPS, EFIAP, GMPSA (c) 2017 Roy Killen Layers, Masks and Channels Page 1 Two approaches to image editing When images are edited in
Black and White using Photoshop
 Topics to be covered: Methods for B&W conversion Improving the image Toning Printer color management Black and White using Photoshop Various ways to get to B&W Adobe Raw Converter (ACR) in from Bridge
PHOTOSHOP & ILLUSTRATOR BOOTCAMP
 FALL 2014 - ELIZABETH LIN PHOTOSHOP & ILLUSTRATOR BOOTCAMP ILLUSTRATOR ALIGNMENT To access the alignment panel, go to Window -> Align. You should see a panel like the one below. This panel allows you to
A quick note: We hope that you will find something from the Tips and Tricks that will add a little pizazz to your yearbook pages!
 A quick note: The following pages are tips and tricks for Basic Photoshop users. You may notice that some instructions indicate that non-awpc fonts were used, and that some colors were created using the
Black and White Photoshop Conversion Techniques
 Black and White Photoshop Conversion Techniques Andrew Gibson on Jan 27th 2011 Final Product What You'll Be Creating A quick glance through any photography or fashion magazine, or at the photos on social
Part 2: Spot Color Lessons
 Why White? The importance of white in color printing is often overlooked. The foundation of color printing is based on applying Cyan, Magenta, Yellow and Black (CMYK) onto white paper. The paper s white
Chroma Mask. Manual. Chroma Mask. Manual
 Chroma Mask Chroma Mask Tooltips If you let your mouse hover above a specific feature in our software, a tooltip about this feature will appear. Load Image Here an image is loaded which has been shot in
6 MASKS AND CHANNELS. Lesson overview
 6 MASKS AND CHANNELS Lesson overview In this lesson, you ll learn how to do the following: Create a mask to remove a subject from a background. Refine a mask to include complex edges. Create a quick mask
Camera Raw software is included as a plug-in with Adobe Photoshop and also adds some functions to Adobe Bridge.
 Editing Images in Camera RAW Camera Raw software is included as a plug-in with Adobe Photoshop and also adds some functions to Adobe Bridge. Camera Raw gives each of these applications the ability to import
Compositing. Compositing is the art of combining two or more distinct elements to create a sense of seamlessness or a feeling of belonging.
 Compositing Compositing is the art of combining two or more distinct elements to create a sense of seamlessness or a feeling of belonging. Selection Tools In the simplest terms, selections help us to cut
Workflow. User Manual
 Workflow I. Installation A. How to Install 3 B. Entering Your Key 3 C. Host-Specific Installation 3 1. Paint Shop Pro 4 2. Photo Impact 5 3. Irfanview 6 D. Uninstalling 7 II. Introduction A. About 8 1.
User Manual. V. Additional Resources A. FAQ s 33 B. Connect 35 C. Company Info 36
 Topaz Texture Effects 2 I. Installation A. How to Install 3 B. Plugin Compatibility 3 C. Host-Specific Installation 3 1. Photoshop 3 2. Lightroom 4 3. PaintShop Pro 4 4. PhotoPlus 5 D. Uninstalling 5 E.
XXXX - ILLUSTRATING FROM SKETCHES IN PHOTOSHOP 1 N/08/08
 INTRODUCTION TO GRAPHICS Illustrating from sketches in Photoshop Information Sheet No. XXXX Creating illustrations from existing photography is an excellent method to create bold and sharp works of art
Teach Yourself Adobe Photoshop Topic 9: Photo Retouching Part 2
 http://www.gerrykruyer.com Teach Yourself Adobe Photoshop Topic 9: Photo Retouching Part 2 In the last week s lesson, you repaired damaged areas of an image, removed unwanted parts of an image, cloned
In order to manage and correct color photos, you need to understand a few
 In This Chapter 1 Understanding Color Getting the essentials of managing color Speaking the language of color Mixing three hues into millions of colors Choosing the right color mode for your image Switching
AGENDA :: MULTIMEDIA TOOLS :: CLASS NOTES. :: Homework Critiques (5-7 minutes each) :: Photoshop Lesson 3. A-1 Gorgeous! [ COMPOSITE DEMO ] :: 7mins.
![AGENDA :: MULTIMEDIA TOOLS :: CLASS NOTES. :: Homework Critiques (5-7 minutes each) :: Photoshop Lesson 3. A-1 Gorgeous! [ COMPOSITE DEMO ] :: 7mins.](/thumbs/86/93336476.jpg "AGENDA :: MULTIMEDIA TOOLS :: CLASS NOTES. :: Homework Critiques (5-7 minutes each) :: Photoshop Lesson 3. A-1 Gorgeous! [ COMPOSITE DEMO ] :: 7mins.") CLASS :: 03 02.10 2017 AGENDA :: Homework Critiques (5-7 minutes each) A-1 Gorgeous! Upload A-1 Project to Student Folder :: Photoshop Lesson 3 [ COMPOSITE DEMO ] :: 7mins. I. SELECTIONS [ Common Law ]:
CLASS :: 03 02.10 2017 AGENDA :: Homework Critiques (5-7 minutes each) A-1 Gorgeous! Upload A-1 Project to Student Folder :: Photoshop Lesson 3 [ COMPOSITE DEMO ] :: 7mins. I. SELECTIONS [ Common Law ]:
Filters. Learning Objectives. Introduction
 6 Painting Tools and Filters Learning Objectives After completing this chapter, you will be able to: Apply paint to an image using the Brush Tool. Select and modify brush styles using the Brush Preset
GETTING STARTED. 0 P a g e B a s i c s o f A d o b e P h o t o s h o p A g a P r i v a t e I n s t i t u t e f o r c o m p u t e r s c i e n c e
 GETTING STARTED 0 P a g e B a s i c s o f A d o b e P h o t o s h o p Adobe Photoshop: is a popular image editing software that provides a work environment consistent with Adobe Illustrator, Adobe InDesign,
32 Float v2 Quick Start Guide. AUTHORED BY ANTHONY HERNANDEZ - (415)
") 32 Float v2 Quick Start Guide 32 Float V2 Trademark/Copyright Information Copyright 2011 by United Color Technologies, LLC. All rights reserved. Unified Color Technologies, BeyondRGB, and HDR Float are
32 Float v2 Quick Start Guide 32 Float V2 Trademark/Copyright Information Copyright 2011 by United Color Technologies, LLC. All rights reserved. Unified Color Technologies, BeyondRGB, and HDR Float are
Photoshop: Manipulating Photos
 Photoshop: Manipulating Photos All Labs must be uploaded to the University s web server and permissions set properly. In this lab we will be manipulating photos using a very small subset of all of Photoshop
Texts and Resources: Assessments: Freefoto.com Group Photo Projects
 Effective Date: 2009-10 Name of Course: Digital Photography Grade Level: 9-12 Department: Industrial Technology and Engineering Length of Course: 30 cycles Instructional Time: 180 days Period Per Cycle:
Adobe Lightroom CC Tutorial
 Adobe Lightroom CC Tutorial GETTING STARTED Adobe Lightroom CC is a photo editing program which can be used to manipulate and edit large quantities of photos at once. It has great exporting and metadata
Exploring Photoshop Tutorial
 Exploring Photoshop Tutorial Objective: In this tutorial we will create a poster composed of three distinct elements: a Bokeh, an image and title text. The Bokeh is an effect which is sometimes seen in
CREATE A BURNT EDGE EFFECT
 CREATE A BURNT EDGE EFFECT One of the all-time classic effects in Photoshop is the burnt edge, and there s lots of different ways to create it, but in this Adobe Photoshop tutorial, we re going to look
Lightroom- Creative Cloud Tips with NIK
 Lightroom- Creative Cloud Tips with NIK Motion Sequence Make several images in your camera on burst mode without following the subject. Let them move past your field. It is best to use a tripod, but not
Ian Barber Photography
 1 Ian Barber Photography Sharpen & Diffuse Photoshop Extension Panel June 2014 By Ian Barber 2 Ian Barber Photography Introduction The Sharpening and Diffuse Photoshop panel gives you easy access to various
Overview of Photoshop Elements workspace
 Overview of Photoshop Elements workspace When you open Photoshop Elements, the Welcome screen offers you two options (Figure 1): The Organize button opens the Organizer. In the Organizer you organize and
FLAMING HOT FIRE TEXT
 FLAMING HOT FIRE TEXT In this Photoshop text effects tutorial, we re going to learn how to create a fire text effect, engulfing our letters in burning hot flames. We ll be using Photoshop s powerful Liquify
Luminosity Masks Program Notes Gateway Camera Club January 2017
 Luminosity Masks Program Notes Gateway Camera Club January 2017 What are Luminosity Masks : Luminosity Masks are a way of making advanced selections in Photoshop Selections are based on Luminosity - how
Pacific New Media David Ulrich
 Pacific New Media David Ulrich pacimage@maui.net www.creativeguide.com 808.721.2862 Digital Imaging Workflow in Adobe Photoshop All color and tonal correction editing should be done in a non-destructive
Photo Effects & Corrections with PhotoFiltre
 Photo Effects & Corrections with PhotoFiltre P 330 / 1 Fix Colour Problems and Apply Stylish Effects to Your Photos in Seconds with This Free Software If you re keen on digital photography, you probably