OzE Field Modules. OzE Studio Series. OzE Studio OzE Studio Lite. Quick reference pages OzE Studio Data Entry (2pgs) OzE Preview.
|
|
|
- Alexandrina Simon
- 5 years ago
- Views:
Transcription

1 1 OzE Field Modules OzE Studio Series OzE Studio OzE Studio Lite Quick reference pages OzE Studio Data Entry (2pgs) OzE Preview OzE has been designed to accommodate many different fields of photography, always keeping the needs of the photographer in mind. Creating the ability to not only capture the art, but, reproduce that artwork by their standards, not at a labs discretion. Working with the interactive lab tools, leaving the creativity to the artist and relieving the lab of tedious work orders, establishes a more efficient, accurate, and cost effective digital solution, catering to everyone s needs. This user s guide will cover all functions of the OzELite and the OzEStudio Series. These Modules are the predecessors to the OzE Assembler and Assembler Pro series. The features of the Preview Screen and the Data Entry Screen (Studio) are also used in the OzE Match Series. The OzE Match Series modules are the most effective source of capturing images and data, and merging the information for production, understanding the OzE Studio System, the base catalyst for the OzE System is a good start to understanding the basics of using The OzE Digital Imaging System. Opening Screen
 Variable 2 (Ex. 2002 or 02) Variable 3 (Ex. 52 or Taft HS) Sitting Starting Sitting Number Assigned to images (Ex.")
2 2 On the title page of OzE there are 6 main functions available Item 1 Options: The information entered in this field will determine how images will be numbered / named when opened in the OzE Digital Imaging System. Variable 1 (Ex. 01) Variable 2 (Ex or 02) Variable 3 (Ex. 52 or Taft HS) Sitting Starting Sitting Number Assigned to images (Ex. 000) (Example = GRAY HS - 001) Variables 1, 2, and 3 create the root directory folder V-1 V-2 V-3 Sit Use only letters, numbers and dash mark, no double spaces. PC Card: Images which have been photographed digitally, stored to a CF or PC card, or Images, which have been transferred to a CF or PC card, can be opened in the OzE Digital Imaging System with the touch of a button. The PC or CF card must be labeled OZE this is done under the properties of the card. Select the PC Card function on the title page, the images from that card will be downloaded and numbered automatically by OzE. Renumbering of images is determined by information entered in the Options preferences. The images are now available to be viewed, adjusted, ordered from, and stored. Images downloaded to OzE from a PC card will be stored in the OzE File Structure under Images the new folder will be named based on the information entered in the Options function. If the

3 3 information is new OzE will generate a root or weekly folder in Images to hold all sitting related by matching information of Options preferences. OzE provides the option to automatically erase the PC card after downloading images or leave the information on the card intact. Folders: By selecting the Folders option, a prompt of the Select a folder browser allows images to be opened for viewing from locations on the hard drive, or previously viewed sittings in the Images file, in the OzE file structure in the hard drive. Images cannot be opened directly from a CD, they must be downloaded to the Hard Drive within a folder. If the images being opened have not been previously opened in the Studio module, the information entered in Options will determine how the images will be filed and numbered. Images being opened from the hard drive or other media will not be renumbered unless that option is selected at the browser. Images downloaded directly from PC card are automatically renumbered. To start viewing, locate the desired images in the Select a folder browser. Double click on the desired folder (Images must be within a labeled folder) and select Preview, Data Entry or Renumber mode.

4 4 Once images have been uploaded to OzE, switching between Preview and Data Entry modes can be performed easily by clicking on the Preview or Data Entry tabs inside the window. If a sitting has not been opened in the OzE system, it can be renumbered using the Renumber function on the Select a folder browser. Simply input the information desired in the preference options (Item 1. Of this section) select folders option, locate desired folder to be loaded, and select Renumber. The images will be opened in preview mode, and will be renumbered according to the information entered in the options field. Only images with no file attachments can be renumbered. Folders previously opened with OzE cannot be renumbered unless all information in the file folder, except the actual images, have been deleted (i.e. Icon Preview folders and all XML attachments). NOTE: By removing these attachments all information is eliminated and sitting will begin as new. CD Creations Creating Lab Order CD After all ordering functions have been completed and saved, a Lab production CD will need to be created to send in for the production order, select the Make Lab CD function button on the title screen of the OzE Digital Imaging System. OzE will automatically create a lab CD from all orders pending in the Saved Orders file in the OzE file structure. If one CD will not accommodate the amount of information in the Saved Orders holding tank, OzE will prompt the operator to insert additional CDs as needed to continue and complete the lab order CD function. Once the Lab order function is complete all information in the Saved Orders folder will be removed. OzE will also create a duplicate copy of each CD created, by part number, in MYCDS in the OzE file structure. A summary report will be printed for each CD Created.

5 5 Creating Archive CD Used to create archives of images root folders in the Images file of the OzE file structure. Insert a CD into the CD-RW on the CPU. Select the Archive CD function on the title screen for OzE. The archive CD will locate individual root folders in the Images File. OzE will ask a series of questions concerning the task of archiving, all root folders in the Images File can be archived or any root folder can be selected independently whether or not to be moved to the archive CD. After configuring the root folders to be archived OzE will move those chosen to CD. After completion OzE will provide an Archive CD Number for labeling and file purposes. Close: To correctly exit any field in the OzE system always use the CLOSE button provided on each screen. It is most important when closing out of the entire system. Selecting the CLOSE function on the Title screen will exit the entire program. Closing with the windows X function will not completely shut down the program, therefore multiple OzE programs can be run simultaneously, this will cause the computer to slow down or become overloaded.
6 6 Usage Acquiring Images Images can be acquired from, PC / CF cards, or stored files within the hard drive. Cards must be labeled OZE to read the card information. To begin a session on the OzE system using a PC or CF card: Insert card in the data chute on the CPU Wait for identification card has been initialized Select the PC CARD option from the title screen on the OzE System Session will open renumbering the images to specifications entered in Options function on the Title Screen Session will begin in Preview mode Proceed with viewing / ordering When finished correctly close OzE Images and information will be updated and saved in a file in the Images folder of the OzE file structure To place an order, Save Order or Save Changes must be selected. OzE provides the option to automatically erase the PC card after downloading images or leave the information on the card intact, to be removed later. To begin a session using images stored on the hard drive: Select the Folders option from the title screen on the OzE System The Welcome folder browser will open Locate the file folder of the images to be viewed / ordered Double click the desired folder (images are not show or listed in the browser screen) Do not open any subfolders of the sittings main folder (Icon, Preview, Retouch, Camera Spot,etc) Select mode to open session Preview, Data Entry or Renumber from options at the bottom of the browser Moving between modes can be done at anytime during the session it is not necessary to exit and reopen to change modes Proceed with viewing / ordering When finished correctly close OzE Images and information will be updated and saved back to the original file in original location For images saved on CD, Zip or Floppy: Images stored on CD, Zip or Floppy cannot be opened directly. Images must be copied to a new folder on the hard drive of the CPU. Images must be in a folder, for the OzE Digital Imaging System to acquire and open them. (Information created and stored by Oze cannot be written directly back to a CD, Zip, or Floppy. Images can be stored independently on the hard drive or can be Renumbered into the OzE Images file structure.

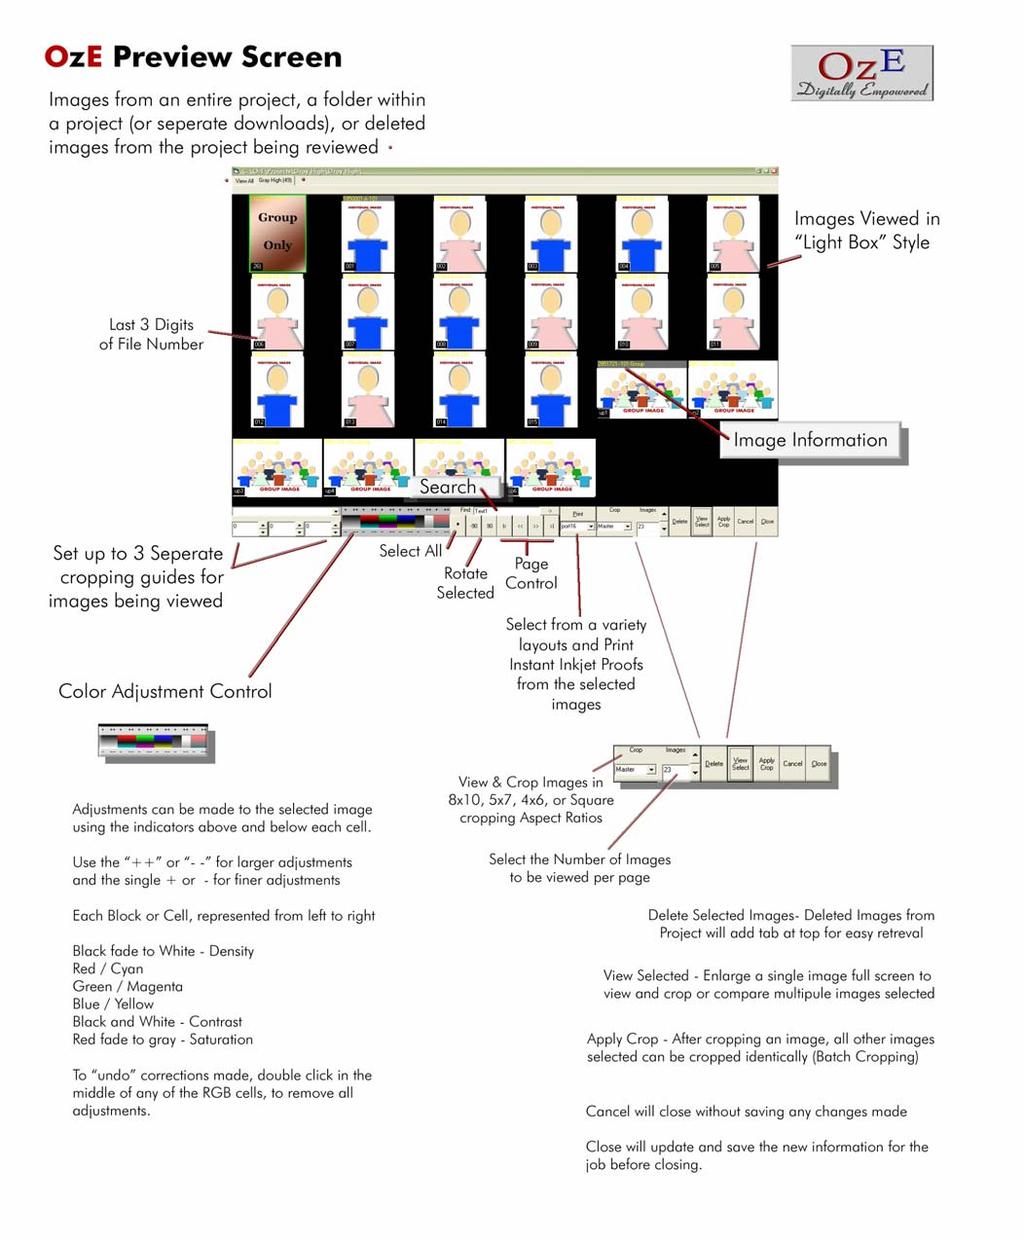
7 7 OzE Preview Screen Functions: Photo Gallery - 12 images per page last 3 digits of image number displayed in corner. Color Control Module Used to correct images for viewing and Instant Proofs only, this does affect the actual prints via attached information, but does not adjust the raw image file Controls: Density, Standard RGB color, Contrast, and Saturation Select the image or images to be changed, using the + and signs correct the image as desired. Adjust in.03 (2cc Eq.value) or.09 (6cc Eq. Value) increments. Name Tag Attach subject name or personal code to each image individually. This tag will be permanent, and will print with the image on the order report. Symbols cannot be used in the nametag, this information is also used in the script feature of the data entry mode. Image Finder Locate a specific image within the session currently open, type in the pose number and OzE will go directly to that image Select All Select all images in session currently open Coarse Rotation Rotate selected image(s) clock wise / counter clockwise 90 0 or rotate After images have been rotated to match orientation they will remain corrected permanently for future viewings. Page Selector Scroll forward or backward page by page, 12 images per page in photo gallery
8 8 Close Close session and return to title screen. OzE automatically saves or updates information for that session (this does not automatically prepare the order for production. This must be done using the Save Orders or Save Changes functions). Open Group After selected images have been tagged as a group using the Tag Group function, they can be opened as a separate group within the session. Data Entry Switches modes from Preview to Data Entry mode Slide Show Select images to be displayed in the Slide Show feature. Select the Slide Show function, the first image will appear, along with the last three digits of the image number in the upper left corner. To begin the automatic Slide Show presentation, press the space bar on the keyboard. The speed of the Slide Show can be adjusted using the up and down arrows on the keyboard. Pause the slide show by pressing the space bar again. To manually move between images use the left and right arrows of the keyboard. Slide Show will automatically return to the preview screen when finished, to exit Slide Show at anytime press the ESC key. View Selected Compare selected images on a single screen by themselves, 1 to 50 images can be selected for comparison. Tag Special Tag images for yearbook, annual, or directory poses. OzE will copy these images to a separate folder, easily accessible, for the creation of a CD to provide to schools, churches, or graphic printing companies. The astrict symbol (* ) located in the upper left of the image in yellow will identify the image as a special pose. Tag Sitting Identify images with group and sitting numbers. Separate multiple sittings within a job by using the Tag Sitting function. Select the images to be identified by group and sitting, use the Tag # Control to set group or sitting numbers, use Tag Sitting to attach group and sitting number. The sitting tag, or second number will increase each time a group of selected images has been tagged. Any image can be identified with multiple group/sitting tags. Group / sitting numbers appear in yellow in the upper left corner of the images. By selecting the first image of a sitting and then holding the ALT key select the last image of each sitting for quick tag feature. Used in conjunction with the Prf 4 instant proofs printing in sequential order by sitting, based on tag values Tag Group Select all images to be viewed as a separate group within a session. Use Tag Group to identify the images then select Open Group to view as a session within a session. Clear Tags Select any images with tags that need to be removed, select Clear Tags any tag information, sitting, group, or special will be removed. Tag # Control The two adjustable numbers relate as group number and sitting number. The first of the two numbers must be changed manually, the second number or sitting number will automatically advance in sequential order, or it can be adjusted manually. Delete Select image(s) to be removed, select the Delete function and those images will be moved to a folder titled Deleted within the file structure of that directory. The images are not permanently deleted, and can be recalled. Proof Style Control Select the desired proof page set-up Instant Proof Print Send selected images to print as instant inkjet or windows based printer type proofs.
9 9 Preview Screen Features Slide Show The slide show function is a great way to display images to clients. It provides a large unobstructed view of each individual image, and displays the last 3 digits of the image number in the upper left corner. To use the slide show function: Rotate images to the correct orientation Select the images to be viewed in the slide show Select the Slide Show function button The first image will appear full screen / full frame The Space Bar starts and pauses the Slide Show The Up and Down Arrows on the keyboard control the speed at which the slide show runs When paused, the Left and Right Arrows scroll through images When Slide Show is complete, OzE returns to the Preview screen To exit the Slide Show at any time press the ESC key Grouping Images Rather than deleting or removing images from a session, it is possible to view and work by groups or mini sessions within job. Groups will remain in the same folder of the overall session being viewed. Select the images to be grouped together Select the Tag Group function button A yellow pound # symbol will appear in the upper left of image, tagging each image in group Select Open Group and only images tagged will be viewed Proceed with viewing / data entry functions To return to all images, close out of the group image gallery in the preview mode. To remove the group tags select all tagged images Select the Clear Tag function Any type of tag is removed with the Clear Tag function Easy Cropping pat. pend. The OzE Digital Imaging System includes the patented Easy Cropping system. Easy Cropping gives the operator complete control of the image. Easy Cropping can be used on any image on any screen of OzE. The features include: Rotations in 90 0 increments Correct orientation is saved for future viewings Zoom in Zoom out Simultaneous Crop Option Free movement of image Fine adjust control Independent cropping aspect ratios (in Data Entry mode) Operating the Easy Cropping System in Preview Mode Rotating Images: Select images to be rotated, hold the ctrl key to choose selectively, the shift key selects all between 2 points, or use the Select All function button. After you have selected the images use the Coarse Rotation function buttons to turn the image(s) to correct orientation.
10 10 After an image has been rotated OzE will record and attach that information with the image for future use. Zooming Function: OzE preview mode displays the images full frame in the gallery pages, as well as in the View Selected function. These images can be zoomed in / out for viewing in preview mode. For actual production cropping with proper aspect ratios you must be in Data Entry Mode. To use the Zoom & Crop function in the preview mode: Select an image to adjust, either in the small 12up page or full screen, using the View Selected function Place curser at the top of the frame, hold control key, then Holding the right mouse button, drag down to zoom in, release ctrl key, click to stop, Holding the right mouse button, drag up to zoom out, release ctrl key, click to stop Use the Left mouse button to grab and move image in the frame Double click on image to reset to original full frame sizing Easy cropping also features a fine adjust function. Hold the Shift+Ctrl keys, select and drag with the cursor on the image (do not hold either mouse button) this spins the image from center axis with in the frame. The image can turn in 1 0 increments within the frame. Fine Adjust, combined with the Zoom and Free Movement features provides complete control of image cropping and sizing. Image Comparison You can compare up to 50 images on a single screen. However, they do get very small. Enlarging a single image or comparing a small group does enhance the viewing presentation. Use the View Selected function button to enlarge one, two, or a group of images together on a single screen. Images can be cropped in this mode (full frame view only). Select close at the bottom of View Selected screen to return to standard Preview mode. Color Control Module The image control module allows the operator the ability to correct the images for viewing presentation and instant proof printing purposes. This DOES affect the final production print, as an attached xml correction, but does not change the raw image file. Select image(s) to be manipulated Using the + (approx. 2cc Eq. Value) ++ (approx. 6cc Eq. Value) or the - / -- symbols adjust images as desired The first cell (black & white) controls density Cells are: Red Cyan, Green Magenta, Blue Yellow Cell 5 Contrast Control Cell 6 Saturation Control Inkjet Proofing Options OzE contains several instant proofing options to select from. Instant inkjet proofing allows for faster delivery, better display of effects, higher marketability, lower cost, and less chance of copyright infringements. By pre-printing information, prices, order forms, or other boarders on proof paper, matching the selected printing layout, creates a complete proof or specialty item for instant product delivery. Instant Proofing Selections Proof Page Layouts: PF4 4-1½ x 2¼ Color Proofs Single Row
11 11 Vertical Layout Images must be tagged with Tag Sitting function PF4 will print all Instant Proof pages in sequential (tagged) order regardless of shoot order FX4 4 1½ x 2 ¼ Color Proofs 1 Row (PF4 page layout) 1 FX Strip (Mini Version of FX layout on bottom of page) Select images to print First image of every 4 default FX Strip pose Port8 8 1½ x 2 ¼ Color Proofs 2 Rows 4each Vertical Layout 8 or more images can be selected to print Group / Sitting tag not required OzE automatically prints number of pages to accommodate number of images selected to be printed Port ½ x 2 ¼ Color Proofs 4 Rows 4each Vertical Layout 16 or more images can be selected to print Group / Sitting tag not required PF8 8 2¼ x 3¼ Color Proofs 2 Rows 4each Horizontal Layout 8 or more images can be selected to print Group / Sitting tag not required FX Special Effects Display 1 Row of 5 2 x2¾ Frames 1 pose per page 5 various effects applied to image from current effects set selected in Data Entry mode Horizontal Layout FX ½ x 2½ Color Proofs 2 Rows Horizontal layout 1 FX Strip Select images for printing First image of every 10 default FX Strip pose Or Tag 1 of every 10 with the Tag Group function to identify pose to be used in FX Strip OzE automatically prints number of pages to accommodate number of images selected, to be printed.

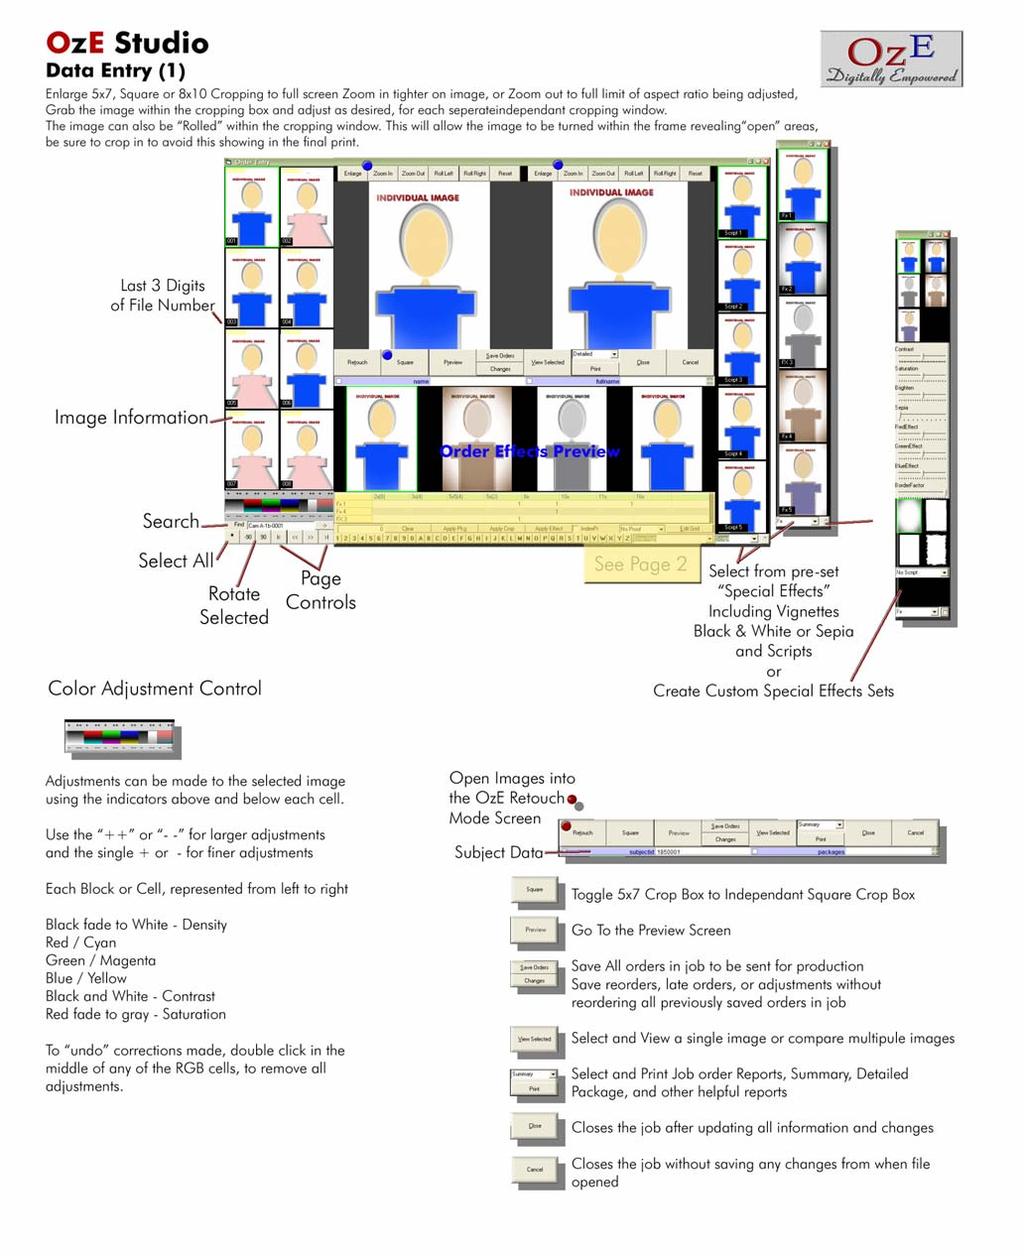
12 12 OzE STUDIO Data Entry Mode Functions: Photo Gallery - 8 images per page, last 3 digits displayed Color Control Module Used to correct images for viewing and Instant Proofs only, this does not affect the actual prints. Controls: Density, Standard RGB color, Contrast, and Saturation Image Finder Locate a specific image within the session currently open, type in the image number and OzE will go directly to that image. Select All Select all images in session currently open (A green box indicates an image has been selected) Coarse Rotation Rotate selected image(s) clock wise / counter clock wise 90 0 or rotate After images have been rotated to match orientation they will remain corrected for future viewings. Page Selector - Scroll forward or backward page by page, 8 images per page. Enlarge Enlarge Square, 5 x 7 or 8 x 10 format to full-page view. Zoom Function Custom crop images as desired, using Zoom in / Zoom out functions. Fine Adjust Rotation For fine adjustments to orientation, straighten images shot out of square, also change orientation of images, vertical to horizontal or horizontal to vertical
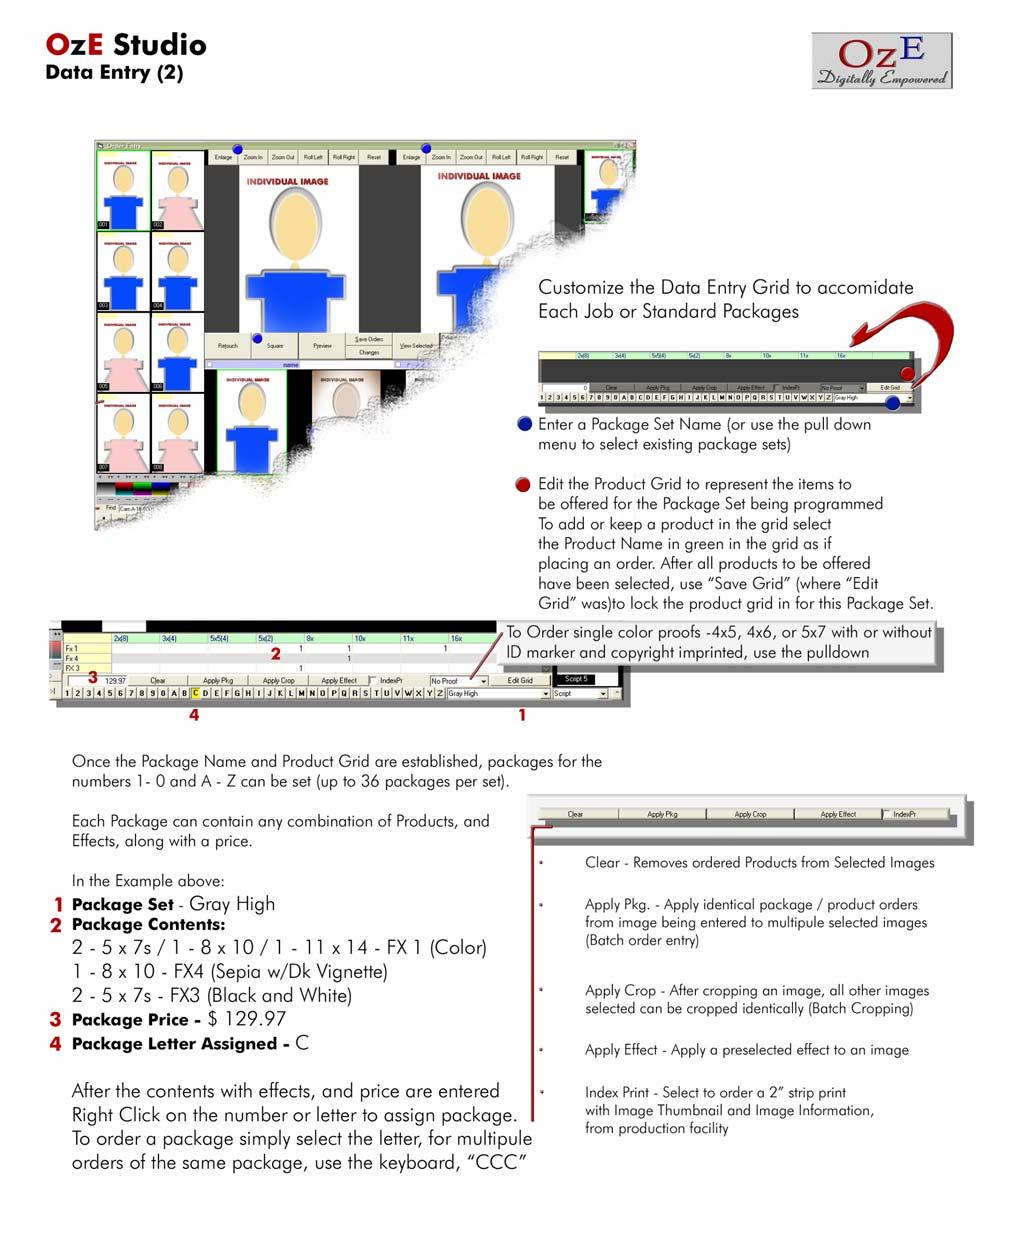
13 13 Reset Reset image to At Capture framing Retouch Toggles job into the OzE Retouch mode Square Crop - Toggle 5x7 aspect ratio to square format ratio (retained independently) Close Close to Title Screen Preview Go to Preview mode Save Changes Creates separate file of data/information entry added to pre-existing orders Save Orders Save data/information of initial order entry Report Generates data/information report containing Image Session Number File number Tag information Data Entry by Size and Unit Values Session summary by Size and Unit Value View Selected Compare selected images on a single screen by themselves, 1 to 100 images can be selected for comparison Effects Ordered Shows the various effects, which have been used for data entry order, for selected image on the bottom half of the Data Entry window. Clear - Clears all data entered for selected images Apply Package - Apply package to multiple selected images Batch package data entry Apply Crop - Used to apply Batch crop to multiple images Data Entry Grid Order images in various sizes by sheets, contains zoom function degradation warning, data entered shown by size and effect title. Special Information Bar Special instructions: Index Print Tag to Print the Image Name Order on 2 x 10 strip Comments - Type special instructions for production to lab Proof Order Menu Select single production proofs to be ordered of selected image : 4x5 4x6 5x5 or 5x7 with or without ID and Copyright Save / Edit Grid This function is used to customize the order entry grid to accommodate the sheet sizes used. Select Edit Grid then select the sheet sizes you wish to use, when completed select Save Grid Package Selector Create custom packages to use for ordering. Use the A-T keys for entering package information. The return key will move to the next image available for ordering.
14 14 Effect Set Selector - Create new or select desired effects set to use for ordering. Effects Module Create new or manipulate existing effects set for different look Effects Data Selection Select desired effects finish for data entry. OzE Studio Features Viewing Images After entering the Data Entry mode images can be viewed by proper aspect ratios. The 2 large frames in the center of the page represent 5x7 cropping ratio (left) and 8x10 cropping ratio (right). Choose an image from the gallery on the left of screen. The gallery displays images 8 to a page. The selected image will appear in both frames simultaneously and can be adjusted independently. Images can also be viewed with Special Effects applied. Using the Special Effects Set Selector obtain the desired set of effect to be displayed. Simply select one of the 5 effects from the Effects Data Selection on the right of the screen and it will be applied to the image being viewed. Easy Cropping Pat.Pend. As in the preview mode, OzE supplies unlimited cropping options to the user. Note: When viewing images in Data Entry mode, any cropping adjustments made in the Preview mode will be retained as the base cropping in Data Entry. To return an image to its original configuration you must reset the image. This can be accomplished by double clicking on the image, in the image gallery. Operating the Easy Cropping system in Data Entry Mode Rotating Images: Images can be rotated in 90 0 increments one at a time or multiple images can be selected to rotate as a batch. If an image has previously been rotated in the Preview mode, or in a previous viewing, it will be retained, unless the user decides to change the orientation. Zoom Functions: Using the Easy Cropping function buttons above each aspect ratio frame, will adjust the images to meet any desired crop. The first option is Enlarge, this will enlarge the represented crop and aspect ratio to a full frame view. Easy cropping functions can be used to make adjustments to the enlarged image. Zoom in and Zoom out options perform as described. There is an unlimited ability to zoom in on an image. However, the more an image is enlarged within a frame, the further the image degrades in quality. Fine Adjustment Rotations: Oze also incorporates the Fine Adjust tools. Using the Roll Left or Roll right function buttons, an image can be rotated from center axis in 1 0 increments. Images, which have been shot out of square, can be corrected. Images shot in a horizontal format can be changed to vertical, or use easy cropping functions to create a totally different look for the image. When using the Fine Adjust, the image will rotate in the frame; the black areas on the sides or above and below the image represent no information (image) in that space. Using the Zoom and Free Movement functions, the frame must be filled with an image for proper print production.
15 15 Reset: After an image has been adjusted, it can be reset to original full view by selecting the reset function button. The image will be reset to its original configuration as it was carried over from the preview mode. Cropping for Production: Images must be adjusted in both framing aspect ratio windows for production. Because OzE allows for independent cropping of (Square), 5x7 and 8x10 aspect ratios, it is necessary for both images to be framed and cropped as desired for production. Having independent cropping aspect ratios allows the operator to frame a perfect 5x7 (represented ratio) as well as a perfect 8x10 (represented ratio) as-well as square without compromising any cropping. The coordinates of how the operator crops the image are recorded and attached to the image. This information correlates with the lab software, and produces a 100% accurate representation of how the operator wanted the image to be printed. Simultaneous Crop Option: In the Data Entry mode the option of simultaneously cropping both aspect ratios equally is available. Select an image Using the mouse, crop the small gallery image as desired This will simultaneously crop the 5x7 and 8x10 images, in other words a base crop This can only be performed on an image if it has not been adjusted individually in the 5x7 or 8x10 framing windows Batch Cropping Feature: To apply identical cropping to multiple images use the Apply Crop feature Select a single image Crop the image as desired in both framing windows Holding the control key, or using select all button, select the images to which the identical crop is to be applied Use the Apply Crop button to apply batch crop to all selected images

16 16 Creating Effects: OzE offers the ability to use and create a wide variety of effects. Varying levels of color, black and white, or sepia tone, can be created. Adding vignettes can also be incorporated into effects. Additional borders overlays, scripting and effects will be released with future OzE upgrades. To create an effect set: 5 effects can be created per set In the Effects Set Selector, create a name for a new effects set to be created After 2 or more sets have been created they can be accessed using the pull down menu of the Selector After you have created a name, the 5 Effects Data Selection images will be represented in color with the effects set name and number (FX 1-5) Select the effects module function button next to the selector The five images will reduce and the Effects control module will appear Select the first Effects Data Selection image for adjustment Use the effects control module to create desired look After a desired effect has been created, right click on the Data Selection Effect to save changes. Adjust the remaining 4 Data Selection images in the set as desired Close and save the new Effects Set with the Effects Module function button With Oze an unlimited number of Effect Sets, can created and stored, for use with any future orders. As with the Easy Cropping functions, OzE will record and attach the information for the effect used, to the image. This information again correlates to the lab software modules, and provides a 100% accurate representation of the effect ordered by the operator.
17 17 Creating Text Script Effects Set: Following the same steps to creating a new set of effects, the operator has the ability to create text overlays for embossing an image. First create a new effects set to use. Open the effects control module. To assign a script / font type: Select the thumbnail above the effects control module Using the Script pull-down menu select the font type to be assigned to that effect Right click on the selected thumbnail to save the script effect. Follow the same steps for the remaining 4 effects thumbnails. Using the Scripting Effects Set: As with ordering a specific effect, such as black and white or sepia, select the script effect desired. In the Name assignment text box type the name to appear on the print i.e. Jimmy To create a second line of text use the underscore (_) to incorporate a line break i.e. - Jimmy, 2002 Once this is in place order the desired sheets using the data entry grid Creating Package Sets: Oze has the ability to create an unlimited number of pre designed package sets containing 20 separate packages per set In the package set selector create a new set by entering a name. After 2 or more package sets have been created the pull down menu can be used to recall any sets for future use. To create any one of the 20 packages per set: Enter the number of elements by size and effect for the package being created Select the desired effect first By selecting the element size desired on the data entry grid, enter the number of sheets for each size making up the package. Effects can be mixed within a single package i.e.: Package A of Set 1 could contain - one sheet of color wallets; two sheets of 5x7s, one in color, one in black and white; and one 8x10 in sepia. After the information for the package has been entered in the Data Entry Grid, right click on the letter, which is to represent the package created. This will save the package information entered.(left click to remove the package) Continue building for all 20 packages in the set if needed, or use only the number of packages required to complete the specific set being created. This is ideal for schools or events with predesigned package ordering. With an unlimited number of Packages Sets available to be created, each school or event could have it s own customized packages and prices. For ease of order entry, use the corresponding letter keys to enter packages, enter will move to the next available image.

18 18 Retouching By selecting retouch in the data entry screen your sitting will be moved into a retouching mode. In this mode you have an 8up image gallery, which can be navigated the same as the preview and data entry modes. The selected image is displayed in the center, large for retouching. Holding the control key, allows for movement of the image, grab and move with the left mouse key, click and drag down with the right mouse button to enlarge, drag up to zoom out. (You must hold the control key to adjust the image in the center). Located at top right are the various brush types to select from The drop down menu below the brushes contains the retouching options Clone Right click area to clone, Left mouse button to execute Blur - Left mouse button to execute Darken (Burn) - Left mouse button to execute Brighten (Dodge) - Left mouse button to execute De Pepper Identifies dark specs (like camera spots) and removes Left mouse button to execute De Salt Identifies light specs (like catch lights) and removes Left mouse button to execute Pearly White Identifies Areas of white (Like Teeth and whitens) Left mouse button to execute Brush Size and the Brush Opacity are the next 2 items below the retouch options Reset Will reset the image as it was when selected Undo Will undo the last action performed The next box identifies the mode of operation Retouch or Camera Spot This is controlled by the box directly below labeled Mode
19 19 The next box Apply is only used with the camera spot mode. After you have corrected the camera spots within an image select individual images or select all images, then select Apply. This will apply the same camera spot retouching corrections to all images selected. The final box OK will save the retouch corrections made to all images and return to the data entry mode. Entering Order Data To place a production order: Select the image to be ordered from Check cropping and framing Select the desired effect to be ordered Enter the number of elements to be ordered for that effect, for that image If additional effects are desired, simply select the effect to be used Order the number of elements for that effect, for that image Each different effect ordered from that image is represented in the Effects Ordered display below the framing windows If more than 3 effects are used to order on 1 image, scroll down the data entry grid to view all order information entered If a pre-designed package needs to be ordered for an image: Select the image to be ordered from Check cropping and framing Select the desired package set to be used Select the letter of the package to be ordered, the letter button will turn yellow when activated The elements of the package chosen will appear in the data entry grid The effects used in that package will also appear in the Effects Ordered Display Additional single elements can be added separately to any package order Batch Package Application Feature Applying packages / order data to multiple images, similar to batch cropping, simply: Select a single image Enter the package ordered using buttons A-T or by the sheet data entry methods Holding the control key, or using the select all button select all images to which the same data is to be entered Use the Apply Package button to enter batch package to selected images Ordering Proofs Select all images to which a specific proof size is to be ordered, Using the pull-up menu select the type of proof to be ordered, Proofs cannot be ordered using the Apply Package function. Proofs will be cropped as image is cropped in corresponding aspect ratio crop guides. Special Information Task Bar Additional data can be entered using the Special Information Task Bar. Index Print Tag images to be printed as an index print Comments - Tag can only be used when selecting single images. This tag cannot be placed to a group of images simultaneously. When a Comment tag is attached to the image, a text window will open next to it providing the ability to type in any special instruction for the lab. To remove order information: By selecting one image, a group of images, or all images, the data information entered can be completely removed using the Clear function button on the Special Information Bar, located directly below the Data Entry Grid.
20 20 By selecting a single image, data entered can be removed by each element ordered. Use the right mouse button to remove data by clicking on the actual element box within the Data Entry Grid. This allows for selective changes to be made within an order. As with Cropping Information, and Effects information, all data entered is recorded and attached to the image. This information will be displayed and represented anytime the images are opened in the OzE Digital Imaging System. Order information will not be processed for CD creation until the Save Order function has been executed. Large Job Refresh At times when entering data for large job the system may become slow due to the amount of information being attached to a large number of images. If the system seems to be moving slower at any point, a job refresh can be executed. When the Refresh button is selected, OzE saves what is being worked on, closes itself down, refreshes it s system and then returns to the exact point at which it was prior to being refreshed. During this time the computer should not be accessed, wait until OzE Assembler has returned to the screen where you left off. Save Orders: After all information Cropping Framing Effects Data Special Instruction has been entered for all images in the session, it is necessary to select the Save Orders function for OzE to create an order file. The images with order data attached are placed into a file folder (of the same name) in the OzE file structure awaiting the creation of a Lab Order CD. If changes to an order are required prior to creating a lab CD, simply make the changes to data information and select the Save Orders Function again. OzE will update the Order folder in the file structure awaiting the creation of the Lab CD. Save Changes: This function allows for reordering additional products from a session currently in production or a completed job. Enter the new order information (Note: all prior information attached to images will still be displayed and active) by selecting the Save Changes function. This will create a new order folder in the OzE file structure for Saved Orders. The folder will have the same name with sequential numbering for each reorder placed. This file will contain only the new order information. Any prior information entered and moved to a lab cd, will not be moved to the new reorder file. Note: If the Save Orders function is selected when placing a reorder ALL order information, new and old will be moved to the order file awaiting lab CD creation. This will cause duplication of previously produced work. Generate Order Report: After all functions in creating an order have been completed, OzE can generate a summary report for that particular job. By selecting the type of Report from the Pull Down Menu, and select Print- OzE will open the Report Preview, showing the report layout. Select Print and OzE will prompt the print info window; select the number of copies to be printed. A Variety of reports and media are available information contained in the reports depends on the Type of Job and Report selected.
21 21
22 22
23 23
OzE Field Modules. OzE School. Quick reference pages OzE Main Opening Screen OzE Process Data OzE Order Entry OzE Preview School Promotion Checklist
 1 OzE Field Modules OzE School Quick reference pages OzE Main Opening Screen OzE Process Data OzE Order Entry OzE Preview School Promotion Checklist OzESchool System Features Field unit for preparing all
Apple Photos Quick Start Guide
 Apple Photos Quick Start Guide Photos is Apple s replacement for iphoto. It is a photograph organizational tool that allows users to view and make basic changes to photos, create slideshows, albums, photo
Photo One Digital Photo Shoots and Edits
 Photo One Digital Photo Shoots and Edits You will submit photo shoots, unedited and you will submit selected edited images. The shoots will be explained first and the edits will be explained later on this
The Main Screen. Viewing Area - show the photos that were selected in the Source List.
 iphoto 11 The Main Screen Source List - This is where the Library, Events and Albums are identified. It is the place where photos can be organized and accessed. The Source List can also contain the slideshows,
Photoshop Elements Hints by Steve Miller
 2015 Elements 13 A brief tutorial for basic photo file processing To begin, click on the Elements 13 icon, click on Photo Editor in the first box that appears. We will not be discussing the Organizer portion
Copyright Notice. Trademarks
 Copyright Notice All rights reserved. No part of this publication may be reproduced, stored in a retrieval system, or transmitted in any form or by any means, electronic, mechanical, photocopying, recording,
Color and More. Color basics
 Color and More In this lesson, you'll evaluate an image in terms of its overall tonal range (lightness, darkness, and contrast), its overall balance of color, and its overall appearance for areas that
ArcSoft PhotoImpression Table of Contents:
 ArcSoft PhotoImpression Table of Contents: 1. Welcome to PhotoImpression 2. Highlights of PhotoImpression 3. System Requirements 4. Installing PhotoImpression 5. Working with PhotoImpression Getting Started
Mullingar Camera Club Basic introduction to Digital Printing using Photoshop CC.
 Mullingar Camera Club Basic introduction to Digital Printing using Photoshop CC. Table of Contents Course aims: 1 Course presentation notes: 1 Introducing Photoshop: 1 Adjusting the Brightness or Contrast
iphoto Objective Course Outline
 iphoto Objective In this class participants will learn how iphoto creates a photo center for photo organization by using rolls and albums. Participants will also learn the built-in editing tools. Participants
Photoshop CC Editing Images
 Photoshop CC Editing Images Rotate a Canvas A canvas can be rotated 90 degrees Clockwise, 90 degrees Counter Clockwise, or rotated 180 degrees. Navigate to the Image Menu, select Image Rotation and then
1 ImageBrowser Software User Guide 5.1
 1 ImageBrowser Software User Guide 5.1 Table of Contents (1/2) Chapter 1 What is ImageBrowser? Chapter 2 What Can ImageBrowser Do?... 5 Guide to the ImageBrowser Windows... 6 Downloading and Printing Images
Nikon View DX for Macintosh
 Contents Browser Software for Nikon D1 Digital Cameras Nikon View DX for Macintosh Reference Manual Overview Setting up the Camera as a Drive Mounting the Camera Camera Drive Settings Unmounting the Camera
ImagesPlus Basic Interface Operation
 ImagesPlus Basic Interface Operation The basic interface operation menu options are located on the File, View, Open Images, Open Operators, and Help main menus. File Menu New The New command creates a
Recitation 2 Introduction to Photoshop
 Recitation 2 Introduction to Photoshop What is Adobe Photoshop? Adobe Photoshop is a tool for creating digital graphics either by starting with a scanned photograph or artwork or by creating the graphics
Photoshop CC 2018 Essential Skills
 Photoshop CC 2018 Essential Skills Adobe Photoshop Creative Cloud 2018 University Information Technology Services Learning Technology, Training, Audiovisual and Outreach Copyright 2018 KSU Division of
Managing Your Workflow Using Coloured Filters with Snapper.Photo s PhotoManager Welcome to the World of S napper.photo
 Managing Your Workflow Using Coloured Filters with Snapper.Photo s PhotoManager Welcome to the World of S napper.photo Get there with a click Click on an Index Line to go directly there Click on the home
iphoto Getting Started Get to know iphoto and learn how to import and organize your photos, and create a photo slideshow and book.
 iphoto Getting Started Get to know iphoto and learn how to import and organize your photos, and create a photo slideshow and book. 1 Contents Chapter 1 3 Welcome to iphoto 3 What You ll Learn 4 Before
Managing images with NewZapp
 Managing images with NewZapp This guide is for anyone using the NewZapp Fixed editor as opposed to the Drag and Drop editor. The Image Manager is where images are uploaded and stored in your NewZapp account
LESSON 02: GET STRONGER FOR PS USERS COMPANION BOOK. Digital Scrapbook Academy. February 2018: Lesson 02 Get Stronger for Photoshop Users
 Digital Scrapbook Academy February 2018: Lesson 02 LESSON 02: GET STRONGER FOR PS USERS COMPANION BOOK Page 1 of 19 Table of Contents Table of Contents 2 Welcome to Lesson 02 for Photoshop Users 4 1: Add
Contents Foreword 1 Feedback 2 Legal information 3 Getting started 4 Installing the correct Capture One version 4 Changing the version type 5 Getting
 Contents Foreword 1 Feedback 2 Legal information 3 Getting started 4 Installing the correct Capture One version 4 Changing the version type 5 Getting to know Capture One Pro 6 The Grand Overview 6 The
Introduction to Photoshop: Basic Editing & Prepare Images for the Web
 Introduction to Photoshop: Basic Editing & Prepare Images for the Web 1 LEARNING OBJECTIVES Basic tools in Photoshop & Use of Bridge Prepare images for print and web use TOPICS COVERED Photoshop Interface
Copyright 2014 SOTA Imaging. All rights reserved. The CLIOSOFT software includes the following parts copyrighted by other parties:
 2.0 User Manual Copyright 2014 SOTA Imaging. All rights reserved. This manual and the software described herein are protected by copyright laws and international copyright treaties, as well as other intellectual
Extreme Makeovers: Photoshop Retouching Techniques
 Extreme Makeovers: Table of Contents About the Workshop... 1 Workshop Objectives... 1 Getting Started... 1 Photoshop Workspace... 1 Retouching Tools... 2 General Steps... 2 Resolution and image size...
Contents. Introduction
 Contents Introduction 1. Overview 1-1. Glossary 8 1-2. Menus 11 File Menu 11 Edit Menu 15 Image Menu 19 Layer Menu 20 Select Menu 23 Filter Menu 25 View Menu 26 Window Menu 27 1-3. Tool Bar 28 Selection
Black and White using Photoshop
 Topics to be covered: Methods for B&W conversion Improving the image Toning Printer color management Black and White using Photoshop Various ways to get to B&W Adobe Raw Converter (ACR) in from Bridge
Appendix A ACE exam objectives map
 A 1 Appendix A ACE exam objectives map This appendix covers these additional topics: A ACE exam objectives for Photoshop CS6, with references to corresponding coverage in ILT Series courseware. A 2 Photoshop
Photo Editing in Mac and ipad and iphone
 Page 1 Photo Editing in Mac and ipad and iphone Switching to Edit mode in Photos for Mac To edit a photo you ll first need to double-click its thumbnail to open it for viewing, and then click the Edit
Apple iphoto 4 ITS Technology & Learning Services Dr. Luanne Fose Revised April 29, 2004
 Apple iphoto 4 ITS Technology & Learning Services Dr. Luanne Fose Revised April 29, 2004 Table of Contents Introduction...1 Importing Photos From Your Digital Camera...1 Importing Photos From Other Sources...2
Organizing artwork on layers
 3 Layer Basics Both Adobe Photoshop and Adobe ImageReady let you isolate different parts of an image on layers. Each layer can then be edited as discrete artwork, allowing unlimited flexibility in composing
Introduction to: Microsoft Photo Story 3. for Windows. Brevard County, Florida
 Introduction to: Microsoft Photo Story 3 for Windows Brevard County, Florida 1 Table of Contents Introduction... 3 Downloading Photo Story 3... 4 Adding Pictures to Your PC... 7 Launching Photo Story 3...
Digital Portable Overhead Document Camera LV-1010
 Digital Portable Overhead Document Camera LV-1010 Instruction Manual 1 Content I Product Introduction 1.1 Product appearance..3 1.2 Main functions and features of the product.3 1.3 Production specifications.4
Digital Design and Communication Teaching (DiDACT) University of Sheffield Department of Landscape. Adobe Photoshop CS5 INTRODUCTION WORKSHOPS
 University of Sheffield Department of Landscape. Adobe Photoshop CS5 INTRODUCTION WORKSHOPS") Adobe INTRODUCTION WORKSHOPS WORKSHOP 1 - what is Photoshop + what does it do? Outcomes: What is Photoshop? Opening, importing and creating images. Basic knowledge of Photoshop tools. Examples of work.
Adobe INTRODUCTION WORKSHOPS WORKSHOP 1 - what is Photoshop + what does it do? Outcomes: What is Photoshop? Opening, importing and creating images. Basic knowledge of Photoshop tools. Examples of work.
MC3 Motion Control System Shutter Stream Quickstart
 MC3 Motion Control System Shutter Stream Quickstart Revised 7/6/2016 Carousel USA 6370 N. Irwindale Rd. Irwindale, CA 91702 www.carousel-usa.com Proprietary Information Carousel USA has proprietary rights
CLICK Pro User Manual. User Manual. CLICK Pro. CLICK Pro - User Manual v 1.0 (October 2005) v. 1.0
 v. 1.0") User Manual User Manual CLICK Pro CLICK Pro - User Manual v 1.0 (October 2005) 2 CONTENTS OF THE MANUAL 1 FUNCTIONAL DESCRIPTION 1.1 General Description 1.2 Product target 1.3 Handling the system 1.4 Image
User Manual User Manual CLICK Pro CLICK Pro - User Manual v 1.0 (October 2005) 2 CONTENTS OF THE MANUAL 1 FUNCTIONAL DESCRIPTION 1.1 General Description 1.2 Product target 1.3 Handling the system 1.4 Image
Photoshop Exercise 2 Developing X
 Photoshop Exercise 2 Developing X X-ray Vision: In this exercise, you will learn to take original photographs and combine them, using special effects. The objective is to create a portrait of someone holding
Editing Using Photoshop CS5
 The Photoshop CS4 Editing Workspace - shown is the document (image) window, ToolBox, Info, Navigator, History, Adjustments and Layers Palettes, Windows Menus and Options Bar (on top). USING THE LAYERS
2. Picture Window Tutorial
 2. Picture Window Tutorial Copyright (c) Ken Deitcher, 1999 Original image Final image To get you started using Picture Window we present two short tutorials. Basic Image Editing This tutorial covers basic
Teton Photography Group
 Overview general post-processing (editing) workflow for serious photographers Focus on processes more than software Examples using Adobe Lightroom and Photoshop Teton Photography Group January 2016 Emphasis
Picture Style Editor Ver Instruction Manual
 ENGLISH Picture Style File Creating Software Picture Style Editor Ver. 1.18 Instruction Manual Content of this Instruction Manual PSE stands for Picture Style Editor. In this manual, the windows used in
Introduction.
 Introduction At Photobooks Express, it s our aim to go that extra mile to deliver excellent service, products and quality. Our fresh, dynamic and flexible culture enables us to stand above the rest and
Tutorial: Correcting images
 Welcome to Corel PHOTO-PAINT, a powerful tool for editing photos and creating bitmaps. In this tutorial, you'll learn how to perform basic image corrections to a scanned photo. This is what the image looks
PASS4TEST. IT Certification Guaranteed, The Easy Way! We offer free update service for one year
 PASS4TEST IT Certification Guaranteed, The Easy Way! \ We offer free update service for one year Exam : 9A0-125 Title : Adobe Photoshop Lightroom 2 ACE Exam Vendors : Adobe Version : DEMO Get Latest &
Contents: Bibliography:
 ( 2 ) Contents: Sizing an Image...4 RAW File Conversion...4 Selection Tools...5 Colour Range...5 Quick Mask...6 Extract Tool...7 Adding a Layer Style...7 Adjustment Layer...8 Adding a gradient to an Adjustment
Introduction to Photoshop CS6
 Introduction to Photoshop CS6 Copyright 2016, Faculty and Staff Training, West Chester University. A member of the Pennsylvania State System of Higher Education. No portion of this document may be reproduced
Image and Data Acquisition
 Image and Data Acquisition LCP Image Acquisition Procedures This section provides guidelines for scanning images that will be added to the LCP image archive. By scanning the image, we obtain a digital
Using Photoshop Elements
 Using Photoshop Elements Created By: Rick Williams August 2004 Table of Contents Photoshop Element Tools...Page 1 Tool Descriptions... Page 3 Starting Photoshop Elements... Page 7 Resizing an Image...
SMALL OFFICE TUTORIAL
 SMALL OFFICE TUTORIAL in this lesson you will get a down and dirty overview of the functionality of Revit Architecture. The very basics of creating walls, doors, windows, roofs, annotations and dimensioning.
PUZZLE EFFECTS 2D Photoshop actions For Photoshop CC, CS6, CS5, CS4
 PUZZLE EFFECTS 2D Photoshop actions For Photoshop CC, CS6, CS5, CS4 User Guide CONTENTS 1. THE BASICS... 1 1.1. About the actions... 1 1.2. How the actions are organized... 1 1.3. The Classic effects (examples)...
ITEC185 INTRODUCTION TO DIGITAL MEDIA
 1 ITEC185 INTRODUCTION TO DIGITAL MEDIA ADOBE PHOTOSHOP ITEC185 - Introduction to Digital Media ITEC185 - Introduction to Digital Media 2 What is Adobe Photoshop? Photoshop is the leading professional
Picture Style Editor Ver Instruction Manual
 ENGLISH Picture Style File Creating Software Picture Style Editor Ver. 1.12 Instruction Manual Content of this Instruction Manual PSE is used for Picture Style Editor. In this manual, the windows used
By Washan Najat Nawi
 By Washan Najat Nawi how to get started how to use the interface how to modify images with basic editing skills Adobe Photoshop: is a popular image-editing software. Two general usage of Photoshop Creating
Adobe Photoshop CC 2018 Tutorial
 Adobe Photoshop CC 2018 Tutorial GETTING STARTED Adobe Photoshop CC 2018 is a popular image editing software that provides a work environment consistent with Adobe Illustrator, Adobe InDesign, Adobe Photoshop,
Created by Eugene Stephens iphoto 11. To start iphoto: - Double-click Macintosh HD. Go to Applications > iphoto. Layout
 iphoto 11 To start iphoto: - Double-click Macintosh HD. Go to Applications > iphoto. Layout Library Viewing Area Search Zoom Toolbar - Library Library of imported photos & video clips, folders, albums,
Creating Photo Borders With Photoshop Brushes
 Creating Photo Borders With Photoshop Brushes Written by Steve Patterson. In this Photoshop photo effects tutorial, we ll learn how to create interesting photo border effects using Photoshop s brushes.
RETRO User guide RETRO. Photoshop actions. For PS CC, CS6, CS5, CS4. User Guide
 RETRO Photoshop actions For PS CC, CS6, CS5, CS4 User Guide CONTENTS 1. THE BASICS... 1 1.1. About the effects... 1 1.2. How the actions are organized... 1 1.3. Installing the actions in Photoshop... 2
AutoCAD Tutorial First Level. 2D Fundamentals. Randy H. Shih SDC. Better Textbooks. Lower Prices.
 AutoCAD 2018 Tutorial First Level 2D Fundamentals Randy H. Shih SDC PUBLICATIONS Better Textbooks. Lower Prices. www.sdcpublications.com Powered by TCPDF (www.tcpdf.org) Visit the following websites to
Photoshop: Manipulating Photos
 Photoshop: Manipulating Photos All Labs must be uploaded to the University s web server and permissions set properly. In this lab we will be manipulating photos using a very small subset of all of Photoshop
Adobe Photoshop. How To Get Started With Adobe InDesign CC: 10 Things Beginners Want To Know How To Do TO START: 1) ZOOM, MOVE, RETOUCH (05:11)
 ZOOM, MOVE, RETOUCH (05:11)") Adobe Photoshop How To Get Started With Adobe InDesign CC: 10 Things Beginners Want To Know How To Do Video By Terry White Tutorial Sheet by Juliet Davis TO START: Open the tutorial in YouTube, download
Adobe Photoshop How To Get Started With Adobe InDesign CC: 10 Things Beginners Want To Know How To Do Video By Terry White Tutorial Sheet by Juliet Davis TO START: Open the tutorial in YouTube, download
THE ORGANIZER 12 THE EDITOR 17 ORGANIZING YOUR WORKFLOW 19 CREATING A NEW DOCUMENT 22 RESIZING AN IMAGE 25 MAKING A SELECTION 27
 Contents 1 PHOTOSHOP ELEMENTS ESSENTIALS 10 2 PHOTO OPTIMIZING 46 INTRODUCTION 8 THE ORGANIZER 12 SEPARATING SCANNED IMAGES 48 THE EDITOR 17 CROPPING WITH CUSTOM SHAPES 50 ORGANIZING YOUR WORKFLOW 19 CROPPING
ISCapture User Guide. advanced CCD imaging. Opticstar
 advanced CCD imaging Opticstar I We always check the accuracy of the information in our promotional material. However, due to the continuous process of product development and improvement it is possible
The Basics. Introducing PaintShop Pro X4 CHAPTER 1. What s Covered in this Chapter
 CHAPTER 1 The Basics Introducing PaintShop Pro X4 What s Covered in this Chapter This chapter explains what PaintShop Pro X4 can do and how it works. If you re new to the program, I d strongly recommend
Use of the built-in Camera Raw plug-in to take your RAW/JPEG/TIFF file and apply basic changes
 There are a lot of different software packages available to process an image for this tutorial we are working with Adobe Photoshop CS5 on a Windows based PC. A lot of what is covered is also available
PhotoStory 3 Tutorial
 PhotoStory 3 Tutorial http://www.microsoft.com/windowsxp/using/digitalphotography/photostory/default.mspx Photostory is one of Microsoft's best kept secrets. This free software package is on your CD or,
 S4B Image Converter Soft4Boost Help S4B Image Converter www.sorentioapps.com Sorentio Systems, Ltd. All rights reserved Contact Us If you have any comments, suggestions or questions regarding S4B Image
A quick note: We hope that you will find something from the Tips and Tricks that will add a little pizazz to your yearbook pages!
 A quick note: The following pages are tips and tricks for Basic Photoshop users. You may notice that some instructions indicate that non-awpc fonts were used, and that some colors were created using the
Picture Style Editor Ver Instruction Manual
 ENGLISH Picture Style File Creating Software Picture Style Editor Ver. 1.15 Instruction Manual Content of this Instruction Manual PSE stands for Picture Style Editor. indicates the selection procedure
11 Advanced Layer Techniques
 11 Advanced Layer Techniques After you ve learned basic layer techniques, you can create more complex effects in your artwork using layer masks, path groups, filters, adjustment layers, and more style
PUZZLE EFFECTS 3D User guide JIGSAW PUZZLES 3D. Photoshop CC actions. User Guide
 JIGSAW PUZZLES 3D Photoshop CC actions User Guide CONTENTS 1. THE BASICS...1 1.1. About the actions... 1 1.2. How the actions are organized... 1 1.3. The Classic effects (examples)... 3 1.4. The Special
 User Manual REV 1.0 Thank you for choosing this Mitsubishi Electric product More information is available at http://www.mitsubishiphotosuite.com/ 2 1 INSTALLING THE PRODUCT.... 4 1.1 SYSTEM REQUIREMENTS...
Quilt Pro 6 Lesson Quilt in a Quilt
 Quilt Pro 6 Lesson Quilt in a Quilt Quilt in a Quilt The Inner Quilt This quilt is a very complex design. We will cover a unique technique not covered in the manual. While any one can master the techniques
NEW ITEMS IN LIGHTROOM 6. Notes in red are notes to me for the presentation and to help you recall what I was doing if you refer to these notes later.
 NEW ITEMS IN LIGHTROOM 6 INTRO Notes in red are notes to me for the presentation and to help you recall what I was doing if you refer to these notes later. Good evening folks. It is a pleasure to see everyone.
Adobe PhotoShop Elements
 Adobe PhotoShop Elements North Lake College DCCCD 2006 1 When you open Adobe PhotoShop Elements, you will see this welcome screen. You can open any of the specialized areas. We will talk about 4 of them:
Using Adobe Photoshop
 Using Adobe Photoshop 4 Colour is important in most art forms. For example, a painter needs to know how to select and mix colours to produce the right tones in a picture. A Photographer needs to understand
Blab Gallery Uploads: How to Reduce and/or Rotate Your Photo Last edited 11/20/2016
 Blab Gallery Uploads: How to Reduce and/or Rotate Your Photo Contents & Links QUICK LINK-JUMPS to information in this PDF document Photo Editors General Information Includes finding pre-installed editors
Kent Messamore 3/6/2010
 Post Processing Kent Messamore 3/6/2010 What we will cover Post Processing Photoshop, Lightroom, Elements, and others JPEG or RAW Photoshop Elements Workflow Organization, Create, share Photoshop Elements
AGENDA :: MULTI- MEDIA TOOLS :: CLASS NOTES. :: Homework Critiques Best and Worst Websites. :: Photoshop Lesson 2 Things aren t what they seem
 CLASS :: 02 02.02 2018 AGENDA :: Homework Critiques Best and Worst Websites :: Photoshop Lesson 2 Things aren t what they seem I. PHOTO RETOUCHING: Before There Were Computers (Web Post) http://jmcolberg.com/weblog/2010/01/photoshop_before_there_were_computers_the_art_of_retouching_and_improving_negatives_and_prints/
ADOBE VISUAL COMMUNICATION USING PHOTOSHOP CS5 Curriculum/Certification Mapping in MyGraphicsLab
 ADOBE VISUAL COMMUNICATION USING PHOTOSHOP CS5 Curriculum/Certification Mapping in MyGraphicsLab OBJECTIVES- 1.0 Setting Project Requirement 1.1 Identify the purpose, audience, and audience needs for preparing
Creating Digital Stories for the Classroom
 Using Photo Story 3 to Create a Digital Story Creating Digital Stories for the Classroom When you open Photo Story 3 you have a few options. To begin a new story select the option Begin a New Story and
ADOBE BRIDGE. Help and tutorials
 ADOBE BRIDGE Help and tutorials September 2013 Contents What s new... 1 What s new in Adobe Bridge CC... 2 What s new in Adobe Bridge CS6... 4 Adobe Bridge... 5 About Adobe Bridge... 6 Start Adobe Bridge...
Buxton & District U3A Digital Photography Beginners Group Lesson 5: Simple Editing. 5 November 2013
 U3A Group Lesson 5: Simple Editing 5 November 2013 Programme Buxton & District 19 September Exploring your camera 1 October You ve taken some pictures now what? (Viewing pictures; filing on your computer)
AutoCAD LT 2012 Tutorial. Randy H. Shih Oregon Institute of Technology SDC PUBLICATIONS. Schroff Development Corporation
 AutoCAD LT 2012 Tutorial Randy H. Shih Oregon Institute of Technology SDC PUBLICATIONS www.sdcpublications.com Schroff Development Corporation AutoCAD LT 2012 Tutorial 1-1 Lesson 1 Geometric Construction
 Introduction At Photobookshop, it s our aim to go that extra mile to deliver excellent service, products and quality. Our fresh, dynamic and flexible culture enables us to stand above the rest and produce
The Magazine for Photographers November 2016
 The Magazine for Photographers The Magazine for Photographers CONTENTS NOVEMBER 4 Panning and Zooming in Lightroom 16 Photoshop Tool Presets 23 Step by Step: Pencil Shading Effect 32 Batch Renaming 46
Quick Start Training Guide
 Quick Start Training Guide To begin, double-click the VisualTour icon on your Desktop. If you are using the software for the first time you will need to register. If you didn t receive your registration
Camera & Photos Apps ios10
 2017 Class Camera & Photos Apps ios10 iphone and ipad 1 Camera iphone also has filter options Live Photos, iphone 6s, 7 and ipad Pro Grid HDR - High Dynamic Range Timer Flash Switch Cameras Exposure Adjust
Challenge Image: Blur the Background
 Challenge Image: Blur the Background Challenge Image: Blur the Background In this lesson, we re going to work on a challenge image that was submitted by a Masters Academy member. The image features a little
The ideal K-12 science microscope solution. User Guide. for use with the Nova5000
 The ideal K-12 science microscope solution User Guide for use with the Nova5000 NovaScope User Guide Information in this document is subject to change without notice. 2009 Fourier Systems Ltd. All rights
User Guide V10 SP1 Addendum
 Alibre Design User Guide V10 SP1 Addendum Copyrights Information in this document is subject to change without notice. The software described in this document is furnished under a license agreement or
Acknowledgements About this book Other Goodies Included with this Book Resources for Nikon Photographers. Part I: Capture NX2 2. Why Capture NX2?
 The Photographer s Guide to Capture NX2 Contents Acknowledgements About this book Other Goodies Included with this Book Resources for Nikon Photographers x xi xii xiii Part I: Capture NX2 2 Why Capture
QuiltCAD will be used to create an entire quilt layout. It can be used for single patterns, pantographs, borders, or sashings. There are some options
 QuiltCAD will be used to create an entire quilt layout. It can be used for single patterns, pantographs, borders, or sashings. There are some options that only QuiltCAD can do when compared to other portions
Retouching Portraits in Photoshop
 Retouching Portraits in Photoshop I Removing Blemishes When removing blemishes, acne or other imperfections on the skin, our goal is to maintain as much of the original skin texture as possible. That way,
INSTRUCTION MANUAL MM-A209
 E INSTRUCTION MANUAL 9222-7300-11 MM-A209 2 BEFORE YOU BEGIN Before installing the DiMAGE Viewer software, read the data-transfer section in the camera manual. This section details how to connect the camera
Adding Content and Adjusting Layers
 56 The Official Photodex Guide to ProShow Figure 3.10 Slide 3 uses reversed duplicates of one picture on two separate layers to create mirrored sets of frames and candles. (Notice that the Window Display
Alibre Design Tutorial: Loft, Extrude, & Revolve Cut Loft-Tube-1
 Alibre Design Tutorial: Loft, Extrude, & Revolve Cut Loft-Tube-1 Part Tutorial Exercise 5: Loft-Tube-1 [Complete] In this Exercise, We will set System Parameters first, then part options. Then, in sketch
Introduction. Introduction
 Introduction Introduction Thank you for purchasing this Canon Microfilm Scanner 800II. These instructions describe how to use the Scanning Utility 800 utility software to import an image projected on the
ScanGear CS-U 5.6. for CanoScan FB1210U Color Scanner. User s Guide
 ScanGear CS-U 5.6 for CanoScan FB1210U Color Scanner User s Guide Copyright Notice Copyright 2000 Canon Inc. This manual is copyrighted with all rights reserved. Under the copyright laws, this manual may
AutoCAD LT 2009 Tutorial
 AutoCAD LT 2009 Tutorial Randy H. Shih Oregon Institute of Technology SDC PUBLICATIONS Schroff Development Corporation www.schroff.com Better Textbooks. Lower Prices. AutoCAD LT 2009 Tutorial 1-1 Lesson
QSL Studio. QSL Card Setting Procedure & Specs. Version 1.0
 73 QSL Studio QSL Card Setting Procedure & Specs Version 1.0 (Desktop Section - QSL Studio) 1. ebabel QSL Studio is not a design tool, the users must upload their cards as a finish art work. 2. The image
Generations Automatic Stand-Alone Lace By Bernie Griffith Generations Software
 We are going to create an open Italian lace. Generations software products provide advanced image processing features allowing for the creation of stand-alone lace with just a few simple techniques. A