Supplies: * 18 gauge wire * 28 gauge wire * Needle nose wire cutters * Sherry s pattern * Embellishments
|
|
|
- Gervais Bryan
- 5 years ago
- Views:
Transcription


1 Retreat 2010 Wire Form Arm~Hands The supplies and techniques listed below are only suggestions. Read through the entire lesson before you proceed. I guarantee you will add or delete items from my outline. The building of the armature is one used by most clay users. Some of the techniques can be sued by cloth artists as well. Supplies: * 18 gauge wire * 28 gauge wire * Needle nose wire cutters * Sherry s pattern * Embellishments Sherry taught me a long time ago to use more pictures than words. Works for me If I can clarify a particular step or share larger pictures please ask me. Print Sherry s patter. Gather 5 wires. Place wires over the middle finger. Page 1


2 Mark just below the wrist. Gather the five 18 gauge wires tightly in your hand. Wrap 28 gauge wire as tight as you can around all the wires up to the wrist. Approximately ¼ of wire will be in place. Use the needle nose pliers and gently crimp the wires on all sides. This will help tighten the wire. Repeat on remaining 5 wires. Now you have the armature for two hands/arms. Page 2


3 Lay one armature over the pattern. Gently spread the wires following the pattern of the fingers. The fingers are taking shape. Lay the second armature of gather wires over the wires resembling fingers. Follow the pattern and spread the wires for the second hand. If this is too clumsy for you lay the wires on the pattern and proceed. You now have two hand armatures developing. Page 3

 Using the tip of the needle nose pliers gently")


4 Lets create the thumb. Slightly bend the wire at the base of the thumb. (See point of black marker.) Using the tip of the needle nose pliers gently bend the tip of the thumb following the pattern. Repeat on second armature. Place armature on pattern. Note the fingers are different in length. Look at your own hand for reference. The longest finger is the middle finger. If you relax your own hand you will note your hand creates a semi circle. Mark the wires and cut off excess wire. Repeat on second armature. To create the palm/top of the hand lay hand on pattern and mark wires with marker. Page 4


5 Secure 28 gauge wire to base of hand. TIGHTLY weave the wire over and under the 5 wires. When you get to the end wire loop over, press it into place and go back in the other direction. Think of it as basket weaving Stay within the marked area of palm/top of the hand. NOTE: the three wires in the middle require more wire than the thumb and little finger. Simply omit the outer wires and continue to wrap the 3 in between ending at the middle finger. The weaving is complete. Take the wire and loop between each finger for added strength. Wrap wire around the wrist a few times and trim. Page 5


6 Gently press wires together with pliers. Repeat process on second armature. Lets give the hand some personality. Bend the hand at the wrist. Note the hand is flat. Look at your own hand in a relaxed pose. The hand is arched. Many times I see gorgeous figures with flat hands. Apply this to your own artwork if you have not already done so and watch the hands come alive. Forgive me this technique requires 2 hands. Unfortunately I need one hand to take the photograph so I will be a bit chatty for a few seconds place your thumbs next to the middle wire and your index finger under the wires meeting the thumb. With one motion, slowly turn YOUR wrist bending the armature creating an arch. Pretty simple eh? Page 6


7 Your hand will look like the armature on the right. Look at your own relaxed hand. Notice the three fingers are parallel to each other. The thumb and little finger are at a slight angle. (this rule does not apply to figures that are perhaps doing a push up, scared, imitating a frog lolol.you get my point) Using the needle nose pliers straighten the 3 fingers shown in the photo on the left. The following steps are simple. Breathe. I will pose my own hand and look at the finger placement. Follow my lead or create your own positioning at this point. Not to worry, you can always change the position when the hand is complete. Photo on the left shows the arch we created. Photo on the right I bent the thumb slightly inwards. Page 7


8 Bend the index finger at the knuckle. I like to add a slight curve to the ends of my fingers. I feel it adds elegance. Do not add that feature if you do not like it. Moving on to the ring finger. I wanted a drastic bend of the finger so I bent the wire at the base of the finger where it meets the palm/top of the hand. Add the slight curve to the tips of the finger. The little finger I left in the original position but curved the tip. Looks elegant don t you think? Repeat on second armature. You can leave hand/arm as is and bring to class or continue. I have added a few ideas below you may or may not like. Rosie my helper says take a break Page 8


9 The photos below are some ideas to help your brain spin a bit. I think they are easy to follow. I will interject some tidbits when needed. Enjoy! Designate one lead wire. Note the wire bending slightly on the pattern in red. All others follow. Cut the lead wire and create a loop. This loop will attach to the wire protruding from the upper fabric torso. Dig up your stash of embellishments. Anything is possible. Fibers, fabric, gems anything! Page 9


10 Don t want to add embellishments? Want to twist some wire instead? Perhaps a combination of wire and embellishments? Page 10


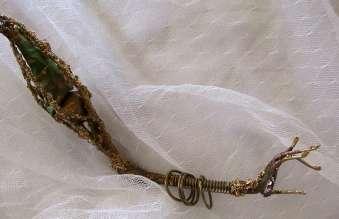
11 A little sprits of metallic bronze spray paint brings it to life. Imagine it with fabric and ribbons. YUM! Here s another thought. I found a spring lying on my desk and added it to my metal theme. Love how it looks! Bend at the elbow. There s that lead wire again Page 11


12 Grip the 5 wires tightly with the pliers. This will cause the wires to lay side by side. Gently fan them out. Leave the lead wire straight and shape the remaining wires. I will slide my thumb along the wire creating the slight arch. Cut just above the bend we created for the elbow. Loop each wire. Note the lead wire is a bit longer in length. Secure the 28 gauge wire to the outside loop. Wrap the wire around the lead wire a few times to secure. Continue to stitch thru each loop drawing the looped wire closer to the lead wire. Page 12


13 Gently position the wires into a cylinder shape. This is the upper arm. Perhaps add some wire to the upper arm? Spray paint with Metallic Bronze? Page 13


14 Maybe add a bit of tissue and some embellishments? Maybe some more tissue, paper or fabric? Page 14

15 There are so many ways to create unusual shapes using simple wire. Play! Have fun! Thank you for allowing me to share some of the ideas I have been playing with. Have a glorious day Love, Jean Jean@JeanBernardArt.com Page 15
Chunky Wire-Wrap Bracelet
 ONLY AT BEADSHOP.COM TM Chunky Wire-Wrap Bracelet Skill Level: Intermediate Project Time: 3-4 hours Prerequisite: Wire Nirvana I, Earring Construction or basic wire-wrapping skills. Learn how to cluster
Dainty Doorknocker Pendant
 Dainty Doorknocker Pendant www.nicolehannajewelry.com NOTES MATERIALS & TOOLS: 3 Pieces 30cm 22 Gauge Round Wire (Dead Soft) 1 Piece 400cm 28 Gauge Round Wire (Dead Soft) 1 Piece 8mm Round Bead (Large
The Cradles Caress Pendant
 The Cradles Caress Pendant www.nicolehannajewelry.com NOTES MATERIALS & TOOLS: 1 Piece 8mm Round Bead 3 Pieces 29cm 20 Gauge Round Wire (Dead Soft) 1 Piece 450cm 28 Gauge Round Wire (Dead Soft) 1 Piece
Twisted Crystals Necklace By Create Your Style with SWAROVSKI ELEMENTS Ambassador Laura Timmons of Vintage Moon Creations
 www.beadsbaublesandjewels.com 1411-4 Laura Timmons shows a unique crochet technique using wire and crystals. For More Information Visit: www.create-your-style.com Twisted Crystals Necklace By Create Your
Advanced Tricks of the Trade by Janice Parsons
 ONLY AT BEADSHOP.COM TM Advanced Tricks of the Trade by Janice Parsons After teaching Tricks of the Trade for 10+ years, I realized I needed a challenge. I am ready to delve deeper into the world of color
Artsy Chiqua. The Decaying Severed Arm
 Artsy Chiqua http://artsychiqua.webs.com/apps/blog/ The Decaying Severed Arm Hello Ghoulies!! This February's challenge was fabric and it was a challenge to come up with an idea for project, but I finally
Perfect Evening Earrings Beadweaving Tutorial by NEDbeads. Three Earring Designs in One - Personal and Commercial Use Tutorial
 Perfect Evening Earrings Beadweaving Tutorial by NEDbeads Three Earring Designs in One - Personal and Commercial Use Tutorial 1 LEGALESE NEDbeads reserves all rights to this design, written, photographic
Beaded Viking knit. necklace
 Beaded Viking knit necklace Add dimension and sparkle to Viking knit by incorporating beads into the weave and working with two different colors of wire simultaneously. By Stephanie Eddy FCT-MWON0316_WRK19
Perennial Link.
 Perennial Link www.nicolehannajewelry.com NOTES MATERIALS & TOOLS: 1 Piece 8mm Round Bead 4 Pieces 27cm 20 Gauge Round Wire (Dead Soft) 1 Piece 550cm 28 Gauge Round Wire (Dead Soft) 1 Piece 15cm 20 Gauge
FINISH 14 LINKS IN ONE EVENING. Pearls Wire. Grade A necklace no matter the. grade of your pearls. by Cynthia B. Wuller
 beginner wirework FINISH 4 LINKS IN ONE EVENING Pearls Wire and on Any Budget Make a Grade A necklace no matter the grade of your pearls. by Cynthia B. Wuller W hether you use economical materials or splurge
Jewelry Basics 101. Basic Wire Loops For best results, use both chain-nose and round-nose pliers. Method 2 Bend then cut. Method 1 Cut then bend
 Jewelry Basics 101 #68-007-01 Basic Wire Loops For best results, use both chain-nose and round-nose pliers. Method 2 Bend then cut Use non-serrated chain-nose pliers to bend the wire just above the bead.
Trim areas that may have overlapped and heat again if necessary.
 Wings Supplies: *28-gauge wire *Fantasy Film *Bond Grrrip Glue * Ranger Adirondack Alcohol Inks: Stream Wild Plum Butterscotch *Ranger Adirondack Alcohol Blending Solution *Glass Glitter extra fine *Micro
Scrappy Turkey Tutorial
 Scrappy Turkey Tutorial Looking for a fun and easy way to create a one of a kind piece of clothing for your child to wear this Thanksgiving? Look no further! Our Scrappy Turkey can be created with little
Lesson 3: Good Posture and Form
 from WorshiptheKing.com Get the full ebook download at https://sowl.co/gcilb Lesson 3: Good Posture and Form In this lesson, you will learn: How to correctly hold the guitar The 4 steps for using the chord
Beaded Knitting Stitch Marker Using beads made from recycled plastic bags
 Beaded Knitting Stitch Marker Using beads made from recycled plastic bags Why have boring plastic rings or messy looking scraps of yarn to mark your knitting stitches? These delightful stitch markers look
Do # 11 Tile Message Board
 Do # 11 Tile Message Board Supplies Needed: 6x6 tiles (or larger!), felt scraps, embellishments (feather, copies of the Be you, Bravely logo, ribbon, stickers, scrapbook paper), Mod Podge, 1 dry erase
THE BELL WIRE & JEW ELRY MAKING TUTORIAL SERIES T73
 THE BELL WIRE & JEW ELRY MAKING TUTORIAL SERIES T73 COPYRIGHT Copyrights DIY Beading Club 2013 Published By DIY Beading Club INTRODUCTION This design is what I called The Bell. The pair of earrings also
Gold Wire Paper Clip Chain Wire Jewelry Making Pattern #103
 Gold Wire Paper Clip Chain Wire Jewelry Making Pattern #103 More Jewelry Making Patterns at http://wire-sculpture.com/patterns/ Supplies Needed * Approximately 4 feet of 21 gauge 14 karat gold filled square
Simple Metalworking Techniques and Making a Steel Butterfly bymattthegamer463 Favorite
 Simple Metalworking Techniques and Making a Steel Butterfly bymattthegamer463 Favorite Step 1: Materials and Tools Not too many materials that we need for this job. Materials: - 22 gauge steel sheet -
Free Wire and Bead Christmas Ornament Easy, and Inexpensive Copyright Lori Fellows 2012
 Easy, and Inexpensive Copyright Lori Fellows 2012 You may not copy/forward/share these instructions in any manner, digitally or otherwise. You may sell the ornaments you make with these directions, but
Little Stitching Bear
 Little Stitching Bear A hand embroidery tutorial January brings some of the coldest weather of the year when, after a brisk and chilly walk with the Newfies (who simply adore these winter days), it s lovely
Wire Crochet looks complicated, but get ready! It s much easier than it looks!
 Wire Crochet looks complicated, but get ready! It s much easier than it looks! Step One: The first thing you need to do it gather up your supplies: One spool of 28 gauge wire, silver or another color.
Monster Marionette ART GRADE LEVEL FOURTH FIFTH MATERIALS
 MATERIALS FOR STUDENT: (one per student unless otherwise noted) FloraCraft Make It: Fun Foam: Rectangular pieces (arms & legs) cut from large Foam Block: Four 1" x 3" x 1" thick, Four 1" x 2 1/2" x 1"
Braid Wire Pearl Bangle
 Materials Needed: 4 Apx. 10mm Pearls or other beads Braid Wire Pearl Bangle By Joyce Richman for Jewel School Flush Cutters Beadalon Braid Wire or other thicker Bent Chain Nose Pliers wire for bracelet
PEACOCK WIRE BANGLE WIRE & JEWELRY MAKING TUTORIAL SERIES T105
 PEACOCK WIRE BANGLE WIRE & JEWELRY MAKING TUTORIAL SERIES T105 COPYRIGHT Copyrights DIY Beading Club 2013 Published By DIY Beading Club INTRODUCTION Another exciting tutorial from XQDesigns using wirework
Crewel Embroidery Instructions Design: Motley Mums (Version 1, 2, 3, & 4)
") Crewel Embroidery Instructions Design: Motley Mums (Version,,, & 4) What you ll need: 9" x 9" Linen (Version : Sky Blue plain weave; Version : Natural plain weave; Version : Oyster White twill, Version
Crewel Embroidery Instructions Design: Motley Mums (Version,,, & 4) What you ll need: 9" x 9" Linen (Version : Sky Blue plain weave; Version : Natural plain weave; Version : Oyster White twill, Version
Peacock Necklace. Crystals with Gold Beadalon stringing wire.
 WWW.BEADSHOP.COM ONLY AT Peacock Necklace Crystals with Gold Beadalon stringing wire. Skill Level: Beginner Project time: 2-3 hours Light and airy, this understated necklace speaks of quiet sophistication.
River Silks Ltd. 100% silk, hand dyed ribbon Information (877)
") FUSCHIAS Design from ArtNeedlepoint.com Stitch guide by River Silks Ltd. Copyright 2011 River Silks Ltd. canvas 9.5 x 13, painting 7 x 10, 14 mesh Materials needed: 9 X 13 stretcher bars, #22 tapestry
FUSCHIAS Design from ArtNeedlepoint.com Stitch guide by River Silks Ltd. Copyright 2011 River Silks Ltd. canvas 9.5 x 13, painting 7 x 10, 14 mesh Materials needed: 9 X 13 stretcher bars, #22 tapestry
Page 1. Jumblenut. The Head. Design by Barbara Allen
 Page 1 Needle felting Needle felting is quite different from creating felt by shrinking wet wool. There s no water involved, it requires very little space and creates no mess at all. It s a craft that
Viking Wire Knitting:
 Viking Wire Knitting: Supplies: 1. Wire: soft (easy to bend) normally a small gauge (24+) but the size is up to you. You do want a softer wire as it will harden while you work it. If you are going to do
NaturallyCaron.com :: Pretoria Lion Toy. Home Yarns Pattern Boutique Gallery Guide to Style Cari's Blog Where to Buy
 Subscribe to Caron Connections, our free enewsletter Enter your e-mail address subscribe Home Yarns Pattern Boutique Gallery Guide to Style Cari's Blog Where to Buy Pretoria Lion Toy designed by KJ Hay
A Pegs & Sticks Pattern
 Pattern 4 Christmas Bauble A Pegs & Sticks Pattern The Christmas Bauble A woven Christmas Bauble. So easy to weave with Weaving Sticks. Introduction Weaving Sticks are so simple to use that anyone can
ascading Create the tiered appearance of chandelier crystals in this elegant set by Jennifer Jordan Park
 intermediate wire ascading carnelian Create the tiered appearance of chandelier crystals in this elegant set by Jennifer Jordan Park Jewelry designers are especially receptive to color, shape, and texture.
How to Add Sewable LEDs to Easter Bunny Ears
 Description Add some flashing LEDs to a set of bunny ears to create a fun Easter project. A miniature cell holder is just the right size to be hidden away under the headband along with a small slide switch
Timing the Millennium, Freedom, Liberty and Discovery
 Timing the Millennium, Freedom, Liberty and Discovery Use these instructions in conjunction with your instructional CD. Symptoms: Skipping or missing stitches. Solution: Change needle. (We strongly recommend
Beaded Pumpkins Tutorial with Sparkle by Monica
 with Sparkle by Monica You can make these lovely pumpkins out of several base beads such as wood, glass pearls, acrylic, ceramic and more. The primary concern is that the inner bead hole needs to be large
How to create a Fairy Tea Light with Polymer Clay
 How to create a Fairy Tea Light with Polymer Clay 400g Beige Make N Bake Polymer Clay Copyright of Mont Marte International Pty Ltd ACN 101589897 Materials List... The materials for this lesson can be
Mixed Metal Heart Author: Patti Bullard Ph.D.
 Mixed Metal Heart Author: Patti Bullard Ph.D. Mixed Metal Heart Difficulty: Easy The beauty of mixed metals paired with a traditional heart shape is sure to bring joy to the jewelry maker as well as the
Designed by Melissa DiRenzo thesweetescape.ca
 instructions Designed by Melissa DiRenzo thesweetescape.ca YOU WILL NEED 3 -diameter foam ball Christmas sweater Hot glue gun and glue sticks 3/8 -wide satin ribbon Elastic thread: metallic Note: A child
Decorative Briolettes
 ONLY AT BEADSHOP.COM TM Decorative Briolettes Skill Level: Intermediate Prerequisites: 1-2 beginner wire work classes, including Briolette Tutorial or equivalent experience. Plain briolette wraps are so
Carry Sew Table and Hoop Bag Created by Joy Harvey
 www.bernina.com.au Carry Sew Table and Hoop Bag Created by Joy Harvey Materials List What to do with all those leftover cords, ribbon, braids, pearls and sequins? Your answer, foot #12C my favourite presser
Thread Sketching Pumpkin Patch
 Thread Sketching Pumpkin Patch Supply List 1. Background fabric (1) 9 x9 piece of tone-on-tone fabric 2. Stabilizer (1) 9 x9 piece of clear water soluble stabilizer film such as 4X by Superior 3. (2) 9
Table of Contents. Instructions: Rotary Cutting 3. Piecing Guidelines 5. Quilting, Stitch in the Ditch 6. Sample file. Bias Tape Application 8
 Table of Contents Instructions: Page: Rotary Cutting 3 Piecing Guidelines 5 Quilting, Stitch in the Ditch 6 Hand Sewing 7 Bias Tape Application 8 Projects: Nine Patch Potholder 9 Little Bag Purse 11 Circle
Thread Painting Pumpkin Patch
 Thread Painting Pumpkin Patch Supply List 1. Background fabric (1) 9 x9 piece of tone-on-tone fabric 2. Stabilizer (1) 9 x9 piece of clear water soluble stabilizer film such as 4X by Superior 3. (2) 9
19" emily, Jenny, & Portrait Dolls. By Dianna effner. Body Pattern and Construction. Strip
 Original Designs for the Doll Industry, Inc. PO BOX 174 JAMESTOWN, MISSOURI 65046 19" emily, Jenny, & Portrait Dolls Copyright 2001 By Dianna effner Body Pattern and Construction ArmATure ConSTruCTIon
Scottish Diaspora Tapestry
 Prestoungrange Arts Festival The Prestoungrange Gothenburg 227-229 High Street Prestonpans EH32 9BE Dear Stitcher Scottish Diaspora Tapestry Thank you for helping us create this lasting legacy, Scotland
Thread Painting. First Flowers
 Thread Painting First Flowers Supply List 1. Background fabric (1) 8 x10 piece of blue batik or tone-on-tone 2. Stabilizer (2) 8 x8 pieces of clear water soluble stabilizer film such as 4X by Superior
Make a dimensional candy holder with embroidery and quilted accents.
 By Evy Hawkins Santa Claus is coming to town and he has two bags of treats for good little girls and boys! A delightful addition to your holiday décor, this embroidered treat holder is assembled using
Bound and Determined:
 Think You Don t Have Time to Create Beautiful Quilts? From quick-quilt adaptations of classic patterns to fun, fresh novelty designs, McCall s Quick Quilts provides you with a treasury of time- and effort-saving
Materials: Preparing your materials: Use your towel to protect your work surface. Layout one length of bubblewrap, bubbles facing up.
 These instructions show the layout and techniques for making flat circular art pieces. Follow these basic steps used to create a strong, even, wool felt surface. This is the base or canvas, open to embellishment
TOASTY HEART TEAPOT COSY. beginner crochet pattern US terminology v1.0. access the online class here > homelealass.com/toasty-heart-tea-cosy-class/
 TOASTY HEART TEAPOT COSY beginner crochet pattern US terminology v1.0 access the online class here > homelealass.com/toasty-heart-tea-cosy-class/ 1 A HOMELEA LASS CROCHET PATTERN homelea lass 2018 #homelealass
Jamie - 11 Soccer Bear
 Jamie - 11 Soccer Bear Artist Designed Bear with Flexlimb by Laura Matthews of TeddiesbyLauraLynn.com and FreeTeddyBearPatterns.NET This is not intended to be a child s toy due to the glass eyes and pellets.
Sculpting Hands. With Deb Wood. Deb Wood /Enchanted Hearts All Rights Reserved
 Sculpting Hands With Deb Wood Deb Wood /Enchanted Hearts 2016. All Rights Reserved Copyright Notice and Disclaimer: The instructions herein are copyright protected and are intended for the personal use
Table of Contents. Pom-Pom Bookmark Yarn covered Pencil Holder Yarn Hangers... Yarn Hair Bows
 1 Table of Contents Pom-Pom Bookmark... 3-5 Yarn covered Pencil Holder... 6-8 Yarn Hangers... 9-11 Yarn Hair Bows... 12-14 Tassel Necklace or Gift Wrapping... 15-17 No Knit Infinity Scarf... 18-20 Braided
SCARVES & COWL. crochet pattern US terminology v1.1
 WARM HEART SCARVES & COWL crochet pattern US terminology v1.1 welcome Hello and welcome to the Warm Heart Scarves and Cowl crochet pattern! I m so glad you ve decided to make this pattern. It s lovely
Artsy Bag. materials and tools. materials and tools
 materials and tools Created by Pat Bravo materials and tools ½ yard of main fabric* ½ yard of lining fabric* Pink, yellow, and blue fabric scraps* ½ yard of quilt batting 10 square of non-woven, ultralightweight
MIXED-MEDIA LINKS. With three different paisley-shaped links and four ways to embellish. Combine woven wire and polymer clay to make bold links.
 Soldered wire frames are the backbone of each link in the bracelet. 8½ x 1¼ in. (21.6 x 3.2cm). WIRE AND POLYMER CLAY BRACELET MIXED-MEDIA LINKS Combine woven wire and polymer clay to make bold links.
1 of 6 22/5/18, 4:37 pm
 Egmont's Umbrella Spanish Version of the Pattern: http://patronesamigurumipuntoorg.blogspot.com.es/2013/03/paraguas.html#.uwxidv5tiac A video tutorial is now available: https://youtu.be/ale6cmidbqa https://youtu.be/hdivfm-l05c
Supplies. Crystal Mushroom Tutorial. * Molly Stanton
 Crystal Mushroom Tutorial * Molly Stanton Mushrooms and the Fair Folk have enjoyed a symbiotic relationship throughout mythology. Anyone who stepped into a fairy ring of mushrooms might just be transported
A. Preparing the fabric (not shown):
:") INSERTING ZIPPERS - CENTER INSERTION The zipper can be snapped on to the right or to the left side of the needle so that you can sew close to the zipper. When sewing on the right side of the zipper, attach
INSERTING ZIPPERS - CENTER INSERTION The zipper can be snapped on to the right or to the left side of the needle so that you can sew close to the zipper. When sewing on the right side of the zipper, attach
New Skills: Finding visual cues for where characters hold their weight
 LESSON Gesture Drawing New Skills: Finding visual cues for where characters hold their weight Objectives: Using the provided images, mark the line of action, points of contact, and general placement of
Complete Drawing Certificate Course
 The Cindy Wider Method Complete Drawing Certificate Course Title: Unit One Outline Drawing Medium: Drawing in graphite pencil Level: Beginners Week: One Course Code: U1-OD-wk1 Major Purpose For This Unit
ROSY DANGLING EARRINGS WIRE & JEW ELRY MAKING TUTORIAL SERIES T164
 ROSY DANGLING EARRINGS WIRE & JEW ELRY MAKING TUTORIAL SERIES T164 COPYRIGHT Copyrights DIY Beading Club 2013 Published By DIY Beading Club INTRODUCTION Polish up your wirework skills! Learn to bead wrap
CONTENTS. Meet Anna...8 How to Use This Book...9
 CONTENTS Meet Anna...8 How to Use This Book...9 PROJECTS...10 Buds & Flowers Tubular Peyote...12 Twisted Cuff Tubular Peyote...16 Luxurious Links Tubular Peyote...18 Crystal Medallions Peyote, Stringing,
Tiny Bunny Couple by Kathy Lewinski
 Tiny Bunny Couple by Kathy Lewinski These bunnies can be knit up in any weight yarn, the bigger the yarn, the bigger the bunnies. Just make sure to use the same weight yarn throughout the project. My girl
Owyhee County 4-H. Cloverbud. Activity Book
 Owyhee County 4-H Cloverbud Activity Book Name Age Year in 4-H 20 Club Name Member s Signature Parent/Guardian s Signature Leader s Signature Projects or activities I worked on this year were: I attended
NOTES 1. Please wash, dry & iron your fabric before beginning. 2. Use a 1/4 seam allowance throughout. 3. All seams are sewn Right Sides together.
 OTHER TOOLS & SUPPLIES - fiber stuffing or fabric scraps - paper printer - 24 contrasting embroidery floss & an embroidery hoop, for eyes - 2 yds of ribbon, for hanging (optional) - basic sewing supplies:
Indigo Blossoms by Grace Richerson / #21006 / 31 Designs
 Note: Some designs in this collection may have been created using unique special stitches and/or techniques. To preserve design integrity when rescaling or rotating designs in your software, always rescale
FREE-FORM WIRE BROOCH Get in Touch. Leave your pliers on your bench and work your wire by hand. by Karen Rakoski
 beginner wire FREE-FORM WIRE BROOCH Get in Touch with Your Leave your pliers on your bench and work your wire by hand. by Karen Rakoski FCT-MWON0216_ART39 lay as you make this brooch! The novelty of working
A Precision 2000 Mixed Media Project
 Día de los Muertos (Day of the Dead) Panel A Precision 2000 Mixed Media Project PROJECT TITLE: Día de los Muertos (Day of the Dead) Panel DESIGNED BY: Andy Spencer SKILL LEVEL: (Adult 1-5: 1 being the
Supply List. Tracing the design onto the clear stabilizer
 Solitary Tree Supply List 1. Background fabric (1) 9 x12 piece of landscape batik 2. Moon Scrap of yellow batik 3. Stabilizer (1) 9 x12 piece of clear water soluble stabilizer film such as 4X by Superior
POSING PITFALLS CHECKLIST 5 THINGS THAT RUIN A POSE & HOW TO FIX THEM
 POSING PITFALLS CHECKLIST 5 THINGS THAT RUIN A POSE & HOW TO FIX THEM PROBLEMS: SOLUTION: Causes shortened neck, compressed height, gathering in midsection. POOR POSTURE Direct your subject to Pull up
Printing and Assembly of Kwawu Arm
 Printing and Assembly of Kwawu Arm Jacquin Buchanan December 2016 This work is licensed under the Creative Commons Attribution-NonCommercial-ShareAlike 4.0 International License. To view a copy of this
a free sewing pattern by
 a free sewing pattern by 2 witch kitty plush Ready your broom and cape! This adorable little kitty is all decked out for Halloween. The pattern comes with loads of cute details, including a capelet with
Serged Blanket, Bib, and Burp Cloth by Stephanie Struckmann at Totally Stitchin
 Serged Blanket, Bib, and Burp Cloth by Stephanie Struckmann at Totally Stitchin SUPPLIES: You can make these cute baby gifts in a jiffy with Baby Lock Sergers! Created by: Stephanie Struckmann, www.totallystitchin.net
Designed By Patty Peterson Featuring Kreinik Metallic Machine Sewing Threads
 Elegant Table Runner Designed By Patty Peterson Featuring Kreinik Metallic Machine Sewing Threads Finished size 11.5" X 40.75" H ave you ever wondered how you can use the decorative stitches on your sewing
Contents. Introduction...4. About the Author...95 BEGINNER PROJECTS GETTING STARTED INTERMEDIATE PROJECTS ADVANCED PROJECTS INSPIRATIONAL GALLERY...
 Contents Introduction...4 GETTING STARTED Wire Weaving Toolkit... 6 Materials... 8 Terminology... 10 Weaves... 10 Snake Weave... 10 Single Snake Weave... 10 Single Snake Weave with One Bead... 11 Double
These wings were created exclusively for Sherry Goshon s Libelle Doll
 These wings were created exclusively for Sherry Goshon s Libelle Doll Recommended Materials Spray Clear Gloss Lacquer FabriTac Adhesive Libelle Dragonfly Wing prints Diamond Glaze Dimensional Adhesive
Cut first cork in half in the middle (the two pieces will serve for two horses). Cut 2 corks in half lengthwise for the four legs.
. Cut 2 corks in half lengthwise for the four legs.") Christmas Cork Horse Supplies: 3 1/2 corks. 4 x 4 piece red bandanna material for bandanna (cut in half diagonally makes two bandannas). White/Black yarn for mane & tail. Two black push pins for eyes.
Christmas Cork Horse Supplies: 3 1/2 corks. 4 x 4 piece red bandanna material for bandanna (cut in half diagonally makes two bandannas). White/Black yarn for mane & tail. Two black push pins for eyes.
Cross Stitch. Created by Becky Stern
 Cross Stitch Created by Becky Stern Guide Contents Guide Contents Overview Instructions Buy Ohm Sweet Ohm Kit 2 3 4 20 Adafruit Industries http://learn.adafruit.com/cross-stitch Page 2 of 20 Overview So
Emerald Paisley by Amanda Greene / #21009 / 30 Designs
 Note: Some designs in this collection may have been created using unique special stitches and/or techniques. To preserve design integrity when rescaling or rotating designs in your software, always rescale
It's my pleasure to introduce my first guest blogger, Donna Walker.
 It's my pleasure to introduce my first guest blogger, Donna Walker. Donna has made some incredibly fun baskets by crocheting around bulky cords. When she showed a photo of the first one in the Snovej Circle,
Triangle Earrings. Another important step is to use split or jump rings on the hooks. They help the earrings dangle more freely.
 Triangle Earrings Description: The Triangle Earrings are based on the Celtic Triangle knot, which is an artistic design called the Triquetra. This Celtic symbol represents the Trinity as well as Body,
Faux Cabled Headband. ...craftable... by Stephanie White of You Can Knit!
 ...craftable... Faux Cabled Headband by Stephanie White of You Can Knit! INSTRUCTIONS Stephanie White, 2015 PHOTOGRAPHY F+W, a Content + ecommerce Company, Inc. 2015 All rights reserved. materials 1 skein
Creative Line Quilting by Amanda Greene / #82013 / 45 Designs
 Note: Some designs in this collection may have been created using unique special stitches and/or techniques. To preserve design integrity when rescaling or rotating designs in your software, always rescale
to Precious From Plumbing PROJECT INTERMEDIATE METALS facetjewelry.com FCT-MW
 PROJECT INTERMEDIATE METALS From Plumbing to Precious FCT-MW-061217-07 2013 Kalmbach Publishing Co. This material may not be reproduced in any form without permission from the publisher. facetjewelry.com
Obtained from Omarshauntedtrail.com
 DaveintheGrave's Halloween Props Animated Crawling Skeleton Build a life-size skeleton torso that realistically crawls across the lawn one arm at a time. 1. Motor Base and Linkage Assembly BASE - I used
PRACTICAL STITCHES. Threading. Thread knotting
 Threading PRACTICAL STITCHES As sewing is based on needlework, the first lesson should be in threading and handling the needle. Thread dark thread into the needle against a light background and light thread
St. Augustine Orchid Society Wire Products by Sue Bottom,
 A well-stocked potting shed has a wide variety of wire products that are used for securing, hanging and staking orchids. Here are some traditional wire gadgets and gizmos you may find handy in your growing
Home Yarns Pattern Boutique Gallery Guide to Style Cari's Blog Where to Buy
 Subscribe to Caron Connections, our free enewsletter Enter your e-mail address subscribe Home Yarns Pattern Boutique Gallery Guide to Style Cari's Blog Where to Buy Panama Dolls designed by KJ Hay Technique
Two Hole Herringbone Bracelet
 1 Two Hole Herringbone Bracelet Instructions by Gail DeLuca This pattern is deceivingly simple - of course, once you get it started! Believe it or not, this is a flat herringbone weave - using two hole
Replacing Hammer Butt Springs in the Upright Action
 Schaff Piano Supply Company Presents: Replacing Hammer Butt Springs in the Upright Action Basic Procedures By Chuck Behm Replacing Hammer Butt Springs -Rationale- In the restoration of an upright, the
Nature's Choice Organic Cotton Crochet Cotton Sun Hat Pattern Number: L10459
 Free Crochet Pattern Lion Brand Nature's Choice Organic Cotton Crochet Cotton Sun Hat Pattern Number: L10459 Wire in the brim gives this hat structure to keep out the sun. And, it looks pretty cute too!
MAKE 1 NECKLACE. wire skills. by Cynthia Wuller. The links in this 16-in. (40.6cm) necklace are forged so they become flat and work-hardened.
 necklace are forged so they become flat and work-hardened.") 6 MAKE 1 NECKLACE Learn basic wire skills by Cynthia Wuller The links in this 16-in. (40.6cm) necklace are forged so they become flat and work-hardened. The pearl in the featured necklace is held in place
6 MAKE 1 NECKLACE Learn basic wire skills by Cynthia Wuller The links in this 16-in. (40.6cm) necklace are forged so they become flat and work-hardened. The pearl in the featured necklace is held in place
Trim The Tree By Marie Duncan
 Trim The Tree By Marie Duncan Make this pretty skirt to grace your Christmas tree this year! The ornaments are easy, using the Circular Attachment. The Applique stitches give gorgeous dimension to the
LEARN TO. Crochet # CROCHET. Original Publications: Book Learn to Crochet Book Baskets Book 6876 So-Cute Scrubbies
 LEARN TO Crochet #808069 CROCHET Original Publications: Book 75491 Learn to Crochet Book 75496 Baskets Book 6876 So-Cute Scrubbies Copyright 2016 by Leisure Arts, Inc., 104 Champs Blvd., STE 100, Maumelle,
In-the-Hoop Novelty Bookmarks 30 Classic Designs. INCLUDES 30 DESIGNS FOR 5" x 7" HOOPS. Free Project. included with Collection
 Free Project Project In-the-hoop Novelty Bookmarks Made in your embroidery machine hoop with no additional sewing required, these unique and clever bookmarks make quick and easy, yet thoughtful gifts.
Materials: unconditionally LED
 Glow bunny Feel free to sell Your finished items. Mass production is - of course - not permitted. Do not copy, alter, share, publish or sell pattern, pictures or images. Copies be made for owner s personal
The patches and pincushions make great gifts for friends, retreats, and quilting guilds.
 Have fun stitching out these Quilty Quotes and Sewing Sayings. You can stitch out a patch to use on your quilting or sewing gear or try creating a pincushion using the Create a Pincushion base and ring
Six FUN! projects for those who are new to sewing, returning to sewing or just want to sharpen basic skills.
 Six FUN! projects for those who are new to sewing, returning to sewing or just want to sharpen basic skills. 1. Clutter Control Bags 2. 3-Button Book Cover 3. Fabric Stash Pincushion 4. Pocket Tissue Case