MUSICMAKER S KITS, INC.
|
|
|
- Eustacia Owens
- 6 years ago
- Views:
Transcription

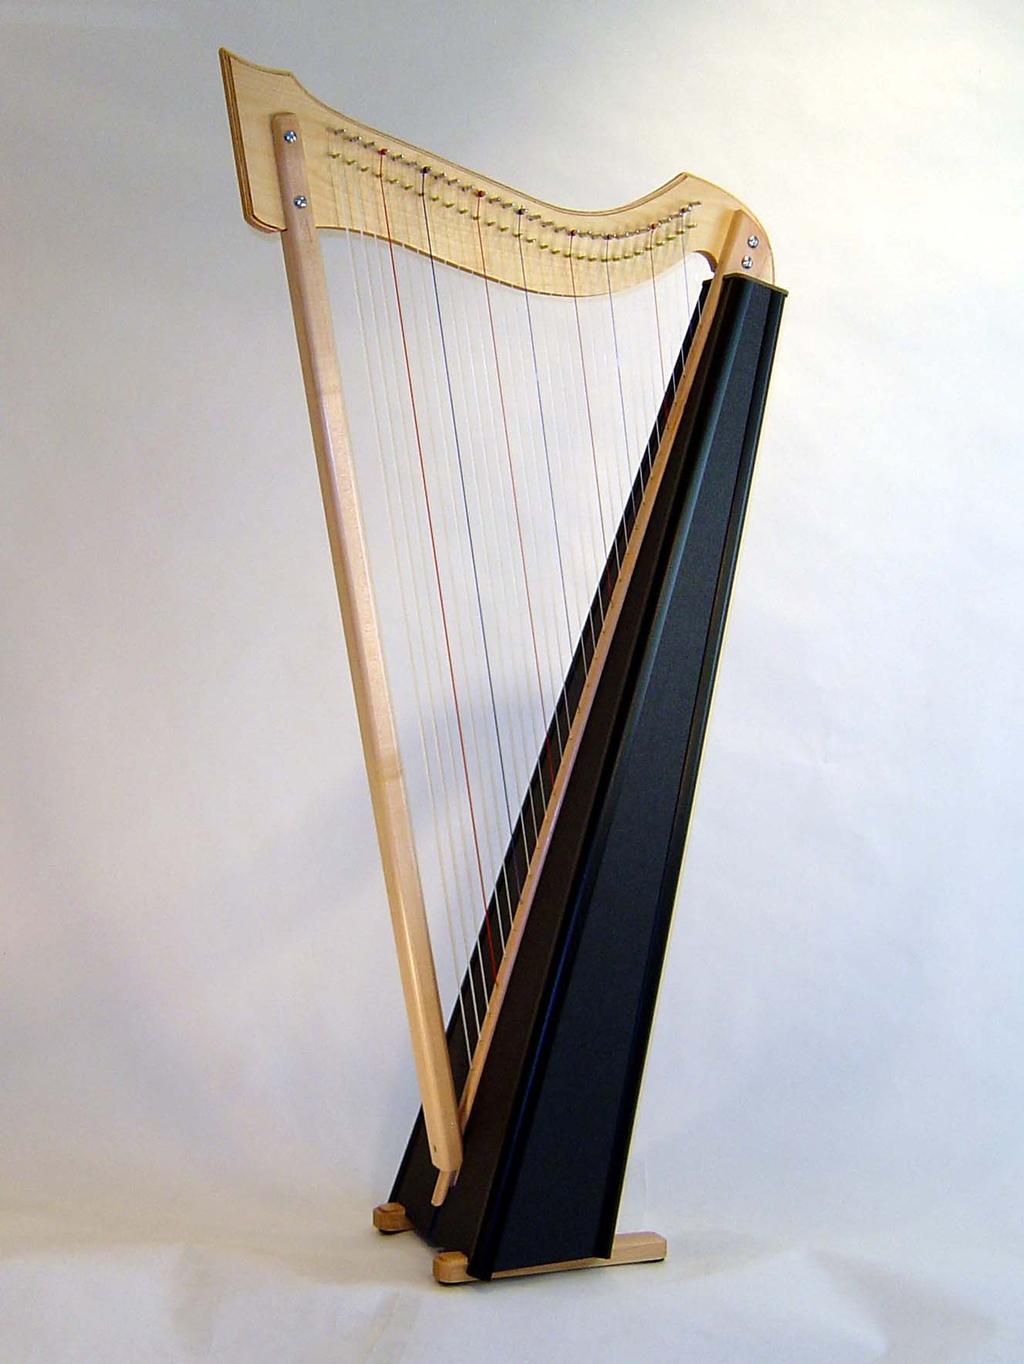
1 SMART HARP KIT MUSICMAKER S KITS, INC. PO Box 2117 Stillwater, Minnesota info@harpkit.com
 1 Wood screw, 2-1/2 1 set of 29")
2 SMART HARP KIT Pre-Cut Kit Parts Supplied: A - Front Corner Mouldings B - Rear Corner Mouldings C - Pillar D - String Rib E - 2 Side Panels F - 2 Front Panels G - Back Panel H - Neck I - 2 Feet J - Bottom Panel K - Top Cap Hardware Parts Supplied: A B F J E G K D C 29 Zither Pins 29 Guide Pins, threaded 29 Eyelets, large 4 Sets Barrel Screws (2 long, 2 short) 1 Wood screw, 2-1/2 1 set of 29 strings 1 Tuning Wrench 4 Felt pads for feet 1 Set of Assembly Instructions H Tools & Supplies You Will Need: Sandpaper (medium & fine grits) Clear Varnish Hammer Square Electric hand drill #1 Phillips screwdriver bit Hot Glue Gun Black Duct Tape Superglue Electronic Tuner (optional) I ASSEMBLY INSTRUCTIONS 1. Please check over your kit parts to make sure you have everything. Contact us right away if you are missing parts so we can rectify the problem without causing too much delay for you. 2. Begin by sanding all the wood parts. Look especially for machining marks and burned spots from our tools. These should sand out nicely with a medium sandpaper ( grit). Try to work your sandpaper parallel with the grain as much as possible, as this avoids adding scratches to the wood. Note: The only part of the String Rib that will show on the finished harp is the rounded front edge. No need to sand the rest of it. Copyright 2009, Musicmaker s Kits, Inc. 2.


3 3. In most woodworking projects we do not apply finish to the wood parts until after gluing them together because regular glue will not stick to a finished surface, but this project uses only hot-melt glue, and that type of glue works fine on finished surfaces. So you can go ahead and apply the finish of your choice to all the wood parts before assembling the harp. Here are some suggestions: STAIN -- STAINS are coloring agents and should only be used if you dislike the natural color of the wood. We usually do not apply stains to our projects, especially when they are made with naturally beautiful hardwoods. These woods look very nice with just a clear finish. But, if you want to color the wood differently, your staining should be accomplished before applying a surface finish such as varnish or lacquer. OIL -- Avoid an oil finish. It takes too long to fully dry. You ll have trouble getting the hot-melt glue to hold the front panels in place if the oil is still damp or tacky. VARNISH -- Any regular varnish will work fine on this project. Choose a satin or semi-gloss polyurethane varnish for quick and easy success. We offer a wipe-on polyurethane called MUSICMAKER'S INSTRUMENT FINISH. Our complete finishing kit includes sandpaper sheets, tack cloth, foam applicator, and lint-free wiping cloth, along with a pint can of semi-gloss polyurethane varnish (instructions printed right on the can). The advantages of this finish are its simple application, durability, and deep, soft luster. LACQUER -- Many professional instrument makers use lacquer for their finish. The most readily available lacquer is called Deft Clear Wood Finish. It is best to purchase a can of liquid to brush on as a sealer coat first, and then use an aerosol can of the same product to spray on the final coats. The advantage of this finish is its quick drying time, but the disadvantage is the strong odor of the toxic lacquer fumes. 4. Apply at least two thin coats of finish, sanding between them with fine sandpaper ( grit). This should give you a nice smooth protective coating. Don t try to form a lake of finish on the wood! Let the first coat soak in and dry overnight. Do not apply the second coat until the first coat is completely dry and sanded smooth. If it is not fully dry in 8 hours, be patient and wait until it no longer feels sticky or gummy to the touch. Your second coat can be very thin and light, and it should dry more quickly than the first. If you don t like the results after two coats, sand lightly again and apply a third coat. You can apply as many coats as you like. 5. Once the finishing is done, you can install the hardware pins in the neck. Begin with the threaded Guide Pins. Lubricate these pins by scraping the threads across some candle wax. Use a hammer to pound them partway into the row of smaller holes drilled into the neck, then a #1 Phillips screwdriver to screw them in until the head of the pin is about 5/8" above the wood. NOTE: Our Threaded Guide Pins are adjustable in depth, allowing you to change the space between the harp string and the wood surface of the neck, using a #1 Phillips screwdriver. This will be important later if you decide to install sharping levers for quick key changes. 6. Find the 29 Tuning Pins in your kit. DO NOT LUBRICATE THE THREADS OF THE TUNING PINS! Pound the Tuning pins into the row of larger holes in the neck. Be sure the threaded end goes into the wood. Pound them into the wood about 3/4" so they stand about 1" above the wood. guide pins NOTE: If you pound a tuning pin in too deep, you can raise it back up by turning it counter-clockwise with the tuning wrench. tuning pins Copyright 2009, Musicmaker s Kits, Inc. 3.


 to 29 (for the longest), and they are color-coded to help guide you as you play. \"C\" strings are all red, and \"F\" strings are blue.")


4 longer bolts here 7. Use the longer bolts to fasten the neck to the pillar and the shorter ones to connect the neck to the string rib using the the four barrel connectors provided. Tighten these bolts hand-tight at first. INSTALLING STRINGS shorter bolts here 8. Install the wood screw through the base of the pillar into the pre-drilled pilot hole in the string rib. Once the frame is assembled properly, go back and tighten all the bolts. It is important to the life of your harp to have these fasteners fully tightened. 9. It is easiest to install the strings before adding the foam core body. To prepare for installing the strings, find the 29 brass Eyelets and push them into the holes in the front of the string rib. The eyelets act as string guides, protecting the wood from being dented by the strings when they are brought up to tension. 10. Stringing a harp is somewhat of an art. We recommend that you read through these last pages of directions completely before beginning, so you know what to expect. It is not uncommon for people to call us to ask why their harp won t stay in tune. Careful installation will do much to stabilize the strings. The strings are numbered from 1 (for the shortest) to 29 (for the longest), and they are color-coded to help guide you as you play. "C" strings are all red, and "F" strings are blue. Note that the bottom bass strings are compound (wound) strings that are already tied with a leather washer at one end. The core of the string extends beyond the wound part on purpose. We don t want the wrapped portion to reach the tuning pin. See photo at right. wrap ends below pins 11. Gather the following tools for this operation: Set of harp strings with plastic beads Tube of Superglue or Krazy glue Scissors Tuning wrench 12. Start at the bass (longest) end of the harp with #29. Push the end of the string through the lowest hole in the string rib from back to front. Then pull the knot tightly against the inside of the string rib, as shown. NOTE: PULL STRAIGHT THROUGH THE HOLE, NOT AT AN ANGLE, TO AVOID SCRATCHING THE NYLON AGAINST THE BRASS EYELET. Thread the other end of the string through the last tuning pin at the point of the NECK. Pull it through the PIN until there is some slack below the pin. Turn the pin clockwise with the tuning wrench and guide the windings of the string downward toward the wood. As the string begins to tighten, place it in the groove of the guide pin. Copyright 2009, Musicmaker s Kits, Inc. 4.

, push it through from the front of the harp and pull the end partway out the back of the harp, so you can thread a plastic bead onto the string and tie a simple overhand knot, as shown.")
5 Install all the wound strings in the proper order this way. HINT: Do not accumulate a lot of windings of string around the tuning pins, especially in the bass. They become bulky and cumbersome. If you find yourself with that problem, turn the tuning pin backwards to unwind the string, then pull more slack through the hole before tightening again 13. When you come to the first plain nylon string (.050 diameter), push it through from the front of the harp and pull the end partway out the back of the harp, so you can thread a plastic bead onto the string and tie a simple overhand knot, as shown. NOTE: We use an oversize drill for boring the holes through the string rib in order to achieve consistent accuracy. We supply plastic beads for you to use as washers on each plain nylon string, so your knots won t pull through those big holes. Please use a bead on each string! You d think this would be enough of a knot to secure the string, but nylon is very slippery, so we always pull the knot tightly against the inside of the harp and then retrieve it from inside the harp so we can put a drop of Superglue on top of the knot. This prevents the nylon from slowly untying itself under tension. 14. Install all three.050 diameter strings in proper order (a clear, a blue, and a clear). Notice that we pack a spare clear one in case you have difficulty. Save the spare of each diameter for emergency replacements, just in case of breakage. When you get to the next size (.040 diameter), you ll need to alter the knot slightly. Start with the same overhand knot, but before you pull it completely tight, push the loose end part way back into the knot, just to add one more thickness of string to the knot, as shown. This will ensure that the knot cannot be pulled through the plastic bead when you tune the harp up to pitch. Be sure to add a drop of Superglue. plastic bead Super glue overhand knot Super glue 15. We also like to anchor the tops of these lighter strings securely to the tuning pins as follows: Make one or two windings of string around the tuning pin, then cross the next winding over the others so the string cinches itself tightly around the PIN. Otherwise you may experience string slippage and breakage, especially in the upper half of the instrument. CAUTION: Nylon strings are somewhat fragile, especially in the upper octaves. Try to avoid scratching them as you install them. Most string breakage occurs at the tuning pin, when the string is pulled forcefully around the sharp corner of the small hole in the metal. You can minimize the problem by installing the string carefully and by crossing the windings before applying too much tension to the strings, so the nylon does not begin to slip back through the hole under tension and become damaged. Copyright 2009, Musicmaker s Kits, Inc. 5.
, you will need to add a short piece of heavier string into the knot in order to make the knot bulky enough to keep from pulling through the hole in the plastic bead.")

 If you want to decorate the body of the instrument with hand painting or stenciling, it might be easier to do that before assembling the flat panels.")

6 Super glue 16. When you come to the lightest strings (.025 diameter), you will need to add a short piece of heavier string into the knot in order to make the knot bulky enough to keep from pulling through the hole in the plastic bead. Just use some scraps of excess nylon from the bottom strings. Don t forget the Superglue... CAUTION: Don t tune the harp up to pitch yet because the tension will bend the string rib and make it more difficult to install the foam core body parts. Wait until the body is attached to tune up the harp. 17. (Optional) If you want to decorate the body of the instrument with hand painting or stenciling, it might be easier to do that before assembling the flat panels. Decide which faces of the parts will show outward, so you make sure to orient your decorations properly. These lightweight panels have a stiff surface on each side which is very suitable for painting. Acrylic paints will probably work the best on this material. If you have a child who wants to attach stickers or glitter for special customization, that might be easier to do after the body is assembled, so you don t interfere with the fit of the corner mouldings. 18. Now you can begin attaching the body pieces to the harp. You ll need a hot-melt glue gun and a couple long glue sticks for this first operation. (We bought a very nice glue gun at Walmart for less than $10.00.) Find something square to help you make sure to install these two front panels nice and straight. Lay the harp frame on its side on a table and check the fit of one of the front panels in the groove of the string rib, as shown. The narrow end should fit all the way up to the end of the slot near the neck, and the notch at the wide end should fit around the pillar. Notice that the slot is wider than the panel material. This is intentional, to make the parts easy to assemble. You ll want to push the front panel against the front edge of the slot to make it look best on the outside of the body. Narrow end of front fits all the way to the top of the slot. Notch in panel should fit around pillar. When satisfied with the fit of the front panel, heat up your glue gun and squirt a bead of glue into the slot, all the way from the neck to the bottom end, below the pillar. Before the glue cools, fit the front panel in place and push it forward so the outer surface is up against the front of the slot. Use your square to make sure to hold this panel perpendicular to the string rib until the glue cools and hardens (just a minute or so). Copyright 2009, Musicmaker s Kits, Inc. 6.


7 When the panel stands firmly by itself, run another bead of hot glue down the inside edge of the slot to secure the back surface of the panel to the wood. Let the glue cool down before flipping the harp frame over and gluing the other front panel in the same way. Now you can un-plug the glue gun for awhile. 19. Find the plastic corners that are long enough to fit the entire length of the front panels, and fit them onto the panels as shown. HINT: This plastic moulding will slide onto the first panel very easily, but it will be more challenging to insert the adjacent panel. To make it easier to install the moulding on the panels, we rub candle wax inside the moulding channels to provide a little lubrication. Rub candle wax inside the channels of the moulding to make them slide on more easily. Orient the corner moulding so the opening aims toward the back of the harp. That s where the sides will fit. Take care to fit the top end flush with the top of the front panel. You can trim the bottom of the corner pieces later if you wish. 20. Notice that we are not using glue in the corners of the harp. We like black duct tape on the inside best. The illustrations here show masking tape for contrast so you can see it in the photo, but black tape looks much nicer. Almost too simple, isn t it? Don t try to apply one long continuous strip of tape -- start with a few short strips to hold the parts snugly, and then fill in between them with longer lengths of tape. Fit the end of the corner piece flush with the panel at the top of the harp. Copyright 2009, Musicmaker s Kits, Inc. 7.


.")


8 21. Now that you understand the system, you can proceed to install both front corners, and then fit the side panels in place as shown at left. Use masking tape to hold each panel firmly at the corners. Take care to align the corner mouldings and side panels even with the front panels at the top so you have a nice level space for fitting the top cap piece later. 22. The back panel will be your last piece of the puzzle. This is the hardest piece to install, but Mike Nielsen came up with a great suggestion: Install a corner molding onto one side of the back and one side of the harp body first, pushing the back panel all the way the into place. Then slide the last corner molding into both the side and back panels at one time (here s where a little candle wax in the channels makes a big difference). You won t need a lot of tape on these corners -- just reach in as far as you can from the bottom to place some strips of tape. 23. Once the back panel is taped in place, you can use a razor knife to trim the excess corner mouldings at each end, if you wish, but this is not necessary. The plastic is kind of difficult material to cut, so we usually leave the excess at the bottom We provide a pre-cut base panel for purposes of stabilizing the body at the bottom. Check the fit of this piece. It should fit 1/2 or more down inside the body, as shown. base You ll need to trim the front and back edges at a slight angle to make the base fit into position. You should push it in a good 1/2 so it stabilizes the four sides of the body. Copyright 2009, Musicmaker s Kits, Inc. 8.


9 25. When satisfied with the fit of the base, heat up your glue gun again and run a bead of hot glue around the perimeter to hold it in place. 26. Check the fit of the feet at the bottom of the harp. Notice that one slot is angled to fit the front panel, and the other is cut straight for the back. These slots are intentionally wider than necessary to give you some wiggle room. When you determine just how the feet will fit, squirt hot glue into each slot and fit the feet in place at the bottom of the foam core, as close to the corners as possible. 27. Add felt pads to each end of the feet as shown. Top cap 28. Now you can stand the harp on its feet and finish off the top of the box. Test fit the top cap to make sure it fits nicely. It has a center cutout that should fit around the string rib. Use hot glue to fasten the top cap in place. 29. If you find that the edges of the access holes in the back are sharp to your fingers, you can round them over with the handle of your tuning key, as shown, or with fine sandpaper, both on the inside and outside lip of each hole. Hold the tuning key handle (or sandpaper) at an angle and just rub it evenly around the circumference of each access hole. This will make it easier on your hands when you carry the harp or reach inside the body. tuning key foam core Copyright 2009, Musicmaker s Kits, Inc. 9.
10 30. When the body is installed, tighten the strings up to pitch and allow the instrument to adjust itself to the tension. The strings should all be tuned to the natural C major scale (white keys on the piano). All the red strings will be C notes and the blue ones F notes. Consult the string chart to see where Middle C is located. Many people are not certain if they are tuning their harp strings to the correct octave. Tuning the strings an octave too low will result in flabby harp strings that don t produce clear sounds. Tuning the strings too high will cause strings to break. To make sure you are tuning your harp strings to the correct octave, you can double-check the pitch on our website with our "online tuner". NOTE: It will take tunings for the harp to stabilize. Be patient! Nylon strings take awhile to stretch out, and the string rib will bow up as you continue to tighten the strings. CONGRATULATIONS! We hope you have enjoyed building this harp and that you enjoy many years of musical pleasure from playing it. We stock a good number of teaching materials and accessories to help you get started playing. Just call us for more information or for placing an order. SHARPING LEVERS Sharping levers are used on folk harps to facilitate key changes. Installing a lever at a string allows you to raise the pitch of that string one-half step by lifting the handle. Thus an F-string can be raised to F# by a simple flick of the lever. Similarly, a B-string may be tuned to Bb so that the lever will raise it to B-natural and release it back to B-flat, as needed. Most folk harp players set the key signature (sharps or flats) on the harp before starting each piece of music. For the key of G, you would engage the levers on all the F strings to produce the F# notes needed for that key (making sure all other notes on the harp are natural). If the following piece were then to be played in the key of F, you would then release the levers on all the F strings to produce F-natural, and also release all the B-string levers to produce Bb. You may install a lever at every string on the harp, or, if you think you won t use all of them, it would be more cost-effective to select which keys you think you are most likely to use, and then install only the levers necessary for those keys. Sharping Levers are shown in our catalog and on our web site. KEY OF E: requires F# and C# and G# and D# KEY OF A: requires F# and C# and G# KEY OF D: requires F# and C# KEY OF G: requires F# KEY OF C: requires no sharps or flats KEY OF F: requires Bb KEY OF Bb: requires Bb and Eb KEY OF Eb: requires Bb and Eb and Ab Copyright 2009, Musicmaker s Kits, Inc. 10.
11 ACCESSORIES FOR YOUR HARP SMARTBAG Nylon Gig Bag for Smart Harp (with shoulder strap) CA- 30 Chromatic Electronic Tuner TUNERCORD External pickup & cord for tuner SMARTSTRG Spare set of 29 strings plus many books, CDs, and DVDs on playing the harp See Website for Current Pricing MUSICMAKER S KITS, INC. PO BOX 2117 Stillwater, MN
12
Finished Limerick Lap Harp
 Finished Limerick Lap Harp Musicmaker s Kits P.O. Box 2117 Stillwater MN 55082 (651) 439 9120 www.harpkit.com Finished Limerick Parts List: 1 Set of Stringing & Tuning Directions 1 L-shaped Tuning Wrench
Shepherd Lap Harp. Musicmaker s Kits PO Box 2117 Stillwater MN (651)
") Shepherd Lap Harp Musicmaker s Kits PO Box 2117 Stillwater MN 55082 (651) 439 9120 info@harpkit.com Parts List: 1 Set of Assembly Instructions a) 1 Walnut Neck/Pillar assembly b) 2 Walnut Sides c) 1 Walnut
Shepherd Lap Harp Musicmaker s Kits PO Box 2117 Stillwater MN 55082 (651) 439 9120 info@harpkit.com Parts List: 1 Set of Assembly Instructions a) 1 Walnut Neck/Pillar assembly b) 2 Walnut Sides c) 1 Walnut
THE PODIUM MUSIC STAND
 THE PODIUM MUSIC STAND 1 Set Assembly Instructions Wooden Parts: a. 1 Column b. 2 Long Slide Pieces c. 2 Slide Spacers (1 long & 1 short) d. 4 Feet e. 2 Fork Pieces f. 1 Fork Spacer g. 2 Long Desk Frame
HOGNOSE PSALTERY KIT Assembly Instructions
 HOGNOSE PSALTERY KIT Assembly Instructions WOOD PARTS 1 Plywood Top (Soundhold Pre-Cut) 1 Plywood Bottom 2 Pin Blocks 1 Short Side 1 Long Side 1 Bridge 1 Scrap of Plywood HARDWARE 1 L-Handle Tuning Wrench
Adjustable Hammered Dulcimer Stand
 Adjustable Hammered Dulcimer Stand Musicmaker s Kits (Hwy 36 behind Joseph s Restaurant) P.O. Box 2117 Stillwater MN 55082 651 439 9120 www.harpkit.com PARTS LIST: 1 Set of Assembly Instructions A. 2 front
LOVELAND BRAND SHARPING LEVERS
 LOVELAND BRAND SHARPING LEVERS GENERAL INFORMATION Sharping levers are used on folk harps to facilitate key changes. Installing a lever over a string allows you to raise the pitch of that string one-half
Bowed Psaltery Kit. Musicmaker s Kits P.O. Box 2117 Stillwater MN (651)
") Bowed Psaltery Kit Musicmaker s Kits P.O. Box 2117 Stillwater MN 55082 (651) 439-9120 www.harpkit.com Parts list: BOWED PSALTERY KIT 2 long side rails 2 short side rails 1 pin block 1 front (soundboard)
Bowed Psaltery Kit Musicmaker s Kits P.O. Box 2117 Stillwater MN 55082 (651) 439-9120 www.harpkit.com Parts list: BOWED PSALTERY KIT 2 long side rails 2 short side rails 1 pin block 1 front (soundboard)
Riverboat Banjo Musicmaker's Kits Inc. (One block north of Hwy 36 & behind Joseph s Restaurant)
") Riverboat Banjo Musicmaker's Kits Inc. (One block north of Hwy 36 & behind Joseph s Restaurant) P.O. Box 2117 Stillwater, MN 55082 (651) 439-9120 info@harpkit.com RIVERBOAT BANJO Wooden Parts List: A --
Riverboat Banjo Musicmaker's Kits Inc. (One block north of Hwy 36 & behind Joseph s Restaurant) P.O. Box 2117 Stillwater, MN 55082 (651) 439-9120 info@harpkit.com RIVERBOAT BANJO Wooden Parts List: A --
The Lynda Lyre Kit
 The Lynda Lyre Kit 651-439-9120 www.harpkit.com Wood Parts: A Side A B Side B C Soundhole Arch D Tail Strip E Front Panel (Soundboard) F Back Panel G Bridge H Bridge Pad I Bridge Cap J Inner Brace K Kerfing
APPENDIX TUNING YOUR HARP
 APPENDIX TUNING YOUR HARP Learning to tune your harp is an important part of learning to play, and it is essential that you keep your harp in tune by tuning it daily. New harps go out of tune quickly,
31 String Gothic Harp Kit
 31 String Gothic Harp Kit Musicmaker s Kits P.O. Box 2117 Stillwater, MN 55082 (651) 43 120 www.harpkit.com 31 STRING GOTHIC HARP KIT 1 set of Assembly Instructions WOOD PARTS: 1 soundboard, laminated
Max Launch Abort System Prod. No *Kevlar is a registered trademark of Dupont
 Flying Model Parts List Max Launch Abort System Prod. No. 3014 A 11820 - Body Tube 3.5 Diam x 5.5" Long B 11824 - Orange Capsule Base Shoulder Ring C 16032 - Laser-cut Ring motor mount rear D 16033 - Laser-cut
Regency Harp Kit. Musicmakers P.O. Box 2117 Stillwater MN (651)
") Regency Harp Kit Musicmakers P.O. Box 2117 Stillwater MN 55082 (651) 439 9120 info@harpkit.com Regency Harp Kit WOOD PARTS: A - 1 pre-drilled neck, solid hardwood B - 1 pillar, solid hardood C - 2 dowels
Regency Harp Kit Musicmakers P.O. Box 2117 Stillwater MN 55082 (651) 439 9120 info@harpkit.com Regency Harp Kit WOOD PARTS: A - 1 pre-drilled neck, solid hardwood B - 1 pillar, solid hardood C - 2 dowels
The Ballistic Blaster Rocket Kit should contain the following items. If anything is missing, call Customer Service at
 Ballistic Blaster User Guide Materials Included The Ballistic Blaster Rocket Kit should contain the following items. If anything is missing, call Customer Service at 800-358-4983. Body tube, 6-1/2" long,
WILDING WALLBEDS INSTALLATION INSTRUCTION Side Mount
 WILDING WALLBEDS INSTALLATION INSTRUCTION Side Mount For Wallbed models: Do-It-Yourself Insturction booklet C92 WARNING! ALL MURPHY/WALLBED SYSTEMS CONTAIN STORED ENERGY. FAILURE TO USE AND FOLLOW THESE
36 String Gothic Harp
 36 String Gothic Harp Musicmaker s Kits P.O. Box 2117 Stillwater MN 55082 (651) 439 9120 info@harpkit.com 1 set assembly instructions Gothic 36 Harp WOOD PARTS: 1 soundboard, laminated spruce/birch 1 back
Solo JB Style DIY Electric Bass Guitar Kit
 Solo JB Style DIY Electric Bass Guitar Kit Assembly Manual JBK-1 V 1.02 Copyright 2011 Solo Music Gear. All rights reserved Materials List Press-fit peghead bushings String Retainer (1 mounting screw included)
U-bass Kit Assembly Instructions
 U-bass Kit Assembly Instructions Compiled by playubass.com This guide is built from the instructions found here: http://kalabrand.com/ubass-kit/index.html Tools Needed 5/8 (16 mm) Wrench 7/16 (~11 mm)
Owner s Manual. Bass-Guitar Kit J-Style
 Owner s Manual Bass-Guitar Kit J-Style Contents Introduction... 3 Body finish... 4 Neck finish... 4 Assembling of tuners... 5 Neck... 6 Wiring... 6 Bridge assembly... 8 Strap buttons... 8 Setting up...
INSTALLATION AND CARE INSTRUCTIONS
 INSTALLATION AND CARE INSTRUCTIONS Vertical Applications Honeycomb Shades 52 C8-10-3401 Rev 2/14 CONTENTS Introduction...2 Before You Begin...3 Vertical Application Parts Overview...4 Materials Required...5
Installation And Care Instructions. Vertical Honeycomb Shades
 Installation And Care Instructions Vertical Honeycomb Shades Rev 5/2013 Table Of Contents Getting Started... 3 Parts Overview... 4 Materials Required... 5 Tools Required... 6 Outside Mount Installation...
INSTALLATION INSTRUCTIONS
 INSTALLATION INSTRUCTIONS For Wallbed models: Do-It-Yourself BOOKLET #C90 WARNING! ALL MURPY/WALLBED SYSTEMS CONTAIN STORED ENERGY. FAILURE TO USE AND FOLLOW THESE INSTRUCTIONS DURING THE INSTALLATION
DIY Kalimba Thumb Piano
 DIY Kalimba Thumb Piano By Caleb Schepart of nykalimba.com This DIY Kalimba Thumb Piano build is made using materials, tools, and supplies that are commonly found at a home improvement center, or at a
Electric Guitar Kit DC Style electric guitar kit
 Electric Guitar Kit DC Style electric guitar kit user manual Musikhaus Thomann Thomann GmbH Hans-Thomann-Straße 1 96138 Burgebrach Germany Telephone: +49 (0) 9546 9223-0 E-mail: info@thomann.de Internet:
Lumber Smith. Assembly Manual. If you are having problems assembling the saw and need assistance, please contact us at:
 Lumber Smith Assembly Manual If you are having problems assembling the saw and need assistance, please contact us at: 804-577-7398 info@lumbersmith.com 1 Step 1 Safety Carefully read the Owners Manual.
RFS Class II Rocket Assembly Instructions
 RFS Class II Rocket Assembly Instructions Instructions by: Loc Precision Photos by: Great Lakes Space Port Sheboygan Education Foundation, Inc. Welcome and thank you for joining the Rockets for Schools
Learn to weave on the. Inklette Loom
 Learn to weave on the Inklette Loom THE ASHFORD INKLETTE LOOM top rear peg Inkle bands are strong and useful braids. Create colourful belts, bracelets, ties, guitar straps, shoe laces or trims for weaving.
GTS Music diy-guitar.com
 GTS Music diy-guitar.com IB Jem Style Kit GTS Music 313 Strachan St. Port Hope, Ontario L1A 0C2 Canada sales@diyguitarkits.net Please read these instructions carefully before beginning in order to have
Central New York Rocket Team Challenge 2018 Rocket Assembly Instructions
 Central New York Rocket Team Challenge 2018 Rocket Assembly Instructions Note: These instructions vary from those provided by the manufacturer of the rocket kits. There is also considerable varying discussion
Congratulations on purchasing the Spirit Rails Magnetic Attach that allows easy wand to pack removal and reattachment by just getting close!
 Introduction Congratulations on purchasing the Spirit Rails Magnetic Attach that allows easy wand to pack removal and reattachment by just getting close! The Spirit Rails Magnetic Attach Kit is designed
Assembly instructions
 Nerdy Gurdy Assembly instructions This manual describes how to assemble a Nerdy Gurdy. Go to http://www.nerdygurdy.nl for more info about these instruments. Jaap Brand The Netherlands January 2018 General
Owner s Manual e-guitar Kit sg-style Harley Benton E-Guitar Kit SG-Style
 Owner s Manual E-Guitar Kit SG-Style Contents Introduction... 3 Body finish... 4 Neck finish... 4 Assembling of tuners... 5 Neck... 6 Wiring... 7 Bridge assembly... 10 Strap buttons... 11 Setting up...
INSTALLATION AND CARE INSTRUCTIONS
 INSTALLATION AND CARE INSTRUCTIONS Vertical Applications Honeycomb Shades CONTENTS Introduction...2 Before You Begin...3 Vertical Application Parts Overview...4 Materials Required...5 Tools Required...6
TURNING A PEN ORIGINAL BY MIKE RUDE REVISED BY GORDON PATNUDE - AUGUST 2015, OCTOBER 2016 EQUIPMENT AND SUPPLIES NEEDED
 TURNING A PEN ORIGINAL BY MIKE RUDE SEPT 2006 REVISED BY GORDON PATNUDE - AUGUST 2015, OCTOBER 2016 PHOTOGRAPHY BY JIM GOTT AUGUST 2015 EQUIPMENT AND SUPPLIES NEEDED A PEN TURNING TUTORIAL [this document]
Frameless Inline Door With Return QCI5263
 INSTALLATION INSTRUCTIONS Frameless Inline Door With Return QCI5263 WALL MOUNT HINGES FRAMELESS DOOR / PANEL / RETURN PANEL QCI5263 REV. 0 Page 1 Certified 06/17/2016 Parts List with wall mount hinges
Printing and Assembly of Kwawu Arm
 Printing and Assembly of Kwawu Arm Jacquin Buchanan December 2016 This work is licensed under the Creative Commons Attribution-NonCommercial-ShareAlike 4.0 International License. To view a copy of this
Engineering Directive
 Thing-a-ma-Jig Finishing To Finish a model means to apply paint and other decorations to complete the look of your model. Meaning to apply a finish. That is what we will discuss in this section. Applying
SCULL HANDLES AND GRIPS INSTRUCTION BOOKLET
 SCULL HANDLES AND GRIPS INSTRUCTION BOOKLET Contents Section I: Scull Grip Replacement: Fixed Handle or 10 cm Length Adjustment System Refer to this section if you need to replace the grips on your fixed
Product must be installed as shown using the screws and brackets provided. Use of incorrect hardware could result in damage to the product.
 General Notes These installation instructions are intended to be comprehensive for a typical Keyeira/Presto configuration. Your configuration may differ. If you have questions contact Geiger Customer Service
Aerospace Speciality Products
 Specifications:! Length: 18.75"/47.6 cm! Diameter: 0.98"/24.9 mm! Weight: 1.5 oz/44 gm! Streamer Recovery! Recommended Engines:!! A8-3; B4-4; B6-4; C6-5! Skill Level: Beginner This is a model rocket kit
Making Simple Bookbinding Equipment
 Tony Firman 20 1 2 19 Notes Tony Firman Tony Firman Bookbinding 18 3 : 2012 Tony Firman Bookbinding P.O. Box 507 Haslet, TX 76052 www.tonyfirmanbookbinding.com 4. When all the tapes have been pinned in
Frameless Bypass Slider
 INSTALLATION INSTRUCTIONS Frameless Bypass Slider QCI-5301 Heavy Glass Bypass Slider with Exposed Rollers QCI5301 Rev 0 Page 1 Certified 11/1/2016 Tools: To install your New Shower Enclosure, you may need
CAL-K1 Self-build guitar kit UK Version 1.0
 CAL-K1 Self-build guitar kit 174.460UK Version 1.0 Thank you for buying the CAL-K1 kit. All the wood, hardware and electrical components of a Chord CAL93 guitar are contained in this package. Please read
F-F-Fiddle Assembly Instructions
 F-F-Fiddle Assembly Instructions Bout Bridge Neck Machine Heads/Tuners Truss Rod Strings An open-source FFF 3d-printable electric violin. 1. Assemble materials 5 3 8 1 9,10, 11 7 4 2 6 PARTS 1. Bout part
tile redi redi DOOR Redi Redi Swing Slide g TM TM...Opening Doors to Stunning Showers! TM TM SERIES: CONFIGURATION: MOUNTING PACKAGE:
 redi DOOR INSTALLATION INSTRUCTIONS tile redi Redi Redi Swing Slide g TM TM...Opening Doors to Stunning Showers! TM TM SERIES: CONFIGURATION: MOUNTING PACKAGE: 3000 Door-Door Header, sliding doors RDQCI5301
Big Oz. Rocket. User Guide V0313
 Big Oz Rocket User Guide 59824 V0313 Materials Included The Big Oz Rocket Kit should include the following materials. If something is missing, contact Customer Service at 800-358-4983. 20-ounce plastic
TOOLS You will need some tools. Mostly, they re tools you probably have around the house, anyway.
 INTRODUCTION Congratulations on your purchase of your RAS Kit. While it can be a great challenge for an inexperienced builder, with care and attention to details, it can produce an excellent instrument
176 S. New Holland Road Gordonville, PA Tel: Fax: Castle Loft
 176 S. New Holland Road Gordonville, PA 17529 Tel: 717-768-0066 Fax: 717-768-8569 A S S E M B LY M A N U A L Castle Loft Castle Loft Assembly Manual revised 08/31/05 Dear Customer, Thank you for your purchase
Installation for Full Size Polaris Ranger Crew Doors
 Installation for Full Size Polaris Ranger Crew Doors Order of Installation: Heater Doors Wiper on to Windshield Windshield Top & Back Panel Note: Most of the steps in these instructions need to be repeated
SE5a Instrument Board part 2 - rev 1.1
 SE5a Instrument Board part 2 - rev 1.1 Fuel (Petrol) Valve This valve uses two circular name plates, eight brass screws, one black plastic base, copper wire and two black plastic risers. You can pick any
Side Mount INSTRUCTION BOOKLET #C122 BED STYLE: PARK CITY
 Side Mount BED STYLE: PARK CITY INSTRUCTION BOOKLET #C1 WARNING! ALL MURPHY/WALLBED SYSTEMS CONTAIN STORED ENERGY. FAILURE TO USE AND FOLLOW THESE INSTRUCTIONS DURING THE INSTALLATION PROCESS COULD RESULT
Treviso POCKET BILLIARD TABLE INSTALLATION MANUAL. SERVICE DEPARTMENT P.O. BOX 68 BRISTOL, WI 53104
 Treviso TM POCKET BILLIARD TABLE INSTALLATION MANUAL www.brunswickbilliards.com SERVICE DEPARTMENT P.O. BOX 68 BRISTOL, WI 53104 51-905881-000 NOVEMBER 2008 NOTE: Please use the instructions in this manual
TECHNIQUE. Because of the flexibility of the woven paper elements, this necklace moves nicely when worn. BEGINNER PAPER/WOOD. facetjewelry.
 TECHNIQUE FCT-SR-09248-03 BEGINNER PAPER/WOOD Because of the flexibility of the woven paper elements, this necklace moves nicely when worn. 203 Kalmbach Publishing Co. This material may not be reproduced
TOYOTA MOTOR EUROPE CA Products Division Tel : Fax :
 TOYOTA MOTOR EUROPE CA Products Division Tel : + 32 2 745 26 77 Fax : + 33 2 745 26 99 Ordering part numbers Comments Part Numbers Wooden floor one hatch PZ449-D3C42-11 one hatch with carpet PZ449-D3C42-01
How to make climbing grips. By,
 How to make climbing grips By, Items needed: * Items may be needed depending on your preference. - Carving Foam - Level Table - Cardboard - Pen - Ruler - Straight Edge - Box cutter - Hot melt glue gun
GTS Music diy-guitar.com
 GTS Music diy-guitar.com Tele Style Kit GTS Music 313 Strachan St. Port Hope, Ontario L1A 0C2 Canada sales@diyguitarkits.net Please read these instructions carefully before beginning to build your guitar
Vertical Honeycomb Shades
 Step by Step Installation Instructions Vertical Honeycomb Shades Customer Service 800.248.8888 or visit us online at smithandnoble.com Thank you for purchasing from Smith+Noble. Your new shades have been
Dusty Harp Pickup for lever harps
 q P10 for 24 30 string harps q P20 for 32 40 string harps Dusty Harp Pickup for lever harps Installation Kit Contents and Diagram of Pickup A. Pickup Element B. Grommet C. Pickup Harness D. Jack E. F.
ParkJet Builder s Manual
 ParkJet Builder s Manual Thank you for purchasing the ParkJet. The ParkJet is a profile ducted fan airplane that can be flown in a larger park. The ParkJet was initially designed by Scott Stoops and modified
guitar Musicmaker s Kits
 GUIT-A-LONG guitar Musicmaker s Kits (Hwy 36 behind Joseph s Restaurant) P.O. Box 2117 Stillwater, MN 55082 (651) 439 9120 info@harpkit.com harpkit.com GUIT-A-LONG GUITAR 1 - Set Assembly Instructions
Retractable Screen Installation Instructions For Vinyl and Aluminum Clad and Wood In-Swing Hinged Doors (See separate instructions for sliding doors)
") Retractable Screen Installation Instructions For Vinyl and Aluminum Clad and Wood In-Swing Hinged Doors (See separate instructions for sliding doors) IMPORTANT: Please read before you begin. Table of Contents
Retractable Screen Installation Instructions For Vinyl and Aluminum Clad and Wood In-Swing Hinged Doors (See separate instructions for sliding doors) IMPORTANT: Please read before you begin. Table of Contents
Building Tips This model can be built using the following types of adhesives:
 Page 1 Building Tips This model can be built using the following types of adhesives: Epoxy (with or without microballons) Odorless cyanoacrylate (CA) with accelerator UHU Creativ for Styrofoam (or UHU
TRUE TECHNICAL SERVICE MANUAL - ALL MODELS. DOORS/DRAWERS/LIDS
 DOORS/DRAWERS/LIDS 55 56 NOTES DOORS/DRAWERS/LIDS Swing s 73 74 NOTES INSTALLATION OF A GDM-SWING DOOR Phillips Head Screwdriver (2) - 1/8" Drift Punches (forged) Top Bracket NOTE: It may be necessary
Kentucky 4H Wood Science Plans Notebook. Plans Level 1
 Kentucky 4H Wood Science Plans Notebook Plans Level 1 MATERIALS NEEDED: 1 piece wood 3/4" x 2 x 2 1 piece wood 3/4" x 3 x 3 1/2" 1 wooden spring-type clothespin 2-1 1/2" nails 1-1/2 woodscrew Wood Glue
Frameless Bypass Slider
 INSTALLATION INSTRUCTIONS Frameless Bypass Slider QCI-5301 3/8 or 1/4 Glass Bypass Slider with Exposed Rollers QCI5301 Rev 1 Page 1 Certified 6/5/2017 Tools: To install your New Shower Enclosure, you may
Replacing Hammer Butt Springs in the Upright Action
 Schaff Piano Supply Company Presents: Replacing Hammer Butt Springs in the Upright Action Basic Procedures By Chuck Behm Replacing Hammer Butt Springs -Rationale- In the restoration of an upright, the
The Useless Machine. DIY Soldering Edition. Instruction Guide v0004
 The Useless Machine DIY Soldering Edition Instruction Guide v0004 TM For the best outcome, follow each step in order. We recommend reading this guide entirely before you get started. Tools required: Soldering
Frameless Fixed Panel Slider
 INSTALLATION INSTRUCTIONS Frameless Fixed Panel Slider QCI-5279 SINGLE ROLLER WITH ANTI-JUMP DOUBLE ROLLERS QCI5279 Rev Page Certified 08/09/6 Tools: To install your New Shower Enclosure, you may need
Please read and understand all instructions before building!
 AGM-256 Pit Bull This kit contains all the parts necessary* to build a flying high power rocket: 1) Pre-slotted main airframe 1) Pre-slotted boat tail 1) Nose cone 4) Main fins 4) Canard fins 1) Piston
EmagiKit. Privacy Pod Plus. Quiet. Easy. Affordable. INSTRUCTIONS ASSEMBLY
 EmagiKit Privacy Pod Plus Quiet. Easy. Affordable. INSTRUCTIONS ASSEMBLY DIMENSIONS AND COMPONENTS 47 47 Ceiling Unit 2-B 2-L 2-R Glass Door Corner Trim Door Handle 90 Adjustable Height Work Surface 1-B
southpaw enterprises, inc.
 southpaw enterprises, inc. Instruction Sheet C-STAND 7100 Store these instructions in a safe place or with the enclosed maintenance checklist Take time to familiarize yourself with the use and maintenance
INSTALLATION INSTRUCTIONS. UNIT No. 160/760 THIN-LINE SHOWER ENCLOSURE
 INSTALLATION INSTRUCTIONS UNIT No. 160/760 THIN-LINE SHOWER ENCLOSURE QCI0011 Rev. 0 Page 1of 10 Certified 10/18/2006 MAINTENANCE: Two primary materials are used to manufacture your new Basco enclosure;
Cobra X Q Construction Tips Construction: Bel y pan
 Cobra X Q Construction Tips : The white plastic in this kit is high impact styrene. It can be painted with most types of coatings if light coats are applied this is necessary due to the thickness of the
LUNAR EXPRESS. Little
 Little LUNAR EXPRESS The Little Lunar Express kit contains all the parts necessary* to build a flying high power rocket: 1) Pre-slotted boattail 1) Airframe 5.5" long 1) Nose cone 2) Main fins 2) Stabilizer
QWALL 5.2 (2 Back Panels)
") QWALL 5. ( Back Panels) SHOWER ACRYLIC WALL INSTALLATION INSTRUCTIONS IMPORTANT DreamLine TM reserves the right to alter, modify or redesign products at any time without prior notice. For the latest up-to-date
QWALL 5. ( Back Panels) SHOWER ACRYLIC WALL INSTALLATION INSTRUCTIONS IMPORTANT DreamLine TM reserves the right to alter, modify or redesign products at any time without prior notice. For the latest up-to-date
Hatch Installation For Pygmy Solo and Double Kayaks
 Introduction/Overview Hatch Installation For Pygmy Solo and Double Kayaks The hatch kit consists of several wooden lips, strapping and hardware. The hatch is constructed by cutting a hole in your deck,
1/4 FRAMELESS DOOR WITH INLINE PANEL 1413A-1713A-1813A
 1/4 FRAMELESS DOOR WITH INLINE PANEL 1413A-1713A-1813A F AB GLASS AND MIRROR www.fabglassandmirror.com Call: +1 888-474-2221 Fax: (614)-334-4919 Office Timing: 8:30-18:00 EST info@fabglassandmirror.com
THE GREEN CLUB PROJECT
 tennis ball end cap finishing tape THE GREEN CLUB PROJECT duct tape How to make the ultimate recycled juggling club at home. BY JONATHAN POPPELE 16 or 20 oz bottle club body hardwood dowel collar finishing
BABY WOLF LOOM. Assembly Instructions for Knocked-Down Looms
 BABY WOLF LOOM Assembly Instructions for Knocked-Down Looms BEFORE YOU BEGIN Please read through the directions before beginning to assemble your loom. Unpack the loom parts carefully. Do not throw away
GTS Music diy-guitar.com
 GTS Music diy-guitar.com SG Style Kit GTS Music 313 Strachan St. Port Hope, Ontario L1A 0C2 Canada sales@diyguitarkits.net Please read these instructions carefully before beginning to build your guitar
Frameless Inline Door QCI5254
 INSTALLATION INSTRUCTIONS Frameless Inline Door QCI5254 FRAMELESS DOOR / PANEL QCI5254 REV. 0 Page 1 Cer fied 06/16/2016 Parts List with wall mount hinges *Quanes may vary QCI5254 REV. 0 Page 2 Cer fied
Installation and Assembly - Universal Articulating Swivel Double-Arm for 42" - 60" Plasma Screens
 Installation and Assembly - Universal Articulating Swivel Double-Arm for 42" - 60" Plasma Screens Models: PLAV 70-UNL, PLAV 70-UNL-S PLAV 70-UNLP, PLAV 70-UNLP-S R This product is UL Listed. It must be
UNIT No FRAMELESS PIVOT SHOWER DOOR
 INSTALLATION INSTRUCTIONS UNIT No. 3600 FRAMELESS PIVOT SHOWER DOOR NEED INSTALLATION HELP? Call 1-800-45-BASCO (452-2726) Monday - Friday 8:00 A.M. - 4:30 P.M. Eastern Time QCI0020 Rev. 3 Page 1 of 8
FRAMELESS DOOR / PANEL WITH WALL MOUNT HINGES QCI5274
 FRAMELESS DOOR / PANEL WITH WALL MOUNT HINGES QCI5274 QCI0274 QCI5274 REV. Rev. 1 0 Page Page 1 1 Date Certified: Certified 06/16/2016 10/01/10 Parts List with wall mount hinges ITEM NO. Part # DESCRIPTION
Coe Percussion 5.0 Octave Concert Marimba Owner's Manual. Aluminum/Wood Hybrid Height Adjustable Frame
 Coe Percussion 5.0 Octave Concert Marimba Owner's Manual Aluminum/Wood Hybrid Height Adjustable Frame Setup, Tear-down, Transportation, and Height Adjustment Step 1. The End-frames Start with the two end-frame
Assembly Instructions Music Library System
 Assembly Instructions Music Library System 7-Shelf Unit is shown. 6-Shelf Unit assembly is the same except where noted. Contents Important User Information...........................2 General...2 Manufacturer...2
Project Skill Level: INTERMEDIATE Plywood Used: CANPLY EXTERIOR Good Two Sides (G2S) or precision sanded Aspen
 or precision sanded Aspen") Project Skill Level: INTERMEDIATE Plywood Used: CANPLY EXTERIOR Good Two Sides (G2S) or precision sanded Aspen MATERIALS LIST: (1) ¾" x 4 ft x 8 ft plywood panel (20) #8 x 2" Robertson or Phillips wood
Project Skill Level: INTERMEDIATE Plywood Used: CANPLY EXTERIOR Good Two Sides (G2S) or precision sanded Aspen MATERIALS LIST: (1) ¾" x 4 ft x 8 ft plywood panel (20) #8 x 2" Robertson or Phillips wood
Removing and Replacing the Y-truck
 Service Documentation Removing and Replacing the Y-truck To remove and replace the Y-truck you will need the following tools: 4mm Allen wrench 12mm stamped flat wrench #2 Phillips screwdriver (magnetic
Parts & Tools. O'Cello printing and assembly instructions. o-cello.com
 The O'Cello is a 3D-printable cello developed by Conor O'Kane, which is free to download and print for personal use. This document will show you how to print and assemble your own O'Cello. For the latest
Salter Industries Spiral Stair
 Salter Industries Spiral Stair The Leader in Spiral Staircases Continuous Sleeve Stair Installation Instructions TOOLS NEEDED: 1. Electric drill with hex chuck and Phillips bit 2. Drill bits 1/8", 1/4",
 INSTRUCTION BOOKLET #C0 Watch step by step installation instructions at: https://www.wallbedsbywilding.com/wallbed-installation-studio-series/ WARNING! ALL MURPHY/WALLBED SYSTEMS CONTAIN STORED ENERGY.
Installing your new Bevella Top. L Shaped Countertop with Joints No Finished Ends (Fits Between Four Walls)
") Installing your new Bevella Top L Shaped Countertop with Joints No Finished Ends (Fits Between Four Walls) Bevella RTI Countertops are engineered and manufactured to the highest quality standards, built
Installing your new Bevella Top L Shaped Countertop with Joints No Finished Ends (Fits Between Four Walls) Bevella RTI Countertops are engineered and manufactured to the highest quality standards, built
How to Install Custom Real Wood and Faux Wood Blinds
 Before you begin your installation: READ ALL INSTALLATION INSTRUCTIONS! Make sure that you have all tools and hardware needed for installation. Check the installation surface (wall, ceiling, or window
Hinge Mortising Jig. One of the make it or break it parts of building a. 6 ShopNotes No. 74
 Hinge Mortising Jig A Mortise for a Hinge. Quick, clean, and accurate that s the only way to describe the mortise you get with a trim router and this hinge mortising jig. One of the make it or break it
 INSTRUCTION BOOKLET #C10 Watch step by step installation instructions at: https://www.wallbedsbywilding.com/wallbed-installation-studio-series/ WARNING! ALL MURPHY/WALLBED SYSTEMS CONTAIN STORED ENERGY.
Assembly Instructions
 Assembly Instructions Parts Included: 1 Nose Cone 1 Body Tube 3 1/8 Balsa Fins 1 Thrust Ring 1 Motor Tube 1 Motor Hook 1 Motor Sleeve 2 Centering Rings 1 Launch Lug 1 Kevlar Shock Cord (yellow) 1 Elastic
Electric Guitar Kit T Style electric guitar kit
 Electric Guitar Kit T Style electric guitar kit user manual Musikhaus Thomann Thomann GmbH Hans-Thomann-Strasse 1 96138 Burgebrach Germany Telephone: +49 (0) 9546 9223-0 E-mail: info@thomann.de Internet:
Bass Guitar Kit J-Style bass electric guitar kit
 Bass Guitar Kit J-Style bass electric guitar kit user manual Musikhaus Thomann Thomann GmbH Hans-Thomann-Strasse 1 96138 Burgebrach Germany Telephone: +49 (0) 9546 9223-0 E-mail: info@thomann.de Internet:
Standard Kit #1 (3-way switch)
") Standard Kit #1 (3-way switch) Please Read All Instructions Before Beginning. Tools you will need: Soldering Iron (35 watt preferably) Solder Wet Sponge Wire Clippers 3/8 Drill Bit 1/4 Drill Bit Variable
Standard Kit #1 (3-way switch) Please Read All Instructions Before Beginning. Tools you will need: Soldering Iron (35 watt preferably) Solder Wet Sponge Wire Clippers 3/8 Drill Bit 1/4 Drill Bit Variable
ROMAN AND. Roller Lift System Continuous Cord Loop GETTING STARTED BRACKET INFORMATION INSIDE MOUNT. A few simple tools are required:
 ROMAN AND WOVEN WOOD SHADES Roller Lift System Continuous Cord Loop GETTING STARTED BRACKET INFORMATION A few simple tools are required: The brackets you received with your product are REQUIRED for proper