Building Gundam Models: Advanced Panel. Intros Simple tricks to improve finish Perfect finish! Make it shine! Now Break it!
|
|
|
- Patience Neal
- 6 years ago
- Views:
Transcription

1 Building Gundam Models: Advanced Panel Intros Simple tricks to improve finish Perfect finish! Make it shine! Now Break it! Contests
2
3 Using glue Using glue in some key sections in the skeleton can help make the model sturdier. You can use glue to close gaps between pieces. Gundams don t need much glue. Use very small amounts, mostly or only around the pin/hole sections. Test fit the parts before applying glue, make sure you re gluing the correct parts


4 Using Glue Regular plastic glue/cement melts the plastic and welds it together. Takes several minutes to fully dry, and can t be used as a filler for gaps. Gel superglue dries faster, and can be used as a filler for gaps. Liquid superglue is not recommended. More difficult to control, dries too fast.

5 Be careful Not to glue your fingers If there s glue on you, stop working on the model immediately and wash your hands. Super glue fumes will frost clear parts. Keep them away from super glue. For clear parts, use white glue, or Testors clear parts glue.

6 Dealing with gaps/seams between parts Newer models rarely have any visible gaps between parts. Most modern Gundams have a panel line depression in between parts to help hide the gaps. You can just use a bit of glue to make sure the parts stay firmly together, and paint the panel line between parts.

7 Gaps between parts If you want to completely hide the gap, that s a lot more work, especially in a Gundam The most important thing is to be consistent. Whichever approach you take, make sure you follow the same approach all over, or at least symmetrical pieces.
8 Hiding gaps using putty 1. Planning planning planning. Are the pieces a single assembly? Do they cover other sections with different finish/color? For the leg example 2. Mask the skeleton sections, like the knee joint 3. Glue the white pieces around it, using a good amount of gel superglue. It s ok if some glue squeezes out. 4. Let the glue dry solid.


9 Hiding gaps using putty 1. Use a xacto knife to cut out the biggest chunks of dry glue. 2. Use sandpaper to sand the remaining glue. 3. If parts of the gap are still visible, fill them with putty. 4. Let the putty dry. 5. Sand again. 6. Once there are no visible gaps, prime the piece. 7. Check for gaps again, and repeat from step 3 if needed.
10 Hiding gaps using putty 1. Paint the white piece as you normally would. 2. Remember the Red shoe? Now you need to do it all again for the shoe, if there are any gaps you want to hide 3. Unmask any masked pieces.

11 Airbrushing Opens up a world of creative possibilities You can minimize the use of spray paint. You can use mostly acrylic paints Long term, it s cheaper than spray paint. Needs commitment and attention.

12 Airbrushing Nice airbrush and compressor set is about $150 to $200. Get a double action Practice writing and drawing simple shapes Try to use mostly acrylics: Easier to clean, cheaper thinner (rubbing alcohol), usually nontoxic.
13 Before airbrushing 1. Recommendation: Tamiya acrylic thinner is just rubbing alcohol, so save some money 2. Thin the paint. About 2:1 thinner:paint ratio. Consistency should be about the same as skim milk. 3. Make sure the airbrush is clean. Consider running a bit of alcohol thru it before starting to paint.

14 Quick cleaning You can immediately continue painting with a different color after a quick cleaning 1. If you have a bottom feed container, cover the airbrush tip and pull on the trigger to make the paint flow back to the container. 2. Shut down the air compressor 3. Clean the paint container 4. Add some thinner to the container. 5. Airbrush some thinner to clean remaining paint.

15 Full cleaning Never store a dirty airbrush. 1. When you re ready to store the airbrush, do the quick cleaning, then disassemble it. 2. Dip pieces in thinner for a few minutes. 3. Check for any remaining paint. Remove it using a cloth dipped in thinner. 4. Dry pieces. 5. Reassemble airbrush.
 2. If you go from any color to a clear coat. 3. If you go from a metallic color to any color.")
16 Airbrush process 1. If you go from light to dark colors, you can just do a quick cleaning in between. 2. You must do a full cleaning in the following cases: 1. If you go from a dark color to a light color (especially white) 2. If you go from any color to a clear coat. 3. If you go from a metallic color to any color.


17 Shading process 1. Prime pieces 2. Optionally apply a quick coat of the final color 3. Pick a pre-shade color: 1. A darker shade of the piece color will give a subtle effect. 2. A darker complementary color will give a more dramatic effect. 4. Airbrush around panel lines, depressed areas, etc.

18 Airbrush process 1. Optionally pre-shade raised areas with a lighter color. 2. Blend all the shades together by applying the base color in light coats until you get the desired effect. 3. Optionally post-shade with both darker and lighter tones for additional effects.

19 Dry Transfer markings Usually included in Master Grade and above 1. Cut out the marking you re about to apply 2. Place on the desired spot. 3. If possible, secure with tape. 4. Rub the marking with a pencil tip

20 Dry transfer markings 1. Keep rubbing until the marking is fully transferred. You ll notice how it detaches from the backing paper. 2. Make sure the decal completely transferred before removing the backing. 3. Remove the backing 4. Clear coat to seal.


21 Waterslide decals Official ones are High Quality, lots of detail Most popular Gundams have their own official waterslide decals set For the rest, you can get a generic set Usually $10 to $15 If nothing works you can make your own ;)

22 Waterslide decals: Process Cut around decal 2. Dip in water for 30s 3. Set on a tissue or napkin to absorb excess water 4. Wait 30s to 1 min. for the decal to detach from the backing. (continued)


23 Waterslide decals: Process (continued) 5. Put some decal softer on application spot 6. Apply decal solution to spot 7. Place decal in place 8. Gently and slowly squeeze with cotton swab or napkin or cloth to remove excess water. 9. Apply mark softer on top. 10. Remove excess (continued)

24 Waterslide decals: Process (continued) 11. Continue making sure the decal is in place. 12. Repeat a couple of times to make sure the decal takes the piece s shape and the clear film blends in. 13. Apply finish coat


25 Custom waterslide decals What to do if there aren t official waterslide decals? Make your own! What you need: Decal paper Decal bonder spray Scanner Photoshop or similar picture editing software Xacto knife Patience Lots of patience
26 Custom waterslide decals: Process 1. Scan stickers sheet 2. Open picture in Photoshop. 3. Remove background color using Photoshop tools: 1. Magic wand 2. Eraser 3. Lasso 4. Once you re done, you should have a transparent picture file, with the original decals 5. Print decals sheet on decal paper
27 Custom waterslide decals: Process 6. Let ink dry at least a few minutes 7. Lightly coat the decal sheet with the decal coat spray. Don t overdo this. 8. Let the clear coat dry, apply one extra coat. 9. Let the decal sheet dry overnight. 10. You now have a decal sheet that s almost as good as the official ones. 11. You just need to cut each and every decal with the exacto knife have fun 12. There s also white decal paper


28

29


30 Paint inside of armor

31 Panel lines using enamel or acrylic wash Get enamel paint (usually grey, black or brown) Piece must have glossy finish. 1. Thin the paint with lighter fluid at a 3:2 fluid:paint ratio 2. With a small paintbrush, get a good amount of paint and place it on the panel. The paint will just flow 3. Continue doing this for the rest of the panels on the piece


32 Panel lines using enamel wash 1. Let the piece dry for a few minutes 2. Clean the excess using a cotton swab dipped in lighter fluid.


33 Better Clear Parts 1. Get Pledge floor polish (formerly known as Future Floor polish) 2. Pour some in a container 3. Dip transparent pieces into container 4. Cover the container 5. Remove the pieces very gently. Watch for air bubbles. 6. Let the excess drip away and cover the piece to avoid dust landing on it. 7. Excess can be removed with rubbing alcohol

34 Better Tinted parts Instead of stickers that go on clear pieces, use clear-colored paints. Available in most common colors. Gives a nice extra shine. Clear-colored paints can also be used for high-gloss finish. We ll talk about it later in this panel.
35 Contests (Part 1) Fun and great way to learn more about model building. But if you go to a contest with the wrong expectations, it can be stressful. Your friends and family will always tell you your Gundam is the best. They re not objective Doing tons of (PERFECT) modifications to a model will likely get you to the top of the contest Normally, a PERFECT model without fancy modifications will beat an imperfect model with tons of modifications. Doing tons of (imperfect) modifications to a model doesn t guarantee winning a contest.

36 Masking Use masking tape to protect painted surfaces while airbrushing. Tamiya Masking tape is great. Great for Camouflage Painting the interior of armor pieces Adding detail to pieces Along panel lines, to have 2 similar color shades

37 Masking 1. Paint the first color. Let it dry overnight 2. Cut the masking tape pieces to the shape you need. 3. Place the masking tape. Make sure it sticks all the way. 4. Paint the next color. Do quick, light coats, to avoid building a paint edge 5. Remove the masking tape carefully.

38 Be careful when masking Use only masking tape. Don t cut the tape while on the piece, or you could scratch the piece. When removing the tape, do it very slowly and carefully. Don t let a masked piece sit for days (or weeks, or months or years)


39 Alcad II 1. Prime pieces with Tamiya Gloss black spray. 2. Airbrush Alclad II normally 3. Let it dry overnight 4. At this point, you can polish the finish, you can apply decals, weather the piece, etc. 5. DON T clear coat. That would hide the metallic finish

40 High Gloss finish Nicely done glossy parts or models can look very nice. As usual, planning is key Paint a couple of glossy pieces to contrast with the rest of the model. Example: head crown. Or you can go all the way with some of the most colorful Mobile suits, like any of Char Aznable s Red Mobile Suits.
41 High gloss and pearl finish 1. Apply a wet coat of the base glossy color. Repeat if needed. 2. Apply a wet coat of the same color in its clear version. Repeat if needed. 3. Apply a wet clear gloss coat. Repeat if needed 4. Apply decals 5. Apply a final clear gloss coat. Let the parts dry for at least 30 minutes between same color coats Let the parts dry overnight before applying the next color. Coat and immediately cover the piece to protect it from dust. For a Low visibility look, apply the decals BEFORE the colored-clear coat (step 2) You can follow the same steps when using Pearl paints.

42

43 Marble paint 1. Apply a wet coat of the base glossy color 2. Using a brush, dip it in thinned black paint, clean it a bit, and apply paint in random patterns over the pieces. Make sure not to over do it. 3. Repeat to darken some spots. 4. You can also use a sponge. 5. Apply a gloss clear coat, then decals, then another clear coat.


44 Candy coat paint 1. Prime with a wet coat of Gloss black 2. Spray paint a wet coat of Metallic Silver 3. Spray paint a coat of clear color (blue, red, green, yellow). Optional: polish in between coats

45

46 Dry brushing Adds metallic highlights to show some wear and tear Best results are on a completely finished piece. Dip brush in metallic paint. Start with a medium or dark metallic. 1. Clean brush with a piece of paper until brush is almost dry but still has some pigment 2. Gently brush around the edges you want to highlight 3. Repeat with progressively lighter tones, and covering less area (more focused in the raised areas). 4. Gunmetal -> metallic grey -> aluminum -> gloss silver.

47 Paint chipping Similar to dry brushing. Instead of a brush, use the corner of a sponge. Apply in random patterns. Be careful not to overdo this. Similar to drybrushing, start with a darker color, then move to adding highlights with aluminum or silver.

48 Adding dirt, rust, snow, dust Easiest way is to get a weathering kit and just follow the instructions. Tamiya weathering kit is pretty nice, and comes with an applicator. Just like with all other weathering techniques, be very careful not to overdo it


49 Paint chipping using salt Most realistic paint-chipping, though easy to over-do. 1. Pick a contrasting metallic color (if the top color is lighter, use a darker metallic and viceversa) 2. Prime 3. Paint with the metallic tone 4. Let it dry overnight 5. Use an old brush, dip it in water, then in salt, then apply in the areas you want to chip

50 Paint chipping Some salt will fall, some will stay, this helps the random patterns Let it dry for a couple of hours. Airbrush/spray paint the top color Let it dry overnight Remove the salt: rub with your fingers, sand it off, etc. Use other weathering techniques to blend the look.

51 Battle Damage Plan carefully before you start. Sketch what you want to do in Photoshop or similar software Decide what type of damage you want: Blunt weapons Bullets Explosions Energy beams Energy saber


52 Battle Damage tools Hobby knives Soldering Iron Sandpaper Dremel power tool

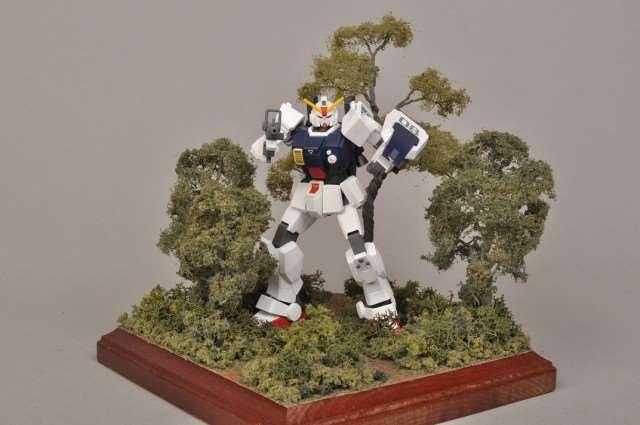
53 Bullet Holes 1. Mark the places for the bullet holes 2. Use a drill bit to start the holes. Not all holes need to go all the way through. 3. Create fractures around the hole by CAREFULLY using a xacto knife

54 Energy blasts 1. Open the holes with a drill bit or Dremel, similar to the bullet holes 2. Open fractures around the hole, similar to the bullet holes 3. Melt the plastic around the holes using a soldering iron. Be very careful not to overdo this. 4. Don t breathe the fumes

55 Beam saber cuts 1. Mark where the cuts will be 2. Follow the lines with the soldering iron. 3. Depending on how much of the melting vs cutting effect you want, either do a quick pass, or slowly bunch up some of the plastic around the edges.
56 Blunt damage Damage by collision with a blunt object or hand to hand combat Armor is not perforated, jut bent Easy to do with power tools, but also easy to overdo and end up with a hole in the armor. Best pieces to do this are curved, spherical pieces, shields, etc. Also possible to do using sandpaper, it just takes longer.
57 Blunt damage 1. Use a power tool with a drill bit or a sanding bit to start depressing the piece. 2. Move slowly and make sure you don t poke a hole thru the piece 3. Blend the main depression with the rest of the piece with the power tool, so it doesn t look like a cavity, but a deformation on the armor. 4. Use sandpaper to blend everything in.

58 Exposing inner detail MGs and RGs include skeletons. The detail in them is nice, though not perfect Exposing inner detail from the skeletons is not as simple as removing the armor pieces. As usual, plan what you want to expose, and based on that you can estimate the amount of work. Depending on the skeleton sections you want to expose, the pre-existing detail may be enough.

59 Exposing inner detail Removing a complete piece or sections usually exposes the pins and holes in the plastic pieces. To make the gundam look realistic you need to hide these pins and holes, and add any detail wherever it may be lacking. There s no single way to enhance the exposed pieces. Here are some ideas:
60 Exposing inner detail Cut and sand out the pins Use putty to fill in the holes Get some network cables, get the small wires out of the cable, peel out some of the cover to expose the wire, and stuff them in the holes. Use your spare Gundam pieces and attach to areas lacking detail. Drybrushing, paint chipping, panel lines, styrene panels, etc. Depending on the reason why the piece is exposed, add more or less weathering or battle damage. Maybe the skeleton is exposed for regular maintenance, or just for display. Or maybe it s exposed due to battle damage.
61 Dioramas The sky is the limit Plenty of resources to get started at any hobby shop: 1. Finished and unfinished bases on different sizes and types of terrain 2. Trees and vegetation 3. Rocks 4. Buildings 5. People The key for a good diorama is to blend all the elements together in a cohesive and harmonious way Use the techniques for painting, weathering, battle damage, etc to achieve these effects


62

63 Barbatos Display base


64
65 Contests Fun and great way to learn more about model building. But if you go to a contest with the wrong expectations, it can be stressful. Your friends and family will always tell you your Gundam is the best. They re not objective Doing tons of (PERFECT) modifications to a model will likely get you to the top of the contest Normally, a PERFECT model without fancy modifications will beat an imperfect model with tons of modifications. Doing tons of (imperfect) modifications to a model doesn t guarantee winning a contest.
66 Contests Be consistent in your finish: If you re going for new look, don t do weathering, keep panel lines discreet, use glossy finish, etc. For the weathered look, make sure you don t forget to weather some spots, like the bottom of the Gundam feet. Don t try to hide imperfections with heavy weathering. Be consistent on hiding or showing panel lines Make sure the finish is clean of any glue, or putty drops. Use latex gloves to avoid leaving fingerprints everywhere Be consistent when painting the inside or armor, especially the edges. NO transparent stickers, and use foil stickers only where the edges will be hidden. Clear film on decals or dry transfers must be completely blended. (gloss coat, decal, gloss coat, final coat)
67 Contests Don t do extras half-way If you add a display base, make sure your Gundam blends with it But most important, build for you, not for the judges If you expose the inner frame, modify or hide the pins/holes, and add mechanical detail. If you add custom LEDs, hide all wiring.


68 Scribing new panel lines RG, newer MG and newer PG don t really need this. Older, larger MG and PG could benefit from this. Most Larger HG could benefit from this. Significant planning and work required.

69 Scribing panel lines 1. Draw the design on the piece. This may be easier on a primed piece 2. Use thick masking tape along the larger panel lines 3. Use a small scriber knife to start scribing, using the masking tape as a guide 4. Switch to a larger knife to finish the panel 5. Sand around in case there s any plastic sticking out.


70 Adding styrene sections Similar to scribing new panels, it s probably not necessary on newer models. Brings life to large, flat pieces

71 Styrene pieces 1. Plan the design you want 2. Get the styrene sheet in the proper thickness. 3. Draw the design on the styrene sheet 4. Cut the styrene pieces 5. Sand the edges 6. Glue the styrene on top of the Gundam pieces. Make there are no gaps or glue sticking out. 7. If needed fill any gaps, clear any glue, sand down any remaining imperfections, etc.
72 Answer a Question, Get a Gundam!
73 Resin Parts Resin casting allows some additional detail compared to regular plastic injection. Plenty of Resin kits to improve the look on your Gundams: More detailed parts Conversion Parts to modify a model and turn it into a variation. Resin conversions are expensive Difficult to work with resin Pieces need lots of cleaning Dust from pieces is highly toxic Must use Glue Usually impairs Gundam s poseability


74 Resin Parts The day you buy a Resin conversion, the rumors start about an official Bandai release The day you start working on your Resin conversion, Bandai officially announces a release The day you complete your Resin conversion, Bandai releases the same model, with better detail and infinitely easier to build

75
76 Resources msn-04.html
77 Q & A
GUNDAM BUILDING BASICS
 GUNDAM BUILDING BASICS LUIS & CHRISTINE INTROS HTTP://ANGELMEX.NET COME TO OUR ADVANCED PANEL: 12:30 PM, HERE STOP BY THE GUNPLA WORKSHOP B-117, 4pm to 10 pm. Bring your model, or purchase an SD kit for
DAVENPORT DEPARTMENT STORE PF5214
 1:160 BUILDING KIT DAVENPORT DEPARTMENT STORE PF5214 Dress up your downtown scene with the classic Victorian architecture and large first-floor picture windows of the Davenport Department Store. Details
4-H Model Building. Monroe County. Grades 3-12
 4-H Model Building Monroe County Grades 3-12 PURPOSE Positive development of our young people through the stimulation of their personal interest and natural skills through the assembly, techniques of construction,
CONCEPT MODELS INSTRUCTIONS FOR UP DC-10 WING CAR El Toro Way Stockton, CA Web Address:
 CONCEPT MODELS Web Address: http://www.con-sys.com 8810 El Toro Way Stockton, CA 95210 INSTRUCTIONS FOR UP DC-10 WING CAR 2 CONCEPT MODELS PARTS DC-10 WING CAR Item No. Part No. DESCRIPTION QTY. 1 2003-1
Background: For the Modeler:
 Right On Replicas, LLC Step-by-Step Review 20141020* Space Shuttle with Fuel Tank and Boosters 1:72 Scale Monogram Model Kit #85-5089 Review (Part 1 of 2) Background: The United States Space Transportation
Rosalina Accessories Tutorial Version March 2011 Martyn
 Rosalina Accessories Tutorial Version 1.0 - March 2011 Martyn Star Brooch Feel free to experiment with these dimensions, you should make a template you are happy with, the method still works. 1) Creating
HARRISON S HARDWARE PF5891
 1:48 BUILDING KIT HARRISON S HARDWARE PF5891 Model the local hardware store where layout residents can find all they need to keep their homes in tip-top shape and workshops running smooth. The positive
Blakes 7 DSV-1 Liberator
 Blakes 7 DSV-1 Liberator Model kit by Masterpiece Models: www.masterpiecemodels.com Pattern Maker: Alfred Wong Casting: J&S Technologies LLC Parts List Main body 3 Main body nose vanes 4 Main body detail
Swift assembly guide
 Swift assembly guide Download the assembly guide at www.scihighmodels.com/swift.pdf Sample kit shown with aluminium bells (available with the Deluxe kit) Shown here without main tanks Version 10/12/2010
How to use a Touch Up Bottle & Brush
 How to use a Touch Up Bottle & Brush Tech Tips General Definitions Base Color (Basecoat): A color coat requiring a clear coat. Base Color provides color and appearance, while the clear coat provides gloss
Copyright Gary Faulkner March Attack All rights reserved.
 Painting and Decorating Sometime passed I posted some painted 28mm Sarissa WWE buildings on to the March Attack Face Book page and had a few show and tell us emails, so here goes. If you meet me at the
1Take the keel (3) and
 and") 1 The hull and the bridge 1Take the keel (3) and apply PVA wood glue in the second slot from the left: a toothpick may make it easier. Take care: the left end is the one that has a projection. THE HULL
1 The hull and the bridge 1Take the keel (3) and apply PVA wood glue in the second slot from the left: a toothpick may make it easier. Take care: the left end is the one that has a projection. THE HULL
Instructions for Assembly of the HO Scale The Charles
 The Charles Instructions for Assembly of the HO Scale The Charles HO Kit Contents: 337 ea. white 1/16" laser cut acrylic part 19 ea. Clear 1/16" laser cut acrylic part 69 ea. white 1/8" laser cut acrylic
Thank you for purchasing E.L. Moore Window & Door.
 Thank you for purchasing E.L. Moore Window & Door. Instructions Version 4.28.15 I ve named this kit after one of the greatest modelers I ve ever known, the late Elliot Moore Jr. Rest in peace my friend.
Building the Bell Tower
 Building the Bell Tower Mold #55 does not contain all of the blocks to build this tower. You will need extra regular blocks (1/2" x 1/2" x 1") and square blocks (1/2" x 1/2" x 1/2"). These blocks can be
Part 3 J. Serresseque, 2012
 Part 3 J. Serresseque, 2012 Vellum wings are among my favorite wing media. I get excited when I see a new pattern that can be translated into a potential wing design. The nice thing about Vellum is the
Chapter 1 Preparing the plastic parts
 Introduction: This guide will focus its content into painting, decaling and clear coating processes of an airliner model (which may also be applied for other subjects). I am writing this guide in an attempt
Cardboard Model Buildings
 Cardboard Model Buildings Get more model kits from http://www.modelbuildings.org PRINTING & ASSEMBLY TIPS: These OO designs can easily be resized by reducing the print percentage as follows: OO scale is
FRANKLIN COUNTY 4-H MODEL BUILDING
 FRANKLIN COUNTY 4-H MODEL BUILDING Save this book, use it each year you are in the project. 4 H Model Building Model building can be fun and exciting. You can express your creative abilities, learn to
Converting a Bachmann Class 45 model to 45133
 Converting a Bachmann Class 45 model to 45133 Bachmann have yet to produce an accurate OO gauge model of a Class 45/1. The 45/1s that have been produced were let down by the presence of steam heat details
The Park Hotel Instructions for Assembly of N Scale Kit
 The Park Hotel Instructions for Assembly of N Scale Kit Kit Contents: 198 ea. Laser Cut Acrylic Parts, 2 ea. Chimney Parts Sheets, 1 ea.2".040 styrene rod, 5 ea. Sidewalk Parts, 14 ea. Cast Resin Dormers,
PROVIDED BY WINDY URTINOWSKI AND REPRESENT HIS PROCEDURE FOR OBTAINING A SUPERIOR FINISH USING BRODAK DOPE
 PROVIDED BY WINDY URTINOWSKI AND REPRESENT HIS PROCEDURE FOR OBTAINING A SUPERIOR FINISH USING BRODAK DOPE The TARGET is for a GREAT FINISH with 6-7 OUNCES of weight FROM BARE WOOD TO READY FOR SILVER
J.W. cobbler 1:160 BUILDING KIT PF5210 WOODLAND SCENICS
 1:160 BUILDING KIT J.W. cobbler PF5210 The partially assembled walls, positive alignment system and prefinished edges make kit assembly quick, easy and accurate. This three-story brownstone features stacked
AK893 GLASS COAT GAUZY AGENT
 A new FUTURE opens up for modelers. AK s R&D department, in its constant desire for evolution, has developed two new products specially designed to cover the modelers needs. Two different products for
The Fyfe Building Instructions for Assembly of the N scale kit.
 The Fyfe Building Instructions for Assembly of the N scale kit. Kit Contents: 150 each laser cut 1/16" acrylic parts. 6 each 020 adhesive backed part 6 each column caps 2 each decorative canopy 1 each.125"
The Rubley Building Instructions for Assembly of the N scale kit. v1.1
 The Rubley Building Instructions for Assembly of the N scale kit. v1.1 Kit Contents: 197 ea. laser cut 1/16" acrylic parts. 1ea. adhesive backed.020 styrene part. 10 ea..060 x 1" styrene alignment pins.
Learn to. Brush Paint Model Airplanes
 Learn to Brush Paint Model Airplanes Table of Contents Model Paints... 4 Brushes... 6 Workspace Setup... 7 Surface Preparation... 9 Painting Procedure... 10 Paintbrush Cleanup... 14 Masking... 15 Dry-brushing...
HRMLaserModels.com T.W. SNOW 25 TON COALING TOWER S SCALE AS USED ON THE MILWAUKEE ROAD
 HRMLaserModels.com T.W. SNOW 25 TON COALING TOWER S SCALE AS USED ON THE MILWAUKEE ROAD HRM-61 S SCALE COAL TOWER T.W.Snow 25 Ton Coaling Tower General Instructions Check out HRMLaserModels.com for construction
Tools and Tips: ( 1 )
") Tools and Tips: As you build instructions will show in my many picture manual how to assemble. You can use your own methods as you desire, my results are very good. A smooth, flat work surface is very
Tools and Tips: As you build instructions will show in my many picture manual how to assemble. You can use your own methods as you desire, my results are very good. A smooth, flat work surface is very
Cobra X Q Construction Tips Construction: Bel y pan
 Cobra X Q Construction Tips : The white plastic in this kit is high impact styrene. It can be painted with most types of coatings if light coats are applied this is necessary due to the thickness of the
3Insert the second rod no. 4
 Yamato: Step-by-step 37 The stern block and searchlight control towers a b c d e f Recommended tools and materials Wood glue Sandpaper (no. 800 grain) Metal file Putty Craft knife For metal: Super Glue
Tools and Tips: ( 1 )
") Tools and Tips: As you build instructions will show in my many picture manual how to assemble. You can use your own methods as you desire, my results are very good. A smooth, flat work surface is very
Tools and Tips: As you build instructions will show in my many picture manual how to assemble. You can use your own methods as you desire, my results are very good. A smooth, flat work surface is very
BUZZ S SAWMILL PF5195 WOODLAND SCENICS BUILDING KIT
 1:87 BUILDING KIT BUZZ S SAWMILL PF5195 Buzz s Sawmill is a detailed work of art with all workings of a vintage steam-fired, belt-driven sawmill. Details include interior rafters and shake roof, attached
Block Sanding Primer Dos and Don ts Transcript
 Block Sanding Primer Dos and Don ts Transcript Hey, this is Donnie Smith. And welcome to this lesson on block sanding primer. In this lesson, we're going to give you some of the do's and some of the don
Tips & Tricks using Part 8
 Tips & Tricks using Part 8 Easy Sand Texturing...1 Advanced Sand Texturing...3 Making Palm Trees...5 Tips & Tricks using Bruce Hirst Part 8 Page i Easy Sand Texturing I'm going to make the sand textured
or clippers to clean the mould lines and flash off the figures.
 In the first of a series of articles aimed at the newbies of wargaming Dave Robotham gives us an insight into his painting methods. This article looks at 10mm scale British WWII armour and infantry from
Hotel Belvedere Instructions for Assembly of the HO scale kit. v1.1
 Hotel Belvedere Instructions for Assembly of the HO scale kit. v1.1 Kit Contents: 319 ea. laser cut.090" acrylic parts. 132 ea. laser cut.060" acrylic parts. 8 ea. window glass templates 8 ea. window glazing
Shutter Installation Instructions
 Shutter Installation Instructions ITEMS YOU WILL NEED: Tape measure Framing square Screw gun Circular saw Caulk gun PL premium adhesive Exterior grade screws 1 ¾" Safety glasses Putty knife Window and
Max Launch Abort System Prod. No *Kevlar is a registered trademark of Dupont
 Flying Model Parts List Max Launch Abort System Prod. No. 3014 A 11820 - Body Tube 3.5 Diam x 5.5" Long B 11824 - Orange Capsule Base Shoulder Ring C 16032 - Laser-cut Ring motor mount rear D 16033 - Laser-cut
The Park Hotel Instructions for Assembly
 The Park Hotel Instructions for Assembly Kit Contents: 280 ea. Laser Cut Acrylic Parts. 1 ea. 6" Plastic Coated Wire. 5 ea. Sidewalk Parts. 14 ea. Cast Resin Dormers. 12 ea. Window Glass Templates, 12
B. Painting: Boat by Frankie Novak. Western Reserve Model Yacht Club Finishing Your Soling One Meter. From simplest to most complex. A.
 Western Reserve Model Yacht Club Finishing Your Soling One Meter From simplest to most complex A. Simplest: 1. Of course, leaving the hull and deck as is (white styrene) is the easiest route to take. The
CONCEPT MODELS SP DOUBLE STACK CONTAINER CARS INSTRUCTIONS Sheep Ranch Rd. Mountain Ranch, CA Web Address:
 CONCEPT MODELS Web Address: http://www.con-sys.com 8331 Sheep Ranch Rd. Mountain Ranch, CA 95246 SP DOUBLE STACK CONTAINER CARS INSTRUCTIONS 2 CONCEPT MODELS PARTS Item No. PART NO. DESCRIPTION QTY. 1
Instructions for Assembling and Painting the Overgrown Stone Wall Set
 About the Overgrown Stone Wall Set The Overgrown Stone Wall set adds lots of character to either our Hedge Row Set or Random Stone Wall set. It s a timeless set that can be used for just about any period
UNIT 11: PAINTING, STAINING, AND FINISHING
 KEY CONCEPTS 1. Equipment needed 2. Primary kinds of Paint: Interior/Exterior 3. Primary kinds of Stain: Interior/Exterior 4. Proper application techniques: Paint/Stain/Finish 5. Equipment care and clean
Jasper County 4-H 2016
 ARTS & CRAFTS Jasper County 4-H 2016 In the Arts and Crafts project the 4-H'er will have a chance to express his/her talents in an array of mediums from fine arts which include drawings and paintings in
TOOLS & SUPPLIES (Included in ProTops Tool Kit)
") TOOLS & SUPPLIES (Included in ProTops Tool Kit) Clean Paint/Mixing Sticks Graduated Mixing Buckets Standard Mixing Cups Nylon Paint Brush Propane Torch 3M Masking Gun Masking Film & Painter s Tape Disposable
TOOLS & SUPPLIES (Included in ProTops Tool Kit) Clean Paint/Mixing Sticks Graduated Mixing Buckets Standard Mixing Cups Nylon Paint Brush Propane Torch 3M Masking Gun Masking Film & Painter s Tape Disposable
1Use the metal file to smooth
 Yamato: Step-by-step 85 Parts of the bridge and the hull a b c d e f a Part of the bridge b Part of the bridge c Part of the bridge d Radar x 2 e Part of the bridge x 2 f Wire Recommended tools and materials
Basic Stenciling Techniques
 Metal Stencil Techniques For each technique you ll need the equipment listed in addition to your stencil and removable tape. To avoid bending your stainless steel stencils, keep them flat at all times.
#70 grit sand Putty knives, sized as needed #1 fine gray sand Corner tools Milestone acrylic liquid
 Countertops Supplies Tools White and/or gray Milestone cement 12 inch steel trowel #70 grit sand Putty knives, sized as needed #1 fine gray sand Corner tools Milestone acrylic liquid Hock Universal tints
LAPORTE COUNTY 4-H MODEL PROJECT
 LAPORTE COUNTY 4-H MODEL PROJECT I. PURPOSE This project is designed to provide members with an opportunity to be creative and to familiarize them with the techniques of assembly, construction and painting.
Mirrorcraft Project Especially for Dogs
 Mirrorcraft Project Especially for Dogs DIY Customized Pet Mirror Make a mirror photo frame to Display your Pets Photo Irene Jacobs April 2007 Mirrorcraft is a fun craft to easily create you own customized
Peter Krause ABN
 Peter Krause ABN 25 736 637 163 T/as O-Aust Kits PO Box 743 ALBANY CREEK QLD 4035 AUSTRALIA Phone +61 (0)7 3298 6283 (7.00pm to 9.30pm ONLY) Facsimile +61 (0)7 3298 6287 (24 hours) Mobile 0419 680 584
This Manual Covers The Construction Of A Hood Scoop Plug From The Drawing Board. Through Construction. To Final Fitting.
 1 This Manual Covers The Construction Of A Hood Scoop Plug From The Drawing Board. Through Construction To Final Fitting. 2 TABLE OF CONTENTS: INTRODUCTION: 3 MAKING A PLUG FOR A CUSTOMIZED PRODUCT. 4
MUDGUN Drywall Finishing System
 Watch the demonstration video online at hydetools.com MUDGUN Drywall Finishing System Quick Start Guide Hyde Tools, Inc. / A Hyde Group Company / 800-872-4933 / custrelations@hydetools.com / hydetools.com
Nanton Grain Mill Assembly
 ( 1 ) Nanton Grain Mill Assembly Locate package for assembling storage building. These are cut from 1/8 masonite. Inspect and lightly sand edges where it will be bonded. Use white glue or CA glue to bond.
CONCEPT MODELS INSTRUCTIONS FOR PRODUCT 60,000 GALLON TANK CAR El Toro Way Stockton, CA 95210
 CONCEPT MODELS Web Address: http://www.con-sys.com Email: concept_models@con-sys.com 8810 El Toro Way Stockton, CA 95210 INSTRUCTIONS FOR PRODUCT 60,000 GALLON TANK CAR 2 CONCEPT MODELS PARTS GATX/UTLX
Model the hub of your layout s rural setting. Planters Feed and Seed Supply Instructions N Scale 1:160 WOODLAND SCENICS
 PF5201 Planters Feed and Seed Supply Instructions N Scale 1:10 Model the hub of your layout s rural setting. Planters Feed and Seed Supply presents a vintage agricultural center where farmers and rural
Engineering Directive
 Thing-a-ma-Jig Finishing To Finish a model means to apply paint and other decorations to complete the look of your model. Meaning to apply a finish. That is what we will discuss in this section. Applying
After the Battle of Kursk, the Soviet army faced the immediate need to contend with new German tanks Pz.Kpfw. V and Pz.Kpfw. VI. Installing the new
 After the Battle of Kursk, the Soviet army faced the immediate need to contend with new German tanks Pz.Kpfw. V and Pz.Kpfw. VI. Installing the new 85-mm gun onto the T-34 tank had become a temporary measure,
Tips & Tricks using Part 17
 Tips & Tricks using Part 17 Making a Secret Door Using Mold #96...1 Using Cotton Swabs For Antiquing...4 Planning Dungeon Waterways...5 Pouring and Texturing Water...6 Making Water for Fountains...11 Tips
Get the benefits of oil with the ease of latex
 One of the most rewarding home improvement projects is putting a fresh coat of paint on your kitchen cabinets. A new color brightens up your kitchen, and can give it a complete updated look. But at the
Drawings of all parts have been included for ease of part identification.
 Acme Corporation Instructions for Assembly of the HO Scale Acme Corporation HO Kit Contents: 156 ea. white 1/16" laser cut acrylic part 10 ea. white 1/8" laser cut acrylic part 37 ea. adhesive-backed brick
WHAT S ON THE MARKET?
 Smart Shopping for Home Furnishings Selecting Paint Dr. Leona Hawks Home Furnishings & Housing Specialist 1987 HI 13 Shopping for paint? When shopping for paint, you will find many different kinds. Some
Baba 30 Butterfly Hatch Repair in 17 or so not-so-easy steps Part I. Rick Beddoe s/v Soñadora
 Baba 30 Butterfly Hatch Repair in 17 or so not-so-easy steps Part I Rick Beddoe s/v Soñadora Introduction Butterfly hatches on any boat are notorious for leaks. However, they are also noted for their attractiveness.
Taco Bell Restaurant kit in HO scale
 Taco Bell Restaurant kit in HO scale Parking lot base and cars not included This kit includes all building parts milled in white styrene plastic, clear window glazing, Plastruct tile roofing, and logo
Car Dress Woodwork Repair and Finishing
 Car Dress Woodwork Repair and Finishing Garth Pennington Osborne SA 5017 Contents Stripping the old finish Repairing wood and veneer Preparing for finishing Pore filling Staining Applying clear finish
At this stage I want the colors to be a little on the bright side, Later weathering will darken the color significantly.
 The kit used is the Tamiya JS II Model 1944 ChKZ, #35289. As you can see quite a bit of aftermarket details were also used including a number of Aber and Voyager photo etched detail sets along with a set
Star Trek TOS communicator upgrade kit Install instructions Hyperdyne Labs 2002
 Star Trek TOS communicator upgrade kit Install instructions Hyperdyne Labs 2002 Package Your package should include: Assembled TOS sound/motor/light board with LEDs and sound chip Moiré motor 9V snap connector
The Saint Paul Building
 The Saint Paul Building Instructions for Assembly of The Saint Paul Building. Kit Contents: 65 each laser cut acrylic parts. 1 each sheet of AC roof unit parts. 1 each sidewalk. 3 each Window Glass Templates,
Hasegawa 1/48 scale Nakajima B5N2 "Kate" by Dick Smith
 Hasegawa 1/48 scale Nakajima B5N2 "Kate" by Dick Smith The release of last summer's motion picture "Pearl Harbor," caused a flood of interest in the modeling world in the Japanese aircraft that took part
PS 5077 cu. ft. Boxcar with EOC device. 1:29 scale resin craftsman kit. by Burl Rice
 PS 5077 cu. ft. Boxcar with EOC device 1:29 scale resin craftsman kit by Burl Rice www.burlrice.com Bill of materials (not included): Thick/medium viscosity CA PL adhesive, or Gorilla Glue Heavy Duty Construction
CORNER PORCH HOUSE PF5196
 1:87 BUILDING KIT CORNER PORCH HOUSE PF5196 Two-story home with cedar-shake roof and a corner wrap-around porch. Clapboard siding, paned windows, and loaded with accessories, such as a bicycle built for
You expect to find PVC. PVC Lumber PROS & CONS OF PVC PROS
 PROS & CONS OF PVC PROS Won t rot. Doesn t have to be painted (but can be). No defects; consistent. Easy to cut and machine. Readily available. CONS Not designed for structural use. Plastic appearance
Shell Gas Station & Convenience Store kit in HO scale
 Shell Gas Station & Convenience Store kit in HO scale Parking lot base and cars not included This kit includes all building parts and signs milled in white and black styrene plastic, clear window glazing,
Time to start something new. I was actually having another go at finishing the Ford GT Matech from Simil R, but frustration with the complete lack of
 Time to start something new. I was actually having another go at finishing the Ford GT Matech from Simil R, but frustration with the complete lack of locators made me put it back into the box. I decided
Building the Gothic Church
 Building the Gothic Church Mold #54 does not contain all of the blocks to build this church. You will need extra regular blocks (1/2" x 1/2" x 1") and square blocks (1/2" x 1/2" x 1/2"). These blocks can
Lots of paints Several brushes from 000 to? Exacto knife. 200 grit sandpaper Bel-Decal Sheets Spray Primer
 Tools Lots of paints Several brushes from 000 to? Exacto knife 200 grit sandpaper Bel-Decal Sheets Spray Primer Brass Rod and a Drill bit that matches Super Glue Sculpy Putty the same size 3/16 suggested
Repairs. Chapter 10 Repairs 10. 1
 10 Repairs Chapter 10 Repairs 10. 1 Repairs As an installer, you will probably be called upon to repair damage to a resilient floor. Here are some of the most common problems and the recommended repairs
FINISHING TREES From The Diorama Very Fortunate Son
 FINISHING TREES From The Diorama Very Fortunate Son The text and pictures in this pdf are the property of Sentinel Miniatures and the author. They cannot be reproduced, published or distributed in any
GTS Music diy-guitar.com
 GTS Music diy-guitar.com IB Jem Style Kit GTS Music 313 Strachan St. Port Hope, Ontario L1A 0C2 Canada sales@diyguitarkits.net Please read these instructions carefully before beginning in order to have
Painting Figures Marty Vaughn MMR
 Painting Figures Marty Vaughn MMR There are as many ways to paint figures as there are ways to paint rolling stock or structures. There is no perfect way and no right way, it s just what ever method you
Right On Replicas, LLC Step-by-Step Review * Panzer IV Tank 1:32 Scale Monogram Model Kit # Review
 Right On Replicas, LLC Step-by-Step Review 20150108* Panzer IV Tank 1:32 Scale Monogram Model Kit #85-7861 Review The Panzer tank was used throughout World War II and had several modifications during that
Continued on next page
 Please read these instructions completely through to be sure you are familiar with all the steps. Then following along again as you build your structure. Download a.zip file of all the pictures including
Engine Shed Overview
 Introduction March 2019 About At ScaleCast we want to provide the best real stone products that go far beyond levels of detail, but also provide an easy and effective product set that help you achieve
Soldering is easy. here's how to do it. Andie Nordgren (Comics adaptation) Jeff Keyzer. by: Mitch Altman (soldering wisdom) (Layout and editing)
 Jeff Keyzer. by: Mitch Altman (soldering wisdom) (Layout and editing)") Soldering is easy here's how to do it by: Mitch Altman (soldering wisdom) Andie Nordgren (Comics adaptation) Jeff Keyzer (Layout and editing) Download this comic book and share it with your friends! Distribute
Soldering is easy here's how to do it by: Mitch Altman (soldering wisdom) Andie Nordgren (Comics adaptation) Jeff Keyzer (Layout and editing) Download this comic book and share it with your friends! Distribute
Season One Phaser Kit PRP1745
 Season One Phaser Kit PRP1745 RODDENBERRY ENTERTAINMENT STAR TREK: THE NEXT GENERATION SEASON ONE PHASER KIT Thank you for your purchase of the Roddenberry Entertainment Star Trek: The Next Generation
A SIMPLE GUIDE TO GREAT LOOKING MODULAR TERRAIN By Dave Robotham
 A SIMPLE GUIDE TO GREAT LOOKING MODULAR TERRAIN By Dave Robotham Like all wargamers we end up making lots of terrain. This usually ends up being for the magazine or for test games when we are trying out
A Total Overhaul and Playing Field Replacement on a Nishijin Model B
 A Total Overhaul and Playing Field Replacement on a Nishijin Model B Supplies: Simple Green to clean all the parts. White vinegar, Painter s tape, Double sided sticky tape, Turtle Wax Chrome Polish on
Fee Fi Faux Fabulous
 Fee Fi Faux Fabulous Mimicking enamel and metal with polymer and mixed media A floral focal pendant project with Christi Friesen For this project you will need:. polymer clay I recommend Premo for this
How to make climbing grips. By,
 How to make climbing grips By, Items needed: * Items may be needed depending on your preference. - Carving Foam - Level Table - Cardboard - Pen - Ruler - Straight Edge - Box cutter - Hot melt glue gun
Taking the mystery out of working with Acrylic By S. Taylor Hedges
 Taking the mystery out of working with Acrylic By S. Taylor Hedges Sandra Taylor Studio One Cat Squared Working with Acrylic Paint Definitions: Glaze thin transparent layers of color that enable the artist
Explorer Wiring Kit (assembled)
") Explorer Wiring Kit (assembled) For Vintage, Firestorm & Standard Series Please Read All Instructions Before Beginning. Tools you will need: Soldering Iron (35 watt preferably) Solder Wet Sponge Wire Clippers
Explorer Wiring Kit (assembled) For Vintage, Firestorm & Standard Series Please Read All Instructions Before Beginning. Tools you will need: Soldering Iron (35 watt preferably) Solder Wet Sponge Wire Clippers
BY SEAN MIDDLETON V 4. Instructions courtesy of TopNotch Page 1
 BY SEAN MIDDLETON V 4 Instructions courtesy of TopNotch Page 1 INSTRUCTIONS INTRODUCTION Using masks take a little bit of practice and some patience when you first begin. Like most things though, once
Fidelity & Guaranty Building
 Fidelity & Guaranty Building N Scale Model Kit Instructions for Assembly of the Fidelity & Guaranty Building Kit Contents: 69 each laser cut acrylic parts. Sidewalk material 1 each Window Glass Templates
The Midtown Apartment Building
 The Midtown Apartment Building Instructions for Assembly of The Midtown Apartment Building. Kit Contents: 70 each laser cut acrylic parts. 3 each sidewalk parts. 3each Window Glass Templates, 3 each Window
by Dave Lesko Thanks, Detective, for making us look good.
 by Dave Lesko Dave Lesko is a detective in a large police department just outside of Chicago. There are only two things that rival his enthusiasm for his family: the Chicago Bears, his job and monster
Laminated Fabric Tray
 Laminated Fabric Tray There are a few things one would assume you can t add embroidery to. Metal. Buildings. Cats. All these things are inadvisable to hoop. You might also think a hard plastic serving
RoR Step-by-Step Review * Caudron Air Racer 1:32 Scale W ms Bros. Kit # Review
 RoR Step-by-Step Review 20130531* Caudron Air Racer 1:32 Scale W ms Bros. Kit #32-460 Review The French Caudron firm was among the pioneer manufactures, dating back to circa 1910. During World War One,
Hardee s Restaurant kit in HO scale
 Hardee s Restaurant kit in HO scale Parking lot base and cars not included This kit includes all building parts milled in white styrene plastic and laser cut white acrylic, clear acrylic window glazing,
A Total Overhaul and Playing Field Replacement on a Nishijin Model B
 A Total Overhaul and Playing Field Replacement on a Nishijin Model B Supplies: Simple Green to clean all the parts. White vinegar, Painter s tape, double sided sticky tape, Turtle Wax Chrome Polish on