Chapter 1 Preparing the plastic parts
|
|
|
- Christiana Ashley Sparks
- 5 years ago
- Views:
Transcription
1
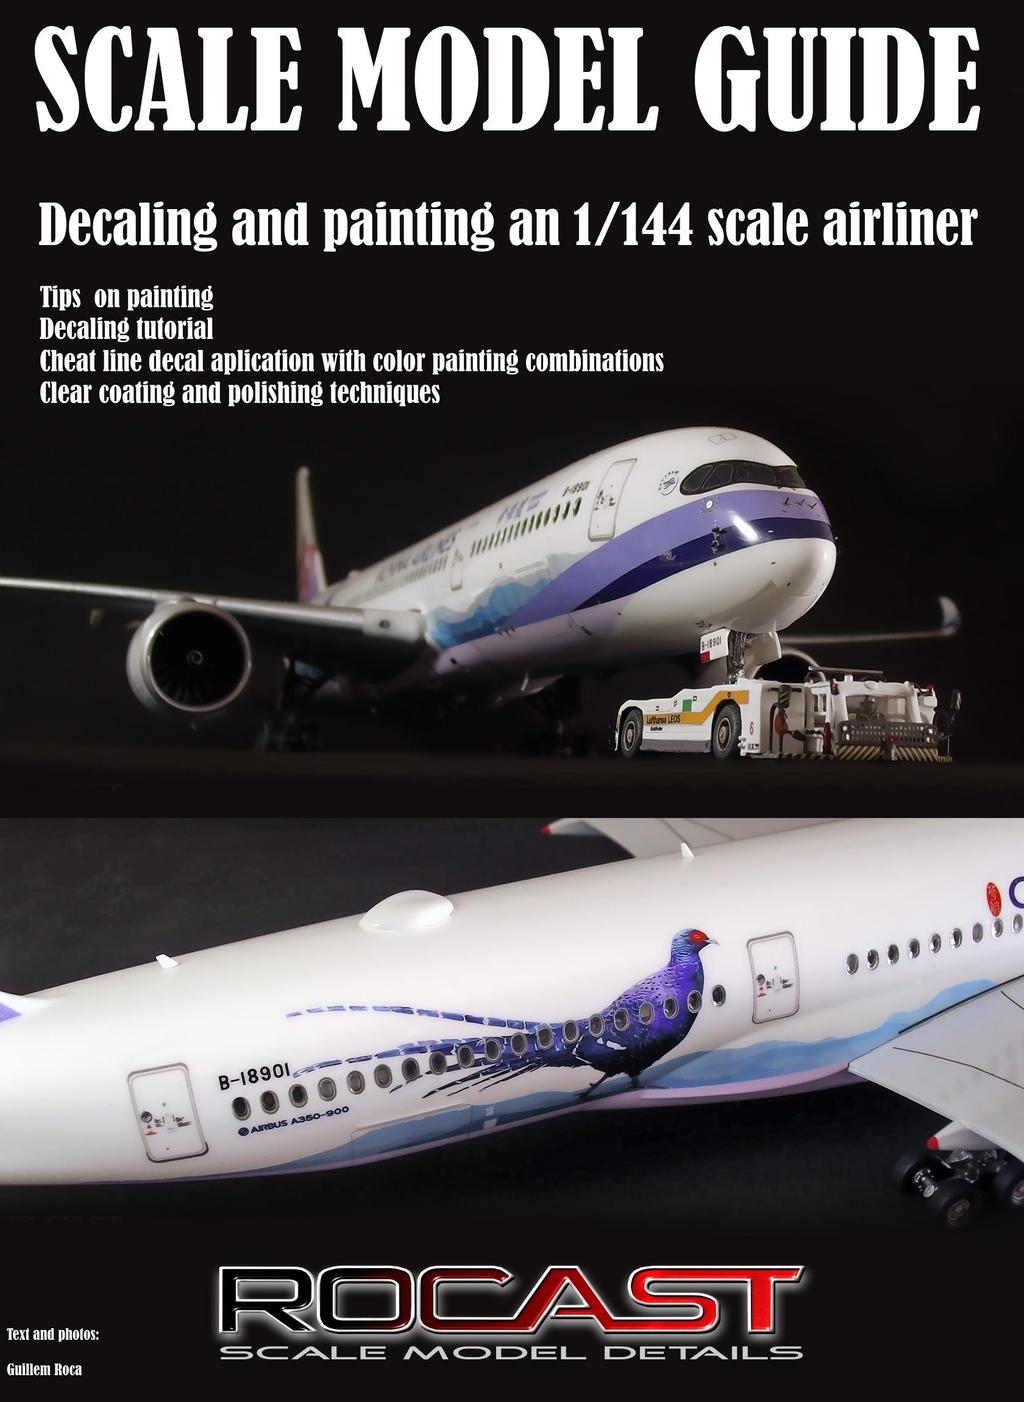
2 Introduction: This guide will focus its content into painting, decaling and clear coating processes of an airliner model (which may also be applied for other subjects). I am writing this guide in an attempt to explain my experiences on painting and finishing, steps that have always been difficult for me, but that after several trials and errors, I have been able to learn and correct (and still to improve) and I am hoping this will serve as a guide on where to be careful at during all these processes in order to avoid some frustrating situations. A general process that this guide will follow is: - Preparation of the plastic parts. - Preparing prior applying the primmer. - Painting. - Clear coating using bi component glossy varnish. - Decaling. - Finishing. Chapter 1 Preparing the plastic parts Although this step may seem not necessary, it is very important to clean thoroughly the plastic parts, since they can carry some grease from the molds or during the plastic injection process. Cleaning will help the primer to attach to the surface much better. Materials required are: - Dishwashing soap. - Kitchen paper. Please note that, it is best to use dishwashing soap over regular soap, since the dishwashing soap has more power on removing grease. Also, another important point to have in mind is to use kitchen paper and not tissues. Tissues generally may leave some bits of lint. Apply a generous coat of dishwashing soap on the model and rub thoroughly with your finger tips, then rinse in water without leaving any trace of soap. Although the bigger parts for this tutorial (fuselage, stabilizers, wings, and engines) can be cleaned rubbing with the finger tips, for smaller parts such as the landing gear, you can also use a small brush to clean these parts thoroughly. Use the kitchen paper to completely dry them. Be very careful if using a hair drier, if too close to the model, plastic may deform.


3 Chapter 2 Preparing the fuselage Since we are going to build this particular model with the clear parts for the windows, we need to paint the inside of the fuselage in a darker grey so that we can achieve a dark effect in proportion to the scale once seen from the exterior. In case we use the clear plastic windshield, we will also need to paint the cockpit area grey, this time we can use a brighter color so that the area can retain more light. Another very important step is to make sure that all the windows fit perfectly in the fuselage frames, failing to this will result in sunken windows, so make sure to take the time needed to sand and trim some of the window holes since the molding may not be perfect. Once done, paint the area around the frame in beige color similar to that of the real aircraft panels, and then once you place the clear plastic windows, the frames will surround them perfectly. Chapter 2B (optional) Adding the interior window decals


4 One of the latest decals we have created consist in decals of frames and shades that are actually placed on the flat surface of the clear windows so that when viewing from the outside, the shades and frames will actually be on the inside like in the real aircraft. With bigger windows such as those on the B777 or A350, these decals give more dimensions to the model, because unlike the photorealistic decals, the shadows are casted on the frames creating a realistic and dynamic effect that varies depending on the light source. Applying the interior window decals is not different than others, so take the time needed to place the decals on each clear part and then (once decal is fixed and dry) place these parts inside the fuselage, which we will see on the next chapter.
5
 so since this guide is not")

6 Chapter 3 Preparing the fuselage prior joining. Before joining both halves of the fuselage, there are some steps that need to be done (as per instructions) so since this guide is not focused on building the model specifically, I will give an advice on gluing the clear windows. Make sure to use a vapor less cyanoacrylate or simply use white glue, you can reinforce these clear windows by adding transparent tape to the surroundings. Follow the instructions of the kit regarding adding the cockpit, the needed ballast, landing gear structure etc.


7 Chapter 4 Working with the fuselage. We have now both halves of the fuselage glued, and it is time to hide the union, so we are going to add masking tape around the union before we apply the putty. By doing this, none of it will go on top of any panel line, so we protect them with the masking tape.


8 I am using bicomponent putty (polyester putty) it is basically the same used to repair cars and it can be found in most hardware stores. It is important for the putty to be fresh, if it is too old, it may become thicker and harder to work with which is what happened with mine, and therefore making this process a bit harder because we will need extra work to sand the putty down. It is important to remove the masking tape once the putty is still fresh, if we remove the masking tape when the putty is dry, it is possible we may tear it off. Sanding the union requires of sand paper, I like using a more abrasive one at first and later a finer one, this will depend on how the putty is and if you were able to apply it smoothly, the smoother it is applied, the easier it is for sanding.


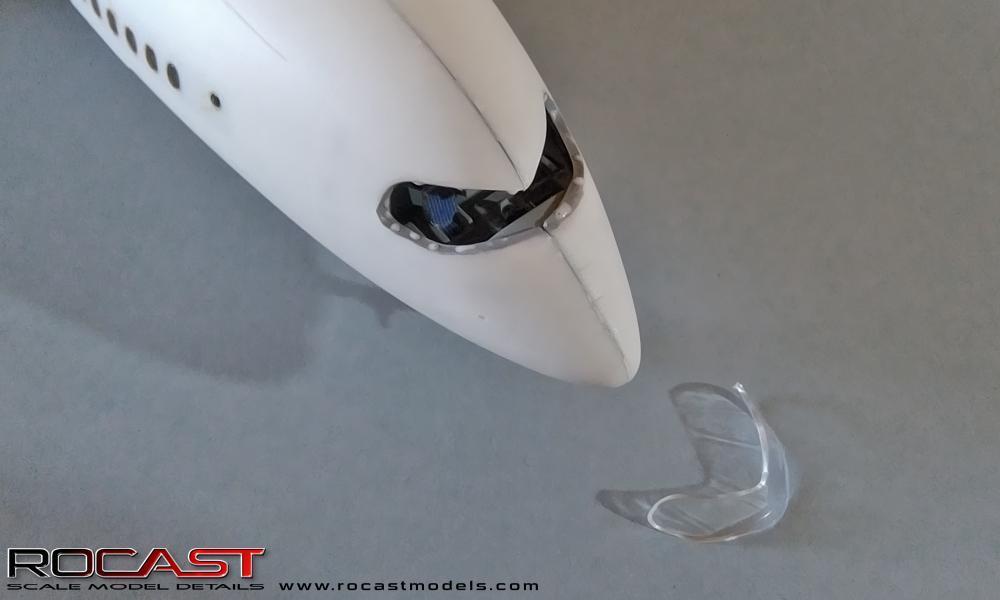
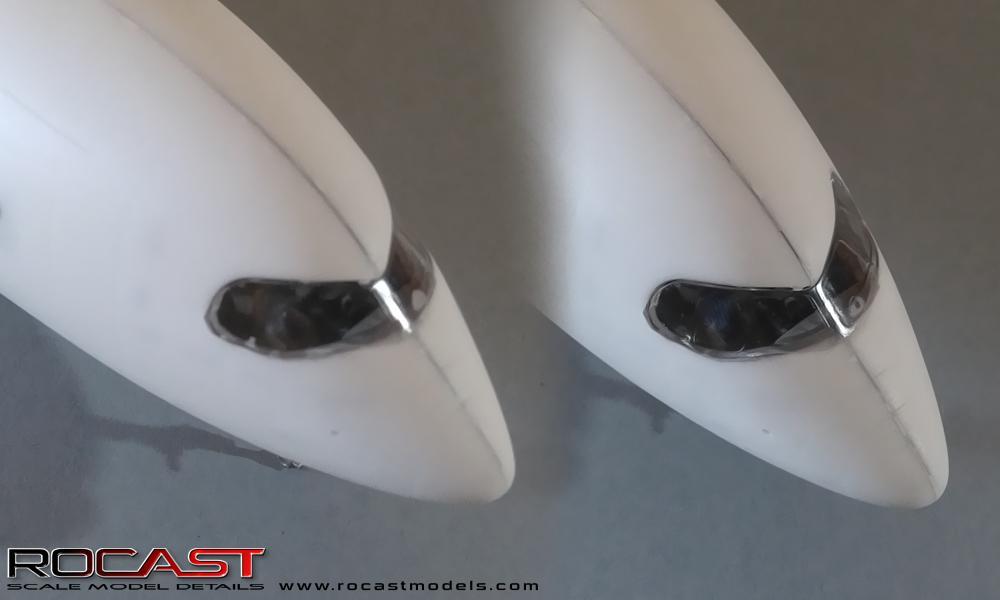
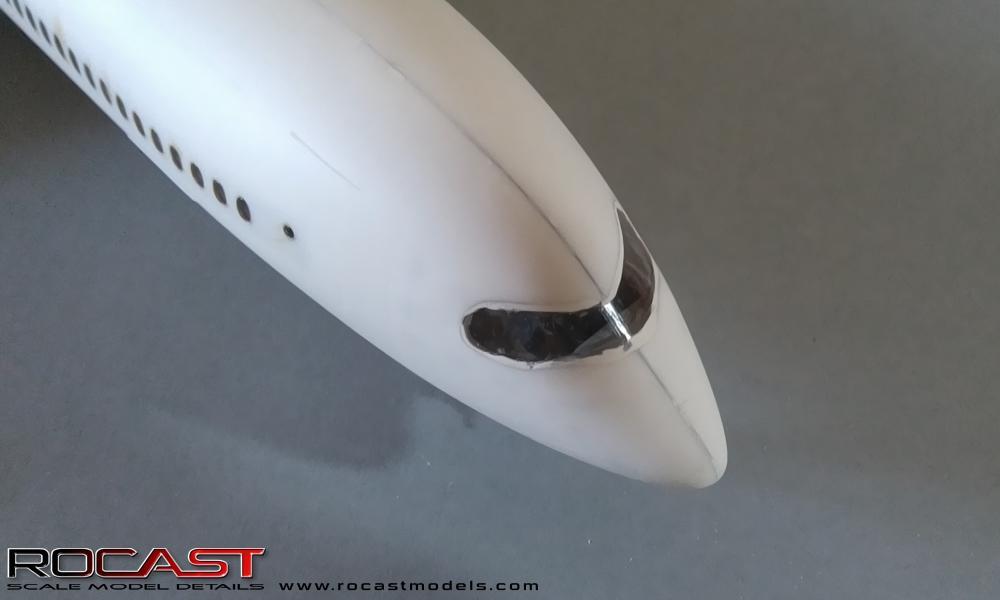
9 Once we have the fuselage prepared, it is time to add the clear windshield. I am using a little bit of white glue; white glue will be transparent once dry, so here we have a good point in case some of it shows around the cockpit area. Prior adding the clear windshield, I painted the surrounding area of the fuselage with the same color as the cockpit.
10


11 Since the windshield did not fit too well on my model, I had to repeat above steps to first mask the windshield and apply putty around it. In this case, I did not remove the masking tape as it also served as protection during the sanding process; you may however; remove the masking tape when the putty is still fresh, wait for it to dry, apply masking tape again and sand down the areas around the cockpit.

12


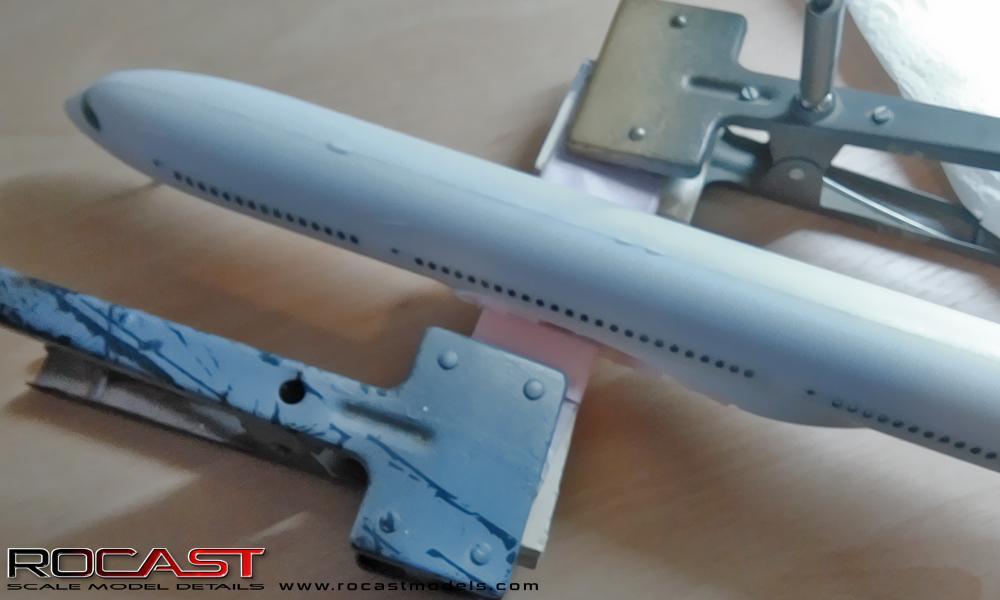
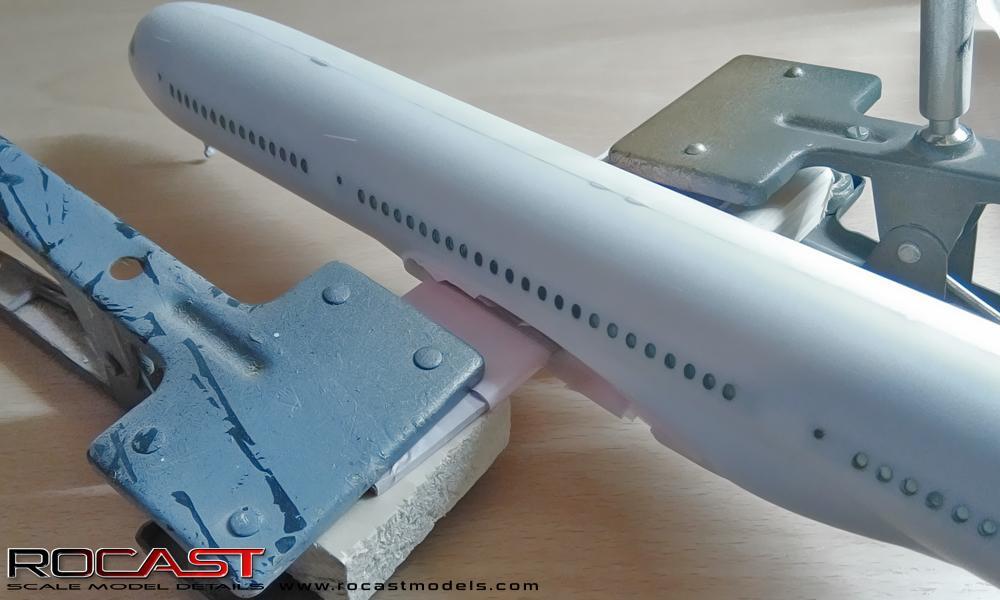
13 Chapter 5 Preparing for painting. At this stage, I always like to build myself an aircraft support so that I can hold the airplane while painting and while drying. I will not extend myself much as a photo is worth a thousand words, but one thing I would like to mention is that some prefer painting with the wings attached, I prefer to leave that area free of space so that I can hold and paint/clear coat easier the aircraft.
14


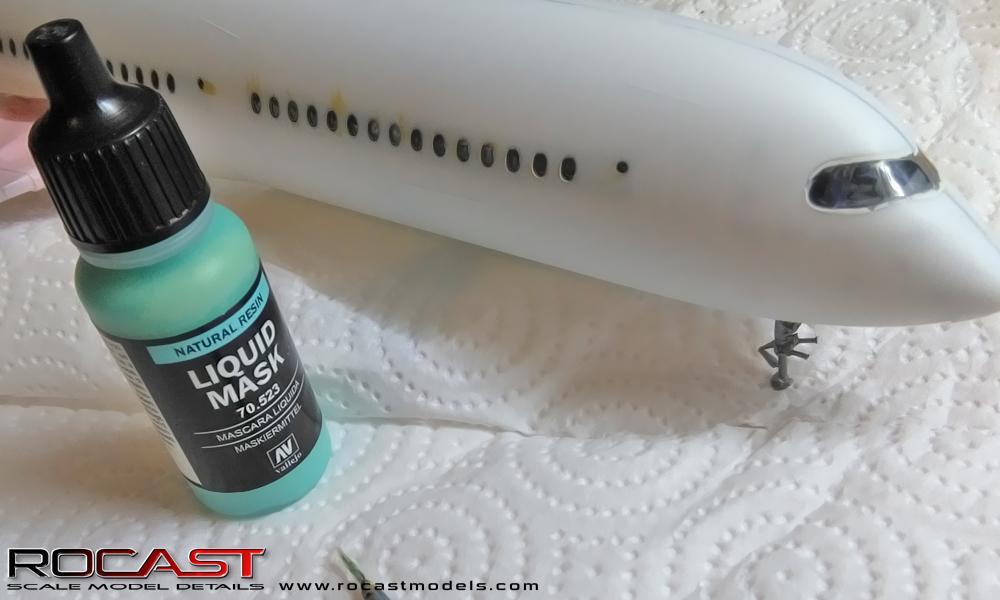
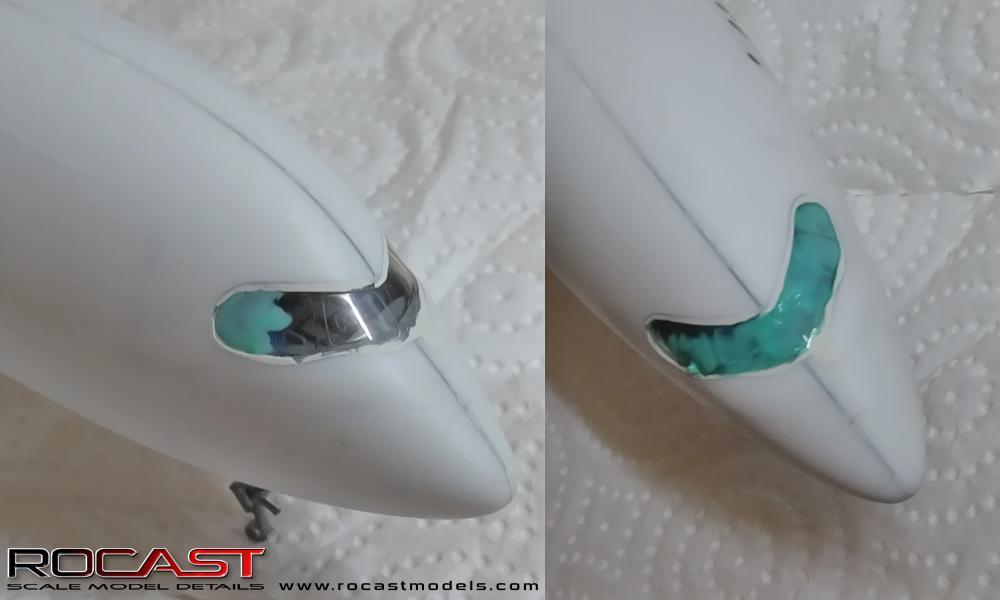
15 Therefore, since the wing unions are a delicate place because the wings need to fit perfectly, I cover those areas with masking tape. One of the big steps prior applying primmer to the model is to cover and protect the windshield and the windows. There may be some ways to do it, I used liquid mask from Vallejo, but I highly recommend using one of those aftermarket manufacturers pre cut templates made of vinyl, so that this process can be easier, cleaner and faster. Again, it is important that the windows (the clear plastic) were well placed, otherwise if they are sunken, it will be much harder to remove the liquid masking later.
16


17 Once ready to paint, I always like to dust off any possible particulates with this Tamiya s antistatic brush but you can also dust off by using the airbrush just pressing without pulling back the trigger. It is important to dispose of a space dedicated to cover the model after painting to avoid any possible dust settling on it. Painting cabins are a great choice and having a clean space will help having better results. A tip; use a water spray to spray water around the cabin, in this case if there is any particulate flying around, it will get trapped by the moist of the water and stick onto the cabin walls.
, there are other brands, but make sure that the")

18 This is the first primer coat, for the primer I always like using Tamiya s surface primer (white), there are other brands, but make sure that the primer is exceptionally fine, we do not want a thick layer of primer, but just a thin coat that will ensure a proper adhesion of the color paint.


19 Priming also helps to visualize problems, here a section of the fuselage wasn t properly finished, and so I applied putty, sanded it down and proceeded with another light coat of primer for that particular area. Tamiya s primer dries relatively quick, however, it is always best to let it dry for about an hour. Next it is time to apply the paint; I am using a spray can from the brand Macota. I am not trying to make publicity nor I get anything from Macota, but I do have some experience with this paint, and after four years having painted another model, it is still keeping its white color, while the model I painted with pure white spray can from Tamiya has lost its pure white to certain degree. Again, apply a thin layer and let it dry (Macota paint dries very fast) and apply a second coat till the color covered the fuselage evenly. If there is some bit of orange peel effect, do not worry as this will be fixed later when applying the glossy varnish. Let the model dry for 24 hours, from this moment onwards, always wear gloves, I am using cotton gloves but you may also use vinyl gloves, more about this on chapter 8 - Clearcoating. Next will be time to peel off the liquid mask or the vinyl mask from the windows. This process is quite time consuming if you are using liquid mask, so take the time needed to fully remove the mask from the windshield and the windows.


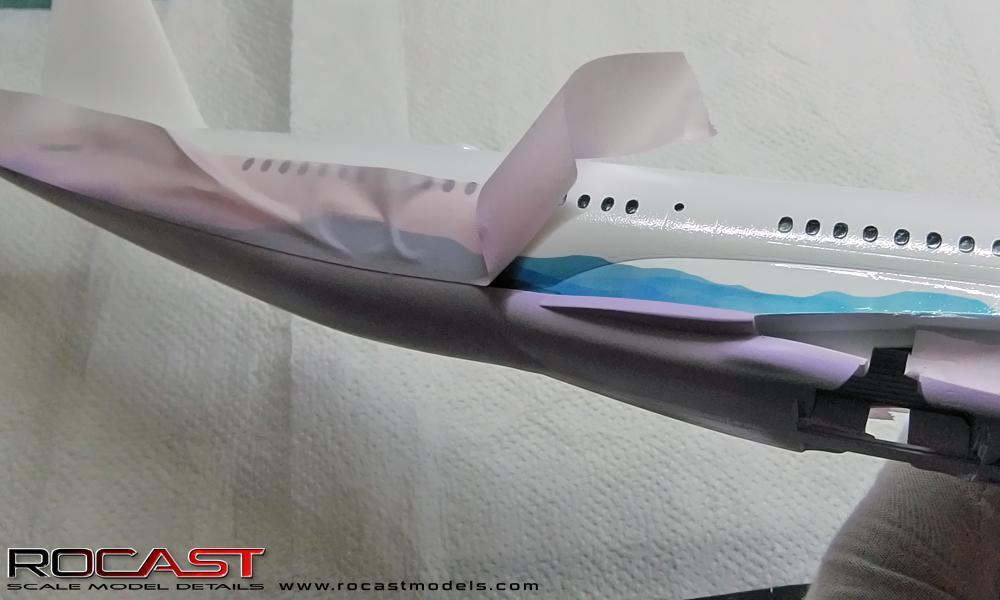
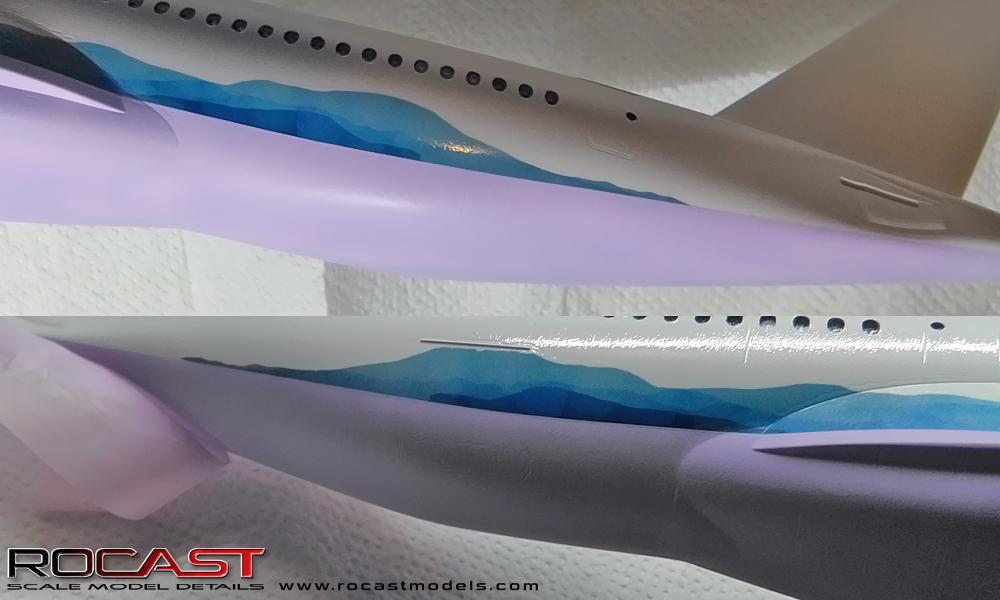
20 Chapter 6 Cheat line technique Some airplanes have a cheat line along the fuselage that divides two or more colors. In this case, the model I am making has a blue mountain and right below it there is purple color on the belly. The blue mountain is represented by a decal, and it is placed in a certain position according to the real aircraft. Therefore, it is impossible to guess where to mask tape before adding the decal to paint the purple belly; the solution is place the decal first. This step is also done for the decals of the front section of the fuselage. Once we applied the decals (check the next chapter how to apply the decals) it is time to apply a light coat of varnish over these decals to protect them from the masking tape, otherwise if we do not protect these decals, we may pull them out with the masking tape.


21 I am using the Diamond clear coat solution from ZeroPaints as it has given me good results before. These systems consist of 3 components, the glossy varnish, the hardener and the thinner. The mix ratio according to ZeroPaints is of 100 parts varnish, 50 parts hardener and 10% thinner. So for example we can use; 20ml of varnish, 10ml of hardener and 3ml of thinner. Make sure to have in hand measuring pipettes so that you can take these products out of their bottles in exact measurements. Important tip: be careful if using a syringe to extract the materials from their bottles, I am not 100% sure this was the cause of the problem, but every time I used syringe to extract the clear coat, hardener and thinner, I ve got what is called fish eye or silicone. This defect is similar to a micro volcano, and it won t be covered no matter how much clear coat you apply on top of it. This happens when the surface is greasy, oily or just simply contaminated due handling the model with the bear hands, hence why I recommended using either cotton or vinyl globes to reduce as much as possible this contamination of the surface. Also note that these defects may appear if the air supply is contaminated. I suspected that the inner part of the syringe has silicone in some degree, or wax for it to slide through the inside of the syringe, so in my opinion a contamination for the clear varnish may come from that. There are however, additives to avoid this defect, so a safe way is to simply add a drop of this additive into the mix. Apply these clear coats in a very well ventilated area and wear a mask regulated for painting to protect yourself from the toxic vapors.

22 Apply a light coat of varnish over the decals and let the model dry for 24 hours. After the model is completely dry, apply the masking tape and then proceed to paint the belly color. Once the paint is applied, remove the masking tape very gently and let the model dry. Depending on the paint used you will need to let the model dry for longer.
23

24 I am using Vallejo paints, (the formula I used for this build was 1 drop Violet 70811, 30 drops white). These have a matt finish, but for the decals we need a glossy base, so I applied another coat of glossy varnish on the entire model to leave it ready for decaling. Allow the model to dry for 24 hours prior starting to add the decals. As an important note I learned from my past builds; I discovered that the results are much, much better when decaling on top of glossy varnish surface and later using the same glossy varnish to seal the decals. A white spray can paint may present some shine, but is always best to have a glossy coat surface to apply the decals on, this will ensure the edges of the decals are invisible as in later steps, we will seal them with the same glossy varnish.

.")

25 Chapter 7 Applying the decals To apply the decals we will need the following items: - Scissors. - A dish with tempered water. - Kitchen paper. - A clean soft bristled paint brush. - Tweezers. - Decal softener (I am using Mr.Mark softer). Make sure the model is glossy, it is ideal to have a glossy varnish base applied of the same varnish we will use later to seal the decals. The first steps consist into cutting the decal around the edge, and then place it inside the dish of tempered water.


26 Keep an eye on the decal, do not let it leave the blue paper base, then after about 30 seconds, use the tweezers to grab the decal still on the blue paper and place it on the model in a nearby area where its final position will be. Start pushing the decal very gently with the brush, if the decal does not move from the base paper, put it back again in the dish with water for a few more seconds. Once the decal is placed on its correct place, remove any excess of water with kitchen paper and use a hair dryer to let the decal set on the model. Attention, make sure to set the hair dryer at a proper distance of about 30-35cm, otherwise the model may melt due the hot temperatures.


27 Apply the softener around the decal to soften the edges so that the carrier is no longer visible, the later step of clear coating will also aid into hiding the edges. You can use a kitchen paper to gently press on the decal to hide the edge, then use a hair dryer again to settle the decal.


28 Chapter 8 Clearcoating We have covered the clear coating preparations on chapter 6 where I wrote about the cheat line technique. Recently I have learned that it is always best to give a mist coat first, this will ensure the decals receive a first light coat that will protect them. You can wait for about 5 to 10 minutes to let this first coat to settle, do not worry if it presents a little bit of orange peel, after all, it may be almost impossible to give a completely smooth coat first. After 5 minutes, you can now apply a thicker coat. In general, 2k clear coats have a great power of adhesion, so you can apply a thicker coat safely but with care to not to make it too thick. Once you are happy with the result, with the thickness, let the model dry for 24h hours. It is important to notice two things: - Do not be very worried if the result after the thicker coat shows some orange peel, we will fix that in the next step. - Make sure that the clear coat is thick enough to cover and protect the decals, in the next step we are going to do some operations that require the decals to be well sealed.
 and will help the model to obtain a uniform shine.")
 sand papers of 1500-2000 -2500 grit or even finner. - Wax and again, a microfiber cloth.")
29 Chapter 9 Polishing and finishing The final process after applying the gloss varnish consists of sanding/polishing the model. This will remove any orange peel, will make the decal edges invisible (if they weren t already on the clear coat process) and will help the model to obtain a uniform shine. For this purpose we will need: - Polishing compounds; I am using Tamiya s compounds, the fine and finish compounds. You can also use coarse compound first. - Polishing cloth, I use the microfiber cleaning clothes for the glasses. - Finishing (water) sand papers of grit or even finner. - Wax and again, a microfiber cloth. Since I use Tamiya s wax, it already includes the wax applicator. - Plastic bowl. The first step will be to sand the model with the help of the sand paper, I am starting to sand the model with 1500 grit, and to do that; we will be doing a wet sanding. Submerge the portion of the waterproof sand paper into the bowl with water and start sanding down the model making sure to keep the surface wet.


30 A successful polishing will start to show the model becoming matt and very smooth. Very important: Be very careful when sanding around edges as the paint may be thinner there and thus you can sand past the clear coat or even past the paint damaging the decals. That is the reason why a final thicker glossy clear coat as the finish coat is best. Delicate areas that can be affected from this are the door gutters and wing exterior area. Do not panic for the shine going away, it is still there but we just opened the clear coat pores and from now on we can continue sanding the model with finer grid, next we can sand the model with 2000 grid water based sand paper. Little by little the orange peel will start to disappear and the model will become smoother and smoother. Once the model is sanded down and no peel orange is visible, it is time to apply the polishes. I am starting with Tamiya s fine compound, but you can start with the coarse compound for a better surface preparation.


31 Apply the polishing compound on the surface and start polishing by doing circular movements with the help of the microfiber cloth, it is very important to keep the surface with the compound on it while polishing. If the compound has disappeared, apply more prior continuing polishing. At this stage you may start seeing some shine from the model s surface.


32 The next step is similar to the previous one, but this time we will use the finish compound.


33 In the photo above you can see a comparison between the surface before sanding/polishing and afterwards. I think that there is no such way to achieve that smooth finish with the glossy varnish just applying it directly. As it happens when clear coating real cars or bikes, a posterior polishing is needed. The latest step may be optional in some cases, if you are already happy with the result. You can lastly apply wax on the model in the same manner as we applied the different polishing compounds. Make sure to follow the wax manufacturer instructions. According to Tamiya s wax, it is applied in the same manner as the polishing compounds, however, you need to polish with a clear area of the cloth to properly apply their wax. Other manufacturers may instruct slightly different steps, so that is why I mentioned to refer to the manufacturer instructions, the same applies for drying times on paint / clear coat. I hope you have a happy modeling time and that this guide can give you some tips or advices while painting and decaling your model. Thank you very much for reading, Guillem Rocast Models
How to use a Touch Up Bottle & Brush
 How to use a Touch Up Bottle & Brush Tech Tips General Definitions Base Color (Basecoat): A color coat requiring a clear coat. Base Color provides color and appearance, while the clear coat provides gloss
CIRRUS AIRPLANE MAINTENANCE MANUAL MODELS SR22 AND SR22T CHAPTER 56-30: DOOR GENERAL. Door 56-30: DOOR. 1. General
 CIRRUS AIRPLANE MAINTENANCE MANUAL Door CHAPTER 56-30: DOOR GENERAL 56-30: DOOR 1. General The cabin door windows are manufactured of acrylic and adhesive bonded to the door structure. Replacement is accomplished
CONCEPT MODELS INSTRUCTIONS FOR UP DC-10 WING CAR El Toro Way Stockton, CA Web Address:
 CONCEPT MODELS Web Address: http://www.con-sys.com 8810 El Toro Way Stockton, CA 95210 INSTRUCTIONS FOR UP DC-10 WING CAR 2 CONCEPT MODELS PARTS DC-10 WING CAR Item No. Part No. DESCRIPTION QTY. 1 2003-1
Swift assembly guide
 Swift assembly guide Download the assembly guide at www.scihighmodels.com/swift.pdf Sample kit shown with aluminium bells (available with the Deluxe kit) Shown here without main tanks Version 10/12/2010
PROVIDED BY WINDY URTINOWSKI AND REPRESENT HIS PROCEDURE FOR OBTAINING A SUPERIOR FINISH USING BRODAK DOPE
 PROVIDED BY WINDY URTINOWSKI AND REPRESENT HIS PROCEDURE FOR OBTAINING A SUPERIOR FINISH USING BRODAK DOPE The TARGET is for a GREAT FINISH with 6-7 OUNCES of weight FROM BARE WOOD TO READY FOR SILVER
SURFACE FINISH MAINTENANCE
 SURFACE FINISH MAINTENANCE SURFACE FINISH MAINTENANCE Lumec strongly recommends that you maintain your luminaires twice a year in order to prolong the appearance of the finished surface. By following this
Carbon Fiber Repair Kit
 CARBON WORKS www.gorillacarbons.com Carbon Fiber Repair Kit This Gozilla Carbonworks CF Repair Kit has been put together by carbon fiber professionals with years of experience in carbon fiber composites.
Time to start something new. I was actually having another go at finishing the Ford GT Matech from Simil R, but frustration with the complete lack of
 Time to start something new. I was actually having another go at finishing the Ford GT Matech from Simil R, but frustration with the complete lack of locators made me put it back into the box. I decided
BLADE REPAIR INSTRUCTION BOOKLET
 BLADE REPAIR INSTRUCTION BOOKLET Contents Section I: Section II: Section III: Section IV: Section V: Section VI: Removing a Blade Refer to this section if you need to remove the blade from an oar shaft.
January Instructions Willem van Aelst Study 2008 David Jansen. For the Video Link, Please see Page 3
 January Instructions Willem van Aelst Study 2008 David Jansen For the Video Link, Please see Page 3 Historical Information To start the painting we first need to establish the Ground. The ground is the
The Rubley Building Instructions for Assembly of the N scale kit. v1.1
 The Rubley Building Instructions for Assembly of the N scale kit. v1.1 Kit Contents: 197 ea. laser cut 1/16" acrylic parts. 1ea. adhesive backed.020 styrene part. 10 ea..060 x 1" styrene alignment pins.
LAPORTE COUNTY 4-H MODEL PROJECT
 LAPORTE COUNTY 4-H MODEL PROJECT I. PURPOSE This project is designed to provide members with an opportunity to be creative and to familiarize them with the techniques of assembly, construction and painting.
B. Painting: Boat by Frankie Novak. Western Reserve Model Yacht Club Finishing Your Soling One Meter. From simplest to most complex. A.
 Western Reserve Model Yacht Club Finishing Your Soling One Meter From simplest to most complex A. Simplest: 1. Of course, leaving the hull and deck as is (white styrene) is the easiest route to take. The
Application guidance for Printed Vinyl decals
 Paint Masks - Dry Rub Decals - Waterslides - Printed media Telephone: Website: email: +44(0)7872 181119 (mobile) http://www.flightlinegraphics.com sales@flightlinegraphics.com Application guidance for
Bumple Glass. Selecting the Screen. Preparing the Screen
 Experimenting with firing glass onto a steel screen, I discovered that firing the glass to a full fuse would cause the glass to form a uniform pattern of small round bumps where the softened glass slumped
3Insert the second rod no. 4
 Yamato: Step-by-step 37 The stern block and searchlight control towers a b c d e f Recommended tools and materials Wood glue Sandpaper (no. 800 grain) Metal file Putty Craft knife For metal: Super Glue
Covering with Quarter Mil Mylar: One Way To Do It.
 Covering with Quarter Mil Mylar: One Way To Do It. By Derek McGuckin Fall 2007 Revised Feb. 2008 I do not consider myself an expert on covering with mylar. I am comfortable with how I do it and the results
Nanton Grain Mill Assembly
 ( 1 ) Nanton Grain Mill Assembly Locate package for assembling storage building. These are cut from 1/8 masonite. Inspect and lightly sand edges where it will be bonded. Use white glue or CA glue to bond.
Carbon Fiber Skinning Starter Kit
 CARBON WORKS www.gorillacarbons.com Carbon Fiber Skinning Starter Kit This Godzilla Carbonworks CF Skinning Starter Kit contains everything you need to take an original part (made from plastic, metal or
The Art of Automotive Model Finishes. by Darryl W. Peters, Ph.D IPMS Nationals
 The Art of Automotive Model Finishes by Darryl W. Peters, Ph.D. 2010 IPMS Nationals doctordwp@gmail.com Presentation Request Please print your e-mail address on the sign in sheet to request an electronic
Freehand Back-Filling: Polymer Clay and Resin Tutorial
 Page 1 of 9 Eugena Topina, 2016 Freehand Back-Filling: Polymer Clay and Resin Tutorial This tutorial is offered for your personal use only. Please do not distribute. Back-filling is a simple and very versatile
AK893 GLASS COAT GAUZY AGENT
 A new FUTURE opens up for modelers. AK s R&D department, in its constant desire for evolution, has developed two new products specially designed to cover the modelers needs. Two different products for
Cleaning Procedure INTRODUCTION:
 Cleaning Procedure INTRODUCTION: Many elements can contaminate the surface of a vehicle s paint film, such as waxes, grease, polishes, road film, tar and general dirt. Pre-cleaning to remove any existing
smooth operators Sanding Without Sandpaper
 tools of the trade smooth operators Sanding Without Sandpaper Sometimes sandpaper just won t cut it. Turn to these sandpaper alternatives to get the job done on highly detailed and curved surfaces. Sanding
Building Tips This model can be built using the following types of adhesives:
 Page 1 Building Tips This model can be built using the following types of adhesives: Epoxy (with or without microballons) Odorless cyanoacrylate (CA) with accelerator UHU Creativ for Styrofoam (or UHU
Quality Marine Equipment Since Antifouling Paint For Metal Under The Waterline ROLLER. Application Instructions.
 Quality Marine Equipment Since 1981 Antifouling Paint For Metal Under The Waterline ROLLER Application Instructions www.antifoulingpaint.net THANK YOU! Thank you for selecting Velox Plus Antifouling Paint
Instructions for Assembly of the HO Scale The Charles
 The Charles Instructions for Assembly of the HO Scale The Charles HO Kit Contents: 337 ea. white 1/16" laser cut acrylic part 19 ea. Clear 1/16" laser cut acrylic part 69 ea. white 1/8" laser cut acrylic
How to make climbing grips. By,
 How to make climbing grips By, Items needed: * Items may be needed depending on your preference. - Carving Foam - Level Table - Cardboard - Pen - Ruler - Straight Edge - Box cutter - Hot melt glue gun
DAVENPORT DEPARTMENT STORE PF5214
 1:160 BUILDING KIT DAVENPORT DEPARTMENT STORE PF5214 Dress up your downtown scene with the classic Victorian architecture and large first-floor picture windows of the Davenport Department Store. Details
COMPOSITES LAB MANUAL
 COMPOSITES LAB MANUAL Version 1 Lab 3: Surface Preparation, Wet Layup, and Vacuum Bagging The original version of this manual was a one student senior design project written by Katherine White, the Composite
(H) PAINTING LIST OF BUREAU OF INDIAN STANDARD CODE OF PRACTICE (ISI)
 PAINTING LIST OF BUREAU OF INDIAN STANDARD CODE OF PRACTICE (ISI)") (H) PAINTING LIST OF BUREAU OF INDIAN STANDARD CODE OF PRACTICE (ISI) 6278 : Code of Practice for white washing and colour washing. 2932 : Enamel and synthetic, exterior (a) Undercoating (b) Finsihing.
(H) PAINTING LIST OF BUREAU OF INDIAN STANDARD CODE OF PRACTICE (ISI) 6278 : Code of Practice for white washing and colour washing. 2932 : Enamel and synthetic, exterior (a) Undercoating (b) Finsihing.
Background: For the Modeler:
 Right On Replicas, LLC Step-by-Step Review 20141020* Space Shuttle with Fuel Tank and Boosters 1:72 Scale Monogram Model Kit #85-5089 Review (Part 1 of 2) Background: The United States Space Transportation
Working with Resin Models
 Working with Resin Models This article will run through the basic techniques and methods required to get the most out of preparing, cleaning up and assembling Forge World s resin kits. If you need extra
Get the benefits of oil with the ease of latex
 One of the most rewarding home improvement projects is putting a fresh coat of paint on your kitchen cabinets. A new color brightens up your kitchen, and can give it a complete updated look. But at the
Mirrorcraft Project Especially for Dogs
 Mirrorcraft Project Especially for Dogs DIY Customized Pet Mirror Make a mirror photo frame to Display your Pets Photo Irene Jacobs April 2007 Mirrorcraft is a fun craft to easily create you own customized
Refurbishing Your Lincoln Mark VII Dew Wipes
 By Rick One_Way Eckenrode Refurbishing Your Lincoln Mark VII Dew Wipes A common flaw among Lincoln Mark VII s can be found at the top of both doors. The dew wipes (rubber weatherstrip that rests against
Building the Bell Tower
 Building the Bell Tower Mold #55 does not contain all of the blocks to build this tower. You will need extra regular blocks (1/2" x 1/2" x 1") and square blocks (1/2" x 1/2" x 1/2"). These blocks can be
Gluing windows with SABA Glasstack 760
 Info sheet 208 Gluing windows with SABA Glasstack 760 Version 2008-05-08 EN, replaces all prior versions Page 2 of 9 Info sheet 208 Gluing windows with SABA Glasstack 760, version 2008-05-08 EN 1. Introduction
wiping Varnish Wipe it on for a low-luster look or brush it on for a higher sheen
 wiping Varnish The only Finish You ll Ever Need Wipe it on for a low-luster look or brush it on for a higher sheen B Y M I C H A E L P E K O V I C H For me, the ideal finish for handmade furniture is a
Polymer Composites Incorporated
 Rod Ham s Project, A Lesson In Synergy The following is an excerpt from correspondence that I had with Mr. Rod Ham who contacted me and inquired about the use of our MAX CLR-HP-HP for a project he had
REVISION LIST CHAPTER 25: AFT WINDOWS. The following list of revisions will allow you to update the Legacy construction manual chapter listed above.
 REVISION LIST CHAPTER 25: The following list of revisions will allow you to update the Legacy construction manual chapter listed above. Under the Action column, R&R directs you to remove and replace the
Learn to. Brush Paint Model Airplanes
 Learn to Brush Paint Model Airplanes Table of Contents Model Paints... 4 Brushes... 6 Workspace Setup... 7 Surface Preparation... 9 Painting Procedure... 10 Paintbrush Cleanup... 14 Masking... 15 Dry-brushing...
DASH KIT INSTALLATION
 ÿÿÿÿÿ ÿÿÿÿÿÿÿÿÿÿÿÿ ÿÿÿ ÿÿÿÿÿ ÿÿ ÿÿÿ ÿÿÿÿÿÿÿÿÿÿÿÿÿÿ ÿÿÿÿÿÿÿÿÿÿ ÿÿÿÿ ÿÿÿÿ ÿÿ ÿÿÿÿÿ ÿÿÿÿÿÿÿÿ PROUDLY MADE IN THE USA DASH KIT INSTALLATION These instructions are aimed at the do-it-yourself installer. Read
M A N U A L 6 June 2017
 M A N U A L 6 June 2017 What are Protection Films? These films are meant to protect the vulnerable parts of cars, bicycles, motorbikes, etc... They are transparent glossy, so the underlying colour remains
is that the pictures are monochrome and some are not as sharp as they might be.
 Airbrushing If you have ever been to a custom car show you will know how beautiful and extraordinary the sprayed designs are. I vaguely knew they were air-brushed but little else. I bought a simple Badger
Hotel Belvedere Instructions for Assembly of the HO scale kit. v1.1
 Hotel Belvedere Instructions for Assembly of the HO scale kit. v1.1 Kit Contents: 319 ea. laser cut.090" acrylic parts. 132 ea. laser cut.060" acrylic parts. 8 ea. window glass templates 8 ea. window glazing
4-H Model Building. Monroe County. Grades 3-12
 4-H Model Building Monroe County Grades 3-12 PURPOSE Positive development of our young people through the stimulation of their personal interest and natural skills through the assembly, techniques of construction,
Stenciling on Fabric. with Renegade (vinyl) Stencils. All Things Silhouette Early Edition
 Stencils. All Things Silhouette Early Edition") Stenciling on Fabric with Renegade (vinyl) Stencils 2016 Shelly Stokes Cedar Canyon Textiles www.cedarcanyontextiles.com You can purchase or make stencils from many different materials. Here are the pros
Stenciling on Fabric with Renegade (vinyl) Stencils 2016 Shelly Stokes Cedar Canyon Textiles www.cedarcanyontextiles.com You can purchase or make stencils from many different materials. Here are the pros
One Piece Fiberglass Mold Construction
 One Piece Fiberglass Mold Construction (This is just a SAMPLE of the Main Manual) Simple Fiberglass Molds Can Be Used For Making Duplicate Parts For Many Applications Including Hobby & Automotive. This
FRANKLIN COUNTY 4-H MODEL BUILDING
 FRANKLIN COUNTY 4-H MODEL BUILDING Save this book, use it each year you are in the project. 4 H Model Building Model building can be fun and exciting. You can express your creative abilities, learn to
Season One Phaser Kit PRP1745
 Season One Phaser Kit PRP1745 RODDENBERRY ENTERTAINMENT STAR TREK: THE NEXT GENERATION SEASON ONE PHASER KIT Thank you for your purchase of the Roddenberry Entertainment Star Trek: The Next Generation
BRUSH APPLICATION INSTRUCTIONS
 QUALITY MARINE EQUIPMENT SINCE 1981 Antifouling Paint For Metal Under The Waterline BRUSH APPLICATION INSTRUCTIONS www.antifoulingpaint.net TABLE OF CONTENTS Humidity & Drying Metal Surfaces... 1 Coverage
HARRISON S HARDWARE PF5891
 1:48 BUILDING KIT HARRISON S HARDWARE PF5891 Model the local hardware store where layout residents can find all they need to keep their homes in tip-top shape and workshops running smooth. The positive
#85-2-5A: PAINT STRIPPING AND FINISH ANALYSIS AND CORRECTION - (Aug 7, 1985)
") #85-2-5A: PAINT STRIPPING AND FINISH ANALYSIS AND CORRECTION - (Aug 7, 1985) "Please discard previous bulletin 85-2-5 due to this updated information." The corrosion protection provided by the factory
#85-2-5A: PAINT STRIPPING AND FINISH ANALYSIS AND CORRECTION - (Aug 7, 1985) "Please discard previous bulletin 85-2-5 due to this updated information." The corrosion protection provided by the factory
I m going to say that Rob coerced me to take part in the club Shell 4000 theme build. He promised me an engine free Tamiya kit. This is what I got
 I m going to say that Rob coerced me to take part in the club Shell 4000 theme build. He promised me an engine free Tamiya kit. This is what I got instead. Looks like it s an older Fujimi kit and it does
Volvo 1800 Smiths Gauge Face Overlay Installation By Dave Barton
 Volvo 1800 Smiths Gauge Face Overlay Installation By Dave Barton These face overlays are the product of a lot of research. They are printed with a special printer using waterproof and UV resistant ink
Sketchpaint. Ideal for turning any smooth surface into a whiteboard. Ready to use in 5 days
 Sketchpaint Ideal for turning any smooth surface into a whiteboard SketchPaint - A whiteboard straight out of a tin! White Gloss or Transparent Finish Simple application Tin size available: 3m² or 6m²
Quality Marine Equipment Since Antifouling Paint For Metal Under The Waterline SPRAY. Application Instructions.
 Quality Marine Equipment Since 1981 Antifouling Paint For Metal Under The Waterline SPRAY Application Instructions www.antifoulingpaint.net Thank you for selecting Velox Plus Antifouling Paint to protect
Tape Measure Metal Clippers Screw Bit Set With Extensions
 IMPORTANT: Read through instructions thoroughly before beginning to replace any damaged material. Minor damage can be fixed with a fiberglass repair kit and color matched paint. Tools Required Tape Measure
Magnetpaint & Sketchpaint
 Magnetpaint & Sketchpaint Turn any smooth surface into a magnetically receptive whiteboard MagnetPaint is an exciting product that allows you to paint your own magnetic surface on any flat area. SketchPaint
C Paint. Product Information Sheets
 T A T G O E C Paint Product Information Sheets Cottage Paint- 8oz jar Available in many pre-tinted colors -see chart. Used for painting furniture and cabinetry. Water based Clay paint that is easily distressed
Volvo 1800 Smiths Gauge Face Overlay Installation By Dave Barton
 Volvo 1800 Smiths Gauge Face Overlay Installation By Dave Barton These face overlays are the product of a lot of research. They are printed with a special printer using waterproof and UV resistant ink
Step by Step Wing Bagging
 Step by Step Wing Bagging By Evan Shaw 073 589 9339 evanevshaw@gmail.com Preparing the Leading Edge 1. Cut cores. (Cutting of wing cores is covered in another article elsewhere) 2. Sand the LE to a nice
CONCEPT MODELS SP DOUBLE STACK CONTAINER CARS INSTRUCTIONS Sheep Ranch Rd. Mountain Ranch, CA Web Address:
 CONCEPT MODELS Web Address: http://www.con-sys.com 8331 Sheep Ranch Rd. Mountain Ranch, CA 95246 SP DOUBLE STACK CONTAINER CARS INSTRUCTIONS 2 CONCEPT MODELS PARTS Item No. PART NO. DESCRIPTION QTY. 1
Read and understand the requirements of this procedure Assist students with installation as needed
 1. PROCEDURE OVERVIEW This procedure is to be used for installation of bonded strain gages on reinforcing bars. It includes necessary materials and a recommended practice for surface preparation, installation,
Drawings of all parts have been included for ease of part identification.
 Acme Corporation Instructions for Assembly of the HO Scale Acme Corporation HO Kit Contents: 156 ea. white 1/16" laser cut acrylic part 10 ea. white 1/8" laser cut acrylic part 37 ea. adhesive-backed brick
BUZZ S SAWMILL PF5195 WOODLAND SCENICS BUILDING KIT
 1:87 BUILDING KIT BUZZ S SAWMILL PF5195 Buzz s Sawmill is a detailed work of art with all workings of a vintage steam-fired, belt-driven sawmill. Details include interior rafters and shake roof, attached
Makeover your place with paint
 Makeover your place with paint A new coat of paint can be an instant fix. It s costeffective and easy to apply, and with a little planning and the right equipment you can completely change the look of
Lots of paints Several brushes from 000 to? Exacto knife. 200 grit sandpaper Bel-Decal Sheets Spray Primer
 Tools Lots of paints Several brushes from 000 to? Exacto knife 200 grit sandpaper Bel-Decal Sheets Spray Primer Brass Rod and a Drill bit that matches Super Glue Sculpy Putty the same size 3/16 suggested
VELOX PLUS APPLICATION INSTRUCTIONS QUALITY MARINE EQUIPMENT SINCE 1981
 VELOX PLUS APPLICATION INSTRUCTIONS QUALITY MARINE EQUIPMENT SINCE 1981 VELOX PLUS TECHNICAL INFORMATION Please read all information and application instructions before beginning. Coverage Estimates Normal
UNIT 11: PAINTING, STAINING, AND FINISHING
 KEY CONCEPTS 1. Equipment needed 2. Primary kinds of Paint: Interior/Exterior 3. Primary kinds of Stain: Interior/Exterior 4. Proper application techniques: Paint/Stain/Finish 5. Equipment care and clean
3Position the hull of the ship as
 Yamato: Step-by-step 25 The hull and stern deck c b d a b d c e e f a Rear frame b Stern deck x 2 c Stern deck x 2 d Side wall x 2 Wood glue Sandpaper (no. 400 grain) Craft knife Pliers d Side wall x 2
Aerospace Speciality Products
 Specifications:! Length: 18.75"/47.6 cm! Diameter: 0.98"/24.9 mm! Weight: 1.5 oz/44 gm! Streamer Recovery! Recommended Engines:!! A8-3; B4-4; B6-4; C6-5! Skill Level: Beginner This is a model rocket kit
GrafiWrap Vehicle Wrapping
 GrafiWrap Vehicle Wrapping What is GrafiWrap? GrafiWrap is the registered trade name for a combination of materials used in the wrapping of a vehicle. The GrafiWrap system is a sandwich made up of a cast
Laminated Fabric Tray
 Laminated Fabric Tray There are a few things one would assume you can t add embroidery to. Metal. Buildings. Cats. All these things are inadvisable to hoop. You might also think a hard plastic serving
CONCEPT MODELS INSTRUCTIONS FOR PRODUCT 60,000 GALLON TANK CAR El Toro Way Stockton, CA 95210
 CONCEPT MODELS Web Address: http://www.con-sys.com Email: concept_models@con-sys.com 8810 El Toro Way Stockton, CA 95210 INSTRUCTIONS FOR PRODUCT 60,000 GALLON TANK CAR 2 CONCEPT MODELS PARTS GATX/UTLX
Cardboard Model Buildings
 Cardboard Model Buildings Get more model kits from http://www.modelbuildings.org PRINTING & ASSEMBLY TIPS: These OO designs can easily be resized by reducing the print percentage as follows: OO scale is
1Use the metal file to smooth
 Yamato: Step-by-step 85 Parts of the bridge and the hull a b c d e f a Part of the bridge b Part of the bridge c Part of the bridge d Radar x 2 e Part of the bridge x 2 f Wire Recommended tools and materials
Instruction for applying the Logo Decals
 Instruction for applying the Logo Decals Supplied: *One set of N/C cut vinyl decals (one right and One left) (Note: packaged with the contoured wing tip plans) Items required to apply the decals (not supplied):
3D printing in MODERN MOLD MAKING. Cutting Time & Costs in Short Run Production.
 3D printing in MODERN MOLD MAKING. Cutting Time & Costs in Short Run Production. RTV Molding Tutorial 2 INDEX 1. The Introduction 2. Raw Facts and Figures 3. FDM Patterns for Modern Mold Making Preliminary
How to Make Faux Porcelain Pendants with Transfer Sheets & Gel Du Soleil
 How to Make Faux Porcelain Pendants with Transfer Sheets & Gel Du Soleil We look forward to bringing you exclusive innovations and distinctive products this year and beyond. www.nunndesign.com www.nunndesign.com
Tools and Tips: ( 1 )
") Tools and Tips: As you build instructions will show in my many picture manual how to assemble. You can use your own methods as you desire, my results are very good. A smooth, flat work surface is very
Tools and Tips: As you build instructions will show in my many picture manual how to assemble. You can use your own methods as you desire, my results are very good. A smooth, flat work surface is very
FOCUS TECHNOLOGY THE BEAUTY OF A LACQUERED SURFACE
 FOCUS TECHNOLOGY FOCUS TECHNOLOGY THE BEAUTY OF A LACQUERED SURFACE Snaidero is one of the few companies on the market with more than 50 years experience in the development of lacquered kitchens. Its product
SURFACE CASTING METHOD: For Molds & Core Boxes. Presented by: Hapco Inc.
 SURFACE CASTING METHOD: For Molds & Core Boxes Presented by: Hapco Inc. RAPIDFIL Detailed Specifications STEP 1 SPACER LAYER Apply a layer of ¼ foam to create a uniform ¼ thickness around the pattern.
Laying and maintenance of cement tiles
 Laying and maintenance of cement tiles David&Goliath cement tiles are manufactured under licence in the Far East, according to our standards and specifications concerning colour and dimensional stability;
Maintenance and other important non-personal injury and non-material damage instructions or statements that should be observed.
 VIGO INDUSTRIES INSTALLATION GUIDE FOR SHOWER ENCLOSURE ()! SAFETY PRECAUTIONS This Installation Guide uses the following symbols to indicate important information. Always observe the instructions indicated
TOOLS & SUPPLIES (Included in ProTops Tool Kit)
") TOOLS & SUPPLIES (Included in ProTops Tool Kit) Clean Paint/Mixing Sticks Graduated Mixing Buckets Standard Mixing Cups Nylon Paint Brush Propane Torch 3M Masking Gun Masking Film & Painter s Tape Disposable
TOOLS & SUPPLIES (Included in ProTops Tool Kit) Clean Paint/Mixing Sticks Graduated Mixing Buckets Standard Mixing Cups Nylon Paint Brush Propane Torch 3M Masking Gun Masking Film & Painter s Tape Disposable
JPM COACHWORKS INSTALLATION GUIDE
 JPM COACHWORKS INSTALLATION GUIDE 2015+ FORD MUSTANG MANUAL SHIFT BOOT Pre-Installation Warning: The installation of this product requires adhesives for proper assembly. Please read and follow all safety
Paint Masks - Stencils - Dry Rub Decals - Waterslides +44(0) (mobile)
 (mobile)") Paint Masks - Stencils - Dry Rub Decals - Waterslides Telephone: Website: email: +44(0)7872 181119 (mobile) http://www.flightlinegraphics.com sales@flightlinegraphics.com Dry Rub Decals Dry rub decals
Paint Masks - Stencils - Dry Rub Decals - Waterslides Telephone: Website: email: +44(0)7872 181119 (mobile) http://www.flightlinegraphics.com sales@flightlinegraphics.com Dry Rub Decals Dry rub decals
Cobra X Q Construction Tips Construction: Bel y pan
 Cobra X Q Construction Tips : The white plastic in this kit is high impact styrene. It can be painted with most types of coatings if light coats are applied this is necessary due to the thickness of the
APPLICATION OF JAC FILMS
 1. Important points For reliable results, JAC films are best applied to smooth, dry and clean surfaces (metal, glass, paintwork, plastic etc.). It is essential to ensure that the surface is free from dirt
Tools and Tips: ( 1 )
") Tools and Tips: As you build instructions will show in my many picture manual how to assemble. You can use your own methods as you desire, my results are very good. A smooth, flat work surface is very
Tools and Tips: As you build instructions will show in my many picture manual how to assemble. You can use your own methods as you desire, my results are very good. A smooth, flat work surface is very
Taco Bell Restaurant kit in HO scale
 Taco Bell Restaurant kit in HO scale Parking lot base and cars not included This kit includes all building parts milled in white styrene plastic, clear window glazing, Plastruct tile roofing, and logo
VICINITY WHITEBOARD PAINT. Installation Guidelines
 VICINITY WHITEBOARD PAINT Installation Guidelines Components Installation Kit Preparation Whiteboard Paint Aerated Stir Stick Drop Sheet Universal Undercoat Base Activator Cutting-In Roller Filling-In
Paint Problems and Solutions Guide. Endura Manufacturing Co. Ltd th Street Edmonton, Alberta T5L 2J
 Paint Problems and Solutions Guide Endura Manufacturing Co. Ltd. 12425 149th Street Edmonton, Alberta T5L 2J6 1-800-661-9930 www.endura.ca Table of Contents Paint problems are easy to spot, but in many
1983 Jaguar XJS Interior Wood Trim Repair and Refinishing
 The following describes and shows one method of wood trim repair/restoration/refinishing for wood trim on Jaguar cars, specifically this 1983 Jaguar XJS, although the wood trim should be the same in all
Rosalina Accessories Tutorial Version March 2011 Martyn
 Rosalina Accessories Tutorial Version 1.0 - March 2011 Martyn Star Brooch Feel free to experiment with these dimensions, you should make a template you are happy with, the method still works. 1) Creating
Parts Identification
 We are excited to introduce the Model Aero Aqua Sport. This is an excellent sport flyer, equally at home flying from grass fields, water, or even snow! The unique V-tail gives the Aqua Sport a distinctive
Hasegawa 1/48 scale Nakajima B5N2 "Kate" by Dick Smith
 Hasegawa 1/48 scale Nakajima B5N2 "Kate" by Dick Smith The release of last summer's motion picture "Pearl Harbor," caused a flood of interest in the modeling world in the Japanese aircraft that took part
MAKE IT YOURS. Digital Photo Decoupage Art. How-2 instruction books for cool projects you can make your own.
 MAKE IT YOURS Digital Photo Decoupage Art How-2 instruction books for cool projects you can make your own. DIGITAL PHOTO DECOUPAGE ART WHAT YOU WILL NEED Computer / Internet Connection Digital photos you