DIY. Beading Magazine #12. Learn To Make Christmas Jewelries Projects. 17 How-To Projects And Designs For Inspiration.
|
|
|
- Franklin Miller
- 6 years ago
- Views:
Transcription


1 DIY Beading Magazine #12 Learn To Make Christmas Jewelries Projects 17 How-To Projects And Designs For Inspiration


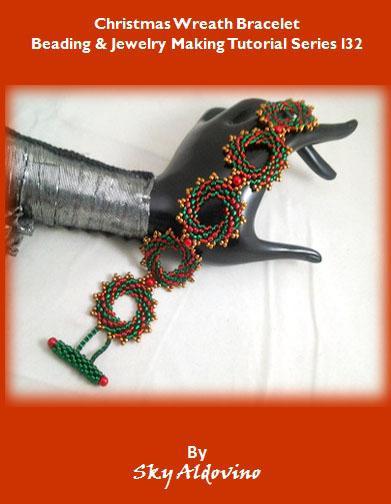
2 Contents Christmas Wreath Bracelet By Sky Aldovino Here's one inspired by a popular Christmas decor, the "Christmas Wreath. The bracelet is composed of circular components using Circular Flat Peyote Stitch, designed to look like a wreath. These wreath components are then linked to form a beautiful Christmas Wreath bracelet. Features Beaded Wreath Pendant Jewelry Making Tutorial Quick Christmas Tree Earrings Seed Beaded Christmas Santa Claus Earring Pattern Christmas jewelry: beaded earrings tutorial DIY Christmas Gift - Friendship Bracelet Tutorial Twelve Days of Christmas - Day 11


3 Beaded Star Bracelet/Necklace set Beading Tutorial 6 Point Glass Star How to Make Christmas Ornaments Beaded Angel Ornament Morning Bracelet Snowrflakes Beaded Snowflake Flurries Necklace-Bracelet-Earrings "Garfield's Star" Pet Remembrance Christmas Ornament DIY Christmas Wreath Pendant


4 Christmas Tree with Delica Beads Snowflake Earrings Snowflake Ornament Cover ADVERTISE HERE

5 Editor s Note Halloween has past and Christmas is just around the corner; one special occasion to the other. In this issue of DIY Beading Magazine, we re bringing you Christmas jewelry making ideas from talented jewelry artists! No need for expensive gifts. Just be creative and you ll come up with beautiful handmade jewelries, perfect as gifts for families and friends. Jane Chew Blog: Lessons: Membership: Join The Fun!

6 Christmas Wreath Bracelet By Sky Aldovino
7 Christmas is just around the corner. Here's one inspired by a popular Christmas decor, the "Christmas Wreath." The bracelet is composed of circular components using Circular Flat Peyote Stitch, designed to look like a wreath. These wreath components are then linked to form a beautiful Christmas Wreath bracelet. Each wreath is linked by a shiny pearl, just like cherries that we sometimes see on Christmas wreath decors. Combining red, green and gold or bronze colors, surely this bracelet looks so festive and in time for Christmas! 1)Materials and Tools: 11/0 silver lined green emerald seed beads 11/0 silver lined ruby seed beads 8/0 silver lined green emerald seed beads 8/0 silver lined ruby seed beads 11/0 bronze seed beads 4mm red pearls Beading thread Scissor Beading Needle size 11 or 12 Beading Techniques: Circular Flat Peyote Stitch Ladder Stitch Flat Peyote Stitch

8 Step By Step Guide Step 1: Creating the wreath - 1st Round Cut at least 25 inches of thread. String 11/0 seed beads - 2 greens and 2 reds, for a total of 28 seed beads. Pass the thread back through the beads and form a circle. You may tie a knot, if you wish to form a circle. Make sure you have at least 7 inches tail. You may come out either a pair of green or red seed beads. On this image, the thread is coming out from a pair of greens. Now, we're ready to start Circular Flat Peyote.

9 Step 2: 2nd Round and 3rd Round Still using 11/0 seed beads, coming out of 2 greens, pick up 1 green. Skip red from the previous round and pass through the next red. Pull the thread. Step 3: Pick up 1 red. Skip the next green from the 1st round and come out the next green. Pull the thread.

10 Step 4: Repeat Step 2 & 3 until you complete the round. Now, pause for awhile and look at your beadwork. Technically, you now have a 1st, 2nd & 3rd round. It is now easy to count the round of beads. You'll see you have 3 reds and 3 greens. Continue by doing a step-up. Your thread is coming out of a green bead from the 2nd round. Pass the thread into the next green bead without adding any bead so you have your thread coming a green bead from the 3rd round. Step 5: 4th Round The entire 4th round consists of red and green 8/0 seed beads. Pick up green, skip red from 2nd round and then pass through red from the 3rd round.

11 Repeat previous step, alternating the colors of beads until you complete the 4th round. When you reach the last 8/0 seed bead, do a step by passing the thread into a bead from the 3rd round without adding any beads and come out an 8/0 seed bead from the 4th round. On this image after step-up your thread is now coming out an 8/0 green bead. You are now ready to start a 5th round. Step 6: 5th Round The entire 5th round consists of 8/0 green and red seed beads. Repeat the same steps as you did on Step 5 to complete the 5th round.
12 Step 7: 6th Round The entire 6th round consists of 11/0 green and red seed beads in pairs. Pick up 2 green, skip red from the 4th round and pass through red from the 5th round. Repeat picking up beads in pairs, alternating the colors until you complete the 6th round. After completing the 6th round your beadwork should look like this. Do not forget to do a step-up so your thread has to come out a pair of 11/0 seed beads.
13 Step 8: Picot edge Now, you're ready to complete your component. Your thread is coming out a pair of 11/0 seed beads. On this image, after step up the thread is coming a green 11/0 seed bead. Pick up 3 bronze 11/0 seed beads then pass the thread into the next pair of 11/0 seed beads. Pulling the thread, this is how it should look like.

14 Repeat the steps until you complete the round and create a picot edge. Secure your thread by passing back through several beads, make knots and then cut off excess thread. You now have a wreath component. Step 9: Repeat from Step 1 to 8 and create several components. Each component measures approximately 32 mm or 1.26 inches. For a 7- inch bracelet, including clasp, you need to create 5 components. When you make your final wreath component I suggest cut thread longer than an arm span or at least 60 inches. When you finish the last wreath component do not cut your thread yet and just set aside because you will need it to connect the wreaths.


15 Step 10: Creating the clasp/tube Cut an arm span of thread. Pass the needle twice into a bead stopper, leaving at least 7 inches tail and then string 14 green 11/0 seed beads. On this image the new beads are shown in light greens. Now, do a Flat Peyote Stitch. Pick up green and going left, pass though the next green bead the pull the thread. Again, pick up a bead. This time skip the immediate next bead and pass through the next bead. Pull the thread. Repeat this pattern of weaving until you reach the other end.


16 Pull the thread tight and so you can see its form and this is how it should look like. You now have 3 rows of Peyote Stitch. Step 11: Let's continue... Again, the new row or beads are shown in light green on the diagram. Going right, pick up a bead and pass through the next bead from the 3rd row. Pull the thread. Then pick up a bead, skip a bead from the 2nd row and pass through the next bead from the 3rd row. Repeat this pattern of weaving until you reach the other end.

17 Step 12: Going left, pick up a bead and pass through the bead from the 4th row. Pull the thread. Then pick up a bead, skip a bead from the 3rd row and pass through the next bead from the 4th row. Repeat this pattern of weaving until you reach the other end. Step 13: Repeat Step 11 & 12, going left and right until you have 10 rows and you'll have a Flat Peyote Stitch.


18 Step 14: Now, let's turn the Flat Peyote into a tube. Going down and left, pass your needle into the 1st bead at the bottom. Pull the thread tight and you'll see the beadwork starts to fold.


19 Step 15: Continue weaving in zigzag direction to form your beadwork into a tube. Go up and then down in zigzag direction.

20 Step 16: When you reach the end of the tube, in this case the right end take a 4mm red pearl and weave back through several beads until you reach the left end. Attach a pearl, weave back through several beads and then secure your thread. Set aside.
21 Step 17: Creating the bracelet Now, you're ready to put it all together... Take your last wreath component you created with the thread still uncut that I suggested on Step 9. On the last wreath component have your thread come out the tip bronze bead from one of the picot edges. Do a Ladder Stitch to create a strip of beads. Pick up a green 11/0 seed bead. In counter-clockwise direction pass the thread again into the bronze seed bead where you just came from.

22 ...then continue to pass the thread into the green bead you just added. Pull the thread. Step 18: Assuming that this is your wreath component with picot edges. Create a strip of Ladder Stitch consisting of 6 green 11/0 seed beads. Remember you already had 1 green bead on Step 17. Weave clockwise and counter-clockwise directions until you have 5 beads more.
23 When you reach the last green bead come back down in zigzag direction. You may have to pass through several beads from the wreath component and have your thread come out a tip bead from another picot edge. Step 18: Assuming that this is your wreath component with picot edges. Create a strip of Ladder Stitch consisting of 6 green 11/0 seed beads. Remember you already had 1 green bead on Step 17. Weave clockwise and counter-clockwise directions until you have 5 beads more.
24 This is how it should look like. Step 19: Create another strip using Ladder Stitch by following Step 18.


25 Step 20: Now you can attach your Peyote tube. Make sure that the tube is secured so you may have to pass back through the beads several times.


26 When finished attaching the tube, weave back through a strip Ladder Stitch. Step 21: Pass the thread through the wreath component and have your thread come out the opposite picot edge.


27 Step 22: Pick up a 4mm red pearl. Going down, pass the thread into the adjacent picot edge and pull the thread. Take another 2nd wreath component and pass the thread into the tip bead picot edge.


28 Step 23: Pass the thread through the pearl again and into the next picot edge from the 2nd wreath. Pull the thread and now you have 2 wreath components linked.

29 Step 24: Secure the link by passing the thread into the adjacent picot edge from the 1st wreath....then pass into the pearl again.
30 Step 25: Shown on the diagram, you have your 2 wreath components, 4 picot edge and the pearl at the middle. Follow the thread path where to weave to secure the link. After Step 24 your thread is coming out of the pearl. Pass the thread again into the left-down side picot edge and continue into the rightdown side picot edge. Go up, pass through the pearl again and come out the right-up side picot edge then into the left-up side picot edge. Lastly, come down again and pass through pearl. Now, your link is secured.


31 Step 26: Two of your wreath components have been linked. Coming out of the pearl, pass the thread into the picot edge and several beads from the 2nd wreath until you reach the opposite side. Repeat Step 22 to 26 and link another wreath component. The last wreath will also server as your toggle clasp When finished, voila! You're ready for a Christmas Party with your Christmas Wreath Bracelet.
32

33 About the Author Sky Aldovino I consider myself a late bloomer when it comes to crafting. I m a self-taught jewelry maker. Jewelry making wasn t really a hobby of mine, but unforeseen events lead me to learn jewellery making. My family put up a craft store where we sell cross stitch, beads and all sorts of crafting materials. I fell in love with the beads and tried to create accessories only for myself. Clients liked the pieces and I started customizing handmade jewelleries. The craft store was a success for 6 years, but like any other small businesses we had to close it down and I was confined to staying at home. While at home I had all the time using the internet. I blog and teach jewelry making. I am a contributing author at

34


35 If you ve enjoyed this issue, make sure you SUBSCRIBE TO DIY BEADING MAGAZINE Every Month, Learn How To Make Your Own Jewelry 2 Issues Per Month Jewelry Making Tutorials From DIY Beading Club Featured Jewelry Making Tips, Lessons and News From Jewelry Artists Techniques Taught include Beading, Stringing, Wireworks, Chainmaille and many more! Interactive lessons in pictorial step by step guides and videos! Jewelry Trend Beading Resources Jewelry Business Tips For better viewing experience, you can subscribe the magazine from ipad at this link:
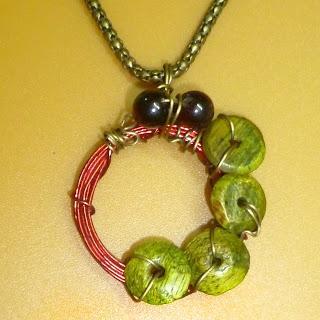
36 Beaded Wreath Pendant Jewelry Making Tutorial Created by XQ Designs Beaded wreath symbolizes Christmas, but it can also be used as pendants and charms and here s one fun tutorial that will teach you how to. With pictoral step by step tutorial, even beginners can follow through. With the tutorial, you will learn how to do right angle weaving technique and form into a circle. You will also learn how to make a bail, a technique that you can on other beaded jewelry designs.
37 Materials required 15 green colour 4mm Swarovski crystals 60 crystal colour 3mm Swarovski crystals 24 white colour 3mm Swarovski crystals Nylon thread measuring 0.25 in dia. Tools Needed 2 Beading needles size 12 Scissor Pliers (optional)


38 Step 1: Cut approximately 1.5m (60 inches) of nylon thread measuring 0.25 in length and thread it through your needle at both ends. Leave about 2cm (0.80 inches) tails at both ends. Thread in 2 x 3mm crystals, 1 x 4mm green crystals and 1x 3mm crystal thru 1 one of needle and pull it to the centre of the nylon string. Step 2: Cross the right thread into the last crystal. Step 3: Continue to thread in 1 green crystal on the right thread and 1 clear crystal on the left thread. Cross both thread into 1 more clear crystals.


39 Repeat Step 3 until you reach your desired length for the circle. Step 4: When you reach your desired length, you will end the last set by adding in 1 green crystal and 1 clear crystal on the right and left threads respectively. Step 5: Then cross the threads into the 1st clear crystal from the other end.


40 Pull the thread and you will see a circle is formed. Step 6: Now pass the left thread thru 2 clear crystals and cross both threads thru the nearest green crystal. Pull the thread.


41 Step 7: Thread in 2 clear crystals at the right thread and 1 at the left thread. Step 8: Cross the right thread in the crystal from the left thread. Pull and tighten the threads. Step 9: Pass one of the left threads from the right into the green crystal next to it.


42 Step 10: Thread in 1 x 3mm clear crystal onto the thread the left thread and cross both threads into a 3mm crystal. Step 11: Continue Step 10 until you form a circle, which we ll call this the upper circle. Step 12: Once you have formed the upper circle, let's pass the threads to the other side to form the lower circle. You can pass the threads thru the clear crystal and cross them into the nearest green crystals.


43 Step 13: Cross both threads in a clear crystal. Step 14: Pass the threads into the crystals and cross them at a crystal from the inner circle.


44 Step 15: Forming the bail Thread in 1 x 3mm white crystals, each at both threads then cross both threads into 1x 3mm white crystal. Step 16: Continue to thread in 2 white crystals at both threads and cross them into 1 crystal. Repeat Step 16 until you reach the desired length for the bail. Step 17: Then bring both threads and cross them into the crystal from the inner circle of the wreath.


45 Step 18: Once the bail is formed, pass the threads thru the entire wreath and tighten the threads. Make a knot at both ends and cut of excess threads. You are done! You have completed the Beaded Wreath Pendant. Hope you like it!
46 About the Author I like to give a brief introduction about myself - the founder of the online jewelry making magazine - My name is Jane Chew a.k.a. XQDesigns. I started XQDesigns few years back and it has became my creative outlet which I can t get from my day job at that time. I founded Handmade-Jewelry-Club in 2008 with the aims to gather and share jewelry making tips and tutorials that I discovered from the internet. I have subsequently published my own tutorials and lessons and found lots of fun in developing tutorials and sharing my knowledge. Jane Chew In 2010, I started a directory website called DIY Lessons. This website allows readers to view videos I found from the web apart from sharing my own tutorials where it allows my buyers to download free and paid tutorials instantly once they complete the purchase transaction. I am currently working with jewelry artists and jointly developing tutorials with them based on their designs. To make our tutorials more affordable and exclusive for loyal customers, I started DIY Beading Club in 2011 and offer monthly subscription plan to our fans. I am getting very excited about all these opportunities and would really like to work with more artists to turn their knowledge into lessons through this club. Year 2013 is another exciting year for me! I have started DIY Beading Magazine that is published through Newsstand at ipad. I will continue to work with many great artists to bring you more jewelry making tips, lessons and inspiration to all of you. Do join me at: Blog: Lessons: Membership:

47

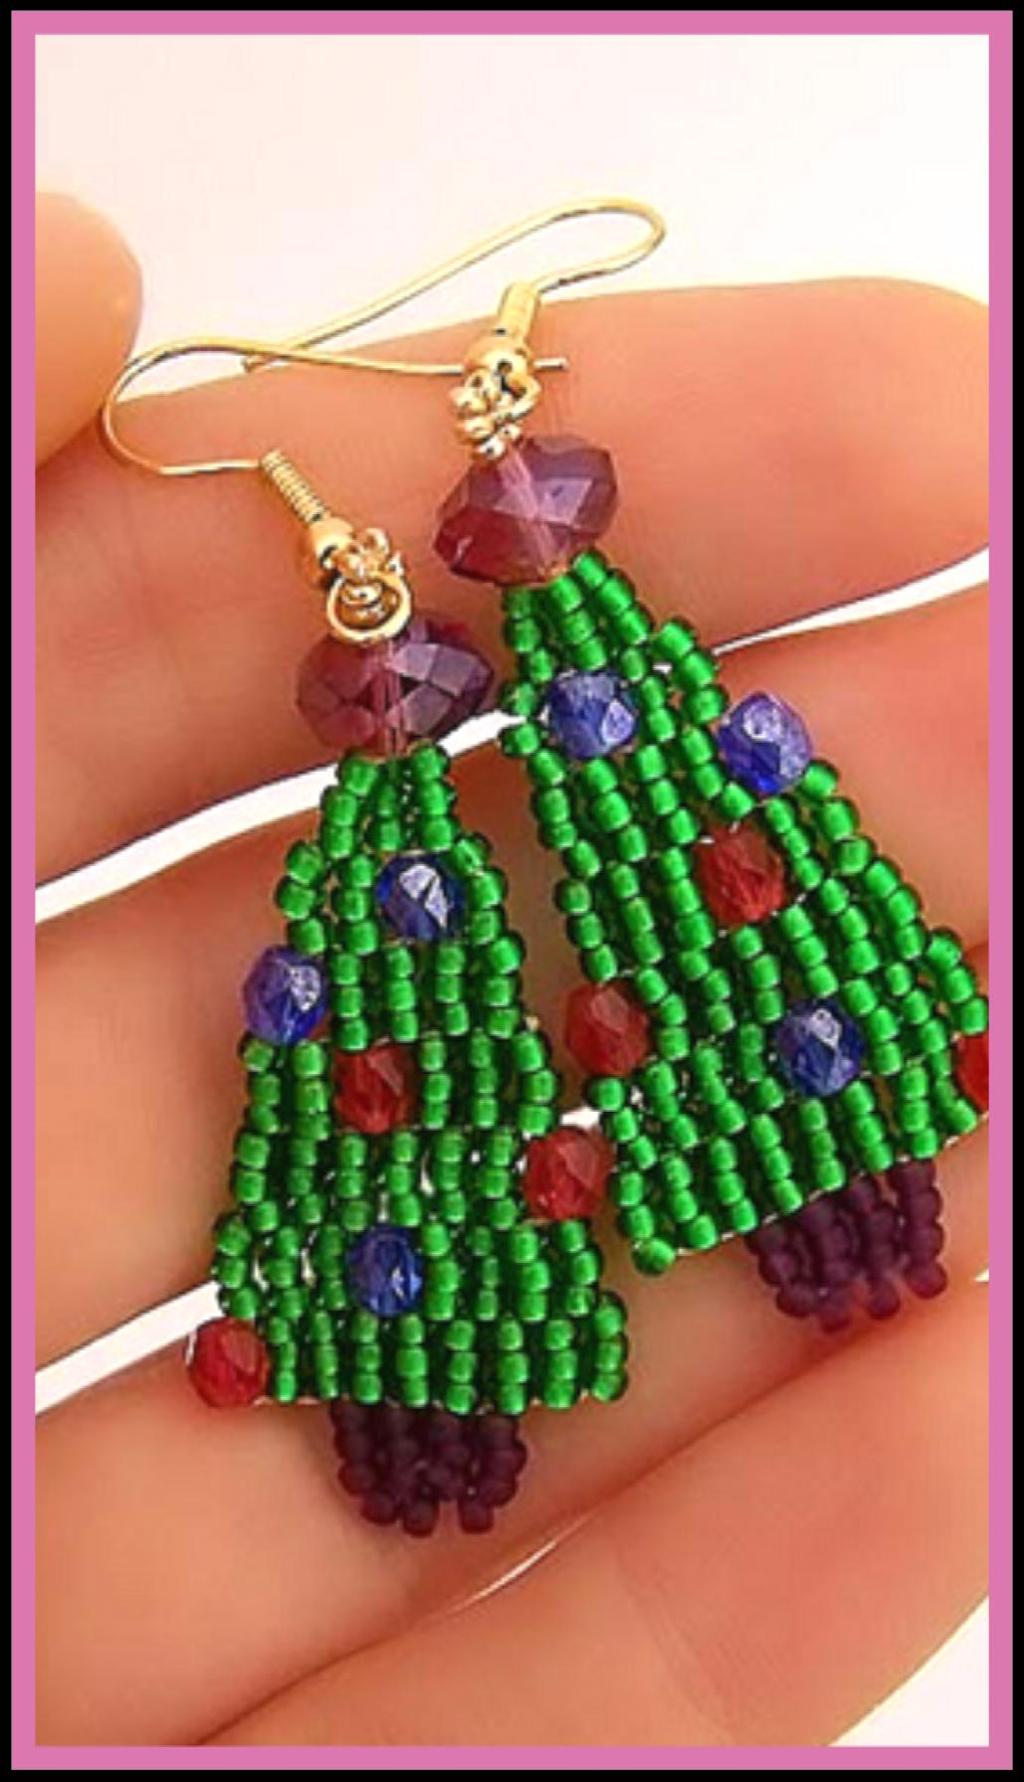
48 Quick Christmas Tree Earrings By Carolina Moore Continuing the week of Quick Handmade Holiday Gifts, today I m showing you jewelry. These earrings are quick and easy to make. It isn t even that tricky to get the left to look like the right because the whole beauty of these earrings is that they are imperfect.
 small paintbrush handle Start by wrapping the end of one wire around the smallest")

49 Supplies: 2 8 pieces of heavy gauge wire 2 earring hooks 2 crystal beads small pliers (round-nose are best, but needlenose will do) small paintbrush handle Start by wrapping the end of one wire around the smallest part of the paintbrush handle. Thread on the earring hook, and make two to two-and-a-half circles at the top. Using your pliers, start bending the wire to make a zig-zag. Keep increasing the width of the zig-zag as you go.


50 When you get to the end, bring the wire to the middle and bend the wire 90 degrees so that it points down. Thread on one of your crystal beads, and bend the excess wire up and out of the way. If the zig zags have gotten distorted, press the earring between your fingers to get it to lie flat.

51 Repeat the process for the second earring, eyeballing to try to keep the tree the same width as the first. If one earring ends up longer than the other, just squish the wire closer together on the longer earring to make it shorter.

52 About the Author Carolina Moore Hi! I m Carolina from Nevada; I m glad that you stopped by! 30 Minute Crafts was created out of the need for fast crafting. Though I love intricate, detailed crafts I don t always have the time. 30 Minute Crafts give me the satisfaction of creating something, without the huge time commitment. Aside from my own project ideas I also feature awesome DIYs from other artists and I ll be glad to have one of yours on my blog! I hope on my blog you ll discover crafts that inspire you to take a minute (or thirty) to create something new. You can reach me at these links: Blog: Always Expect Moore: Craft Snark: Crafty Hangouts: Twitter: Facebook: Pinterest: Google+:
53
54 Seed Beaded Christmas Santa Claus Earring Pattern

55 Christmas Jewelry: Beaded Earrings Tutorial
56 DIY Christmas Gift Friendship Bracelet Tutorial

57 Twelve Days of Christmas - Day 11

58 Beaded Star Bracelet/Necklace Set Beading Tutorial be

59 6 Point Glass Star - How to Make Christmas Ornaments

60 Beaded Angel Ornament
61 Morning Bracelet Snowflakes

62 Beaded Snowflake Flurries Necklace-Bracelet-Earrings overview&list=uuayxdktykeojr7kqceyxzha

63 "Garfield's Star" Pet Remembrance Christmas Ornament

64 DIY Christmas Wreath Pendant

65 Christmas Tree with Delica Beads
66 Snowflake Earrings
67 Snowflake Ornament Cover

68

69
BEADED BEZEL CABOCHON PENDANT BEADING & JEW ELRY MAKING TUTORIAL SERIES I20
 BEADED BEZEL CABOCHON PENDANT BEADING & JEW ELRY MAKING TUTORIAL SERIES I20 COPYRIGHT Copyrights DIY Beading Club 2013 Published By DIY Beading Club INTRODUCTION Bezeling a cabochon is fun! Once you learn
How to use this app?
 Tap & Hold the screen to show the top bar HOME Tap to return to the app home page How to use this app? Swipe Horizontally to go to the next page Tap & Hold the screen to show the top bar Swipe Horizontally
Oval Shaped Turquoise Earrings Jewelry Making Tutorial By XQ Designs. Wire Cage Wire & Jewelry Making Tutorial Series T72
 Contents My Sweet Heart Pendant Beading & Jewelry Making Tutorial By Sky Aldovino Day of the hearts is near so here's something to show how sweet your heart is - My Sweet Heart Pendant. 5 Features Oval
Chain Maille Flower Bracelet Tutorial
 Chain Maille Flower Bracelet Tutorial Created by XQ Designs www.handmade-jewelry-club.com, www.diylessons.org Please do not distribute, lend or copy. Do not mass produce. Copyrights 2010 XQ Designs This
Deco Triangle Earrings
 Deco Triangle Earrings An original earring design by Laura McCabe, 2016 Designed exclusively for the Beadworkers Guild National Beading Week 2016 Instructions by Laura McCabe, Illustrations by Melissa
Star Flower Lariat Necklace An original design by Laura McCabe, 2017 Instructions by Laura McCabe, Illustrations by Melissa Grakowsky-Shippee
 Star Flower Lariat Necklace An original design by Laura McCabe, 2017 Instructions by Laura McCabe, Illustrations by Melissa Grakowsky-Shippee 1 Supply List Materials: 11º Japanese cylinder beads (metallic
FLORETS BEADED BRACELET BEADING & JEW ELRY MAKING TUTORIAL SERIES T156
 FLORETS BEADED BRACELET BEADING & JEW ELRY MAKING TUTORIAL SERIES T156 COPYRIGHT Copyrights DIY Beading Club 2013 Published By DIY Beading Club INTRODUCTION This bracelet is formed by 2 petals per row
Boracay Palms Necklace
 Boracay Palms Necklace Designed by Naz Garces Compiled by XQ Designs www.handmade-jewelry-club.com, www.diylessons.org Please do not distribute, lend or copy. Do not mass produce. Copyrights 2011 XQ Designs
TRIANGULAR NECKLACE TUTORIAL
 TRIANGULAR NECKLACE TUTORIAL COPYRIGHT Copyrights DIY Jewelry Making 2016 Published By DIY Jewelry Making INTRODUCTION Learn to make this elegant sparkling triangular necklace. This project is based on
Satellites Bracelet by Jill Wiseman
 Satellites Bracelet by Jill Wiseman 2017 Supply List Size 11 seed beads o Color A 10 grams o Color B 3 grams 3mm Swarovski pearls 92 3mm Swarovski bicones 32 Beading needle Size 10 Fireline 6lb, or beading
Second Look Bracelet by Jill Wiseman
 Second Look Bracelet by Jill Wiseman 2015 Supply List 4 grams Size 11 seed beads 1 gram Size 15 seed beads 4mm Swarovski bicone crystals 12 crystals per inch of bracelet 4mm Swarovski pearls 6 pearls per
Fireworks Necklace. By Jill Wiseman All Rights Reserved.
 Fireworks Necklace 2014. All Rights Reserved. Supply List Size 11 seed beads 40 grams Size 8 seed beads 12 grams Size 15 seed beads 5 grams Swarovski pearls or freshwater pearls in assorted colors (450
Beading Tutorials and Patterns by Ellad2
 Tutorial: Flat even-count peyote stitch by Ellad2 www.ellad2.com www.ellad2.etsy.com FOR: Your Highness - Beginner For this tutorial I used: - Miyuki Delica beads 10/0 Beaders usually using Miyuki or Toho
PEACOCK WIRE BANGLE WIRE & JEWELRY MAKING TUTORIAL SERIES T105
 PEACOCK WIRE BANGLE WIRE & JEWELRY MAKING TUTORIAL SERIES T105 COPYRIGHT Copyrights DIY Beading Club 2013 Published By DIY Beading Club INTRODUCTION Another exciting tutorial from XQDesigns using wirework
Contents. Building Blocks. Projects. Introduction...4 Materials and Tools...5 Jewelry Techniques... 7
 Contents Introduction...4 Materials and Tools...5 Jewelry Techniques... 7 Building Blocks Circle... 11 Triangle... 14 Square...17 Bezel... 20 Bail... 23 Spiral Rope... 25 Toggle Clasp...27 Projects Wreath
Quilling Paper Jewelry Making
 Quilling Paper Jewelry Making 1 / 6 2 / 6 Thank you for reading. Maybe you have knowledge that, people have search hundreds times for their chosen readings like this, but end up in malicious downloads.
Bezeled Gemstone Pendant Jewelry Making Tutorial
 Bezeled Gemstone Pendant Jewelry Making Tutorial Created by Reem Reviewed by XQDesigns www.handmade-jewelry-club.com, www.diylessons.org Please do not distribute, lend or copy. Do not mass produce. Copyrights
Color Blend Rope. by Jill Wiseman All rights reserved.
 Color Blend Rope by Jill Wiseman 2016. All rights reserved. Supply List Necklace Size 11 seed beads 7 grams 3mm Czech Fire Polished beads Colors, A, B, and C up to 200 each, depending on size made Bracelet
Directions by Laura McCabe, Illustrations by Melissa Grakowsky Shippee
 Let It Snow Necklace Holiday Pattern 2010 An original design by Laura McCabe, 2010 Directions by Laura McCabe, Illustrations by Melissa Grakowsky Shippee Materials: 12mm crystal rivolis, 4 stones 11º Japanese
DESIGNER. of the Year SERIES BEAD STITCHING. Vintage-Inspired Jewelry. with KELLY WIESE
 DESIGNER of the Year SERIES BEAD STITCHING Vintage-Inspired Jewelry with KELLY WIESE DESIGNER of the Year SERIES BEAD STITCHING Vintage-Inspired Jewelry with KELLY WIESE Medallion Component Use peyote,
Rose, Rose.. I Love You! Beading & Jewelry Making Tutorial By XQDesigns
 Rose, Rose.. I Love You! Beading & Jewelry Making Tutorial By XQDesigns NOTES FROM THE AUTHOR Rose, Rose. I Love You is a project inspired by the Rose Flower. The tutorial is written with both pictorial
River of Pearls Necklace
 River of Pearls Necklace 2017. All Rights Reserved Supply List 35 grams size 11 seed beads 3 grams size 8 Delicas 112 6mm Swarovski glass pearls Two hole slide clasp Fireline (6lb) Size 10 beading needles
Blue Victorian Earrings Circular Right Angle Weave (RAW)
") 1 Blue Victorian Earrings Circular Right Angle Weave (RAW) What you will need for the earrings: I have put in parenthesis how I will refer to the beads in the tutorial: -4 of 4MM bi cone crystal or glass
1 Blue Victorian Earrings Circular Right Angle Weave (RAW) What you will need for the earrings: I have put in parenthesis how I will refer to the beads in the tutorial: -4 of 4MM bi cone crystal or glass
- 1 seed bead size 8/0 stopper bead (Extra seed or Delica bead to act as a stopper to keep beads on thread)
") Tutorial: Flat even-count peyote stitch by Ellad2 www.ellad2.com FOR BEGINNERS Material list: - Miyuki Delica beads 10/0 Beaders usually use Miyuki or Toho cylinder beads size 11/0. For this project I
Tutorial: Flat even-count peyote stitch by Ellad2 www.ellad2.com FOR BEGINNERS Material list: - Miyuki Delica beads 10/0 Beaders usually use Miyuki or Toho cylinder beads size 11/0. For this project I
BEAD KNITTING. Shimmery. knit necklace. An easy-to-knit crystal necklace hides a magnetic clasp. designed by Ea Eden. 1 Bead&Button online project
 BEAD KNITTING Shimmery knit necklace An easy-to-knit crystal necklace hides a magnetic clasp designed by Ea Eden 1 Bead&Button online project MATERIALS necklace 15 in. (38 cm) 864 Swarovski 4 mm round
THE BELL WIRE & JEW ELRY MAKING TUTORIAL SERIES T73
 THE BELL WIRE & JEW ELRY MAKING TUTORIAL SERIES T73 COPYRIGHT Copyrights DIY Beading Club 2013 Published By DIY Beading Club INTRODUCTION This design is what I called The Bell. The pair of earrings also
Perfect Evening Earrings Beadweaving Tutorial by NEDbeads. Three Earring Designs in One - Personal and Commercial Use Tutorial
 Perfect Evening Earrings Beadweaving Tutorial by NEDbeads Three Earring Designs in One - Personal and Commercial Use Tutorial 1 LEGALESE NEDbeads reserves all rights to this design, written, photographic
BLUE OCEAN PENDANT BEADING & JEWELRY MAKING TUTORIAL SERIES T153
 BLUE OCEAN PENDANT BEADING & JEWELRY MAKING TUTORIAL SERIES T153 COPYRIGHT Copyrights DIY Beading Club 2013 Published By DIY Beading Club INTRODUCTION Learn how to make an elegant pendant with the Blue
Party in Paradise by FusionBeads.com
 Party in Paradise by FusionBeads.com Approximate finished length: 18 inches Beads and other products needed for one necklace: 2 grams - Size 15 Starlight Permanent Galvanized Round Japanese Seed Beads
ROSY DANGLING EARRINGS WIRE & JEW ELRY MAKING TUTORIAL SERIES T164
 ROSY DANGLING EARRINGS WIRE & JEW ELRY MAKING TUTORIAL SERIES T164 COPYRIGHT Copyrights DIY Beading Club 2013 Published By DIY Beading Club INTRODUCTION Polish up your wirework skills! Learn to bead wrap
- 1 seed bead size 8/0 stopper bead (Extra seed or Delica bead to act as a stopper to keep beads on thread)
") Tutorial: Flat odd-count peyote stitch by Ellad2 www.ellad2.com FOR BEGINNERS Material list: - Miyuki Delica beads 10/0 Beaders usually use Miyuki or Toho cylinder beads size 11/0. For this project I used
Tutorial: Flat odd-count peyote stitch by Ellad2 www.ellad2.com FOR BEGINNERS Material list: - Miyuki Delica beads 10/0 Beaders usually use Miyuki or Toho cylinder beads size 11/0. For this project I used
twist bracelet what you need all styles safari
 twist bracelet what you need all styles Beading thread size A to match color A beads Silver or gold toggle clasp 4 jump rings, 5 mm to match clasp safari 5 grams twisted bugle beads, 6 mm, metallic hematite
Nordic Snowflakes Loomed Ornament Deb Moffett-Hall
 Nordic Snowflakes Loomed Ornament Deb Moffett-Hall A classic knitting design style beautifully translated into sparkling glass beads. 3 different snowflakes circle the 2 5/8 glass ball Design Band: Miyuki
Wire Crochet looks complicated, but get ready! It s much easier than it looks!
 Wire Crochet looks complicated, but get ready! It s much easier than it looks! Step One: The first thing you need to do it gather up your supplies: One spool of 28 gauge wire, silver or another color.
BLOG: MEMBERSHIP: DIY BEADING MAGAZINE ISSUE #10
 Contents Clear Ombre Necklace by High on DIY There are times when you just have to be transparent about things and today s DIY is all about that! Spring 2013 was filled with clear/see-through accessories
CINCH Stitch - Basic
 CINCH Stitch - Basic Patterns & Copyrights belong to Isabella Lam www.bead4all.com www.isabellalam.com https://www.etsy.com/shop/bead4me CINCH Stitch - Basic 2 MATERIAL LIST ROPE PLAIN 20 grams Miyuki
Contents. SQUARE STITCH Learn: Grandmother s Cocktail Ring Practice: Vintage-Inspired Dragonfly Pin Apply: Ethnic Spice Bracelet...
 Contents Introduction... 6 Basics... 7 LADDER STITCH Learn: Faux Circular Brick Stitch Earrings... 16 Practice: Victorian Romance Ring... 19 Apply: Dream s Doorway Bracelet... 22 RIGHT-ANGLE WEAVE Learn:
For personal use only!
 Seeing Stars 2003 Galaxy series 2003-2009 Galaxy Series 2003 Page 2 of 9 Notice of Rights: All rights reserved. No part of this booklet may be reproduced or transmitted in any form by any means, electronic,
Kheops Patchwork Bracelet
 www.beadflowers.co.uk Designed by Katie Dean 2015. All rights reserved. For distribution and teaching by customers of the Beadsmith. Kheops Patchwork Bracelet This is a great project for using Kheops colour
Seamless Twisted Herringbone Bangle
 Seamless Twisted Herringbone Bangle by Kassie Shaw The Beading Butterfly www.beadingbutterfly.com Make a herringbone bangle with an invisible join. The trick is to start the rope with a ring instead of
Crystal Flowers Bracelet Deb Moffett-Hall
 Crystal Flowers Bracelet Deb Moffett-Hall This ultra-feminine style is perfect for summer, light and airy in pastels with a touch of sparkling crystal. Use deep reds and greens to create a poinsettia bloom
Beaded Pumpkins Tutorial with Sparkle by Monica
 with Sparkle by Monica You can make these lovely pumpkins out of several base beads such as wood, glass pearls, acrylic, ceramic and more. The primary concern is that the inner bead hole needs to be large
Layered Tila Bracelet
 1 Layered Tila Bracelet What you will need to make a 7 inch bracelet end to end, 6 and 3/4" wearable: 51 Tila beads, Matte Metallic Copper #TL-2005 224MM Czech fire polished beads, Ruby 333MM Czech fire
art jewelry & fine beadwork by Kim Van Antwerp
 art jewelry & fine beadwork by Kim Van ntwerp www.kimvanantwerp.com www.beadblogshop.bigcartel.com Flashing Daggers Earrings eautifully iridescent dagger beads with an etched feather pattern work up into
Dainty Doorknocker Pendant
 Dainty Doorknocker Pendant www.nicolehannajewelry.com NOTES MATERIALS & TOOLS: 3 Pieces 30cm 22 Gauge Round Wire (Dead Soft) 1 Piece 400cm 28 Gauge Round Wire (Dead Soft) 1 Piece 8mm Round Bead (Large
From the left, below: Floating Flowers Bracelet Shaggy Flower Ring. Sunburst Tiger Pendant and Wings Necklace.
 Designs for National Beading Week 2016 Page 1 of 10 Four Beadopedia Patterns from Jennifer s article in The Beadworkers Guild Journal July 2016 - free downloads for National Beading Week 2016. Using Cup
Introduction... 6 Projects. Lush loops necklace & bracelet Circular logic necklace & earrings... 19
 CONTENTS Introduction... Projects Beader s dozen necklace & earrings... 0 p.9 Lush loops necklace & bracelet... 5 Circular logic necklace & earrings... 9 Grasping at (colorful) straws necklace & bracelet...
What You ll Need... About the diagrams... Notions Size 12 to 13 beading needles, beading thread (8lb Fireline recommended)
") www.mgsdesigns.net focal points. Accompanying the antique cuts are superduos and seed beads in sizes 11/0 and 8/0. What You ll Need... Symbol/Supply Name # Weight Size 11/0 seed beads, matte gold 11A 1312
www.mgsdesigns.net focal points. Accompanying the antique cuts are superduos and seed beads in sizes 11/0 and 8/0. What You ll Need... Symbol/Supply Name # Weight Size 11/0 seed beads, matte gold 11A 1312
 FLEUR-DE-LIS" Beadwoven earrings Tutorial 2015 by Iulia Postică from TECHNIQUES Beadweaving PROJECT LEVEL Beginner to Intermediate MATERIALS 32 Picasso jet opaque 2.5x5mm two-hole Czech Superduo beads
Nokota Horse Bracelet Copyright Gail H. Devoid, Ph.D. Need For Beads, Inc.
 The Nokota Conservancy This pattern is provided to you free of charge in hopes that you will support the efforts of The Nokota Conservancy, a non-profit organization whose mission is to save the Nokota
2. Round 1 Pick up one copper 11/0; working in a counter-clockwise direction, pass through the next tila.
 51 Tila beads, Matte Metallic Copper #TL-2005 22 4MM Czech fire polished beads, Ruby 33 3MM Czech fire polished beads, Garnet 5 grams size 11/0 Miyuki seed beads, Metallic Bronze Copper #11-457a 5 grams
Princess Peyote Bracelet by Jill Wiseman 2015
 Princess Peyote Bracelet by Jill Wiseman 2015 Materials List 1 4 colors of size 11 Delicas, for a total of 16.5 grams 136 148 small accent beads (3 6mm) Slide Clasp Fireline, or beading thread of your
Netted Pearl Bracelet
 Netted Pearl Bracelet If you would like to be notified when new patterns are posted, go to AroundTheBeadingTable.com and click on the Join the Mailing List tab on the left to subscribe to my mailing list.
Poinsettia Loomed Ornament Deb Moffett-Hall
 Poinsettia Loomed Ornament Deb Moffett-Hall Rich, glowing reds and vibrant green against a velvet black background these poinsettia blooms are elegant and timeless. Repeat five times to circle the 2 5/8
CONTENTS. Meet Anna...8 How to Use This Book...9
 CONTENTS Meet Anna...8 How to Use This Book...9 PROJECTS...10 Buds & Flowers Tubular Peyote...12 Twisted Cuff Tubular Peyote...16 Luxurious Links Tubular Peyote...18 Crystal Medallions Peyote, Stringing,
Simple Sparkle Bracelet
 Simple Sparkle Bracelet 2007. All Rights Reserved. Supply list Approximately 38-50 Swarovski crystals (4mm bicones) your exact amount will depend on the length of your bracelet 3 grams Size 11 seed beads
Laksmi Pendant. End Caps. Finishe d Size
 54 Laksmi Pendant Laksmi is the Hindu goddess of wealth, prosperity, light, wisdom, fortune, fertility, generosity, and courage; she s also the embodiment of beauty, grace, and charm. A carved ivory statuette
Pretty Petals by FusionBeads.com
 Pretty Petals by FusionBeads.com Approximate finished length: 23 inches Beads and other products needed for one necklace: 15 beads Size 11 Duracoat Opaque Dyed Medium Salmon Pink Japanese Seed Beads by
Table of Contents. Fun Halloween Tree page 03. Chenille Spider with Rhinestone Eyes page 06. Inexpensive Fall Decoration page 09
 Table of Contents Fun Halloween Tree page 03 Chenille Spider with Rhinestone Eyes page 06 Inexpensive Fall Decoration page 09 Festive Fall Wreath page 12 Primitive Country Ribbon Turkey page 15 Dog Toy
Y ore So Vein! Beth Stone Designs 2015
 Y ore So Vein! Beth Stone Designs 2015 1 Materials: 8/0 Matubo Turquoise Green Picasso (approx 74 beads, plus clasp loop if desired) 6/0 Matubo Crystal Gold Rainbow (approx 32 beads) Two-hole Copper Lentils
River Walk Necklace By Cynthia Newcomer Daniel
 Tutorials by Presents: JewelryTales.com River Walk Necklace By Cynthia Newcomer Daniel 2012 Cynthia Newcomer Daniel, all rights reserved. Distributed by The Beadsmith. This project may be distributed and
Chunky Wire-Wrap Bracelet
 ONLY AT BEADSHOP.COM TM Chunky Wire-Wrap Bracelet Skill Level: Intermediate Project Time: 3-4 hours Prerequisite: Wire Nirvana I, Earring Construction or basic wire-wrapping skills. Learn how to cluster
Partridge in a Pear Tree Star
 Page1 A 3D Star Color Chart & Word Chart adapted by Debi Caldeira, original designs by Deb Moffett-Hall. Step-by-Step Instructions & photos by Deb Moffett-Hall This delightful 4 five pointed 3D Peyote
Flower. bracelet. Stitch Workshop. Make a pretty bracelet with a new stitch. Tso Stitch
 Stitch Workshop Tso Stitch Flower bracelet Make a pretty bracelet with a new stitch designed by Hsiao-Hsuan Tso and Anna Elizabeth Draeger Master the basics of tso stitch as you make this charming bracelet.
Contents. Introduction...6 Basics Hour Projects. 2 Hour Projects. 3 Hour Projects. 4 Hour Projects
 Contents Introduction...6 Basics...8 Beading Tools and Materials...9 Beading Techniques... 12 1 Hour Projects Rhapsody Earrings... 16 Electric Slide Earrings...20 Arabesque Earrings...23 Flying Saucer
Select the pair of sizing rods for the desired bracelet size and assemble the loom.
 The BEADSMITH tm Super Duos tm & Minos tm Double Wrap Leather Bracelet by Deb Moffett-Hall Materials: Super Duos in turquoise or coral, (Note Two hole beads: The first hole that thread passes through is
Seed Bead Chains: 11 Projects (Easy-Does-It) By Bead & Button Books
 By Bead & Button Books") Seed Bead Chains: 11 Projects (Easy-Does-It) By Bead & Button Books Do your round necklines tend to sit at your collarbone, or do they plunge? Easy. Birthstone. Jewelry. Exciting Projects. Personalized
Seed Bead Chains: 11 Projects (Easy-Does-It) By Bead & Button Books Do your round necklines tend to sit at your collarbone, or do they plunge? Easy. Birthstone. Jewelry. Exciting Projects. Personalized
The Cradles Caress Pendant
 The Cradles Caress Pendant www.nicolehannajewelry.com NOTES MATERIALS & TOOLS: 1 Piece 8mm Round Bead 3 Pieces 29cm 20 Gauge Round Wire (Dead Soft) 1 Piece 450cm 28 Gauge Round Wire (Dead Soft) 1 Piece
Watermelon Pansies by FusionBeads.com
 Watermelon Pansies by FusionBeads.com Approximate finished length: 7.5 inches Beads and other products needed for one bracelet: 1-6mm Pink Coral Swarovski Elements Crystal Gemcolor Pearl (PL6910) 2 grams
EmmeClaire - Sweetpea Slouch
 Creative beauty is a projection of the heart. EmmeClaire - Sweetpea Slouch Size This pattern has the instructions for four sizes (see size chart). Each size will be indicated in brackets and colour coded
DESIGN PROJECT BROOCH LOVE
 DESIGN PROJECT BROOCH LOVE Sewing BROOCH LOVE Stringing CRYSTALLIZED Swarovski Elements Article Product Group Article No. Amount Size Colour Colour Code Round Stones 1201 1 pc. 35 mm Crystal 001 Beads
Miss Daisy by FusionBeads.com
 Miss Daisy by FusionBeads.com Approximate finished length: 7.5 inches Beads and other products needed for one bracelet: 3 grams - Size 11 Transparent Silver Lined Orange Delica Beads - DB0045 (11DB0045)
Pacifica Point by FusionBeads.com
 Pacifica Point by FusionBeads.com Approximate finished length: 7 inches Beads and other products needed for one bracelet: 1 - Size 11 Matte Mustard Yellow Round Japanese Seed Beads (SB2587) (A) 1 - Size
Perennial Link.
 Perennial Link www.nicolehannajewelry.com NOTES MATERIALS & TOOLS: 1 Piece 8mm Round Bead 4 Pieces 27cm 20 Gauge Round Wire (Dead Soft) 1 Piece 550cm 28 Gauge Round Wire (Dead Soft) 1 Piece 15cm 20 Gauge
Zip It Up by FusionBeads.com
 Zip It Up by FusionBeads.com Approximate finished length: 7.5 inches Beads and other products needed for one bracelet: 2 grams - Size 11 Matte Metallic Sky Blue Round Japanese Seed Bead (SB1837) 11 grams
Two Hole Herringbone Bracelet
 1 Two Hole Herringbone Bracelet Instructions by Gail DeLuca This pattern is deceivingly simple - of course, once you get it started! Believe it or not, this is a flat herringbone weave - using two hole
Beaded Fantasies 30 Romantic Jewelry Projects
 SaBine Lippert S Beaded FanTasies 30 Romantic Jewelry Projects This book is amazing! It s one you ll keep out on your desk at all times. Suzanne Golden LARK Jewelry & Beading beadweaving master class S
Tutorial: Cute Ring Created by Ellad2
 Tutorial: Cute Ring Created by Ellad2 www.ellad2.com www.ellad2.etsy.com This Tutorial will show you step by step how to make this cute ring. Material you need: - Seed beads size 11 or Miyuki Delica beads
Cherry Blossom Lattice by FusionBeads.com
 Cherry Blossom Lattice by FusionBeads.com Approximate finished length: 8 inches Beads and other products needed for one bracelet: 1 gram - Size 11 Metallic Gray Lined Transparent Light Gray Round Japanese
FOR Your Highness - Beginner
 Tutorial: FOR Your Highness - Beginner For this tutorial I used: - Miyuki seed beads 11/0 sb11 - Miyuki drop beads 3.4mm 2 colors (dba, dbb) - Pearl 6mm (or you can use 7mm pearl even better). Your work
Contents. Introduction...4. About the Author...95 BEGINNER PROJECTS GETTING STARTED INTERMEDIATE PROJECTS ADVANCED PROJECTS INSPIRATIONAL GALLERY...
 Contents Introduction...4 GETTING STARTED Wire Weaving Toolkit... 6 Materials... 8 Terminology... 10 Weaves... 10 Snake Weave... 10 Single Snake Weave... 10 Single Snake Weave with One Bead... 11 Double
Big Bold Tassel. Instructions by Gail DeLuca
 1 Big Bold Tassel Instructions by Gail DeLuca My classic tassel, re-booted to make it big and bold (and easier to stitch with larger beads!) Hang it from a simple herringbone rope or add sections of some
Purple Pansies by FusionBeads.com
 Purple Pansies by FusionBeads.com Approximate finished length: 7.5 inches Beads and other products needed for one bracelet: 1-6mm Light Green Preciosa Czech Crystal Round Pearl Bead (PC9053) 2 grams -
Rolling Rivoli Swarovski Rivoli/cabochon bezel with Rulla Beads Material (one pair of earrings):
:") Rolling Rivoli Swarovski Rivoli/cabochon bezel with Rulla Beads Material (one pair of earrings): 12mm Swarovski Rivoli (2 pcs) Matubo Rulla beads (20 pcs) 11/0 Japanese seed beads (approx. 1 g) 15/0 Japanese
Rolling Rivoli Swarovski Rivoli/cabochon bezel with Rulla Beads Material (one pair of earrings): 12mm Swarovski Rivoli (2 pcs) Matubo Rulla beads (20 pcs) 11/0 Japanese seed beads (approx. 1 g) 15/0 Japanese
Contents. Fast & Easy. Moving On. Mastering Micro-Macramé. Specialty Knotting. Projects. Introduction 6. Getting Started 7. Acknowledgments 110
 Contents Introduction 6 Getting Started 7 Materials & Tools 8 Basic Knotting Techniques & Terms 10 Projects Fast & Easy Delicious Arm Candy Bracelets 21 Double Rainbow of Color Necklace 28 Curvy Mother-of-Pearl
DESIGN PROJECT CHRISTMAS DECORATION ANGEL
 DESIGN PROJECT CHRISTMAS DECORATION ANGEL Weaving CHRISTMAS DECORATION ANGEL Sewing CRYSTALLIZED Swarovski Elements Article Product Group Article No. Amount Size Colour Colour Code Sew-on Stones 3700 2
Techniques: Right Angle Weave Tube Bead
 SIGN UP FOR OUR EMAIL NEWSLETTER > CUSTOMER SERVICE FAQ WISH LIST MY ACCOUNT VIEW CART LOG IN NEW PRODUCTS BEAD KITS INSPIRATION STAFF PICKS BEADING REFERENCE BEADING TECHNIQUES COLOR IDEAS 50% OFF KEYWORD
Japanese Beadwork. with sonoko nozue. 25 Jewelry Designs from a Master Artist
 Japanese Beadwork with sonoko nozue 25 Jewelry Designs from a Master Artist These exquisitely beautiful jewelry designs capture the delicacy and grace of the Japanese aesthetic for both novice and experienced
Techniques: Peyote Stitch Bezel
 SIGN UP FOR OUR EMAIL NEWSLETTER > CUSTOMER SERVICE FAQ WISH LIST MY ACCOUNT VIEW CART LOG IN NEW PRODUCTS BEAD KITS INSPIRATION STAFF PICKS BEADING REFERENCE BEADING TECHNIQUES COLOR IDEAS 50% OFF KEYWORD
Ribbon of Hope by FusionBeads.com
 Ribbon of Hope by FusionBeads.com Approximate finished length: 7.5 inches Beads and other products needed for one bracelet: 1 - Size 11 Semi Matte Transparent Silver Lined Pink Delica Beads - DB0625 (11DB0625)
 BLOSSOM Beadwoven bracelet and earrings set Tutorial 2017 by Iulia Postică from TECHNIQUES Bead weaving PROJECT LEVEL Advanced Beginner to Intermediate MATERIALS Silver/Blue set 26 metallic matte beige
Silver and Diamonds. - a Russian Collar. by Alexis 2003
 Silver and Diamonds - a Russian Collar by Alexis 2003 The inspiration to this collar came from a television show, where an old russian collar made from silver and diamonds was shown. I have neither however
Leather Wrap Bracelet
 Leather Wrap Bracelet 2017. All Rights Reserved. Supply List Size 11 Delicas number of colors and amount determined by pattern, but generally 1 to 4 colors, and fewer than 5 grams each 1.5 or 2mm leather
Rivoli Drop Earrings Tutorial
 Rivoli Drop Earrings Rivoli Drop Earrings Tutorial By Mandi Olaniyi Bead Woven Dreams Copyright 2017. All rights reserved. Use Right Angle Weave to create an easy and effective rivoli bezel, then add herringbone
When I ve earned this badge, I ll know how to make different kinds of jewelry.
 Jeweler Junior GET MOVING! badge Want more sparkle in your life? Try making jewelry! It s easy and inexpensive to do. You can design necklaces, bracelets, or earrings for yourself or to give to other people.
Ritzy Ribbon Necklace
 Ritzy Ribbon Necklace by Jill Wiseman 2017. All rights reserved. Supply List Size 11 seed beads 16 grams Size 15 seed beads 3 grams 3mm Swarovski bicones - 180 Fireline, 6lb Size 12 needle This super simple,
Contents. Introduction 8
 Contents Introduction 8 Basics and supplies 10 Learn all you need to know about seed beads, threads, and needles, and get familiar with basic beading terms. Chapter 1: Peyote Stitch 16 Start with traditional
Curb Appeal by FusionBeads.com
 Curb Appeal by FusionBeads.com Graph made with Beader s Canvas software (BK2597) Approximate Finished Size of Pattern Using Suggested Materials: 1.3 x 8 inches Beads and other products needed for one bracelet:
Twisted Crystals Necklace By Create Your Style with SWAROVSKI ELEMENTS Ambassador Laura Timmons of Vintage Moon Creations
 www.beadsbaublesandjewels.com 1411-4 Laura Timmons shows a unique crochet technique using wire and crystals. For More Information Visit: www.create-your-style.com Twisted Crystals Necklace By Create Your
A Dash of Glamour. beaded bracelet design by Melissa Grakowsky Shippee exclusively for Beads, Baubles & Jewels
 www.mgsdesigns.net A Dash of Glamour beaded bracelet design by Melissa Grakowsky Shippee exclusively for Beads, Baubles & Jewels Take the evening to relax, get out your beads, and indulge yourself in this