Arduino Setup & Flexing the ExBow
|
|
|
- Leon Fields
- 6 years ago
- Views:
Transcription
1 Arduino Setup & Flexing the ExBow

2 What is Arduino? Before we begin, We must first download the Arduino and Ardublock software. For our Set-up we will be using Arduino. Arduino is an electronics platform. This platform is made for anyone making interactive projects. The Board we will be using for this project is the Arduino nano. An Arduino Board receives inputs from many sensors, and affects its surroundings by controlling lights, motors, and other actuators. Using the Arduino software we will be able to communicate with the board by writing code and using the Arduino development environment. What is Ardublock? Source: Ardublock is a programming environment designed for beginner physical computation. It allows you to visually program using code blocks, without the hassle of correct coding syntax or misplacing semicolons. In terms of this project, it will make coding for the elbow much easier to understand.
3 Installing Software (USB Stick) 1. Install Arduino 2. Install Ardublock
 of the LED must be connected to the resistor The negative end (short leg) of the LED must be connected to ground Digital Pin 13")
4 Getting Started: Blink Program Insert your Arduino Nano into your bread board, and let s run a a simple program. Run the sample program, blink, in Arduino and make sure your board is working. Set up the circuit as shown to the right The positive end (long leg) of the LED must be connected to the resistor The negative end (short leg) of the LED must be connected to ground Digital Pin 13 (D13) LED 100 Ohm Resistor Ground Long leg Short leg The online instructions use the Arduino Uno Board:


5 Before Verifying and Uploading Code Before uploading a code, it is important to make sure you have the right board, processor, and port selected, otherwise, the code will not be uploaded. For this project: the board we are using is the Arduino Nano, the processor is ATmega328, and you should select the port you have plugged your Arduino Nano to. NOTE: If you are using a Macbook, you will most likely notice that your port has not appeared, and may just see bluetooth ports. In this case, you will need to download a driver. A driver will allow Arduino to recognize the port. A driver can be downloaded from this link:

6 Physical Circuit Your circuit should look like this
7 Code Initialize pin 13 as an output pin - we will output a signal to tell the LED what to do For us, wherever it says LED_BUILTIN write 13 Turn the LED on Turn the LED off

8 Completed Code For us, wherever it says LED_BUILTIN write 13


9 Output When you ve uploaded the code, then you should see the small LED light blinking. NOTE: it may be hard to see at first due to the brightness of the Nano s light.
10 Voltage Divider A simple circuit which turns a large voltage into a proportionally smaller one By changing R1 and R2, we can make Vout be a fraction of Vin Try R1=1000 Ohms and R2=1000 Ohms What should you get? What about is R2 is really high? For the Exbow, R2 will be our flex sensor

11 Voltage Divider with Flex Now let s program our flex sensor.

12 Physical Circuit
 or Serial Plotter (Plot Display) You should see one solid line.")
13 Output To see printed outputs, go to the Arduino Program and click on Tools > Serial Monitor (Text Display) or Serial Plotter (Plot Display) You should see one solid line.

14 Integrating the Flex Sensor Type out this code in Arduino: This is where our Ardublock comes into play. Once you type out this code in Arduino, go to Tools and select Ardublock, and replicate this code. Once complete, Upload it to Arduino. You should see a now changed Arduino code.
15 Output Use Serial Plotter As you move the flex sensor back and forth you should see something to the right
16 Min - Max Function Range of outputs for person using the flex sensor differs Use a formula to find bounds Initiate high minimum and every time the flex sensor has a lower value, the minimum becomes that Initiate low maximum and every time the flex sensor has a higher value, the maximum becomes that
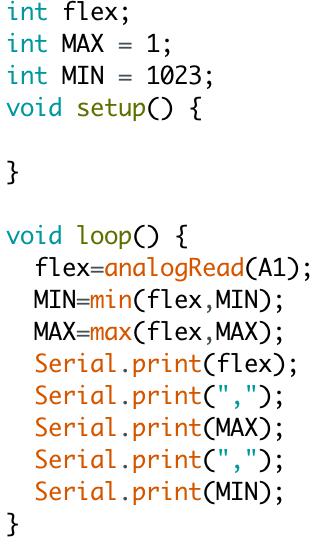

17 Code
18 Output As the flex value grows, so does the maximum As the flex value shrinks, so does the minimum Blue = actual output red=max green = min
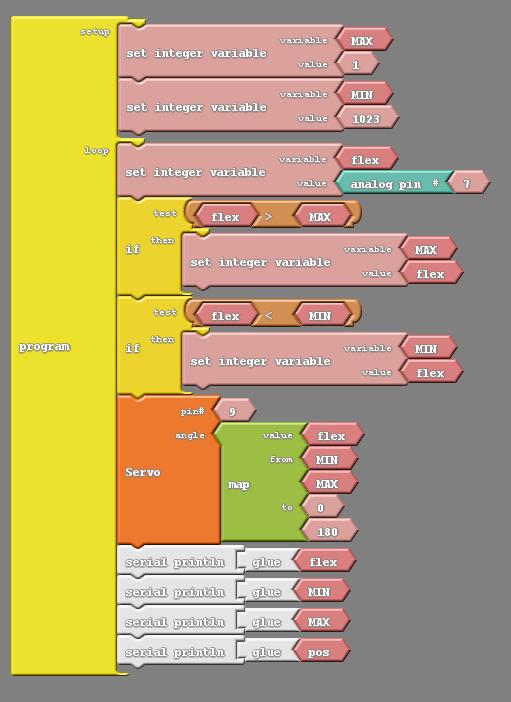
19 Finding the angle Now that we have the flex values and the range of values, we can convert them to angles Example: Find the proportional value of the flex from the MAX and MIN and multiply by 180 deg
 The right side then multiplies that into an angle from 0 to")
20 Code The left side of the equation maps the Flex value to a value between a new range of 0 to 1 (min to max) The right side then multiplies that into an angle from 0 to 180
21 Output Use the Serial Monitor: Tools > Serial Monitor As you move the flex sensor back and forth you should see something to the right yellow is the angle now

22 Servo Motor Sweep Image: With-Arduino-Nano/


23 Physical Circuit

24 Code
25 Output Use the Serial Monitor: Tools > Serial Monitor As the servo moves the arm back and forth you should see something to the right Try increasing the Max Angle to see how the arm moves
26 Putting it all together


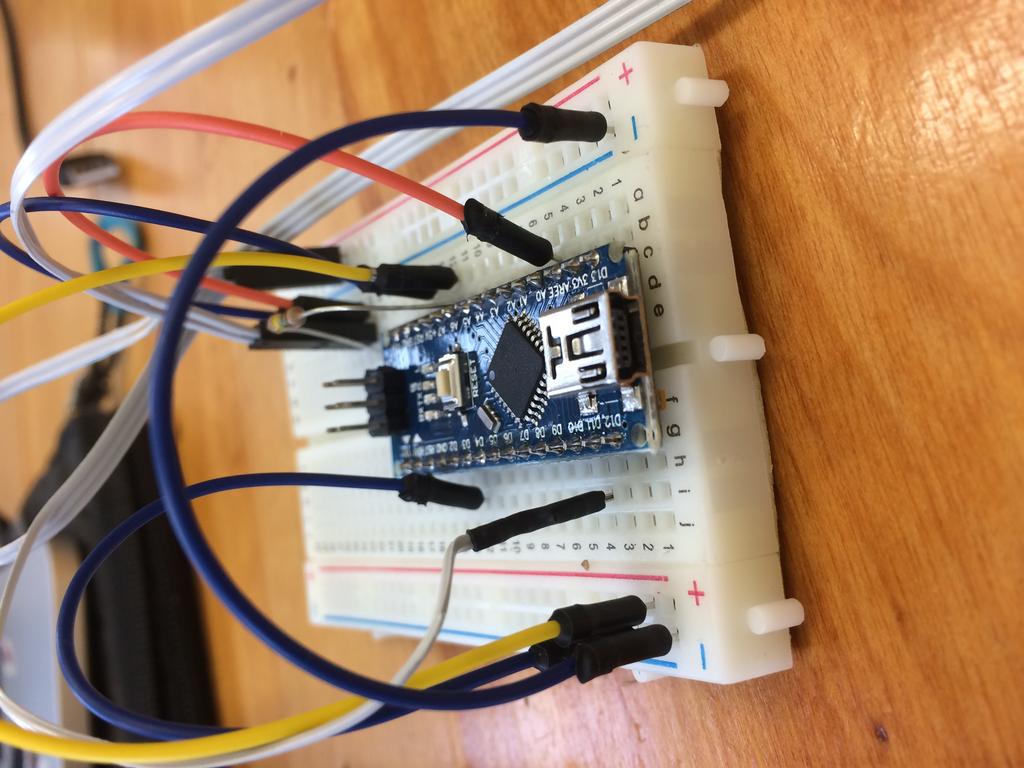
27 Physical Circuit
28
29 1
Objectives: Learn what an Arduino is and what it can do Learn what an LED is and how to use it Be able to wire and program an LED to blink
 Objectives: Learn what an Arduino is and what it can do Learn what an LED is and how to use it Be able to wire and program an LED to blink By the end of this session: You will know how to use an Arduino
Rodni What will yours be?
 Rodni What will yours be? version 4 Welcome to Rodni, a modular animatronic animal of your own creation for learning how easy it is to enter the world of software programming and micro controllers. During
Arduino STEAM Academy Arduino STEM Academy Art without Engineering is dreaming. Engineering without Art is calculating. - Steven K.
 Arduino STEAM Academy Arduino STEM Academy Art without Engineering is dreaming. Engineering without Art is calculating. - Steven K. Roberts Page 1 See Appendix A, for Licensing Attribution information
Application Note AN 157: Arduino UART Interface to TelAire T6613 CO2 Sensor
 Application Note AN 157: Arduino UART Interface to TelAire T6613 CO2 Sensor Introduction The Arduino UNO, Mega and Mega 2560 are ideal microcontrollers for reading CO2 sensors. Arduino boards are useful
Coding with Arduino to operate the prosthetic arm
 Setup Board Install FTDI Drivers This is so that your RedBoard will be able to communicate with your computer. If you have Windows 8 or above you might already have the drivers. 1. Download the FTDI driver
Programming a Servo. Servo. Red Wire. Black Wire. White Wire
 Programming a Servo Learn to connect wires and write code to program a Servo motor. If you have gone through the LED Circuit and LED Blink exercises, you are ready to move on to programming a Servo. A
Programming 2 Servos. Learn to connect and write code to control two servos.
 Programming 2 Servos Learn to connect and write code to control two servos. Many students who visit the lab and learn how to use a Servo want to use 2 Servos in their project rather than just 1. This lesson
Welcome to Arduino Day 2016
 Welcome to Arduino Day 2016 An Intro to Arduino From Zero to Hero in an Hour! Paul Court (aka @Courty) Welcome to the SLMS Arduino Day 2016 Arduino / Genuino?! What?? Part 1 Intro Quick Look at the Uno
Application Note AN 102: Arduino I2C Interface to K 30 Sensor
 Application Note AN 102: Arduino I2C Interface to K 30 Sensor Introduction The Arduino UNO, MEGA 1280 or MEGA 2560 are ideal microcontrollers for operating SenseAir s K 30 CO2 sensor. The connection to
EE-110 Introduction to Engineering & Laboratory Experience Saeid Rahimi, Ph.D. Labs Introduction to Arduino
 EE-110 Introduction to Engineering & Laboratory Experience Saeid Rahimi, Ph.D. Labs 10-11 Introduction to Arduino In this lab we will introduce the idea of using a microcontroller as a tool for controlling
Demon Pumpkin APPROXIMATE TIME (EXCLUDING PREPARATION WORK): 1 HOUR PREREQUISITES: PART LIST:
: 1 HOUR PREREQUISITES: PART LIST:") Demon Pumpkin This is a lab guide for creating your own simple animatronic pumpkin. This project encourages students and makers to innovate upon the base design to add their own personal touches. APPROXIMATE
Demon Pumpkin This is a lab guide for creating your own simple animatronic pumpkin. This project encourages students and makers to innovate upon the base design to add their own personal touches. APPROXIMATE
Lesson 3: Arduino. Goals
 Introduction: This project introduces you to the wonderful world of Arduino and how to program physical devices. In this lesson you will learn how to write code and make an LED flash. Goals 1 - Get to
MAE106 Laboratory Exercises Lab # 1 - Laboratory tools
 MAE106 Laboratory Exercises Lab # 1 - Laboratory tools University of California, Irvine Department of Mechanical and Aerospace Engineering Goals To learn how to use the oscilloscope, function generator,
Internet of Things Student STEM Project Jackson High School. Lesson 2: Arduino and LED
 Internet of Things Student STEM Project Jackson High School Lesson 2: Arduino and LED Lesson 2: Arduino and LED Time to complete Lesson 60-minute class period Learning objectives Students learn about Arduino
Workshops Elisava Introduction to programming and electronics (Scratch & Arduino)
") Workshops Elisava 2011 Introduction to programming and electronics (Scratch & Arduino) What is programming? Make an algorithm to do something in a specific language programming. Algorithm: a procedure
Workshops Elisava 2011 Introduction to programming and electronics (Scratch & Arduino) What is programming? Make an algorithm to do something in a specific language programming. Algorithm: a procedure
EGG 101L INTRODUCTION TO ENGINEERING EXPERIENCE
 EGG 101L INTRODUCTION TO ENGINEERING EXPERIENCE LABORATORY 6: INTRODUCTION TO BREADBOARDS DEPARTMENT OF ELECTRICAL AND COMPUTER ENGINEERING UNIVERSITY OF NEVADA, LAS VEGAS GOAL: This section introduces
CONSTRUCTION GUIDE Robotic Arm. Robobox. Level II
 CONSTRUCTION GUIDE Robotic Arm Robobox Level II Robotic Arm This month s robot is a robotic arm with two degrees of freedom that will teach you how to use motors. You will then be able to move the arm
LED + Servo 2 devices, 1 Arduino
 LED + Servo 2 devices, 1 Arduino Learn to connect and write code to control both a Servo and an LED at the same time. Many students who come through the lab ask if they can use both an LED and a Servo
Internet of Things Student STEM Project Jackson High School. Lesson 3: Arduino Solar Tracker
 Internet of Things Student STEM Project Jackson High School Lesson 3: Arduino Solar Tracker Lesson 3 Arduino Solar Tracker Time to complete Lesson 60-minute class period Learning objectives Students learn
smraza Getting Start Guide Contents Arduino IDE (Integrated Development Environment)... 1 Introduction... 1 Install the Arduino Software (IDE)...
... 1 Introduction... 1 Install the Arduino Software (IDE)...") Getting Start Guide Contents Arduino IDE (Integrated Development Environment)... 1 Introduction... 1 Install the Arduino Software (IDE)...1 Introduction... 1 Step 1: Get an Uno R3 and USB cable... 2 Step
Getting Start Guide Contents Arduino IDE (Integrated Development Environment)... 1 Introduction... 1 Install the Arduino Software (IDE)...1 Introduction... 1 Step 1: Get an Uno R3 and USB cable... 2 Step
MICROCONTROLLERS BASIC INPUTS and OUTPUTS (I/O)
") PH-315 Portland State University MICROCONTROLLERS BASIC INPUTS and OUTPUTS (I/O) ABSTRACT A microcontroller is an integrated circuit containing a processor and programmable read-only memory, 1 which is
PH-315 Portland State University MICROCONTROLLERS BASIC INPUTS and OUTPUTS (I/O) ABSTRACT A microcontroller is an integrated circuit containing a processor and programmable read-only memory, 1 which is
Attribution Thank you to Arduino and SparkFun for open source access to reference materials.
 Attribution Thank you to Arduino and SparkFun for open source access to reference materials. Contents Parts Reference... 1 Installing Arduino... 7 Unit 1: LEDs, Resistors, & Buttons... 7 1.1 Blink (Hello
Light Emitting Diode IV Characterization
 Light Emitting Diode IV Characterization In this lab you will build a basic current-voltage characterization tool and determine the IV response of a set of light emitting diodes (LEDs) of various wavelengths.
Training Schedule. Robotic System Design using Arduino Platform
 Training Schedule Robotic System Design using Arduino Platform Session - 1 Embedded System Design Basics : Scope : To introduce Embedded Systems hardware design fundamentals to students. Processor Selection
Arduino: Sensors for Fun and Non Profit
 Arduino: Sensors for Fun and Non Profit Slides and Programs: http://pamplin.com/dms/ Nicholas Webb DMS: @NickWebb 1 Arduino: Sensors for Fun and Non Profit Slides and Programs: http://pamplin.com/dms/
MICROCONTROLLERS BASIC INPUTS and OUTPUTS (I/O)
") PH-315 Portland State University MICROCONTROLLERS BASIC INPUTS and OUTPUTS (I/O) ABSTRACT A microcontroller is an integrated circuit containing a processor and programmable read-only memory, 1 which is
PH-315 Portland State University MICROCONTROLLERS BASIC INPUTS and OUTPUTS (I/O) ABSTRACT A microcontroller is an integrated circuit containing a processor and programmable read-only memory, 1 which is
Two Hour Robot. Lets build a Robot.
 Lets build a Robot. Our robot will use an ultrasonic sensor and servos to navigate it s way around a maze. We will be making 2 voltage circuits : A 5 Volt for our ultrasonic sensor, sound and lights powered
Module: Arduino as Signal Generator
 Name/NetID: Teammate/NetID: Module: Laboratory Outline In our continuing quest to access the development and debugging capabilities of the equipment on your bench at home Arduino/RedBoard as signal generator.
Lab 06: Ohm s Law and Servo Motor Control
 CS281: Computer Systems Lab 06: Ohm s Law and Servo Motor Control The main purpose of this lab is to build a servo motor control circuit. As with prior labs, there will be some exploratory sections designed
Arduino
 Arduino Class Kit Contents A Word on Safety Electronics can hurt you Lead in some of the parts Wash up afterwards You can hurt electronics Static-sensitive: don t shuffle your feet & touch Wires only
Ardweeny 1.60" 0.54" Simple construction - only 7 parts plus pins & PCB! Ideal for breadboard applications
 Ardweeny tm Arduino -compatible Microcontroller Like to build your own breadboard-compatible Arduino? Get all the basic features of Arduino in a tidy, cost-effectve package! Build Time: 20mins Skill Level:
A servo is an electric motor that takes in a pulse width modulated signal that controls direction and speed. A servo has three leads:
 Project 4: Arduino Servos Part 1 Description: A servo is an electric motor that takes in a pulse width modulated signal that controls direction and speed. A servo has three leads: a. Red: Current b. Black:
Build a Mintronics: MintDuino
 Build a Mintronics: MintDuino Author: Marc de Vinck Parts relevant to this project Mintronics: MintDuino (1) The MintDuino is perfect for anyone interested in learning (or teaching) the fundamentals of
CONSTRUCTION GUIDE IR Alarm. Robobox. Level I
 CONSTRUCTION GUIDE Robobox Level I This month s montage is an that will allow you to detect any intruder. When a movement is detected, the alarm will turn its LEDs on and buzz to a personalized tune. 1X
O Reilly Ebooks Your bookshelf on your devices!
 Free Sampler O Reilly Ebooks Your bookshelf on your devices! When you buy an ebook through oreilly.com, you get lifetime access to the book, and whenever possible we provide it to you in four, DRM-free
Arduino An Introduction
 Arduino An Introduction Hardware and Programming Presented by Madu Suthanan, P. Eng., FEC. Volunteer, Former Chair (2013-14) PEO Scarborough Chapter 2 Arduino for Mechatronics 2017 This note is for those
DC Motor and Servo motor Control with ARM and Arduino. Created by:
 DC Motor and Servo motor Control with ARM and Arduino Created by: Andrew Kaler (39345) Tucker Boyd (46434) Mohammed Chowdhury (860822) Tazwar Muttaqi (901700) Mark Murdock (98071) May 4th, 2017 Objective
Lab 2: Blinkie Lab. Objectives. Materials. Theory
 Lab 2: Blinkie Lab Objectives This lab introduces the Arduino Uno as students will need to use the Arduino to control their final robot. Students will build a basic circuit on their prototyping board and
NAME DESCRIPTION OF ACTIVITY LEARNING GOALS PRE-REQUISITE KNOWLEDGE/SKILL MATERIALS NEEDED EDUCATION PROJECT IMAGE. Animated Character
 EDUCATION PROJECT IMAGE NAME Animated Character DESCRIPTION OF ACTIVITY In this experiment you will learn how to build one of the most common mechanical systems, the four-bar linkage. To make it a bit
The USELESS BOX. Procedure:
 The USELESS BOX The useless box is exactly what it implies. A project that is pretty much Useless and is made for pure entertainment. You are going to go through the process of building this project from
Setup Download the Arduino library (link) for Processing and the Lab 12 sketches (link).
 for Processing and the Lab 12 sketches (link).") Lab 12 Connecting Processing and Arduino Overview In the previous lab we have examined how to connect various sensors to the Arduino using Scratch. While Scratch enables us to make simple Arduino programs,
Lab 12 Connecting Processing and Arduino Overview In the previous lab we have examined how to connect various sensors to the Arduino using Scratch. While Scratch enables us to make simple Arduino programs,
Sten-Bot Robot Kit Stensat Group LLC, Copyright 2013
 Sten-Bot Robot Kit Stensat Group LLC, Copyright 2013 Legal Stuff Stensat Group LLC assumes no responsibility and/or liability for the use of the kit and documentation. There is a 90 day warranty for the
For this exercise, you will need a partner, an Arduino kit (in the plastic tub), and a laptop with the Arduino programming environment.
, and a laptop with the Arduino programming environment.") Physics 222 Name: Exercise 6: Mr. Blinky This exercise is designed to help you wire a simple circuit based on the Arduino microprocessor, which is a particular brand of microprocessor that also includes
Physics 222 Name: Exercise 6: Mr. Blinky This exercise is designed to help you wire a simple circuit based on the Arduino microprocessor, which is a particular brand of microprocessor that also includes
Servo Sweep. Learn to make a regular Servo move in a sweeping motion.
 Servo Sweep Learn to make a regular Servo move in a sweeping motion. We have seen how to control a Servo and also how to make an LED Fade on and off. This activity will teach you how to make a regular
Getting started with the SparkFun Inventor's Kit for Google's Science Journal App
 Page 1 of 16 Getting started with the SparkFun Inventor's Kit for Google's Science Journal App Introduction Google announced their Making & Science Initiative at the 2016 Bay Area Maker Faire. Making &
LESSONS Lesson 1. Microcontrollers and SBCs. The Big Idea: Lesson 1: Microcontrollers and SBCs. Background: What, precisely, is computer science?
 LESSONS Lesson Lesson : Microcontrollers and SBCs Microcontrollers and SBCs The Big Idea: This book is about computer science. It is not about the Arduino, the C programming language, electronic components,
Content Components... 1 i. Acrylic Plates... 1 ii. Mechanical Fasteners... 3 iii. Electrical Components... 4 Introduction... 5 Getting Started... 6 Ar
 About r Preface r is a technology company focused on Raspberry Pi and Arduino open source community development. Committed to the promotion of open source culture, we strive to bring the fun of electronics
itracker Arduino environment 1. Pin definition DNCX
 1. Pin definition 1 2. PC Software install 2.1 JTAG drivers Before we proceed make sure that our system has the necessary JTAG JLink drivers for us to use the JLink module to program the nrf52 device via
ASCOM EF Lens Controller
 ASCOM EF Lens Controller ASCOM EF Lens Controller control unit for Canon EF/EF-S lenses. It allows you to control lens using the ASCOM platform tools. Features (supported by driver): focus control; aperture
FABO ACADEMY X ELECTRONIC DESIGN
 ELECTRONIC DESIGN MAKE A DEVICE WITH INPUT & OUTPUT The Shanghaino can be programmed to use many input and output devices (a motor, a light sensor, etc) uploading an instruction code (a program) to it
Computational Crafting with Arduino. Christopher Michaud Marist School ECEP Programs, Georgia Tech
 Computational Crafting with Arduino Christopher Michaud Marist School ECEP Programs, Georgia Tech Introduction What do you want to learn and do today? Goals with Arduino / Computational Crafting Purpose
INTRODUCTION to MICRO-CONTROLLERS
 PH-315 Portland State University INTRODUCTION to MICRO-CONTROLLERS Bret Comnes, Dan Lankow, and Andres La Rosa 1. ABSTRACT A microcontroller is an integrated circuit containing a processor and programmable
Arduino Workshop 01. AD32600 Physical Computing Prof. Fabian Winkler Fall 2014
 AD32600 Physical Computing Prof. Fabian Winkler Fall 2014 Arduino Workshop 01 This workshop provides an introductory overview of the Arduino board, basic electronic components and closes with a few basic
Lab 5: Arduino Uno Microcontroller Innovation Fellows Program Bootcamp Prof. Steven S. Saliterman
 Lab 5: Arduino Uno Microcontroller Innovation Fellows Program Bootcamp Prof. Steven S. Saliterman Exercise 5-1: Familiarization with Lab Box Contents Objective: To review the items required for working
100UF CAPACITOR POTENTIOMETER SERVO MOTOR MOTOR ARM. MALE HEADER PIN (3 pins) INGREDIENTS
 INGREDIENTS") 05 POTENTIOMETER SERVO MOTOR MOTOR ARM 100UF CAPACITOR MALE HEADER PIN (3 pins) INGREDIENTS 63 MOOD CUE USE A SERVO MOTOR TO MAKE A MECHANICAL GAUGE TO POINT OUT WHAT SORT OF MOOD YOU RE IN THAT DAY Discover:
05 POTENTIOMETER SERVO MOTOR MOTOR ARM 100UF CAPACITOR MALE HEADER PIN (3 pins) INGREDIENTS 63 MOOD CUE USE A SERVO MOTOR TO MAKE A MECHANICAL GAUGE TO POINT OUT WHAT SORT OF MOOD YOU RE IN THAT DAY Discover:
Sensors and Sensing Motors, Encoders and Motor Control
 Sensors and Sensing Motors, Encoders and Motor Control Todor Stoyanov Mobile Robotics and Olfaction Lab Center for Applied Autonomous Sensor Systems Örebro University, Sweden todor.stoyanov@oru.se 13.11.2014
Pulse Width Modulation and
 Pulse Width Modulation and analogwrite ( ); 28 Materials needed to wire one LED. Odyssey Board 1 dowel Socket block Wire clip (optional) 1 Female to Female (F/F) wire 1 F/F resistor wire LED Note: The
Mechatronics. STEAM Clown Production. STEAM Clown & Productions Copyright 2016 STEAM Clown
 Mechatronics Production Page 1 - Mechatronics SVCTE Mechatronics Class Class Production Ready To Hear about Mechatronics? Mecha = Mechanical Engineering Design Tronincs = Electrical Engineering Design
INA169 Breakout Board Hookup Guide
 Page 1 of 10 INA169 Breakout Board Hookup Guide CONTRIBUTORS: SHAWNHYMEL Introduction Have a project where you want to measure the current draw? Need to carefully monitor low current through an LED? The
Application Note. Communication between arduino and IMU Software capturing the data
 Application Note Communication between arduino and IMU Software capturing the data ECE 480 Team 8 Chenli Yuan Presentation Prep Date: April 8, 2013 Executive Summary In summary, this application note is
Arduino Lesson 1. Blink. Created by Simon Monk
 Arduino Lesson 1. Blink Created by Simon Monk Guide Contents Guide Contents Overview Parts Part Qty The 'L' LED Loading the 'Blink' Example Saving a Copy of 'Blink' Uploading Blink to the Board How 'Blink'
Tarocco Closed Loop Motor Controller
 Contents Safety Information... 3 Overview... 4 Features... 4 SoC for Closed Loop Control... 4 Gate Driver... 5 MOSFETs in H Bridge Configuration... 5 Device Characteristics... 6 Installation... 7 Motor
ARDUINO / GENUINO. start as professional
 ARDUINO / GENUINO start as professional . ARDUINO / GENUINO start as professional short course in a book MOHAMMED HAYYAN ALSIBAI SULASTRI ABDUL MANAP Publisher Universiti Malaysia Pahang Kuantan 2017 Copyright
02 Digital Input and Output
 week 02 Digital Input and Output RGB LEDs fade with PWM 1 Microcontrollers utput ransducers actuators (e.g., motors, buzzers) Arduino nput ransducers sensors (e.g., switches, levers, sliders, etc.) Illustration
ARDUINO / GENUINO. start as professional. short course in a book. faculty of engineering technology
 ARDUINO / GENUINO start as professional short course in a book faculty of engineering technology Publisher Universiti Malaysia Pahang Kuantan 2017 Copyright Universiti Malaysia Pahang, 2017 First Published,
PCB & Circuit Designing (Summer Training Program) 6 Weeks/ 45 Days PRESENTED BY
 6 Weeks/ 45 Days PRESENTED BY") PCB & Circuit Designing (Summer Training Program) 6 Weeks/ 45 Days PRESENTED BY RoboSpecies Technologies Pvt. Ltd. Office: D-66, First Floor, Sector- 07, Noida, UP Contact us: Email: stp@robospecies.com
PCB & Circuit Designing (Summer Training Program) 6 Weeks/ 45 Days PRESENTED BY RoboSpecies Technologies Pvt. Ltd. Office: D-66, First Floor, Sector- 07, Noida, UP Contact us: Email: stp@robospecies.com
Community College of Allegheny County Unit 4 Page #1. Timers and PWM Motor Control
 Community College of Allegheny County Unit 4 Page #1 Timers and PWM Motor Control Revised: Dan Wolf, 3/1/2018 Community College of Allegheny County Unit 4 Page #2 OBJECTIVES: Timers: Astable and Mono-Stable
Downloading a ROBOTC Sample Program
 Downloading a ROBOTC Sample Program This document is a guide for downloading and running programs on the VEX Cortex using ROBOTC for Cortex 2.3 BETA. It is broken into four sections: Prerequisites, Downloading
Introduction. 1 of 44
 Introduction I set out to create this robot kit to give teachers, students, and hobbyists an affordable way to start learning and sharing robotics in their community. Most robotics kits that have the same
EGG 101L INTRODUCTION TO ENGINEERING EXPERIENCE
 EGG 101L INTRODUCTION TO ENGINEERING EXPERIENCE LABORATORY 7: IR SENSORS AND DISTANCE DEPARTMENT OF ELECTRICAL AND COMPUTER ENGINEERING UNIVERSITY OF NEVADA, LAS VEGAS GOAL: This section will introduce
INSTRUCTIONS. 3DR Plane CONTENTS. Thank you for purchasing a 3DR Plane!
 DR Plane INSTRUCTIONS Thank you for purchasing a DR Plane! CONTENTS 1 1 Fuselage Right wing Left wing Horizontal stabilizer Vertical stabilizer Carbon fiber bar 1 1 1 7 8 10 11 1 Audio/video (AV) cable
Object Detection for Collision Avoidance in ITS
 Available online www.ejaet.com European Journal of Advances in Engineering and Technology, 2016, 3(5): 29-35 Research Article ISSN: 2394-658X Object Detection for Collision Avoidance in ITS Rupojyoti Kar
Data Conversion and Lab Lab 1 Fall Operational Amplifiers
 Operational Amplifiers Lab Report Objectives Materials See separate report form located on the course webpage. This form should be completed during the performance of this lab. 1) To construct and operate
Battle Crab. Build Instructions. ALPHA Version
 Battle Crab Build Instructions ALPHA Version Caveats: I built this robot as a learning project. It is not as polished as it could be. I accomplished my goal, to learn the basics, and kind of stopped. Improvement
Lecture 4: Basic Electronics. Lecture 4 Brief Introduction to Electronics and the Arduino
 Lecture 4: Basic Electronics Lecture 4 Page: 1 Brief Introduction to Electronics and the Arduino colintan@nus.edu.sg Lecture 4: Basic Electronics Page: 2 Objectives of this Lecture By the end of today
Building Machines that Emulate Humans. Lesson plan and more resources are available at: aka.ms/hackingstem
 Building Machines that Emulate Humans Lesson plan and more resources are available at: aka.ms/hackingstem Hacking STEM A free resource for teachers, delivering inquiry and project-based lessons that complement
ISSN: [Singh* et al., 6(6): June, 2017] Impact Factor: 4.116
![ISSN: [Singh* et al., 6(6): June, 2017] Impact Factor: 4.116](/thumbs/96/126741285.jpg "ISSN: [Singh* et al., 6(6): June, 2017] Impact Factor: 4.116") IJESRT INTERNATIONAL JOURNAL OF ENGINEERING SCIENCES & RESEARCH TECHNOLOGY WORKING, OPERATION AND TYPES OF ARDUINO MICROCONTROLLER Bhupender Singh, Manisha Verma Assistant Professor, Electrical Department,
IJESRT INTERNATIONAL JOURNAL OF ENGINEERING SCIENCES & RESEARCH TECHNOLOGY WORKING, OPERATION AND TYPES OF ARDUINO MICROCONTROLLER Bhupender Singh, Manisha Verma Assistant Professor, Electrical Department,
Product Manual QD1010-USB. Description. Contents. Material List. Setup. General Use. USB Cable Use. USB to RS485 Communications Converter
 Product Manual QD00-US US to Communications Converter Description The QD00-US is a US to converter used to allow asys Controls controllers to communicate with a PC. Material List QD00-US communication
INTRODUCTION to MICRO-CONTROLLERS
 PH-315 Portland State University INTRODUCTION to MICRO-CONTROLLERS Bret Comnes, Dan Lankow, and Andres La Rosa 1. ABSTRACT A microcontroller is an integrated circuit containing a processor and programmable
Voltage Dividers a learn.sparkfun.com tutorial
 Voltage Dividers a learn.sparkfun.com tutorial Available online at: http://sfe.io/t44 Contents Introduction Ideal Voltage Divider Applications Extra Credit: Proof Resources and Going Further Introduction
J. La Favre Using Arduino with Raspberry Pi February 7, 2018
 As you have already discovered, the Raspberry Pi is a very capable digital device. Nevertheless, it does have some weaknesses. For example, it does not produce a clean pulse width modulation output (unless
PLAN DE FORMACIÓN EN LENGUAS EXTRANJERAS IN-57 Technology for ESO: Contents and Strategies
 Lesson Plan: Traffic light with Arduino using code, S4A and Ardublock Course 3rd ESO Technology, Programming and Robotic David Lobo Martínez David Lobo Martínez 1 1. TOPIC Arduino is an open source hardware
You'll create a lamp that turns a light on and off when you touch a piece of conductive material
 TOUCHY-FEELY LAMP You'll create a lamp that turns a light on and off when you touch a piece of conductive material Discover : installing third party libraries, creating a touch sensor Time : 5 minutes
Practical Assignment 1: Arduino interface with Simulink
 !! Department of Electrical Engineering Indian Institute of Technology Dharwad EE 303: Control Systems Practical Assignment - 1 Adapted from Take Home Labs, Oklahoma State University Practical Assignment
Blink. EE 285 Arduino 1
 Blink At the end of the previous lecture slides, we loaded and ran the blink program. When the program is running, the built-in LED blinks on and off on for one second and off for one second. It is very
WifiBotics. An Arduino Based Robotics Workshop
 WifiBotics An Arduino Based Robotics Workshop WifiBotics is the workshop designed by RoboKart group pioneers in this field way back in 2014 and copied by many competitors. This workshop is based on the
Objective of the lesson
 Arduino Lesson 5 1 Objective of the lesson Learn how to program an Arduino in S4A All of you will: Add an LED to an Arduino and get it to come on and blink Most of you will: Add an LED to an Arduino and
1. Introduction to Analog I/O
 EduCake Analog I/O Intro 1. Introduction to Analog I/O In previous chapter, we introduced the 86Duino EduCake, talked about EduCake s I/O features and specification, the development IDE and multiple examples
RLC Software User s Manual
 RLC Software User s Manual Venable Instruments 4201 S. Congress, Suite 201 Austin, TX 78745 512-837-2888 www.venable.biz Introduction The RLC software allows you to measure the frequency response of RLC
Embedded Systems & Robotics (Winter Training Program) 6 Weeks/45 Days
 6 Weeks/45 Days") Embedded Systems & Robotics (Winter Training Program) 6 Weeks/45 Days PRESENTED BY RoboSpecies Technologies Pvt. Ltd. Office: W-53G, Sector-11, Noida-201301, U.P. Contact us: Email: stp@robospecies.com
Embedded Systems & Robotics (Winter Training Program) 6 Weeks/45 Days PRESENTED BY RoboSpecies Technologies Pvt. Ltd. Office: W-53G, Sector-11, Noida-201301, U.P. Contact us: Email: stp@robospecies.com
Sten BOT Robot Kit 1 Stensat Group LLC, Copyright 2016
 StenBOT Robot Kit Stensat Group LLC, Copyright 2016 1 Legal Stuff Stensat Group LLC assumes no responsibility and/or liability for the use of the kit and documentation. There is a 90 day warranty for the
MAKEBLOCK MUSIC ROBOT KIT V2.0
 MAKEBLOCK MUSIC ROBOT KIT V2.0 Catalog Music Robot Kit V2.0 Introduction... 1 1 What is Music Robot Kit V2.0?... 1 1.1 Mechanical part... 1 1.2 Electronic part... 1 1.3 Software part... 1 2 Music Robot
Lesson 13. The Big Idea: Lesson 13: Infrared Transmitters
 Lesson Lesson : Infrared Transmitters The Big Idea: In Lesson 12 the ability to detect infrared radiation modulated at 38,000 Hertz was added to the Arduino. This lesson brings the ability to generate
Performance Analysis of Ultrasonic Mapping Device and Radar
 Volume 118 No. 17 2018, 987-997 ISSN: 1311-8080 (printed version); ISSN: 1314-3395 (on-line version) url: http://www.ijpam.eu ijpam.eu Performance Analysis of Ultrasonic Mapping Device and Radar Abhishek
INTRODUCTION to MICRO-CONTROLLERS
 PH-315 Portland State University INTRODUCTION to MICRO-CONTROLLERS Bret Comnes and A. La Rosa 1. ABSTRACT This laboratory session pursues getting familiar with the operation of microcontrollers, namely
AlphaBot Assembly Diagram
 AlphaBot Assembly Diagram Part 1:AlphaBot baseboard assembly 1 Fix the motors onto the AlphaBot baseboard with the brackets, and then use (C) and (F) to install the encoder disks. 2 Fix the Infrared sensors
ME 333 Assignment 7 and 8 PI Control of LED/Phototransistor Pair. Overview
 ME 333 Assignment 7 and 8 PI Control of LED/Phototransistor Pair Overview For this assignment, you will be controlling the light emitted from and received by an LED/phototransistor pair. There are many
Sensors and Sensing Motors, Encoders and Motor Control
 Sensors and Sensing Motors, Encoders and Motor Control Todor Stoyanov Mobile Robotics and Olfaction Lab Center for Applied Autonomous Sensor Systems Örebro University, Sweden todor.stoyanov@oru.se 05.11.2015
Saturday Academy Program
 Lesson Plans High School Courses Donald L. McCoy K-to-College STEM Education Consultant thempitman@gmail.com Last Update: October 17, 2018 Virtual Reality Coding using PlayCanvas RobotC Coding Applications
Megamark Arduino Library Documentation
 Megamark Arduino Library Documentation The Choitek Megamark is an advanced full-size multipurpose mobile manipulator robotics platform for students, artists, educators and researchers alike. In our mission