Installation and User Guide
|
|
|
- Jared West
- 5 years ago
- Views:
Transcription

1 Installation and User Guide Millboard Enhanced Grain Limed Oak
2
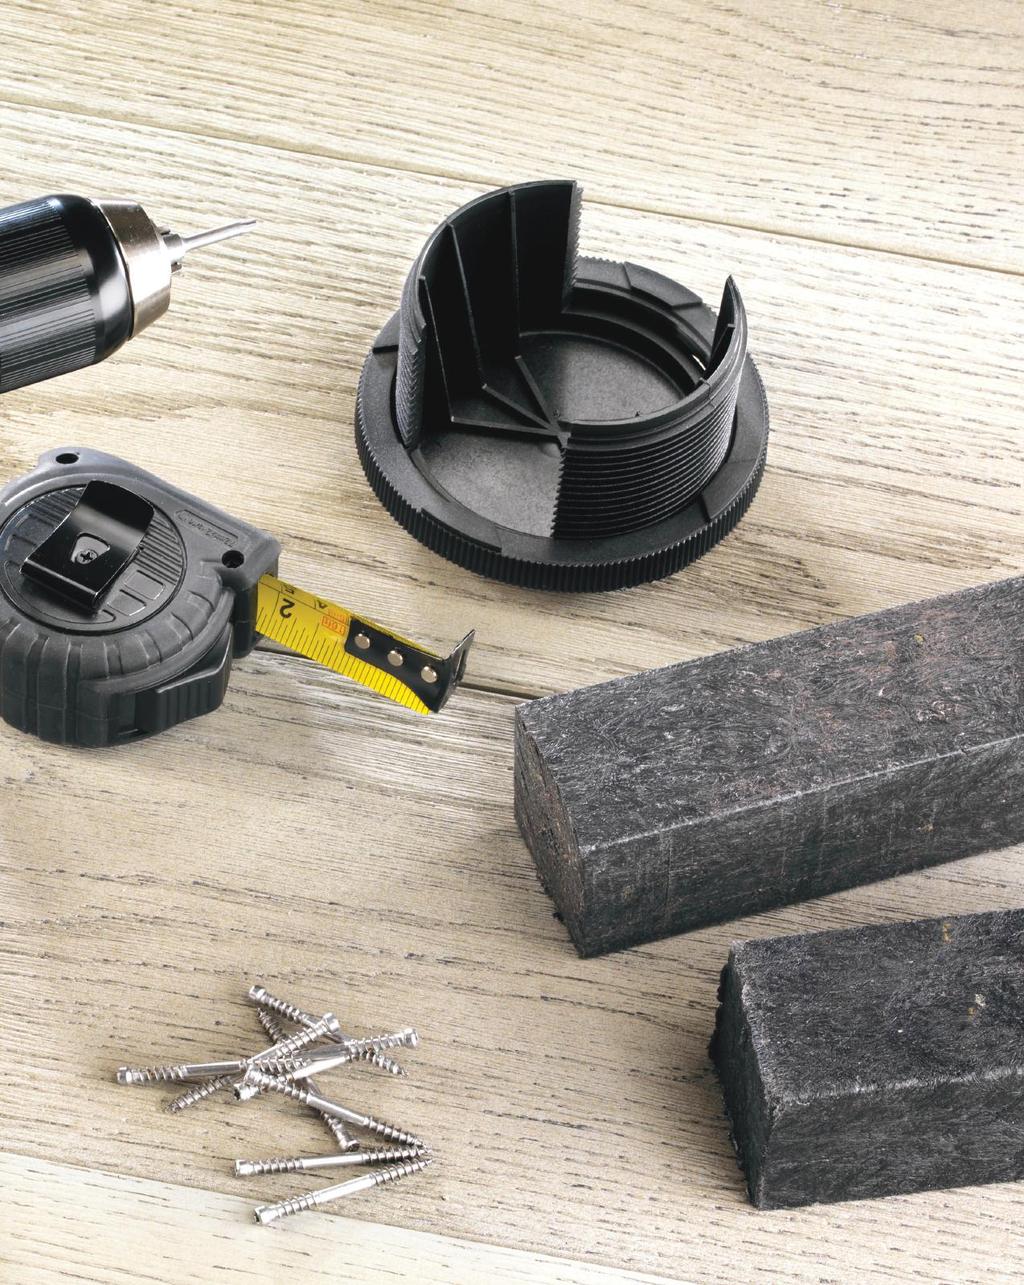
3 Tools These are the tools that you need to install Millboard. Circular saw/jigsaw Dustmask, gloves and safety glasses Handsaw String line Power drill and driver Spirit level Tape measure Set Square 3 Installation and user guide

4 @millboard


5 Millboard Installation and User Guide Storage and handling Millboard should always be stored on a flat surface or level bearers a maximum of 400mm apart and stacked face-to-face, not back-to-face. Be careful not to drag the Millboard off the pallet or over each other, as this could cause abrasion or marking on the surface and only move the pallet if the Millboard is safely strapped to it. Wear gloves and long sleeves when handling Millboard and take care when lifting the boards as Millboard is solid rather than hollow. We recommend that two people carry the boards. Boards should be stacked face-to-face Colour To recreate the aesthetics of natural products, we intentionally add secondary toning colours. There may be variance within the same board or from board to board in colour tone. This means that samples cut from boards may vary from the general colour of the boarding. Colour tone may vary from batch to batch With our range of colours, you can choose what is best for you. As with all products, the darker colours will feel warmer in sunny exposed locations. The lighter colours are normally used in such locations. Whilst every care is taken to ensure consistency some colour variation from batch to batch may occur. To avoid this, we recommend that you order all you need in one delivery. If you do have different batches it is best to mix the batches to blend the colours. As with all things constantly exposed to ultra violet light and all weathers, colours will tone slightly in time, this is normal for decking. On delivery if you find the colour unacceptable or believe them to be defective in any way, do not install the boards. 5 Installation and user guide


6 @millboard Joist spacing Joist spacing of 400mm between joist centres is recommended for normal residential and light commercial use 1. On heavy commercial, bridges, balconies, moorings, doorways and steps, use 300mm between joist centres. If you need to cut Millboard down along the length, then reduce the joist centres accordingly. A minimum of three joists is required for any cut boards. 1 2mm gap 4mm gap Joists mm centres 50mm max 2 2 For laying 45º to the joist, reduce the joist centres to 300mm for residential and 240mm for commercial use. Always leave a 10mm expansion gap between ends of bearers and joists. Joists To install Plas-Pro frame solutions, drill the fixing holes oversize to allow the material to expand. Posts should always have a minimum of a third of their length in the ground, subject to a minimum of 400mm in the ground. Joist ends must always be positioned over bearers. 4mm gap 2mm gap 300mm centres Installation and user guide 6

7 Millboard Installation and User Guide Fastening to substructure Millboard Durafix stainless steel fixings mean that there s no need to pre-drill or countersink, just screw straight in. When fixing in, push down, start the driver slowly and speed up; then slow down when driving the head of the screw through the Lastane 3. Stop the screw about 5mm below the surface 4. This should leave a small, virtually indistinguishable hole. Failure to use our Durafix Fixings or not fitting according to these guidelines may invalidate the warranty. 3 4 Two fixings per board should be used where the board crosses a joist, we advise to use three at the ends of the boards on shorter lengths. The fixings at the ends of the boards should be fixed at a slight angle to prevent being too close to the end of the board 5, positioning the screws 20-25mm from the ends and 30mm from the sides of the boards. Board ends should be supported by a minimum of 20mm. As the boards are dimensionally stable, they can be fitted with only 4mm spacing and 2mm gap at the ends of the boards. Cuts must always be positioned over the joist. Boards may have a +/- 2% dimensional variance. Best practice is to fix the boards at one end, then a fixing in the middle adjusting spacing as necessary, then the far end. Then fix to the remaining joists. We recommend working to a mm Joist 5mm 20mm minimum deck board support 7 Installation and user guide

8 @millboard Cutting the Millboard Millboard can be cut with standard saw blades, although we recommend a carbon-tipped, multi-purpose chop saw. As the formed end of the Millboard is lost when cut, these can be placed in less visual areas against a wall or edging profile. Use our Edgings (page 28) or Touch-up coating (page 35) where they are visible. Dispose of off-cuts as general waste, don t burn them. When cutting the Millboard, wear a dust mask, safety glasses, long sleeves and protective gloves. A dust bag must be used on chop saws. Make sure that the Millboard is adequately supported when cutting. Taking care If the Millboard picks up marks during installation simply wash with hot, soapy water and a firm broom straightaway. To remove any cement and lime-based stains, we recommend using Geocel Brick & Mortar Cleaner. Test a small area first and follow the mixing instructions, leaving for five minutes before washing off with soapy water. Fascia boards, steps and edges We recommend that our purpose-made edging be fitted to all steps and perimeters of the deck. It s coated with extra Lastane for added resilience on these areas, helping prevent excessive wear. Edging is available in either a Bullnose 6 or Square profile 7. Ensure that the edging is supported on a joist by a minimum of 25mm. We recommend trimming the ends to butt tightly when fitting both edging and fascias. For the best visual effect, stagger the edging and fascia joints so that they re not in line this creates a subtler look. 6 Millboard 2mm gap 20mm min 25mm min Joist 8mm Fascia Bullnose edge We also manufacture the Bullnose edging in a flexible material suitable for curved designs. Flexible Bullnose edgings can be curved to follow a maximum convex diameter of 2.4metres. These flexible profiles need to be at least room temperature (c.20ºc), then bent gently. Standard fascia will bend up to 2.4m convex diameter. When fixing start from the end and work along, fixing at 300mm intervals as you go. This flexible material doesn t conceal the fixings as well, leaving some holes partially visible. 7 2mm gap Square edge Millboard 20mm min 25mm min Joist Fascia Installation and user guide 8


9 @millboard Edging, steps and drainage Edging, steps and drainage are made to order, so please allow 4-6 weeks delivery 600mm 900mm 600mm 300mm Bullnosed 300 x 600mm 220mm Bullnosed 900 x 220mm 200mm Slotted drain 200 x 600mm
10 @millboard Frequently asked questions Where can I use Millboard? Millboard is extremely versatile and can be used in practically every outdoor space. Create decks, balconies, roof gardens, boardwalks, bridges, pontoons, seating, steps, planters and more. Do I need to seal Millboard? No, all Millboards are surface sealed in the factory to ensure they arrive in premium condition. In the first few weeks of use, rainwater will sit on the surface in globules, but don t worry this is normal and will stop once the temporary surface seal breaks down. Does Millboard mark? The Lastane finish is highly resistant to scratches and food and drink stains, and everyday wear and tear. Sharp objects such as unprotected table or chair legs, spiked shoes or metal planter bases can leave marks if dragged across the surface, so take care when moving these items around. The risk of marking from strong dyes and stains such as berries and animal droppings will be reduced if removed as soon as possible. How do I clean Millboard? Because Millboard is made of non-porous composite, it resists mossy build-up and stains, so needs very little maintenance. To remove spills and marks, simply use a mild detergent and a cloth. Just steer clear of solvents, chemicals and abrasive cleaners that could damage your Millboard and there s normally no need for pressure washing. What if it snows or is icy? A small amount of granulated white salt can be used to keep your Millboard ice-free. Please don t use rock salt, as this contains clay and grit and can be abrasive. When winter s over, clean the surface with soapy water and a soft broom. Does Millboard come with a Warranty? For more information go to Is Millboard anti-slip? Yes, in BS79.76 slip resistance tests, all styles of Millboard achieve one of the highest anti-slip ratings, even in wet conditions. Are Millboard colours consistent? As with all flooring, we advise buying all the Millboard you need at the same time to help ensure that the colour is as consistent as possible. If you don t order all your Millboard at once, you can blend different batches to create only subtle variation throughout your space. Can Millboard be cut just like wood? Millboard can be cut with standard saw blades, although we recommend a carbon-tipped, multi-purposed chop saw. As the formed end of the board is lost when cut, these can be placed in less visual areas against a wall or edging profile. Matching Touch-up Coating for exposed ends is available to buy separately. See page 35. What fixings should be used to fix Millboard? Following extensive trials, we recommend and supply Durafix stainless steel screws, designed specifically for Millboard. There s no need to pre-drill or countersink Millboard and the unique Lastane material self-heals, leaving a virtually indistinguishable mark on the surface. See pages 35 and 37. Can you recommend an installer? A nationwide network of APPROVED Installers are available at Chosen for their professionalism and high quality, you should always follow normal precautions before entering into a contract with a third party, especially if a deposit payment is required. Something else? For any other technical, installation or care questions, go to call our technical team on , or us at enquiries@millboard.co.uk Order Millboard samples There s nothing like seeing Millboard for yourself. Simply go to to find your nearest merchant or display centre. Installation and user guide 10

11 After Care Now that your Millboard is installed, make sure its stays in premium condition with our handy tips on aftercare. Factory sealed Millboards are surface sealed in the factory to ensure they arrive in premium condition. In the first few weeks of use, rainwater will sit on the surface in globules, but don t worry this is normal and will stop once the temporary surface seal breaks down. Marking The Lastane finish is highly resistant to scratches and food and drink stains, and everyday wear and tear. Sharp objects such as unprotected table or chair legs, spiked shoes or metal planter bases can leave marks if dragged across the surface, so take care when moving these items around. The risk of marking from strong dyes and stains such as berries and animal droppings will be reduced if removed as soon as possible. Winter ice and snow A small amount of granulated white salt can be used to keep your Millboard ice-free. Please don t use rock salt, as this contains clay and grit and can be abrasive. When winter s over, clean the surface with soapy water and a soft broom. Cleaning Because Millboard is made of non-porous composite, it resists mossy build-up and stains, so needs very little maintenance. To remove spills and marks, simply use a mild detergent and a cloth. Just steer clear of solvents, chemicals and abrasive cleaners that could damage your Millboard and there s normally no need for pressure washing. 11 Aftercare

12 @millboard Millboard Enhanced Grain Golden Oak

13 It s simple to enjoy Millboard How to order Get inspired Check out our brochure and website for style ideas and the complete Millboard collection. Choose your Millboard Order your free samples to help you choose the colour and finish for your project, or visit a display centre or merchant. Remember the finishing touches Take a look at our matching fascias and edging, essential fixings and more. Contact a professional Arrange an independent fitter or ask us for a recommendation. Visit our website, for more details. Or buy and fit it yourself You can also order Millboard from an authorised merchant and install it yourself. The Millboard Company Ltd UK Head Office Castle Court Bodmin Road Coventry CV2 5DB T 44 (0) F 44 (0) E enquiries@millboard.co.uk W millboard.co.uk Company registered No VAT No:
14 Frequently asked questions Where can I use Millboard? Millboard is extremely versatile and can be used in practically every outdoor space. Create decks, balconies, roof gardens, boardwalks, bridges, pontoons, seating, steps, planters and more. Do I need to seal Millboard? No, all Millboards are surface sealed in the factory to ensure they arrive in premium condition. In the first few weeks of use, rainwater will sit on the surface in globules, but don t worry this is normal and will stop once the temporary surface seal breaks down. Does Millboard mark? The Lastane finish is highly resistant to scratches and food and drink stains, and everyday wear and tear. Sharp objects such as unprotected table or chair legs, spiked shoes or metal planter bases can leave marks if dragged across the surface, so take care when moving these items around. The risk of marking from strong dyes and stains such as berries and animal droppings will be reduced if removed as soon as possible. How do I clean Millboard? Because Millboard is made of non-porous composite, it resists mossy build-up and stains, so needs very little maintenance. To remove spills and marks, simply use a mild detergent and a cloth. Just steer clear of solvents, chemicals and abrasive cleaners that could damage your Millboard and there s normally no need for pressure washing. What if it snows or is icy? A small amount of granulated white salt can be used to keep your Millboard ice-free. Please don t use rock salt, as this contains clay and grit and can be abrasive. When winter s over, clean the surface with soapy water and a soft broom. Does Millboard come with a Warranty? For more information go to Is Millboard anti-slip? Yes, in BS79.76 slip resistance tests, all styles of Millboard achieve one of the highest anti-slip ratings, even in wet conditions. Are Millboard colours consistent? As with all flooring, we advise buying all the Millboard you need at the same time to help ensure that the colour is as consistent as possible. If you don t order all your Millboard at once, you can blend different batches to create only subtle variation throughout your space. Can Millboard be cut just like wood? Millboard can be cut with standard saw blades, although we recommend a carbon-tipped, multi-purposed chop saw. As the formed end of the board is lost when cut, these can be placed in less visual areas against a wall or edging profile. Matching Touch-up Coating for exposed ends is available to buy separately. See page 35. What fixings should be used to fix Millboard? Following extensive trials, we recommend and supply Durafix stainless steel screws, designed specifically for Millboard. There s no need to pre-drill or countersink Millboard and the unique Lastane material self-heals, leaving a virtually indistinguishable mark on the surface. See pages 35 and 37. Can you recommend an installer? A nationwide network of APPROVED Installers are available at Chosen for their professionalism and high quality, you should always follow normal precautions before entering into a contract with a third party, especially if a deposit payment is required. Something else? For any other technical, installation or care questions, go to call our technical team on , or us at enquiries@millboard.co.uk Order Millboard samples There s nothing like seeing Millboard for yourself. Simply go to to find your nearest merchant or display centre. 14 FAQs

15 @millboard Millboard Enhanced Grain Golden Oak
Installation & user guide
 Installation & user guide Thankyou for choosing Millboard Because we believe that there is nothing as beautiful as the appearance of wood s natural grain, we ve spent years perfecting an outdoor alternative
NewTech - CleverDeck Composite Decking Installation Guidelines
 NewTech - CleverDeck Composite Decking Installation Guidelines Composite decking has unique characteristics and requires specific fixing requirements that differ from timber. We strongly recommend that
SHIPLOCK CLADDING PRODUCT GUIDE INSTALLATION TECHNICAL SPECIFICATIONS CARE & MAINTENANCE
 SHIPLOCK CLADDING PRODUCT GUIDE INSTALLATION TECHNICAL SPECIFICATIONS CARE & MAINTENANCE SHIPLOCK CLADDING CN-04E / CN-04W / CN-W008 Prior to the installation of any form of Cladding, it is recommended
Trim Edge Trim Edge Trim Edge Trim Edge
 Trim Edge T T Bring your living room outside Weathered Oak Vintage Discover the beauty of outdoor living Because we believe that there is nothing as beautiful as the appearance of wood s natural grain,
INSTALLATION GUIDE INSTALLATION GUIDE EKODECK SHOULD NOT: IMPORTANT INFORMATION
 INSTALLATION GUIDE INSTALLATION GUIDE EKODECK SHOULD NOT: To achieve a safe and long lasting Ekodeck installation, it is important to read the following guide in full. Be used as a structural or load bearing
Installation Guide (888)
") BamDeck Installation Guide (888) 788-2254 The Collection Decking Systems BAMDECK 3G 5-7/16 Wide Plank Dims: 96 L x 5-7/16 W x 13/16 H BAMDECK 3G 16FT. 5-7/16 Wide Plank Dims: 192 L x 5-1/2 W x 13/16 H
BamDeck Installation Guide (888) 788-2254 The Collection Decking Systems BAMDECK 3G 5-7/16 Wide Plank Dims: 96 L x 5-7/16 W x 13/16 H BAMDECK 3G 16FT. 5-7/16 Wide Plank Dims: 192 L x 5-1/2 W x 13/16 H
I N S TA L L AT I O N & M A I N T E N A N C E G U I D E
 I N S TA L L AT I O N & M A I N T E N A N C E G U I D E E N V I R O B U I L D. C O M + 4 4 ( 0 ) 2 0 8 0 8 8 4 8 8 8 Version 3.2 EnviroBuild 2018 C O N T E N T S Storage & Handling 03 Tools 04 Calculating
INSTALL GUTTERING. 2 - Planning the work. Care is needed in setting out the guttering accurately, but actually fitting it is relatively easy.
 INSTALL GUTTERING Care is needed in setting out the guttering accurately, but actually fitting it is relatively easy. Before you climb a ladder, make sure it is stable and fixed securely to the structure
EASY INSTALLATION GUIDE WPC DECKING.
 EASY INSTALLATION GUIDE WPC DECKING www.eva-last.com EASY INSTALLATION GUIDE Condensed / Quick glance Installation Instructions Thank you for your interest in our Eva-tech WPC product range. Whether you
NyloDeck Installation Guidelines
 Page 1 of 5 NyloDeck Installation Guidelines Thank-you for choosing NyloDeck decking products, please take a few minutes and read the following installation guidelines along with the NyloDeck Care and
installation care & maintenance instructions lifecycledecking.com 25-year limited residential warranty 20-year limited commercial warranty
 installation care & maintenance instructions lifecycledecking.com 25-year limited residential warranty 20-year limited commercial warranty Installation Instructions As with any building project, use proper
CONTRACTOR CERTIFICATION COURSE
 CONTRACTOR CERTIFICATION COURSE 1 Learning Objectives After completing this course you will be able to: Explain appropriate methods for storing and installing ChoiceDek decking Discuss care and maintenance
INSTALLATION GUIDE HEALTH & SAFETY NATURAL VARIANCES & WEATHERING. Ekodeck Should Not: Warnings
 INSTALLATION GUIDE INSTALLATION GUIDE To achieve a safe and long lasting Ekodeck installation, it is read the following guide in full. The installation guide is intended to be viewed along with the Ekodeck
Installation Guide (888)
") BamDeck Installation Guide (888) 788-2254 The Collection Decking Systems BAMDECK 4G 5-7/16 Wide Plank Dims: 192 L x 5-7/16 W x 13/16 H BAMDECK 4G WIDE 8-1/4 Wide Plank Dims: 96 L x 8-1/4 W x 13/16 H BAMDECK
BamDeck Installation Guide (888) 788-2254 The Collection Decking Systems BAMDECK 4G 5-7/16 Wide Plank Dims: 192 L x 5-7/16 W x 13/16 H BAMDECK 4G WIDE 8-1/4 Wide Plank Dims: 96 L x 8-1/4 W x 13/16 H BAMDECK
GREEN WORLD LUMBER GENUINE MAHOGANY DECKING INSTALLATION GUIDE
 GREEN WORLD LUMBER GENUINE MAHOGANY DECKING INSTALLATION GUIDE Genuine Mahogany is among the most durable natural wood decking available. When properly installed and maintained, you should have a beautiful
INSTRUCTION MANUAL ASTRID SOFA TABLE ITEM CODE: 13AST10SC
 Imported by Furniture Solutions (Aust) Pty Ltd 10-16 Daisy St, Revesby, NSW. 2212 www.furnituresolutions.com.au INSTRUCTION MANUAL ASTRID SOFA TABLE ITEM CODE: 13AST10SC Imported by Furniture Solutions
Bring your living room outside
 Bring your living room outside Weathered Oak Vintage Discover the beauty of outdoor living Because we believe that there is nothing as beautiful as the appearance of wood s natural grain, we ve spent years
PolyCarb has good resistance to many chemicals. Some chemicals may harm the PolyCarb sheets. Contact us when in doubt about any chemical.
 Polycarbonate Panels This manual provides the basic information for working with and installing PolyCarb sheets. Due to their hollow core, prior preparation is needed before the actual installation, with
Enhanced Grain Smoked Oak
 Enhanced Grain Smoked Oak Discover the beauty of outdoor living Because we believe that there is nothing as beautiful as the appearance of wood s natural grain, we ve spent years perfecting an outdoor
Discover. the beauty of outdoor living. Live.Life.Outside.
 Discover the beauty of outdoor living Because we believe that there is nothing as beautiful as the appearance of wood s natural grain, we ve spent years perfecting an outdoor alternative that s just as
Handrail H Series. Product Installation. Instructions. Installation Instructions For. Wall Mounted and Freestanding Round Handrails
 Product Installation Installation Instructions For Instructions Handrail H Series Installation Instructions for Wall Mounted and Freestanding Round Handrails Step Nosing F Series Concrete and Timber Step
Installation Guide. Deckorum. Composite Decking
 Installation Guide Deckorum Composite Decking 1. Introduction Welcome to Deckorum Installation Guide Please fully read the installation guide before commencing any installation works. This will provide
Installation Instructions for. Before You Begin TOOLS REQUIRED
 Composite Railing System STEP-BY-STEP Installation Instructions for Spectrum Composite Railing Virtually maintenance free 20-year warranty EverNew Spectrum Railing system is designed to work with a number
INSTALLATION INSTRUCTIONS MILLENNIUM DECKING Before Installing Millennium Decking, please read these instructions in their entirety.
 INSTALLATION INSTRUCTIONS MILLENNIUM DECKING Before Installing Millennium Decking, please read these instructions in their entirety. Safety PRE-INSTALLATION Compliance with all applicable local, state
installation care & maintenance instructions moistureshield.com limited lifetime warranty
 installation care & maintenance instructions 866.729.2378 moistureshield.com limited lifetime warranty It s comforting to know that you re about to build a deck that gives you every possible advantage.
EZYSTONE WORKSURFACES
 EZYSTONE WORKSURFACES Installation & Maintenance Instructions 1. Tools Required Worktop Edge Finishing Kit Pack 1-100mm Velcro Backing Pad Pack 2-100mm Diamond Dry Cut Velcro Discs (100 Grit Yellow) (200
DuraLife Porch Collection Installation Instructions
 DuraLife Porch Collection Installation Instructions Updated: 1/11 www.gaf.com 1 Getting Started... ilation and Drainage Plan the design of the porch it is the beginning of a successful project. DuraLife
Installation Guide. deckorum Composite Decking
 Installation Guide deckorum Composite Decking 1. Introduction Welcome to Deckorum installation Guide Please fully read the installation guide before commencing any installation works. This will provide
Contents. Installation Guide. Dynex Soffit Installation Guide V03 March The Smart Choice in Soffit
 The Smart Choice in Soffit Installation Guide Looks great - A contemporary tongue and groove styled soffit, with hidden fixings, that provides a versatile and sleek lining complimenting a range of building
Bring your living room outside
 Bring your living room outside Weathered Oak Vintage Discover the beauty of outdoor living Because we believe that there is nothing as beautiful natural products. weathered creations that capture the character
LOOKS AND FEELS LIKE TIMBER
 LOOKS AND FEELS LIKE TIMBER SMART COMPOSITE MATERIALS WHAT IS EKODECK AND EKODECK+? A composite decking that looks and feels like natural timber and is naturally weather resistant. Their unique design
Dubnium 11 Installation Instructions & Parts List
 Dubnium 11 Installation Instructions & Parts List Illustration Dubnium, H1 Handle Right Hand: Open Out Page 1 of 25 IMPORTANT This shower screen / enclosure must be installed by suitably qualified individuals.
I N S T A L L A T I O N & M A I N T E N A N C E G U I D E
 I N S T A L L A T I O N & M A I N T E N A N C E G U I D E E N V I R O B U I L D. C O M + 4 4 ( 0 ) 2 0 8 0 8 8 4 8 8 8 Version 3.7 EnviroBuild 2018 C O N T E N T S 03 Storage & Handling 04 Tools 05 Calculating
Balustrade Systems / Installation Instructions
 A. PARTS AND SUPPLIES NEEDED FOR INSTALLATION Hardware included for each 10 section of rail: 2 3 x 1-1/2 L-brackets 4 1-3/4 x 3/16 Blue hex-head screws for anchoring the L-brackets to the newel cap, column
Adorn Mortarless Stone Veneer Installation Natural Concrete Products
 Adorn Mortarless Stone Veneer Installation Adorn Mortarless Stone Veneer can be used on new or existing construction. Adorn is nailed or screwed onto the wall; therefore no brick ledge is required. Adorn
Pergola PR100N1. Assembly Instructions. Systems Trading Corporation Customer service: (877)
") FABRIC Pergola PR00N Assembly Instructions Systems Trading Corporation Customer service: (8)82 82 of 20 Introduction Thank you for purchasing the Pergola PR00N. When properly assembled and maintained,
FABRIC Pergola PR00N Assembly Instructions Systems Trading Corporation Customer service: (8)82 82 of 20 Introduction Thank you for purchasing the Pergola PR00N. When properly assembled and maintained,
Gazebo GZ3584 Aluminum Composite Roof Panels
 Gazebo GZ8 Aluminum Composite Roof Panels Assembly Instructions 7 9 2 9 8 0 2 2 Systems Trading Corporation Customer service: (877)782 82 Email: easygrow@stcaustin.com of Introduction Thank you for purchasing
Installation Manual for Thermo Panel
 Installation Manual for Thermo Panel 1 About Thermo Panel is a building wrap, insulation, air and water barrier, mold inhibitor and cold bridge eliminator all-in-one. Delivering an R-value of up to 5 on
INSTALLATION INSTRUCTIONS FOR QUICK-STEP LAMINATE WITH HYDROSEAL TECHNOLOGY.
 . PREPARATION. INSTALLATION. FINISHING. MAINTENANCE INSTALLATION INSTRUCTIONS FOR QUICK-STEP LAMINATE WITH HYDROSEAL TECHNOLOGY. IN ORDER TO OBTAIN A GOOD RESULT, WE ADVISE TO FOLLOW ALL GIVEN INSTRUCTIONS
Ensure there is reasonable access for materials and working space, ensure the shed site is level and consider the disposal of run-off water.
 INSTALLATION GUIDE TM Flat Roof Homesheds THE POTTER BEFORE YOU START It is important to check your Local Government Authority requirements before the installation of your new Stratco Potter Flat Roof
Effective April 1, 2013
 Effective April 1, 2013 Table of Contents Ensuring System Performance 1 Components 2 Frequently Asked Questions 3 List of Tools 3 Before you Begin Preparation 3 Quality Tips 4 Cold Weather Tips 4 Cleaning
HALLMARK DECKING INSTALLATION MANUAL
 HALLMARK DECKING INSTALLATION MANUAL CARE AND MAINTENANCE Congratulations on the purchase of your Hallmark composite decking. To ensure that you keep your low maintenance decking looking its best we recommend
Alderley 6 Seat Round Table Dining Set Table Assembly Instructions Product size: Dia140*H75 cm
 Product size: Dia140*H75 cm The frame of this product is manufactured from mild steel coated with a weather resistant paint. Steel has a natural tendency to rust over time and, whilst we expect you to
FITTING INSTRUCTIONS FOR OFD SOLID OAK FLOORING
 FITTING INSTRUCTIONS FOR OFD SOLID OAK FLOORING SECTION 1 Installers Responsibility Pre-Installation SECTION 2 Glue Down (Solid & Engineered Flooring) SECTION 3 Secret Nailing (Solid & Engineered Flooring)
Effective February, 2015
 Effective February, 2015 Table of Contents Ensuring System Performance 1 Components 2 Frequently Asked Questions 3 List of Tools 3 Before you Begin Preparation 3 Quality Tips 4 Cold Weather Tips 4 Cleaning
SlipGrip Data Sheet & Installation Guide
 SlipGrip Data Sheet & Installation Guide Stair Treads Landing Covers Flat Sheets 9/2015 SlipGrip Technical Data Description SlipGrip products are high performance safety stair treads, landing covers and
Installation Instructions
 www.marlite.com Effective Date 03/01/2018 ARTIZAN FRP, SYMMETRIX FRP, ENVUE FRP, STANDARD FRP Installation Instructions Statements expressed in this technical bulletin are recommendations for the application
Constable Oak Extension Dining Table
 Constable Oak Extension Dining Table Assembly Instructions - Please keep for future reference 176/0325 Dimensions Width - 160/ 200cm Depth - 90cm Height - 75cm Important - Please read these instructions
DECKING INSTALLATION GUIDE
 STAIR TREAD INSTALLATION GUIDE Step 7: Install the Remaining Treads Repeat steps 2 to 6 for the remaining stair treads. Step 8: Install the Fascia 1. Measure the riser height. 2. Rip the fascia to the
CELLBOARD DECK CLIP FIXING INSTALLATION MANUAL CBWD14525
 CELLBOARD DECK CLIP FIXING INSTALLATION MANUAL CBWD14525 1 BEFORE YOU COMMENCE Please note that: The Product is subject to natural variation* in finish as part of the manufacturing process. The purchaser
Bird Feeder BUILD TIME
 This bird feeder should attract many different birds to your yard. With a platform for those birds that like to move around on a flat surface while they pick at feed as well as a dowel for those who prefer
GREENHOUSE 6'x8' ASSEMBLY INSTRUCTIONS. (Internal Dimensions) Overall Dimensions (Approx.) L 193 W 200 H cms 97.5" L 76" W 78.
 Overall Dimensions (Approx.) L 193 W 200 H cms 97.5 L 76 W 78.") ASSEMBLY INSTRUCTIONS GREENHOUSE 'x8' (Internal Dimensions) Overall Dimensions (Approx.) 7. L 9 W 00 H cms 97." L 7" W 78.8" H 0 IMPORTANT You must read these instructions carefully before you start to
ASSEMBLY INSTRUCTIONS GREENHOUSE 'x8' (Internal Dimensions) Overall Dimensions (Approx.) 7. L 9 W 00 H cms 97." L 7" W 78.8" H 0 IMPORTANT You must read these instructions carefully before you start to
Radon 07 Installation Instructions & Parts List
 Radon 07 Installation Instructions & Parts List Illustration Radon 07, H1 Handle Right Hand: Open Out 14/06/2016 Revision 1.1 Page 1 of 21 IMPORTANT This shower screen / enclosure must be installed by
Xenon 05 Installation Instructions & Parts List
 Xenon 05 Installation Instructions & Parts List Illustration Xenon 05, H1 Handle Left Hand: Open Out 26/05/2016 Revision 2.1 Page 1 of 19 IMPORTANT This shower screen / enclosure must be installed by suitably
Curium 19H Installation Instructions & Parts List
 Curium 19H Installation Instructions & Parts List Illustration Curium 19H Right Hand Page 1 of 15 01/07/2016 Revision 2.1 IMPORTANT This shower screen / enclosure must be installed by suitably qualified
- BALUSTRADES - A light elegance for any home or business.
 - BALUSTRADES - A light elegance for any home or business 01438 289 508 www.stevenage-glass.co.uk CONTENTS What Are Glass Balustrades? Where To Use A Glass Balustrade Why Choose A Glass Balustrade? Types
RENU PANELING SYSTEM Installation Guide PLEASE READ GUIDE COMPLETELY BEFORE ASSEMBLY. Version 1.0 ALL STATED SIZES ARE NOMINAL DIMENSIONS.
 RENU PANELING SYSTEM Installation Guide Version 1.0 PLEASE READ GUIDE COMPLETELY BEFORE ASSEMBLY. ALL STATED SIZES ARE NOMINAL DIMENSIONS. Components Trim Track (TT) 1" x 1 3 4" (GER3TTAA): fastens to
Rev. 05/16 01 ACRYLIC INSTALLATION GUIDE
 Rev. 05/16 01 ACRYLIC INSTALLATION GUIDE Contents 1.0 Inspection 3 2.0 Storage 3 3.0 Handling 3 4.0 Planning & Preparation 3 5.0 Panels 4 6.0 Accessories 4 7.0 Tools & Fixings 4 8.0 Fitting Tips 5 9.0
Curium 19.4H Installation Instructions & Parts List
 Curium 19.4H Installation Instructions & Parts List Illustration Curium 19.4H Right Hand Page 1 of 21 30/06/2016 Revision 1.0 IMPORTANT This shower screen / enclosure must be installed by suitably qualified
Information Guide for Tools and Fabrication Techniques
 Information Guide for Tools and Fabrication Techniques Our Innovation. Your Imagination. Table of Contents General Tooling Information.... 4-5 Standard woodworking tools.. 4 Pocket screw.. 4 Heat guns
Install your floor between 18 and 30 C.
 GOLDEN RULES 8-0 C Install your floor between 8 and 0 C. Quick-Step Livyn must be acclimatized in the room of installation between 8-0 C for a period of at least 8 hours before installation. This floor
INSTALLATION GUIDE. IMPORTANT: Not for use with flue-less or balanced flue appliances.
 5117622/06 INSTALLATION GUIDE Or Hearth and Back Panel Set IMPORTANT: Not for use with flue-less or balanced flue appliances. This guide should be read in conjunction with the installer and owner guides
Installation Guide. SUPERWOOD decking with groove
 Installation Guide SUPERWOOD decking with groove (Plastic T-clip) (V2014 1.1) Key points: Before installing our SUPERWOOD products, it's necessary to read the Installation Guide. The installation is suitable
IMPORTANT NOTES ABOUT YOUR FLOORING PLEASE READ BEFORE INSTALLING INSTALLATION & MAINTENANCE FOR ENGINNERED HERRINGBONE
 IMPORTANT NOTES ABOUT YOUR FLOORING PLEASE READ BEFORE INSTALLING INSTALLATION & MAINTENANCE FOR ENGINNERED HERRINGBONE ACCLIMATIZATION AND STORAGE Your new flooring has to be acclimatized before installation,
Install Instructions for Torrance Jurastone #4004 Mantel
 Install Instructions for Torrance Jurastone #4004 Mantel Please read this manual before installing the suite. This manual should remain with the homeowner. 20/05/11 Fires of Tradition assumes no responsibility
Fitting Instructions
 Fitting Instructions = Actions. Red = Notes you must read before continuing. Grey = Only applies to canopies over 4m widths. Overview 1. Tools you will need. 2. What you will need to provide. 3. Description
E N G L I S H GARDEN SHED. Assembly Instructions. Suitable for Models WITH VARYING DEPTHS
 GARDEN SHED Assembly Instructions Suitable for Models 6' Wide 8' Wide 0' Wide WITH VARYING DEPTHS GI0003 November 0 INSTALLATION ADVICE It's Not That Difficult! The construction of your shed isn't as complicated
AZEK Porch Install Guide
 TRIM MOULDING DECK PORCH RAIL PAVERS AZEK Porch Install Guide Installation Guidelines...2 Tools Required...2 Installation Preparation...3 Fasteners...4 Expansion and Contraction...4 Installation Instructions...5-6
Fitted Furniture Installation and Aftercare Guide
 Fitted Furniture Installation and Aftercare Guide Customer Service Contact Number 08008 778899 Important Information In the unlikely event that your product is damaged or faulty in any way, this must be
EASY APPLICATION. Furniture Linoleum
 EASY APPLICATION Furniture Linoleum can be applied easily on all common materials such as MDF, chipboard and Plywood as well as steel or composite materials. Furniture Linoleum has a special matte appearance
GREENHOUSE EXTENSION 6 X4
 ASSEMBLY INSTRUCTIONS GREENHOUSE EXTENSION 6 X Overall Dimensions (Approx.) 0 L x 93 W x 00 H cms 9" L x 76" W x 8.7" H 0 IMPORTANT You must read these instructions carefully before you start to assemble
Installation Guide. Shingles. Classical. Shingles. Warning. Storage. Cutting Shingles. Touch-Up. Eastern White Cedar
 Installation Guide Before you begin, take the time to read this entire guide to clearly understand the requirements and steps to follow for proper installation. The Fastening Make shingle fastening simpler
INSTALLATION, ASSEMBLY & OPERATIONAL MANUAL
 INSTALLATION, ASSEMBLY & OPERATIONAL MANUAL Dog Park Equipment Hill Climb, Balance Beam, Bridge Climb, Mini Hill Climb, Jump Hurdles, Tunnel House, Training Platform, Jump Balance Beam Safe Zone When installing
How to operate (folding)
") How to operate (folding) LEFT HAND STACKING OUTWARD OPENING How to operate (folding) RIGHT HAND STACKING OUTWARD OPENING LOCK BOTH LEVER HANDLE AND FLAT HANDLE UTILISING THE D-HANDLE LOCATED ABOVE THE
How to operate (folding) LEFT HAND STACKING OUTWARD OPENING How to operate (folding) RIGHT HAND STACKING OUTWARD OPENING LOCK BOTH LEVER HANDLE AND FLAT HANDLE UTILISING THE D-HANDLE LOCATED ABOVE THE
Install Instructions for Solano Jurastone #4012 Mantel
 Install Instructions for Solano Jurastone #4012 Mantel Please read this manual before installing the suite. This manual should remain with the homeowner. Updated 12/03/12 NOTE the installation requirements
Adirondack Chair BUILD TIME
 There are many variations of the classic adirondack chair. This particular version features straightforward construction and common materials. This chair makes for a satisfying project that can be built
IMPORTANT!!! ASSEMBLY ASSEMBLY INSTRUCTIONS. (Internal Dimensions)
") ASSEMBLY ASSEMBLY INSTRUCTIONS (Internal Dimensions) Ent Spec Edition Ltr v-0- Overall dimensions including base: 7. L x 9 W x 0 H cms 97.5" L x 7" W x 8.7" H IMPORTANT!!! Please read these instructions
ASSEMBLY ASSEMBLY INSTRUCTIONS (Internal Dimensions) Ent Spec Edition Ltr v-0- Overall dimensions including base: 7. L x 9 W x 0 H cms 97.5" L x 7" W x 8.7" H IMPORTANT!!! Please read these instructions
CELLBOARD DECK CLIP FIXING INSTALLATION MANUAL CBWD14525
 CELLBOARD DECK CLIP FIXING INSTALLATION MANUAL CBWD14525 1 BEFORE YOU COMMENCE Please note that: The Product is subject to natural variation* in finish as part of the manufacturing process. The purchaser
Gallium 03 Installation Instructions & Parts List
 Gallium 03 Installation Instructions & Parts List Illustration Gallium 03, H1 Handle Left Hand: Open Out 04/05/2016 Revision 1.1 Page 1 of 19 IMPORTANT This shower screen / enclosure must be installed
The following instructions will guide you through the installation of your new vinyl railing.
 Installation Guide St. James Vinyl T-Rail Tools Required Protective eye glasses 3/8 x 3 Concrete Anchors/Fasteners (for Tape measure concrete installations) Variable speed drill/screwdriver Philips Driver
Processing and design Solid Textile Board
 Processing and design Solid Textile Board List of contents Introduction Kerfing Joints and assembly Increasing thickness and stiffness Edges Cutting Milling and drilling Three-dimensional pressing Surface
11 x11 Pergola. Assembly Instructions. Paragon Group USA cm cm cm
 FABRIC x Pergola Assembly Instructions 0cm 9 2cm 0cm 0 20cm Paragon Group USA Customer Service:(8) 82 82 Email:cs-outdoors@paragongroupusa.com Introduction Thank you for purchasing the x Pergola. When
POTTING BENCH. SAFETY EQUIPMENT Gloves Goggles Dust mask
 POTTING BENCH TM LUMBER 2 2 x 4 x 6 YellaWood brand treated lumber 2 2 x 4 x 8 YellaWood brand treated lumber 3 2 x 4 x 10 YellaWood brand treated lumber 9 5/4 x 6 x 8 YellaWood brand deck boards 1 1 diameter
Before you start Warnings Never use scourers, abrasives or chemical cleaner. IMPORTANT, RETAIN FOR FUTURE REFERENCE READ CAREFULLY See enclosed instru
 Product size: L150*W90*H72 cm The frame of this product is manufactured from mild steel coated with a weather resistant paint. Steel has a natural tendency to rust over time and, whilst we expect you to
INSTALLATION INSTRUCTIONS FOR QUICK-STEP LAMINATE.
 . PREPARATION. INSTALLATION. FINISHING. MAINTENANCE INSTALLATION INSTRUCTIONS FOR QUICK-STEP LAMINATE. IN ORDER TO OBTAIN A GOOD RESULT, WE ADVISE TO FOLLOW ALL GIVEN INSTRUCTIONS CAREFULLY. - 0-% RH 8h
Corrugated Installation and Technical Guide
 Corrugated Installation and Technical Guide AmeriLux International, in partnership with Menards, offers high quality polycarbonate, pvc and fiberglass panels which feature the latest in product technology.
Stratco Sanctuary INSTALLATION BEFORE YOU START TOOLS REQUIRED GUIDE
 INSTALLATION GUIDE Stratco Sanctuary Verandahs, Patios and Carports BEFORE YOU START It is important to check with your Local Government Authority prior to the installation of your new Stratco Sanctuary
SteelChief Installation Instructions for pre-assembled panel form sheds GABLE ROOF
 SteelChief Installation Instructions for pre-assembled panel form sheds GABLE ROOF Please read fully before commencing work...any queries will be promptly answered, contact theboss@steelchief.com.aui MPORTANT
DIY SHED GUIDE Planning your Project I Simple Illustrations I Hints
 Easy Step by Step Guide DIY SHED GUIDE Planning your Project I Simple Illustrations I Hints TIMBERLINK. MADE OF TASMANIA. DIY Shed Guide Timberlink Green Outdoor Structural Range Timberlink Green Outdoor
TORLYS LEATHER PLANK INSTALLATION INSTRUCTIONS
 ENGLISH INSTRUCTIONS TORLYS LEATHER PLANK INSTALLATION INSTRUCTIONS Dear Customer, You have chosen a high quality TORLYS Leather floor, well suited for all residential application except bathrooms and
VANITY INSTALLATION INSTRUCTIONS
 VANITY INSTALLATION INSTRUCTIONS Congratulations and thank you for your purchase. These cabinets have been designed and assembled to a very high standard and if installed correctly will provide you with
Customer Service: Installation, Care and Maintenance
 Customer Service: 800-951-5117 Installation, Care and Maintenance Installation Instructions Easy step-by-step instructions for decking, railing and stairs. As with any building project, use proper eye
Installation Guidelines
 Page 1 Tools You ll Need 4 ft. Carpenter s level Chalk line (to mark U channel locations) Cordless drill/nut driver Caulking gun Chop saw with a metal cutting blade on it (required to make accurate and
Bianco Bistro Set Assembly instructions
 Product size: Coffee Table: Dia50*H50 cm Chair: W72*D77*H86 cm The frame of this product is manufactured from mild steel coated with a weather resistant paint. Steel has a natural tendency to rust over
PAT installation of a Sun Dome over a in-ground
 PAT. 3766573 Installation of Sun Domes for in-ground pool GENERAL INSTRUCTIONS: STEP 1. Read thru the entire instructional materials before beginning any installation. You will find that the installation
IMPORTANT: Read all sections before you start
 1 IMPORTANT: Read all sections before you start For the most up to date information please visit our website @ www.newtechwood.com Prior to installing the railing, please consult local zoning laws in regards
INSTALLATION MANUAL STORAGE
 IMVersion 1.1 INSTALLATION MANUAL GENERAL GUIDE: The information in this IM is intended to serve as a general guide to proper installation with no warranties intended or implied. Prime Panels assumes no
Loose Lay Luxury Vinyl Plank
 Loose Lay Luxury Vinyl Plank FLEX COLLECTION Installation & maintenance * PLEASE READ CAREFULLY * Installation, maintenance & warranty guideline for loose lay luxury vinyl products. Adherence to This guideline
Wood Molding Installation Guide
 Wood Molding Installation Guide 1 P age Estimating the Quantity of Molding Required for the Job. Calculate the following: 1. Total lineal feet of Wall Base required for the job: Lineal feet 2. Total lineal
INSTALLATION INSTRUCTIONS FOR ELKALAMINATE. IN ORDER TO OBTAIN A GOOD RESULT, WE ADVISE TO FOLLOW ALL GIVEN INSTRUCTIONS CAREFULLY.
 INSTALLATION INSTRUCTIONS FOR ELKALAMINATE. IN ORDER TO OBTAIN A GOOD RESULT, WE ADVISE TO FOLLOW ALL GIVEN INSTRUCTIONS CAREFULLY. PREPARATION Let the planks acclimatize for 48 hours in the unopened packaging