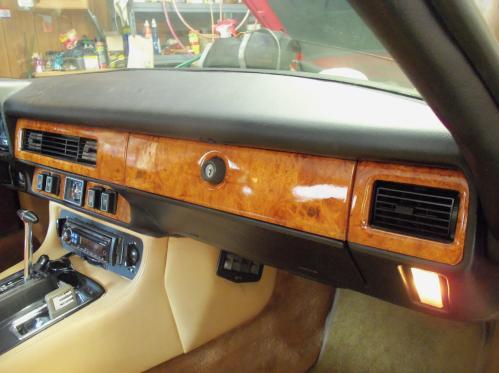
1983 Jaguar XJS Interior Wood Trim Repair and Refinishing
|
|
|
- Neal Sherman
- 6 years ago
- Views:
Transcription

1 The following describes and shows one method of wood trim repair/restoration/refinishing for wood trim on Jaguar cars, specifically this 1983 Jaguar XJS, although the wood trim should be the same in all similar years. CAUTION! The wood veneer is thin VERY THIN do not use a power sander on it, not even a finishing sander, but especially not a belt sander the veneer would be gone before you even had a chance to check and see how you were doing. The wood veneer around the switches and clock is applied to a metal backing plate, the other pieces on the dash are applied to wood backing (I have not yet removed the wood trim on the doors to see what the backing is for those pieces). Some of the wood trim veneer pieces were cracked and peeling away from the backing, other pieces had the veneer cracking and lifting at the cracks, but were not yet completely peeling away from the backing. ATTENTION! The longer you wait to repair/restore the cracked/cracking wood trim, the more difficult the work in repairing/restoring/refinishing the wood veneer will become just ask me I found that out. The wood veneer trim around the switches and the clock were in the worst condition, with many cracks with the cracked veneer lifting and peeling away from the metal backing. My intent was to save the original veneer and repair/restore/refinish it as close to the original look and condition as I could (with the realization that I was not a master wood worker nor did I have all the tools which would likely be necessary for such work) with that in mind, I set about considering various ways to save the original veneer. I started with the worst piece first what to heck, if I couldn t do the worst piece and had to replace it, no harm, no foul, but if I could repair/restore/refinish the worst piece, then I should be able to do the same with the wood veneer pieces which are not in as bad condition - seemed logical at the time. This wood veneer was really worse than it looks in these photos as these photos do not show all the cracks and splits, or all of the lifting/peeling of the veneer. The photos which follow show the cracking, peeling, and lifting in better detail. Page 1 of 14


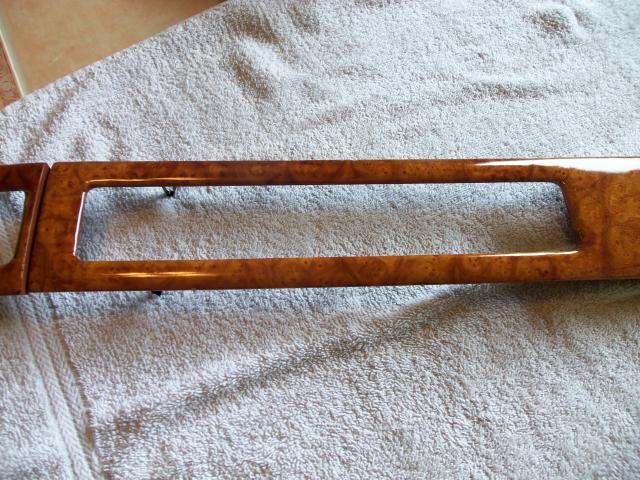
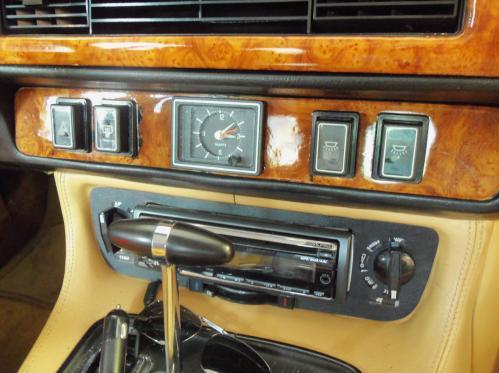
2 Removal of the wood veneer trim which the switches and clock are mounted in requires a thin, flat, yet strong tool as the wood trim is adhered to a metal backing which has four retaining prongs that are in push-in receiver fittings. The tool needs to be thin to be able to be inserted behind the metal backing, flat so the tool does not leave marks pressed into the leather surround, and strong enough to pry the metal backing out of the push-in receivers. Two of the retaining prongs are shown near the bottom corners in the lower photo above the other two retaining prongs are in the same location near the top corners. I found that a the use of ordinary tools in my garage worked quite well, I used a well worn 5-in-1 tool to remove this piece as it was thin, flat, and strong and being well worn means no sharp points, edges, or anything sharp which could tear or scratch the leather surround or the wood veneer itself. After releasing the metal backing retaining prongs from the push-in receivers, the switches have plugs on them which need to be pulled off (the plugs pull off from the sides of the switches, not from the backs), lights need to be pulled out of their openings (they are held in with spring tension around the socket ends), and there are two leads which need to be disconnected from the clock. You are now holding the entire wood trim veneer, metal backing, switches and clock assembly in your hand. The switches and clock push out of the metal backing by releasing the spring tension pieces which hold each in place at the backside of the metal backing NOTE: keep track of which switch is removed from where, while they are not easy to mix up, you could inadvertently swap pairs, swap halves of the pairs or put them back in upside down with respect to each other a simple way to keep track of what goes where is to take a photo before removing anything, you will then know the way they were when you started. You now have the wood veneer and metal backing ready for you to start addressing what you need to do to repair/restore/refinish the wood veneer. The center piece of veneer fell out when the switches and clock were removed. Almost none of the veneer is still adhered to the metal back in this part between the left switches and the clock to the right. Page 2 of 14


3 The two thin strips across the top and bottom of the switch are also no longer adhered and are cracked and broken. Almost none of the veneer is still adhered to the metal back in this part between the clock and the switches to the right. The left end is also cracked and does not look to still be adhered very well either. My original intention was to glue the loose veneer back to the wood backing but the backing turned out to be metal and the metal backing prevents that, as does the stiff and curled veneer (I didn t want to risk cracking/breaking the thin wood veneer any more than it already was). I had to get creative in order to save the wood veneer as it was worse than it looked like when in the car. The switches and the clock were helping hold the veneer in place so it did not look as bad don t get me wrong, it did not look good all cracked and bending outward like it was, but I did not realize that the switches and clock were holding the veneer in place like it was. I decided that when I removed the wood veneer from the metal backing, I would have to glue each piece to a thin piece of cloth to serve as a puzzle piece holder to keep all the pieces of the puzzle together and each piece in its proper place. What to use that was very thin? I recycle old handkerchiefs to serve as rags in the garage, and one of those old handkerchiefs would work quite well for this purpose. Page 3 of 14


4 I started at the upper left corner as that piece practically fell off when I tried to remove it, and the piece below it had already fallen off when I removed the switches. The piece on the handkerchief has already been glued in place and is dry. This was my starting point for removing the puzzle pieces from the metal backing and making a completed but separate wood veneer piece I could then work with. Progress! Getting ready to glue the small piece at the top in place, but I need a guide to know where to place it. A putty knife and utility knife work well for removing the pieces of veneer from the metal backing. I placed the metal backing over the pieces I had already glued in place and used two paint stirrers as guides. Now I had the left end, and guides for the top and bottom of the veneer. Page 4 of 14


5 More progress! Some pieces are actually still adhered in place pretty good Darn! Loose pieces are easier to work with. Mostly done removing the veneer puzzle from the metal backing and gluing to the cloth. A few small pieces of the wood veneer are all that are left to be removed. The veneer piece is definitely taking shape and now looks like it might be feasible to repair and refinish. Page 5 of 14


6 Now that I have completed removing the wood veneer puzzle pieces from the metal backing and gluing them to the cloth backing to keep the veneer pieces aligned and together, the reassembled veneer piece does not lay flat due to the veneer pieces being warped. My next concern is making my wood veneer piece flat if the veneer piece does not lay flat, the veneer piece will not be usable for being re-adhered to the metal backing. I decided that I could make the wood veneer lay flat using a method used for bending wood after all, I was simply un-bending the wood, so the method should work: steam and pressure. This is my un-bending form that I will use as the form to which the steam un-bending will form the wood veneer to (flat). The wood veneer is on the un-bending form with the cloth side down; a sheet of wax paper has been placed over the wood veneer, which is facing up. This is my steam and pressure forming tool. The veneer is now un-bent and lays flat. The wood veneer is now flat, however, the cloth backing leaves the wood veneer too flexible a stiffer backing is needed to keep the wood veneer in plane with itself such that the wood veneer can be handled and then re-adhered to the metal backing. I used a thin but stiff piece of cardboard (which is basically wood in a different form) to glue the cloth backed wood veneer to. Page 6 of 14


7 Tracing the metal backing to make the cardboard backing for the wood veneer. This is the traced cardboard backing. The wood veneer and the cardboard backing are ready to be glued together. The cardboard backing is coated with wood glue, the wood veneer is ready to be placed on the glue and clamped in place. The wood veneer has been placed on the glued cardboard backing. Applying initial pressure to set the veneer into the glue prior to clamping. Page 7 of 14


8 Preparing for overnight clamping of the wood veneer to the cardboard backing. Ready for overnight clamping overnight and flattening of the wood veneer. Clamps applied to flatten the wood veneer while clamping for gluing to the cardboard backing. Wood veneer after being clamped overnight to glue the wood veneer to the cardboard backing and flatten the wood veneer. It is now time to chisel out the cloth and cardboard backing. Chiseling out the cloth and cardboard backing from the switch and clock openings in the wood veneer. Page 8 of 14

 1/4 inch wood chisel.")
9 The wood veneer is temporarily placed on the metal backing to check for overall fit and flatness. The wood veneer lays flat on the metal backing and the openings line up. The next step will be removing the original finish, which is yellowed from age. After experimenting with various methods to find the best way to remove the original finish, I found that carefully and carefully is the correct word carefully scraping/prying/popping off the original finish using a semi-sharp (not dull, but not brand new sharp either) 1/4 inch wood chisel. Work the wood chisel under the original finish (which is about as thick as the veneer itself), making sure not to cut into the veneer, then slowly push the chisel with its flat side down on the veneer, allowing the original finish to go up the tapered side of the chisel. You may need to start the chisel with its flat side up see photo. In some cases, when I could see a large area coming loose, I used a feeler gauge (thick enough to be somewhat stiff, but thin enough to slip under the original finish) to slip under the original finish and gently force the feeler gauge between the original finish and the wood veneer this successfully worked for larger pieces of the original finish which would come loose in one larger piece. Wear a glove on the hand you are using to hold the wood veneer in place as the wood chisel may slip, and when it does, the chisel will cut into your skin not to worry, though those cuts will heal soon and you can then put the glove on to protect yourself from future cuts I only slipped and cut myself twice before I put the glove on maybe you are a faster learner? If you thought the earlier job of removing the wood veneer from the metal backing was detailed and labor intensive, Or that the job of gluing the puzzle pieces you removed from the metal backing to the cloth backing was detailed and labor intensive Or that the job of steaming the wood veneer flat or gluing the wood veneer to the cardboard backing was work If so, you may not want to undertake this project as removing the original finish from the wood veneer is more detailed and labor intensive than all the previous put together this is just a heads up, it is not meant to discourage you from taking on the project the results are worth it. Page 9 of 14


 looks yellowish.")

10 Using the wood chisel, start where the wood veneer is cracked and lifting start the chisel under the original finish but between the original finish and the wood veneer itself. This work needs to be done carefully so as to not push the chisel into the wood veneer below and create a gouge in the veneer you do not want that. While most of the original finish will likely come off in smaller pieces, as can be seen on the towel in the background, some pieces may come loose as a larger area, I used a feeler gauge thick enough to be somewhat stiff yet thin enough that I could slide the feeler gauge between the original finish and the wood veneer and gently pushed in, loosening larger area which would pop off as larger pieces. The wood veneer with the original yellowed finish removed. This is the original finish, which was originally clear, but it is now so yellowed that you whatever you can see through it (which is not much) looks yellowish. I originally thought the wood trim in my car was some special kind of blonde burl, maybe maple or something. As it turned out, the blonde look was just from the yellowed finish, which made it look blonde, that was all it was 34 years of exposure to sunlight and my car was a New Jersey car which was not driven during the winter months, and was garage kept when not in use (I am the second owner and have owned the car the last eight years, since February of 2008). The wood veneer in a car left outside in the sun for longer periods may be in worse condition, however, if all the wood veneer is still there, you can probably repair/restore/refinish it. Page 10 of 14


11 After some light hand sanding, I sprayed a first coat of clear gloss lacquer on the wood veneer side so glue and other stuff could be removed and not be on the actual wood. This came in quite handy as I progressed through the following steps. Once the wood veneer is flattened and on the cardboard backing, very little sanding was needed keep in mind that the veneer is very thin, so it would not take much sanding to go too deep into the veneer. Also, the only sanding you should need to do is to sand down any high ridges along where the cracks were. If you were successful in getting all the wood veneer off the metal backing, you shouldn t have any significant holes or gaps which need wood filler. I had a couple of small areas and a knot which I had to fill. This photo shows the cardboard backing side of the wood veneer and the metal backing plate coated with contact cement. This is the contact cement I used, it is available in small bottles or quarts, it is less expensive by the quart, save the small bottles and refill them. The contact as set up and is ready to be assembled. The toothpicks you see allow the wood veneer to be laid over the metal backing without making contact. Remove a toothpick at one end and squeeze the wood veneer to the metal backing plate, making sure the two are aligned. Work toward the other end, making sure the pieces are still aligned, then remove a toothpick and squeeze the two pieces together, toothpick by toothpick. Page 11 of 14


12 After matching the wood veneer with the metal backing and removing all the toothpicks, make sure to squeeze the two pieces tightly together to assure a good and full adhesion bond between the two. You now have a wood veneer on metal backing with one coat of clear gloss lacquer which is ready for any touchups which might be needed, followed by finishing with multiple coats of clear gloss lacquer. This is ready for touchup and finishing the wood veneer on the metal backing the switches and the clock go in. You can see some minor imperfections which need to be addressed during the finishing process. Minor imperfections can be touched up with black lacquer spray some black lacquer into the can s cap, dip a Q-Tip into the liquid black lacquer in the cap and touch the black lacquer end to the imperfection wipe the excess out (lacquer dries very quickly, so you need to act QUICKLY or you may need to lightly sand some black lacquer off (another reason to spray a coat of clear lacquer on the wood veneer first, so the black lacquer or wood filler can be removed easier). The fill in a knot in the wood veneer fell out, I used some dark walnut wood filler to fill the knot, sanded it to be flush with the surface, then it looked original behind the clear gloss lacquer coats. You can now build up the lacquer in the imperfections using clear gloss lacquer, filling, sanding, filling, sanding and spraying the entire piece occasionally as you fill and sand. When you spray the entire piece, you will be able to see high spots which you can sand down (you will be sanding lacquer, not the wood veneer) and the low spots you will need to fill with clear gloss lacquer. I used clear gloss lacquer for everything as each additional coat of the lacquer bonds itself into and becomes part of the lacquer below it. This is why lacquer, unlike paint, does not have multiple defined coats lacquer becomes one thicker and thicker coat with the application of another coat of lacquer. Once the surface of the piece looks evenly smooth when sprayed with clear gloss lacquer, the piece is now ready for a very light sanding and another several coats of clear gloss lacquer. With lacquer, once you have an evenly smooth surface, you do not need to sand between coats, just spray as many additional coats as you want to achieve the depth and desired look you want. When the surface looks like you want it too, you are done with that piece. Page 12 of 14


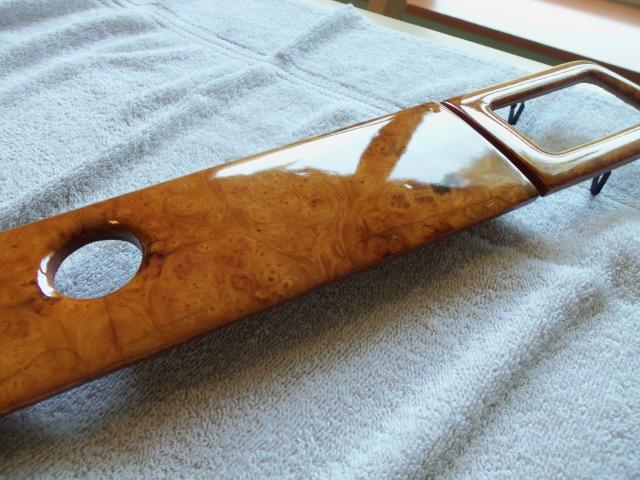
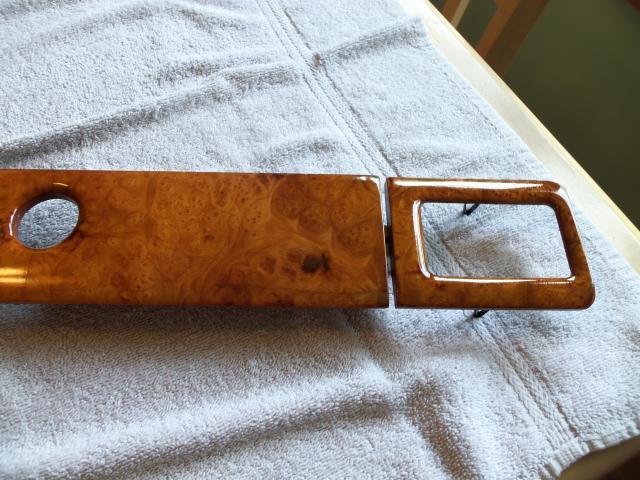
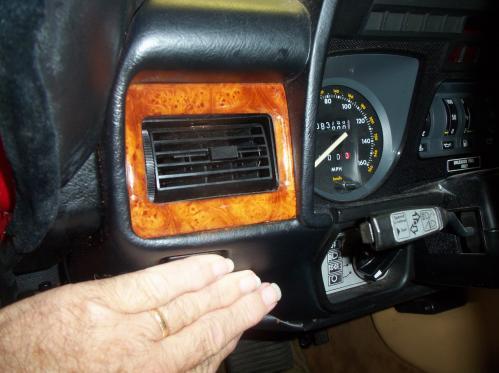
13 This is the preliminary fit and checking to see how it looks nearly finished. An angle view showing the surface of the wood veneer after having been repaired/restored/refinished as described above. This is a close up of the installed wood veneer, you can see some of the crack lines behind the clear lacquer, but it is all flat, smooth, and glossy. This is the same end this is what I started with. The large curved crack line is visible in the finished veneer, but the finished wood veneer look was well worth the effort, time, and work it took. The photo to the left shows the other wood veneer trim pieces which went through the same process, except that these pieces have wood backing, which eliminated the steps up to adhering the veneer to the metal backing. Other photos of the finished wood veneer trim pieces follow. Those are followed by photos of the wood veneer trim pieces installed and the project complete. Page 13 of 14


14 Page 14 of 14
Antique Trunks: Refinish, Repair, Restore, Revised and Expanded
 15. Patch any holes on the inside of the trunk: There will often be splits or holes on the inside of the trunk that may or may not be visible from the outside. Most often they are holes left by the removal
Repairing Microsoft Wedge Touch Mouse Battery Cover Retaining Clip
 Repairing Microsoft Wedge Touch Mouse Battery Cover Retaining Clip Disassembly, repair and reassembly of Wedge Touch mouse when the battery cover will not stay closed. Also is a good guide to repair other
Instructables Butcher Block Top
 Instructables Butcher Block Top Project Overview: This project requires basic woodworking skills and access to woodworking machines. Woodworking machines have sharp cutting edges and are NOT forgiving.
Tools and Tips: ( 1 )
") Tools and Tips: As you build instructions will show in my many picture manual how to assemble. You can use your own methods as you desire, my results are very good. A smooth, flat work surface is very
Tools and Tips: As you build instructions will show in my many picture manual how to assemble. You can use your own methods as you desire, my results are very good. A smooth, flat work surface is very
PROJECT PLANS WOODEN GIFT BOX
 PROJECT PLANS WOODEN GIFT BOX Make the gifts you give even more special by presenting them in this one-of-a-kind gift box. In fact, the box may be valued more than whatever it contains. The box is sized
Chapter Six. Getting started inboard. Installing the false deck
 A close look at the thinning down of the bulkhead extensions. They are just 1/16 thick after fairing them. Chapter Six Getting started inboard This next step is one of the last remaining messy tasks to
Nanton Grain Mill Assembly
 ( 1 ) Nanton Grain Mill Assembly Locate package for assembling storage building. These are cut from 1/8 masonite. Inspect and lightly sand edges where it will be bonded. Use white glue or CA glue to bond.
The Park Hotel Instructions for Assembly of N Scale Kit
 The Park Hotel Instructions for Assembly of N Scale Kit Kit Contents: 198 ea. Laser Cut Acrylic Parts, 2 ea. Chimney Parts Sheets, 1 ea.2".040 styrene rod, 5 ea. Sidewalk Parts, 14 ea. Cast Resin Dormers,
1Take the keel (3) and
 and") 1 The hull and the bridge 1Take the keel (3) and apply PVA wood glue in the second slot from the left: a toothpick may make it easier. Take care: the left end is the one that has a projection. THE HULL
1 The hull and the bridge 1Take the keel (3) and apply PVA wood glue in the second slot from the left: a toothpick may make it easier. Take care: the left end is the one that has a projection. THE HULL
Installing your new Bevella Top. L Shaped Countertop with Joints No Finished Ends (Fits Between Four Walls)
") Installing your new Bevella Top L Shaped Countertop with Joints No Finished Ends (Fits Between Four Walls) Bevella RTI Countertops are engineered and manufactured to the highest quality standards, built
Installing your new Bevella Top L Shaped Countertop with Joints No Finished Ends (Fits Between Four Walls) Bevella RTI Countertops are engineered and manufactured to the highest quality standards, built
Written By: Brett Hartt
 Replace the battery in your ipad 3 4G. Written By: Brett Hartt ifixit CC BY-NC-SA www.ifixit.com Page 1 of 36 INTRODUCTION When your ipad can't stay awake for longer than a few hours, it is time to replace
GENERAL NOTES: Page 1 of 9
 Laminating A Zia Into A Turning Blank by W. H. Kloepping, Jan. 2009 This describes how a zia (the New Mexico state symbol) can be laminated into a turning blank. Materials needed: Square Turning Block
Swift assembly guide
 Swift assembly guide Download the assembly guide at www.scihighmodels.com/swift.pdf Sample kit shown with aluminium bells (available with the Deluxe kit) Shown here without main tanks Version 10/12/2010
This Manual Covers The Construction Of A Hood Scoop Plug From The Drawing Board. Through Construction. To Final Fitting.
 1 This Manual Covers The Construction Of A Hood Scoop Plug From The Drawing Board. Through Construction To Final Fitting. 2 TABLE OF CONTENTS: INTRODUCTION: 3 MAKING A PLUG FOR A CUSTOMIZED PRODUCT. 4
For Barrel Tapers. Installation and Operating Instructions for use with table saws and large disk sanders
 Tim s Taper Tool For Barrel Tapers Installation and Operating Instructions for use with table saws and large disk sanders Your taper tool is capable of making barrel tapered shafts. The term barrel is
3Insert the second rod no. 4
 Yamato: Step-by-step 37 The stern block and searchlight control towers a b c d e f Recommended tools and materials Wood glue Sandpaper (no. 800 grain) Metal file Putty Craft knife For metal: Super Glue
Tools and Tips: ( 1 )
") Tools and Tips: As you build instructions will show in my many picture manual how to assemble. You can use your own methods as you desire, my results are very good. A smooth, flat work surface is very
Tools and Tips: As you build instructions will show in my many picture manual how to assemble. You can use your own methods as you desire, my results are very good. A smooth, flat work surface is very
MAGNUM BOARD INTERIOR INSTALLATION GUIDELINES
 TECHNICAL BULLETIN No.: 090509-1405 Subject: Issue Date: September 4, 2009 Issue No.: II MAGNUM BOARD INTERIOR INSTALLATION GUIDELINES 1. CUTTING MAGNUM BOARD You can easily cut Magnum Board with carbide
EXTREME LOAD no. TWO
 1602 - EXTREME LOAD no. TWO Kit Features: 22' 4 " x 14' x 3'-6 Oversize Load 49mm (1.9") actual height Bolt Head Details Welded Load Mounting Fins Painting Handles Tools Required: Hobby Knife Tweezers
The Park Hotel Instructions for Assembly
 The Park Hotel Instructions for Assembly Kit Contents: 280 ea. Laser Cut Acrylic Parts. 1 ea. 6" Plastic Coated Wire. 5 ea. Sidewalk Parts. 14 ea. Cast Resin Dormers. 12 ea. Window Glass Templates, 12
DASH KIT INSTALLATION
 ÿÿÿÿÿ ÿÿÿÿÿÿÿÿÿÿÿÿ ÿÿÿ ÿÿÿÿÿ ÿÿ ÿÿÿ ÿÿÿÿÿÿÿÿÿÿÿÿÿÿ ÿÿÿÿÿÿÿÿÿÿ ÿÿÿÿ ÿÿÿÿ ÿÿ ÿÿÿÿÿ ÿÿÿÿÿÿÿÿ PROUDLY MADE IN THE USA DASH KIT INSTALLATION These instructions are aimed at the do-it-yourself installer. Read
FLEXITEEK INSTALLATION INSTRUCTIONS
 an Advanced Plastic Fabrications Company 99 marcus Blvd., 631.244.3620 631.231.4466fax FLEXITEEK INSTALLATION INSTRUCTIONS Before you begin, take your new Flexiteek deck out of the shipping package and
Installation Guide. Pionite Decorative Surfaces One Pionite Road, Auburn, Maine PIONITE ( )
") Installation Guide A Subsidiary of Panolam Surface Systems SMPBRO00-012 6/14 Pionite decorative laminates are designed for finished interior surfaces which require high impact, wear and stain resistance
Installation Guide A Subsidiary of Panolam Surface Systems SMPBRO00-012 6/14 Pionite decorative laminates are designed for finished interior surfaces which require high impact, wear and stain resistance
Installing Your New Creature From The Black Lagoon Tail Light DMD Panel MOD
 Installing Your New Creature From The Black Lagoon Tail Light DMD Panel MOD A few things before we start: The wooden speaker panel provided in this MOD was manufactured using a Precision CNC machine and
How to repair a wall or ceiling FREE
 How to repair a wall or ceiling FREE How to repair a wall or ceiling This guide shows how to repair walls and ceilings throughout the guide we only refer to walls but the same principles apply to ceiling
ipad 2 GSM Right Cellular Data Antenna Replacement
 ipad 2 GSM Right Cellular Data Antenna Replacement Replace the right cellular data antenna in your ipad 2 GSM. Written By: Brett Hartt ifixit CC BY-NC-SA www.ifixit.com Page 1 of 43 INTRODUCTION Use this
Repairs. Chapter 10 Repairs 10. 1
 10 Repairs Chapter 10 Repairs 10. 1 Repairs As an installer, you will probably be called upon to repair damage to a resilient floor. Here are some of the most common problems and the recommended repairs
Volvo 1800 Smiths Gauge Face Overlay Installation By Dave Barton
 Volvo 1800 Smiths Gauge Face Overlay Installation By Dave Barton These face overlays are the product of a lot of research. They are printed with a special printer using waterproof and UV resistant ink
SANDCASTING. by Joyce Clarin
 SANDCASTING by Joyce Clarin Supplies Deeply veined leaf Hosta, rhubarb, burdock, elephant ear, castor bean, cabbage, squash, hollyhock, etc Quikcrete Vinyl Patch Sturdy box (or plastic tray) at least 2
The Lansdowne One Car Garage Assembly Instruction by Laser Dollhouse Designs
 The Lansdowne One Car Garage Assembly Instruction by Laser Dollhouse Designs NOTE 1: Please do a dry assembly using only tape to hold house together. This will get you familiar with parts, location, and
Chapter # 002 : Creating Threaded Metal Anchoring Points in Fiberglass Foam Structures
 Chapter # 002 : Creating Threaded Metal Anchoring Points in Fiberglass Foam Structures The following is a method of creating permanent, threaded, metal anchor point in a foam & fiberglass structure. The
ipad 3 4G Home Button Control Board Replacement
 ipad 3 4G Home Button Control Board Replacement Replace the home button control board in your ipad 3. Written By: Brett Hartt ifixit CC BY-NC-SA www.ifixit.com Page 1 of 28 INTRODUCTION This guide will
For Barrel Tapers. Installation and Operating Instructions For use with small combination belt & disk sanders. Assembled Taper Tool
 Tim s Taper Tool For Barrel Tapers Installation and Operating Instructions For use with small combination belt & disk sanders Assembled Taper Tool Your taper tool is capable of making barrel tapered shafts.
Install Instructions for Solano Jurastone #4012 Mantel
 Install Instructions for Solano Jurastone #4012 Mantel Please read this manual before installing the suite. This manual should remain with the homeowner. Updated 12/03/12 NOTE the installation requirements
Cardboard Model Buildings
 Cardboard Model Buildings Get more model kits from http://www.modelbuildings.org PRINTING & ASSEMBLY TIPS: These OO designs can easily be resized by reducing the print percentage as follows: OO scale is
Step by Step Wing Bagging
 Step by Step Wing Bagging By Evan Shaw 073 589 9339 evanevshaw@gmail.com Preparing the Leading Edge 1. Cut cores. (Cutting of wing cores is covered in another article elsewhere) 2. Sand the LE to a nice
Craftman One Car Garage Assembly Instruction by Laser Dollhouse Designs
 Craftman One Car Garage Assembly Instruction by Laser Dollhouse Designs NOTE 1: Please do a dry assembly using only tape to hold house together. This will get you familiar with parts, location, and fit.
Building the Gothic Church
 Building the Gothic Church Mold #54 does not contain all of the blocks to build this church. You will need extra regular blocks (1/2" x 1/2" x 1") and square blocks (1/2" x 1/2" x 1/2"). These blocks can
Vinyl Installation Guide and Tips
 Vinyl Installation Guide and Tips Tools Needed: Squeegee; Grease Pencil (white or blue only!); 2" & 1/4" Masking Tape Prepare your surface and vinyl as outlined on back cover prior to employing this technique
Written By: Walter Galan
 ipad 2 CDMA Camera Bracket Replacement Replace the camera bracket in your ipad 2 CDMA. Written By: Walter Galan ifixit CC BY-NC-SA www.ifixit.com Page 1 of 29 INTRODUCTION Use this guide to replace the
CIRRUS AIRPLANE MAINTENANCE MANUAL MODELS SR22 AND SR22T CHAPTER 56-30: DOOR GENERAL. Door 56-30: DOOR. 1. General
 CIRRUS AIRPLANE MAINTENANCE MANUAL Door CHAPTER 56-30: DOOR GENERAL 56-30: DOOR 1. General The cabin door windows are manufactured of acrylic and adhesive bonded to the door structure. Replacement is accomplished
Demilune 4. Apron Joinery. Curved Apron Tenon. Bridle Joint Legs. Bridle Joint Front Apron
 Demilune Email 4 Apron Joinery There are two types of joints used in connecting the aprons and legs. The rear legs use conventional mortise and tenon joints, while the front legs use the less conventional
Written By: Walter Galan
 Replace the logic board in your ipad 3 Wi-Fi. Written By: Walter Galan ifixit CC BY-NC-SA www.ifixit.com Page 1 of 29 INTRODUCTION Use this guide to replace the logic board. TOOLS: iopener (1) Phillips
Max Launch Abort System Prod. No *Kevlar is a registered trademark of Dupont
 Flying Model Parts List Max Launch Abort System Prod. No. 3014 A 11820 - Body Tube 3.5 Diam x 5.5" Long B 11824 - Orange Capsule Base Shoulder Ring C 16032 - Laser-cut Ring motor mount rear D 16033 - Laser-cut
Scissor Stool. Written By: Feitan
 Scissor Stool If the stool is going to be kept indoors simply rub all the pieces with a Minwax WipeOn Poly before assembling the stool. If it is going to go outdoors use Minwax SparUrathane and coat all
Written By: Walter Galan
 ipad 4 CDMA SIM Board Replacement Replace the SIM Board in your ipad 4 CDMA. Written By: Walter Galan ifixit CC BY-NC-SA www.ifixit.com Page 1 of 33 INTRODUCTION Use this guide to replace the SIM Board.
ipad 2 Wi-Fi EMC 2415 Front Panel Replacement
 ipad 2 Wi-Fi EMC 2415 Front Panel Replacement Replace the Front Panel in your ipad 2 Wi-FI EMC 2415. Written By: Walter Galan ifixit CC BY-NC-SA www.ifixit.com Page 1 of 31 INTRODUCTION Note: this is a
Wallpaper. the Right Way. Wallpaper is trendy again, both with designers, who are speccing it more often, and
 Wallpaper the Right Way Installed correctly, this wall covering should last a lifetime and come off easily once it has worn out its welcome By John Clift Wallpaper is trendy again, both with designers,
ipad 3 4G Home Button Assembly Replacement
 ipad 3 4G Home Button Assembly Replacement Replace the home button assembly in your ipad 3 4G. Written By: Brett Hartt ifixit CC BY-NC-SA www.ifixit.com Page 1 of 29 INTRODUCTION Use this guide to replace
Building the Wizards Tower
 Building the Wizards Tower Building Instructions You will need to fill this mold 18 times to have enough blocks to build the tower. Also, the blocks should be completely dry before gluing them together.
ProSeal Instructions for RB67 film back and camera body
 ProSeal Instructions for RB67 film back and camera body Please read these instructions completely before you start. Knowledge strengthens confidence, and like most jobs, this is better done right the first
Volvo 1800 Smiths Gauge Face Overlay Installation By Dave Barton
 Volvo 1800 Smiths Gauge Face Overlay Installation By Dave Barton These face overlays are the product of a lot of research. They are printed with a special printer using waterproof and UV resistant ink
Installation Instructions Stainless Steel Wall Panels
 Please read all instructions before installing wall panels. Always plan before you place! 1. Before installation: a. Acclimate Stain Steel Panels, Trim, adhesives and wall substrates to room temperature
Replacing Original Starwind 19 Ports with Plexiglass:
 Replacing Original Starwind 19 Ports with Plexiglass: The OEM Beckson ports on my 1983 Starwind 19 were trashed they leaked excessively and the frames inside and out were cracked from a previous owner
Frameless Inline Door With Return QCI5263
 INSTALLATION INSTRUCTIONS Frameless Inline Door With Return QCI5263 WALL MOUNT HINGES FRAMELESS DOOR / PANEL / RETURN PANEL QCI5263 REV. 0 Page 1 Certified 06/17/2016 Parts List with wall mount hinges
Building the Bell Tower
 Building the Bell Tower Mold #55 does not contain all of the blocks to build this tower. You will need extra regular blocks (1/2" x 1/2" x 1") and square blocks (1/2" x 1/2" x 1/2"). These blocks can be
ipad 2 GSM Home Button Assembly Replacement
 ipad 2 GSM Home Button Assembly Replacement This guide will show you how to replace the home button assembly in your ipad 2. Written By: Scott Head ifixit CC BY-NC-SA www.ifixit.com Page 1 of 29 INTRODUCTION
Christmas Bell Ornament
 Christmas Bell Ornament This is an easy Christmas ornament idea I cabbaged from a friend and skilled turner, Curt Fuller, from Utah. I kind of adapted it to my style but I still got the idea from him.
LAPORTE COUNTY 4-H MODEL PROJECT
 LAPORTE COUNTY 4-H MODEL PROJECT I. PURPOSE This project is designed to provide members with an opportunity to be creative and to familiarize them with the techniques of assembly, construction and painting.
REINFORCING THE CORNERS OF FLAT FRAMES
 REINFORCING THE CORNERS OF FLAT FRAMES There are a number of different methods that may be used to join flat frame sides together. As most Woodworkers know, end grain glue joints are not nearly as strong
About.com :
 http://woodworking.about.com/gi/dynamic/offsite.htm?sit...//www.popularwoodworking.com/features/fea.asp%3fid=1088 (1 of 8)1/28/2004 12:05:01 AM Modern Storage Tower The last thing I want to do when starting
Written By: Walter Galan
 ipad 3 Wi-Fi Dock Connector Replacement Replace the dock connector in your ipad 3 Wi-Fi. Written By: Walter Galan ifixit CC BY-NC-SA www.ifixit.com Page 1 of 29 INTRODUCTION Use this guide to replace the
Frameless Bypass Slider
 INSTALLATION INSTRUCTIONS Frameless Bypass Slider QCI-5301 3/8 or 1/4 Glass Bypass Slider with Exposed Rollers QCI5301 Rev 1 Page 1 Certified 6/5/2017 Tools: To install your New Shower Enclosure, you may
Drawings of all parts have been included for ease of part identification.
 Acme Corporation Instructions for Assembly of the HO Scale Acme Corporation HO Kit Contents: 156 ea. white 1/16" laser cut acrylic part 10 ea. white 1/8" laser cut acrylic part 37 ea. adhesive-backed brick
T-Top Headliner Repair Guide With detailed instructions
 T-Top Headliner Repair Guide With detailed instructions Supplies: Fabric: 1 ¼ yards will do -You can use any kind of fabric you want. Some fabrics will be harder to install than others. I d highly recommend
Written By: Walter Galan
 Replace the Logic Board in your ipad 4 Wi-Fi. Written By: Walter Galan ifixit CC BY-NC-SA www.ifixit.com Page 1 of 32 INTRODUCTION Use this guide to replace the logic board. TOOLS: iopener (1) Phillips
Cockpit Kit. Full Depth - Builds Quickly - Light Weight READ THROUGH THIS INSTRUCTION MANUAL FIRST. IT CONTAINS IM- laser cut wood kit
 The Savage Light Sukhoi Su- 27 Cockpit Kit contains everything you need to build a full depth semi scale Su-27 cockpit, yet adds less than an ounce to your finished model s weight (not including pilot).
Building the Circular Tower
 Building the Circular Tower You will need to fill this mold 18 times to have enough blocks to build the circular tower. Be sure the blocks are completely dry before gluing them together. For detailed instructions
Written By: Sam Lionheart
 Replace the SIM Board in your ipad 4 GSM. Written By: Sam Lionheart ifixit CC BY-NC-SA www.ifixit.com Page 1 of 29 INTRODUCTION Use this guide to replace the SIM Board. TOOLS: SIM Card Eject Tool (1) iopener
BLADE REPAIR INSTRUCTION BOOKLET
 BLADE REPAIR INSTRUCTION BOOKLET Contents Section I: Section II: Section III: Section IV: Section V: Section VI: Removing a Blade Refer to this section if you need to remove the blade from an oar shaft.
M A N U A L 6 June 2017
 M A N U A L 6 June 2017 What are Protection Films? These films are meant to protect the vulnerable parts of cars, bicycles, motorbikes, etc... They are transparent glossy, so the underlying colour remains
The Rubley Building Instructions for Assembly of the N scale kit. v1.1
 The Rubley Building Instructions for Assembly of the N scale kit. v1.1 Kit Contents: 197 ea. laser cut 1/16" acrylic parts. 1ea. adhesive backed.020 styrene part. 10 ea..060 x 1" styrene alignment pins.
THE PODIUM MUSIC STAND
 THE PODIUM MUSIC STAND 1 Set Assembly Instructions Wooden Parts: a. 1 Column b. 2 Long Slide Pieces c. 2 Slide Spacers (1 long & 1 short) d. 4 Feet e. 2 Fork Pieces f. 1 Fork Spacer g. 2 Long Desk Frame
CONCEPT MODELS INSTRUCTIONS FOR UP DC-10 WING CAR El Toro Way Stockton, CA Web Address:
 CONCEPT MODELS Web Address: http://www.con-sys.com 8810 El Toro Way Stockton, CA 95210 INSTRUCTIONS FOR UP DC-10 WING CAR 2 CONCEPT MODELS PARTS DC-10 WING CAR Item No. Part No. DESCRIPTION QTY. 1 2003-1
5If the protruding part is. 6Place 1 as is shown in the. 7Place what was assembled
 Yamato: Step-by-step 49 The base of the bridge and strakes a c b d a Base of the bridge b Base of the bridge c Base of the bridge d Strakes x 10 THE BASE OF THE BRIDGE 1Smooth 1 to 3, first using the metal
WILDING WALLBEDS INSTALLATION INSTRUCTION Side Mount
 WILDING WALLBEDS INSTALLATION INSTRUCTION Side Mount For Wallbed models: Do-It-Yourself Insturction booklet C92 WARNING! ALL MURPHY/WALLBED SYSTEMS CONTAIN STORED ENERGY. FAILURE TO USE AND FOLLOW THESE
Curium 19.4H Installation Instructions & Parts List
 Curium 19.4H Installation Instructions & Parts List Illustration Curium 19.4H Right Hand Page 1 of 21 30/06/2016 Revision 1.0 IMPORTANT This shower screen / enclosure must be installed by suitably qualified
Berea Hardwoods Survival Ballpoint Pen
 Berea Hardwoods Co., Inc. Pencil Instructions 18745 Sheldon Road Middleburg Heights, Ohio 44130 Toll Free 1-877-736-5487 Survival Ballpoint Pen (Berea #1602/x-xxx- x) Needed: Mandrel-A Bushing-61A Drills-
PROVIDED BY WINDY URTINOWSKI AND REPRESENT HIS PROCEDURE FOR OBTAINING A SUPERIOR FINISH USING BRODAK DOPE
 PROVIDED BY WINDY URTINOWSKI AND REPRESENT HIS PROCEDURE FOR OBTAINING A SUPERIOR FINISH USING BRODAK DOPE The TARGET is for a GREAT FINISH with 6-7 OUNCES of weight FROM BARE WOOD TO READY FOR SILVER
CA to each one. You may have to hold the end down while to glue sets or use an accelerator like I did.
 The following information and photographs are what I did to build the kit. Your methods and needs may differ from this which is fine. There is no right or wrong way if you are used to scratch building.
CUSTOM SHUTTERS IN-A-BOX
 CUSTOM SHUTTERS IN-A-BOX SHUTTER ASSEMBLE INSTRUCTIONS & INSTALLATION INSTRUCTIONS 1. Inspect the contents of your package. Do not discard the shutter packaging box until you have started painting your
Written By: Brett Hartt
 Replacing the Wi-Fi antenna in the third generation ipad Written By: Brett Hartt ifixit CC BY-NC-SA www.ifixit.com Page 1 of 31 INTRODUCTION Wireless internet is awesome. A third generation ipad without
ining Table Materials *Notes on Materials
 D ining Table We looked around for the perfect table for the dining room. Some were too big, some too small, and most were just too expensive. So we built this one, and we are happy with the result. It
How to make climbing grips. By,
 How to make climbing grips By, Items needed: * Items may be needed depending on your preference. - Carving Foam - Level Table - Cardboard - Pen - Ruler - Straight Edge - Box cutter - Hot melt glue gun
Classic Kitchen Island
 America s leading woodworking authority Step by Step construction instruction. A complete bill of materials. Classic Kitchen Island Exploded view and elevation drawings. How-to photos with instructive
Written By: Brett Hartt
 ipad 3 4G LCD Replacement Removing the LCD Written By: Brett Hartt ifixit CC BY-NC-SA www.ifixit.com Page 1 of 25 INTRODUCTION The third generation ipad loses a lot of luster when its gorgeous retina display
Nojo Design: Large Step Cabinet: February 2012
 Nojo Design: Large Step Cabinet: February 2012 The largest single piece of furniture I ve ever made is this stepped cabinet. Finished piece is 8! tall and over 10 long. This project has been great, although
129 KITCHEN BASE CABINET 480
 129 KITCHEN BASE CABINET 480 There are two sorts of kitchen cabinets: base cabinets, which sit on the floor, and wall cabinets. Base cabinets provide both storage space and work surfaces. They often house
SCULL HANDLES AND GRIPS INSTRUCTION BOOKLET
 SCULL HANDLES AND GRIPS INSTRUCTION BOOKLET Contents Section I: Scull Grip Replacement: Fixed Handle or 10 cm Length Adjustment System Refer to this section if you need to replace the grips on your fixed
Robert Bosch GmbH. Lounge light fixture
 Lounge light fixture Nice and relaxing Lounge light fixture Light has an important effect on mood. This cool light fixture is perfect for creating a cosy lounge atmosphere. 1 Introduction This cool light
Curved Metal Segmenting
 Curved Metal Segmenting A Tutorial by: David Washburn A.K.A djwood1 This tutorial was downloaded from The International Association of Penturners Introduction As I continue to learn about pen turning,
ProSeal Instructions for All Olympus XA style Cameras
 ProSeal Instructions for All Olympus XA style Cameras Please read these instructions completely before you start. Knowledge will increase your confidence, and like most jobs, this is better done right
Car Construction E-Book
 Physics Lecture 15 - Building the Simple But Fast (SBF) Car - Part 2 Introduction - This lecture continues on where Lecture 14 left off- Explain to your Cub partner how Archimedes in about 100 AD first
Instructions for Turning Laminated Bracelets
 Instructions for Turning Laminated Bracelets 1. Start with Design 1. Make a paper template circle for the bracelet. Use this to check the fit on the person you are making the bracelet for. After checking
Piper Cherokee /3 scale. Construction Manual
 Piper Cherokee 140 1/3 scale Construction Manual STAB CONSTRUCTION 1. Remove foam cores from cradle and place on flat surface. Inspect pieces before you epoxy halves together making sure leading and trailing
Taco Bell Restaurant kit in HO scale
 Taco Bell Restaurant kit in HO scale Parking lot base and cars not included This kit includes all building parts milled in white styrene plastic, clear window glazing, Plastruct tile roofing, and logo
#P571 - Victorian Queen Fretwork Clock inspired by 18th century Victorian elegance. 17 H x 21 W. Requires a 3 1/2 clock insert.
 - Victorian Queen Fretwork Clock inspired by 8th century Victorian elegance. 7 H x 2 W. Requires a 3 /2 clock insert. Cut on dashed line for Back Cut on solid line for Frame only. Stock: /8 - /4, cut each
ARTS AND CRAFTS CHAIR
 ARTS AND CRAFTS CHAIR 491 MATERIALS LIST--DINING CHAIR Key No. Size and description (use) A 2 1-3/4 x 1-3/4 x 16-1/4'' oak (front leg) B 2 1-3/4 x 3-3/4 x 40-1/2'' oak (rear leg) C 1 1-3/4 x 3-3/16 x 15''
Installation Instructions
 www.marlite.com Effective Date 03/01/2018 ARTIZAN FRP, SYMMETRIX FRP, ENVUE FRP, STANDARD FRP Installation Instructions Statements expressed in this technical bulletin are recommendations for the application
1Smooth pieces 4, 5 and 6, using
 Yamato: Step-by-step 109 Machine-guns, anti-aircraft guns and decking h e f a b c g d e f a Anti-aircraft gun base x 2 b Anti-aircraft gun (bottom) x 2 c Anti-aircraft gun (top) x 2 d Machine-gun base