How to make climbing grips. By,
|
|
|
- Kerrie Merritt
- 5 years ago
- Views:
Transcription


1 How to make climbing grips By,

 - Stiff toothbrush - Rigid Polyurethane - Belt Sander and Sanding Belt - 5/8 and 3/8 Masonry drill bit. - 15/64 Wood / Metal drill bit.")
2 Items needed: * Items may be needed depending on your preference. - Carving Foam - Level Table - Cardboard - Pen - Ruler - Straight Edge - Box cutter - Hot melt glue gun - Hot melt glue sticks - Good music - Release agent - Nitrile gloves - Ear protection - Protective eye-glasses - Protective respirator (for organic vapors & dust) ml mixing cups ml mixing cups - Mixing sticks - Disposable clean-up rags - Silicone rubber & catalyst - Personal assistant to do all the work for you ;) - Stiff toothbrush - Rigid Polyurethane - Belt Sander and Sanding Belt - 5/8 and 3/8 Masonry drill bit. - 15/64 Wood / Metal drill bit. - 5/8 Dremel grinding bit - Drill press - 3/8-16 climbing hold bolt - Hand held drill * Air Compressor * 100 grit sandpaper * 500 grit sandpaper * Your cut vinyl logo - Sharp knife or razor blade - M6 washers - 3/8 SAE flat washers (We use the hardened ones) -Climbing wall to put your new gourmet grips on :) - Donʼt forget to Tag us on Instagram! Wo! That s too much stuff!!! Don t worry, you probably already have most of it, especially if you are not new to the whole Do it yourself thing. While they may not all be available right away, we plan to make the harder to find items available at threeballclimbing.com You won t have to go searching around for days and weeks and possibly buy the wrong thing. Before you get started: Safety safety safety! Making grips can be fun, but it can also be harmful if you are not careful. This is your project, and it s up to you to take care of yourself. Three Ball Climbing LLC. and our staff strongly encourages you to purchase and use the proper safety equipment, (Vapor / dust mask, ear and eye protection, gloves)


3 Make a mold box Okay, lets get started. First thing you need to do is grab the foam copies of the shapes you have already designed, and a piece of cardboard for the base of your mold box. *Shaping techniques will not be covered in this document. Arrange your shape or shapes on the cardboard and leave about 5mm between each shape. Next draw a line around the shapes about 1cm away from the edge of the shapes. This line will mark where you will be glueing the cardboard wall to contain the liquid silicone. Grab the tallest shape in the group, and measure the height. This one is about 1.75 inches tall, so we will make the walls of our mold box 2.5 inches tall. (add.75 inches to the height of your tallest shape.)


4 If you haven t already, now would be a good time to plug in that glue gun. Now you ll need a long piece of cardboard to make the wall of the mold box. Measure and mark the right side, and the left side at the proper height, (height of tallest hold +.75 inches) in our case, 2.5 inches. Using your straight edge as a guide and box cutter, cut the long strip of cardboard from the mark on the right side to the mark on the left side.


5 Find a good corner you can use to bend each section of the cardboard and make it more flexible. If you are making a rectangular box you don t need to do this. Next take your perfectly measured and cut mold wall and wrap it more or less around the outline you drew earlier. If your piece is too long, trim off the excess with your box cutter. We usually trim the base of the mold box at this point to make it a little easier to work with.


6 Glue the wall to the base Grab that glue gun and squeeze out a nice even line of glue onto part of the outline you drew on the base of the mold box. Little by little. If you squeeze out too much it ll harden before you can get the wall in place. Quickly and carefully grab the piece that you will use to form the wall of the mold box and place it directly on the hot glue. Hold it firmly in place until the glue cools enough. (30 seconds or more) Once the first section of the wall is firmly in place, grab your glue gun, squeeze out another line of glue. Bend the wall section over and hold it firmly in place on top of the glue for 30 Seconds or so.


7 Continue this gluing/holding process until you have completed a mold box that will be able to contain the liquid silicone. Once you ve got the wall in place, squeeze out another bead of glue along the outside seams of the entire box. You want to be sure the box will not leak. When the glue is fully cooled and you are sure silicone won t be able to leak out of the box, put on your organic vapor respirator, safety glasses, and protective gloves. I said put on your gloves!!!! When you are ready, grab your release agent and spray the inside of the box evenly. Be careful not to spray too much in one spot. If you feel you need more, it s better to give it another thin layer when the first layer is dry.


8 Thats better, you should always put on your safety equipment before you use the release agent. The purpose of the release agent is to make it easier to remove the mold box once the mold is ready to be pulled out. After you have sprayed the mold box, let it dry / air out for 30 minutes or so before you start mixing silicone. Some types of release agents can keep the silicone from curing properly if it hasn t completely dried when silicone is applied. Before you start measuring silicone, you need to know a couple things. Silicone used for making silicone rubber has many different elements which can separate over time. It is important that you rotate your container of silicone frequently to keep it mixed. Don t leave it sitting in the same position day after day. It s completely avoidable, but If the components separate, the silicone will not cure properly, and you may end up ruining your shapes. The silicone (white) must be mixed with the catalyst (pink) at a Ratio of 10 to 1 by weight, or about 10 to 1.1 by volume.
 When you are sure the mold box has aired out enough, mix the catalyst")
 * You won t be able to wash silicone out of your clothes, so be sure to")


9 Measure out about 500ml of silicone and about 55ml of catalyst. (It s better to have a little too much catalyst than not enough) When you are sure the mold box has aired out enough, mix the catalyst with the silicone. (While wearing your respirator, eye protection, and gloves) * You won t be able to wash silicone out of your clothes, so be sure to wear something thats okay to get spots on. You want to mix thoroughly, and gently. Try not to introduce too many bubbles into your mix. Be sure to scrape the sides and the bottom of your bucket well. When you think you ve mixed enough, mix a little more. Now grab a little dab and smear it onto one of your foam shapes. Your going to be making what we call a skin coat. The purpose of this step is to eliminate bubbles from the surface of the mold, so your grips come out with nice consistent texture. Press firmly, but not too hard. Press just hard enough to fill in all those tiny holes in the surface of the foam. Keep smearing and pressing until the entire shape, except for the very bottom is covered with a thin layer.

10 When you are all done applying the skin coat, apply a thin layer of silicone to the bottom of the mold box. Arrange the shapes in the mold box with even space between the shapes, and between the shapes and the wall of the mold box. When you are all done applying the skin coat, apply a thin layer of silicone to the bottom of the mold box. Arrange the shapes in the mold box with even space between the shapes, and between the shapes and the wall of the mold box. Break time! Cover the mold box with a piece of cardboard to keep it from being contaminated by dust. Before you start mixing up more silicone, you ll need to let the skin coat cure for a couple hours. If you pour too soon, your shapes won t stick to the bottom of the box and will float to the surface. Okay, breaks over. get back to work! When the skin coat has cured long enough to keep the shapes from floating, get your safety equipment back on, and get ready to measure and mix more silicone :)


11 You are going to have to estimate the volume of silicone needed to fill up the mold box. You ll need enough to cover the tallest shape with a 1/2 inch or so of silicone. This will get easier as you make more molds if you keep a record of the volume required to make each of your molds. *Molding and casting MUST be done on a flat level surface. When you feel like you ve got a good idea, mix up the silicone with the catalyst and start pouring it in the mold box. It s best if you pour into the lowest spot in the mold slowly from a height of 24 inches or more. This will help some of the air to escape from the silicone. If your estimate was good, and you got lucky like I did, you ll have juuust enough to fill up the mold box :)
 When the silicone is firm in")


12 we ve molded over 1,000 shapes, and this part is still exciting :) When the silicone is firm in about 24 hours Use the box cutter and carefully cut the side of the mold box. Be careful not to cut the mold itself. Peel off the wall of the mold box. Peel off the bottom of the mold box. Using your box cutter, carefully trim off the excess silicone that is sitting on the very bottom of the shapes. Be careful not to cut any of the silicone that is making contact with the side of a shape. Peel the foam shapes out of the mold. They are probably going to break, but don t worry about that.


13 Brush out the foam residue with a stiff nylon brush. Do not use any kind of a metal brush. Brush and wipe out the foam until your mold is nice and clean. a terry cloth or micro-fiber cloth works well. When it s clean you are ready to start casting! It s best to heat the mold up to about 190 degrees before casting. A conventional oven works just fine. Most silicone rubber doesn t need a release agent until you ve done a dozen or so castings, but it really depends on what kind of urethane you use. Some urethane mixes are stickier than others. If you need to use a release agent, be sure to read and follow the directions carefully. In a few minutes you ll be pouring the first plastic copies of your shapes! While the mold is heating up, we like to put some cardboard or something on the table to keep from getting urethane on it when you pour. You ll also need to grab 2 small measuring cups, 1 mixing cup, and 1 mixing stick.


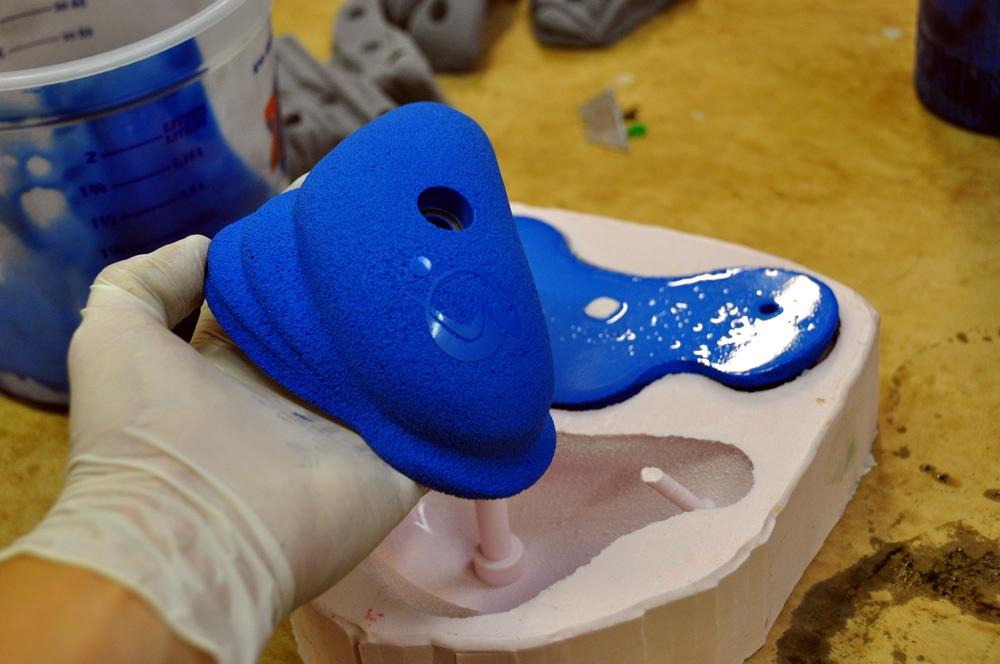
14 Okay, your Pouring Table is protected, you ve got your respirator, your glasses, and your gloves on, and you are ready to pour! You are going to use one 1000ml cup only for measuring Part A of the urethane, and one cup only for measuring part B of the urethane. Once again you are going to have to estimate the Total volume needed to fill your mold cavity. For the two holds shown we estimated 700ml would be enough. This means we ll need 350ml of part A and 350ml of part B urethane. Measure equal amounts of part A and part B urethane. (We use rigid Urethane for this part) Pour the part A (Polyol) into your mixing cup. Put a few drops of dye into the part A and mix it well. Pour the part B into your mixing cup and mix for about 40 or 50 strokes. Pour the urethane mixture into the mold cavity or cavities until the the level of urethane is almost, but not quite as high as the top of the mold.


15 D molding!! When the plastic is hard to the touch in a few minutes, and the edges are the same color as the rest of the plastic, the grips are ready to be removed from the mold. Bend the mold backwards and carefully peel the sides away from the urethane, before pulling the holds out of the mold.


16 Time to break out that camera! Take some pics and post them on our Facebook fan page! Sand & Drill Put on your respirator for filtering dust, and your safety glasses. Make sure you are not wearing long sleeves or anything that could get caught up in the sander or drill press. The next steps are going to require the use of a sander, and a drill press. We use a sander that fits 6 wide by 48 long 80 grit sanding belts. For making regular size holds, pretty much any drill press will do. Sand the backs of your holds until they are clean and flat like the one shown above. The next step will require the use of the 4 drill bits noted in blue on the items needed list, your drill press, and possibly a handheld drill.


17 Now Change the bit to the 5/8 masonry bit. Little by little drill down and enlarge the top of the 3/8 hole. You are making space for the head of the bolt. When there is almost but not quite enough space to hide the head of a bolt, stop. When you ve decided where you want to make the bolt-hole, use your 3/8 masonry bit and drill press to drill a hole all the way through the shape.


18 Replace the 5/8 Masonry bit with the 5/8 Dremel grinding stone. These stones happen to be about the same size as the head of a 3/8 socket head bolt. Grind down your 5/8 hole until the top of the bit is flush with the surface of the grip. When a bolt is placed through the newly drilled bolt-hole, the top of the bolt should be flush with the surface of the shape :) The next part is pretty easy. You ll need the Hand-held drill, 3/8 masonry bit, and the 15/64 wood bit.


19 You ll need to find a spot on the shape where you want to be able to fasten a deck screw. If used, this will ensure the hold won t spin when bolted to the wall. Set screws are not always necessary, but it s nice to have the option. Use the 3/8 Masonry bit and drill a small cavity just deep enough to fit the head of a deck screw. Next make room for the rest of the screw by drilling a hole through the center of the 3/8 cavity using the 15/64 bit. When you are done, your grips should look something like these two. Blow them clean with some compressed air and get ready for the next step!


20 Logo If you don t have a logo you d like to place on your grips you can skip this step and move on to molding. If you ve got your logo in the form of a cut vinyl sticker follow the next steps to make it permanently part of your grips Here we go: Find a spot on the shape where your logo will fit. The next thing you ll need to do is smooth out that spot a bit to allow your sticker to stick. Be careful not to sand so much that you lose all the texture and you change the look of the surface. Use the 100 grit sandpaper to start the smoothing process, then finish up with the 500 grit. When you think you ve got it smooth enough, blow off the dust and try to adhere your sticker. If it doesn t stick, your shape is either not clean enough, or not smooth enough. This isn t totally necessary, but if you d like, cover the logo and give grip a light spray of release agent to prepare it for molding.


21 The first mold you made was a Master Mold. You ll want to store it in a safe clean room temperature place. If the master copies of your grips get damaged, or you decide to sell your shape to a hold company you ll need to pour new copies from the master mold. Production Mold From here you are going to repeat the molding process just like you did with the foam shapes. We are not going to cover it in detail at this point since this process has already been covered. Make the mold box... Apply the skin coat of silicone... after a couple hours, fill the box the rest of the way to cover the shapes like before. * If you ve reached this point and decided for whatever reason that this whole grip making thing isn t for you, don t worry. Three Ball is happy to help. Send a copies of your urethane master shapes to us. If we like them we ll make arrangements with you and see about making the production mold at our shop and sending you a couple finished copies :)


22 When the mold has cured for about 24 hours, remove the mold box like you did for the master mold. Grab a sharp knife and carefully trim off the excess silicone from the back of the holds. Remember, It s better to trim too little than too much. When you ve got the mold cleaned up, carefully pull out the grips and put them in a safe clean place. Congratulations! You re new mold is ready for Production!


23 Casting Final Copies If your silicone needs a release agent, get your protective equipment on, give the mold a light coating of release agent and use your fingers to evenly spread the release agent around the surface of the mold cavity. Next put a washer on each stem as shown. Make sure each washer is sitting flat against the base of the stem. When the mold has aired out enough, mix up some urethane and cast some copies of your new shapes! When they have cured for a few minutes pull them out of the mold. They ll be hot, so be careful!


24 It s best to pour in a warm mold (around 190 degrees). If you want several copies, now would be the best time to pour them. They ll release better and the texture of the mold will be preserved longer. When you are done pouring for the day, and all the grips have cured for at least an hour, sand them and blow the dust off like you did with the master copies.


25 You are Done!!! Your new grips will be ready to be used on your climbing wall once they have cured for about 12 hours. As I m sure you expect, we d love to see some pics! Please feel free to tag us Instagram so we can see your work!
26 Sources of Raw Materials: Alumilite: RC3 Casting Resin is great for Rigid Holds. We also use their polyurethane dyes. Reynolds Advanced Materials: Reoflex 40 Moldmaking rubber is great for making the Master Mold of the Foam. Mold Max 10 is great for production molds. Polyurethane dyes are excellent. SC325 is perfect for making bomber Semi-Rigid grips for contoured concrete walls. (Make sure you heat up your molds to 180 degrees before you cast with SC325) General Plastics is a great source for shaping foam. We use FR-3703 Freeman Supply has and excellent ISOkote 531 Wax Release agent Please tell them we referred you!

27

28

29
Repairing Sheet-Molded Compound (SMC) With Epoxy
 With Epoxy") Repairing Sheet-Molded Compound (SMC) With Epoxy 1. Properties: A. It does not dent. B. It does not rust C. Panels are formed using a flat sheet or compound that is heat molded in a press. 2. Preparation
Repairing Sheet-Molded Compound (SMC) With Epoxy 1. Properties: A. It does not dent. B. It does not rust C. Panels are formed using a flat sheet or compound that is heat molded in a press. 2. Preparation
COMPOSITES LAB MANUAL
 COMPOSITES LAB MANUAL Version 1 Lab 3: Surface Preparation, Wet Layup, and Vacuum Bagging The original version of this manual was a one student senior design project written by Katherine White, the Composite
Products used in this How To:
 How to Slush Cast Products used in this How To: * Original Piece * Alumilite High Strength 3 Silicone Rubber * Alumilite Casting Resin * 610 Foam * Alumilite Liquid Dye or Alumidust * Corrugated Plastic
AranaMuerta.com. Molding Skulls with Dragon Skin
 AranaMuerta.com http://aranamuerta.com/2008/09/10/molding-skulls-with-dragon-skin#more-70 Molding Skulls with Dragon Skin Sep 10th, 2008 by DeadSpider Making your own skull mold isn t as hard as you might
BLADE REPAIR INSTRUCTION BOOKLET
 BLADE REPAIR INSTRUCTION BOOKLET Contents Section I: Section II: Section III: Section IV: Section V: Section VI: Removing a Blade Refer to this section if you need to remove the blade from an oar shaft.
TOOLS & SUPPLIES (Included in ProTops Tool Kit)
") TOOLS & SUPPLIES (Included in ProTops Tool Kit) Clean Paint/Mixing Sticks Graduated Mixing Buckets Standard Mixing Cups Nylon Paint Brush Propane Torch 3M Masking Gun Masking Film & Painter s Tape Disposable
TOOLS & SUPPLIES (Included in ProTops Tool Kit) Clean Paint/Mixing Sticks Graduated Mixing Buckets Standard Mixing Cups Nylon Paint Brush Propane Torch 3M Masking Gun Masking Film & Painter s Tape Disposable
Colori. Part I Geometry
 Colori Part I Geometry 1 2 Determine the size of your cane. TOOLS & MATERIALS FOR BUILDING A CANE: - photocopy paper - ruler - pen or a black marker - color markers (optional) - pasta machine - clay of
SILICONE CAULK MOLD MAKING TUTORIALS
 SILICONE CAULK MOLD MAKING TUTORIALS SILICONE CAULK MOLD MAKING TUTORIAL Method #1 Pro s: Fast, cheap in comparison to other mold systems, effective when procedures are followed, these molds can be used
Chapter # 002 : Creating Threaded Metal Anchoring Points in Fiberglass Foam Structures
 Chapter # 002 : Creating Threaded Metal Anchoring Points in Fiberglass Foam Structures The following is a method of creating permanent, threaded, metal anchor point in a foam & fiberglass structure. The
Baba 30 Butterfly Hatch Repair in 17 or so not-so-easy steps Part I. Rick Beddoe s/v Soñadora
 Baba 30 Butterfly Hatch Repair in 17 or so not-so-easy steps Part I Rick Beddoe s/v Soñadora Introduction Butterfly hatches on any boat are notorious for leaks. However, they are also noted for their attractiveness.
Cardboard Model Buildings
 Cardboard Model Buildings Get more model kits from http://www.modelbuildings.org PRINTING & ASSEMBLY TIPS: These OO designs can easily be resized by reducing the print percentage as follows: OO scale is
How to make a paper mache skull
 http://www.spookyblue.com/halloween/skulls/paper mache skull.htm How to make a paper mache skull Materials List Resin skull from Anatomical Chart Company What?! Spend $25 on a skull? Hear me out. A good
SCULL HANDLES AND GRIPS INSTRUCTION BOOKLET
 SCULL HANDLES AND GRIPS INSTRUCTION BOOKLET Contents Section I: Scull Grip Replacement: Fixed Handle or 10 cm Length Adjustment System Refer to this section if you need to replace the grips on your fixed
HOGNOSE PSALTERY KIT Assembly Instructions
 HOGNOSE PSALTERY KIT Assembly Instructions WOOD PARTS 1 Plywood Top (Soundhold Pre-Cut) 1 Plywood Bottom 2 Pin Blocks 1 Short Side 1 Long Side 1 Bridge 1 Scrap of Plywood HARDWARE 1 L-Handle Tuning Wrench
4-H Model Building. Monroe County. Grades 3-12
 4-H Model Building Monroe County Grades 3-12 PURPOSE Positive development of our young people through the stimulation of their personal interest and natural skills through the assembly, techniques of construction,
PREMIUM CONCRETE COUNTERTOP MIX INSTALLATION INSTRUCTIONS
 PREMIUM CONCRETE COUNTERTOP MIX INSTALLATION INSTRUCTIONS High Strength Fast Setting Pourable Helpful Items: TCC Materials February 09 Version 2.0 Tools Required: Concrete mixer or ½ drill (600 RPM or
MAGNUM BOARD INTERIOR INSTALLATION GUIDELINES
 TECHNICAL BULLETIN No.: 090509-1405 Subject: Issue Date: September 4, 2009 Issue No.: II MAGNUM BOARD INTERIOR INSTALLATION GUIDELINES 1. CUTTING MAGNUM BOARD You can easily cut Magnum Board with carbide
50 TIPS TO HELP YOU BE BETTER WITH RESIN. By Katherine Swift
 50 TIPS TO HELP YOU BE BETTER WITH RESIN By Katherine Swift 2016 Resin Obsession, LLC, all rights reserved Gainesville, FL 32606 www.resinobsession.com May not be shared in any form without permission
MAKE IT YOURS. Digital Photo Decoupage Art. How-2 instruction books for cool projects you can make your own.
 MAKE IT YOURS Digital Photo Decoupage Art How-2 instruction books for cool projects you can make your own. DIGITAL PHOTO DECOUPAGE ART WHAT YOU WILL NEED Computer / Internet Connection Digital photos you
SCULPTURE SUPPLY CANADA TECHNICAL BULLETIN
 TECHNICAL BULLETIN Work Surface Always work on a non-stick Teflon or Silicone baking sheet. Do not use a metal cooking sheet unless it has a teflon coating. If you re working with a heat gun, make sure
Colorfil INSTRUCTIONS
 Colorfil INSTRUCTIONS SUPPLIES REQUIRED: HOT AIR GUN DENATURED ALCOHOL CLEAN WHITE RAG NYLON BRISTLE SCRUB BRUSH (tooth brush) ORBITAL SANDER ORBITAL ABRASIVES SPRAY BOTTLE WITH WATER OPTIONAL: SCALES
MUDGUN Drywall Finishing System
 Watch the demonstration video online at hydetools.com MUDGUN Drywall Finishing System Quick Start Guide Hyde Tools, Inc. / A Hyde Group Company / 800-872-4933 / custrelations@hydetools.com / hydetools.com
2. Sanding the Modules Sand the entire surface of each cyc module with 60-grit sandpaper. This will provide for better paint adhesion.
 ASSEMBLY INSTRUCTIONS SYSTEM SUPER 2.5 EZ Congratulations on your decision to use the world s most advanced and user-friendly cyclorama system. We have taken a great deal of care to create and ship your
PRO CYC PRO CYC, INC. SYSTEM SUPER 3EZ
 ASSEMBLY INSTRUCTIONS SYSTEM SUPER 3 EZ Congratulations on your decision to use the world s most advanced and user-friendly cyclorama system. We have taken a great deal of care to create and ship your
Explorer Wiring Kit (assembled)
") Explorer Wiring Kit (assembled) For Vintage, Firestorm & Standard Series Please Read All Instructions Before Beginning. Tools you will need: Soldering Iron (35 watt preferably) Solder Wet Sponge Wire Clippers
Explorer Wiring Kit (assembled) For Vintage, Firestorm & Standard Series Please Read All Instructions Before Beginning. Tools you will need: Soldering Iron (35 watt preferably) Solder Wet Sponge Wire Clippers
Step by Step Wing Bagging
 Step by Step Wing Bagging By Evan Shaw 073 589 9339 evanevshaw@gmail.com Preparing the Leading Edge 1. Cut cores. (Cutting of wing cores is covered in another article elsewhere) 2. Sand the LE to a nice
Freehand Back-Filling: Polymer Clay and Resin Tutorial
 Page 1 of 9 Eugena Topina, 2016 Freehand Back-Filling: Polymer Clay and Resin Tutorial This tutorial is offered for your personal use only. Please do not distribute. Back-filling is a simple and very versatile
REVISION LIST CHAPTER 25: AFT WINDOWS. The following list of revisions will allow you to update the Legacy construction manual chapter listed above.
 REVISION LIST CHAPTER 25: The following list of revisions will allow you to update the Legacy construction manual chapter listed above. Under the Action column, R&R directs you to remove and replace the
Overflow Kit Installation!
 Overflow Kit Installation! Thank you for choosing a Glass-Holes overflow kit. Please note that this is a do-it-yourself project that we supply the do-it yourself stuff for you to do-it-yourself. Working
Building the Gothic Church
 Building the Gothic Church Mold #54 does not contain all of the blocks to build this church. You will need extra regular blocks (1/2" x 1/2" x 1") and square blocks (1/2" x 1/2" x 1/2"). These blocks can
1Use the metal file to smooth
 Yamato: Step-by-step 85 Parts of the bridge and the hull a b c d e f a Part of the bridge b Part of the bridge c Part of the bridge d Radar x 2 e Part of the bridge x 2 f Wire Recommended tools and materials
Working with Resin Models
 Working with Resin Models This article will run through the basic techniques and methods required to get the most out of preparing, cleaning up and assembling Forge World s resin kits. If you need extra
PRO CYC PRO CYC, INC. SYSTEM SUPER 1.5 EZ
 ASSEMBLY INSTRUCTIONS SYSTEM SUPER 1.5 EZ Congratulations on your decision to use the world s most advanced and user-friendly cyclorama system. We have taken a great deal of care to create and ship your
M A N U A L 6 June 2017
 M A N U A L 6 June 2017 What are Protection Films? These films are meant to protect the vulnerable parts of cars, bicycles, motorbikes, etc... They are transparent glossy, so the underlying colour remains
Turkey Football Panel
 Turkey Football Panel PROJECT TITLE: Turkey Football Turkey Football Panel A Stained Glass Project DESIGNED BY: Jeanne Baruth for Diamond Tech SKILL LEVEL: (Adult 1-5 1 being the easiest, 5 being difficult)
3Insert the second rod no. 4
 Yamato: Step-by-step 37 The stern block and searchlight control towers a b c d e f Recommended tools and materials Wood glue Sandpaper (no. 800 grain) Metal file Putty Craft knife For metal: Super Glue
One Piece Fiberglass Mold Construction
 One Piece Fiberglass Mold Construction (This is just a SAMPLE of the Main Manual) Simple Fiberglass Molds Can Be Used For Making Duplicate Parts For Many Applications Including Hobby & Automotive. This
Parts Identification
 We are excited to introduce the Model Aero Aqua Sport. This is an excellent sport flyer, equally at home flying from grass fields, water, or even snow! The unique V-tail gives the Aqua Sport a distinctive
DASH KIT INSTALLATION
 ÿÿÿÿÿ ÿÿÿÿÿÿÿÿÿÿÿÿ ÿÿÿ ÿÿÿÿÿ ÿÿ ÿÿÿ ÿÿÿÿÿÿÿÿÿÿÿÿÿÿ ÿÿÿÿÿÿÿÿÿÿ ÿÿÿÿ ÿÿÿÿ ÿÿ ÿÿÿÿÿ ÿÿÿÿÿÿÿÿ PROUDLY MADE IN THE USA DASH KIT INSTALLATION These instructions are aimed at the do-it-yourself installer. Read
Standard Kit #1 (3-way switch)
") Standard Kit #1 (3-way switch) Please Read All Instructions Before Beginning. Tools you will need: Soldering Iron (35 watt preferably) Solder Wet Sponge Wire Clippers 3/8 Drill Bit 1/4 Drill Bit Variable
Standard Kit #1 (3-way switch) Please Read All Instructions Before Beginning. Tools you will need: Soldering Iron (35 watt preferably) Solder Wet Sponge Wire Clippers 3/8 Drill Bit 1/4 Drill Bit Variable
2. Sanding the Modules Sand the entire surface of each cyc module with 60-grit sandpaper. This will provide for better paint adhesion.
 ASSEMBLY INSTRUCTIONS SYSTEM 4 BI (Built-In) Congratulations on your decision to use the world s most advanced and user-friendly cyclorama system. We have taken a great deal of care to create and ship
Refurbishing Your Lincoln Mark VII Dew Wipes
 By Rick One_Way Eckenrode Refurbishing Your Lincoln Mark VII Dew Wipes A common flaw among Lincoln Mark VII s can be found at the top of both doors. The dew wipes (rubber weatherstrip that rests against
675 Quick N Stall Neo Angle Framed Hinge Shower Enclosure
 INSTALLATION INSTRUCTIONS 675 Quick N Stall Neo Angle Framed Hinge Shower Enclosure Call Technical Dept @ 1-800-452-2726 QCI1003 Page 1 of 9 Certified 10/01/09 INSTALLATION NOTES: Unpack your unit carefully
GrafiWrap Vehicle Wrapping
 GrafiWrap Vehicle Wrapping What is GrafiWrap? GrafiWrap is the registered trade name for a combination of materials used in the wrapping of a vehicle. The GrafiWrap system is a sandwich made up of a cast
1 SELECT suitable material. It takes time to cut a cab. Don t waste it on rubbish.
 7 July 09 CUTTING A STANDARD CABOCHON A Standard Cabochon or CAB is an oval or round stone with one flat side and the other side having an even curved dome shape. Top of Cab It will have a narrow bevel
TM TM DOG HOUSE Age 9+
 TM TM DOG HOUSE Age 9+ Safety First! Use eye protection, always! Use ear protection with loud power tools Stay with kids while they work! Follow tool manufacturers safety guidelines This project is recommended
1Take the keel (3) and
 and") 1 The hull and the bridge 1Take the keel (3) and apply PVA wood glue in the second slot from the left: a toothpick may make it easier. Take care: the left end is the one that has a projection. THE HULL
1 The hull and the bridge 1Take the keel (3) and apply PVA wood glue in the second slot from the left: a toothpick may make it easier. Take care: the left end is the one that has a projection. THE HULL
Tips & Tricks using Part 17
 Tips & Tricks using Part 17 Making a Secret Door Using Mold #96...1 Using Cotton Swabs For Antiquing...4 Planning Dungeon Waterways...5 Pouring and Texturing Water...6 Making Water for Fountains...11 Tips
Building the Bell Tower
 Building the Bell Tower Mold #55 does not contain all of the blocks to build this tower. You will need extra regular blocks (1/2" x 1/2" x 1") and square blocks (1/2" x 1/2" x 1/2"). These blocks can be
Laminated Fabric Tray
 Laminated Fabric Tray There are a few things one would assume you can t add embroidery to. Metal. Buildings. Cats. All these things are inadvisable to hoop. You might also think a hard plastic serving
SGTalon s Enterprise-A Foamie Build Guide. SGTalon s. Enterprise. Enterprise--A. Assembly Instructions
 SGTalon s Enterprise SGTalon s Enterprise--A Enterprise Assembly Instructions Page 1 4-13-2013 SGTalon s Enterprise *******Recommended Hardware******** 2.6oz 250w Motor and Speed Control with 8x6 prop
Install Instructions for Corner Octavia Mantel
 Install Instructions for Corner Octavia Mantel Please read this manual before installing the suite. This manual should remain with the homeowner. 137 Nelson St Brantford Ontario Canada N3S 4B5 1-800-325-7988
Tabletop Epoxy Resin Instruction Guide
 Table Top Epoxy Full Instructional Guide WARNING! You should read through ALL of these instructions BEFORE starting. These instructions are intended for Bar Tops, Table Tops, Artwork and Countertop applications.
1983 Jaguar XJS Interior Wood Trim Repair and Refinishing
 The following describes and shows one method of wood trim repair/restoration/refinishing for wood trim on Jaguar cars, specifically this 1983 Jaguar XJS, although the wood trim should be the same in all
TM TM MESSAGE CENTRE
 TM TM MESSAGE CENTRE Safety First! Use eye protection, always! Use ear protection with loud power tools Stay with children while they work! Follow tool manufacturers safety guidelines Page 1 TOOLS Drill
968 Side Cladding Rubber Beading Replacement
 968 Side Cladding Rubber Beading Replacement A common and simple wear-oriented project for the 968 is the replacement of the rubber seals or beading on the lower side body cladding. These seals become
SURFACE CASTING METHOD: For Molds & Core Boxes. Presented by: Hapco Inc.
 SURFACE CASTING METHOD: For Molds & Core Boxes Presented by: Hapco Inc. RAPIDFIL Detailed Specifications STEP 1 SPACER LAYER Apply a layer of ¼ foam to create a uniform ¼ thickness around the pattern.
MANUAL 3. Wrapping with Graficast Automotive & Deco Films HIGH LE VEL. GrafiWrap. Grafityp wrapping films
 MANUAL 3 GrafiWrap Grafityp wrapping films Wrapping with Graficast Automotive & Deco Films 2017 1 WHAT IS GRAFIWRAP? GrafiWrap is a trade name that was registered by Grafityp Selfadhesive Products, which
Vash/Knives Future Revolver Kit. V2.0
 Vash/Knives Future Revolver Kit. V2.0 Thank you for purchasing the Vash/Knives Future Revolver Pistol Kit. This kit contains almost everything you ll need to build up your own replica. This kit is an advanced
Berea Hardwoods Survival Ballpoint Pen
 Berea Hardwoods Co., Inc. Pencil Instructions 18745 Sheldon Road Middleburg Heights, Ohio 44130 Toll Free 1-877-736-5487 Survival Ballpoint Pen (Berea #1602/x-xxx- x) Needed: Mandrel-A Bushing-61A Drills-
DIY Eliza: Instructions
 Make sure you first download from Redlightsonthebrain the list of things required for a DIY Eliza. 1. Take your bucket, ruler and marking pen. We will put on all the markings before we start cutting the
U-bass Kit Assembly Instructions
 U-bass Kit Assembly Instructions Compiled by playubass.com This guide is built from the instructions found here: http://kalabrand.com/ubass-kit/index.html Tools Needed 5/8 (16 mm) Wrench 7/16 (~11 mm)
Contents. pages 20-24: Installing Edge sinks into. custom laminate countertops page 8: Installing Edge sinks into postform laminate countertops
 Contents pages 2-8: Installing Edge sinks into custom laminate countertops page 8: Installing Edge sinks into postform laminate countertops pages 9-14: Installing Acrylic sinks into custom laminate countertops
How to use a Touch Up Bottle & Brush
 How to use a Touch Up Bottle & Brush Tech Tips General Definitions Base Color (Basecoat): A color coat requiring a clear coat. Base Color provides color and appearance, while the clear coat provides gloss
PRO CYCTM PRO CYC, INC. SYSTEM 1.5 FS
 ASSEMBLY INSTRUCTIONS Congratulations on your decision to use the world s most advanced and user-friendly cyclorama system. We have taken a great deal of care to create and ship your cyc, so please take
Quantum 2 SQUARE 0605
 Installation Instructions #CH-S-0605-KIT #CH-S-0605-2FT #CH-S-0605-4FT #CH-S-0605-6FT #CH-S-0605-8FT Custom #CH-S-0605 Sections: Pg. 2 Fixture Kit Channel Preparation Pg. 6 Cut Length Chart Pg. 7 Recessed
THE PODIUM MUSIC STAND
 THE PODIUM MUSIC STAND 1 Set Assembly Instructions Wooden Parts: a. 1 Column b. 2 Long Slide Pieces c. 2 Slide Spacers (1 long & 1 short) d. 4 Feet e. 2 Fork Pieces f. 1 Fork Spacer g. 2 Long Desk Frame
INSTALLATION GUIDE VERSION 11/14
 INSTALLATION GUIDE VERSION 11/14 In this guide we will demonstrate effective techniques and methods for installing EDGE stainless steel sinks seamlessly in both laminate and solid surface. These techniques
Mirrorcraft Project Especially for Dogs
 Mirrorcraft Project Especially for Dogs DIY Customized Pet Mirror Make a mirror photo frame to Display your Pets Photo Irene Jacobs April 2007 Mirrorcraft is a fun craft to easily create you own customized
Creating Unique Fused Glass Designs Using Stencils & Powdered Glass
 Creating Unique Fused Glass Designs Using Stencils & Powdered Glass Written by Jackie L. Doehling 2014 Full Moon Loon Designs http://www.fullmoonloon.com http://www.facebook.com/fullmoonloondesigns 2 Supplies
BONDO PROCESS. Installation Guide.
 BONDO PROCESS Installation Guide www.karran.com BONDO PROCESS This Installation Guide demonstrates simple methods and proven techniques for seamlessly installing Karran undermount sinks in laminate countertops.
#70 grit sand Putty knives, sized as needed #1 fine gray sand Corner tools Milestone acrylic liquid
 Countertops Supplies Tools White and/or gray Milestone cement 12 inch steel trowel #70 grit sand Putty knives, sized as needed #1 fine gray sand Corner tools Milestone acrylic liquid Hock Universal tints
Max Launch Abort System Prod. No *Kevlar is a registered trademark of Dupont
 Flying Model Parts List Max Launch Abort System Prod. No. 3014 A 11820 - Body Tube 3.5 Diam x 5.5" Long B 11824 - Orange Capsule Base Shoulder Ring C 16032 - Laser-cut Ring motor mount rear D 16033 - Laser-cut
Soldering is easy. here's how to do it. Andie Nordgren (Comics adaptation) Jeff Keyzer. by: Mitch Altman (soldering wisdom) (Layout and editing)
 Jeff Keyzer. by: Mitch Altman (soldering wisdom) (Layout and editing)") Soldering is easy here's how to do it by: Mitch Altman (soldering wisdom) Andie Nordgren (Comics adaptation) Jeff Keyzer (Layout and editing) Download this comic book and share it with your friends! Distribute
Soldering is easy here's how to do it by: Mitch Altman (soldering wisdom) Andie Nordgren (Comics adaptation) Jeff Keyzer (Layout and editing) Download this comic book and share it with your friends! Distribute
Please read through the entire document before starting your installation process to better understand what is required.
 1 P a g e How s It Hanging? Step-by-Step Guide for Hanging your Wallpaper Walls Republic offers a richer and wider selection of designs, textures and colours than ever before found in the wallpaper world,
COMPOSITES LAB MANUAL
 COMPOSITES LAB MANUAL Version 1 Lab 6: Post-cure Processing The original version of this manual was a one student senior design project written by Katherine White, the Composite lab assistant, during Spring
Repairs. Chapter 10 Repairs 10. 1
 10 Repairs Chapter 10 Repairs 10. 1 Repairs As an installer, you will probably be called upon to repair damage to a resilient floor. Here are some of the most common problems and the recommended repairs
Application guidance for Printed Vinyl decals
 Paint Masks - Dry Rub Decals - Waterslides - Printed media Telephone: Website: email: +44(0)7872 181119 (mobile) http://www.flightlinegraphics.com sales@flightlinegraphics.com Application guidance for
Obtained from. Omarshauntedtrail.com
 BORN2HAUNT.COM http://www.born2haunt.com/batsreasy01.html Bats R Easy Here is another way to make bats with foam and wire. The first thing I did was cut a piece of scrap foam to the size I wanted 5" long,
How to correctly install and level a 3-piece slate.
 How to correctly install and level a 3-piece slate. Basic steps to leveling a 3 piece slate. First of all, we re going to have to break this down into sections, as leveling a 3 piece slate is more like
Basic Instructions. Preparing the Moulds
 Preparing the Moulds Basic Instructions 1. Make sure the moulds are clean and free of plaster residue (see our CARE & CLEANING instructions for more information). 2. Rinse the moulds in warm water and
APPLICATION OF JAC FILMS
 1. Important points For reliable results, JAC films are best applied to smooth, dry and clean surfaces (metal, glass, paintwork, plastic etc.). It is essential to ensure that the surface is free from dirt
Big Oz. Rocket. User Guide V0313
 Big Oz Rocket User Guide 59824 V0313 Materials Included The Big Oz Rocket Kit should include the following materials. If something is missing, contact Customer Service at 800-358-4983. 20-ounce plastic
After the canopy hinge is square with the firewall and the nut plates are installed you can set up the hinge mounts. Start by clamping a 1/16 tongue
 Written by: Sean Cole September 19, 2008 When fitting the stiffener use 3/32 clecos to hold it in place, it makes a smaller hole and is easier to work with. Only use the amount needed to hold the stiffener
Embedded Embroidery. Embroidery design: Martini. Braid or cording. Two-part (resin and hardener) forty-coat varnish. Tools needed: Wooden stool
 forty-coat varnish. Tools needed: Wooden stool") Embedded Embroidery As I went out to our deck recently, I noticed a stool that had been left outside for several days. I was slightly annoyed at first, but as I moved closer, I noticed some colored leaves
Embedded Embroidery As I went out to our deck recently, I noticed a stool that had been left outside for several days. I was slightly annoyed at first, but as I moved closer, I noticed some colored leaves
Car Construction E-Book
 Physics Lecture 15 - Building the Simple But Fast (SBF) Car - Part 2 Introduction - This lecture continues on where Lecture 14 left off- Explain to your Cub partner how Archimedes in about 100 AD first
THE GREEN CLUB PROJECT
 tennis ball end cap finishing tape THE GREEN CLUB PROJECT duct tape How to make the ultimate recycled juggling club at home. BY JONATHAN POPPELE 16 or 20 oz bottle club body hardwood dowel collar finishing
Cobra X Q Construction Tips Construction: Bel y pan
 Cobra X Q Construction Tips : The white plastic in this kit is high impact styrene. It can be painted with most types of coatings if light coats are applied this is necessary due to the thickness of the
Insta-DE Series Soft- padded Dry- erase Whiteboard Projection Screen
 Insta-DE Series Soft- padded Dry- erase Whiteboard Projection Screen User s Guide Product Features Ø Award winning and GREENGUARD certified VersaWhite material. Ø 1.1 gain with 180 degree wide viewing
ANCHOR PLATE ATTACHMENT STEEL STUD FRAMING OR FURRING CONSTRUCTION WITH ACCESS FROM PANEL SIDE ONLY
 ANCHOR PLATE ATTACHMENT STEEL STUD FRAMING OR FURRING CONSTRUCTION WITH ACCESS FROM PANEL SIDE ONLY INSTALLATION MATERIALS No. 8 Phillips Head Tek Screws Glazier's horseshoe shaped shims 1/16 inch, 1/8
Beyond Rubber: Unique Techniques Your Own Stamps
 Beyond Rubber: Unique Techniques for or Making M Your Own Stamps There are many materials you can carve in order to make your own rubber stamps to use in décor projects. Popular materials include erasers,
Bedtime for Bondo MERA Training
 Bedtime for Bondo 2002 MERA Training Section 1: Making the Plug/Model This section will show the process of building a plug/model for a plaster mold.this will represent what the final fiberglass part
INSTALLATION INSTRUCTIONS FRAMELESS CONTINUOUS HINGE SHOWER ENCLOSURE QCI5232
 INSTALLATION INSTRUCTIONS FRAMELESS CONTINUOUS HINGE SHOWER ENCLOSURE QCI5232 QCI5232 Rev 0 Page 1 Certified 06/20/2016 INSTALLATION NOTES: Unpack your unit carefully and inspect for freight damage. Lay
Japanese Quartet. With. Nikolina Otržan
 Japanese Quartet With Nikolina Otržan List of tools and materials for this class: - Clean & Flat Surface - Pasta Machine - Round Kemper Cutters - A Rigid Blade - A Ruler - A Pen - A Needle Tool - Coarse
Read and understand the requirements of this procedure Assist students with installation as needed
 1. PROCEDURE OVERVIEW This procedure is to be used for installation of bonded strain gages on reinforcing bars. It includes necessary materials and a recommended practice for surface preparation, installation,
Installing Your New Creature From The Black Lagoon Tail Light DMD Panel MOD
 Installing Your New Creature From The Black Lagoon Tail Light DMD Panel MOD A few things before we start: The wooden speaker panel provided in this MOD was manufactured using a Precision CNC machine and
Seamed Undermount Bowls
 CUTOUT TEMPLATES MAKING CUTOUT TEMPLATES 7.1 CUTOUT TEMPLATES The use of an accurate template is one of the most essential elements to the successful completion of a cutout in Corian. For the completion
Install Instructions for Solano Jurastone #4012 Mantel
 Install Instructions for Solano Jurastone #4012 Mantel Please read this manual before installing the suite. This manual should remain with the homeowner. Updated 12/03/12 NOTE the installation requirements
Building a Scarab 350 Trimaran
 This boat was designed to be built using flat panels. In either foam laminated panels or plywood. 1. The build time is less. Panels are lofted, cut out and joined on the frame. 2. Frame can be simpler.
Palladian/ Keystone Models 202/204 Maintenance Kit
 Palladian/ Keystone Models 202/204 Maintenance Kit Please read all of the instructions before you begin. Confirm that you have all the necessary tools and parts required. Allow about one hour to complete