Curved Metal Segmenting
|
|
|
- Evangeline Bates
- 6 years ago
- Views:
Transcription

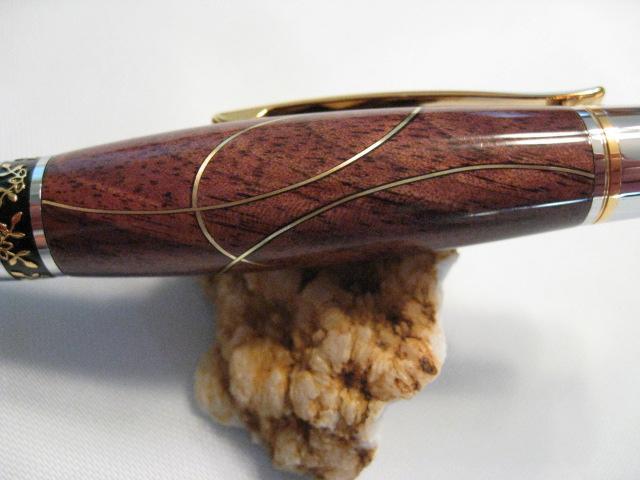
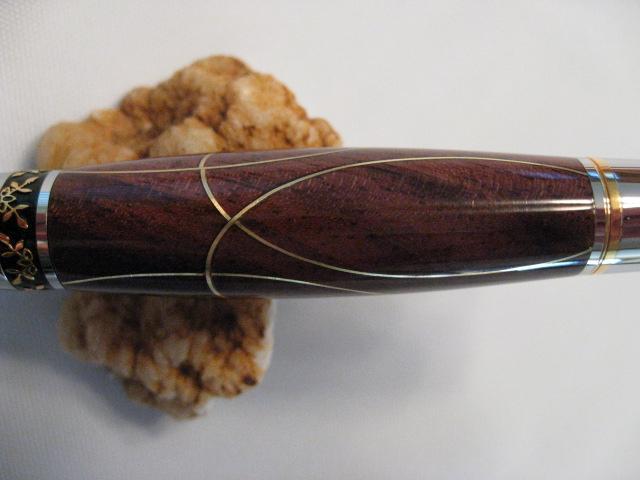
1 Curved Metal Segmenting A Tutorial by: David Washburn A.K.A djwood1 This tutorial was downloaded from The International Association of Penturners
2 Introduction As I continue to learn about pen turning, I have really been excited about all the creativity in curved segmenting with different metals. In late July 2009, I posted a new design that I created and the responses the design received were absolutely fantastic. Everything that I learned about segmenting came from reading different posts online and from a whole bunch of trial and error. So, I wanted to share with all of you what I have learned about segmenting by writing this tutorial. I will specifically be discussing segmenting metals, but you can segment with plastic, veneer, etc. Please read through this entire tutorial before starting. I will not provide basic instructions for turning, sanding, finishing, etc. of a pen, but there are some important key points that I will be discussing throughout the whole process. I hope this tutorial will provide clear details and allow you to follow the process through to completion of your own work of art. If you have any questions just send me a PM and I will do what I can to answer them. I am fairly new to segmenting and always learning, so I always welcome any experts comments or suggestions on this tutorial! Items required Normal pen making items - Wood Blank, pen kit, drill bits, etc. Design template Scroll saw Metal product aluminum, brass, pewter, etc Coarse sand paper Scissors (or something to cut the metal product) Thick Super Glue (CA) Wax paper Vise Belt Sander Designing a template You will need a template to use for cutting the wood blank. You can use any method to design a template, but the design will ultimately need to be on paper that can be glued to the wood blank. I do not use an expense drawing program or Computer Aided Design (CAD) package. I simply use Microsoft Word to create my designs. With Word, you can turn on what is called gridlines. Gridlines provide a reference to go by when laying out your design. The gridlines are spaced approximately 1/8 apart. You can insert all kinds of shapes to come up with a design. The first thing I do is draw some dotted lines that represent the size of the blank. In this tutorial I will be making an Aero pen, which uses a single barrel that is just under 2 inches in length. This length of design will allow printing of three designs across and thirteen designs down the page of normal size paper (see last page of this tutorial).

3 If you want to turn a two barrel pen, don t draw any vertical dotted lines and draw your design all the way across the page. This will allow adjustment of the design on the blank because there may be an area of grain that you want the design to be placed a certain way. This screen shot below shows Word with gridlines turned on and the dotted lines, really those are dotted lines! Now comes the part that will be hard to explain and I hope I can do this well enough to not confuse anyone! This will certainly make more sense when you complete one of these and see the finished barrel. When designing, you will need to understand how the placement of the metal will ultimately appear when the barrel is turned to the final size. The metal will look like a line when it stays within the finished barrel width. If the metal curves out of the finished barrel width, it will appear as a loop on the perpendicular side from the side the cut was made on the wood blank. A design can be placed on just one side of a blank, while putting designs on perpendicular sides dramatically increases the end result. You can place designs on one or two sides, make one cut or several cuts on a side, draw different kinds of lines and draw lines for one or both barrels of a pen giving an unlimited amount of design options! Once you make a design and finish the pen, there will be another idea for a design that is spawned, then another and so on. Some designs you think will look

4 great will come out not looking so good, while other designs you just throw together will amaze you when finished. Just start designing, turning and having a blast! For this tutorial I will be using a simple design that consists of two arcs. This simple design will be placed on two perpendicular sides. The screen shot below shows several of these templates with the gridlines removed to make it easier to see. Print the page of designs and cut out each of the designs using the dotted lines as a guide.


5 Metal discussion The metal that is used must be very close in thickness to the size of the kerf. The bigger the difference between the metal thickness and the kerf will result in the finished barrel having lines that are skewed. This is compounded with the more lines a design contains. I like to use metal that is around smaller than the kerf so there is a small amount of room for glue and I don t clamp tightly. I use a scroll saw to make the cuts with blades that have a width of The metals that I use are.010, which is also 10mil or 30 gauge. Craft supply stores will have this same thickness of metals for embossing, which is referenced as a medium thickness. Different types of metals that I use are aluminum, pewter aluminum, yellow brass and jeweler s brass. Plain aluminum is the most economical and provides a shiny silver look and the pewter reminds me of black titanium. The yellow brass is a light bright gold, while the jeweler s brass is a deeper gold color. I will be using yellow brass in this tutorial. Measure, mark and cut the metal to the width of the wood blank you will be using.


6 Preparing and cutting the wood blank It is very important to start with a square pen blank or at least two sides that are squared. On the wood blank, pick perpendicular sides that are a perfect 90 degrees. Mark these sides (arrows used in picture) and these will be the sides that are down on the table when cutting out the design. The other two sides will have the paper design placed on them. Use wood glue and apply a design template to only one side of the wood blank. Make sure the paper is placed squarely on the wood blank. Allow time for the glue to dry completely.


7 Cut only one of the design lines with a scroll saw, starting at the end grain. Make sure to clean the two pieces of wood to get rid of any dust particles. Cut the metal to a length that equals or is a little bit longer than the saw cut. I take the long strip of metal, from earlier, and lay it between the two pieces of wood, squeeze the wood together bending the metal between the wood and mark the metal. Cut the metal squarely to that length. Sand the metal on both sides to allow the glue to bond better. The grit of sand paper depends on the type of metal you will be using. Some metals will be hard and will require course grit, while other metals will be really soft and a finer grit will do the job. You just want to score the metal to provide some nice grooves for the glue to grab and not decrease the thickness of the metal. I use 80 grit for harder brass and 120 grit for the soft pewter aluminum.


8 Next, form the metal to the design cut. Gluing in the metal segments Now is the time to apply glue. I use thick CA, but you can use epoxy if you want. I use CA because I don t want to wait for epoxy to setup! BEWARE, using CA adds difficulty since it sets so quickly! I ll describe more about this in a minute. I put a piece of wax paper down on the table, since this part gets messy with the CA oozing all over the place! Apply thick CA to both sides of the metal piece. On the wax paper, stand the metal piece on edge between the two pieces of wood. This is the part that gets really difficult. Just remember to work quickly BUT efficiently since the CA glue can grab quickly and the pieces need to be in perfect alignment. Start pressing the wood pieces together. Make sure the wood and metal stay in alignment as they all come together. Sometimes I will put a thin pencil line on the paper across the cut, since this gives a


9 better point to focus on while bringing all pieces together. Once you squeeze the pieces together with your fingers, place the blank into a vise or clamp and apply more pressure. Do not apply so much pressure that all of the glue squeezes out, just good and snug. Notice there s also some wax paper under the blank in the vise to catch any glue that drips. At this point I will take a paper towel and wipe any excess glue off of the blank. After the glue has set, remove the blank from the vise. Sand the metal and any glue on the bottom side of the blank flat for the next cut to be made. I also sand the ends where the metal is extending out from the blank. I try to keep any sharp metal that is sticking out to a minimum. Don t sand too much on the end that has the mark that tells which side to place the second design template. You can sand the metal down on the paper side if you want, just make sure you don t sand away the design template!
.")

10 Now do the same steps above for the next line on the design template. After you have finished with the second line, glue on the second design template to the proper adjacent side of the wood blank (see markings on end of blank). Make sure the side of the blank that will be on the saw table is flat and has no glue or metal sticking out. Continue preparing the wood blank with metal until all four lines are in place. Sand protruding metal from all sides and you now have a wood blank with metal segmented inside. Finishing the wood blank The rest is just regular steps of turning a wood blank. I ll point out a few key points to remember. The blank must be drilled exactly in the center of the blank. This is very important so the design will be spaced evenly around the finished barrel. I use a center marking tool to find the center of the blank.


11 I mark from all four corners of the blank, holding the pencil at the same angle each time and end up with a square in the middle of the blank. I then take an awl and mark the center. The pencil marks and hole will help visually in making sure the tip of the drill bit is setup perfectly to drill the center of the blank. I use a drill vise and clamp the vise down securely on the drill press. When drilling for the tubes, take it VERY VERY slow. Excess heat will soften/breakdown the glue and too much pressure will cause the drill bit to grab the metal, both resulting in the blank falling apart. Also, do not clamp the blank in the drill vise too tightly. You can take some small rope and wrap around the entire blank and pour on some thin CA. This will strengthen the whole blank, but after you are done, you have to remove all of the CA and rope.


12 After you insert the brass tube in the blank, mount it on your lathe and start turning. Take it slow and easy when turning the blank, take small bites with a roughing gouge. Notice the small wood chips! Finish the barrel to your personal preference. If you use any type of polishing compound, watch out for oxidation to occur with the metal. Put the pen together and you are done making a metal segmented pen!

13 David Washburn
14
6 Segment Knot Pen. A Tutorial by: Larry Wirt A.K.A ribanett. This tutorial was downloaded from. The International Association of Penturners
 Segment Knot Pen A Tutorial by: Larry Wirt A.K.A ribanett This tutorial was downloaded from. The International Association of Penturners How I Make A Six-Segment Knot By: Larry Wirt (aka ribanett) This
Slicing Jig For Pen Inlays
 Slicing Jig For Pen Inlays By Randall Smith (randyrls) May 2008 This article has been downloaded from the library of the International Association of Penturners. www.penturners.org You are welcome to reproduce
Slimline Pro Single Tube Click Pen
 Slimline Pro Single Tube Click Pen Contributed by: Tom Wilson A.K.A Jolly Red This tutorial was downloaded from http://www.penturners.org The International Association of Penturners - 2016 MAKING THE SLIMLINE
How I Made My Aluminum Slim Line Pen
 - 1 - How I Made My Aluminum Slim Line Pen Written by Joe Agrella http://www.joespens.com - 2 - Getting Started First and formost remember safety. Remember that you will need eye protection and plenty
Slanted Brick Pattern Pen Blanks
 Slanted Brick Pattern Pen Blanks Contributed by: Joseph Schneider & Kevin Kronewitter A.K.A wood128 & kronewi This tutorial was downloaded from http://www.penturners.org The International Association of
TURNING A PEN ORIGINAL BY MIKE RUDE REVISED BY GORDON PATNUDE - AUGUST 2015, OCTOBER 2016 EQUIPMENT AND SUPPLIES NEEDED
 TURNING A PEN ORIGINAL BY MIKE RUDE SEPT 2006 REVISED BY GORDON PATNUDE - AUGUST 2015, OCTOBER 2016 PHOTOGRAPHY BY JIM GOTT AUGUST 2015 EQUIPMENT AND SUPPLIES NEEDED A PEN TURNING TUTORIAL [this document]
Instructions for Turning Laminated Bracelets
 Instructions for Turning Laminated Bracelets 1. Start with Design 1. Make a paper template circle for the bracelet. Use this to check the fit on the person you are making the bracelet for. After checking
Legacy Slimline Pencil Kit
 Description: The model is considered one of the most basic pen kits and is a great starter kit for those new to pen turning. Many experienced pen turners use the kit to make elaborate and unusual pens
Legacy Slimline Touch Pen Kit
 Description: The model is considered one of the most basic pen kits and is a great starter kit for those new to pen turning. Many experienced pen turners use the kit to make elaborate and unusual pens
Berea Hardwoods Survival Ballpoint Pen
 Berea Hardwoods Co., Inc. Pencil Instructions 18745 Sheldon Road Middleburg Heights, Ohio 44130 Toll Free 1-877-736-5487 Survival Ballpoint Pen (Berea #1602/x-xxx- x) Needed: Mandrel-A Bushing-61A Drills-
Making a Scalloped Segmented Pen Blank
 Making a Scalloped Segmented Pen Blank Contributed by: Tim Spaulding A.K.A Tim Originally Published for the South Puget Sound Woodturners This tutorial was downloaded from http://www.penturners.org The
Legacy Upgraded Junior Gentlemen s Pen Kit
 Description: The Upgraded Junior Gentlemen s model is a classic style pen which is easy to turn and uses a Roller Ball Refill which is highly desirable among pen enthusiasts The Upgraded Junior Gentlemen
Legacy Hex Pencil Kit
 Description: The Hex pencil is a step-up kit, with similar features to a Slimline Pro Pencil. It has a click mechanism instead of a twist. It uses an 3/8 tube and 2MM pencil lead. It has a heavier feel
Legacy Polaris Pen Kit
 Description: The Polaris model is a single tube pen kit that uses a 3/8 tube and is a great starter kit for those new to pen turning. They look similar to our Viceroy kit but the body tube is longer which
Fig01: A spindle with the intended extents of a spiral marked with V-cuts.
 Spiral Layouts Three Ways Introduction The traditional way to lay out spirals leaves me cold for a simple spiral on small work with 5 full turns you would need 4 longitudinal lines, dealing with parallax
Legacy Bullet Click Pen Kit
 Description: The Bullet Click pen is a step-up kit, with similar features to a Power Click Pen. It has a click mechanism instead of a twist. It uses an 8mm tube and a Parker style gel refill. It is popular
Legacy Magnet Pen Kit
 Description: The Magnet pen model is a variation of the Slimline pen and considered one of the most basic pen kits and is a great starter kit for those new to pen turning. Sometimes called the Refrigerator
A candle stick addresses transferring and reproducing dimensions from a plan and breaking the project into steps.
 Activities Discussion These projects allow more skill development including making items to match a drawing, sizing projects to specific dimensions, and just trying fun stuff for the first time! A candle
Bluenose II Part 2. Planking the Hull
 Planking the Hull Planking is time consuming and requires care, but it can be very satisfying to watch your creation take shape. It is also the point at which many would-be ship modelers throw up their
Rosalina Accessories Tutorial Version March 2011 Martyn
 Rosalina Accessories Tutorial Version 1.0 - March 2011 Martyn Star Brooch Feel free to experiment with these dimensions, you should make a template you are happy with, the method still works. 1) Creating
Homemade Weaving Jig By David Dosser
 Homemade Weaving Jig By David Dosser Items needed for a 100 thread weaving jig: 1. 8x10 -.080 Plastic sheet (Optix brand or Lexan). Clear or white Plastic is easier to work with and can be found at most
GENERAL NOTES: Page 1 of 9
 Laminating A Zia Into A Turning Blank by W. H. Kloepping, Jan. 2009 This describes how a zia (the New Mexico state symbol) can be laminated into a turning blank. Materials needed: Square Turning Block
Christmas Bell Ornament
 Christmas Bell Ornament This is an easy Christmas ornament idea I cabbaged from a friend and skilled turner, Curt Fuller, from Utah. I kind of adapted it to my style but I still got the idea from him.
A Pictorial of David Dawes AA400 HFT Thumbhole Stock in the Making
 DRAFT Version A Pictorial of David Dawes AA400 HFT Thumbhole Stock in the Making Part 1 and finally Part 2 as well Updated: February 2008 By James Mitchell (a.k.a. mitchejc) Note: Building rifle stocks
Nojo Design: Large Step Cabinet: February 2012
 Nojo Design: Large Step Cabinet: February 2012 The largest single piece of furniture I ve ever made is this stepped cabinet. Finished piece is 8! tall and over 10 long. This project has been great, although
Legacy Classic Twist Pencil Kit
 Legacy Pencil Kit Description: The pencil is great kit and has features to make it a step-up pen. It is slightly more difficult to make, but still very easy if you follow these instructions carefully.
Scissor Stool. Written By: Feitan
 Scissor Stool If the stool is going to be kept indoors simply rub all the pieces with a Minwax WipeOn Poly before assembling the stool. If it is going to go outdoors use Minwax SparUrathane and coat all
1Take the keel (3) and
 and") 1 The hull and the bridge 1Take the keel (3) and apply PVA wood glue in the second slot from the left: a toothpick may make it easier. Take care: the left end is the one that has a projection. THE HULL
1 The hull and the bridge 1Take the keel (3) and apply PVA wood glue in the second slot from the left: a toothpick may make it easier. Take care: the left end is the one that has a projection. THE HULL
Step by-step three piece lid and finial
 Step by-step three piece lid and finial Hi all. Just thought I would share my way of creating a three piece finial. This really adds interest to vessels and boxes by providing a visual highlight and enabling
Making a Veneer Sand Shaded Fan
 P. Michael Henderson January 24, 2007 There are many decorative elements for furniture that you can make using veneer in fact, the possibilities are limited only by the imagination of the veneer worker.
Cardboard Model Buildings
 Cardboard Model Buildings Get more model kits from http://www.modelbuildings.org PRINTING & ASSEMBLY TIPS: These OO designs can easily be resized by reducing the print percentage as follows: OO scale is
EASY BREAD/ CUTTING BOARDS
 PLANS BY DEEPLY SOUTHERN HOME EASY BREAD/ CUTTING BOARDS DIFFICULTY LEVEL: EASY TOOLS REQUIRED 18V ONE+ RANDOM ORBIT SANDER 18V ONE+ CORNER CAT FINISH SANDER 18V ONE+ LITHIUM-ION DRILL KIT 18V ONE+ ORBITAL
Fig2: The Sliding Glue Block from the back.
 Ornament Stand Introduction It was one of those forehead smacking moments. I was taking the #2 jaws off my Stronghold chuck, to put on my homemade wooden two jaw chuck set-up. For some reason instead of
Al & Gary's Illusionist Heart
 Al & Gary's Illusionist Heart Plans and Instructions by: Albert Herwig and Gary A. Emerich Al & Gary's Illusionist Heart As Al Would Say: It's a pendant Now it's a heart Our pictures are in there My children'
Central New York Rocket Team Challenge 2018 Rocket Assembly Instructions
 Central New York Rocket Team Challenge 2018 Rocket Assembly Instructions Note: These instructions vary from those provided by the manufacturer of the rocket kits. There is also considerable varying discussion
Turning Between Centers (Reissued 2015)
") Turning Between Centers (Reissued 2015) Contributed by: George Butcher A.K.A Texatdurango This tutorial was downloaded from http://www.penturners.org The International Association of Penturners - 2015
Turning Between Centers (Reissued 2015) Contributed by: George Butcher A.K.A Texatdurango This tutorial was downloaded from http://www.penturners.org The International Association of Penturners - 2015
Single Barrel Finial Twist Parker Pen. Jeff Powell
 Single Barrel Finial Twist Parker Pen by Jeff Powell A.K.A workinforwood This tutorial was downloaded from http://www.penturners.org The International Association of Penturners Single Barrel Finial Twist
Curved Pieces are a Common Woodworking Challenge
 Curved Pieces are a Common Woodworking Challenge I recently created a set of four dining chairs that required three curved back rest pieces each. On the top piece of each chair I wanted to inlay a marquetry
3Insert the second rod no. 4
 Yamato: Step-by-step 37 The stern block and searchlight control towers a b c d e f Recommended tools and materials Wood glue Sandpaper (no. 800 grain) Metal file Putty Craft knife For metal: Super Glue
A Pictorial of David Dawes AA400 HFT Thumbhole Stock in the Making
 A Pictorial of David Dawes AA400 HFT Thumbhole Stock in the Making From This This To Part 1 By James Mitchell (a.k.a. mitchejc) Note: Building rifle stocks is super fun and the idea with this pictorial
ALAN CARTER STUDIO 5332 RIVERVIEW DR., LISLE, IL
 ALAN CARTER STUDIO 5332 RIVERVIEW DR., LISLE, IL 60532 630-971-0690 apcarter@sbcglobal.net www.alancarterstudio.com SPLITTING THE DIFFERENCE This is for all you slackers out there. Sometimes half measures
1 SELECT suitable material. It takes time to cut a cab. Don t waste it on rubbish.
 7 July 09 CUTTING A STANDARD CABOCHON A Standard Cabochon or CAB is an oval or round stone with one flat side and the other side having an even curved dome shape. Top of Cab It will have a narrow bevel
LITTLE CRITTERS WITH CHARACTER
 LITTLE CRITTERS WITH CHARACTER Spindle Turning for FUN By Linda Ferber You will discover there are many design options that will give these critters personality. Make these in batches; I am sure you will
Dusty Harp Pickup for lever harps
 q P10 for 24 30 string harps q P20 for 32 40 string harps Dusty Harp Pickup for lever harps Installation Kit Contents and Diagram of Pickup A. Pickup Element B. Grommet C. Pickup Harness D. Jack E. F.
Perhaps the best thing about. Three bowls slightly rearranged Twisted Possibilities
 Three bowls slightly rearranged Twisted Possibilities By Malcolm Tibbetts Lacewood Ribbon, 13 7½" Perhaps the best thing about segmented turning is the total lack of restrictions; there is no end to the
MATERIALS & TOOLS REQUIRED INTRODUCTION. Before you start turning, read and understand this entire procedure.
 INTRODUCTION This set of instructions shows one method to turn mills.there are many other possible variations and techniques. NOTE: These instructions are specific to 'Chef Specialties' mechanism. For
REVISION LIST CHAPTER 25: AFT WINDOWS. The following list of revisions will allow you to update the Legacy construction manual chapter listed above.
 REVISION LIST CHAPTER 25: The following list of revisions will allow you to update the Legacy construction manual chapter listed above. Under the Action column, R&R directs you to remove and replace the
SEGMENTED TURNING. Segmenting 101
 SEGMENTED TURNING Segmenting 101 The greatest difference between segmented turning and traditional turning is the turner must decide what final form the turning will take even before the first cut is made.
Casting Braided Steel
 Casting Braided Steel Contributed by: Neil Wright A.K.A Dai SENSEI This tutorial was downloaded from http://www.penturners.org The International Association of Penturners - 2016 CASTING BRAIDED STEEL By
Band Less Slim Line Pens A How To Guide. Written By: Joe Agrella.
 Band Less Slim Line Pens A How To Guide Written By: Joe Agrella http://www.joespens.com/ Step 1: First let s select a nice pen blank. I will use a iron wood blank. Any blank about 5 ½ should do fine. Step
A Shaker Sewing Stand
 America s leading woodworking authority Step by Step construction instruction. A Shaker Sewing Stand A complete bill of materials. Exploded view and elevation drawings. How-to photos with instructive captions.
1Use the metal file to smooth
 Yamato: Step-by-step 85 Parts of the bridge and the hull a b c d e f a Part of the bridge b Part of the bridge c Part of the bridge d Radar x 2 e Part of the bridge x 2 f Wire Recommended tools and materials
COFFEE TABLE WITH RECESSED TRAY
 COFFEE TABLE WITH RECESSED TRAY Why not treat your guests to a tray laid with delicacies and then remove it from sight in your new coffee table. There's no easier way to show that you are a thoughtful
Legacy DaVinci Pen Kit
 Description: The DaVinci model is a single tube pen kit that uses a 3/8 tube and is a great starter kit for those new to pen turning. They are look similar to our Viceroy kit with a more intricate design.
Corner Cupboard. This space-saving piece enhances any room 46 FINE WOODWORKING
 Corner Cupboard This space-saving piece enhances any room BY G A R R E T T H A C K On every trip to the Shelburne Museum near Burlington, Vt., I visit a favorite object a small hanging corner cabinet.
Scratchbuild A Backwoods Water Tank Part V - Making the Frost Box and Hanging the Water Spout
 Scratchbuild A Backwoods Water Tank Part V - Making the Frost Box and Hanging the Water Spout By Dwight Ennis In this section, we're going to make the Frost Box, and we'll build the Spout Hanger Assembly
Building Tips This model can be built using the following types of adhesives:
 Page 1 Building Tips This model can be built using the following types of adhesives: Epoxy (with or without microballons) Odorless cyanoacrylate (CA) with accelerator UHU Creativ for Styrofoam (or UHU
3Position the hull of the ship as
 Yamato: Step-by-step 25 The hull and stern deck c b d a b d c e e f a Rear frame b Stern deck x 2 c Stern deck x 2 d Side wall x 2 Wood glue Sandpaper (no. 400 grain) Craft knife Pliers d Side wall x 2
Tutorials. To create your antique embroidered book, you'll need:
 Tutorials Part of the beauty in some books is simply how they look, and if we can t find them that way, we ll make 'em! It s a perfect and unusual way to display your favorite literary embroidery designs
Fretboard Wednesday, January 16, :36 PM
 ASL Breakdown Page 1 Fretboard Wednesday, January 16, 2013 9:36 PM - - To prepare the fretboard for cutting fret slots: True one edge of the fretboard blank on the jointer. True one of the other edges
ARTS AND CRAFTS CHAIR
 ARTS AND CRAFTS CHAIR 491 MATERIALS LIST--DINING CHAIR Key No. Size and description (use) A 2 1-3/4 x 1-3/4 x 16-1/4'' oak (front leg) B 2 1-3/4 x 3-3/4 x 40-1/2'' oak (rear leg) C 1 1-3/4 x 3-3/16 x 15''
Indian Blanket Blanks
 Indian Blanket Blanks Contributed by: Jeff Powell A.K.A workingforwood This tutorial was downloaded from http://www.penturners.org The International Association of Penturners - 2014 Indian Blanket Blanks
ALAN CARTER STUDIO 7 Cane Creek Circle, Fairview, NC
 ALAN CARTER STUDIO 7 Cane Creek Circle, Fairview, NC 28730 630-390-8821 apcarter@sbcglobal.net www.alancarterstudio.com TURNING SMALL GOBLETS As a follow up to my thin stem article, here s a how-to on
CUSTOM SHUTTERS IN-A-BOX
 CUSTOM SHUTTERS IN-A-BOX SHUTTER ASSEMBLE INSTRUCTIONS & INSTALLATION INSTRUCTIONS 1. Inspect the contents of your package. Do not discard the shutter packaging box until you have started painting your
Fancy Keepsake Box. Premium Plan. In this plan you ll find: America s leading woodworking authority
 America s leading woodworking authority Premium Plan In this plan you ll find: Step-by-step construction instruction. A complete bill of materials. Construction drawings and related photos. Tips to help
5If the protruding part is. 6Place 1 as is shown in the. 7Place what was assembled
 Yamato: Step-by-step 49 The base of the bridge and strakes a c b d a Base of the bridge b Base of the bridge c Base of the bridge d Strakes x 10 THE BASE OF THE BRIDGE 1Smooth 1 to 3, first using the metal
OFFSET TURNINGS. By using an eccentric chuck, SHOPMADE CHUCK BUILD A FOR. David Mueller FEATURE. Build the chuck body
 FEATURE BUILD A SHOPMADE CHUCK FOR OFFSET TURNINGS David Mueller By using an eccentric chuck, you can add interest to turnings such as pendants and box lids. The workpiece is mounted out of alignment with
Bandsawn curves, Precise and repeatable
 Bandsawn curves, Precise and repeatable Template-guided techniques from a master of the machine BY BRIAN BOGGS In 35 years working wood I ve gradually acquired many machines, but the bandsaw remains at
TECHNICAL BULLETIN BELT FINISHING WITH MICRO-MESH
 TECHNICAL BULLETIN BELT FINISHING WITH MICRO-MESH MICRO-MESH finishing belts provide desired surface qualities and economic benefits to many types of finishing operations, and are available in a range
Trebuchet Construction Instructions
 Trebuchet Construction Instructions Follow these instructions step by step to create your trebuchet. Materials: Trebuchet Template (6 pages cardstock) Trebuchet Template (1 page paper) One unsharpened
Jimmy s 2 nd demonstration was what he called an African Drum style box made from Iroko with a cocobolo insert in the lid with inlaid sterling silver.
 Jimmy s 2 nd demonstration was what he called an African Drum style box made from Iroko with a cocobolo insert in the lid with inlaid sterling silver. He started by roughing out the block with a roughing
Sky-in-a-Box Instructions
 Strand 1 Activity 7 The Shifting Stars Sky-in-a-Box Instructions Large or Small? The Sky-in-a-Box designs are provided ready to print on A4 or US Letter size paper. Used at this size they will require
Tools and Tips: ( 1 )
") Tools and Tips: As you build instructions will show in my many picture manual how to assemble. You can use your own methods as you desire, my results are very good. A smooth, flat work surface is very
Tools and Tips: As you build instructions will show in my many picture manual how to assemble. You can use your own methods as you desire, my results are very good. A smooth, flat work surface is very
Hinge Mortising Jig. One of the make it or break it parts of building a. 6 ShopNotes No. 74
 Hinge Mortising Jig A Mortise for a Hinge. Quick, clean, and accurate that s the only way to describe the mortise you get with a trim router and this hinge mortising jig. One of the make it or break it
How to Turn a Wooden Egg
 How to Turn a Wooden Egg By Alex Elias (Alxe24) January 2008 This article has been downloaded from the library of the International Association of Penturners. www.penturners.org You are welcome to reproduce
C-Note Bookshelf Speaker Kit
 C-Note Bookshelf Speaker Kit Thank you for purchasing the C-Note bookshelf speaker kit. This speaker kit was precision cut using CNC machinery for the best possible fit and finish. With a little time and
Coffee table with recessed tray
 Coffee table with recessed tray Dinner is served Coffee table with recessed tray This coffee table has it all: it contains a recessed tray, so that you can treat your guests to various delicacies. 1 Introduction
Corner Entertainment Center Plans
 Table of Contents Introduction... 3 Let s discuss the tools needed... 3 Let s discuss the materials needed... 4 Let s build it... 4 Attaching the 2x2's... 7 Determine the shelf spacing... 9 Scribing the
Shop-Made Miter Clamps
 *Editor s note: In the photos showing the table saw, the blade guard has been removed for clarity. I try to be as self-sufficient as possible, so I like to manufacture my own tools whenever I can. I designed
Tools and Tips: ( 1 )
") Tools and Tips: As you build instructions will show in my many picture manual how to assemble. You can use your own methods as you desire, my results are very good. A smooth, flat work surface is very
Tools and Tips: As you build instructions will show in my many picture manual how to assemble. You can use your own methods as you desire, my results are very good. A smooth, flat work surface is very
NaI (New and Improved) Realistic Cigar Pen
 Realistic Cigar Pen") NaI (New and Improved) Realistic Cigar Pen Contributed by: Bill Bettag A.K.A Wood Butcher This tutorial was downloaded from http://www.penturners.org The International Association of Penturners - 2016
NaI (New and Improved) Realistic Cigar Pen Contributed by: Bill Bettag A.K.A Wood Butcher This tutorial was downloaded from http://www.penturners.org The International Association of Penturners - 2016
Never power this piano with anything other than a standard 9V battery!
 Welcome to the exciting world of Digital Electronics! Who is this kit intended for? This kit is intended for anyone from ages 13 and above and assumes no previous knowledge in the field of hobby electronics.
Big Oz. Rocket. User Guide V0313
 Big Oz Rocket User Guide 59824 V0313 Materials Included The Big Oz Rocket Kit should include the following materials. If something is missing, contact Customer Service at 800-358-4983. 20-ounce plastic
Hubble Space Telescope Paper Model Directions Downloads, patterns, and other information at:
 Hubble Space Telescope Paper Model Directions Downloads, patterns, and other information at: www.hubblesite.org/go/model Materials: model pattern printed onto cardstock/coverstock instructions printed
Making a Corian Desktop Pen Holder
 Making a Corian Desktop Pen Holder Contributed by: Pete Ripaldi A.K.A pete00 This tutorial was downloaded from http://www.penturners.org The International Association of Penturners - 2016 Making a Corian
Building a shaft less Crush/Grind Pepper mill Chuck Ellis
 Building a shaft less Crush/Grind Pepper mill Chuck Ellis First off, I don t want you guys laughing at my drawing I m a better turner than I am a graphic artist. This is a rough sketch very rough of my
This Manual Covers The Construction Of A Hood Scoop Plug From The Drawing Board. Through Construction. To Final Fitting.
 1 This Manual Covers The Construction Of A Hood Scoop Plug From The Drawing Board. Through Construction To Final Fitting. 2 TABLE OF CONTENTS: INTRODUCTION: 3 MAKING A PLUG FOR A CUSTOMIZED PRODUCT. 4
Turning between centers - another way
 Turning between centers - another way There has been a fair amount of discussion of turning between centers and questions always pop up and it seems like we've never really sat down and discussed the process
WOOD TOY NEWS SANDING DRUMS & JIGS ISSUE
 WOOD TOY NEWS SANDING DRUMS & JIGS ISSUE toymakingplans.com June 11, 2014 Wednesday How to Make a Sanding Drum Jig for Smarter Toymaking. By Imants Udris Udie Our discussion begins based on the 5 piece
Nanton Grain Mill Assembly
 ( 1 ) Nanton Grain Mill Assembly Locate package for assembling storage building. These are cut from 1/8 masonite. Inspect and lightly sand edges where it will be bonded. Use white glue or CA glue to bond.
Flamingo. That s what I looked
 Plans N O W w w w. P l a n s N O W. c o m flip-seat Storage Bench Flamingo. That s what I looked like as I stood in the doorway perched on one leg, with my other foot raised so that I could untie the laces
Make your own zero clearance throat plate.
 Make your own zero clearance throat plate. A picture tutorial By Wayne Breshears One of the more important table saw accessories you can have is a zero clearance insert or throat plate. The close tolerance
Domed Cove Box. Materials: Dry stable hardwood, straight grained with pronounced end grain, about 3+ square and 3+ long Sandpaper Finish of choice
 Domed Cove Box Michael G. Stafford I don t know who first turned a box where the sides were curved in to form a waist or as we like to say in woodturning, coved. I started gradually turning boxes with
HORNSBY DISTRICT WOODTURNERS INC. Established 1983
 HORNSBY DISTRICT WOODTURNERS INC. Established 1983 NEWSLETTER SEPTEMBER 2016 September started with John Ewart demonstrating at our first mid week (Thursday) demonstration, well attended and enjoyed by
Contents. pages 20-24: Installing Edge sinks into. custom laminate countertops page 8: Installing Edge sinks into postform laminate countertops
 Contents pages 2-8: Installing Edge sinks into custom laminate countertops page 8: Installing Edge sinks into postform laminate countertops pages 9-14: Installing Acrylic sinks into custom laminate countertops
A vibration is one back-and-forth motion.
 Basic Skills Students who go to the park without mastering the following skills have difficulty completing the ride worksheets in the next section. To have a successful physics day experience at the amusement
4. Bevel the LE face of HS1-HS11 to match the horizontal stab leading edge sweep angle.
 BEFORE YOU BUILD 1. Unroll each sheet of the plans. Roll them inside out so that they will lie flat on the building surface. 2. Assemble the tools that you will need to build each section so that they
1.9 KIT # Fits Aerotech 1.9 diameter rockets. Uses coupler and payload tube included with select Aerotech Kits. Ebay Parts List Description.
 KIT #0545.9 Fits Aerotech.9 diameter rockets. Uses coupler and payload tube included with select Aerotech Kits. Ebay Parts List P/N Description Qty 5405.9 Ebay Laser Cut Sheet Thin 5406.9 Ebay Laser Cut
Digital Patterns. Designed by Steve Good
 WWW.SCROLLSAWWORKSHOP.BLOGSPOT.COM Digital Patterns Designed by Steve Good Hundreds of free Patterns Stencil Printer Jigsaw Puzzle Templates DVD s Key Chain Pattern Printer Video Tutorials Reviews Community
Invisible Clip Tutorial
 Invisible Clip Tutorial I first saw what I call the Invisible Clip in Russ Fairfield s PMG gallery and fell in love with it. I could not figure out how he made them so I sent him an e-mail and he was kind