Nojo Design: Large Step Cabinet: February 2012
|
|
|
- Alisha Smith
- 5 years ago
- Views:
Transcription
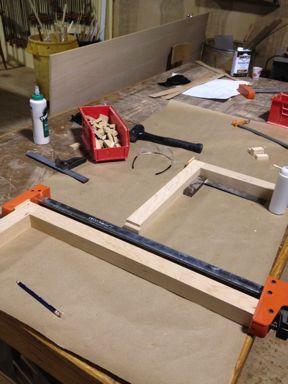
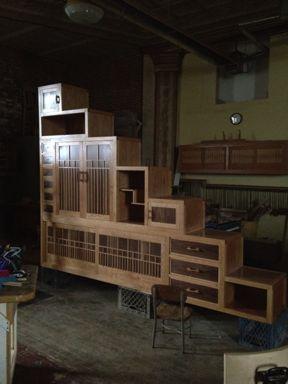
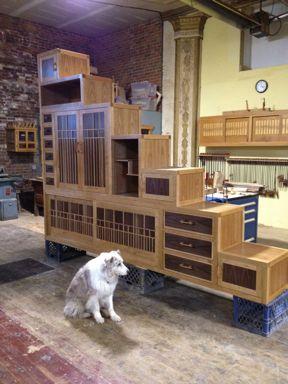
1 Nojo Design: Large Step Cabinet: February 2012 The largest single piece of furniture I ve ever made is this stepped cabinet. Finished piece is 8! tall and over 10 long. This project has been great, although it almost fell over on top of me at one point 1. I started with several client meetings and design iterations for the cabinet. 2. Once the design was finalized, I did some calculations and headed to the lumberyard and bought /4 boards of black cherry to build the frame of the piece. 3. Back in the shop, I cut down all the rough boards except for one, which I made the longest members with. Then I straightened one face and one edge of each board on the jointer and then sent them all through the planer to get even and consistent thickness of 1 13/ After that, I ripped all the boards on the table saw down to 1 13/16 squares and sent them all through the wide belt sander to achieve even 1 3/4 square stock. 5. Then I carefully calculated a cut list for the stock and cut all parts to length on the table saw.

2 6. Moving to the horizontal mortiser, I carefully set up an exactly centered mortis in the stock and begin cutting mortises in the ends of all the short pieces and then on the longer pieces, I took time to lay out the mortise location.

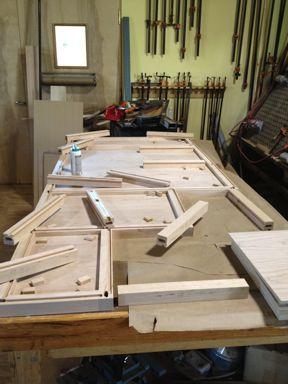
3 7. Once all mortises were cut, I dry fit the carcass to see the shape of things to come.

4 8. Then, I measured for all the panels to fill in the backs, dividers, and sides. 9. Using 1/16 thick veneer I cut panels for all the back panels and interior dividers. For the outer walls, I carefully book matched some of the same material into 9 x 22 panels so the grain followed up the treads and also
5 the risers as you look at the unit from the side or top. This effect is subtle but was worth doing. This detail only takes some careful planning and labeling as you go. To make a tight/straight joint on the veneer, run it across the jointer set very low. This trick will only work with the extra thick veneer. I then secure the joint with regular masking tape. 10. For the substrate, I used! ultra light MDF. Since the panels aren t structural, the less weight will be appreciated later. I cut pieces to match the laid up panels on the table saw. Using a foam roller I applied an even coat of yellow glue to the veneer and one side of the substrate and slid it into my vacuum bag face down. Some prefer to glue both sides at once; I ve never had any problem doing one side at a time. I leave each side to dry a minimum of 4 hours. There are a lot panels this takes a few days. 11. When the panels were all done, I scraped the tape with a cabinet scraper. If you don t have a widebelt sander I strongly recommend looking into renting an hour on one at a local cabinet shop. This will give you consistent thickness and uniform sanding pattern. You ll still need to finish sand prior to assembly, but this is unavoidable. 12. With the frame still dry fit together, I labeled all of the parts. I also marked where every panel went. Take the extra time to double check that every part is labeled and the position of each panel is well marked. I have never not missed one, so triple check. 13. Back at the table saw, I set the dado blade to the thickness of the sanded panels plus a hair. Just loose enough to get piece bit of paper into the slot with the panel. 14. Now, I cut all the dados in the members as marked. There are some that required stopped dados. When you do this, PLEASE TAKE YOUR TIME! Stopped dados need extra special care on the table saw. I did mine on a Saw Stop and was glad to know I had that extra security. 15. I made some! loose tenon stock and sized them to fit the exact width of the mortises. Then I set a stop on a miter gage and cut a enough for all the front and back mortises. I cut them 1/8 shorter than the combined depth. 16. I then glued the front frames together. I choose to do this in stages when possible. It s nice to be able to just have a few elements to have to control and square up. As each element is glued together I take careful care to check for squareness. Tight and straight work is imperative at this stage.
6

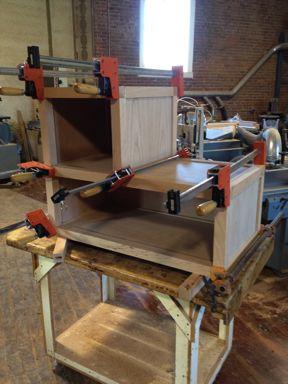
7 17. I measured off the front frames for the sizes of the back panels. Adding for the depth of the dados, I cut the panels starting with the largest ones first and took care to choose pleasing grain placement. Then, I finish
8 sanded all panels to 220 grit and eased all the edges. This is important to avoid chipping the veneer during construction. 18. Next, I glued up back panels. Now it s coming together! 19. For the last time, I dry fit the cases together and measured for the missing panels. I sized and sanded all panels taking careful care to label the riser and tread panels to keep them in order. 20. I sanded the front and back frames, preparing for the big glue ups. I took an extra minute and ran some 180 grit along each dado. This helps the parts come together when the heat is on and the glue is setting. 21. Now I gathered clamps, a couple of glue bottles, some rags and a rosary. I cleared the workspace and carefully laid out all the parts needed and devised a plan for applying glue, inserting tenons and panels as smoothly as possible. At the start of your glue up, take a deep breath and get going. If all goes well congratulations, if not pull it apart. It s not worth getting it wrong. Take it apart, wipe off the glue and try again the next day.
9
10

11 22. Now invite friends and family to tell you how clever you are for making such a cool thing.

12 23. With a sharp chisel and a random orbit sander, I cleaned up the extra glue and smoothed the joints and was sure not to round over any of the nice square pieces.
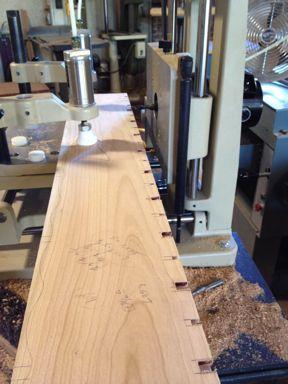
13 24. On a piece of paper, I laid out the different paneled doors. Then, taking care with my measurements off of the case, I created a cut list for the necessary parts. 25. I milled necessary stock to a strong 3/4 and also laid up the necessary door panels as described earlier. Once I milled the stock, I checked the original dimensions carefully and sized all stock on table saw. 26. Then, I cut mortises in all the necessary joints this should only take one setup on the mortiser. 27. I put panels in the veneer press one side at a time. After pressing, I removed all glue from the press panels and sand panels. As with the frame, I cut dado s to allow for panels. Once again, you should be very careful with the stop dado s. 28. I glued up the doors, taking care that they were flat and square. 29. For the sliding doors, I repeated all the same steps, but made the stock 5/8 thick. 30. Using a calculator, I devised a symmetrical layout for the decorative latticework. 31. With decorative lattice strips prepared, I created layout blocks to help evenly space the strips. I marked all joints with a pencil and cut on a mortising machine.
14

15 32. I glued up the sliding doors same as the regular doors. Then, I sanded all doors, paying close attention to the joints; making them nice and even.
16 33. On the regular swinging doors, I bored for 32mm cup hinges. At the same time, I took a sacrificial piece of wood the same vertical size as the door and bore that as well. 34. I mounted cup hinges in the sacrificial member in order to align the cabinet hardware of the hinge. 35. Now, I placed the sacrificial stick in cabinet with a " setback, taking care to keep the stick perfectly vertical. 36. I attached the door hardware into the cups and placed the doors in the stepped cabinet. Are you still with me? 37. Then I made adjustments for even spacing for optimal 1/16 reveal all the way around and smooth swinging.

17 38. On to the sliders; I installed the decorative latticework of the sliders. My first step was to size all the sticks, disregarding the need for joinery.
18 39. Then, in two stages, I marked for the joinery. First I installed all the vertical sticks at once and with a long straight edge and marked all the necessary dado s. 40. I remove the horizontal sticks and repeated the steps above for the vertical sticks.

19 41. With a miter gauge on the table saw and my blade just coming out of the table, I cut all necessary dado s, taking time to fit each one. 42. I glued it all together with the assistance of a little hammer.

20 43. Then I moved on to drawers. I decided what size I wanted my drawers to be and sized my stock. I like! wall drawer boxes.
21 44. I cut dovetails (use whatever method you are comfortable with) and glued the drawers together. Then, I decided what kind of drawer fronts and handles I wanted. I fabricated, sanded and attached to the drawers after they d been sanded. 45. After, I final sanded all my parts case and all. For this, I suggest you wear your dust mask and turn your radio really loud, this step is going to take a while. 46. Time for finish work. I chose to spray all my parts. You may choose the same or to oil. As with all steps, take your time here. Any piece of furniture is only as good as the finish that you put on it.

22
23 !
24
Dining Table with Two-Way Drawers
 Dining Table with Two-Way Drawers DOUBLE-FRONTED DRAWERS MAKE THIS PIECE UNIQUE With two drawer fronts, a center beam, plywood bottoms, and custom pulls, these drawers are both distinctive and durable.
Tongue & Groove Cabinet Doors Copyright 2014 JaysCustomCreations.com
 Tongue & Groove Cabinet Doors Copyright 2014 JaysCustomCreations.com A tongue and groove cabinet door is made up of at least 5 pieces. Two horizontal rails (blue), two vertical styles (green), and one
Demilune 4. Apron Joinery. Curved Apron Tenon. Bridle Joint Legs. Bridle Joint Front Apron
 Demilune Email 4 Apron Joinery There are two types of joints used in connecting the aprons and legs. The rear legs use conventional mortise and tenon joints, while the front legs use the less conventional
This is a solid wood cabinet. The only plywood used is for the back and drawer bottoms.
 Sideboard Sideboard Overview: This project requires basic woodworking skills and access to woodworking machines. Woodworking machines have sharp cutting edges and are NOT forgiving. You should be properly
Instructables Butcher Block Top
 Instructables Butcher Block Top Project Overview: This project requires basic woodworking skills and access to woodworking machines. Woodworking machines have sharp cutting edges and are NOT forgiving.
Grade 11 Woods Lift Lid Coffee Table. Based on Under the big Top from Popular Mechanics Website
 Grade 11 Woods Lift Lid Coffee Table Based on Under the big Top from Popular Mechanics Website TABLE TOP 1. Select enough lumber to construct a top that is between 22 ½ and 24 wide after jointing. Ensure
Jeff Branch WOODWORKING YOU CAN BUILD A. By adding subtle design elements, a traditional furniture style becomes decidedly modern.
 Jeff Branch WOODWORKING YOU CAN BUILD A By adding subtle design elements, a traditional furniture style becomes decidedly modern. Jeff Branch WOODWORKING Publisher: Jeff Branch Editor: Jeff Branch Art
Traditional glass-pane and wood-muntin doors highlight this free-standing piece.
 Bookcase Traditional glass-pane and wood-muntin doors highlight this free-standing piece. As the saying goes, there's nothing like good books. But they can present some storage problems--especially if
Kitchen Step Stool. Premium Plan. In this plan you ll find: America s leading woodworking authority
 America s leading woodworking authority Premium Plan In this plan you ll find: Step-by-step construction instruction. A complete bill of materials. Construction drawings and related photos. Tips to help
Project 17884EZ: Shaker End Table
 Project 17884EZ: Shaker End Table With its clean, simple lines, this piece is unmistakably Shaker style. Ours is made from cherry, a wood commonly used by Shaker craftsman, but we ve also seen this piece
Arched. Building an. Passageway. Although my company specializes in high-end jobs
 Building an Arched Passageway All photos by Brian Striegler This straightforward approach combines basic shop methods with simple site joinery to create an elegant frame-and-panel archway by Gary Striegler
 America s leading woodworking authority To download these plans, you will need Adobe Reader installed on your computer. If you want to get a free copy, visit: http://adobe.com/ reader. Having trouble downloading
BUILDING A STORM DOOR
 BUILDING A STORM DOOR BY NEAL BARRETT Illustrations by George Retseck If you're in the market for a storm door, you probably know that there are many styles and models available. However, most of them
Dress up your dining room with this Southern delicacy. that was used to serve drinks after a hunt. Breeches and jodhpurs are optional.
 Dress up your dining room with this Southern delicacy that was used to serve drinks after a hunt. Breeches and jodhpurs are optional. Huntboard Classic Six-Legged My dad has been making this six-legged
Project 13586EZ: Writing Desk. Writing Desk Materials List
 Project 13586EZ: Writing Desk This writing desk will make a handsome addition to just about any room in the house. The one shown is made of cherry, a logical choice for a piece like this, but mahogany
Silverware Chest Plan
 Silverware Chest Plan 05L14.01 Introduction 1. Measure the space required for your cutlery before beginning this project to be sure that it will fit in the drawers and top compartment. The best way to
HANDCRAFTED LIDDED CHEST IN CHERRY With Red Cedar Lining
 HANDCRAFTED LIDDED CHEST IN CHERRY With Red Cedar Lining Design A chest was desired as a gift to family. The Shaker style of furniture was identified as a pleasing style. After viewing a number of pictures
Mid-Century Credenza Thoughtful details and modern joinery merge in this sleek design
 Mid-Century Credenza Thoughtful details and modern joinery merge in this sleek design BY LIBBY SCHRUM Mid-Century Modern furniture has not been wildly popular since, well, the mid-century. But fashion
Serving Tray. When some good friends got married recently, An exercise in template-making yields a great gift project that s easy to duplicate
 Serving Tray An exercise in template-making yields a great gift project that s easy to duplicate END Create from 3 8 2 8" piece. By Geoff Noden When some good friends got married recently, I decided to
Installation Guide. Pionite Decorative Surfaces One Pionite Road, Auburn, Maine PIONITE ( )
") Installation Guide A Subsidiary of Panolam Surface Systems SMPBRO00-012 6/14 Pionite decorative laminates are designed for finished interior surfaces which require high impact, wear and stain resistance
Installation Guide A Subsidiary of Panolam Surface Systems SMPBRO00-012 6/14 Pionite decorative laminates are designed for finished interior surfaces which require high impact, wear and stain resistance
Classic Kitchen Island
 America s leading woodworking authority Step by Step construction instruction. A complete bill of materials. Classic Kitchen Island Exploded view and elevation drawings. How-to photos with instructive
WAYNESBORO AREA SCHOOL DISTRICT CURRICULUM MATERIALS AND MANUFACTURING IV
 UNIT: Safety NO. OF DAYS: 20 KEY LEARNING(S): Safe and proper use of tools and machines UNIT : How do I safely work in materials and manufacturing lab & How to apply machines and tools? 3.4.10. D2. Diagnose
Hardware Cabinet. Part 3
 Hardware Cabinet Part 3 The vertical dividers are the next task on the cabinet and a bit of a trick to get right. The horizontal dividers are only ½ thick pine spanning the 31 width of the cabinet and
Knockdown Bookcase. This slant-sided bookcase was a popular mail-order item in the early 1900s.
 Knockdown Bookcase This slant-sided bookcase was a popular mail-order item in the early 1900s. The Arts & Crafts movement was part of an interesting social change in America the advent of mail-order purchases.
MAKING THE TV RISER CUTTING A STOPPED GROOVE ON THE TABLE SAW
 TV RISER Cherry 19 MAKING THE TV RISER First, the material that will make up the riser is glued together. Then, dress down the glued-up panel to a flat surface and a consistent thickness. In a shop with
DOCUMENT CHEST. Curly Maple, White Pine
 25 DOCUMENT CHEST Curly Maple, White Pine 100 MAKING THE DOCUMENT CHEST After the stock has been thicknessed, ripped to width, and cut to length, plough a 1/4" X 3 /8" groove on the inside faces of the
Shaker Classic Change the legs to change the look
 Shaker Classic Change the legs to change the look 2 Ways B Y C H R I S T I A N BECKSVOORT not long ago, a couple ordered a set of cherry side tables from me, one for each side of their pencil-post bed.
Cherry Chest of Drawers. Dovetail joinery decorates this Shaker-inspired case piece
 Cherry Chest of Drawers Dovetail joinery decorates this Shaker-inspired case piece BY M I C H A E L P E K O V I C H DRESSER CONSTRUCTION Case top Rabbet, 9 6 in. deep 4 in. 0 7 8 in. 9 2 in. 4 in. Top
Make a cupboard as a BCATS
 National Certificate in Building, Construction, and Allied Trades Skills (BCATS) Make a cupboard as a BCATS project Unit Standard 25921 Level 2, Credit 6 Name: Contents Reference Page What you need to
How to Construct the 8-Point Star by Jay S. Helland
 How to Construct the 8-Point Star by Jay S. Helland 1-5-2013 The photos in these instructions were not taken in consequential order but provide the reader the general idea of the processed used. The process
Shoulder Plane. dovetailed. fine tools. Make an heirloom tool and learn the secret to creating double dovetails in metal it s easier than you think.
 fine tools dovetailed Shoulder Plane Make an heirloom tool and learn the secret to creating double dovetails in metal it s easier than you think. I ve always been fascinated by old, metal hand planes.
I then moved on to the legs assemblies. The legs are simply three pieces of 1 ½ in x 4 ¼ in stock glued up, planed and jointed to 4 in x 4in.
 Nicholson Workbench Another workbench? Does this guy have nothing better to do than build one workbench after another? First off, this one is not for me. I recently received a commission to build a Nicholson
Cabinetmaking & Millwork CIP Task Grid
 1 Secondary Task List 100 FOLLOW RULES FOR WORKING IN THE CABINETMAKING LAB. 101 Review and discuss school rules. 102 Review and demonstrate knowledge of cabinetmaking lab rules. 103 Complete all theory
Cabinetmaking & Millwork CIP Task Grid
 1 Secondary Task List 100 DEMONSTRATE PERSONAL SAFETY. 101 Demonstrate knowledge of general safety rules for working in the cabinetmaking lab. 102 Identify cabinetmaking lab tools and equipment. 103 State
Corner Cupboard. This space-saving piece enhances any room 46 FINE WOODWORKING
 Corner Cupboard This space-saving piece enhances any room BY G A R R E T T H A C K On every trip to the Shelburne Museum near Burlington, Vt., I visit a favorite object a small hanging corner cabinet.
Butterfly Leaf Dining Table Plans
 Butterfly Leaf Dining Table Plans Part 1 An attractive dining table with a secret: the leaf folds and stores inside the table. Season 1, Episode 7 P a g e 2 I first saw a butterfly leaf table in a back
This tailor s cabinet was brought to my attention by a customer
 So what if you don t sew? This authentic Shaker case piece is drop-dead gorgeous in any room. This tailor s cabinet was brought to my attention by a customer who wanted one just like it. She had seen the
add Muscle to your Miters Shopmade L-shaped tenons create a powerful joint BY DUNCAN GOWDY, TIMOTHY COLEMAN, AND REED HANSULD 52 FIne WOODWORKInG
 add Muscle to your Miters Shopmade L-shaped tenons create a powerful joint BY DUNCAN GOWDY, TIMOTHY COLEMAN, AND REED HANSULD 52 FIne WOODWORKInG Photos, except where noted: jonathan Binzen Three versions
Media Center Woodworking Plans Our Home from Scratch
 Media Center Woodworking Plans by Our Home from Scratch Our Home from Scratch LLC Page 1 Disclaimer Our Home from Scratch LLC and its legal owners cannot be held responsible for any loss, damage, injury
Flamingo. That s what I looked
 Plans N O W w w w. P l a n s N O W. c o m flip-seat Storage Bench Flamingo. That s what I looked like as I stood in the doorway perched on one leg, with my other foot raised so that I could untie the laces
Step-by-Step Instructions for Making the Wall-hung Bookcase
 Step-by-Step Instructions for Making the Wall-hung Bookcase When a piece of furniture has an air and look of simplicity, you can be sure that it deftly conceals the complexity of its making. I wanted this
Display Case (for J&S)
") Display Case (for J&S) This is constructed of maple plywood with solid maple (soft maple) edge banding. It was made to fit between a door and a kitchen cabinet, and has an elegant circular taper between
Display Case (for J&S) This is constructed of maple plywood with solid maple (soft maple) edge banding. It was made to fit between a door and a kitchen cabinet, and has an elegant circular taper between
Alaska Bird Observatory Shelves Christopher Swingley
 Introduction Alaska ird Observatory Shelves Christopher Swingley These are the bookshelves I built for the Alaska ird Observatory s new building at Wedgewood Resort in Fairbanks. My version was built from
Cedar 2-Drawer Desktop Storage Cube
 Cedar 2-Drawer Desktop Storage Cube 5 ½ Dimensions 5 ½ 5 ½ 2 2 1 7/8 4 ¼ 4 ½ Author s Notes: Build a Cedar 2-Drawer Desktop Storage Cube from just 1 cedar fence picket. No angles, special cuts or rips
Classic Project. Two-drawer Platform Bed. In this plan you ll find: Step-by-step construction instruction. A complete bill of materials.
 America s leading woodworking authority Classic Project In this plan you ll find: Step-by-step construction instruction. Two-drawer Platform Bed A complete bill of materials. Construction drawings and
WOOD MANUFACTURING 30
 WOOD MANUFACTURING 30 Description This course is designed to introduce to the student the processes and techniques of leg and rail construction. Student skills will be developed through tool and machine
By Gail Cone. Disclaimer This is a presentation on how I created this project. It is not intended to be a definitive how to.
 By Gail Cone Disclaimer This is a presentation on how I created this project. It is not intended to be a definitive how to. 3/11/2014 The inspiration for this furniture project. This table was presented
Butcher Block Countertop
 A friend asked if I would be willing and able to construct a new countertop for an existing island in his kitchen. He had priced countertops of granite and many other materials, but his wife was partial
Christmas Bell Ornament
 Christmas Bell Ornament This is an easy Christmas ornament idea I cabbaged from a friend and skilled turner, Curt Fuller, from Utah. I kind of adapted it to my style but I still got the idea from him.
Mortisting Stand. Premium Plan. In this plan you ll find: America s leading woodworking authority
 America s leading woodworking authority Premium Plan In this plan you ll find: Mortisting Stand Step-by-step construction instruction. A complete bill of materials. Construction drawings and related photos.
A Shaker Sewing Stand
 America s leading woodworking authority Step by Step construction instruction. A Shaker Sewing Stand A complete bill of materials. Exploded view and elevation drawings. How-to photos with instructive captions.
Pivot-Door Downdraft Cabinet Plans
 Pivot-Door Downdraft Cabinet Plans Finished Cabinet Closed Open Exploded View Introduction This simple downdraft-style dust collection cabinet is a great way to keep your shop cleaner and keep your router
I I. . i1 AD JUSTABLE SHELVES
 ADJUSTABLE SHELVES HAD BEEN TRYNG TO WORK out a really simple (read "fast") way to make an elegant wooden version of the old standby, metal standards and brackets. Although have seen many commercial versions
WOODWORKING GUIDE: BASIC JOINERY
 WOODWORKING GUIDE: BASIC JOINERY Close isn't really good enough. A perfect fit is what counts. When building furniture, there are many ways to construct joints. The simplest are those that use mechanical
Classic Mitered Jewelry Box
 America s leading woodworking authority Premium Plan In this plan you ll find: Step-by-step construction instruction. A complete bill of materials. Construction drawings and related photos. Tips to help
PROJECT PLAN TOOL CHEST
 BUILD IT WITH ROCKLER PROJECT PLAN TOOL CHEST FEATURING ROCKLER S BUILD QUESTIONS? Go to www.rockler.com or call 800-279-4441 Stock # Item 63420 1/4" x 24" x 30" Baltic Birch Plywood 63446 1/2" x 24" x
Shopsmith Mobile Storage Cabinet.
 http://wwwinstructablescom/id/shopsmith-mobile-storage-cabinet/ technology workshop living food play outside Shopsmith Mobile Storage Cabinet by Beave2012 on May 3, 2015 Table of Contents Shopsmith Mobile
Router Table. In a recent article, I wrote about the router table I built for the Center. 5 Essential Jigs for the
 5 Essential Jigs for the Router Table Great fixtures and fences offer better control and new possibilities BY PETER SCHLEBECKER In a recent article, I wrote about the router table I built for the Center
Materials and Tools: Printer s Triple Console Cabinet. Free Plans to build a Triple Console Cabinet
 Materials and Tools: Materials: 3 sets euro style bottom corner mount drawer slides, 16 length 3 sets inset hinges 24 cup style handles 8 2x2 @ 8 feet long 6 1x3 @ 8 feet long 6 1x2 @ 8 feet long 1 sheet
GENERAL NOTES: Page 1 of 9
 Laminating A Zia Into A Turning Blank by W. H. Kloepping, Jan. 2009 This describes how a zia (the New Mexico state symbol) can be laminated into a turning blank. Materials needed: Square Turning Block
Shop-Made Miter Clamps
 *Editor s note: In the photos showing the table saw, the blade guard has been removed for clarity. I try to be as self-sufficient as possible, so I like to manufacture my own tools whenever I can. I designed
Woodline USA Woodline Spacer Fence System
 Woodline USA Woodline Spacer Fence System MADE IN THE USA Includes: (1) ¼ Spacer Fence (1) 3/8 Spacer Fence (1) ½ Spacer Fence (1) Hardware Package (1) 3 Piece Brass bar set (2) Setup Blocks Visit Us Online
ARTS AND CRAFTS CHAIR
 ARTS AND CRAFTS CHAIR 491 MATERIALS LIST--DINING CHAIR Key No. Size and description (use) A 2 1-3/4 x 1-3/4 x 16-1/4'' oak (front leg) B 2 1-3/4 x 3-3/4 x 40-1/2'' oak (rear leg) C 1 1-3/4 x 3-3/16 x 15''
Project 11010EZ: Gun/Bookcase/Curio Cabinet
 Project 11010EZ: Gun/Bookcase/Curio Cabinet No man can be all things to all people, but this cabinet comes as close to fitting multiple uses as any inanimate object can. We ve pictured it as a gun cabinet
Celebrate 100 years of PM with the fourth in our furniture series.
 Anniversary Desk Celebrate 100 years of PM with the fourth in our furniture series. With all the business involved in running a home, it's no wonder most of us run out of space to handle the paperwork.
Stand & Bowls. optional. Online Extra
 Online Extra optional Stand & Bowls Once you make a bowl using the jig and technique from Woodsmith No. 229, it s only natural to see what else you can do with it. The starting point is to make copies
MITER SAW SUPPORT WINGS PLAN
 MITER SAW SUPPORT WINGS PLAN Version 1.0 How to build support wings for your miter saw With easy to follow step-by-step instructions, you will be able to cut, assemble, and finish your very own support
Bathroom Storage Unit. Wilkerdos.com
 Bathroom Storage Unit Wilkerdos.com Copyright 2015 Material List Quantity Item Notes 1 4 x 8 x 3/4 plywood Construction grade 1 2 x 4 x 1/2 plywood Construction grade 11" 7-1/2" Page 1 Some 1 1/4" brad
Hinge Mortising Jig. One of the make it or break it parts of building a. 6 ShopNotes No. 74
 Hinge Mortising Jig A Mortise for a Hinge. Quick, clean, and accurate that s the only way to describe the mortise you get with a trim router and this hinge mortising jig. One of the make it or break it
Complete Dovetail Jig Instructions
 Complete Dovetail Jig Instructions 15 18 4 3 1 12 13 8 19 17 16 6 14 5 9 11 10 2 9 PARTS LIST - Complete Dovetail Jig Introduction Your new dovetail jig will cut Full Through Dovetails and three varieties
About.com :
 http://woodworking.about.com/gi/dynamic/offsite.htm?sit...//www.popularwoodworking.com/features/fea.asp%3fid=1088 (1 of 8)1/28/2004 12:05:01 AM Modern Storage Tower The last thing I want to do when starting
Mousetrap Catapult. About this project:
 Designed by: Ritchie Kinmont Project #44 Page 1/19 About this project: The is fun for ages four and up. Using a mousetrap for the spring, this catapult is designed to throw objects such as practice golf
Build a Rolling Tool Tote
 The rolling tool tote design calls for readily available materials: a cheap hand truck (it could be an axle and two wheels), 3/4 and 1/2 thick plywood, 1/4 thick MDF (you could use plywood or hardboard)
An Everyday Cabinet. Straightforward construction methods for building a case with doors and drawers 66 FINE WOODWORKING
 An Everyday Cabinet Straightforward construction methods for building a case with doors and drawers BY S C O T T G I B S O N 66 FINE WOODWORKING A Leg with Flare square = 2 in. 4 in. Leg, 4 in. square
Shop Projects. Plans NOW. Each Built from One Sheet of Plywood!
 Plans NOW www.plansnow.com 5 Shop Projects Each Built from One Sheet of Plywood! Tool Tote - Sawhorse - Workbench - Wood Bin - Wall Cabinet PLUS: 7 SHOP SECRETS Working with Plywood Dread the thought of
129 KITCHEN BASE CABINET 480
 129 KITCHEN BASE CABINET 480 There are two sorts of kitchen cabinets: base cabinets, which sit on the floor, and wall cabinets. Base cabinets provide both storage space and work surfaces. They often house
Morris Chair. Make the mortises in the legs before you shape the curve near the bottom or make cutouts on the top.
 Morris Chair Make the mortises in the legs before you shape the curve near the bottom or make cutouts on the top. Make the mortises in the legs before you shape the curve near the bottom or make cutouts
curved-lid treasure box
 curved-lid treasure box 20 ugust Home Publishing o. Feature Project urved-lid Treasure Box The curved lid and ebonized sides of this attractive box show off the highly figured wood and your woodworking
CUSTOM SHUTTERS IN-A-BOX
 CUSTOM SHUTTERS IN-A-BOX SHUTTER ASSEMBLE INSTRUCTIONS & INSTALLATION INSTRUCTIONS 1. Inspect the contents of your package. Do not discard the shutter packaging box until you have started painting your
Somewhere along the way, we ve
 Precision 60 FINEHOMEBUILDING.com Window Trim A systematic approach ensures better joints and a faster installation By Anthony Vitale Somewhere along the way, we ve decided that it s the apprentice s job
Perkins Statewide Articulation Agreement. Documentation item: Secondary Competency Task List Coversheet
 Perkins Statewide Articulation Agreement Documentation item: Secondary Task List Coversheet The Secondary School agrees to: A. Implement the approved PDE Program(s) of Study. B. Provide assessment of student
Seascape Bungalow Assembly instructions. Laser Dollhouse Designs
 Seascape Bungalow Assembly instructions Laser Dollhouse Designs NOTE: Please do a dry assembly using only tape to hold house together. This will get you familiar with parts, location, and fit. This also
Greene & Greene. Mailbox. by Seth Keller. Signature details create an elegant box. 2 AmericanWoodworker.com
 Greene & Greene Mailbox by Seth Keller Signature details create an elegant box. 2 AmericanWoodworker.com We needed a new mailbox, but I couldn t find an off-the-shelf version that I liked. So I decided
Project 11355EZ: Wall Cabinet with Louvered Doors and Shelf
 Project 11355EZ: Wall Cabinet with Louvered Doors and Shelf This Early American style cabinet will look good in any room, although it seems particularly well suited for the kitchen or bathroom. To make
Performance Rating Scale: Limited Skills... Moderate Skills..High Skills
 PERFORMANCE STANDARD EVALUATION CHECKLIST Student Name Instructor s Name School District Performance Rating Scale: 1 2 3 4 5 6 7 8 9 10 Limited Skills..... Moderate Skills..High Skills Performance assessments
Curved Metal Segmenting
 Curved Metal Segmenting A Tutorial by: David Washburn A.K.A djwood1 This tutorial was downloaded from The International Association of Penturners Introduction As I continue to learn about pen turning,
Carcase Construction. Choosing and making the right joints. by Tage Frid
 Carcase Construction Choosing and making the right joints by Tage Frid Furniture construction is broken down into two main categories: frame and carcase. In frame construction, relatively narrow boards
Shaker Lap Desk. The classic Shaker lap desk, designed two centuries ago to. Celebrate pen and ink with this quintessential case
 Shaker Lap Desk Celebrate pen and ink with this quintessential case BY CHRISTIAN BECKSVOORT The classic Shaker lap desk, designed two centuries ago to function as a miniature traveling office, was the
A quick and easy way to make a hidden reinforced miter joint
 A quick and easy way to make a hidden reinforced miter joint Text and photos by Jerry Work 2011 Carefully mitered corners add a touch of elegance to any square or rectangular piece. The problem is they
Chess board. The true origins of chess are. from old wood scraps Michael T Collins makes a chessboard and a box to store the pieces
 What you will need: Combination plane with 3mm, 6mm and 13mm cutters Rip and cross cut saw Block and jack plane Marking gauge and knife Card scraper optional and try square Chess board from old wood scraps
Colonial Washstand Circa 1760
 Colonial Washstand Circa 1760 I found the original of this piece while on vacation on Jekyll Island in Georgia. It was one of a pair in a conference room at the Jekyll Island Club Hotel, part of the island's
SkillsUSA Wisconsin CABINETMAKING
 SkillsUSA Wisconsin CABINETMAKING The following rules are for the Wisconsin state contest only. Students/Teams that qualify for the national contest need to adhere to the rules and guidelines for that
Code Description Qty. Material Dimensions A Long Inner 4 2 x 4 pine 34-1/2 long
 B utler s Chest Because it s designed to suit a variety of purposes, this butler s chest is a piece of furniture that absolutely anyone can appreciate. Used by itself, it can serve as an end table or can
WOODStore.net. Thank You! Adobe Acrobat Reader Troubleshooting Guide. WOOD Store. Browse more than 800 plans, projects, books, techniques, & more
 WOODStore.net Browse more than 800 plans, projects, books, techniques, & more Thank You! WOOD Store Customer Favorites Shop Tools & Accessories Thank you for ordering a WOOD magazine download. We hope
SHAKER COUNTER. Build a Classic. This shallow chest of drawers is a catalog of traditional joinery details. By Chris Hedges
 Build a Classic SHAKER COUNTER This shallow chest of drawers is a catalog of traditional joinery details. By Chris Hedges O f the many reasons I am drawn to Shaker furniture, the one that stands strongest
Modern Farmhouse Printer Cabinet. Addicted2DIY.com
 Modern Farmhouse Printer Cabinet Addicted2DIY.com Before beginning this project please read through all of the plans as well as the blog post associated with this project. Always use safety precautions
Reasons to Own a Shoulder Plane
 9 Reasons to Own a Shoulder Plane Fine-tune your joinery with these tips and techniques B y C h r i s G o c h n o u r It s easy to dismiss the shoulder plane as a specialty plane, another way of saying
ULTIMATE ROUTER TABLE PLANS. By Dan Phalen
 ULTIMATE ROUTER TABLE PLANS By Dan Phalen January 2017 Ultimate Router Table Plans. Copyright 2012-2017 by Daniel Phalen. Published by Creston Hall Publishing Company. All rights reserved. No part of this
Rose Inspired Corner Shelf
 Photo 1: The side pieces are sized so you can hot melt glue them together outside of the pattern. Scoring a shallow v-groove with a utility knife holds the glue at bay. Rose Inspired Corner Shelf The best
Herringbone Serving Tray
 Overall dimensions 3"h 11"w 171/2"l Fun-and-Fanciful Herringbone Serving Tray Designer/Builder: Craig Godsey Writer: Jim Harrold Note: Before beginning this project, take a few minutes to install your