Cigar-box Charkha. Copyright Spin.Off magazine, Interweave Press, LLC. Not to be reprinted. All rights reserved. by Marilyn Rishel Sult
|
|
|
- Juliana Manning
- 6 years ago
- Views:
Transcription
 and two-box (front, set for spinning) charkhas from cigar boxes. trouble. 1. To cause mental agitation, worry, harass, perturb, or vex. 2.")
1 Cigar-box Charkha by Marilyn Rishel Sult You can always find a friend to get you into trouble. Marilyn made one-box (back, disassembled for carrying) and two-box (front, set for spinning) charkhas from cigar boxes. trouble. 1. To cause mental agitation, worry, harass, perturb, or vex. 2. To cause difficulty or inconvenience. My friend Mary Wilson told me her charkha needed some work, so I went to look at it. I decided the cotton drive bands were making it vibrate too much, and replaced them with O-ring material. Anyone who owns an imported charkha can make it run more smoothly by replacing the belts this way. You ll need two drive belts of different diameters. The large one connects the large wheel with the pulley on the bottom of the small wheel. The small one connects the small wheel to the spindle pulley. Measure the length of O-ring material you ll need and cut the stuff on an angle, so you ll have more surface area for supergluing the joint. Pay attention; there will be a quiz later. Mary s problem was solved, but now I wanted a charkha. My husband made me one out of black cherry. It is beautiful. It has amber for the driving knob and for the spindle pulley. I was in love. Then I started wondering how someone like me, without a lot of woodworking 66 SPIN. OFF Winter 1996
2 skills, could make a charkha. The box would be the hardest part, because it has to be square. I m not very good at square. square. 1. Having four equal sides and four right angles. 2. More or less cubical, rectangular, and three-dimensional, as a box. Okay, what kind of existing box could I use? How about cigar boxes? The news agency where I indulge my magazine addiction sells cigars. I asked Dean what she does with the boxes; she sells them, for a dollar each. Thinking I needed two boxes that were the same, I bought her supply and then went to more cigar stores. I ended up with twenty boxes, none of which matched. I changed my mind and thought I would use one of the larger boxes, putting the whole charkha mechanism in the same box. If you follow my idea, you ll need a box at least 2 inches (5 cm) deep. My box is also 7 1 4" wide and 11" long, measured to the outside edges (18 by 28 cm). Cigar boxes seem to be made of 1/4" (6 mm) stock; the insides were 1 3 4" (4.4 cm) deep, 6 3 4" (17 cm) wide, and " (26.7 cm) long. This project can be made completely by hand, but it s a lot faster with power tools. If you know someone who has stuff like a drill press, sander, grinder, and other tools, visit them. The case I made a one-box charkha and a two-box charkha. The layouts are illustrated here. The box has to be big enough to fit the large (driving) wheel, with some clearance on the sides (1/2"/1.25 cm or so). The small wheel can be mounted so it overlaps the edges. It lifts off its post for storage. You ll be happiest if your box has enough open space after the large wheel is installed for you to carry the small wheel, your spindle(s), extra rubberbands, and some fiber. The lid of your box needs to be deep enough to close with all the parts inside. Ideally, you ll leave the large wheel in place for storage, which means the lid needs to clear the driving knob. On one of my charkhas, I filed down the knob to get this to work. For a two-box charkha, take the tops off the boxes and use hinges to connect the two bottoms into a box with two deep halves. It s hard to find small enough screws to attach the hinges. After fitting the hinges, I removed the screws and cut off their tips before installing them permanently. Most of my description will refer to the one-box charkha. On the two-box version, the mounting blocks and spindle holder need to be longer because the box is deeper. The wheels, part 1 Charkhas are meant to rotate pretty fast, so there are two wheels. The large one is the driving wheel. My large wheels are to 5" (11.5 to 13 cm) in diameter. Make sure your large wheel fits inside your box with enough clearance to turn comfortably. The small wheel has two sections: the one you see, on top, that drives the spindle, and the part you don t see, underneath, which is driven by the big wheel. For the smaller part underneath, I like to use a spool from buttonhole-twist or silk thread although you can also cut a small wooden spool (for regular thread) in half. Materials needed Tools needed This is the minimum. Use more or fancier if you have them. coping saw hacksaw drill and bits: 15/64", 3/16", and 1/8" (approx. 59, 47, and 31 mm) screwdrivers ruler sandpaper needle file pliers clothespins, or small wood clamps something to drill very straight holes with (drill press, woodworking friend, or a kid who takes shop) cigar box(es) one 3/16" (5 mm) steel rod, length depends (a few inches should work) one 4" (10 cm) piece of 3/16" (5 mm) copper tubing (for refrigerators) one small drawer pull thin pieces of scrap wood: 1/8" (3 mm) stock, extra cigar boxes, paneling, or hollow-core door skins more small scraps of wood one 2-ounce jar of waterbase sealer several shank-type buttons, 1/2 to 1 1 2" ( cm) across these buttons have a metal shank running through them; cut off the shank and the button has a hole through it between one and three small hinges tiny springs or rubberbands two brass eye hooks, the smallest you can find O-ring material, two sizes* one wooden spool either from buttonhole twist or silk thread, or from regular thread (you ll have to cut this one in half) between one and three steel knitting needles, size 0 or 1 ( mm) tacky or wood glue superglue * Marilyn s smaller band is 1/16" O-ring stock and her larger one is 3/32". See comments on O-ring stock on pages Winter 1996 SPIN. OFF 67

3 1 1 2" long 3/4" wide 5/8" deep 1 3 4" 1 5 8" 3/8" 1 1 8" 1/16" knitting needle 8 5 8" long 3/4" boxes 1 3 4" deep Two-box charkha plan, with Marilyn s measurements. Precise dimensions depend upon specific boxes. The large wheel and the upper part of the small wheel are made the same way, and you have choices. What you want is a wheel with a groove in it to carry the drive band. Easy way: Back to the hobby store. Look for basswood plaques. Unfinished wood again. They re milled with a narrow edge on what s supposed to be the face. You need two for each wheel. Cheap way (also may be easier than shopping): Make a wheel sandwich. Each wheel consists of three circles, cut from scrap wood, about 1/8 3/16" (3 5 mm) thick like basswood, pine, hardwood, extra cigar box pieces, paneling, or hollow-core door skins. Two of the circles are the size of the finished wheel. The third has a smaller radius by about 3/8" (9 mm) for the large wheel and about 1/8" (3 mm) for the small wheel. The difference between the circles makes the groove for the drive band. As long as the band fits, the depth of the groove isn t critical " 5/8" hinge 2 3 4" diameter 4 1 2" diameter 6 7 8" 2 1 2" 2 1 2" 3/4" knob Examples: For a large wheel, cut two 5" (13 cm) circles and one 4 1 4" (11 cm) circle. For a small wheel, cut two 3" (7.5 cm) circles and one 2 3 4" (7 cm) circle. Sand the circles so they are smooth. Mounting posts, part 1 Each wheel sits on a post that sticks straight up from the base of the box. I used 3/16" (5 mm) steel rod You ll need two pieces, one for each wheel, but they won t be very long. The center of each wheel is fitted with a sleeve that slides over the steel rod. I used 3/16" (5 mm) (inner dimension) copper tubing (sold for refrigeration) The wheels, part 2 Determine the outer dimension of your sleeve or copper tubing and select a drill bit to match. Mine was 15/64" (6 mm). Drill a hole in the exact center of each of the six circles you cut earlier (or the four basswood plaques). Make sure the hole in the spool matches; redrill it if necessary. You need two lengths of copper tubing; here s how to figure their sizes. For the large wheel, hold the three layers together and measure the thickness. Cut one piece of tubing to this length plus 1/8" (mine was 5/8"/1.6 cm). For the small wheel, do the same calculation and then add the thickness of the spool. Cut your second piece of tubing to this length (mine was 1 1 8"/2.8 cm). Check the fit of the tubing on the steel rod. I needed to ream out my tubing slightly with a 3/16" (5 mm) drill bit, which I did by holding the tubing with a vise or pliers. File or sand the edges of the tubing until they re smooth. It s time to glue together the plaques, or to make three-circle sandwiches. For sandwiches, start with the large wheel. Apply tacky glue or wood glue to both sides of the smaller circle. Place it in between the two larger circles and push the appropriate piece of copper tubing through the holes; this will center all of the pieces. For plaques or toy plates, glue the pieces together with their narrow sides facing and center with the tubing. Have the extra 1/8" (3 mm) of tubing extending 68 SPIN. OFF Winter 1996
4 at the top of the sandwich. Wipe off excess glue with a damp paper towel and clamp the layers together with clothespins or small wood clamps. If you use wood clamps, protect the surface of your wheels with something like cereal-box cardboard. Repeat the process with the small wheel, but put glue on one end of the spool and add it to the bottom of the sandwich. Make sure everything s centered. Let the wheels dry. Mounting posts, part 2 Cut two pieces of scrap wood, each about 1" 3/4" 2" ( cm). Drill a 3/16" (5 mm) hole to fit the steel rod. One-box charkha plan, with Marilyn s measurements. Precise dimensions depend upon specific boxes. Measure and cut steel rod for mounting wheels. The rod should go from the bottom of the hole in the wood up through the wheel. It shouldn t protrude from the top of the wheel; it should come out even, or a little short. Sand or file the cut edges. Tap the rods into place in the holes in the wood, place the wheels on the rods, and then position the blocks in the bottom of the box to test the locations where you ll glue the blocks. Start with the large wheel; its edges should clear the sides of the box by about 7/16" (1.1 cm). Then try a location for the small wheel, checking the one-box and two-box layouts for options. The support block for the small wheel on mine was next to one side of the box and about 1" (2.5 cm) from its top. Make sure 11" 7 1 4" knitting needle 8 5 8" long 1" 2 7 8" diameter two buttons: face 5/8" diameter back 1/4" diameter total thickness 5/16" 5" diameter 2 7 8" 3/8" button 1" diameter 1 3 4" 1/16 1/8" thick 1 1 2" 7/8" spindle mounting block 3/8" deep Winter 1996 SPIN. OFF 69

 and glue the blocks in place, clamping them in place or weighting them with something heavy.")
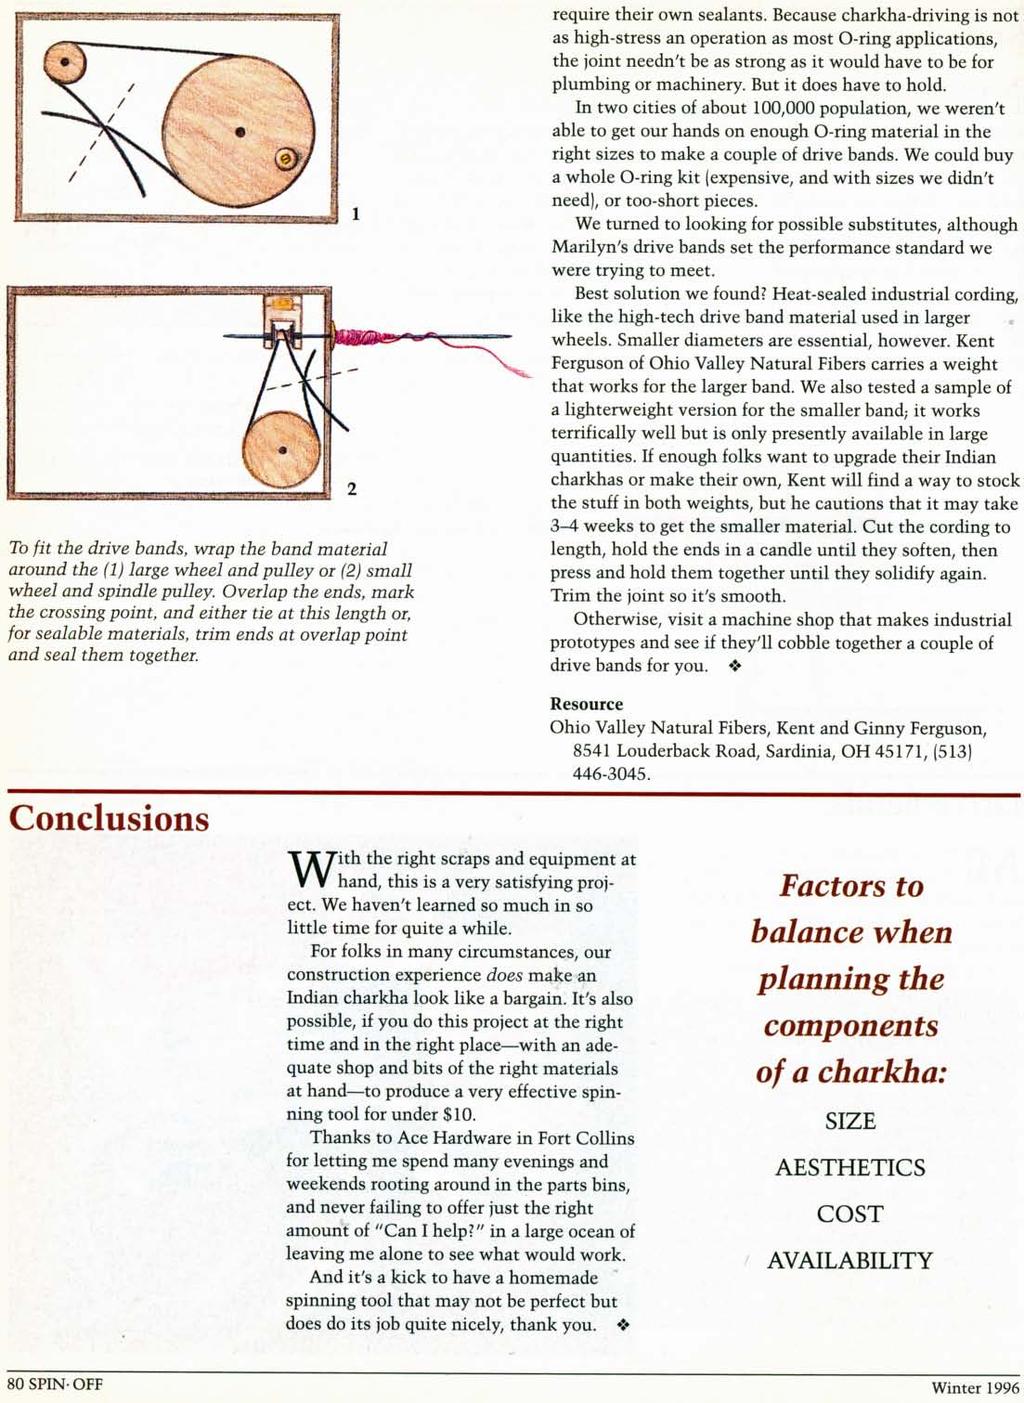
5 1/2" 3/8" 1/4" 3 8" 1 3 4" 1 8" 1" 1 8" 1 1 2" You spin off the point of a charkha s spindle. The device is like a turbocharged handspindle, and is well suited for spinning fine, high-twist yarns. Underneath this onebox charkha is the textured shelf liner Marilyn uses to keep the charkha from sliding around when she spins a good tip for any small wheel. the wheel clears the side of the box. Make pencil marks showing where the support blocks go. Remove wheels and rods from blocks (you may need a pliers for the rod) and glue the blocks in place, clamping them in place or weighting them with something heavy. Spindle I used a knitting needle for the spindle. Sizes 0 and 1 (2.25 and 2.5 mm) work well because they re stiff enough not to bend and thin enough to suit a fine yarn. For a spindle pulley, I used two concave buttons glued together. On buttons with shafts, there s a center hole which you can reveal by cutting and removing the shaft. It s nice when the spindle fits tightly into the pulley, but you may have to redrill the hole in the button to make it fit. If the hole s a little too big, use superglue. For a yarn stop, use a larger button. I like to use pearl buttons because they re a natural material and the hole can be enlarged with a needle file. Most charkhas from India come with three spindles. Full-size plan for spindle support. Check dimensions against your box and spindle before making this piece. big enough for the spindle pulley to rotate freely and the support has to clear the side of the box. For a tensioning device, I use two eye hooks, one on the spindle support and one on the box. Depending on your design, you may need to locate the hooks and the hinge of the spindle support in various places. See the drawings on page 72 for some options. Tension is provided by a tiny spring or rubberband stretched between the eye hooks. Rubberbands from the orthodontist work great on one of my wheels. Finishing up Add the driving knob to the large wheel; I used a drawer pull. On the one-box charkha, I had to sand down its top so the box would close. Use the waterbase sealer to coat the box and all the parts. This helps keep the wheel clean. Fit O-ring drive bands connecting (1) large wheel and pulley on small wheel and (2) small wheel and pulley on spindle. Take it for a test spin. Spindle support See the full-size pattern for the spindle support; the center open area needs to be 70 SPIN. OFF Winter 1996

6 Copyright Spin.Off magazine, Interweave Press, LLC. Not to be reprinted. All rights reserved. skills, could make a charkha. The box would be the hardest part, because it has to be square. I m not very good at square. square. 1. Having four equal sides and four right angles. 2. More or less cubical, rectangular, and three-dimensional, as a box. Okay, what kind of existing box could I use? How about cigar boxes? The news agency where I indulge my magazine addiction sells cigars. I asked Dean what she does with the boxes; she sells them, for a dollar each. Thinking I needed two boxes that were the same, I bought her supply and then went to more cigar stores. I ended up with twenty boxes, none of which matched. I changed my mind and thought I would use one of the larger boxes, putting the whole charkha mechanism in the same box. If you follow my idea, you ll need a box at least 2 inches (5 cm) deep. My box is also 71 4" wide and 11" long, measured to the outside edges (18 by 28 cm). Cigar boxes seem to be made of 1/4" (6 mm) stock; the insides were 13 4" (4.4 cm) deep, 6 3 4" (17 cm) wide, and 101 2" (26.7 cm) long. This project can be made completely by hand, but it s a lot faster with power tools. If you know someone who has stuff like a drill press, sander, grinder, and other tools, visit them. The case I made a one-box charkha and a two-box charkha. The layouts are illustrated here. The box has to be big enough to fit the large (driving) wheel, with some clearance on the sides (1/2"/1.25 cm or so). The small wheel can be mounted so it overlaps the edges. It lifts off its post for storage. You ll be happiest if your box has enough open space after the large wheel is installed for you to carry the small wheel, your spindle(s), extra rubberbands, and some fiber. The lid of your box needs to be deep enough to close with all the parts inside. Ideally, you ll leave the large wheel in place for storage, which means the lid needs to clear the driving knob. On one of my charkhas, I filed down the knob to get this to work. For a two-box charkha, take the tops off the boxes and use hinges to connect the two bottoms into a box with two deep Winter 1996 halves. It s hard to find small enough screws to attach the hinges. After fitting the hinges, I removed the screws and cut off their tips before installing them permanently. Most of my description will refer to the one-box charkha. On the two-box version, the mounting blocks and spindle holder need to be longer because the box is deeper. The wheels, part 1 Charkhas are meant to rotate pretty fast, so there are two wheels. The large one is the driving wheel. My large wheels are 41 2 to 5" (11.5 to 13 cm) in diameter. Make sure your large wheel fits inside your box with enough clearance to turn comfortably. The small wheel has two sections: the one you see, on top, that drives the spindle, and the part you don t see, underneath, which is driven by the big wheel. For the smaller part underneath, I like to use Tools needed This is the minimum. Use more or fancier if you have them. coping saw hacksaw drill and bits: 15/64", 3/16", and 1/8" (approx. 59, 47, and 31 mm) screwdrivers ruler sandpaper needle file pliers clothespins, or small wood clamps something to drill very straight holes with (drill press, woodworking friend, or a kid who takes shop) a spool from buttonhole-twist or silk thread although you can also cut a small wooden spool (for regular thread) in half. Materials needed cigar box(es) one 3/16" (5 mm) steel rod, length depends (a few inches should work) one 4" (10 cm) piece of 3/16" (5 mm) copper tubing (for refrigerators) one small drawer pull thin pieces of scrap wood: 1/8" (3 mm) stock, extra cigar boxes, paneling, or hollow-core door skins more small scraps of wood one 2-ounce jar of waterbase sealer several shank-type buttons, 1/2 to 11 2" ( cm) across these buttons have a metal shank running through them; cut off the shank and the button has a hole through it between one and three small hinges tiny springs or rubberbands two brass eye hooks, the smallest you can find O-ring material, two sizes* one wooden spool either from buttonhole twist or silk thread, or from regular thread (you ll have to cut this one in half) between one and three steel knitting needles, size 0 or 1 ( mm) tacky or wood glue superglue * Marilyn s smaller band is 1/16" O-ring stock and her larger one is 3/32". See comments on O-ring stock on pages SPIN. OFF 67

7

8

9

10

11

12

13
14
Kentucky 4H Wood Science Plans Notebook. Plans Level 1
 Kentucky 4H Wood Science Plans Notebook Plans Level 1 MATERIALS NEEDED: 1 piece wood 3/4" x 2 x 2 1 piece wood 3/4" x 3 x 3 1/2" 1 wooden spring-type clothespin 2-1 1/2" nails 1-1/2 woodscrew Wood Glue
Continue gluing the remaining top parts ensuring the angled piece is glued well. Set aside and let dry. See photo below
 Radiator rev 1.1 The SE5a s radiator is one of the most recognized radiators in WW1. It is one of the components that defines the SE5a. The original SE5a has seen multiple radiator designs used during
Hinge Mortising Jig. One of the make it or break it parts of building a. 6 ShopNotes No. 74
 Hinge Mortising Jig A Mortise for a Hinge. Quick, clean, and accurate that s the only way to describe the mortise you get with a trim router and this hinge mortising jig. One of the make it or break it
NOT ALLOW YOUNG CHILDREN TO PLAY WITH THIS TOY UNSUPERVISED.
 SNAPPING ALLIGATOR This wooden toy is great for parents or grandparents to play with young children. Hold by the tail and move the alligator slowly along with the front wheel slightly off the ground and
Extendable Large Dovetail Jig
 Extendable Large Dovetail Jig Instruction Manual Part # 3458 CAUTION: Please read, understand, and follow all manufacturers instructions, guidelines and owners manuals that come with your power tools.
Castle loft bed [1] Additional Photos. Castle loft bed Published on Ana White (http://www.ana-white.com)
![Castle loft bed [1] Additional Photos. Castle loft bed Published on Ana White (http://www.ana-white.com)](/thumbs/76/73086219.jpg "Castle loft bed [1] Additional Photos. Castle loft bed Published on Ana White (http://www.ana-white.com)") [1] Submitted by fsmumford [2] on Tue, 2011-10-18 21:51 [1] Additional Photos [3] [4] Page 1 of 31 [5] [6] [7] Summary: I stumbled upon Ana s blog about a year ago. Since, like many of you, I have become
[1] Submitted by fsmumford [2] on Tue, 2011-10-18 21:51 [1] Additional Photos [3] [4] Page 1 of 31 [5] [6] [7] Summary: I stumbled upon Ana s blog about a year ago. Since, like many of you, I have become
Fig2: The Sliding Glue Block from the back.
 Ornament Stand Introduction It was one of those forehead smacking moments. I was taking the #2 jaws off my Stronghold chuck, to put on my homemade wooden two jaw chuck set-up. For some reason instead of
HOME WORKSHOP HANDBOOK Rugged BENCH GRINDER. By JOEL B. LONG
 6 HOME WORKSHOP HANDBOOK Rugged BENCH GRINDER W By JOEL B. LONG ITH this bench grinder you can keep your cutting tools sharp and do general offhand grinding, and can, with the aid of various attachments,
WOOD TOY NEWS. July 23, 2013 Tuesday
 WOOD TOY NEWS Make your own perfect turntable for spray painting toys with these useful tips. And it s fast, fun and easy to build! by Imants Udris Watch the video on our website at : http://www.toymakingplans.com/website/how-to/
SASKATOON, Saskatchewan
 CONSTRUCTION GUIDE AVRO ARROW (CONTEST VERSION) Copyright, Bill Jones, 2004 SASKATOON, Saskatchewan This is a work in progress, so there are a couple of rough areas ( I ll point out those that I m aware
WESTERN PISTOL.22 CALIBER SINGLE SHOT. Entire pamphlet Copyrighted by JACO Designs 1972
 WESTERN PISTOL.22 CALIBER SINGLE SHOT Entire pamphlet Copyrighted by JACO Designs 1972 This pamphlet contains the plans and instructions necessary to construct the Western pistol. This pistol breaks open
woodworkersjournal.com MATERIAL LIST
 MATERIAL LIST T x W x L 1 Legs (2) 1 1 2" x 3 1 2" x 36 7 16" 2 End Uprights (2) 1 1 2" x 3 1 2" x 32 1 2" 3 Stringers (4) 1 1 2" x 3 1 2" x 42" 4 Top Cladding, Long (2) 3/4" x 7 1 4" x 65 3 4" 5 Side
A candle stick addresses transferring and reproducing dimensions from a plan and breaking the project into steps.
 Activities Discussion These projects allow more skill development including making items to match a drawing, sizing projects to specific dimensions, and just trying fun stuff for the first time! A candle
The Universal Table Saw Sled
 The Universal Table Saw Sled Do Precision Work Even with Inexpensive Table Saws! Table saw blades always tend to move the wood while the cut is being made. This is why it's so difficult to get accurate
15 Dovetail Jig. Instruction Manual. Part # 3452
 15 Dovetail Jig Instruction Manual Part # 3452 CAUTION: Please read, understand, and follow all manufacturers instructions, guidelines and owners manuals that come with your power tools. Peachtree Woodworking
How to install backchecks
 How to install backchecks Note: All pictures can be enlarged for better clarification. Revision 7 8/2009 Backchecks wear out in a piano much like brake pads in an automobile. While wear is a valid reason
MATERIALS & TOOLS REQUIRED INTRODUCTION. Before you start turning, read and understand this entire procedure.
 INTRODUCTION This set of instructions shows one method to turn mills.there are many other possible variations and techniques. NOTE: These instructions are specific to 'Chef Specialties' mechanism. For
Jimmy s 2 nd demonstration was what he called an African Drum style box made from Iroko with a cocobolo insert in the lid with inlaid sterling silver.
 Jimmy s 2 nd demonstration was what he called an African Drum style box made from Iroko with a cocobolo insert in the lid with inlaid sterling silver. He started by roughing out the block with a roughing
Assembly & Construction Procedures
 Assembly & Construction Procedures Foreword: This device was designed as an open source open architecture technology. With that in mind the construction of this device was made to be extremely flexible.
Router Table. Construction
 Router Table A router table is an invaluable tool. The problem, however, is that ready-built router tables are usually relatively expensive and too narrow for many projects. This router table provides
Machine Your Fishing Reel
 Machine Your Fishing Reel You will be well prepared for the coming season if you start on this smooth-running job now. IF you're an enthusiastic fisherman and have a lathe in your workshop, we'll say no
Plans for The Siamese Twins
 Plans for The Siamese Twins Requests have been pouring in for plans for the Siamese Twins. In fact, another one poured in just last week! So I ve spent the past several days drawing them up. I think it
ASHFORD COUNTRY SPINNER 2
 INSTRUCTIONS ASHFORD COUNTRY SPINNER 2 CS110618V8 Ashford Handicrafts Limited Factory and Showroom: 415 West Street PO Box 474, Ashburton 7700 New Zealand Telephone 64 3 308 9087 Facsimile 64 3 308 8664
Classic Kitchen Island
 America s leading woodworking authority Step by Step construction instruction. A complete bill of materials. Classic Kitchen Island Exploded view and elevation drawings. How-to photos with instructive
ULTIMATE ROUTER TABLE PLANS. By Dan Phalen
 ULTIMATE ROUTER TABLE PLANS By Dan Phalen January 2017 Ultimate Router Table Plans. Copyright 2012-2017 by Daniel Phalen. Published by Creston Hall Publishing Company. All rights reserved. No part of this
Star Trek TOS communicator upgrade kit Install instructions Hyperdyne Labs 2002
 Star Trek TOS communicator upgrade kit Install instructions Hyperdyne Labs 2002 Package Your package should include: Assembled TOS sound/motor/light board with LEDs and sound chip Moiré motor 9V snap connector
Building the Gothic Church
 Building the Gothic Church Mold #54 does not contain all of the blocks to build this church. You will need extra regular blocks (1/2" x 1/2" x 1") and square blocks (1/2" x 1/2" x 1/2"). These blocks can
Plans. Easy-to-Build Full-size Deluxe Murphy Bed Plan. For more plans, tools and hardware visit rockler.com
 Easy-to-Build Full-size Deluxe Murphy Bed Plan Build a full-size Deluxe Murphy Bed complete with decorative molding and matching side cabinets! Plans For more plans, tools and hardware visit rockler.com
Can-Do Can Crusher. America s leading woodworking authority. Step by Step construction instruction. A complete bill of materials.
 America s leading woodworking authority Can-Do Can Crusher Step by Step construction instruction. A complete bill of materials. Exploded view and elevation drawings. How-to photos with instructive captions.
Obtained from Omarshauntedtrail.com
 DaveintheGrave's Halloween Props Animated Crawling Skeleton Build a life-size skeleton torso that realistically crawls across the lawn one arm at a time. 1. Motor Base and Linkage Assembly BASE - I used
Assembly instructions
 Nerdy Gurdy Assembly instructions This manual describes how to assemble a Nerdy Gurdy. Go to http://www.nerdygurdy.nl for more info about these instruments. Jaap Brand The Netherlands January 2018 General
Wanderlust Suitcase Vanity
 Wanderlust Suitcase Vanity If you re like me, you re always up for an adventure. When I saw some examples of DIY reclaimed suitcases, paired with the exciting new Wanderlust embroidery design collection,
Apartment Dining Table
 Jeff Branch WOODWORKING You Can Build an Apartment Dining Table By JEFF BRANCH H ave you ever found yourself wanting a new piece of furniture, but everything you see in stores is too big? Big furniture
An Improved Tool Support for a Harbor Freight Tool Grinder, version 2.2
 An Improved Tool Support for a Harbor Freight Tool Grinder, version 2.2 By R. G. Sparber Copyleft protects this document. 1 Advisory This article was written with a hobby machinist a bit above novice in
Materials and Tools: Printer s Triple Console Cabinet. Free Plans to build a Triple Console Cabinet
 Materials and Tools: Materials: 3 sets euro style bottom corner mount drawer slides, 16 length 3 sets inset hinges 24 cup style handles 8 2x2 @ 8 feet long 6 1x3 @ 8 feet long 6 1x2 @ 8 feet long 1 sheet
Patrol Box Plans by David J. Yarusso Troop 609
 Patrol Box Plans by David J. Yarusso Troop 609 Materials List: 1. One 4 x8 sheet of ½ thick cabinet grade (birch or oak) or AC plywood. If using AC grade, use the A grade surface on the outside for a clean
Cedar 2-Drawer Desktop Storage Cube
 Cedar 2-Drawer Desktop Storage Cube 5 ½ Dimensions 5 ½ 5 ½ 2 2 1 7/8 4 ¼ 4 ½ Author s Notes: Build a Cedar 2-Drawer Desktop Storage Cube from just 1 cedar fence picket. No angles, special cuts or rips
Tools: Scissors, hand held single-hole punch, metal ruler or other good straight-edge, sharp knife or Exacto-knife.
 Instructions for Building a Kepler Paper Model Version 30 Mar 3, 2010 You need the following files: File Sheet # Printer Paper Color Kepler_model_instructionspdf plain b/w Photometerpdf 1 Photo stock color
This book, or portions of it, may not be duplicated, resold, or redistributed in any way, without the expressed written consent of Stay Tooned, Inc.
 Copyright 2006 - Stay Tooned, Inc. All rights reserved worldwide. This book, or portions of it, may not be duplicated, resold, or redistributed in any way, without the expressed written consent of Stay
Agricultural Mechanics and Technology Power Tool Safety Rules
 Agricultural Mechanics and Technology Power Tool Safety Rules Name: BAND SAW Use: Cutting curves, circles and irregular shapes. 1. Use clean SHARP blades. 2. The teeth should always point DOWN. 3. Adjust
A Magazine Rack with a Top
 A Magazine Rack with a Top Introduction: I have never come across a good free plan for a magazine rack. Yet almost all homes have one. So this is one of the few items I have made on my own, as I don t
Engineering Directive
 Thing-a-ma-Jig Finishing To Finish a model means to apply paint and other decorations to complete the look of your model. Meaning to apply a finish. That is what we will discuss in this section. Applying
Weekly Report February 26, 2010 Multifunction Table & HANSS with Biofeedback
 Weekly Report February 26, 2010 Multifunction Table & HANSS with Biofeedback By Mark Galiette, Liz Hufnagel, Daniel Tichon Team #1 Project for Client: Annalee Hughes Client Contact: Susan Lucek, slucek@nerac.com,
A better knurling Tool for the Sherline Lathe. Atkinson s Miniature Knurling Tool
 A better knurling Tool for the Sherline Lathe I am a great enthusiast for the design and quality of Sherline tools. But in my experience, their knurling tool leaves much to be desired. In spite of my adding
SE5a Instrument Board part 2 - rev 1.1
 SE5a Instrument Board part 2 - rev 1.1 Fuel (Petrol) Valve This valve uses two circular name plates, eight brass screws, one black plastic base, copper wire and two black plastic risers. You can pick any
Plan #1 Wooden hinge, single action
 Plan #1 Wooden hinge, single action There are two types of wooden hinges, a single action hinge (that is in effect a finger joint with a pin through it) and a double action hinge which has two pins. The
The Simple Birdhouse Ornament
 The Simple Birdhouse Ornament There are a number of techniques for constructing birdhouse Christmas ornaments and the resulting ornaments vary from simple to very ornate and complicated. It has been my
Citabria Pro. Aerobatic Parkflyer. by Joel Dirnberger
 Citabria Pro Aerobatic Parkflyer by Joel Dirnberger Revision C: December 21, 2004 Citabria Pro Building Instructions Length: Wingspan: Wing Area: Flying Weight: Wing Loading: Functions: Specifications:
LocoGear. Technical Bulletin - 14 November 28, 2003 Copyright 2003 by LocoGear LIVE STEAM CASTINGS. Tech Bulletin - 14
 LIVE STEAM CASTINGS LocoGear Tech Bulletin - 14 John D.L. Johnson 3879 Woods Walk Blvd Lake Worth, FL 33467-2359 jjohnson@locogear.com www.locogear.com Technical Bulletin - 14 November 28, 2003 Copyright
2 Cylinder Slidevalve Steam Engine
 2 Cylinder Slidevalve Steam Engine By Thor Hansen After making a slide valve engine that I managed to get running I decided to try and make a 2-cylinder version. Since the first one was a vertical steam
Ratcheting and Angled Leg Vises. Ratcheting Parallel Guide
 Ratcheting and Angled Leg Vises Ratcheting Parallel Guide In Scott Landis s The Work Bench Book there is a drawing of a ratchet mechanism for a parallel guide. It was one of those little tidbits I tend
Building a 30 Turntable
 Building a 30 Turntable Introduction I wanted a turntable at the North end of my Mystic Mountain railroad to turn trains for point-topoint running and for visual interest. After measuring all my engines
Nojo Design: Large Step Cabinet: February 2012
 Nojo Design: Large Step Cabinet: February 2012 The largest single piece of furniture I ve ever made is this stepped cabinet. Finished piece is 8! tall and over 10 long. This project has been great, although
Clock 35 - Toyland. Construction instructions for Clock 35
 This clock has been designed for children, it is a stand-alone unit and can be positioned on a shelf or cabinet out of the reach of very young hands who may be tempted to touch. The clock is shown in two
Wooden Faceplates. Tapping on the Lathe
 Wooden Faceplates There are lots of turning jobs where spending some time on set-up makes the turning go quicker and easier. Making Wooden Faceplates is one way to make set-ups and jigs for turning. As
Cabins and Hatchways. Bluenose II Part 5
 With the hull fully prepared, we can now add the deck furniture and other fittings. Unfortunately, this is where things begin to go badly wrong with this kit. If you compare the AL plans to the plans in
Star Trek TOS communicator MOTOR upgrade kit Install instructions Hyperdyne Labs 2002
 Star Trek TOS communicator MOTOR upgrade kit Install instructions Hyperdyne Labs 2002 Package Your package should include: Moiré motor Button cell battery holder with 357 1.5V battery wires for switch
Shop Projects. Plans NOW. Each Built from One Sheet of Plywood!
 Plans NOW www.plansnow.com 5 Shop Projects Each Built from One Sheet of Plywood! Tool Tote - Sawhorse - Workbench - Wood Bin - Wall Cabinet PLUS: 7 SHOP SECRETS Working with Plywood Dread the thought of
Al & Gary's Illusionist Heart
 Al & Gary's Illusionist Heart Plans and Instructions by: Albert Herwig and Gary A. Emerich Al & Gary's Illusionist Heart As Al Would Say: It's a pendant Now it's a heart Our pictures are in there My children'
How to Build a Fretless, Acoustic Cigar Box Guitar
 How to Build a Fretless, Acoustic Cigar Box Guitar Introduction Welcome to the fun and world of building Cigar Box Guitars. It is unlikely that you will build only one - it is addictive. Regardless of
Hubble Space Telescope Paper Model Directions Downloads, patterns, and other information at:
 Hubble Space Telescope Paper Model Directions Downloads, patterns, and other information at: www.hubblesite.org/go/model Materials: model pattern printed onto cardstock/coverstock instructions printed
Kromski Minstrel Assembly Instructions
 Kromski Minstrel Assembly Instructions Important Notice If you have any difficulty in understanding these instructions, assembling the wheel, or having it operate to its fullest potential, WE WANT YOU
Building a shaft less Crush/Grind Pepper mill Chuck Ellis
 Building a shaft less Crush/Grind Pepper mill Chuck Ellis First off, I don t want you guys laughing at my drawing I m a better turner than I am a graphic artist. This is a rough sketch very rough of my
Rosalina Accessories Tutorial Version March 2011 Martyn
 Rosalina Accessories Tutorial Version 1.0 - March 2011 Martyn Star Brooch Feel free to experiment with these dimensions, you should make a template you are happy with, the method still works. 1) Creating
Note - the nose ribs and are thinner than the main ribs. These nose ribs will use a thinner rib cap than the ribs. This is per design.
 Stabilizer rev 1.2 The SE5a stabilizer is the heartbeat of the tail and is recreated like the full scale version. All tail pieces depend on the stabilizer. It uses the steel fittings, pulleys, inspection
By Larry Brown & Charles Webb
 By Larry Brown & Charles Webb Page 1 of 16 SAFETY: Wood turning can be Hazardous so you should take precautions to minimize the risk of an accident. I always wear safety glasses when turning. On large
Homemade Weaving Jig By David Dosser
 Homemade Weaving Jig By David Dosser Items needed for a 100 thread weaving jig: 1. 8x10 -.080 Plastic sheet (Optix brand or Lexan). Clear or white Plastic is easier to work with and can be found at most
The first step is to cut all wood to proper size. Refer to the cutting schedule and Details 1 and 2 for further instructions.
 CHILD S ARMOIRE 275 THIS CHILD'S ARMOIRE will make it easy for kids to keep their rooms neat and orderly. Its six drawers and two shelves provide enough storage space to house a substantial wardrobe. By
Technicians of Terror. This is the air valve we make to use with our air
 These are pictures of our scissor prop. Technicians of Terror http://www.halloweenfear.com/scissorprop.html props. This is the air valve we make to use with our air This pictures the duel door closer cylinders
Cowper From Steve Wolverton on the T&TTT forum, Feb 2005 For Reference Only Do not use to build a trailer. Check on Teardrop and Tiny Travel Trailers
 Cowper From Steve Wolverton on the T&TTT forum, Feb 2005 For Reference Only Do not use to build a trailer. Check on Teardrop and Tiny Travel Trailers for up to date building information; http://www.mikenchell.com/forums
Legacy Magnet Pen Kit
 Description: The Magnet pen model is a variation of the Slimline pen and considered one of the most basic pen kits and is a great starter kit for those new to pen turning. Sometimes called the Refrigerator
REPAIR INSTRUCTIONS. Cat. No Cat. No MILWAUKEE ELECTRIC TOOL CORPORATION. SDS Max Demolition Hammer. SDS Max Rotary Hammer
 Cat. No. 9-0 SDS Max Demolition Hammer Cat. No. -0 SDS Max Rotary Hammer MILWAUKEE ELECTRIC TOOL CORPORATION W. LISBON ROAD BROOKFIELD, WISCONSIN 00-0 8-9-0 d 000 8-9-0 d Special Tools Require Forcing
Shoulder Plane. dovetailed. fine tools. Make an heirloom tool and learn the secret to creating double dovetails in metal it s easier than you think.
 fine tools dovetailed Shoulder Plane Make an heirloom tool and learn the secret to creating double dovetails in metal it s easier than you think. I ve always been fascinated by old, metal hand planes.
Shaker Lap Desk. The classic Shaker lap desk, designed two centuries ago to. Celebrate pen and ink with this quintessential case
 Shaker Lap Desk Celebrate pen and ink with this quintessential case BY CHRISTIAN BECKSVOORT The classic Shaker lap desk, designed two centuries ago to function as a miniature traveling office, was the
HOW TO MAKE A WINE BARREL SMOKER
 HOW TO MAKE A WINE BARREL SMOKER THINGS YOU LL NEED: Empty wine barrel 80 & 220 grit sandpaper Eye protection 150 pan head screws Building tape (optional) Pencil Electric drill & forstner attachment Skill
The saw is not a decoration piece but sees regular use at the school. The cross pieces at either end are made from oak, the long stretchers are made
 Roy s Saw When you walk in the front door of Roy Underhill s Woodright s School and look to your left in the window hanging above Roy s stuffed chicken is a large frame saw. Now the chicken is an interesting
Project 17884EZ: Shaker End Table
 Project 17884EZ: Shaker End Table With its clean, simple lines, this piece is unmistakably Shaker style. Ours is made from cherry, a wood commonly used by Shaker craftsman, but we ve also seen this piece
Simple Soap Cutter. This first photo shows the cutter sitting on top of the two bricks and the 8 bar log ready to rock-n-roll.
 Simple Soap Cutter I've had this thing sitting in the garage for a year now and forgot about it. Last month I discovered it again and decided to finish it off and give it a test run. The idea is not one
gravity feeder GRAVITY FEEDER
 Z5979i_pg066-077.indd 68 3//10 4:09:48 PM gravity feeder USING A TRIED-AND-TRUE DESIGN, GRAVITY feeders can hold a large amount of chow. The wide opening at the bottom accommodates a seed mix containing
Building Rudy Kouhoupt s Walking-Beam Engine
 Building Rudy Kouhoupt s Walking-Beam Engine Some time ago I came across a copy of Rudy Kouhoupt s article: "Build this Walking-Beam Engine" (Popular Mechanics August 1969), and decided to try and make
Flamingo. That s what I looked
 Plans N O W w w w. P l a n s N O W. c o m flip-seat Storage Bench Flamingo. That s what I looked like as I stood in the doorway perched on one leg, with my other foot raised so that I could untie the laces
F-F-Fiddle Assembly Instructions
 F-F-Fiddle Assembly Instructions Bout Bridge Neck Machine Heads/Tuners Truss Rod Strings An open-source FFF 3d-printable electric violin. 1. Assemble materials 5 3 8 1 9,10, 11 7 4 2 6 PARTS 1. Bout part
Copyright WilkerDos.com Dining Table. Project Designed By April Wilkerson - Plan Created By Jay Bates (jayscustomcreations.
 Copyright WilkerDos.com 2017 Project Designed By April Wilkerson - Plan Created By Jay Bates (jayscustomcreations.com) Layout & Shopping List Page 2 of 12 Layout & Shopping List Item Quantity Description
A Quick-Change Gearbox For The 7x Minilathe
 A Quick-Change Gearbox For The 7x Minilathe Richard Hagenbuch 10 August 2002 This article describes how to a build a quick-change gearbox for your 7X minilathe. I'll describe one that I built as a prototype
Build a Rolling Tool Tote
 The rolling tool tote design calls for readily available materials: a cheap hand truck (it could be an axle and two wheels), 3/4 and 1/2 thick plywood, 1/4 thick MDF (you could use plywood or hardboard)
Reversing Gear. Shay Reversing Gear
 Shay Nelson Riedel Nelson@NelsonsLocomotive.com Initial: 9/23/03 Last Revised: 06/05/2004 The reversing gear is another one of those pieces I've been putting off. The reason for the postponement was that
Articulated Dragon Toy
 America s leading woodworking authority Step by Step construction instruction. A complete bill of materierals. Exploded view and elevation drawings. How-to photos with instructive captions. Articulated
hanging mirror Two-piece desk set Handmade Gifts Photo: John Tetreault
 hanging mirror Two-piece desk set Handmade Gifts 44 FINE woodworking Photo: John Tetreault Flatware carrier Tea light candle holder 4 Tasteful projects made quickly from scraps BY CHRISTIAN BECKSVOORT
Thank you for purchasing these easel plans. I think you will find this to be a fun, easy to build project that will serve you for years to come.
 Construction Plans for The Basic Wooden Easel Updated August, 2002 Thank you for purchasing these easel plans. I think you will find this to be a fun, easy to build project that will serve you for years
129 KITCHEN BASE CABINET 480
 129 KITCHEN BASE CABINET 480 There are two sorts of kitchen cabinets: base cabinets, which sit on the floor, and wall cabinets. Base cabinets provide both storage space and work surfaces. They often house
Complete Dovetail Jig Instructions
 Complete Dovetail Jig Instructions 15 18 4 3 1 12 13 8 19 17 16 6 14 5 9 11 10 2 9 PARTS LIST - Complete Dovetail Jig Introduction Your new dovetail jig will cut Full Through Dovetails and three varieties
NEXT ARE (6) BLOCKS THAT MEASURE 7/8"+ (.885") THICK X 1-1/4"+ (1.255") TALL X 1-1/2" (1.500") LONG. SAME DRILL AND TAP PATTERN AS THE 4 ABOVE!!!
 BLOCKS THAT MEASURE 7/8+ (.885) THICK X 1-1/4+ (1.255) TALL X 1-1/2 (1.500) LONG. SAME DRILL AND TAP PATTERN AS THE 4 ABOVE!!!") 1"- 2" - 3" BLOCKS HAVE (4 total) TAPPED 1/4" X 20 in 1" thick face alone AND (2) TAPPED HOLES 3/8" X 16 IN 1" THICKNESS AS SHOWN. BLOCKS ALSO HAVE (6) DRILLED 25/64" HOLES WITH (8) 9/16" COUNTER-BORES
1"- 2" - 3" BLOCKS HAVE (4 total) TAPPED 1/4" X 20 in 1" thick face alone AND (2) TAPPED HOLES 3/8" X 16 IN 1" THICKNESS AS SHOWN. BLOCKS ALSO HAVE (6) DRILLED 25/64" HOLES WITH (8) 9/16" COUNTER-BORES
Face Once you've tapped the hole, cut the circles out on your band saw.
 Introduction An earlier article in More Woodturning on turning wine stoppers got me thinking about collet chucks. I wondered if I could make one entirely out of wood. I thought this would be just an exercise
Easy Engineering Guide
 Index: Unleash Your Creativity! Page 1: The Basics Page 2: Sorting Dowels Page 3: Measuring and Cutting Page 4: Dowels and Holes (Reaming Holes) Page 5: Reaming, Screws, Slide-Stop Material Page 6: Hydraulics/Pneumatics
A Tale of Two Budget Moxons
 The two budget Moxons one with hardware the author made, and one with hardware she purchased. Within the hand-tool woodworking community, there has been all kinds of buzz recently about Moxon vises. So
Australian Vintage Radio Society Inc.
 Australian Vintage Radio Society Inc. (Incorporated in Victoria A0050003S) P.O. Box 3099, Syndal L.P.O., Victoria, 3150, Australia. Cabinet assembly instructions for the AVRS 10 th Anniversary construction
Tools and Tips: ( 1 )
") Tools and Tips: As you build instructions will show in my many picture manual how to assemble. You can use your own methods as you desire, my results are very good. A smooth, flat work surface is very
Tools and Tips: As you build instructions will show in my many picture manual how to assemble. You can use your own methods as you desire, my results are very good. A smooth, flat work surface is very
Contrivance. sample. a modular mechanism machine. design by Derek Hugger. Important:
 sample Important: McMaster Carr, a supplier whose part numbers are referenced throughout this document, can only ship within the United States. Builders outside of the U.S. must find an alternate supplier
Project 13586EZ: Writing Desk. Writing Desk Materials List
 Project 13586EZ: Writing Desk This writing desk will make a handsome addition to just about any room in the house. The one shown is made of cherry, a logical choice for a piece like this, but mahogany
SZD-10 bis CZAPLA ASSEMBLY MANUAL IN PICTURES
 1 RUDDER Plan and parts: 2 Assembly steps: Photo above: glue together rudder spar, ribs and trailing edge. Clamp spar to a flat surface (chipboard on the photo) and make sure the straight aligment of the