How to Assemble the Vacuum Formed Plastic 7/8 Scale Lewis Gun
|
|
|
- Roberta Andrews
- 6 years ago
- Views:
Transcription
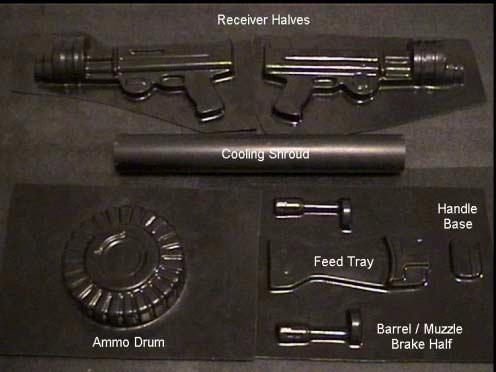
1 How to Assemble the Vacuum Formed Plastic 7/8 Scale Lewis Gun 1. Read ALL the instructions before starting assembly. 2. Begin assembly by thoroughly washing the inside and outside surfaces of the vacuum formed parts with warm soapy water to remove any traces of mold release. Dish detergent works fine. 3. The next step is to trim the parts. Trimming and removal of excess plastic can be accomplished with an Exacto knife and scissors. Use a straightedge where possible. USE CARE as the ABS plastic is relatively tough but it is easy to slip with a knife or scissors, bleed on your parts, and ruin the day! Note you can simply score the plastic with a knife then twist the plastic back and forth until it breaks. The outline of the part will determine the trim method to use. 4. Begin by marking a guideline with a pencil (or score using a scribe or punch) around the periphery of the part to be trimmed. DO NOT TRIM THE PART TOO CLOSELY TO BEGIN WITH. The ABS plastic is not difficult to cut, but it is difficult to add plastic once it is cut off! It is best to rough trim the parts then begin evening up the edges in small increments with scissors and sandpaper. TAKE YOUR TIME. 240-grit sandpaper and a sanding block works well to straighten the edges of the parts once trimmed. Another method is to lay a sheet of sandpaper on a flat surface and rub the trimmed edges of the part over the sandpaper until all edges are even. 5. The ammo drum should be trimmed just below the scallops on the side of the drum and above the fillet created by the forming process. The ammo tray and handle base should be trimmed just above the fillet created by the forming process. The real Lewis ammo drums did not have the scallops (ie, the side of the drums have valleys and troughs from top to bottom), but I trim below the scallops so the bottom of the drum is nice and round to easily accept the ply bottom your choice! The gun barrel and muzzle brake should be trimmed just above the fillet so you end up with two half circles that when placed together will create a round barrel & muzzle brake. 6. The receiver halves should be trimmed equally to yield a receiver the same width at the back as the handle base is wide. The front of the receiver should be round and the extreme front of the receiver should slip inside the end of the ABS pipe that creates the barrel and cooling shroud. The trimming dimensions ARE NOT CRITICAL. Keeping the edges straight IS CRITICAL to yield a good-looking part and to ensure the gun halves fit together well for gluing and final assembly.
 then epoxying it into the bottom inside of the drum with 5-min epoxy.")
2 7. Once all the parts are trimmed out, ensure all edges are roughened (not smooth!) to help the glue bond the parts. ABS cement works best. Epoxy or cyanoacrylate (super glue) also works well. 8. The ammo drum can be finished by cutting a round piece of wood (thin plywood, paneling, etc) then epoxying it into the bottom inside of the drum with 5-min epoxy. Expanding spray foam available at most home stores (Wal-Mart, Lowes, Home Depot, Target, etc) can be sprayed inside the drum to stiffen the assembly once the bottom is installed. GO EASY ON THE FOAM. Spray a small amount on some scrap cardboard and watch it to see how much it expands. If you spray in too much, the foam will push the bottom off the ammo drum as it expands! 9. The ammo tray can be installed as-is by notching out the front and back lower edges so the tray mounts flat on the top of the gun s receiver. Another good method is to epoxy in a thin piece of wood cut to the shape of the tray to fill and strengthen it. 10. One method that works well for assembly of the two gun receiver halves is to carefully glue small strips of scrap ABS around the inside periphery of the halves to create a flange (or step) to help align the halves (shown at right). 11. After the gun halves are glued together, expanding foam can be sprayed into small holes cut into the front and rear of the receiver to help fill and strengthen it. Take a quick look at step 16 as at this point you may want to install a ½ wooden dowel to facilitate alignment. Be careful with the amount of foam. 12. Glue the handle base to the aft end of the receiver. A thin piece of wood or aluminum can be glued between the base and the receiver so the gun handle can be mounted with wood or sheet metal screws for strength. 13. The handle loop can be fashioned with a ½ wide aluminum strip. Two sheet metal or wood screws can be used, in addition to epoxy, to attach the handle loop to the receiver. The handle can be made from 5/8 or ¾ dowel as shown and secured to the loop with wood screws. 14. The cooling shroud is made from an 18 length of 2 diameter PVC or ABS plastic pipe (available inexpensively at most home supply stores). Square the ends after cutting. Note that overall length is not that critical. 15. Bevel the inner circumference of the PVC/ABS pipe so it slips over the front end of the receiver snugly and fits with as little seam as possible.
3 16. Glue the pipe to the receiver ensuring the assembly is kept STRAIGHT until the glue dries. A handy method for aligning the entire assembly is to insert a ½ wooden dowel running lengthwise from the end of the receiver protruding up through the cooling shroud and into the barrel/muzzle brake. Once the expanding foam is sprayed in and set, the dowel helps make a rigid and straight assembly! 17. Glue the barrel / muzzle brake assembly to the INSIDE of the end of the shroud pipe. The barrel exits the shroud toward the top. 18. Using care, trim out the plastic inside the trigger guard area. A dummy trigger can be fashioned from scrap ABS or sheet metal and glued inside the trigger guard. 19. Plastic gun grips available for pistols like a.45 or 9mm can be purchased at sporting goods stores, carved to fit, and epoxied on the Lewis grip to provide a realistic touch. 20. Many different Lewis Gun mounts were used depending on the application. Below are a couple of photos to provide ideas for mounting. The loop on top the ammo can was fashioned from a piece canvas web belt (Army/Navy store) and the bracket from sheet metal. 21. The gun should be painted to add authenticity. Plastic model filler can be used to fill in seams. Lightly roughen surfaces to be painted with 240 to 400 grit sandpaper and clean thoroughly to ensure the paint adheres. Model paints or spray enamels work great. Black or Gun Metal colored paint looks best. The ammo drum can be painted black or olive drab. Flat or satin paints look best. If gloss paints are used, an overcoat of satin clear will cut the gloss. Have fun and me if you have any questions or comments at flier@sbcglobal.net. Go as far as you desire on the detailing but remember this is a STAND-OFF SCALE kit which means it ain t exact! Check the net at to download a copy of these instructions in PDF format. I ll also add additional info from time to time including reference materials for detailing. Regards, Ted

4


5
Cobra X Q Construction Tips Construction: Bel y pan
 Cobra X Q Construction Tips : The white plastic in this kit is high impact styrene. It can be painted with most types of coatings if light coats are applied this is necessary due to the thickness of the
HARRISON S HARDWARE PF5891
 1:48 BUILDING KIT HARRISON S HARDWARE PF5891 Model the local hardware store where layout residents can find all they need to keep their homes in tip-top shape and workshops running smooth. The positive
SE5a Instrument Board part 2 - rev 1.1
 SE5a Instrument Board part 2 - rev 1.1 Fuel (Petrol) Valve This valve uses two circular name plates, eight brass screws, one black plastic base, copper wire and two black plastic risers. You can pick any
Building Tips This model can be built using the following types of adhesives:
 Page 1 Building Tips This model can be built using the following types of adhesives: Epoxy (with or without microballons) Odorless cyanoacrylate (CA) with accelerator UHU Creativ for Styrofoam (or UHU
Central New York Rocket Team Challenge 2018 Rocket Assembly Instructions
 Central New York Rocket Team Challenge 2018 Rocket Assembly Instructions Note: These instructions vary from those provided by the manufacturer of the rocket kits. There is also considerable varying discussion
Model the hub of your layout s rural setting. Planters Feed and Seed Supply Instructions N Scale 1:160 WOODLAND SCENICS
 PF5201 Planters Feed and Seed Supply Instructions N Scale 1:10 Model the hub of your layout s rural setting. Planters Feed and Seed Supply presents a vintage agricultural center where farmers and rural
WOOD TOY NEWS. July 23, 2013 Tuesday
 WOOD TOY NEWS Make your own perfect turntable for spray painting toys with these useful tips. And it s fast, fun and easy to build! by Imants Udris Watch the video on our website at : http://www.toymakingplans.com/website/how-to/
Cockpit Kit. Full Depth - Builds Quickly - Light Weight READ THROUGH THIS INSTRUCTION MANUAL FIRST. IT CONTAINS IM- laser cut wood kit
 The Savage Light Sukhoi Su- 27 Cockpit Kit contains everything you need to build a full depth semi scale Su-27 cockpit, yet adds less than an ounce to your finished model s weight (not including pilot).
Hubble Space Telescope Paper Model Directions Downloads, patterns, and other information at:
 Hubble Space Telescope Paper Model Directions Downloads, patterns, and other information at: www.hubblesite.org/go/model Materials: model pattern printed onto cardstock/coverstock instructions printed
CONCEPT MODELS INSTRUCTIONS FOR THE KASGRO KRL SPECIAL DEPRESSED CENTER FLAT CARS El Toro Way Stockton, CA 95210
 CONCEPT MODELS Web Address: http://www.con-sys.com Email: concept_models@con-sys.com 8810 El Toro Way Stockton, CA 95210 INSTRUCTIONS FOR THE KASGRO KRL 204000-2 SPECIAL DEPRESSED CENTER FLAT CARS 2 CONCEPT
Model Grandma and Grandpa s cozy cottage, a. Country Cottage Instructions HO Scale 1:87 WOODLAND SCENICS PF5186
 PF586 Country Cottage Instructions HO Scale :87 Model Grandma and Grandpa s cozy cottage, a young family s first home or give this vintage Victorian cottage the run-down look of an abandoned shack. This
Hatch Installation For Pygmy Solo and Double Kayaks
 Introduction/Overview Hatch Installation For Pygmy Solo and Double Kayaks The hatch kit consists of several wooden lips, strapping and hardware. The hatch is constructed by cutting a hole in your deck,
Max Launch Abort System Prod. No *Kevlar is a registered trademark of Dupont
 Flying Model Parts List Max Launch Abort System Prod. No. 3014 A 11820 - Body Tube 3.5 Diam x 5.5" Long B 11824 - Orange Capsule Base Shoulder Ring C 16032 - Laser-cut Ring motor mount rear D 16033 - Laser-cut
Copyright 2010 Springbok Publishing All Rights Reserved- Page 1
 Copyright 2010 Springbok Publishing All Rights Reserved- www.woodensaddlerackplans.com Page 1 Legal Information All contents copyright 2010 by Springbok Publishing. All rights reserved. No part of this
ParkJet Builder s Manual
 ParkJet Builder s Manual Thank you for purchasing the ParkJet. The ParkJet is a profile ducted fan airplane that can be flown in a larger park. The ParkJet was initially designed by Scott Stoops and modified
DAVENPORT DEPARTMENT STORE PF5214
 1:160 BUILDING KIT DAVENPORT DEPARTMENT STORE PF5214 Dress up your downtown scene with the classic Victorian architecture and large first-floor picture windows of the Davenport Department Store. Details
Additional Parts List:
 THE TIME MACHINE Additional Parts List: In addition to the cast resin parts enclosed in this kit, there should also be a plastic bag containing the following items needed to complete your time machine
A Pictorial of David Dawes AA400 HFT Thumbhole Stock in the Making
 DRAFT Version A Pictorial of David Dawes AA400 HFT Thumbhole Stock in the Making Part 1 and finally Part 2 as well Updated: February 2008 By James Mitchell (a.k.a. mitchejc) Note: Building rifle stocks
Vash/Knives Future Revolver Kit. V2.0
 Vash/Knives Future Revolver Kit. V2.0 Thank you for purchasing the Vash/Knives Future Revolver Pistol Kit. This kit contains almost everything you ll need to build up your own replica. This kit is an advanced
Continue gluing the remaining top parts ensuring the angled piece is glued well. Set aside and let dry. See photo below
 Radiator rev 1.1 The SE5a s radiator is one of the most recognized radiators in WW1. It is one of the components that defines the SE5a. The original SE5a has seen multiple radiator designs used during
Instructions for Turning Laminated Bracelets
 Instructions for Turning Laminated Bracelets 1. Start with Design 1. Make a paper template circle for the bracelet. Use this to check the fit on the person you are making the bracelet for. After checking
TOOLS 2 ½ hole saw (a good sharp one. You re going to make 36 holes.) Sharp pencil Yard stick Compass Protractor Sandpaper Rasp Drill Motor Jig Saw
 Sharp pencil Yard stick Compass Protractor Sandpaper Rasp Drill Motor Jig Saw") My version of this upright rifle rack does not have a turntable or lazy Suzan on it. I need to be able to move my rifles around so I opted to put casters on the bottom of the rack. With four casters, it
My version of this upright rifle rack does not have a turntable or lazy Suzan on it. I need to be able to move my rifles around so I opted to put casters on the bottom of the rack. With four casters, it
Rosalina Accessories Tutorial Version March 2011 Martyn
 Rosalina Accessories Tutorial Version 1.0 - March 2011 Martyn Star Brooch Feel free to experiment with these dimensions, you should make a template you are happy with, the method still works. 1) Creating
SASKATOON, Saskatchewan
 CONSTRUCTION GUIDE AVRO ARROW (CONTEST VERSION) Copyright, Bill Jones, 2004 SASKATOON, Saskatchewan This is a work in progress, so there are a couple of rough areas ( I ll point out those that I m aware
CONCEPT MODELS INSTRUCTIONS FOR PRODUCT 60,000 GALLON TANK CAR El Toro Way Stockton, CA 95210
 CONCEPT MODELS Web Address: http://www.con-sys.com Email: concept_models@con-sys.com 8810 El Toro Way Stockton, CA 95210 INSTRUCTIONS FOR PRODUCT 60,000 GALLON TANK CAR 2 CONCEPT MODELS PARTS GATX/UTLX
Piper Cherokee /3 scale. Construction Manual
 Piper Cherokee 140 1/3 scale Construction Manual STAB CONSTRUCTION 1. Remove foam cores from cradle and place on flat surface. Inspect pieces before you epoxy halves together making sure leading and trailing
For Barrel Tapers. Installation and Operating Instructions For use with small combination belt & disk sanders. Assembled Taper Tool
 Tim s Taper Tool For Barrel Tapers Installation and Operating Instructions For use with small combination belt & disk sanders Assembled Taper Tool Your taper tool is capable of making barrel tapered shafts.
3Insert the second rod no. 4
 Yamato: Step-by-step 37 The stern block and searchlight control towers a b c d e f Recommended tools and materials Wood glue Sandpaper (no. 800 grain) Metal file Putty Craft knife For metal: Super Glue
J.W. cobbler 1:160 BUILDING KIT PF5210 WOODLAND SCENICS
 1:160 BUILDING KIT J.W. cobbler PF5210 The partially assembled walls, positive alignment system and prefinished edges make kit assembly quick, easy and accurate. This three-story brownstone features stacked
Assembly Instructions
 Assembly Instructions Parts Included: 1 Nose Cone 1 Body Tube 3 1/8 Balsa Fins 1 Thrust Ring 1 Motor Tube 1 Motor Hook 1 Motor Sleeve 2 Centering Rings 1 Launch Lug 1 Kevlar Shock Cord (yellow) 1 Elastic
From "American Woodturner" the Journal of the American Association of Woodturners, April 2015, vol 30, no 2 - CUSTOM - TOOL HANDLES
 From "American Woodturner" the Journal of the American Association of Woodturners, April 2015, vol 30, no 2 - CUSTOM - TOOL HANDLES Carl Ford I have found most commercially available tool handles uncomfortable
PILOT SEAT AND HARNESS
 1. Locate the following parts PILOT SEAT AND HARNESS #84 threading needle, 1 each #88 lacing cord, 1 each #119 aluminum seat, 1 each #120 plywood, pilot seat bottom, 1 each #121 wood screw, 3 each #293
Tools and Tips: ( 1 )
") Tools and Tips: As you build instructions will show in my many picture manual how to assemble. You can use your own methods as you desire, my results are very good. A smooth, flat work surface is very
Tools and Tips: As you build instructions will show in my many picture manual how to assemble. You can use your own methods as you desire, my results are very good. A smooth, flat work surface is very
Contents. pages 20-24: Installing Edge sinks into. custom laminate countertops page 8: Installing Edge sinks into postform laminate countertops
 Contents pages 2-8: Installing Edge sinks into custom laminate countertops page 8: Installing Edge sinks into postform laminate countertops pages 9-14: Installing Acrylic sinks into custom laminate countertops
Drum Trigger Project Part 2: Electric Bongo Case
 Drum Trigger Project Part 2: Electric Bongo Case When I started this project, it seemed that the best implementation of Ray Wilson s drum trigger circuit would be as a sort of hand drum. Since I ve got
4-H Model Building. Monroe County. Grades 3-12
 4-H Model Building Monroe County Grades 3-12 PURPOSE Positive development of our young people through the stimulation of their personal interest and natural skills through the assembly, techniques of construction,
Big Oz. Rocket. User Guide V0313
 Big Oz Rocket User Guide 59824 V0313 Materials Included The Big Oz Rocket Kit should include the following materials. If something is missing, contact Customer Service at 800-358-4983. 20-ounce plastic
1Take the keel (3) and
 and") 1 The hull and the bridge 1Take the keel (3) and apply PVA wood glue in the second slot from the left: a toothpick may make it easier. Take care: the left end is the one that has a projection. THE HULL
1 The hull and the bridge 1Take the keel (3) and apply PVA wood glue in the second slot from the left: a toothpick may make it easier. Take care: the left end is the one that has a projection. THE HULL
PITTS S2S CONSTRUCTION
 PITTS S2S CONSTRUCTION FUSELAGE CONSTRUCTION 1) Place the right fuselage side over the plan and mark the former positions. Place the left side over the right side and mark the former positions. Glue F1
Cardboard Model Buildings
 Cardboard Model Buildings Get more model kits from http://www.modelbuildings.org PRINTING & ASSEMBLY TIPS: These OO designs can easily be resized by reducing the print percentage as follows: OO scale is
Triangle Triumph Game Elements. Table of Contents
 CAppendix JR. Triangle Triumph Game Elements Table of Contents Appendix C Triangle Triumph Playing Field...2 C.1 Description...2 C.2 Bill of Materials...2 C.3 Rack Bases...3 C.4 Rack System...4 C.5 Central
Sentinel Armor Kit Assembly Guide
 1 Sentinel Armor Kit Assembly Guide 2 Thank you for purchasing the Mynock s Den Collection Sentinel Armor Kit by Vader s Vault. This guide will help you assemble your new kit, so be sure to keep it close
CORNER PORCH HOUSE PF5196
 1:87 BUILDING KIT CORNER PORCH HOUSE PF5196 Two-story home with cedar-shake roof and a corner wrap-around porch. Clapboard siding, paned windows, and loaded with accessories, such as a bicycle built for
CONCEPT MODELS SP DOUBLE STACK CONTAINER CARS INSTRUCTIONS Sheep Ranch Rd. Mountain Ranch, CA Web Address:
 CONCEPT MODELS Web Address: http://www.con-sys.com 8331 Sheep Ranch Rd. Mountain Ranch, CA 95246 SP DOUBLE STACK CONTAINER CARS INSTRUCTIONS 2 CONCEPT MODELS PARTS Item No. PART NO. DESCRIPTION QTY. 1
The Ballistic Blaster Rocket Kit should contain the following items. If anything is missing, call Customer Service at
 Ballistic Blaster User Guide Materials Included The Ballistic Blaster Rocket Kit should contain the following items. If anything is missing, call Customer Service at 800-358-4983. Body tube, 6-1/2" long,
Railroad Kits PO Box 461 Holden, MA
 (Formerly Downtown Deco DD 1004 Fallburg Station) HO Scale. Thanks for purchasing one of my kits. Because different people have different degrees of experience, I'll walk you through, step by step, explaining
Repairing Sheet-Molded Compound (SMC) With Epoxy
 With Epoxy") Repairing Sheet-Molded Compound (SMC) With Epoxy 1. Properties: A. It does not dent. B. It does not rust C. Panels are formed using a flat sheet or compound that is heat molded in a press. 2. Preparation
Repairing Sheet-Molded Compound (SMC) With Epoxy 1. Properties: A. It does not dent. B. It does not rust C. Panels are formed using a flat sheet or compound that is heat molded in a press. 2. Preparation
3Position the hull of the ship as
 Yamato: Step-by-step 25 The hull and stern deck c b d a b d c e e f a Rear frame b Stern deck x 2 c Stern deck x 2 d Side wall x 2 Wood glue Sandpaper (no. 400 grain) Craft knife Pliers d Side wall x 2
Hudson Dresser [1] Hudson Dresser Published on Ana White ( Submitted by dan-k [2] on Fri, :43 [1]
![Hudson Dresser [1] Hudson Dresser Published on Ana White ( Submitted by dan-k [2] on Fri, :43 [1]](/thumbs/90/102626096.jpg "Hudson Dresser [1] Hudson Dresser Published on Ana White ( Submitted by dan-k [2] on Fri, :43 [1]") [1] Submitted by dan-k [2] on Fri, 2011-03-11 11:43 [1] If you plan on staining this piece, it is recommended that you stain all of the drawer face materials before assembly for a more professional look.
[1] Submitted by dan-k [2] on Fri, 2011-03-11 11:43 [1] If you plan on staining this piece, it is recommended that you stain all of the drawer face materials before assembly for a more professional look.
BUZZ S SAWMILL PF5195 WOODLAND SCENICS BUILDING KIT
 1:87 BUILDING KIT BUZZ S SAWMILL PF5195 Buzz s Sawmill is a detailed work of art with all workings of a vintage steam-fired, belt-driven sawmill. Details include interior rafters and shake roof, attached
WRIGHT FLYER 1 INSTRUCTIONS FOR THE D10LC KIT
 WRIGHT FLYER 1 INSTRUCTIONS FOR THE D10LC KIT Manufactured in the USA by Easy Built Models PO Box 681744, Prattville, AL 36068-1744 Visit us at www.easybuiltmodels.com Easy Built Models GLUE METHODS Always
MUTINEER AND BUCCANEER TOP-MOUNTED CENTERBOARD HANGERS. Note, drawing not to scale Bob DeRoeck May 31, 05
 MUTINEER AND BUCCANEER TOP-MOUNTED CENTERBOARD HANGERS Note, drawing not to scale Bob DeRoeck May 31, 05 Holes for #10 selftapping SS screws (pan head). 5.75 1 Bend line Aluminum plate, series 5000 or
1Smooth pieces 4, 5 and 6, using
 Yamato: Step-by-step 109 Machine-guns, anti-aircraft guns and decking h e f a b c g d e f a Anti-aircraft gun base x 2 b Anti-aircraft gun (bottom) x 2 c Anti-aircraft gun (top) x 2 d Machine-gun base
For Barrel Tapers. Installation and Operating Instructions for use with table saws and large disk sanders
 Tim s Taper Tool For Barrel Tapers Installation and Operating Instructions for use with table saws and large disk sanders Your taper tool is capable of making barrel tapered shafts. The term barrel is
FUSELAGE CONSTRUCTION
 FUSELAGE CONSTRUCTION Note: prior to building and gluing on the work surface use protective covering on your building surface. (wax paper or clear wrap) Fit the laser cut Fuselage Front and Fuselage Rear
FireFighter.21 Building Instructions
 A Tom Moorehouse design. Thank-you for purchasing the FireFighter.21. I believe that you will find it to be the best.21 rigger kit available. It has won 1 st place in the 2006 AMPBA nationals! It was designed
SCULL HANDLES AND GRIPS INSTRUCTION BOOKLET
 SCULL HANDLES AND GRIPS INSTRUCTION BOOKLET Contents Section I: Scull Grip Replacement: Fixed Handle or 10 cm Length Adjustment System Refer to this section if you need to replace the grips on your fixed
Mousetrap Catapult. About this project:
 Designed by: Ritchie Kinmont Project #44 Page 1/19 About this project: The is fun for ages four and up. Using a mousetrap for the spring, this catapult is designed to throw objects such as practice golf
Parts Identification
 We are excited to introduce the Model Aero Aqua Sport. This is an excellent sport flyer, equally at home flying from grass fields, water, or even snow! The unique V-tail gives the Aqua Sport a distinctive
Seamed Undermount Bowls
 CUTOUT TEMPLATES MAKING CUTOUT TEMPLATES 7.1 CUTOUT TEMPLATES The use of an accurate template is one of the most essential elements to the successful completion of a cutout in Corian. For the completion
N Scale Concrete Coal Dock Instruction Manual
 N Scale Concrete Coal Dock Instruction Manual 1. General Overview This kit combines precision laser cut acrylic, photo etched brass and wood parts to make a highly detailed model of the Roberts and Schaefer
Legacy Classic Twist Pencil Kit
 Legacy Pencil Kit Description: The pencil is great kit and has features to make it a step-up pen. It is slightly more difficult to make, but still very easy if you follow these instructions carefully.
Pachinko Machine. Supplies: Part One: Construction. Optional: (1) 21" x 15.5" piece of wood. jumbo craft sticks. (2) 17" x 1" pieces of wood
 21 x 15.5 piece of wood. jumbo craft sticks. (2) 17 x 1 pieces of wood") Supplies: (1) 21" x 15.5" piece of wood jumbo craft sticks (2) 17" x 1" pieces of wood standard craft sticks (2) 14.5" x 1" pieces of wood 1" wooden craft circles (2) 4" x 2" pieces of wood drill (1) 14.5
Supplies: (1) 21" x 15.5" piece of wood jumbo craft sticks (2) 17" x 1" pieces of wood standard craft sticks (2) 14.5" x 1" pieces of wood 1" wooden craft circles (2) 4" x 2" pieces of wood drill (1) 14.5
SLIM TRIM MOULDING INSTALLATION METHODS
 Slim Trim as a reducer Use SlimTrack (Metal Track) for up to 4 mm floors. Up to 4 mm Floors 3/8 *If the flooring manufacturer suggests/permits the use of underlayments you may need to shim the track to
BUILDING MARTIN-STYLE ACOUSTIC GUITAR KITS 41
 Braces To Be Tucked Into Lining The braces in the photo at right with circles at the ends are those that will be notched into the lining of the guitar. In this procedure, the end of the brace is trimmed
The Rubley Building Instructions for Assembly of the N scale kit. v1.1
 The Rubley Building Instructions for Assembly of the N scale kit. v1.1 Kit Contents: 197 ea. laser cut 1/16" acrylic parts. 1ea. adhesive backed.020 styrene part. 10 ea..060 x 1" styrene alignment pins.
SZD-10 bis CZAPLA ASSEMBLY MANUAL IN PICTURES
 1 RUDDER Plan and parts: 2 Assembly steps: Photo above: glue together rudder spar, ribs and trailing edge. Clamp spar to a flat surface (chipboard on the photo) and make sure the straight aligment of the
RIM: Use a purchased rim, or cut and drill a donut rim from plywood or MDF.
 Home-made DIY e-drums These e-drums are pretty simple to make from MDF and/or plywood, inexpensive wooden embroidery hoops, purchased rims, and fiberglass window screen. They are very low profile, less
MAGNUM BOARD INTERIOR INSTALLATION GUIDELINES
 TECHNICAL BULLETIN No.: 090509-1405 Subject: Issue Date: September 4, 2009 Issue No.: II MAGNUM BOARD INTERIOR INSTALLATION GUIDELINES 1. CUTTING MAGNUM BOARD You can easily cut Magnum Board with carbide
 ARIZ NA www.arizonamodels.com Lewis.30 cal MACHINE GUN KIT Assembly Directions- All Scales Reprinted with the permission of Air Age Publications Inc. Lewis Gun Arrangements use for option variations and
Legacy Hex Pencil Kit
 Description: The Hex pencil is a step-up kit, with similar features to a Slimline Pro Pencil. It has a click mechanism instead of a twist. It uses an 3/8 tube and 2MM pencil lead. It has a heavier feel
6 Segment Knot Pen. A Tutorial by: Larry Wirt A.K.A ribanett. This tutorial was downloaded from. The International Association of Penturners
 Segment Knot Pen A Tutorial by: Larry Wirt A.K.A ribanett This tutorial was downloaded from. The International Association of Penturners How I Make A Six-Segment Knot By: Larry Wirt (aka ribanett) This
Tools and Tips: ( 1 )
") Tools and Tips: As you build instructions will show in my many picture manual how to assemble. You can use your own methods as you desire, my results are very good. A smooth, flat work surface is very
Tools and Tips: As you build instructions will show in my many picture manual how to assemble. You can use your own methods as you desire, my results are very good. A smooth, flat work surface is very
Building an Unfeathered Paddle with a Wood Shaft and Carbon Fiber Blades
 Building an Unfeathered Paddle with a Wood Shaft and Carbon Fiber Blades by Duane Strosaker Choosing the Wood Two 3/4" pieces of Sitka spruce laminated with epoxy for an unfeathered one-piece paddle. For
1Use the metal file to smooth
 Yamato: Step-by-step 85 Parts of the bridge and the hull a b c d e f a Part of the bridge b Part of the bridge c Part of the bridge d Radar x 2 e Part of the bridge x 2 f Wire Recommended tools and materials
Aerospace Speciality Products
 Specifications:! Length: 18.75"/47.6 cm! Diameter: 0.98"/24.9 mm! Weight: 1.5 oz/44 gm! Streamer Recovery! Recommended Engines:!! A8-3; B4-4; B6-4; C6-5! Skill Level: Beginner This is a model rocket kit
San Felipe: Step by Step Pack 3
 Pack 3 Your parts Bulwarks Gun port covers x 2 Tools and equipment Wood glue Sandpaper Brushes Wood stain Hammer Pin pusher/nails Razor saw a Remove the longer bulwark and test-fit it in place at the bow
A Pictorial of David Dawes AA400 HFT Thumbhole Stock in the Making
 A Pictorial of David Dawes AA400 HFT Thumbhole Stock in the Making From This This To Part 1 By James Mitchell (a.k.a. mitchejc) Note: Building rifle stocks is super fun and the idea with this pictorial
C-180 Builder s Manual
 C-180 Builder s Manual. May 20, 2002 Last revised July 11, 2002 Copyright! 2002 Douglas Binder, Mountain Models www.mountainmodels.com sales@mountainmodels.com (719) 630-3186 1 Required Equipment! Xacto
Curved Metal Segmenting
 Curved Metal Segmenting A Tutorial by: David Washburn A.K.A djwood1 This tutorial was downloaded from The International Association of Penturners Introduction As I continue to learn about pen turning,
Background: For the Modeler:
 Right On Replicas, LLC Step-by-Step Review 20141020* Space Shuttle with Fuel Tank and Boosters 1:72 Scale Monogram Model Kit #85-5089 Review (Part 1 of 2) Background: The United States Space Transportation
Tips & Tricks using Part 2
 Tips & Tricks using Part 2 Using the cobblestone mold #210...1 Making a dungeon diorama...2 Making torches...3 Making a textured door...4 Making a portcullis...5 Adding moss...6 Tips & Tricks using Bruce
HIGH-END TECHNOLOGY. Electric ducted fan Starfighter
 HIGH-END TECHNOLOGY RC Electric ducted fan Starfighter First we want to thank and congratulate you with your decision in buying one of our Kits. The Starfighter puts together very easily so there is not
Layout and Fitting. Chapter 6 Layout and Fitting
 6 Layout and Fitting A. RESILIENT SHEET FLOORING Layout and Fitting There are three general methods of fitting resilient sheet flooring into a room: freehand knifing, direct (or straight) scribing and
GENERAL INSTRUCTIONS. Woodland Scenics PO BOX 98, LINN CREEK, MO woodlandscenics.com PREPARE PLASTIC PARTS PREPARE METAL CASTINGS
 #40700 Popa Weelie's Saloon INSTRUCTIONS CAUTION: Cutting tools recommended. Use with care. This item is not a Children s Product and is not intended for use by Children. Conforms to Health Requirements
Hotel Belvedere Instructions for Assembly of the HO scale kit. v1.1
 Hotel Belvedere Instructions for Assembly of the HO scale kit. v1.1 Kit Contents: 319 ea. laser cut.090" acrylic parts. 132 ea. laser cut.060" acrylic parts. 8 ea. window glass templates 8 ea. window glazing
CONCEPT MODELS INSTRUCTIONS FOR UP DC-10 WING CAR El Toro Way Stockton, CA Web Address:
 CONCEPT MODELS Web Address: http://www.con-sys.com 8810 El Toro Way Stockton, CA 95210 INSTRUCTIONS FOR UP DC-10 WING CAR 2 CONCEPT MODELS PARTS DC-10 WING CAR Item No. Part No. DESCRIPTION QTY. 1 2003-1
Flash Coving. Chapter 8 Flash Coving 8. 1
 8 Flash Coving Chapter 8 Flash Coving 8. 1 Flash Coving A. TOOLS In addition to the normal tools (knives, dividers, recess scribers, straightedges, rollers, trowels, etc.), other tools are also needed
Versi-Loader 2 A Competition Payload Model Rocket Kit for 18mm Engines Can be flown single-stage or two-stage.
 Versi-Loader 2 A Competition Payload Model Rocket Kit for 18mm Engines Can be flown single-stage or two-stage. Specifications: Length (Two-Stage)*: 20.5"/52.1 cm Dia.:.739"/18.77 mm Weight (Two-Stage w/payload)*:
Scratchbuilding. (or why don t they make a kit?)
") Scratchbuilding (or why don t they make a kit?) By Mike Belcher Retired Mechanical Engineer Modelling since 1975; First kit was a scratchbuilt 1/35 tank Resin casting since 1994; scratchbuild my own masters
Scratchbuilding (or why don t they make a kit?) By Mike Belcher Retired Mechanical Engineer Modelling since 1975; First kit was a scratchbuilt 1/35 tank Resin casting since 1994; scratchbuild my own masters
Legacy Slimline Touch Pen Kit
 Description: The model is considered one of the most basic pen kits and is a great starter kit for those new to pen turning. Many experienced pen turners use the kit to make elaborate and unusual pens
Car Construction E-Book
 Physics Lecture 15 - Building the Simple But Fast (SBF) Car - Part 2 Introduction - This lecture continues on where Lecture 14 left off- Explain to your Cub partner how Archimedes in about 100 AD first
CONCEPT MODELS UTLX 80006,80020 CRYOGENIC TANK CAR KIT INSTRUCTIONS Sheep Ranch Rd. Mountain Ranch, CA 95246
 CONCEPT MODELS Web Address: http://www.con-sys.com Email: concept_models@con-sys.com 8331 Sheep Ranch Rd. Mountain Ranch, CA 95246 UTLX 80006,80020 CRYOGENIC TANK CAR KIT INSTRUCTIONS 2 CONCEPT MODELS
EXTREME LOAD no. TWO
 1602 - EXTREME LOAD no. TWO Kit Features: 22' 4 " x 14' x 3'-6 Oversize Load 49mm (1.9") actual height Bolt Head Details Welded Load Mounting Fins Painting Handles Tools Required: Hobby Knife Tweezers
Mid-Power Model Rockets
 Kit #5030 Made By: DynaStar Mid-Power Model Rockets A Brand of Apogee Components, Inc. Snarky Aerial Target Drone Rocket Kit Parts List P/N Description Qty 10090 Engine Mount Tube (AT24-3.75) 1 10160 Airframe
Build the Spitfire: Step-By-step. Pack 7 Stages 61-71
 Pack 7 Stages 61-71 1 Stage Contents Page Number 61 212-215 62 216-218 63 219-221 64 222-224 65 225-228 66 229-231 67 232-235 68 236-238 69 239-241 70 242-245 71 246-249 Editorial and design by Continuo
Blakes 7 DSV-1 Liberator
 Blakes 7 DSV-1 Liberator Model kit by Masterpiece Models: www.masterpiecemodels.com Pattern Maker: Alfred Wong Casting: J&S Technologies LLC Parts List Main body 3 Main body nose vanes 4 Main body detail
Layout and Fitting. Chapter 6 Layout and Fitting 6. 1
 6 Layout and Fitting Chapter 6 Layout and Fitting 6. 1 Layout and Fitting A. RESILIENT SHEET FLOORING There are three general methods of fitting resilient sheet flooring into a room: freehand knifing,
Crow T Robot. Assembly Notes
 Crow T Robot Assembly Notes Thank you for purchasing one of my MST3K Crow T Robot Kits. These notes and pictures will help you complete the construction. Feel free to assemble Crow in your own way if you
SAN FELIPE: Step by Step Pack 2
 Pack 2 Your parts Stern reinforcement Bulkheads The poop deck Bulkhead planks Planks Tools and equipment Knife Pencil Wood glue Sandpaper File a Using leftover 5 x 5-mm wooden strips, measure and cut beams