Repairing Sheet-Molded Compound (SMC) With Epoxy
|
|
|
- Dwight Daniels
- 5 years ago
- Views:
Transcription

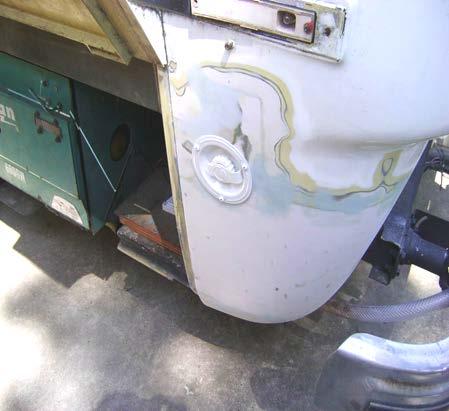
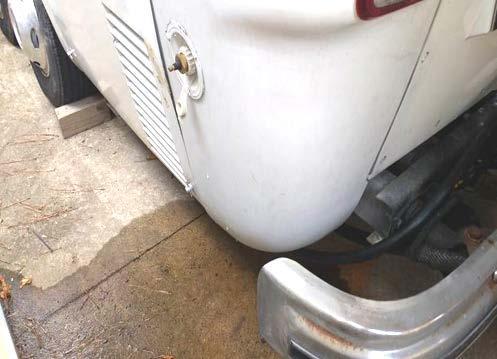
1 Repairing Sheet-Molded Compound (SMC) With Epoxy 1. Properties: A. It does not dent. B. It does not rust C. Panels are formed using a flat sheet or compound that is heat molded in a press. 2. Preparation for repair A. Relieve any cause for the repair. 1. Broken attachment point 2. Stress Crack B. Remove any material that has disintegrated, it will make the repair easier. C. Access to the back side of the area to be repaired. 1. This area is sometimes crucial to give the repair a certain amount of strength. Supporting the repair from the back will hold it in place. 3. Supplies A. Epoxies 1. Why epoxy. a. SMC is a polyester-based material, but it cannot be repaired with polyester resin. This is due to the mold release agent that is present throughout the entire SMC part. Unlike conventionally molded parts where release agents are applied to the mold surface, SMC is compounded with them in the resin mix for quicker processing. This means that as the damage is sanded to prepare a good bonding surface, fresh mold release agent is exposed. Polyester resin products are not strong enough to adhere to this surface. 2. West System SIX 10. a. Thickened adhesive. Initial mix is thicker than a regular type of epoxy. b. Properties of SIX 10 is that it thins as it is worked. c. 42 minutes work time. Allow 24 hours to cure completely. d. West Marine ( Jamestown Distributers ( 1


2 B. Fiberglass cloth and mat 1. Support and structure a. Epoxy by itself is brittle. The matt or cloth gives a bonding area to support the repair. Like rebar in concrete. 2. Cloth or mat a. The higher the weight the more dense the material. 1. Mat is made with crossed fibers and supports the repair better. 2. Cloth is woven and very thin and does not shred as easily as mat. b. Cuts with scissors. C. Tools 1. Foam or a small regular type brush 2. Spreaders and small brushes 3. Protective Gloves and dust mask 4. Scissors 5. Drill, bits and screw drivers. 6. Mixing board 7. Wax paper 4. Prepping the area A. Size of area to be prepped. 1. Only repair the area not the panel. Outline an area with at least an inch of circumference around the repair area. 2


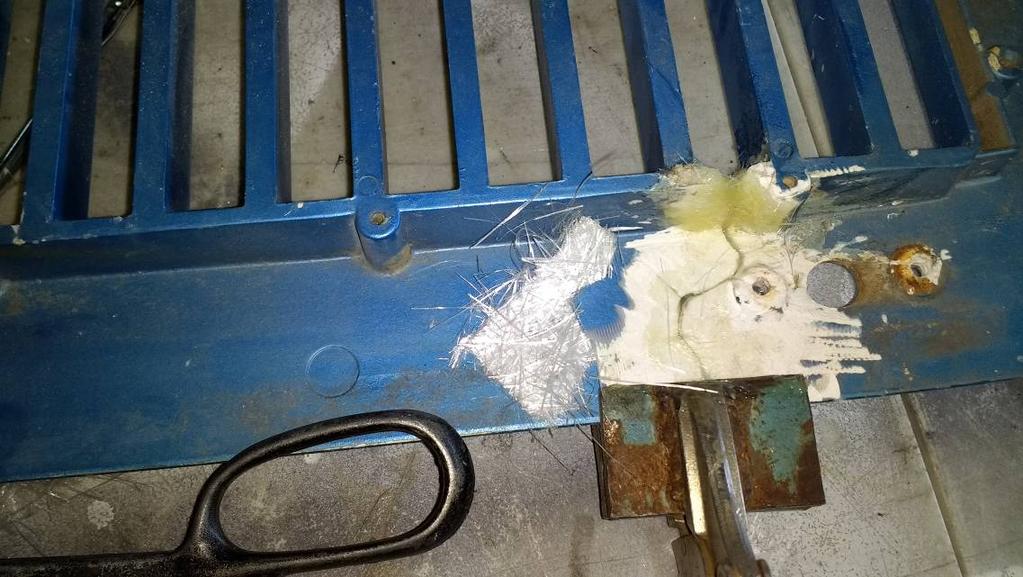
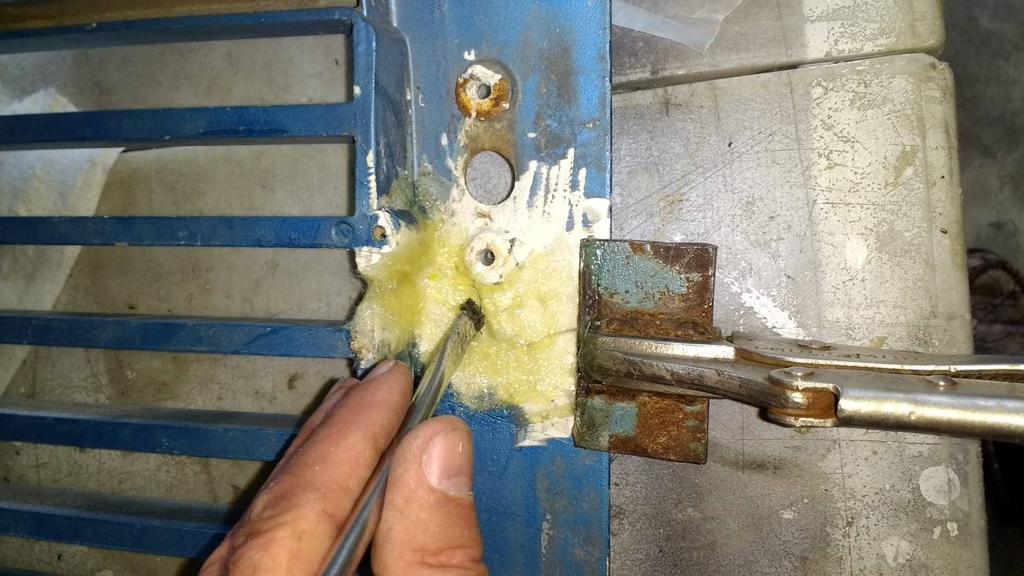
3 B. Preparing the area to repair. 1. Begin by using either a Dremel tool or some other tool and make a graduated valley along the of the area seams. The valley should reach out to about 3/4 of an inch on both sides on the seam. This creates a void for the patch to adhere too for strength and allows feathering of the repair material later on. You want to get rid of any dirt, 2. Sand the remaining area surrounding edges with at least 80 grit sandpaper to give a good mechanical surface for the epoxy to adhere too. 3. Blow area down with clean dry air. Wipe the area clean with dry paper cloth. Don t use solvents. 3


4 C. Supporting the area to be repaired 1. Splint the area if the crack is not stable. You can use paint stirs or thin strips of Aluminum. Use self-tapping screws to attach. Put the splints across the corners or at the end of the repair. Vise Grips work also. You want to hold the break or patch in place as the Epoxy cures. You can fill the screw holes after the Epoxy cures. 4
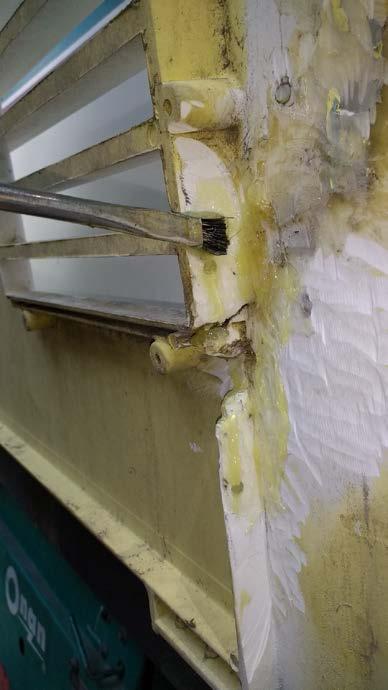
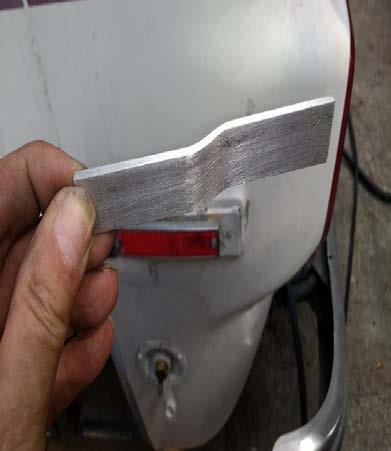
5 5


6 5. Applying the patch 1. Put on your gloves. A. Cut out your Fiber or cloth to match the length between your splints with an overhang of a ½ inch on each side. B. Lay out some wax paper and mix the Epoxy on it. Don t start with a lot at first, you can always mix more. C. Using a small brush, apply some Epoxy to the sides of the patch area you cleaned between the splints. D. Lay your mat strips out on the wax paper. Wet the mat until it is completely saturated with epoxy. Use a cut down acid brush or a plastic spreader. Be easy when you wet the cloth. The mat will want to separate as you apply the epoxy. Just take it slow and work the epoxy into the material. 6


7 E. Using either the spreader or a knife, lift the cloth off the wax paper and lay it on to the gap of your patch between the splints and slowly work it to get any air out from under it, the cut down acid brush works well for this. But dab at it don t brush it. Let this application cure for 24 hours. 7
8 8

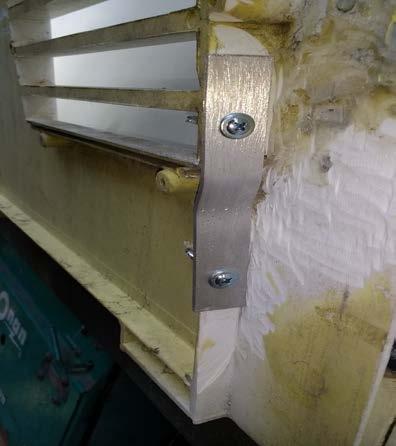
9 2. Finishing A. Remove the splints. After mixing more Epoxy, apply a small amount to wet the seam that was under the splinted areas with a brush. Or as in the photo above, leave the splint in and cover it with wet mat. This will support the repair from breaking again. B. Wet 1/2 strips of mat or cloth then lay it into the gap that was covered by the splint and work out any air. Now you can add layers of wet mat or cloth to fill and cover the entire repair. What you want is to fill the repaired area completely and close to level with the surrounding surfaces. Fill any screw holes also. Let cure for 24 hours, and then sand it down to allow a surface filler to be applied for finishing. 9
 or 410 Microlight Fairing filler (for making a workable surface). Mix it to sticky putty texture. 2.")

10 C. Fillers for holes or surfaces building 1. Mix in some West 406 Colloidal Silica filler (for thickening) or 410 Microlight Fairing filler (for making a workable surface). Mix it to sticky putty texture. 2. Using a spreader, work the mixture into the gap. Don t worry about getting it smooth. You can sand it flat after it cures. 6. Finishing A. Rough sand the outside seam with 80 grit sand paper to get it down to a just below surface level. Blow out any residue with dry air. Wipe area with a dry cloth. B. Use a leveling compound to smooth the repaired area. Sand with at least a 180 grit paper. Spray with a primer and paint as best you see fit. 10
11 References and guides
12 12
13 13
#85-2-5A: PAINT STRIPPING AND FINISH ANALYSIS AND CORRECTION - (Aug 7, 1985)
") #85-2-5A: PAINT STRIPPING AND FINISH ANALYSIS AND CORRECTION - (Aug 7, 1985) "Please discard previous bulletin 85-2-5 due to this updated information." The corrosion protection provided by the factory
#85-2-5A: PAINT STRIPPING AND FINISH ANALYSIS AND CORRECTION - (Aug 7, 1985) "Please discard previous bulletin 85-2-5 due to this updated information." The corrosion protection provided by the factory
Tape Measure Metal Clippers Screw Bit Set With Extensions
 IMPORTANT: Read through instructions thoroughly before beginning to replace any damaged material. Minor damage can be fixed with a fiberglass repair kit and color matched paint. Tools Required Tape Measure
How to build a Javelin Skiff
 How to build a Javelin Skiff This is not your grandfather s plywood boat! The Javelin involves a high-tech type construction, called composite. The hull can be constructed with foam or plywood; these materials
TRAVEL TOUGH TRANSLUCENT ROOF REPAIR GUIDE REPAIR KIT FOR SMALL AND LARGE ROOF REPAIRS FOR USE WITH ALL R50T-FIX REPAIR KITS
 TRANSLUCENT ROOF REPAIR GUIDE REPAIR KIT FOR SMALL AND LARGE ROOF REPAIRS FOR USE WITH ALL R50T-FIX REPAIR KITS The Translucent Roof Repair Kit is a technique specifically designed for repairing damage
Insta-DE Series Soft- padded Dry- erase Whiteboard Projection Screen
 Insta-DE Series Soft- padded Dry- erase Whiteboard Projection Screen User s Guide Product Features Ø Award winning and GREENGUARD certified VersaWhite material. Ø 1.1 gain with 180 degree wide viewing
Restoring the Bouyancy Tanks on 6878
 Restoring the Bouyancy Tanks on 6878 On March 31, 2001 I became the proud owner of Albacore 6878, a Skeene built in 1980. The boat was in pretty good shape, but like many Skeene and Ontario Yachts (non-foam
Do-it-yourself plastic repair kit by Jaeger Aviation
 Do-it-yourself plastic repair kit by Jaeger Aviation If your aircraft is adorned by yellowed, cracked and broken window trim, side panels or headliner there is something you can do about it! In the past,
How to make climbing grips. By,
 How to make climbing grips By, Items needed: * Items may be needed depending on your preference. - Carving Foam - Level Table - Cardboard - Pen - Ruler - Straight Edge - Box cutter - Hot melt glue gun
Loose Lay Luxury Vinyl Plank
 Loose Lay Luxury Vinyl Plank FLEX COLLECTION Installation & maintenance * PLEASE READ CAREFULLY * Installation, maintenance & warranty guideline for loose lay luxury vinyl products. Adherence to This guideline
PLEASE READ ALL INSTRUCTIONS BEFORE BEGINNING
 C R A N E C O M P O S I T E S Repair Techniques PLEASE READ ALL INSTRUCTIONS BEFORE BEGINNING These guidelines are provided in good faith, but without guarantee. The manufacturer and/or distributor of
installation manual m y w a l l a r t. c o m
 installation manual Step 1 Step 2 Acclimate panels for 48 hours in the environment and temperature they will be installed in. Step 3 Install over relatively smooth flat surfaces, all major holes or major
One Piece Fiberglass Mold Construction
 One Piece Fiberglass Mold Construction (This is just a SAMPLE of the Main Manual) Simple Fiberglass Molds Can Be Used For Making Duplicate Parts For Many Applications Including Hobby & Automotive. This
Cobra X Q Construction Tips Construction: Bel y pan
 Cobra X Q Construction Tips : The white plastic in this kit is high impact styrene. It can be painted with most types of coatings if light coats are applied this is necessary due to the thickness of the
Filling the cracks. Grinding and sanding. velomobiel.nl
 Filling the cracks We have published a manual on how to repair the laminate before, now it's time to smoothen the outside of the repair. This nose damage (picture ) has been repaired from the inside. The
Finishes and Finishing Techniques
 Finishes and Finishing Techniques TED 126 Spring 2007 Review pages 147-150, 284-294 Finishes and finishing techniques The finishing process to choose depends partly on the type of wood and the appearance
BLADE REPAIR INSTRUCTION BOOKLET
 BLADE REPAIR INSTRUCTION BOOKLET Contents Section I: Section II: Section III: Section IV: Section V: Section VI: Removing a Blade Refer to this section if you need to remove the blade from an oar shaft.
MAINTENANCE GUIDE: Exterior
 Ferrous Metal Benches Building & Address Numbers Entry Doors & Frames Entry Kiosks Fire Hydrants Handrails Light Fixtures Mailboxes Monument Signs Perimeter Walls Stairwell Supports & Frames Window & Door
How to make a paper mache skull
 http://www.spookyblue.com/halloween/skulls/paper mache skull.htm How to make a paper mache skull Materials List Resin skull from Anatomical Chart Company What?! Spend $25 on a skull? Hear me out. A good
PRO CYC PRO CYC, INC. SYSTEM SUPER 3EZ
 ASSEMBLY INSTRUCTIONS SYSTEM SUPER 3 EZ Congratulations on your decision to use the world s most advanced and user-friendly cyclorama system. We have taken a great deal of care to create and ship your
How to use a Touch Up Bottle & Brush
 How to use a Touch Up Bottle & Brush Tech Tips General Definitions Base Color (Basecoat): A color coat requiring a clear coat. Base Color provides color and appearance, while the clear coat provides gloss
2. Sanding the Modules Sand the entire surface of each cyc module with 60-grit sandpaper. This will provide for better paint adhesion.
 ASSEMBLY INSTRUCTIONS SYSTEM 4 BI (Built-In) Congratulations on your decision to use the world s most advanced and user-friendly cyclorama system. We have taken a great deal of care to create and ship
Front Clip Mold. a 20 pound-or-less front clip, a savings of 38 pounds off the nose of the car.
 Front Clip Mold Those of us that have lightened our cars for racing learn quickly how much easier it is to get weight out of the back of the 928 as opposed to the front. Our front clip project last year
Chapter # 002 : Creating Threaded Metal Anchoring Points in Fiberglass Foam Structures
 Chapter # 002 : Creating Threaded Metal Anchoring Points in Fiberglass Foam Structures The following is a method of creating permanent, threaded, metal anchor point in a foam & fiberglass structure. The
MUTINEER AND BUCCANEER TOP-MOUNTED CENTERBOARD HANGERS. Note, drawing not to scale Bob DeRoeck May 31, 05
 MUTINEER AND BUCCANEER TOP-MOUNTED CENTERBOARD HANGERS Note, drawing not to scale Bob DeRoeck May 31, 05 Holes for #10 selftapping SS screws (pan head). 5.75 1 Bend line Aluminum plate, series 5000 or
2. Sanding the Modules Sand the entire surface of each cyc module with 60-grit sandpaper. This will provide for better paint adhesion.
 ASSEMBLY INSTRUCTIONS SYSTEM SUPER 2.5 EZ Congratulations on your decision to use the world s most advanced and user-friendly cyclorama system. We have taken a great deal of care to create and ship your
BESSEY Training BESSEY Tools North America Alvin Products: Lab Metal, Lab Solvent
 BESSEY Training BESSEY Tools North America Alvin Products: Lab Metal, Lab Solvent Page 1-1 Lab Metal A ready to use, aluminum filled metal repair, filler and patching compound. Easy to use Ready to use
2K weather resistance clear coat A850
 Clear coat Donglai Coating Technology (Shanghai) Co., Ltd. 2K weather resistance clear coat A850 Description High-build, two-component clear coat designed for universal application and optimal appearance
PRO CYC PRO CYC, INC. SYSTEM SUPER 1.5 EZ
 ASSEMBLY INSTRUCTIONS SYSTEM SUPER 1.5 EZ Congratulations on your decision to use the world s most advanced and user-friendly cyclorama system. We have taken a great deal of care to create and ship your
PRO CYC PRO CYC, INC. SYSTEM SUPER 1.5QS
 Assembly Instructions System Super 1.5QS Congratulations on your decision to use the world s most advanced and user-friendly cyclorama system. We have taken a great deal of care to create and ship your
PRO CYCTM PRO CYC, INC. SYSTEM 1.5 FS
 ASSEMBLY INSTRUCTIONS Congratulations on your decision to use the world s most advanced and user-friendly cyclorama system. We have taken a great deal of care to create and ship your cyc, so please take
Bedtime for Bondo MERA Training
 Bedtime for Bondo 2002 MERA Training Section 1: Making the Plug/Model This section will show the process of building a plug/model for a plaster mold.this will represent what the final fiberglass part
Discover the Difference FRP PANEL SOLUTIONS REPAIR TECHNIQUES. fiberglass sidewall repair techniques
 Discover the Difference FRP PANEL SOLUTIONS REPAIR TECHNIQUES fiberglass sidewall repair techniques INDEX Supplies and Equipment 3 Paint, Fillers, and Fiberglass General Supplies Equipment High Gloss Automotive-Look
Gels, Pastes, Liquid Mediums & Additives
 Gels, Pastes, Liquid Mediums & Additives There are far more acrylic mediums available than you may ever want to explore. It can get somewhat confusing. So, I will try to simplify it as much as possible,
Storing, Handling, and Cleaning dekō Markerboards Storing Markerboards. Handling. Cleaning
 Storing, Handling, and Cleaning dekō Markerboards Storing Markerboards dekō markerboards must be stored inside, and stacked horizontally to avoid bowing. Do not store or transport dekō markerboards outdoors
Above are the offsets for the plywood panels.
 DinkyDink Plans Bottom Panel Half Station X Y X2 Y2 1 1/4 3/4 0 11 5/16 2 4 9/16 4 12 9/16 3 11 11/16 1/4 11 7/16 14 1/2 4 18 5/8 1/16 18 5/8 15 11/16 5 25 3/4 0 25 3/4 16 5/16 6 32 13/16 0 32 13/16 16
How to Build an Advanced Composite Clipboard
 How to Build an Advanced Composite Clipboard Tools and Equipment Measuring Tape Black Sharpie Silver Sharpie Rivet Puller Tile Saw or Hacksaw Drill and Drill Bits (5/32) Scissors Utility Knife Straight
How to make a template to mount your plaque to a surface
 How to make a template to mount your plaque to a surface A piece of heavy paper 3 4 wider than your plaque on all four sides (paper grocery bag works great too) Small amount of paint (latex dries the fastest)
Fitting Fiberglass arches to MK 1 Escort
 Fitting Fiberglass arches to MK 1 Escort This is a fairly big job and not for the faint hearted. I got a mate who has done some glass work before, to help me. The method of fixture is varied. You could
SURFACE CASTING METHOD: For Molds & Core Boxes. Presented by: Hapco Inc.
 SURFACE CASTING METHOD: For Molds & Core Boxes Presented by: Hapco Inc. RAPIDFIL Detailed Specifications STEP 1 SPACER LAYER Apply a layer of ¼ foam to create a uniform ¼ thickness around the pattern.
Paint and Decals. Adequate ventilation is required when working in a confined area with paint and paint-related chemicals.
 Service Guide Paint Repair Paint and Decals Utilimaster recommends that a professional body shop do all paint repairs. The service technician should read this entire procedure before working on the vehicle.
INSTA-DE FRAME SERIES
 http://www. www.elitescreens.com Section : Screen Design n. INSTA INSTA-DE FRAME SERIES What is it for? The Insta-DE Screen is a pliable front projection screen with dry dry-erase erase capabilities. It
Sandpaper Product Guide. Premium Automotive Aftermarket Quality Complete Selection of Hand & Power Sanding Accessories Excellent Value
 Sandpaper Product Guide Premium Automotive Aftermarket Quality Complete Selection of Hand & Power Sanding Accessories Excellent Value Index Introduction to Abrasives Abrasive Components... 3 Sandpaper
Mold Release, Break-In, Maintenance and Storage. Linda Bergstrom
 Mold Release, Break-In, Maintenance and Storage Linda Bergstrom Mold Release Requirements Form a barrier between the mold and molded part Provide a lubricating film which allows the molded part to be easily
Steps and Resources for Composite Construction Mark Westlake
 Steps and Resources for Composite Construction Mark Westlake Hopefully the following information will help you avoid some of the learning curve that comes with a project of this complexity. Plug Construction
Insta-DE Frame Series
 Insta-DE Frame Series Section 1: Screen Design. 1.1 What is it? Instantly transform any wall or window into a white board projection screen: The soft-padded dry erase whiteboard projection screen with
Nanton Grain Mill Assembly
 ( 1 ) Nanton Grain Mill Assembly Locate package for assembling storage building. These are cut from 1/8 masonite. Inspect and lightly sand edges where it will be bonded. Use white glue or CA glue to bond.
Quality Marine Equipment Since Antifouling Paint For Metal Under The Waterline ROLLER. Application Instructions.
 Quality Marine Equipment Since 1981 Antifouling Paint For Metal Under The Waterline ROLLER Application Instructions www.antifoulingpaint.net THANK YOU! Thank you for selecting Velox Plus Antifouling Paint
MAINTENANCE GUIDE: Interior
 Ferrous Metal Enclosed Offices Leasing Ofices Lunchrooms Meeting & Conference Rooms Office Doors & Door Jambs On previously painted surfaces, wash to remove dirt, grease, oil, mildew, and other contaminants.
This Manual Covers The Construction Of A Hood Scoop Plug From The Drawing Board. Through Construction. To Final Fitting.
 1 This Manual Covers The Construction Of A Hood Scoop Plug From The Drawing Board. Through Construction To Final Fitting. 2 TABLE OF CONTENTS: INTRODUCTION: 3 MAKING A PLUG FOR A CUSTOMIZED PRODUCT. 4
Carbon Fiber Repair Kit
 CARBON WORKS www.gorillacarbons.com Carbon Fiber Repair Kit This Gozilla Carbonworks CF Repair Kit has been put together by carbon fiber professionals with years of experience in carbon fiber composites.
Cleaning Procedure INTRODUCTION:
 Cleaning Procedure INTRODUCTION: Many elements can contaminate the surface of a vehicle s paint film, such as waxes, grease, polishes, road film, tar and general dirt. Pre-cleaning to remove any existing
Installation Instructions
 www.marlite.com Effective Date 03/01/2018 ARTIZAN FRP, SYMMETRIX FRP, ENVUE FRP, STANDARD FRP Installation Instructions Statements expressed in this technical bulletin are recommendations for the application
Kam Aero 43% Extra 300.
 Stab Sheeting Kam Aero 43% Extra 300. Stabs / Elevator: Make your skins using the same method as you did for the fuselage foam parts. The stabs require 8 sheets (4 per stab) of 4 x 48 A grain sheeting.
FLEXITEEK INSTALLATION INSTRUCTIONS
 an Advanced Plastic Fabrications Company 99 marcus Blvd., 631.244.3620 631.231.4466fax FLEXITEEK INSTALLATION INSTRUCTIONS Before you begin, take your new Flexiteek deck out of the shipping package and
MUDGUN Drywall Finishing System
 Watch the demonstration video online at hydetools.com MUDGUN Drywall Finishing System Quick Start Guide Hyde Tools, Inc. / A Hyde Group Company / 800-872-4933 / custrelations@hydetools.com / hydetools.com
Installing Cliffy's AFM mothership protectors
 Installing Cliffy's AFM mothership protectors These instructions tell you what needs to be removed and done to install Cliffy's two new AFM protectors. The front edge protector for the moving target bank
Installation Instructions
 Please read all instructions before installing products. STORAGE: Keep crates in the upright position. When unpacking, store panels flat in a clean dry place. BEFORE INSTALLATION: Check for damage that
Super 2.5-EZ. Sheetrock Wall. Sheetrock Wall 10'-10" 2.5V-EZ 2.5V-EZ 2.5A-EZ
 Super 2.5-EZ Company: 30 Vertical Radius Phone: 36 Horizontal Radius w/12 Wide Flat Expansion in Corner Non-Parabolic Corner Easy Installation Built-In System Date: 24'-1/2" 20'-1/2" 16'-1/2" 12'-1/2"
BRUSH APPLICATION INSTRUCTIONS
 QUALITY MARINE EQUIPMENT SINCE 1981 Antifouling Paint For Metal Under The Waterline BRUSH APPLICATION INSTRUCTIONS www.antifoulingpaint.net TABLE OF CONTENTS Humidity & Drying Metal Surfaces... 1 Coverage
COMPOSITES LAB MANUAL
 COMPOSITES LAB MANUAL Version 1 Lab 3: Surface Preparation, Wet Layup, and Vacuum Bagging The original version of this manual was a one student senior design project written by Katherine White, the Composite
Installation Guide. Pionite Decorative Surfaces One Pionite Road, Auburn, Maine PIONITE ( )
") Installation Guide A Subsidiary of Panolam Surface Systems SMPBRO00-012 6/14 Pionite decorative laminates are designed for finished interior surfaces which require high impact, wear and stain resistance
Installation Guide A Subsidiary of Panolam Surface Systems SMPBRO00-012 6/14 Pionite decorative laminates are designed for finished interior surfaces which require high impact, wear and stain resistance
Instructions for Making Repairs to 3M 8681HS Blade Tapes Installed on Enstrom Helicopter Blades.
 REPORT NO: TITLE: Instructions for Making Repairs to 3M 8681HS Blade Tapes Installed on Enstrom Helicopter Blades. MODEL NO: All PREPAIRED BY: P.B. dupont CHECKED BY: APPROVED BY: 1. SCOPE This specification
#70 grit sand Putty knives, sized as needed #1 fine gray sand Corner tools Milestone acrylic liquid
 Countertops Supplies Tools White and/or gray Milestone cement 12 inch steel trowel #70 grit sand Putty knives, sized as needed #1 fine gray sand Corner tools Milestone acrylic liquid Hock Universal tints
Quality Marine Equipment Since Antifouling Paint For Metal Under The Waterline SPRAY. Application Instructions.
 Quality Marine Equipment Since 1981 Antifouling Paint For Metal Under The Waterline SPRAY Application Instructions www.antifoulingpaint.net Thank you for selecting Velox Plus Antifouling Paint to protect
8 x 10 Sandwich Panel
 *Before starting, please read entire manual *Changes can be made in order for this manual to work for you 8 x 10 Sandwich Panel Follow all applicable sections of the attached Manufacturing Plan. Objectives:
Get the benefits of oil with the ease of latex
 One of the most rewarding home improvement projects is putting a fresh coat of paint on your kitchen cabinets. A new color brightens up your kitchen, and can give it a complete updated look. But at the
Your Best Finish! Darrell Krasoski and Charles Samaha Article originally prepared for the SeaWind Express
 Your Best Finish! By Darrell Krasoski and Charles Samaha Article originally prepared for the SeaWind Express Whether it s for being able to identify your boat from a distance, protecting the plastic from
Some cases of contact dermatitis in dentists and surgeons from use of methylmethacrylate monomer have been reported (1). It is advisable to wear glove
. It is advisable to wear glove") Technical Note: Prosthetic Applications of Methylmethacrylate Acrylic Plastic Scott Hornbeak, C.P.O., B.S. Richard J. Boryk, C.P., B.A. Timothy B. Staats, M.A.C.P. Methylmethacrylate, or acrylic, is a
Technical Note: Prosthetic Applications of Methylmethacrylate Acrylic Plastic Scott Hornbeak, C.P.O., B.S. Richard J. Boryk, C.P., B.A. Timothy B. Staats, M.A.C.P. Methylmethacrylate, or acrylic, is a
Installing your SHOE KEEL
 Installing your SHOE KEEL The shoe keel is there solely to protect the bottom of the hull. On a windy day, it will offer some resistance to a side or quartering wind and will help to avoid being blown
Insta-DE2a/2aF Series
 Insta-DE2a/2aF Series Self-Adhesive Dry-EraseFront Projection Screen Film with Frame Border and Pen Tray User s Guide Thank you for choosing the Insta-DE2a Series dry-erase whiteboard projection screen!
TOOLS & SUPPLIES (Included in ProTops Tool Kit)
") TOOLS & SUPPLIES (Included in ProTops Tool Kit) Clean Paint/Mixing Sticks Graduated Mixing Buckets Standard Mixing Cups Nylon Paint Brush Propane Torch 3M Masking Gun Masking Film & Painter s Tape Disposable
TOOLS & SUPPLIES (Included in ProTops Tool Kit) Clean Paint/Mixing Sticks Graduated Mixing Buckets Standard Mixing Cups Nylon Paint Brush Propane Torch 3M Masking Gun Masking Film & Painter s Tape Disposable
INSTA-DE2 SCREEN SERIES
 Section 1: Screen Design 1.1 What is it for? INSTA-DE2 SCREEN SERIES Convert entire walls into a dry-erase whiteboard projection screen: The Insta-DE 2 is a wall covering film material that instantly converts
Installation Instructions
 GENERAL INSTALLATION INFORMATION To ensure maximum performance from your A 2 bath fixture, please read and follow the instructions and cautions. Carefully inspect the new fixture for any shipping damage.
HOW TO SELECT & USE A ROLLER
 HOW TO SELECT & USE A ROLLER www.paintaids.co.nz 1 select the right roller The two most important things for a great paint finish are: a good quality paint, and the right roller sleeve to match the paint
How to Assemble the Vacuum Formed Plastic 7/8 Scale Lewis Gun
 How to Assemble the Vacuum Formed Plastic 7/8 Scale Lewis Gun 1. Read ALL the instructions before starting assembly. 2. Begin assembly by thoroughly washing the inside and outside surfaces of the vacuum
Working with Resin Models
 Working with Resin Models This article will run through the basic techniques and methods required to get the most out of preparing, cleaning up and assembling Forge World s resin kits. If you need extra
Deck Repair Grady White Runabout
 Deck Repair Grady White Runabout An older Grady White runabout with pedestal mounted captains chairs had suffered a structural failure at one of the pedestal bases. The deck in this area was cored. Inadequate
PITTS S2S CONSTRUCTION
 PITTS S2S CONSTRUCTION FUSELAGE CONSTRUCTION 1) Place the right fuselage side over the plan and mark the former positions. Place the left side over the right side and mark the former positions. Glue F1
*Before starting, please read entire manual *Changes can be made in order for this manual to work for you. 3 x 6 I-Beam
 *Before starting, please read entire manual *Changes can be made in order for this manual to work for you 3 x 6 I-Beam Follow all applicable sections of the attached Manufacturing Plan. Objectives: Understand
UNIT 11: PAINTING, STAINING, AND FINISHING
 KEY CONCEPTS 1. Equipment needed 2. Primary kinds of Paint: Interior/Exterior 3. Primary kinds of Stain: Interior/Exterior 4. Proper application techniques: Paint/Stain/Finish 5. Equipment care and clean
Installation Guide. Aspect Stone Peel & Stick Tile. proper surface preparation is essential for a successful project. Installations Methods
 Aspect Stone Peel & Stick Tile Installation Guide E proper surface preparation is essential for a successful project Failure to follow recommended surface preparation instructions may void the warranty.
Tools and Tips: ( 1 )
") Tools and Tips: As you build instructions will show in my many picture manual how to assemble. You can use your own methods as you desire, my results are very good. A smooth, flat work surface is very
Tools and Tips: As you build instructions will show in my many picture manual how to assemble. You can use your own methods as you desire, my results are very good. A smooth, flat work surface is very
Building a Scarab 350 Trimaran
 This boat was designed to be built using flat panels. In either foam laminated panels or plywood. 1. The build time is less. Panels are lofted, cut out and joined on the frame. 2. Frame can be simpler.
Repairs. Chapter 10 Repairs 10. 1
 10 Repairs Chapter 10 Repairs 10. 1 Repairs As an installer, you will probably be called upon to repair damage to a resilient floor. Here are some of the most common problems and the recommended repairs
ELiTE ProPanel Installation Guide
 ELiTE ProPanel Installation Guide ELiTE ProPanel Installation Guide Impaling Clips Figure 1.1 Impaling Clip installation side view Figure 1.2 Impaling Clip placement on 4 x8 panel Figure 1.3 Impaling Clip
Pettit Technical Bulletin Applying Topside Finishes
 What s better than a boat that looks good? The answer is simple, a boat that looks good and has superior protection from the elements all season long. Topside finishes do exactly that; provide your boat
Primer Surfacer EP II
 Description Surfacer EP II is a gray, 4.6 lbs/gal, chromate-free epoxy primer that can be applied as a sprayable sanding surfacer, rollable sanding surfacer or primer sealer. This product provides good
January Instructions Willem van Aelst Study 2008 David Jansen. For the Video Link, Please see Page 3
 January Instructions Willem van Aelst Study 2008 David Jansen For the Video Link, Please see Page 3 Historical Information To start the painting we first need to establish the Ground. The ground is the
Page 1. Trophy Oar Blade Finishing and Care Manual
 Page 1 Trophy Oar Blade Finishing and Care Manual Page 2 I. Finishing with Paint Materials Needed for Painting: Krylon Fusion Spray Paint (or other plastics Instructions for Painting: spray paint) Primer
Installation Instructions
 Aspex Digitally Printed Wall Art PL PREMIUM HEAVY DUTY ADHESIVE ASPEX WALL ART DOUBLE SIDED FOAM TAPE Installation of Aspex Digitally Printed Wall Art with Foam Tape and PL Premium Adhesive. Maximum size
COMPOSITES LAB MANUAL
 COMPOSITES LAB MANUAL Version 1 Lab 6: Post-cure Processing The original version of this manual was a one student senior design project written by Katherine White, the Composite lab assistant, during Spring
Carbon Fiber Skinning Starter Kit
 CARBON WORKS www.gorillacarbons.com Carbon Fiber Skinning Starter Kit This Godzilla Carbonworks CF Skinning Starter Kit contains everything you need to take an original part (made from plastic, metal or
CONCEPT MODELS INSTRUCTIONS FOR UP DC-10 WING CAR El Toro Way Stockton, CA Web Address:
 CONCEPT MODELS Web Address: http://www.con-sys.com 8810 El Toro Way Stockton, CA 95210 INSTRUCTIONS FOR UP DC-10 WING CAR 2 CONCEPT MODELS PARTS DC-10 WING CAR Item No. Part No. DESCRIPTION QTY. 1 2003-1
Max Launch Abort System Prod. No *Kevlar is a registered trademark of Dupont
 Flying Model Parts List Max Launch Abort System Prod. No. 3014 A 11820 - Body Tube 3.5 Diam x 5.5" Long B 11824 - Orange Capsule Base Shoulder Ring C 16032 - Laser-cut Ring motor mount rear D 16033 - Laser-cut
RFS Class II Rocket Assembly Instructions
 RFS Class II Rocket Assembly Instructions Instructions by: Loc Precision Photos by: Great Lakes Space Port Sheboygan Education Foundation, Inc. Welcome and thank you for joining the Rockets for Schools
Did I say that proper cleaning is important? I am going to start this module off with that.
 PREPARATION It All Starts Here Featheredging, Masking, Primer, Block Sanding, Final Sanding One of the most important, or perhaps the most important, things you need to do when painting a car is to properly
VELOX PLUS APPLICATION INSTRUCTIONS QUALITY MARINE EQUIPMENT SINCE 1981
 VELOX PLUS APPLICATION INSTRUCTIONS QUALITY MARINE EQUIPMENT SINCE 1981 VELOX PLUS TECHNICAL INFORMATION Please read all information and application instructions before beginning. Coverage Estimates Normal
All Terrain Flares 2014 Chevy Silverado
 Page 1/8 Components: 1. Front Flares (2) 2. Rear Flares (2) Tools required: - Utility knife - #2 Phillips driver - Socket wrench - 13 mm Socket - 6 mm Allen Wrench - T-15 Torx bit - Trim Removal Tool -
TAPE & GLUE PROCESS Version: Jun. 2011
 FREE to print TAPE & GLUE PROCESS Version: Jun. 2011 The following small boat assembly process was developed out of the need for an easy, lightweight, cost effective and health friendly method of providing
gently pry up all your door switches.. disconnect them.. same with the mirror control on the drivers side..
 How To Recover Door Panels By: Crispy SUPPLY/TOOL LIST NEEDED Dremel with drill cutter attachment (or drill with drill bit) contact cement 1/2 inch self tapping screws Carpet/Headliner spray on glue Phillips