Creative & Research USER CODE # JCM! Copyright PO BOX 557 New Albany, IN USA Page 2
|
|
|
- Garey Hood
- 5 years ago
- Views:
Transcription

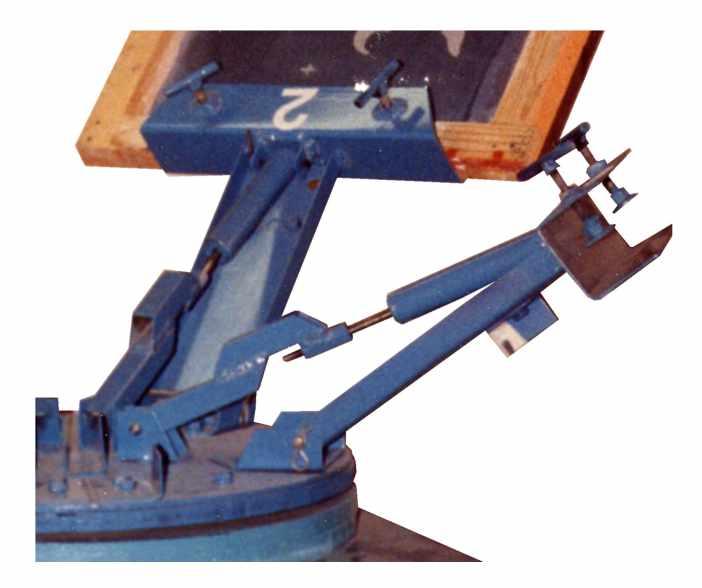
1 Creative & Research USER CODE # JCM! Copyright PO BOX 557 New Albany, IN USA JC-M1 Screen Printing Press Close up of Part # 31 Page 1


2 Creative & Research USER CODE # JCM! Copyright PO BOX 557 New Albany, IN USA Page 2

3 Creative & Research USER CODE # JCM! Copyright PO BOX 557 New Albany, IN USA Parts and Supplies You can buy metal parts from a metal salvage company, Hardware Store, Metal Supply Companies or a Machine Shop. Machine shops can also cut metal, weld, bend metal or anything else you may need, by the job or in whole! I have found you can get a better deal if you take a few parts at a time. You will need a hack saw, A jig saw with metal cutting blade, a drill press, or a band saw with metal cutting blade or you can have a machine shop cut the pieces for you, all you need to do is provide them with a good drawing of what you need done. Part # Qty PARTS DESCRIPTION /8 X 1 LONG.. BOLTS ( coarse thread ) with nuts, washers & locknuts Welder, If you do not want to do your own welding have a machine shop do it /8 x 3 or 3 ½ long. ( coarse thread ) with head screw /8 x 20 Metal round rod Swivel Pads 3/8 D ( coarse thread ) Part Name Leveling feet DIXIE INDUSTRIAL (LEXINGTON KY) NANDINO BLVD LEXINGTON, KY UNITED STATES Phone Fax info@dixiesupply.com ASLO SEE: Carrlane.com 6. 1 LAZY SUSAN Bearing type - metal turn table Supply Source: AceHardware.com or search the internet, keyword Lazy Susan. 6a x 3 x 3 Square metal tube Use about a 14 gauge. Cut to 12 7/8 lengths. Page 3 Lazy Susan
4 Creative & Research USER CODE # JCM! Copyright PO BOX 557 New Albany, IN USA Parts and Supplies Part# QTY Parts Description gauge metal U, 60 x 1 x 4 Supply source: Scrap metal yards, Machine shops, Metal supply companies you will need to cut a QTY- of 5 pieces cut to 12 lengths. Finished size: 12 x 1 x 4 Front View Side View 7a. 1 Flat metal 25 x 2 1/8 ( For registration #27 ) length x 1 x 1. ( For arm Extensions #25 ) Use about 14 gauge also Round Metal Tubing ( for spring arm cylinder ) 1 1/8 Diameter You will need to cut 5 pieces to 7 ½ lengths. You can use thin metal such as electrical conduit pipe or other. Supply Source: Metal supply companies, internet, machine shops, Push Springs: 30 lbs or less 7/8 D x 4 L Long Bolts with washers ( coarse thread ) 3/8 x 8 L Page 4


5 Creative & Research USER CODE # JCM! Copyright PO BOX 557 New Albany, IN USA Parts and Supplies Part# QTY Parts Description 11a. 5 Bolts ( Coarse thread ) 1/4 x 2 ½ L. With lock nuts and washers HL Nuts 3/8 x 1 ½ These are for adjusting the spring extension arms. Long bolt hex nuts Metal round rod 3/8 x 36 cut to a Qty of 5-6 Length pieces Carter Pins Heavy long nails 3 ½ Length. These are for attaching spring arm to attachment 7-27 for printing arms #6-a Metal U 14 gauge. 1 3/16 x 2 1 This is for attaching spring arms to printing arms #6-a attachment 7-27 FRONT VIEW Roller Bearings 3/8 for registration # Plywood or particle board ( as used by cabinet makers ) 4 x 8 x ½ thick or 3/4 thick. This is for the base of the printer Heavy Duty Roller wheels, to attach to bottom of plywood base. 20. Wood glue, C clamps, Hammer, Tape measure, Jig saw, Drill press x 15 x ½ or 3/4 thick Particle board or plywood topped with Formica plastic as used by cabinet makers. This will be the printing table base that extends from printer. Page 5
6 Creative & Research USER CODE # JCM! Copyright PO BOX 557 New Albany, IN USA PRINTING ARMS Figure A #24 Part #6-a Use a jig saw with a metal blade or a hacksaw. Cut part 6-a to 12 7/8 smooth all edges with a file. Remember you can get a machine shop or metal supply company to make the cuts for you. You will need to assemble a total of 5 arms #24 Center Part #7 to Part #6-a and weld into place, make sure it is centered and level. Weld must be strong! Now take part # 3 3/8 nuts and place over holes in top and weld into place or you can simply tap threads into the metal. This is for the level legs as a screen clamp. NOTE: If you have trouble getting parts in place to weld use a wooden jig. See figure #Jig, it is very important that part #7 is welded level to part # 6-a Figure # Jig Page 6
7 Creative & Research USER CODE # JCM! Copyright PO BOX 557 New Albany, IN USA 1. Get part # 8,.Cut A Spring Extension Arm Part # 25 You will need 5 of these 2. Take part #9 and cut off a total of 5 pieces, each piece being 7 ½ long. Then with a hacksaw cut out D ( see fig A ) all the way through to the other side to the 6 mark as shown. Now with a hammer pound C as flat as you can, then bend upward ( see fig B, 3. ) flat against the end of the cut. ( see fig B, 4. ) Then cut off the access, rounding it with the tube. Be careful that you do not burn through the light metal. You can use thicker aluminum type pipe if you wish or gas pipe that is threaded on the ends and use threaded metal end caps. Drill 3/8 hole s in the ends of each pipe ( see 5. ) Now drill 2 3/16 bolt holes on the other end of the pipe. ( see 6. ) Make sure the hole are straight and centered. If you can not do it, then have a machine shop drill the holes for you. The purpose of the Spring Arm is to allow the entire screen printing arm to move freely up and down. Into registration position and out of registration position. ( See our Screen printing video. ) Spring and Bolt Assembly #7 Assemble part # 11-a and #10 to part # bolt. Then slide into the Hydro Spring Tube Arm until the bolt comes all the way through ( see Fig C ) This bolt will later connect to the spring extension arm. See Video Close ups...# 402V $19.95 Hydro Spring Arm #26 Fig B C Page 7 D C C Fig C Fig A C C C C C
 #27 Use part # 7-a and cut and weld as shown. Then drill a Qty of 2-3/8 hole on both sides as shown. Then drill 2 3/8 holes in# 24 as shown.")
8 Registration Device Part # 27 You will need 5 of these Printer Registration holder is used for keeping the printing arm from moving while you are printing onto your T-shirts or solar cells etc.. ( See Video ) #27 Use part # 7-a and cut and weld as shown. Then drill a Qty of 2-3/8 hole on both sides as shown. Then drill 2 3/8 holes in# 24 as shown. ( Placement does not need to be that close ). Now assemble #24 to #27 using 2-3/8 x 1 bolts, lock washer and nut. The screen printing screens fit into the #24 arms and are clamped into place so the screen will not move. Hold Down Clamp Bolts ( or Level Bolts ) ( You will need a total of 10 ) Of printer Arm Side View of printer Arm Use part # 3, # 4, & # 5 pad bolt and rod and weld as shown. Then attach to top holes of printing arm #24. Another option is to buy a pre-made level bolt and purchase a steel handle to attach to top of bolt. See Carrlane.com You can make your own or purchase one Carousel #30 Lazy Susan The Lazy Susan Carousel is used to turn the 5 arm printer around so you can print one color at a time with a different pattern. Use part # 18 & # 6 ( the Lazy Susan ) The lazy Susan will fit between A & C as shown. Cut 3-19 diameter sheets of particle board or ½ cherry plywood for A,C and D. A can be made of 1/4 thick metal. Nail and glue C and D #18 together. Now make center marks on A #18 and center, drill and attach B #6 ( Lazy Susan to the bottom of A ) Page 8
9 Rocker Arm Attachments Part # 28 You will need 5 of these You will need to bend these parts to the size shown or cut and weld. It is best to get a metal fabricator or machine shop to bend the 1/4 steel for you and then you can cut your angles out yourself. Once you have the U shape you will need to drill your holes. Drill holes A & B to 3/8 Diameter. It is very important that A is in perfect line to B so when you slide your 3/8 metal round rod into the hole the rod will be perfectly level. You can have a machine shop do it for you can do it yourself. # 24 printing arm will be fitting inside here. So you will want about 1/4 space on each side. See Video... You must also have these bent to shape by a metal shop fabricator. Or again you can cut the metal your self and weld it. Cut and weld or bend to the size and shape as shown. Then drill your holes using a drill press and wood center inside of U shape for support. ( When starting your holes always start out with a very small starter drill bit. ) These attachments will attach and support the Spring extension arms. A short round rod shaft will be placed through the holes and Arm to attache them together. Use carter pins on the shaft ends. Rocker Arm Attachments Part # 29 You will need 5 of these Page 9
10 This is a top view of the A=#18 Carousel assembly. It can be 1/4 thick metal or 3/4 cherry plywood. You will need to draw a center mark and a 5 line star. Now you will be attaching parts #28 and # 29 to the metal carousel ( which will have the lazy Susan attached underneath it. ) Mark center lines on each part with a fine pint permanent marker or a fine point wax pencil. Now line up #28 & 29 parts and mark your drill holes with a pencil. Leave about a ½ space from edge to parts #28. Drill 3/4 holes so you can attach carousel #6. Rocker Arm Attachments Base Carousel #30 If using 3/4 wood, After you drill your holes turn over your wood carousel drill larger holes over top of the smaller holes as a sinker, drill down about ½ way. This is so the nuts will be hidden. If you do not do this the nuts will drag when turning Carousel during operation. Fig 13 BASE #31 You can build a base unit for your carousel and arm assemblies to lay on or you can use a table top already made. It is best in the long run and much more convenient to build a base with rollers or you can purchase a metal heavy duty roll around cart from Graingers.com or another company from the internet. Cut your plywood to the measurements shown in fig 14. Apply Elmer s Wood Glue before nailing each part together. Assemble entire cabinet and let dry 24 hrs. Then attach your heavy duty rollers on the bottom of the cabinet on each corner end. Fig 14 Page 10

11 Attach Carousel to A=#18 Center part # 6 Lazy Susan onto the bottom of A = #18 3/4 wooden carousel ( 19 Diameter ). Use wooden screws or nuts and bolts to attach Lazy Susan to wood. It is very important that the Lazy Susan is dead center of A= #18 or when printer is in operation the carousel could wobble. C Bottom of 3/4 plywood carousel 19 diameter Lazy Susan C Side View Bottom View C= #18 and D = #18 ½ particle board or plywood 19 diameter pieces should have been glued together with Elmer s glue. ( see page 8 ) You must now attach these to the top of the back of the base unit with long bolts or wood from underneath the top of table base unit. ( be sure to use Elmers glue on this as well ) Now center the Carousel and Lazy Susan assembly over top of the 19 diameter wood pieces and attach using wood screws or other, using a starter drill bit smaller than the wood and screwing in wood screws or use an electric screw driver. Page 11
12 Part # 31 ( see page 1 ) Use a 4 piece of angle iron. Drill your holes as shown. This part must be as accurate as possible. ( Get a machine shop to drill long holes for you if you can not ). Now attach your roller bearings ( part(s) # 17 ). Use 3/8 short bolts. Roller Bearing Registration Sysytem Part # 31 Fig 17 Do not tighten bolts and nuts yet until you assemble entire printing press. This should be the last thing you do. This part is for registering the printing arms to the printing pallet. The printing pallet is where you lay the object you want to print. The printing arm comes down and the part #27 that is attached to the printing arm(s) fits in between the 2 roller bearings. Printing Pallet #32 This is the printing pallet ( see page 1 & 2 also ) If you are printing T-shirts, solar cells or paper signs, 3-M Spray Adhesive is applied to the top and allowed to dry for 4 to 5 minutes and then object to print is placed on the pallet and screen printed. ( see Video $19.95 order # 402Video ) Pallet base arm is part # 7 ( metal ) or a hard cherry wood can be used. Cut long bolt holes so pallet can be adjusted as needed during registration process. Pallet and pallet base are then attached to printing base # 31 ( See page 10 ) Page 12
13 Printing Pallet cont... Use ½ particle board #18 & #21. You will also need to wood grip nuts or t- nuts asa they are called, 3/8. ( see page 1 - part # 32 ) Drill 3/8 holes in A. Hammer in wood grip nuts in top of the 3/8 holes, pencil 2 center marks one on A and one on B. Notice: before putting together, you may need to drill out or router out a space for the nuts to fit snug with top board. Now apply wood glue and nail A to B make sure everything is straight! Top View Let dry 24 hrs and sand all edges to a smooth touch. Printing Top Side View T-shirt Suppliers Wholesale: A 12 B Center mark 14 Top View 3/8 holes A 4 15 ½ Page 13
14 ASSEMBLY: Make sure all parts are sanded and painted very well! Attach printing pallet assembly to cabinet base using bolts. The extension arm can be ½ cherry wood, do not use particle board. Center the printing pallet onto the base, drill 2 holes on the end of pallet extension arm and the wood cabinet base and use ½ nuts and bolts to attach. The printing pallet can have a Formica top or wood top. Formica is best. Many lumber yards and some hardware stores carry small Formica counter top pieces which you can purchase and cut to Printing Pallet size. All metal parts should be painted with a primer first and then 3 coats of a good industrial blue / green color should be used. Now attach the metal printing arms and spring extensions to the carousel. Attach # 26 spring extension to # 6-A. It is best to attach #29 and #28 to the wood or metal carousel using 3/8 nuts and bolts. For #29 you can use 3/8 bolts or 3/8 round rod with carter pins on both sides, ( round rods are best to use in the long run. ) Once you are done attaching everything you can now adjust your spring extension arms using a pair of pliers. Flip a printing arm up and turn the bolt to tighten the spring until the arm will stay up on it s own. Do this to all 5 printing arms. Now adjust your roller bearing register guides ( #27 and #31 ) #27 should fit snug in between the 2 roller bearings. If you built every arm to the exact same measurements and all is centered and straight each arm will now be able to lock into the #31 roller bearing register guide when you swing an arm around pull it down by hand into the guide, there should not be any play in it at all. Now pull arm up and out and swing to the next arm. If an arm is giving you trouble and not staying in the up position when you are not using it then re adjust the spring tension. Page 14


15 Screen Printing We hope you enjoy this information. All this information can be applied to screen printing Solar Cells on glass, plastic or metal. If you are needing more information as in large booklet forms as well as Screen Printing supplies, then check out these companies online at: another great supplier to check out is at: The following photo s are just examples of what is used to Screen Print. Free News Free News Free News 2 wood frame printing screens Example: of 3 aluminum frames 1 color t-shirt printer, which can be used to print Solar Cells 6- Color T-shirt Printer 4-Color T-shirt Printer Page 15
16 Screen Printing Materials you will need Wood Frame IT IS BEST IF YOU MAKE OR BUY 2 SCREENS 1- used for negative contact, nickel mesh print 2nd used for layers n-type and p-type. Photo Emulsion Image for Solar Cells INK Screen Printing Ink Screen Squeegee Used to move the printing ink from the top of the inside of the screen to the bottom. To press the ink through the image and screen onto the glass or paper. 1. SPRAY ADHESIVE 2. RAGS-Viva PAPER TOWELS for clean up. 3. MINERAL SPIRITS 4. LACQUER THINNER 5. SMALL DOOR HINGES 6. A TABLE TO PRINT ON 7. PHOTO EMULSION or LACQUER FILM 8. RUBYLITHE or AMBERLITH FILM 9. EXACTO KNIFE 10. Screen Coater 13 1/2" Page 16

17 Screen Printing Homemade Solar Cells Learn how to build your own 16 " Solar Cell, and you can do it right in your own back yard! Information the Solar Cell Companies do not want you to know! Just by using the art of screen printing and your outdoor grill to bake them, you can make as many powerful solar cells as you want! Cover your entire roof! We were told these cells are just as powerful as the US made Silicon cells. Plans/ Patent only... $16.95 #401 Screen Printing Video only... $19.95 #402Video Output: 12 VDC by 8 amps 16" Diameter Example only! Plans Only $16.95 # 401 Screen Printing Booklet only...$9.95 #402booklet Page 17
18 Page 18

19 Learn how to Screen Print. Screen printing is done all over the world by very large printing companies right down to the guy who does it at home in his basement. Screen printing was first discovered by the Chinese hundreds of years ago. It is a very simple process that anyone can do. The Chinese first used silk to use in there wood frames to print with, then as time went on better material was made to print with. Wood Frame Screen Printing Image! Image! With your new 5 color printing you can print up to 5 colors on t-shirts, wet on wet and then if using platisol ink you will need to heat cure with an infra red dryer. Suppliers also sell air dry ink but you can only print one color onto a shirt with that. or signindustry.com Screen cloth & Photo Emulsion Screen printing is done by using a wooden frame with screen printing cloth stretched over it, Then there is a photo emulsion applied to the screen, dried and then exposed to a bright light source, ( You can use the sun or a photo bulb ) but before exposing it to the light source, you must first apply your film positive to the back of screen. A film positive is simply a clear piece of plastic with a silhouette or a profile or art work design filled in with a dark color, in this case you can use dark red or black. Art stores and screen supply companies sell a red film you can cut with an exacto knife called amberlith. You simply cut out your design and peel away the background that you do not want. I suggest you go to a local screen printing shop and ask them if you can buy a small 24 x 24 piece, it would be cheaper than buying a whole roll. Once you are done cutting out your design on the amberlith plastic film, you then spray the front of it ( the side with the film cut on it, ) with all purpose spray adhesive, let it dry for 3 minutes or so and then apply to back of Photo emulsioned screen and then expose to light source. Now after exposing it to the sun, the screen is then washed out with water using a water hose. The black or red image on the film positive did not let any sun get to the photo emulsion, therefor the unexposed photo emulsion can then be washed out, the other has been hardened by the sun light and can not be washed out. now after the screen has dried. you can use it to print your image with over and over as many times as you like. Ink is then applied to the inside of the screen, and by using a soft rubber squeegee, you pull the ink over top of the image area. ink then only passes through that area which was not exposed to the sun. ( See our video ) This process is known as screen printing. Let me give an example: The screen is like an open water valve, when certain areas of the screen are stopped off, then the water can not go through it, only where you want it to go. The photo emulsion can be like this example: take a 8 ½" x 11" piece of paper. now cut a hole in it. now lay it flat down onto a table. Now get a can of spray paint and begin spraying the paper. Now lift the paper up and what do you have? you have a painted circle. This is the same way screen printing works. The nice thing about screen printing is you can pass just about any type of liquid you want through the screen print area. If you are printing on paper you can screen print with any type of paint or screen printing ink, just as long as it is thick enough. If it is to thin your printed image will have run spots. Page 19

20 Photo Screen Emulsion Page 20


21 Example: 4 diameter Solar Cell Image in photo screen Replace T-shirt with Glass or other and print solar cells JCM1 5 -Color Screen Printing Machine Constructed By: David Waggoner 1991 Page 21
END FRAMES. End frames built using pressure treated 2x4 (1 1/2" x 3 1/2") 36" 34" 7/16" pilot hole. 5 1/2" x 1/2" lag bolt 8" wheel 23"
 36 34 7/16 pilot hole. 5 1/2 x 1/2 lag bolt 8 wheel 23") END FRAMES End frames built using pressure treated 2x4 (1 1/2" x 3 1/2") 23" 17 1/2" (B) (B) Measure from the bottom of your stone to 1" below the lip to get your measurement. 17 1/2"(B) 36" 34" 1/2" flat
END FRAMES End frames built using pressure treated 2x4 (1 1/2" x 3 1/2") 23" 17 1/2" (B) (B) Measure from the bottom of your stone to 1" below the lip to get your measurement. 17 1/2"(B) 36" 34" 1/2" flat
SCREEN MAKING PROCESS
 Silkscreening is highly suitable for home printing, whether it is a series on paper, a set of T-shirts, team jackets or vinyl printing on plastic. It is possible to temporarily create a home print shop
Obtained from Omarshauntedtrail.com
 DaveintheGrave's Halloween Props Animated Crawling Skeleton Build a life-size skeleton torso that realistically crawls across the lawn one arm at a time. 1. Motor Base and Linkage Assembly BASE - I used
BEAST THE. Tube and Pipe Notcher Operating Instructions. Notches In Bends Straight Notches. Angled Notches. Offset Notches
 Copyright (c) 2007 J D SQUARED INC. www.jd2.com THE BEAST Tube and Pipe Notcher Operating Instructions Notches In Bends Straight Notches Angled Notches PATENT PENDING Offset Notches Assembly After unpacking
joining materials - wood
 UNIT D E S I G N A N D M A N U F A C T U R E : C O U R S E M A T E R I A L Wood joints joining materials - wood The majority of joints used in woodcraft have been designed specifically to attain the maximum
Practical Scrap Metal Small Arms Vol.10 By Professor Parabellum
 Practical Scrap Metal Small Arms Vol.10 By Professor Parabellum Introduction The 9mm submachine gun design described here is extremely basic and can be put together using very limited tools and materials.
Motorcycle Lift Assembly Instructions
 Motorcycle Lift Assembly Instructions Copyright JCS 2009 Rev1M Page 1 Lift Table Assembly Instructions The following pages will assist you in the construction of your Motorcycle Lift Table. You will find
!! " # $ % & '! ( ) * +, -
 * +, -") !! " # $ % & '! ( ) * +, - North Pegasus This carton contains: (1) Instruction package. Response Curves North Creek Cabinet Handbook North Creek Wiring Guide (2) 6 oz. Rolls of Dacron stuffing. (1) Tube
!! " # $ % & '! ( ) * +, - North Pegasus This carton contains: (1) Instruction package. Response Curves North Creek Cabinet Handbook North Creek Wiring Guide (2) 6 oz. Rolls of Dacron stuffing. (1) Tube
PAK Drum Roll Top Assembly Instructions. Note: 2 people will be required to assemble roll top
 PAK901 4 Drum Roll Top Assembly Instructions Note: 2 people will be required to assemble roll top PLEASE READ ASSEMBLY INSTRUCTIONS CARFULLY Tools required: 5/8 Socket & Ratchet 9/16 Deep Well Socket &
How to Make a Hat Bending Jig
 How to Make a Hat Bending Jig MATERIALS One 2" x 8" x 11" long (Base Block) exact measurements are 7 ½" x 1 ½" x 11" (Pine is OK to use, I have used scrap Walnut for my benders) Four pieces of Oak 1" x
Harriet Chair with Modifications
 Harriet Chair with Modifications This modification of the Harriet chair includes a slat back, padded seat, and is 2 inches wider than the original plan. The overall dimensions of the finished chair: 38
Project: Trebuchet Overview: This medieval launcher would reek. Materials: 3/4 plywood, 2 of 5/8 threaded. Minimum Cutting Area: 2 sheets of plywood
 Project: Trebuchet Overview: This medieval launcher would reek havoc on enemies castles. However, the modern day conversion using 20lbs of weight will easily through a tennis ball the length of a gymnasium.
15 Dovetail Jig. Instruction Manual. Part # 3452
 15 Dovetail Jig Instruction Manual Part # 3452 CAUTION: Please read, understand, and follow all manufacturers instructions, guidelines and owners manuals that come with your power tools. Peachtree Woodworking
Lumber Smith. Assembly Manual. If you are having problems assembling the saw and need assistance, please contact us at:
 Lumber Smith Assembly Manual If you are having problems assembling the saw and need assistance, please contact us at: 804-577-7398 info@lumbersmith.com 1 Step 1 Safety Carefully read the Owners Manual.
WOOD TOY NEWS. July 23, 2013 Tuesday
 WOOD TOY NEWS Make your own perfect turntable for spray painting toys with these useful tips. And it s fast, fun and easy to build! by Imants Udris Watch the video on our website at : http://www.toymakingplans.com/website/how-to/
DTU Animal Cart Programme
 DTU Animal Cart Programme TECHNICAL 25 LIGHT STEEL AND WOOD DONKEY CART RELEASE Development Technology Unit, Department of Engineering, University of Warwick, Coventry, CV4 7AL UK, tel: +44 (0)203 523523
PROJECT PLANS OUTDOOR SERVING CART
 R PROJECT PLANS OUTDOOR SERVING CART Make outdoor entertaining easy with this serving cart. It offers lots of space for storing food, tableware, and outdoor supplies, plus it cradles bottles where they
Kentucky 4H Wood Science Plans Notebook. Plans Level 1
 Kentucky 4H Wood Science Plans Notebook Plans Level 1 MATERIALS NEEDED: 1 piece wood 3/4" x 2 x 2 1 piece wood 3/4" x 3 x 3 1/2" 1 wooden spring-type clothespin 2-1 1/2" nails 1-1/2 woodscrew Wood Glue
How To Make A. Large Diameter Brayer
 How To Make A Large Diameter Brayer Charles G. Morgan Mossworks Studio 77 Moss Street Victoria, B.C. V8V 4M2 CANADA 2008 www.mossworks.com charlesgmorgan@yahoo.com I got the basic design for this homemade
Side Winder R o u t e r L i f t.
 Woodpeckers PRECISION WOODWORKING TOOLS Side Winder R o u t e r L i f t. INSTALLATION INSTRUCTIONS The wrench handle must be pointing left in order to fully insert or remove it. Lift Wrench Once fully
PROJECT PLANS EXPANDABLE CRAFT CENTER
 R PROJECT PLANS EXPANDABLE CRAFT CENTER Whether you re working on craft projects, sewing, or pursuing another hobby, this craft center offers a great place to work. It features a large work surface that
Vastex Manual Press Registration System Assembly and Operations Manual
 Vastex Manual Press Registration System Assembly and Operations Manual Contents Pg. # Introduction 2 Component Identification 2-3 Pallet Jig Assembly (Manual Rear Clamp) 4 Pallet Jig Assembly (Manual Side
Pivot-Door Downdraft Cabinet Plans
 Pivot-Door Downdraft Cabinet Plans Finished Cabinet Closed Open Exploded View Introduction This simple downdraft-style dust collection cabinet is a great way to keep your shop cleaner and keep your router
Outdoor Cooler Cart. Outdoor Cooler Cart Construction Instructions
 Outdoor Cooler Cart Outdoor Cooler Cart Construction Instructions Make the Legs and Side Panels. Cut the eight long and short leg pieces to length. See Material List on next page.. Apply a bead of glue
woodworkersjournal.com MATERIAL LIST
 MATERIAL LIST T x W x L 1 Legs (2) 1 1 2" x 3 1 2" x 36 7 16" 2 End Uprights (2) 1 1 2" x 3 1 2" x 32 1 2" 3 Stringers (4) 1 1 2" x 3 1 2" x 42" 4 Top Cladding, Long (2) 3/4" x 7 1 4" x 65 3 4" 5 Side
About.com :
 http://woodworking.about.com/gi/dynamic/offsite.htm?sit...//www.popularwoodworking.com/features/fea.asp%3fid=1088 (1 of 8)1/28/2004 12:05:01 AM Modern Storage Tower The last thing I want to do when starting
T-Top Headliner Repair Guide With detailed instructions
 T-Top Headliner Repair Guide With detailed instructions Supplies: Fabric: 1 ¼ yards will do -You can use any kind of fabric you want. Some fabrics will be harder to install than others. I d highly recommend
SE5a Instrument Board part 2 - rev 1.1
 SE5a Instrument Board part 2 - rev 1.1 Fuel (Petrol) Valve This valve uses two circular name plates, eight brass screws, one black plastic base, copper wire and two black plastic risers. You can pick any
Rorty No.2 Tube Bender.
 Copyright. This entire Manual is copyrighted to Rorty Design, with all rights reserved. No part may be transferred or copied by any means whatsoever, without the express written permission of Rorty Design.
DTU 26 LOW-COST STEEL & WOOD OX CART. Animal Cart Programme D T U
 DTU D T U Animal Cart Programme TECHNICAL 26 LOW-COST STEEL & WOOD OX CART RELEASE Development Technology Unit, Department of Engineering, University of Warwick, Coventry, CV4 7AL UK, tel: +44 (0)1203
129 KITCHEN BASE CABINET 480
 129 KITCHEN BASE CABINET 480 There are two sorts of kitchen cabinets: base cabinets, which sit on the floor, and wall cabinets. Base cabinets provide both storage space and work surfaces. They often house
PowerLock. Installation Instructions. Attention Dealers: Please give this owners manual to the customer when the product is delivered.
 Serving the Truck & Trailer Industry Since 1944 FOR Attention Dealers: Please give this owners manual to the customer when the product is delivered. Call 800-535-9545 www.aeroindustries.com Indianapolis,
This manual will aid in the assembly of the FireBall V90 and FireBall X90. The assembly of both machines will be identical, unless specified.
 This manual will aid in the assembly of the FireBall V90 and FireBall X90. The assembly of both machines will be identical, unless specified. Step #1 Lay all parts out to verify quantities. (2) 2 x 25-1/4
Slab rollers Guion Road Indianapolis, Indiana USA (800) Fax: (317)
 Fax: (317)") Slab rollers 6060 Guion Road Indianapolis, Indiana 46254-1222 USA (800) 374-1600 Fax: (317) 248-9300 www.amaco.com Dear Customer, We hope you enjoy your new brent slab roller. Many different people are
Slab rollers 6060 Guion Road Indianapolis, Indiana 46254-1222 USA (800) 374-1600 Fax: (317) 248-9300 www.amaco.com Dear Customer, We hope you enjoy your new brent slab roller. Many different people are
PAT installation of a Sun Dome over a in-ground
 PAT. 3766573 Installation of Sun Domes for in-ground pool GENERAL INSTRUCTIONS: STEP 1. Read thru the entire instructional materials before beginning any installation. You will find that the installation
Downtown Rack. Custom logo option available
 Custom logo option available Downtown Rack The Downtown Rack uses thick, square-tube construction that can t be cut with a pipe cutter. The extended width of the Downtown Rack makes for easy bike parking
Why are we giving this guidebook as a FREE download?
 Construction Guide Queen, Double & Twin Vertical 1 Note: This guide covers the construction steps for all 3 sizes of the vertical wall mount Easy DIY Murphy beds, Queen, Double and Twin. The construction
THE PODIUM MUSIC STAND
 THE PODIUM MUSIC STAND 1 Set Assembly Instructions Wooden Parts: a. 1 Column b. 2 Long Slide Pieces c. 2 Slide Spacers (1 long & 1 short) d. 4 Feet e. 2 Fork Pieces f. 1 Fork Spacer g. 2 Long Desk Frame
Shark Guard Installation
 Shark Guard Installation In the Package When you receive your Shark Guard, verify that nothing was damaged in shipping. Here is a current list of parts that should be included with this Craftsman packages.
Obtained from Omarshauntedtrail.com
 http://www.scary-terry.com/dancskele/dancskele.htm This is a how-to for making a set of dancing skeletons for your Halloween window display. It uses a pair of cheap, glow-in-the-dark plastic skeletons
Swerve Rack CUSTOM RACKS AVAILABLE
 CUSTOM RACKS AVAILABLE Swerve Rack The design of the Swerve mirrors the bike frame, thus providing superior bike support while making it easy to secure both the bike frame and wheel with a standard u-lock.
Cabinet is 90% assembled, all you need to do is to attach the legs, lay the glass top on the cabinet, connect the faucet, drains & ptrap.
 Things you might need for the installation: vessel sink, plumber's putty(home depot), liquid nails(home depot), Bucket silicone caulk(home depot), Putty knife Plumber's putty Pipe wrench Channel-lock pliers
Kwik-Lock. Installation Instructions. Attention Dealers: Please give this owners manual to the customer when the product is delivered.
 Serving the Truck & Trailer Industry Since 1944 Installation Instructions Attention Dealers: Please give this owners manual to the customer when the product is delivered. Call 800-535-9545 www.aeroindustries.com
Plans. Easy-to-Build Full-size Deluxe Murphy Bed Plan. For more plans, tools and hardware visit rockler.com
 Easy-to-Build Full-size Deluxe Murphy Bed Plan Build a full-size Deluxe Murphy Bed complete with decorative molding and matching side cabinets! Plans For more plans, tools and hardware visit rockler.com
PRO Brake Operating Instructions
 PRO Brake Operating Instructions Tapco Products Company P R O 9 a n d P R O B r a k e s PRO Brake System PRO Cut Off Gauge Simplifies cutting. PRO Cut-Off Quickly, safely, and easily makes factory quality
Leafy Greens Spinner Construction Manual
 Leafy Greens Spinner Construction Manual University of Houston Conrad N. Hilton College Food Science Lab Materials list: Base and Armature Approximately 8-1 PVC cut into sections o 3-22.5 o 2-7 o 2-4 o
Scissor Stool. Written By: Feitan
 Scissor Stool If the stool is going to be kept indoors simply rub all the pieces with a Minwax WipeOn Poly before assembling the stool. If it is going to go outdoors use Minwax SparUrathane and coat all
PRO Series Brakes Operating Instructions
 PRO Series Brakes Operating Instructions Tapco Products Company PRO Brake System PRO Cut Off Gauge Simplifies cutting. PRO Cut-Off Quickly, safely, and easily makes factory quality cuts in coil stock,
Flex Fence Instruction Manual
 The Safer Stronger Smarter Choice Flex Fence Instruction Manual Table of contents 2 3 4 4 5 5 6 7 8 10 10 11 11 12 13 13 15 18 18 19 20 22 Table of contents Supplies, tools and equipment Introduction Laying
Adjustable Hammered Dulcimer Stand
 Adjustable Hammered Dulcimer Stand Musicmaker s Kits (Hwy 36 behind Joseph s Restaurant) P.O. Box 2117 Stillwater MN 55082 651 439 9120 www.harpkit.com PARTS LIST: 1 Set of Assembly Instructions A. 2 front
Hydraulic Clamp Carrier. Installation & Operation Manual
 Hydraulic Clamp Carrier Installation & Operation Manual Hydraulic Clamp Carrier Installation & Operation Manual Quick Machinery Company 8272 Peninsula Drive Kelseyville, CA 95451 phone: (707) 272-6719
N. 15th Street, Middlesboro, KY FLIP TARP DUMP BODY INSTALLATION INSTRUCTIONS
 1-800-248-7717 1002 N. 15th Street, Middlesboro, KY 40965 FLIP TARP DUMP BODY INSTALLATION INSTRUCTIONS Congratulations on your purchase of a Mountain Flip Tarp Dump Body tarping system. With tarping systems
Classic Kitchen Island
 America s leading woodworking authority Step by Step construction instruction. A complete bill of materials. Classic Kitchen Island Exploded view and elevation drawings. How-to photos with instructive
Jeep. Flat Style Fender Flares Front Pair. Included in Hardware Kit:
 Jeep Flat Style Fender Flares Front Pair STEP 1 PRIOR TO INSTALLATION A) Bushwacker only approves installing the fl ares according to these written instructions with the hardware provided. WARNING: Failure
The Useless Machine. DIY Soldering Edition. Instruction Guide v0004
 The Useless Machine DIY Soldering Edition Instruction Guide v0004 TM For the best outcome, follow each step in order. We recommend reading this guide entirely before you get started. Tools required: Soldering
Frameless Fixed Panel Slider
 INSTALLATION INSTRUCTIONS Frameless Fixed Panel Slider QCI-5279 SINGLE ROLLER WITH ANTI-JUMP DOUBLE ROLLERS QCI5279 Rev Page Certified 08/09/6 Tools: To install your New Shower Enclosure, you may need
Build your own Drawer unit. D3 / D4
 Page1 Build your own Drawer unit. D3 / D4 1: Introduction. This guide will give you the plans, materials and how to information to build your own drawer unit. The dimensions given will fit a D3 or D4,
From "American Woodturner" the Journal of the American Association of Woodturners, April 2015, vol 30, no 2 - CUSTOM - TOOL HANDLES
 From "American Woodturner" the Journal of the American Association of Woodturners, April 2015, vol 30, no 2 - CUSTOM - TOOL HANDLES Carl Ford I have found most commercially available tool handles uncomfortable
Wood Duck Nest Box Design & Assembly Directions
 Wood Duck Nest Box Design & Assembly Directions Instructions, Illustrations & Photos Courtesy of MWDI and Scott Jasion, Harford County Chapter, Ducks Unlimited Side door opening design for easy mounting
Copyright 1998 KDE Technologies
 Modular Computer Corner Desk Unit Copyright 1998 KDE Technologies http://members.tripod.com/~kdetech/ 1. Introduction 2. Plans Sheet one - Isometric Sheet two - Top Detail / Corner Unit Sheet three - Leg
MODEL T28173/T28174 ROLLER TABLES INSTRUCTIONS
 MODEL T28173/T28174 ROLLER TABLES INSTRUCTIONS FOR MODELS MFD. SINCE 10/17 For questions or help with this product contact Tech Support at (570) 546-9663 or techsupport@grizzly.com Rails Rollers Reversible
GlideRite Retractable Cover System For HotSpring & Tiger River Spas (except Classic & pre-2000 Landmark Spas)
") List of Contents Quantity Description 12 #10 x 1 ½ Flat Head Phillips Screw (see pg. 2) 2 #10 x ½ Pan Head Phillips Screw (see pg. 2) 8 ¼ x 2 ½ Lag Bolt (see pg. 2) 7 ¼ 20 x 5 / 8 Hex Head Bolt (see pg.
List of Contents Quantity Description 12 #10 x 1 ½ Flat Head Phillips Screw (see pg. 2) 2 #10 x ½ Pan Head Phillips Screw (see pg. 2) 8 ¼ x 2 ½ Lag Bolt (see pg. 2) 7 ¼ 20 x 5 / 8 Hex Head Bolt (see pg.
EASY-IN POOL STEP SYSTEM NE132
 EASY-IN POOL STEP SYSTEM NE132 This instruction manual features multiple guides for the step unit components. 7939 EASY POOL STEP (NE113) FOR USE WITH: EASY-IN POOL STEP (NE126) 6492 PARTS & HARDWARE FOR
Clock 35 - Toyland. Construction instructions for Clock 35
 This clock has been designed for children, it is a stand-alone unit and can be positioned on a shelf or cabinet out of the reach of very young hands who may be tempted to touch. The clock is shown in two
Copyright 2010 Springbok Publishing All Rights Reserved- Page 1
 Copyright 2010 Springbok Publishing All Rights Reserved- www.woodensaddlerackplans.com Page 1 Legal Information All contents copyright 2010 by Springbok Publishing. All rights reserved. No part of this
Parts list Instruction guide Warnings Please read carefully before assembling and using product.
 Parts list Instruction guide Warnings Please read carefully before assembling and using product. Jet Rail XL Part Number 27377 Tools required for assembly Hammer 9/16 Wrench 3/4 Wrench Ratchet 9/16 Socket
C L A S S I C. Deluxe. Snow Thrower Cab. Assembly and Care Instructions
 C L A S S I C Deluxe Snow Thrower Cab Assembly and Care Instructions Deluxe Snow Thrower Cab Assembly and Care Instructions Before you begin please unpack the carton and check that you have all your parts.
Note - the nose ribs and are thinner than the main ribs. These nose ribs will use a thinner rib cap than the ribs. This is per design.
 Stabilizer rev 1.2 The SE5a stabilizer is the heartbeat of the tail and is recreated like the full scale version. All tail pieces depend on the stabilizer. It uses the steel fittings, pulleys, inspection
Hoop House Construction Plans
 Kerr Center for Sustainable Agriculture (918) 647-9123 24456 Kerr Rd. Poteau, OK 74953-5215 Copyright 2017 Published Fall 2017 www.kerrcenter.com Hoop House Construction Plans This document explains how
INFINITY-Z SHOWER DOOR / TUB DOOR INSTALLATION INSTRUCTION. MODEL #s 01-Chrome
 INFINITY-Z SHOWER DOOR / TUB DOOR INSTALLATION INSTRUCTION IMPORTANT DreamLine reserves the right to alter, modify or redesign products at any time without prior notice. For the latest up-to-date technical
Project: Smoker Overview: Smoking meat has been around for. Materials: 3/4 plywood, 7-48 of 1/2 dowel,
 Project: Smoker Overview: Smoking meat has been around for hundreds of years. Now with this simple smoker one can bring back to life the ancient methods of preserving meats and adding the smoky flavor.
Thank you for purchasing these easel plans. I think you will find this to be a fun, easy to build project that will serve you for years to come.
 Construction Plans for The Basic Wooden Easel Updated August, 2002 Thank you for purchasing these easel plans. I think you will find this to be a fun, easy to build project that will serve you for years
FOR PROFESSIONAL GARAGE DOOR INSTALLERS
 Composite Garage Doors Installation Instructions FOR PROFESSIONAL GARAGE DOOR INSTALLERS Tools required Screwdriver Claw Hammer Locking Pliers Power Drill Level with a 3/32" Drill Bit Utility Knife 9/16",
Kid-powered "squaris" wheel
 Kid-powered "squaris" wheel DESIGNED By ROBERT WOOLSON DUBBED A "SQUARIS WHEEL" by its designer because of its square wheel, this pint-sized backyard version of its big brother, the ferris wheel, will
Shop-Made Miter Clamps
 *Editor s note: In the photos showing the table saw, the blade guard has been removed for clarity. I try to be as self-sufficient as possible, so I like to manufacture my own tools whenever I can. I designed
Desert Gold! OK Enterprises P.O. Box 2908 Lake Havasu City, AZ
 Desert Gold! Desert Drywash OK Enterprises P.O. Box 2908 Lake Havasu City, AZ 86405 www.lookout2000.com/desertgold email: desertgold@lookout2000.com 866-496-3197 ext 702 DESERT DRYWASHER MATERIAL REQUIREMENTS
PRIME SHOWER ENCLOSURE INSTALLATION INSTRUCTIONS
 PRIME SHOWER ENCLOSURE INSTALLATION INSTRUCTIONS IMPORTANT DreamLine reserves the right to alter, modify or redesign products at any time without prior notice. For the latest up-to-date technical drawings,
Organisational Kitchen Fittings Kitchen Cabinet Accessories
 Kitchen waste bin systems Single waste bin, capacity 1 litres Carcase width: Min. 400 mm For door mounting: For left and right hand use Installation: Screw fixing to side panel Housing: Steel, plastic
OPERATIONS MANUAL. Port-O-Slitter
 Tapco Products Company The World Leader in Specialty Tools for the Professional Port-O-Slitter OPERATIONS MANUAL General instructions, set up, accessories and guide to using your portable precision slitting,
GlideRite Retractable Cover System For Hot Spot Spas (SE & SLX only)
") List of Contents Quantity Description 12 #10 x 1 ½ Flat Head Phillips Screw (see pg. 2) 2 #10 x ½ Pan Head Phillips Screw (see pg. 2) 8 ¼ x 2 ½ Lag Bolt (see pg. 2) 7 ¼ 20 x 5 / 8 Hex Head Bolt (see pg.
List of Contents Quantity Description 12 #10 x 1 ½ Flat Head Phillips Screw (see pg. 2) 2 #10 x ½ Pan Head Phillips Screw (see pg. 2) 8 ¼ x 2 ½ Lag Bolt (see pg. 2) 7 ¼ 20 x 5 / 8 Hex Head Bolt (see pg.
Installing Your New Creature From The Black Lagoon Tail Light DMD Panel MOD
 Installing Your New Creature From The Black Lagoon Tail Light DMD Panel MOD A few things before we start: The wooden speaker panel provided in this MOD was manufactured using a Precision CNC machine and
Continue gluing the remaining top parts ensuring the angled piece is glued well. Set aside and let dry. See photo below
 Radiator rev 1.1 The SE5a s radiator is one of the most recognized radiators in WW1. It is one of the components that defines the SE5a. The original SE5a has seen multiple radiator designs used during
CABINETRY Assembly Instructions
 www.hdicabinetry.com Assembly Instructions TABLE OF CONTENTS Category Page(s) Section 1: Framed Series Base Cabinet Instructions Wall Cabinet Instructions Easy Reach Cabinet Instructions 1.01-1.04 1.05-1.06
Bulkhead Model Number and
 Bulkhead Model Number 96141-3-01 and 96142-3-01 Installing your ProMaster bulkhead is very clear cut following these instructions. Before cutting or drilling in the floor, verify the location of you gas
Making a Cement Upper Molding Surface for Compression Molding of Shape&Roll Prosthetic Foot Cores
 Making a Cement Upper Molding Surface for Compression Molding of Shape&Roll Prosthetic Foot Cores Andrew Hansen, PhD Steven Steer, MS Kerice Tucker Elizabeth Klodd Craig Heckathorne, MS Northwestern University
INSTALLATION MANUAL FORTRESS SERIES
 Guardian Security Structures TEL 1-406-212-2334 EMAIL rg@gssdoors.com WEB www.gssdoors.com FORTRESS SERIES GENERAL INSTALLATION GUIDELINES 1. The door frame is installed using 16 bolt screws 7,5 mm in
Swift assembly guide
 Swift assembly guide Download the assembly guide at www.scihighmodels.com/swift.pdf Sample kit shown with aluminium bells (available with the Deluxe kit) Shown here without main tanks Version 10/12/2010
PowerLock. Installation Instructions. Attention Dealers: Please give this owners manual to the customer when the product is delivered.
 Serving the Truck & Trailer Industry Since 1944 FOR Attention Dealers: Please give this owners manual to the customer when the product is delivered. Call 800-535-9545 www.aeroindustries.com Indianapolis,
Contents. pages 20-24: Installing Edge sinks into. custom laminate countertops page 8: Installing Edge sinks into postform laminate countertops
 Contents pages 2-8: Installing Edge sinks into custom laminate countertops page 8: Installing Edge sinks into postform laminate countertops pages 9-14: Installing Acrylic sinks into custom laminate countertops
Materials and Tools: Printer s Triple Console Cabinet. Free Plans to build a Triple Console Cabinet
 Materials and Tools: Materials: 3 sets euro style bottom corner mount drawer slides, 16 length 3 sets inset hinges 24 cup style handles 8 2x2 @ 8 feet long 6 1x3 @ 8 feet long 6 1x2 @ 8 feet long 1 sheet
Cambridge International Examinations Cambridge International General Certificate of Secondary Education
 Cambridge International Examinations Cambridge International General Certificate of Secondary Education *2410250691* DESIGN AND TECHNOLOGY 0445/32 Paper 3 Resistant Materials May/June 2018 1 hour Candidates
Connect Transit Shelter
 Tools Required *denotes special tools required Connect Shelter, 8ft Connect Shelter, 12ft *Soft, non abrasive protective surface such as a furniture blanket *Source of compressed air (for thorough dust
Potter s Wheel Plans. Flywheel is poured in form made by tacking tar paper to plywood disk. Partly set concrete is broom-finished.
 Potter s Wheel Plans Flywheel is poured in form made by tacking tar paper to plywood disk. Partly set concrete is broom-finished. Throwing Pottery on a wheel is the most challenging form of pottery making
1949 to 1954 Chevrolet Dual Master Cylinder Conversion
 1949 to 1954 Chevrolet Dual Master Cylinder Conversion This document is a one stop shop to getting your brake system updated on your old Chevy. Whether you re going with a disc conversion or just sticking
Empire Dresser Plans
 1 Empire Dresser Plans Materials 1 sheet 3/4" plywood (cabinet grade 4' x 8') 1 sheet 5 mm (3/16") underlayment plywood 4'x 8', buy another 1/2 sheet if you want to put a back on the dresser. 1-2" x 4"
Project Identity. Assistive Robotic Arm Week 9 March April 4, 2007 Megan Madariaga
 Project Identity Assistive Robotic Arm Week 9 March 28 2007- April 4, 2007 Megan Madariaga Work Completed: On Friday March 30 th we filled out the return sheet for our large base motor then traveled to
1/4 Rubber Spacer, 26 pcs. M5-.8 Machine Screw, 26 pcs 13. Female Wire Connector, 4 pcs
 97-06 Jeep Wrangler TJ Set Part #10920-07 Rev-3 12-15-08 A) B) C) D) E) F) G) STEP 1 - PRIOR TO INSTALLATION Bushwacker only approves installing the fl ares according to these written instructions with
Regulator installation guide Air Arms S4xx/S5xx
 Welcome to Huma-Air. We design and manufacture brand- and model specific precision regulators for PCP air rifles. By using only the highest quality materials such as aircraft grade aluminum, aluminumbronze,
Congratulations on purchasing the Spirit Rails Magnetic Attach that allows easy wand to pack removal and reattachment by just getting close!
 Introduction Congratulations on purchasing the Spirit Rails Magnetic Attach that allows easy wand to pack removal and reattachment by just getting close! The Spirit Rails Magnetic Attach Kit is designed
Written By Phil (T90) for Team MudRhino
 for Team MudRhino") Rock Sliders Written By Phil (T90) for Team MudRhino WWW.MUDRHINO.COM.AU The most vulnerable cosmetic part of any vehicle while off-roading is the door sills (rocker panels), located just under the doors.
Rock Sliders Written By Phil (T90) for Team MudRhino WWW.MUDRHINO.COM.AU The most vulnerable cosmetic part of any vehicle while off-roading is the door sills (rocker panels), located just under the doors.