GARDEN SCREEN FENCE 232
|
|
|
- Erick Perry
- 5 years ago
- Views:
Transcription

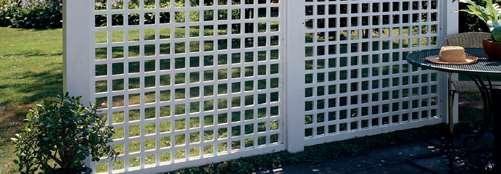
1 GARDEN SCREEN FENCE 232


2 233
3 Materials List--Privacy Screen Key No. Size and description (use) A 16 3/4 x 1 x 53" cedar (horizontal slat) B 14 3/4 x 1 x 72" cedar (vertical slat) C 4 3/4 x 2-1/2 x 53" cedar (rail) D 2 3/4 x 2-1/4 x 72" cedar (lattice end) E 1 3/4 x 2-3/4 x 54-1/2" cedar (top cap) F 4 3/4 x 5-1/4 x 76" cedar (post face) G 4 3/4 x 3-3/4 x 76" cedar (post side) H 2 1-1/2 x 7-1/4 x 7-1/4" cedar (post cap) I 8 1/2 x 1-1/2 x 6-1/4" cedar (molding) J 2 6'-long 4 x 4 pressuretreated post K 224 3/4" No. 4 fh brass woodscrew L /2" No. 8 fh brass woodscrew M /2" No. 10 fh brass woodscrew N 24 2" No. 10 fh brass woodscrew O 56 No. 0 plate P as reqd. 6d galvanized finishing nail Note: Quantities based on one lattice and two posts. Misc.: 120-grit sandpaper; Benjamin Moore Moorwhite Penetrating Alkyd Primer 100 and MoorGlo 100% Acrylic House & Trim Paint 096, 234


4 Making The Lattice First, crosscut 1 x 8 stock to length for the vertical and horizontal lattice members. Clamp each set of blanks in a stack with the ends flush, and mark the locations of the half-lap joints on the stock edges. Use a dado blade to cut 5/16-in.-deep notches at the half-lap joint marks (Photo 1). Make two passes to complete each notch. Then, rip the lattice slats from the wide stock (Photo 2). To assemble a lattice panel, first lay out the horizontal slats with a 3-in. space between each. Spread glue in the notches of a vertical slat and in the mating notches on the horizontal slats. Firmly seat the joints, and drive a 3/4-in. No. 4 brass screw at each intersection (Photo 3). Install the remaining vertical slats in the same way. After cutting the 1 x 8 lattice stock to length, lay out the half-lap joint notches and cut them with a dado blade. Rip and crosscut the top and bottom rails to size, and fasten them to each side of the lattice with 6d galvanized finishing nails (Photo 4). Cut the vertical end strips to size, and nail them to the ends of the top and bottom rails. Attach the end strips to the end vertical lattice slats with screws placed in between the horizontal slats (Photo 5). Rip and crosscut blanks for the lattice panel cap. Then, tilt your table saw blade to 12 and cut the top bevels. Smooth the cut surfaces with 120-grit sandpaper and use galvanized finishing nails to fasten the cap to the top rails and end strips (Photo 6). When the notches are cut, rip the 1-in.-wide horizontal and vertical lattice strips from the 1 x 8 blanks. Apply glue to the half-lap joints and press the lattice strips together. Reinforce each joint with a single screw. 235


5 Position the top and bottom rails along each side of the lattice panel, and secure them with galvanized finishing nails. Nail the vertical end strips to the top and bottom rails, and add screws between the horizontal lattice members. After ripping the angles on the top of the lattice cap, fasten the cap to the rails and end strips with finishing nails. 236


6 The Posts Rip and crosscut the post faces and sides to finished size. While it's not necessary to use fasteners other than nails, post assembly is easier if you use joining plates to help position the parts. Clamp a fence to the worktable and cut platejoint slots in the post faces (Photo 7). Then, cut the corresponding slots in the edges of the post sides. Install the joining plates in the faces. Since the plates are only positioning aids, it's not necessary to use glue. Position the side pieces over one face, add the opposite face and secure with 6d galvanized finishing nails. Take care not to nail through the joining plates (Photo 8). Cut 2 x 8 stock into 7-1/4-in. squares for the post caps, and set up the table saw to make the angled cuts on the caps. Begin by clamping a tall guide to the table saw fence. Tilt the saw blade to 12 and raise it so the top of the blade is 2-3/4 in. above the table. Adjust the fence so it's 7/8 in. from the blade at the table. Clamp one edge of a cap block to a 2 x 6 x 12-in. backer board. Turn on the saw and cut one of the angled faces (Photo 9). When the blade enters the backer board, shut off the saw, wait till the blade stops and remove the assembly. Then make the remaining cuts in the same way. If using the raised fence, backer board and clamps seems too complicated, simply shape the cap bevels with a hand plane. This may take longer, but it's a more relaxed procedure. Mount a 3/8-in.-radius, quarter-round bit in your router table and shape the bottom edges of the post caps. Sand the caps and nail them to the post tops (Photo 10). Then, use the same bit to round one edge of 1/2 x 1-1/2-in. stock for the cap molding. Cut the molding pieces to length with a miter saw, and nail the mitered pieces under the post caps (Photo 11). Lay out plate joints in the post parts and cut the slots. The plates keep the pieces aligned during assembly. Assemble the box posts with plates but no glue. Then, use galvanized finishing nails to fasten the pieces together. Use a tall auxiliary fence when cutting the post cap angles. Clamp stock to a backer board to support the cut. 237


7 Position the cap so it overhangs the post uniformly. Then, fasten it to the top of the post with galvanized finish nails. Miter the ends of the cap molding pieces. Fit each piece under a cap and secure with galvanized finishing nails. Assembly And Finishing Bore screwholes in the lattice panel side strips, position a panel on one of the posts and secure with screws (Photo 12). Repeat the procedure for each lattice/post joint. If you're constructing more than one screen section, disassemble the parts into separate lattice/post subassemblies so they're easier to carry. Cut pressure-treated 4 x 4s to 6-ft. lengths. Slide one of these pieces into the bottom end of each post so that 30 to 36 in. protrudes. Notice that the post cavity is 1/4 in. wider than the 4 x 4 to make installation easier. Drive two screws through the post into the 4 x 4 to temporarily hold it in place. After you install the screen you can remove the screws to adjust the relative heights of the posts. Set all nail holes, then prime the screen with a quality exterior-grade primer. We used Benjamin Moore Moorwhite Penetrating Alkyd Primer 100. Fill all nail holes with glazing compound or painter's putty, then apply a coat of a 100 percent acrylic topcoat, such as Benjamin Moore MoorGlo Bore screwholes in the lattice side strips and position the lattice on a post. Attach with screws. 238
8 100% Acrylic House & Trim Paint 096. To install the screen, mark the post centers on the ground, and use a posthole digger or shovel to dig holes at least 30 in. deep. Place a few inches of crushed stone in the bottom of each hole. Bring the screen to the site and reassemble it. Tip the 4 x 4 post ends into the holes, and brace the screen so that the posts are plumb. Fill the holes with more crushed stone to within 6 in. of the surface, tamping it down to provide a solid base. Then top off the holes with topsoil. Check that the bottom rail of the screen is level. If necessary, remove the screws that hold the posts to the 4 x 4s and adjust the height of the screen as required. Install more screws to hold the posts to the 4 x 4s, then fill the holes over the screwheads and touch up the paint. This system will work for locations where the ground slopes no more than 2 in. from one end of the screen to the other. For dramatically sloped yards, you'll need to construct posts that accommodate the difference in grade. 239


9 Want To Get More Tips, Designs & Plans Like This? You ll LOVE The Full Package At TedsWoodworking Want to get the FULL complete plan to this project? You ll get: All-Inclusive Blueprints & Plans Step-By-Step Photos Detailing Every Step Along The Way Illustrated Drawings and Sketches Metric and Imperial Measurements Complete Easy-To-Follow Instructions Insider tips, tricks, tactics and techniques that professionals use so you can cut corners, and get the job done faster 16,000 More Woodworking Plans! Order TedsWoodworking today and get full access to all the details of this plan PLUS 16,000 step-by-step woodworking plans. This package will blow your mind because it s filled with everything you need to complete any woodworking project you could ever imagine! Get Full Access To 16,000 Plans Now!
ARTS AND CRAFTS CHAIR
 ARTS AND CRAFTS CHAIR 491 MATERIALS LIST--DINING CHAIR Key No. Size and description (use) A 2 1-3/4 x 1-3/4 x 16-1/4'' oak (front leg) B 2 1-3/4 x 3-3/4 x 40-1/2'' oak (rear leg) C 1 1-3/4 x 3-3/16 x 15''
Build A Cedar Chair And Ottoman
 Build A Cedar Chair And Ottoman If you've ever dreamed of extending the comfort of your living room to your deck, patio or yard, our porch chair-and-ottoman combination is a great place to start making
Redwood 3. Install the chair back Finishing A d i r o n d a c k C h a i r Grades Materials For Adirondack Chair Quantity Size Length 4.
 Adirondack Chair Adirondack Chair BUILD THE CHAIR FRAME The rounded wooden slats, oversized armrests and inviting slant-back design identify the classic Adirondack chair. Born a century ago in upstate
Nineteenth-Century Dough Box
 Nineteenth-Century Dough Box T he dough box was a functional piece found in many a country kitchen. The idea was that the cook would make a large batch of bread dough, knead it on the large work surface
under the bottom shelf and along the top shelf should do the trick.
 w Bookshelves in a Day BY ST E V E L A T T A Iget the most pure enjoyment from reproducing 18th-century furniture, but every now and then it s nice to break out of that mode and dive into a project that
Colonial Washstand Circa 1760
 Colonial Washstand Circa 1760 I found the original of this piece while on vacation on Jekyll Island in Georgia. It was one of a pair in a conference room at the Jekyll Island Club Hotel, part of the island's
woodworkersjournal.com MATERIAL LIST
 MATERIAL LIST T x W x L 1 Legs (2) 1 1 2" x 3 1 2" x 36 7 16" 2 End Uprights (2) 1 1 2" x 3 1 2" x 32 1 2" 3 Stringers (4) 1 1 2" x 3 1 2" x 42" 4 Top Cladding, Long (2) 3/4" x 7 1 4" x 65 3 4" 5 Side
BUILDING A STORM DOOR
 BUILDING A STORM DOOR BY NEAL BARRETT Illustrations by George Retseck If you're in the market for a storm door, you probably know that there are many styles and models available. However, most of them
It can be either a 2½ seater bench seat (2 adult and a kid), or a 5 seater picnic table.
, or a 5 seater picnic table.") Page 1 Folding picnic table in both bench-seat and picnic table mode Introduction Description A single bench seat that can be changed into a picnic table with ease. This 'Bench come Picnic Table' is ideal
Page 1 Folding picnic table in both bench-seat and picnic table mode Introduction Description A single bench seat that can be changed into a picnic table with ease. This 'Bench come Picnic Table' is ideal
 America s leading woodworking authority To download these plans, you will need Adobe Reader installed on your computer. If you want to get a free copy, visit: http://adobe.com/ reader. Having trouble downloading
Project Skill Level: INTERMEDIATE Plywood Used: CANPLY EXTERIOR Good Two Sides (G2S) or precision sanded Aspen
 or precision sanded Aspen") Project Skill Level: INTERMEDIATE Plywood Used: CANPLY EXTERIOR Good Two Sides (G2S) or precision sanded Aspen MATERIALS LIST: (1) ¾" x 4 ft x 8 ft plywood panel (20) #8 x 2" Robertson or Phillips wood
Project Skill Level: INTERMEDIATE Plywood Used: CANPLY EXTERIOR Good Two Sides (G2S) or precision sanded Aspen MATERIALS LIST: (1) ¾" x 4 ft x 8 ft plywood panel (20) #8 x 2" Robertson or Phillips wood
HOW TO INSTALL ELITE PANELED WAINSCOTING Using X-Rails with Either Raised, Flat or Beaded Panels
 HOW TO INSTALL ELITE PANELED WAINSCOTING Using X-Rails with Either Raised, Flat or Beaded Panels 1. First, remove the cover plates from all electrical outlets. All baseboards should also be removed; the
MAKING THE TV RISER CUTTING A STOPPED GROOVE ON THE TABLE SAW
 TV RISER Cherry 19 MAKING THE TV RISER First, the material that will make up the riser is glued together. Then, dress down the glued-up panel to a flat surface and a consistent thickness. In a shop with
Celebrate 100 years of PM with the fourth in our furniture series.
 Anniversary Desk Celebrate 100 years of PM with the fourth in our furniture series. With all the business involved in running a home, it's no wonder most of us run out of space to handle the paperwork.
Chapter 17 - Porch Trim
 Chapter 17 - Porch Trim Contents Chapter 17 - Porch Trim... 17-1 Timing & Prerequisites... 17-2 Trim on Porch Beams (Volunteer)... 17-4 Smart Trim on the Bottom of the Beam... 17-4 Smart Trim on the Inside
Jigsaw Puzzle Tray. Premium Plan. In this plan you ll find: America s leading woodworking authority
 America s leading woodworking authority Premium Plan In this plan you ll find: Step-by-step construction instruction. A complete bill of materials. Construction drawings and related photos. Tips to help
Essential BOX JOINT JIG
 Essential BOX JOINT JIG Home in on precise finger joints with this table saw sled. By Ken Burton The box (or finger) joint is a remarkably strong, interlocking corner joint that can be quickly made on
Birdhouse Plan Combo Pack
 Birdhouse Plan Combo Pack Two Quick and Creative Projects for Your Yard PROJECT 17 Old Plane Birdhouse BY CHRISTOPHER SCHWARZ Every woodworker should spruce up the yard (or the shop) with this simple birdhouse.
The first step is to cut all wood to proper size. Refer to the cutting schedule and Details 1 and 2 for further instructions.
 CHILD S ARMOIRE 275 THIS CHILD'S ARMOIRE will make it easy for kids to keep their rooms neat and orderly. Its six drawers and two shelves provide enough storage space to house a substantial wardrobe. By
Demilune 4. Apron Joinery. Curved Apron Tenon. Bridle Joint Legs. Bridle Joint Front Apron
 Demilune Email 4 Apron Joinery There are two types of joints used in connecting the aprons and legs. The rear legs use conventional mortise and tenon joints, while the front legs use the less conventional
Project 17884EZ: Shaker End Table
 Project 17884EZ: Shaker End Table With its clean, simple lines, this piece is unmistakably Shaker style. Ours is made from cherry, a wood commonly used by Shaker craftsman, but we ve also seen this piece
Kreg Tool Co. All Rights Reserved.
 Version 1 p. 1 Materials: Lumber: Qty: Board 2 2x2s 3 ft. long 2 1x2s 8 ft. long 2 1x3s 8 ft. long 6 1x6s 10 ft. long INSTRUCTIONS: Supplies: 1 1 / 4" Kreg Screws (coarse thread for softwoods, fine thread
ADULT. Adirondack / Muskoka Chair Plans
 ADULT Adirondack / Muskoka Chair Plans Materials List 3/4" x 9 1/2" (1.9cm x 24.1cm) redwood, cedar or pine boards. Six, 8' (2.44m) boards should make one chair depending on knots and layout. You can also
Burning For It. The world's easiest table doubles as a workbench, a laundry counter, a project table and, in a pinch, a spare bunk bed.
 Burning For It The world's easiest table doubles as a workbench, a laundry counter, a project table and, in a pinch, a spare bunk bed. If you're like me, you need more surface area. And I'm not talking
Installation Guide. Capped Cellular PVC Fencing. Table of Contents. Storage and Handling Tools Needed Fence Layout and Locating Posts
 Capped Cellular PVC Fencing Installation Guide Table of Contents Storage and Handling Tools Needed Fence Layout and Locating Posts Installation instructions 4 x 4 Over Sleeve Post - 3.5 Rail Privacy Shadowbox
Kentucky 4H Wood Science Plans Notebook. Plans Level 3
 Kentucky 4H Wood Science Plans Notebook Plans Level 3 MATERIALS: 2 pieces wood 3/4 x 10 x 4 1 piece wood 3/4 x 12 x 4 2 pieces wood 3/4 x 3 x 2 5 1/2" 2 pieces wood 3/4 x 3 x 1 8 1 piece wood 2 x 4 x
I I. . i1 AD JUSTABLE SHELVES
 ADJUSTABLE SHELVES HAD BEEN TRYNG TO WORK out a really simple (read "fast") way to make an elegant wooden version of the old standby, metal standards and brackets. Although have seen many commercial versions
Corner Cabinet. American. There is something about corner cabinets that spooks
 American Corner Cabinet The triangular shape of this project puts off most woodworkers. Here s a secret: It s actually quite easy to build. There is something about corner cabinets that spooks most woodworkers.
Greene & Greene. Mailbox. by Seth Keller. Signature details create an elegant box. 2 AmericanWoodworker.com
 Greene & Greene Mailbox by Seth Keller Signature details create an elegant box. 2 AmericanWoodworker.com We needed a new mailbox, but I couldn t find an off-the-shelf version that I liked. So I decided
Iearn my living by making cabinetry not cookie-cutter
 Supporting Shelves Five methods for installing by Stephen Winchester Iearn my living by making cabinetry not cookie-cutter kitchens, but one-of-a-kind pieces and custom built-ins. Every cabinet I build
Traditional glass-pane and wood-muntin doors highlight this free-standing piece.
 Bookcase Traditional glass-pane and wood-muntin doors highlight this free-standing piece. As the saying goes, there's nothing like good books. But they can present some storage problems--especially if
PROJECT PLANS PATIO PLANTER BOX
 PROJECT PLNS PTIO PLNTER BOX This great-looking planter makes the perfect place for your favorite plants and flowers. It s sized to hold an 18" round plastic pot, which you can pick up in any garden center.
SHADOWBOX INSTALLATION FOR: Standard 6 H x 8 W Shadowbox Fence 5 x 5 Routed Posts Dog Ear or Straight-Edge Pickets 1.75 x 3.5 Rail
 SHADOWBOX INSTALLATION FOR: Standard 6 H x 8 W Shadowbox Fence 5 x 5 Routed Posts Dog Ear or Straight-Edge Pickets 1.75 x 3.5 Rail Storage and Handling Fence Preparation and Layout Locate and Set Posts
Butterfly Leaf Dining Table Plans
 Butterfly Leaf Dining Table Plans Part 1 An attractive dining table with a secret: the leaf folds and stores inside the table. Season 1, Episode 7 P a g e 2 I first saw a butterfly leaf table in a back
COMPLIMENTARY WOODWORKING PLAN
 COMPLIMENTARY WOODWORKING PLAN ORIENTAL GARDEN ARBOR PLAN This downloadable plan is copyrighted. Please do not share or redistribute this plan in any way. It has been paid for on your behalf by JET Tools,
Flamingo. That s what I looked
 Plans N O W w w w. P l a n s N O W. c o m flip-seat Storage Bench Flamingo. That s what I looked like as I stood in the doorway perched on one leg, with my other foot raised so that I could untie the laces
The image above is intended to give you an idea of what the dovecote will look like when finished.
 Thank you for buying my book, I hope it is useful and enjoyable in your quest to building your own dovecote. This book will give you step-by step instructions on how to build your own dovecote also included
Outdoor Swing and Arbor
 America s leading woodworking authority Step by Step construction instruction. A complete bill of materials. Outdoor Swing and Arbor Exploded view and elevation drawings. How-to photos with instructive
Knockdown Bookcase. This slant-sided bookcase was a popular mail-order item in the early 1900s.
 Knockdown Bookcase This slant-sided bookcase was a popular mail-order item in the early 1900s. The Arts & Crafts movement was part of an interesting social change in America the advent of mail-order purchases.
Mail Truck Bank Plan. Rockler Mail Truck Bank Plan
 Mail Truck Bank Plan Build this nostalgic Mail Truck Bank and capture the imagination of a child! This easy-to-build plan uses our Solid Brass Mailbox Door (#55358) to commemorate the stalwart little truck
PRIVACY INSTALLATION FOR: Standard 6 H x 8 W Privacy Fence 4 x 4 Post Sleeve & Brackets Dog Ear or Straight-Edge Pickets 1.75 x 3.
 PRIVACY INSTALLATION FOR: Standard 6 H x 8 W Privacy Fence 4 x 4 Post Sleeve & Brackets Dog Ear or Straight-Edge Pickets 1.75 x 3.5 Rail Storage and Handling Fence Preparation and Layout Locate and Set
The WoodWorker s Edge
 The WoodWorker s Edge Draw-leaf Game Table 1. 2. Layout the area for the tenons. The tenons are 3/8 thick x 4-1/2 long x 1-1/4 deep and offset to the inside. Create the tenons using the step method to
About.com :
 http://woodworking.about.com/gi/dynamic/offsite.htm?sit...//www.popularwoodworking.com/features/fea.asp%3fid=1088 (1 of 8)1/28/2004 12:05:01 AM Modern Storage Tower The last thing I want to do when starting
Workstation. Multipurpose. Shop Project
 Shop Project Multipurpose Workstation Rock-solid, practical, and inexpensive it s tough to beat this versatile workstation that you can make from one sheet of plywood.. I don t think a woodworker can ever
PROJECT PLAN TRAVEL CRIBBAGE BOARD
 BUILD IT WITH ROCKLER PROJECT PLAN TRAVEL CRIBBAGE BOARD BUILD Stock # Item Stock # Item 59160 Small Cribbage Board Template, 2-Player, Straight Track 90638 3/4" Dia. Straight Router Bit (1/2" shank) 21026
Cedar fence. Construction plan. fence with shutters of which you. can decide the angle, allowing to create the required amount of privacy.
 4" STEP BY STEP Guide Construction plan Cedar fence A fence with shutters of which you can decide the angle, allowing to create the required amount of privacy. 4" X 4" 76 1 /2" Diffi culty level: 1 2 3
Kentucky 4H Wood Science Plans Notebook. Plans Level 4
 Kentucky 4H Wood Science Plans Notebook Plans Level 4 MATERIALS NEEDED: Note: 1" wood may be 3/4" thick and 2" x 2" may be 1 1/2" x 1 1/2" 2 pieces wood 1 x 3 x 17 1 piece wood 1 x 3 x 14 3/4" 2 pieces
MyOutdoorPlans.com. By Julian King [2X4 GARDEN BENCH]
![MyOutdoorPlans.com. By Julian King [2X4 GARDEN BENCH]](/thumbs/75/72876801.jpg "MyOutdoorPlans.com. By Julian King [2X4 GARDEN BENCH]") MyOutdoorPlans.com By Julian King [2X4 GARDEN BENCH] CUT LIST A 2 pieces of 2 4 lumber 24 long, 2 pieces 32 1/2 long LEGS B 2 pieces of 2 4 lumber 45 long, 2 pieces 15 1/2 long, 1 piece 12 1/2 long SEAT
MyOutdoorPlans.com By Julian King [2X4 GARDEN BENCH] CUT LIST A 2 pieces of 2 4 lumber 24 long, 2 pieces 32 1/2 long LEGS B 2 pieces of 2 4 lumber 45 long, 2 pieces 15 1/2 long, 1 piece 12 1/2 long SEAT
Jeff Branch WOODWORKING YOU CAN BUILD A. By adding subtle design elements, a traditional furniture style becomes decidedly modern.
 Jeff Branch WOODWORKING YOU CAN BUILD A By adding subtle design elements, a traditional furniture style becomes decidedly modern. Jeff Branch WOODWORKING Publisher: Jeff Branch Editor: Jeff Branch Art
Arched. Building an. Passageway. Although my company specializes in high-end jobs
 Building an Arched Passageway All photos by Brian Striegler This straightforward approach combines basic shop methods with simple site joinery to create an elegant frame-and-panel archway by Gary Striegler
Router Table-Mate. Everything you'd want in a router table for just $50.
 Router Table-Mate Everything you'd want in a router table for just $50. Commercially made router tables are everywhere these days. Some of them come with more gizmos and gadgets than a 59 Edsel. By the
Kitchen Upper Cabinet: Double Doors Cabinets from Scratch
 Kitchen Upper Cabinet: Double Doors by Cabinets from Scratch Our Home from Scratch LLC Page 1 Disclaimer Our Home from Scratch LLC and its legal owners cannot be held responsible for any loss, damage,
FLOW HIVE ASSEMBLY GUIDE. If we look after the bees they will look after us, and the honey really is an amazing bonus. Flow Hive Hybrid 3 Frame
 AUSTRALIAN MADE If we look after the bees they will look after us, and the honey really is an amazing bonus. FLOW HIVE ASSEMBLY GUIDE Flow Hive Hybrid 3 Frame Read all instructions first. If you are unfamiliar
Install Windsor Corners
 Install Windsor Corners Tools and Supplies You'll Need 1. Exterior Grade Screws use screws that are long enough to go through the FauxPanel and firmly attach to the wall behind the FauxPanel. We recommend
How to Install Elite Bayside Beadboard
 How to Install Elite Bayside Beadboard Beadboard will give a room a warm and comfortable feeling. Its beauty lies in its simplicity. It is one of the easiest to install out of all wainscoting, regardless
Build a comfortable outdoor seat in time for spring
 asy lider Build a comfortable outdoor seat in time for spring by Vern rassel Our glider features metal swing arms that are easy to install and provide a smooth gliding motion. W hen you re choosing a spot
135 ROLLTOP DESK 515
 135 ROLLTOP DESK 515 For the person who hates to clear off a desk, who wants to leave everything where it is overnight yet still have the clutter hidden, a rolltop desk is a godsend. The tambour hides
With Illustrations, Drawings & Step By Step Details. Click Here To Download 12,000 Shed Plans. 1 P a g e Download 12,000 More Shed Plans
 With Illustrations, Drawings & Step By Step Details Click Here To Download 12,000 Shed Plans 1 P a g e Download 12,000 More Shed Plans Table of Contents OVERVIEW... 3 MATERIALS & CUTTING LISTS... 4 DRAWINGS,
DOWNLOADABLE PROJECT PLANS FROM THE EDITORS OF WOOD MAGAZINE Whether it s
 DWNDBE JEC NS F HE EDIS F WD GZINE http://www.woodmagazine.com Whether it s butterflies or baseball cards, Irish lace or South merican stamps, this ten-drawer beauty has got your collection covered. Not
Classic Project. Two-drawer Platform Bed. In this plan you ll find: Step-by-step construction instruction. A complete bill of materials.
 America s leading woodworking authority Classic Project In this plan you ll find: Step-by-step construction instruction. Two-drawer Platform Bed A complete bill of materials. Construction drawings and
Mudroom Unit. Page 1 of 25
 Mudroom Unit www.andrewharriswoodwork.com Page 1 of 25 Introduction This plan makes a unit which is 66 ¾ inches tall, 39 ½ inches wide and 18 ½ inches deep. It was custom made for some friends to fit the
Kitchen Upper Cabinet: Single Door Cabinets from Scratch
 Kitchen Upper Cabinet: Single Door by Cabinets from Scratch Our Home from Scratch LLC Page 1 Disclaimer Our Home from Scratch LLC and its legal owners cannot be held responsible for any loss, damage, disappointment,
Project 13519EZ: Shaker Sewing Desk
 Project 13519EZ: Shaker Sewing Desk This fine example of a Shaker sewing desk was measured and photographed at Hancock Shaker Village in Hancock, Massachusetts. On the original, the legs and various frame
With Illustrations, Drawings & Step By Step Details. Click Here To Download 12,000 Shed Plans. 1 P a g e Download 12,000 More Shed Plans
 With Illustrations, Drawings & Step By Step Details Click Here To Download 12,000 Shed Plans 1 P a g e Download 12,000 More Shed Plans Table of Contents OVERVIEW... 3 MATERIALS & CUTTING LISTS... 4 DRAWINGS,
Hinge Mortising Jig. One of the make it or break it parts of building a. 6 ShopNotes No. 74
 Hinge Mortising Jig A Mortise for a Hinge. Quick, clean, and accurate that s the only way to describe the mortise you get with a trim router and this hinge mortising jig. One of the make it or break it
Build a Rolling Tool Tote
 The rolling tool tote design calls for readily available materials: a cheap hand truck (it could be an axle and two wheels), 3/4 and 1/2 thick plywood, 1/4 thick MDF (you could use plywood or hardboard)
Post & Rail. Includes: Crossbuck, 2-Rail, 3-Rail and 4-Rail POST SUPPORT OPTIONS
 Post & Rail Includes: Crossbuck, 2-Rail, 3-Rail and 4-Rail STAGGER RAIL ENDS FOR GREATER STRENGTH ALLOW 1-1/2" GAP ON HINGE SIDE OF GATE AND 1-1/4" ON LATCH SIDE OF GATE HARDWARE DIG HOLES 30" MINIMUM
Chief s Shop: Simple Woodworking Bench
 Chief s Shop: Simple Woodworking Bench Be sure to read the instructions and review the illustrations and accompanying video for this project BEFORE you start. Follow ALL SAFETY GUIDELINES AND RECOMMENDATIONS
PROJECT PLAN MODERN COFFEE TABLE
 BUILD IT WITH ROCKLER PROJECT PLAN MODERN COFFEE TABLE With its clean lines and striking geometry, this coffee table will lend iconic midcentury modern style to any living space. And you can build it yourself
World. Old. Dining Table YOU CAN BUILD AN
 YOU CAN BUILD AN Old World Dining Table This design combines heavy oak timbers with period specific elements. The result brings an old world look to a modern sized dining table. Publisher: Jeff Branch
HOW TO: BUILD A RAISED-BED GARDEN
 HOW TO: BUILD A RAISED-BED GARDEN one of the remaining uprights between each pair of corner connectors, drill 3/16-inch holes through the uprights, and drive 2-1/2-inch deck screws. WHAT YOU NEED Forty
Ways to get the most out of your
 5 Ways to get the most out of your router table When you mount a router on a table, you expand your shop s potential. To help you take advantage of this potential, we assembled five router table techniques
Router bit cabinet August Home Publishing Co.
 Router bit cabinet 2011 ugust Home Publishing Co. Feature Project Router Bit Cabinet Dovetail keys at the corners reinforce the joints to make a stronger cabinet. Plus, a clear, plastic door panel lets
Dining Table with Two-Way Drawers
 Dining Table with Two-Way Drawers DOUBLE-FRONTED DRAWERS MAKE THIS PIECE UNIQUE With two drawer fronts, a center beam, plywood bottoms, and custom pulls, these drawers are both distinctive and durable.
1 ¼-inch Pocket Screws Brad Nailer or Hammer 1 ¼-inch Brad Nails Clamps
 MATERIALS: TOOLS: (4) 2 x 6 x 8 Ft. Boards Tape Measure (2) 2 x 4 x 8 Ft. Boards Carpenter s Square (7) 1 x 4 x 8 Ft. Boards Pencil (2) 1 x 3 x 8 Ft. Boards Drill (1) Half Sheet of ¾-inch Thick Plywood
Materials. Special Tools and Techniques Chisel Long pipe clamps Miters Router with 1/2" rabbet cutter Rabbets Dadoes. Hardware
 D esk Our executive desk was built with specific needs in mind. We wanted a large desktop, large drawers, and a cubbyhole to house a rollaway hanging file cabinet. We are thrilled with our finished project.
Outdoor Storage Locker
 Easy To Build Outdoor Storage Locker A little shed that spells big relief for a crowded garage Complexity: Simple Cost: $100-$500 Assemble this easy-to-build storage locker for your outdoor tools. It's
Project 12231EZ: Country Curio Clock
 Project 12231EZ: Country Curio Clock This good-looking clock not only reminds you of the time, it also provides a couple of shelves to display favorite curios. No fancy joinery is needed here, just butt
How do I cut the wedge piece that goes in the corner of a cathedral/vaulted ceiling?
 How do I cut the wedge piece that goes in the corner of a cathedral/vaulted ceiling? These instructions are for cutting your crown laying flat, face up on your compound miter saw. These instruction will
Kitchen Step Stool. Premium Plan. In this plan you ll find: America s leading woodworking authority
 America s leading woodworking authority Premium Plan In this plan you ll find: Step-by-step construction instruction. A complete bill of materials. Construction drawings and related photos. Tips to help
Entrance Cabinet Plans
 Entrance Cabinet Plans www.andrewharriswoodwork.com Page 1 of 19 Introduction I have tried to ensure all steps are covered in these plans but if you find any errors in the plans or have a question then
How to Build a Recessed Medicine Cabinet
 How to Build a Recessed Medicine Cabinet See post for install info http://www.hertoolbelt.com/recessed-medicine-cabinet/ Materials 6 Inset Cabinet Door Hinges 3 Latches 1 sheet Beadboard or 1/4 plywood
AFCO-Rail Post INSTALLATION INSTRUCTIONS AFCO-RAIL POST
 AFCO-Rail Post INSTALLATION INSTRUCTIONS TOOLS REQUIRED: Drill Bits (for the appropriate fastener) Drill (with adjustable clutch, recommended) Level String Line Tape Measure Tools to install fasteners
This is a solid wood cabinet. The only plywood used is for the back and drawer bottoms.
 Sideboard Sideboard Overview: This project requires basic woodworking skills and access to woodworking machines. Woodworking machines have sharp cutting edges and are NOT forgiving. You should be properly
Agricultural Mechanics and Technology Power Tool Safety Rules
 Agricultural Mechanics and Technology Power Tool Safety Rules Name: BAND SAW Use: Cutting curves, circles and irregular shapes. 1. Use clean SHARP blades. 2. The teeth should always point DOWN. 3. Adjust
Mortisting Stand. Premium Plan. In this plan you ll find: America s leading woodworking authority
 America s leading woodworking authority Premium Plan In this plan you ll find: Mortisting Stand Step-by-step construction instruction. A complete bill of materials. Construction drawings and related photos.
Tools and Tips: ( 1 )
") Tools and Tips: As you build instructions will show in my many picture manual how to assemble. You can use your own methods as you desire, my results are very good. A smooth, flat work surface is very
Tools and Tips: As you build instructions will show in my many picture manual how to assemble. You can use your own methods as you desire, my results are very good. A smooth, flat work surface is very
CONTINUED. BACK & SEAT RAILS: 1. Sort three (3) 2x2x8 pieces. 2. Measure and cut one (1) 61 length from each piece.
 2x2x8 pieces. 2. Measure and cut one (1) 61 length from each piece.") # Materials: Quantity Each: Total Quantity: 2x2x8 6 2x4x8 9 4x4x8 2 4x6x8 1 TIPS FOR SUCCESSFUL PREP WORK: Before starting, carefully read through the entire instruction sheet. Refer to the material list
# Materials: Quantity Each: Total Quantity: 2x2x8 6 2x4x8 9 4x4x8 2 4x6x8 1 TIPS FOR SUCCESSFUL PREP WORK: Before starting, carefully read through the entire instruction sheet. Refer to the material list
World. Old. Dining Table YOU CAN BUILD AN
 YOU CAN BUILD AN Old World Dining Table This design combines heavy oak timbers with period specific elements. The result brings an old world look to a modern sized dining table. Publisher: Jeff Branch
How-to-Install. Laminate Countertops and Sheet Laminate. FREE brochure Reverso en español
 FREE brochure Reverso en español How-to-Install Laminate Countertops and Easy to install instructions provided inside Multiple colors available for unique design options Durable and easy to care for Accessory
Hudson Dresser [1] Hudson Dresser Published on Ana White ( Submitted by dan-k [2] on Fri, :43 [1]
![Hudson Dresser [1] Hudson Dresser Published on Ana White ( Submitted by dan-k [2] on Fri, :43 [1]](/thumbs/90/102626096.jpg "Hudson Dresser [1] Hudson Dresser Published on Ana White ( Submitted by dan-k [2] on Fri, :43 [1]") [1] Submitted by dan-k [2] on Fri, 2011-03-11 11:43 [1] If you plan on staining this piece, it is recommended that you stain all of the drawer face materials before assembly for a more professional look.
[1] Submitted by dan-k [2] on Fri, 2011-03-11 11:43 [1] If you plan on staining this piece, it is recommended that you stain all of the drawer face materials before assembly for a more professional look.
Trestle Table and Benches Materials List
 Project 18444EZ: Trestle Table and Benches In the early days of our country, trestle tables were popular because they could easily be disassembled and moved out of the way when not in use no small advantage
U. M. ARMY Texas Conference. Wheel Chair Ramp Manual
 U. M. ARMY Texas Conference Wheel Chair Ramp Manual June 2014 U. M. ARMY Texas Conference Building & Repair Tips Wheelchair Ramps Complete a site survey to determine the design and layout of the ramp.
Read guide from beginning to end before starting installation. Read all warnings and cautions during unit installation.
 Installation Guide for E-Series/Eagle High-Performance Mullion Windows with LVL Reinforcement and Installed Using Type B Clips Thank you for choosing Andersen. Instructions are for typical, new wood-framed
curved-lid treasure box
 curved-lid treasure box 20 ugust Home Publishing o. Feature Project urved-lid Treasure Box The curved lid and ebonized sides of this attractive box show off the highly figured wood and your woodworking
Silverware Chest Plan
 Silverware Chest Plan 05L14.01 Introduction 1. Measure the space required for your cutlery before beginning this project to be sure that it will fit in the drawers and top compartment. The best way to
An Irish Parlor Clock
 America s leading woodworking authority Step by Step construction instruction. An Irish Parlor Clock A complete bill of materials. Exploded view and elevation drawings. How-to photos with instructive captions.
Kitchen Base Cabinet: Multiple Drawers Cabinets from Scratch
 Kitchen Base Cabinet: Multiple Drawers by Cabinets from Scratch Our Home from Scratch LLC Page 1 Disclaimer Our Home from Scratch LLC and its legal owners cannot be held responsible for any loss, damage,
SECTION 19: Endwood Fusion Welded Gate Installation Guide
 SECTION 19: Endwood Fusion Welded Gate Installation Guide ASSEMBLY AND INSTALLATION FOR: Fusion Welded Gates Gate Frame with Full Size Pickets Privacy & Board on Board California & Shadowbox Gate width
While creating a two-wall
 Ready-To-Assemble Cabinets Outfit your shop in a weekend or less. By Gary Lombard with Jim Harrold 32 woodcraftmagazine.com Aug/Sept 2013 While creating a two-wall or larger shop (or a kitchen, for that