BUILDING A STORM DOOR
|
|
|
- Ronald Lyons
- 5 years ago
- Views:
Transcription

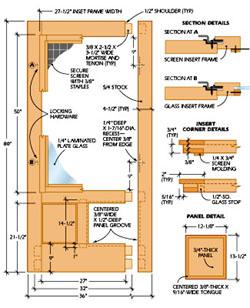
1 BUILDING A STORM DOOR BY NEAL BARRETT Illustrations by George Retseck If you're in the market for a storm door, you probably know that there are many styles and models available. However, most of them are aluminum so if your heart is set on a traditional wooden storm door, the selection is severely limited. With this dilemma in mind, we designed a traditional door with interchangeable screen and glass inserts. Our door can be built with portable tools and anyone with basic skills can achieve a quality result. Our straightforward design utilizes special locks to hold the inserts within the main door frame. The hardware is called "combo insert locking hardware with protector plate" and is available from Morse Sash & Door Co., 40 Jarley Rd., Rochester, NY You'll need four complete locks and four additional protector plates for the second insert frame. The storm door frame and insert frames are made of 5/4 lumber, which is 1 1/8 in. thick. The door panels are made of 3/4-in.-thick stock. If you desire a painted door, select pine is a good choice because its high resin content makes it more rot resistant than other paint-grade woods. You also can use hardwood and apply a clear, weather-resistant finish. When shopping for door lumber, make sure that the material is straight, flat and relatively free of serious defects such as knots and insect holes. If possible, have your dealer joint one edge of each piece so you have a true edge to work from. If you start your project with warped or twisted lumber, your finished door will not be flat. The door that we constructed is designed to fit a 36 x 80-in. opening. If you want a door of different dimensions, make a scaled drawing that incorporates your changes. Door stiles, and top and middle rails should be no less than 4 in. wide and the bottom rail should be at least 9 in. wide. (1 of 7)1/10/ :56:40 PM
.")


 and bring them to finished dimension.")

2 The Main Frame Begin by using a circular saw and edge guide to rip the frame parts to width. Be sure that the edge guide runs against the straightest edge of each piece. Use a circular saw to crosscut the stock to finished length. To guarantee square crosscuts, clamp a guide block squarely across the stock and run the base of the saw against it (Fig. 1). Use a marking gauge and square to lay out the tenons on the door rails (Fig. 2). Note that on the bottom rail there are two separate tenons on each end. If single tenons were used, seasonal movement of the wide stock could either crack the rail or loosen the joint. 1 After ripping stock to width, crosscut squarely to length. Use a board clamped across the stock to guide a circular saw. Clamp a rail upright in a vise and use a backsaw to make the tenon cheek cuts. Keep the saw blade on the waste side of the line and let the weight of the tool guide the progress of the cut. Stop the cut just shy of the tenon shoulder layout line. Then make the face shoulder cuts to remove the waste from the tenon (Fig. 3). Lay out the small shoulders at the top and bottom edges of the joint and make the required cuts (Fig. 4). Use a block or rabbet plane and chisel to smooth the tenon cheeks (Fig. 5) and bring them to finished dimension. Lay out the space between the double tenons on the bottom rail ends and use the backsaw to make the long-grain cuts between the tenons. Chop out the waste using a sharp chisel (Fig. 6). Alternate vertical and horizontal cuts working from both faces of the joint. 2 Use a marking gauge to lay out tenons on the rail ends. Carry lines around all faces to provide a clear guide for the cuts. 3 After cutting tenon cheeks by sawing in from the rail ends, cut squarely across both faces of each rail to remove waste. 4 Finish each tenon by marking and cutting 1/2-in. shoulders on each edge. Use a chisel to trim shoulders flush. (2 of 7)1/10/ :56:40 PM

. Then finish the joint with a sharp chisel (Fig. 8).")
 available from Sears. Test fit each mortise-and-tenon joint. If the joint is too tight, sand or plane the tenon.")
 in the router.")
3 5 If necessary, trim the thickness of each tenon to exact dimension with a rabbet plane or block plane and chisel. 6 At bottom rail, remove waste between tenons with two saw cuts along the grain followed by chisel cuts from each face. Mark the location of the mortises on the door stiles and also on the middle and bottom rails. The most efficient way to form these mortises is to bore a series of slightly overlapping 3/8-in.- dia. holes to remove most of the waste (Fig. 7). Then finish the joint with a sharp chisel (Fig. 8). To bore aligned holes, use a doweling jig to guide the drill bit or mount your drill in a drill stand that converts your tool into a small drill press. A good choice is the Craftsman No drill stand (about $35) available from Sears. Test fit each mortise-and-tenon joint. If the joint is too tight, sand or plane the tenon. If it's too loose, glue a veneer shim to the tenon to correct the fit. Dry assemble the door frame and clamp the parts together. Place the frame on a set of sawhorses so you can rout the grooves to accept the solid wood panels. Place a 1/4-in. slotting bit (with ball bearing pilot) in the router. Adjust the depth of cut so you will achieve a centered 3/8-in.-wide groove after a pass is made from each face of the frame. Test the setup on scrap lumber until the adjustments are just right. Make a pass with the router around each panel opening (Fig. 9), moving clockwise. Turn the frame over and make a second pass around each opening to complete the grooves. Disassemble the frame and use a sharp chisel to square the rounded ends of the grooves (Fig. 10). To make each wide bottom panel, glue together two or three pieces of narrower 3/4-in.-thick stock. Use a water-resistant glue (such as Titebond II) on the edge joints and build the panel blanks slightly larger than finished dimension. After the glue is dry, trim each panel square and to exact size. 7 Bore slightly overlapping 3/8-in. holes to remove most of the waste from mortises. A drill stand holds the drill for accurate holes. 8 Clamp the work to the bench and use a sharp chisel to finish the mortises. Check each mortise for a snug fit with tenon. Use your router with a straight bit and edge guide to cut a rabbet around all edges on both sides of the panel to form a tongue 3/8 in. thick by 9/16 in. wide (Fig. 11). Begin assembly of the frame by joining the center vertical member to the bottom and middle rails with water-resistant glue. Spread the glue on the tenons and in the mortises of the rails. Join the parts and apply a clamp to pull the joints tight. Check that the assembly is square by comparing opposite diagonal measurements, then let the glue set for at least 1 hour before proceeding with the assembly. 9 Temporarily assemble the door frame. Rout 3/8-in. panel grooves by working from each face of the door with a slotting bit. While the glue sets, mark the location of the recess for each piece of locking insert hardware on the door stiles. Use a Forstner or multispur bit to bore each recess (Fig. 12). It's (3 of 7)1/10/ :56:40 PM
.")


4 helpful to use a drill guide or drill stand to position these holes. Slide the panels into position in the rail subassembly (Fig. 13). Apply glue to all rail tenons and stile mortises, then assemble the door. Use clamps to pull the joints tight, then check that the door is square before letting the glue set thoroughly. Drill pilot holes for the screws, then install the locking hardware (Fig. 14). Do not overtighten the screws or the locks will be too hard to operate. 10 Disassemble the door frame and use a sharp chisel to square the rounded ends of the routed panel grooves. 11 Cut the door panels to exact size and use a router to form a 3/8-in. tongue by cutting 9/16-in.-deep rabbets from each face. 12 Use a Forstner or multispur bit to bore the four 1/4-in.-deep x 1 7/16-in.-dia. recesses for insert-frame locking hardware. 13 With the bottom subassembly glued together, slide the panels in place. Then assemble the remaining stiles and rail. (4 of 7)1/10/ :56:40 PM


. Since the rabbet is quite deep, it is best to make the cut in two or three stages.")

5 14 After boring pilot holes for the locking hardware screws, install each lock in its recess. Don't overtighten the screws. The Insert Frames Cut parts to size for the interchangeable insert frames. The corner joints are open mortise and tenons. Cut the tenons as described for the main frame. Note that the tenons on the glass frame rails have unequal shoulders to allow for the glass rabbet. Cut the mortises by making two parallel cuts into the end grain of the stiles, then use a chisel to chop out the waste (Fig. 15). Work halfway through the stile, then turn the stock over and finish the mortise from the other edge. The inside edges of the screen frame are square because the screen can be stapled to the face of the frame, but the glass frame requires a rabbet to accept the glass. Use the router with a straight bit and edge guide to cut the rabbet in both rails and stiles (Fig. 16). Since the rabbet is quite deep, it is best to make the cut in two or three stages. 15 To make open mortises in insert frames, first cut from the end with a backsaw. Then chop from edge and end to remove waste. Test the fit of the insert frame joints and make any adjustments required. Apply glue to the joints, assemble and clamp. When the glue has fully cured, use the router, straight bit and edge guide to cut the rabbets around the outer frame edges. Mark the location of the protector-plate mortises in the frame edges. Use a doweling jig to guide the drill in boring 1/4-in.-dia. holes to remove most of the waste (Fig. 17). Then finish with a sharp chisel. Place a protector plate into each mortise (Fig. 18) and tap it into place with a hammer to engage the pronged ends in the wood. 16 Use a router with straight bit and edge guide to cut the rabbet for the glass. Make 3/8- in.-deep cuts in several stages. 17 Use a doweling jig to guide the drill when making the mortises in the inserts for the locking hardware. Trim mortises with chisel. 18 Insert a protector plate into each insert mortise. Tap it in place with a hammer to force the prongs into the wood. (5 of 7)1/10/ :56:40 PM

. Use 3/4-in.")


6 Purchase a piece of screen for the insert that is slightly bigger than the frame. Place the screen frame outside face up on a worktable and lay the screen over it. Staple one long edge of the screen to the frame, using 3/8-in.-long staples every 3 in. to 4 in. Pull the screen tight across the frame and staple it on the opposite stile. Finish stapling across the top and bottom rails. Use a straightedge and utility knife to trim the excess screen so that it extends over the frame by about 5/8 in. (Fig. 19). Use the rip guide on the circular saw to cut 1/4 x 3/4-in. strips for screen molding. Install these over the edges of the screen and flush to the inside edges of the frame (Fig. 20). Use 3/4-in. brads to fasten the molding in place. Since the glass panel is quite large, use 1/4-in.-thick laminated safety glass for the insert. Order the glass about 1/8 in. smaller in each dimension than the opening in the frame. 19 After stapling a piece of oversize screen to the insert frame, use a straightedge and utility knife to trim the screen to size. The stops that hold the glass in the frame have a cross section of 1/2 x 1/2 in. To make these pieces, first use the router to cut a 1/4-in.-deep x 1/2-in.-wide rabbet down the length of a piece of 3/4-in. stock. Then, use the circular saw to rip the 1/2 x 1/2- in. strip off the edge of the board. Repeat the process for each piece of molding. Run a bead of clear silicone around the frame rabbet (Fig. 21). Carefully lower the glass panel into the frame, then run another bead of silicone around the edges of the glass. Position the glass stops around the frame (Fig. 22) and fasten them with brads or screws. 20 Rip 1/4 x 3/4-in. molding strips and nail these over screen edges. Align strips with inside edge of frame and secure with brads. Hang the door in its opening using three good quality butt hinges. Allow a margin of 3/16 in. around all edges of the door. Mount a knob and latch to the door and install a piston closer. If your location is windy, use two piston closersâ one at the top and one at the middle rail. To finish the door, remove all hardware and sand the door and frames with 120-grit sandpaper. Dust off the parts completely. If the door is to be painted, apply a good quality exterior primer and a minimum of two coats of paint following the manufacturer's directions for proper drying between coats. If you want a clear finish, use a spar varnish such as McCloskey's Man O' War Varnish. Follow the manufacturer's directions for application of the finish. 21 Place a small bead of silicone around the rabbet that holds the glass panel. Carefully place the glass in the frame. 22 Add a bead of silicone around the glass panel and cut 1/2-in.-sq. strips to fit over glass. Secure strips with brads or screws. (6 of 7)1/10/ :56:40 PM
7 (7 of 7)1/10/ :56:40 PM
Traditional glass-pane and wood-muntin doors highlight this free-standing piece.
 Bookcase Traditional glass-pane and wood-muntin doors highlight this free-standing piece. As the saying goes, there's nothing like good books. But they can present some storage problems--especially if
WOODWORKING GUIDE: BASIC JOINERY
 WOODWORKING GUIDE: BASIC JOINERY Close isn't really good enough. A perfect fit is what counts. When building furniture, there are many ways to construct joints. The simplest are those that use mechanical
ARTS AND CRAFTS CHAIR
 ARTS AND CRAFTS CHAIR 491 MATERIALS LIST--DINING CHAIR Key No. Size and description (use) A 2 1-3/4 x 1-3/4 x 16-1/4'' oak (front leg) B 2 1-3/4 x 3-3/4 x 40-1/2'' oak (rear leg) C 1 1-3/4 x 3-3/16 x 15''
Build A Cedar Chair And Ottoman
 Build A Cedar Chair And Ottoman If you've ever dreamed of extending the comfort of your living room to your deck, patio or yard, our porch chair-and-ottoman combination is a great place to start making
How to Build a Recessed Medicine Cabinet
 How to Build a Recessed Medicine Cabinet See post for install info http://www.hertoolbelt.com/recessed-medicine-cabinet/ Materials 6 Inset Cabinet Door Hinges 3 Latches 1 sheet Beadboard or 1/4 plywood
Kentucky 4H Wood Science Plans Notebook. Plans Level 3
 Kentucky 4H Wood Science Plans Notebook Plans Level 3 MATERIALS: 2 pieces wood 3/4 x 10 x 4 1 piece wood 3/4 x 12 x 4 2 pieces wood 3/4 x 3 x 2 5 1/2" 2 pieces wood 3/4 x 3 x 1 8 1 piece wood 2 x 4 x
Silverware Chest Plan
 Silverware Chest Plan 05L14.01 Introduction 1. Measure the space required for your cutlery before beginning this project to be sure that it will fit in the drawers and top compartment. The best way to
The WoodWorker s Edge
 The WoodWorker s Edge Draw-leaf Game Table 1. 2. Layout the area for the tenons. The tenons are 3/8 thick x 4-1/2 long x 1-1/4 deep and offset to the inside. Create the tenons using the step method to
Corner Cupboard. This space-saving piece enhances any room 46 FINE WOODWORKING
 Corner Cupboard This space-saving piece enhances any room BY G A R R E T T H A C K On every trip to the Shelburne Museum near Burlington, Vt., I visit a favorite object a small hanging corner cabinet.
Hinge Mortising Jig. One of the make it or break it parts of building a. 6 ShopNotes No. 74
 Hinge Mortising Jig A Mortise for a Hinge. Quick, clean, and accurate that s the only way to describe the mortise you get with a trim router and this hinge mortising jig. One of the make it or break it
Project 13586EZ: Writing Desk. Writing Desk Materials List
 Project 13586EZ: Writing Desk This writing desk will make a handsome addition to just about any room in the house. The one shown is made of cherry, a logical choice for a piece like this, but mahogany
 America s leading woodworking authority To download these plans, you will need Adobe Reader installed on your computer. If you want to get a free copy, visit: http://adobe.com/ reader. Having trouble downloading
Serving Tray. When some good friends got married recently, An exercise in template-making yields a great gift project that s easy to duplicate
 Serving Tray An exercise in template-making yields a great gift project that s easy to duplicate END Create from 3 8 2 8" piece. By Geoff Noden When some good friends got married recently, I decided to
Project 17884EZ: Shaker End Table
 Project 17884EZ: Shaker End Table With its clean, simple lines, this piece is unmistakably Shaker style. Ours is made from cherry, a wood commonly used by Shaker craftsman, but we ve also seen this piece
Copyright WilkerDos.com Dining Table. Project Designed By April Wilkerson - Plan Created By Jay Bates (jayscustomcreations.
 Copyright WilkerDos.com 2017 Project Designed By April Wilkerson - Plan Created By Jay Bates (jayscustomcreations.com) Layout & Shopping List Page 2 of 12 Layout & Shopping List Item Quantity Description
The Q Frame PROJECT. a picture frame with secrets created exclusively for the Router Forum
 The Q Frame PROJECT a picture frame with secrets created exclusively for the Router Forum 007 OR RELEASE FPLANS APPROVED The Q Frame: Project Overview LIST OF MATERIALS Frame Sides & Face 3/4 x 5 1/2 x
Grade 11 Woods Lift Lid Coffee Table. Based on Under the big Top from Popular Mechanics Website
 Grade 11 Woods Lift Lid Coffee Table Based on Under the big Top from Popular Mechanics Website TABLE TOP 1. Select enough lumber to construct a top that is between 22 ½ and 24 wide after jointing. Ensure
MODERN BED FRAME ROCKLER BUILD IT WITH BUILD SIMPLIFY CUSTOMIZE. Plan Value $14.99
 BUILD Stock # Item 63446 Baltic Birch Plywood /2" x 24" x 30" (2 qty) Stick veneer - Maple 24" x 96" 3/8" Dowels - Birch Bed Connector Hardware I-Semble Platform Bed Frame - Queen 3/8" Beadlock Basic Starter
Trestle Table and Benches Materials List
 Project 18444EZ: Trestle Table and Benches In the early days of our country, trestle tables were popular because they could easily be disassembled and moved out of the way when not in use no small advantage
This is a solid wood cabinet. The only plywood used is for the back and drawer bottoms.
 Sideboard Sideboard Overview: This project requires basic woodworking skills and access to woodworking machines. Woodworking machines have sharp cutting edges and are NOT forgiving. You should be properly
Project 11010EZ: Gun/Bookcase/Curio Cabinet
 Project 11010EZ: Gun/Bookcase/Curio Cabinet No man can be all things to all people, but this cabinet comes as close to fitting multiple uses as any inanimate object can. We ve pictured it as a gun cabinet
The frame sections of the china hutch are assembled with the aid of glue and spiral dowels. Dowel centers are recommended to
 60 CHINA HUNT 282 ARE YOU LOOKING for a showpiece china hutch to display your elegant chinaware, antique vase, or collectibles? Here's the perfect cabinet for you, with lots of transparent glass to show
Floating-Top Table. Creative joinery adds spark to this versatile piece
 Floating-Top Table Creative joinery adds spark to this versatile piece By Michael Pekovich 28 FINE woodworking This is one of those projects that almost wasn t. Rachel, my wife, had asked for a small,
129 KITCHEN BASE CABINET 480
 129 KITCHEN BASE CABINET 480 There are two sorts of kitchen cabinets: base cabinets, which sit on the floor, and wall cabinets. Base cabinets provide both storage space and work surfaces. They often house
Demilune 4. Apron Joinery. Curved Apron Tenon. Bridle Joint Legs. Bridle Joint Front Apron
 Demilune Email 4 Apron Joinery There are two types of joints used in connecting the aprons and legs. The rear legs use conventional mortise and tenon joints, while the front legs use the less conventional
Congratulations on your purchase of the Divided Light Door Set. This set will help you create beautiful cabinet doors with true divided light panels.
 Divided Light Door Set User Instructions Congratulations on your purchase of the Divided Light Door Set. This set will help you create beautiful cabinet doors with true divided light panels. Following
Celebrate 100 years of PM with the fourth in our furniture series.
 Anniversary Desk Celebrate 100 years of PM with the fourth in our furniture series. With all the business involved in running a home, it's no wonder most of us run out of space to handle the paperwork.
This photo more clearly shows how locating pins are used to transfer the dowel holes from the edge to front of frame. Use bar clamps till glue dries.
 CHINA HUTCH 266 The frame sections of the china hutch are assembled with the aid of glue and spiral dowels. Dowel centers are recommended to ease matching of dowel holes. gant chinaware, antique vase,
Greene & Greene. Mailbox. by Seth Keller. Signature details create an elegant box. 2 AmericanWoodworker.com
 Greene & Greene Mailbox by Seth Keller Signature details create an elegant box. 2 AmericanWoodworker.com We needed a new mailbox, but I couldn t find an off-the-shelf version that I liked. So I decided
craftsman rocker Classic style meets comfort in this sturdy oak rocking chair BY MICHAEL PEKOVICH 34 FiNE woodworking
 craftsman rocker Classic style meets comfort in this sturdy oak rocking chair BY MICHAEL PEKOVICH 34 FiNE woodworking photo, this page: Michael pekovich shape the rear legs designing a chair can be a tough
Project 11355EZ: Wall Cabinet with Louvered Doors and Shelf
 Project 11355EZ: Wall Cabinet with Louvered Doors and Shelf This Early American style cabinet will look good in any room, although it seems particularly well suited for the kitchen or bathroom. To make
DOCUMENT CHEST. Curly Maple, White Pine
 25 DOCUMENT CHEST Curly Maple, White Pine 100 MAKING THE DOCUMENT CHEST After the stock has been thicknessed, ripped to width, and cut to length, plough a 1/4" X 3 /8" groove on the inside faces of the
Build a Stout Workbench
 Build a Stout Workbench Tail vise is at the heart of this versatile bench by chris gochnour I ve done a fair amount of handplaning during my 32 years as a professional furniture maker, and I ve found that
I then moved on to the legs assemblies. The legs are simply three pieces of 1 ½ in x 4 ¼ in stock glued up, planed and jointed to 4 in x 4in.
 Nicholson Workbench Another workbench? Does this guy have nothing better to do than build one workbench after another? First off, this one is not for me. I recently received a commission to build a Nicholson
Project 13519EZ: Shaker Sewing Desk
 Project 13519EZ: Shaker Sewing Desk This fine example of a Shaker sewing desk was measured and photographed at Hancock Shaker Village in Hancock, Massachusetts. On the original, the legs and various frame
Shoulder Plane. dovetailed. fine tools. Make an heirloom tool and learn the secret to creating double dovetails in metal it s easier than you think.
 fine tools dovetailed Shoulder Plane Make an heirloom tool and learn the secret to creating double dovetails in metal it s easier than you think. I ve always been fascinated by old, metal hand planes.
Display Case (for J&S)
") Display Case (for J&S) This is constructed of maple plywood with solid maple (soft maple) edge banding. It was made to fit between a door and a kitchen cabinet, and has an elegant circular taper between
Display Case (for J&S) This is constructed of maple plywood with solid maple (soft maple) edge banding. It was made to fit between a door and a kitchen cabinet, and has an elegant circular taper between
Jeff Branch WOODWORKING YOU CAN BUILD A. By adding subtle design elements, a traditional furniture style becomes decidedly modern.
 Jeff Branch WOODWORKING YOU CAN BUILD A By adding subtle design elements, a traditional furniture style becomes decidedly modern. Jeff Branch WOODWORKING Publisher: Jeff Branch Editor: Jeff Branch Art
Classic Mitered Jewelry Box
 America s leading woodworking authority Premium Plan In this plan you ll find: Step-by-step construction instruction. A complete bill of materials. Construction drawings and related photos. Tips to help
Corner Cabinet. American. There is something about corner cabinets that spooks
 American Corner Cabinet The triangular shape of this project puts off most woodworkers. Here s a secret: It s actually quite easy to build. There is something about corner cabinets that spooks most woodworkers.
ULTIMATE ROUTER TABLE PLANS. By Dan Phalen
 ULTIMATE ROUTER TABLE PLANS By Dan Phalen January 2017 Ultimate Router Table Plans. Copyright 2012-2017 by Daniel Phalen. Published by Creston Hall Publishing Company. All rights reserved. No part of this
Instructables Butcher Block Top
 Instructables Butcher Block Top Project Overview: This project requires basic woodworking skills and access to woodworking machines. Woodworking machines have sharp cutting edges and are NOT forgiving.
Modern Farmhouse Printer Cabinet. Addicted2DIY.com
 Modern Farmhouse Printer Cabinet Addicted2DIY.com Before beginning this project please read through all of the plans as well as the blog post associated with this project. Always use safety precautions
woodworkersjournal.com MATERIAL LIST
 MATERIAL LIST T x W x L 1 Legs (2) 1 1 2" x 3 1 2" x 36 7 16" 2 End Uprights (2) 1 1 2" x 3 1 2" x 32 1 2" 3 Stringers (4) 1 1 2" x 3 1 2" x 42" 4 Top Cladding, Long (2) 3/4" x 7 1 4" x 65 3 4" 5 Side
ENJOY THIS SELECTION FROM. Woodworking 101. Includes Step-by-Step Instructions for 8 Projects. Woodworking
 W ENJOY THIS SELECTION FROM Woodworking 101 Includes Step-by-Step Instructions for 8 Projects Woodworking 101 Aimé Fraser, Matthew Teague, and Joe Hurst-Wajszczuk To purchase your copy of Woodworking 101,
Knockdown Bookcase. This slant-sided bookcase was a popular mail-order item in the early 1900s.
 Knockdown Bookcase This slant-sided bookcase was a popular mail-order item in the early 1900s. The Arts & Crafts movement was part of an interesting social change in America the advent of mail-order purchases.
Cabinetmaking & Millwork CIP Task Grid
 1 Secondary Task List 100 DEMONSTRATE PERSONAL SAFETY. 101 Demonstrate knowledge of general safety rules for working in the cabinetmaking lab. 102 Identify cabinetmaking lab tools and equipment. 103 State
About.com :
 http://woodworking.about.com/gi/dynamic/offsite.htm?sit...//www.popularwoodworking.com/features/fea.asp%3fid=1088 (1 of 8)1/28/2004 12:05:01 AM Modern Storage Tower The last thing I want to do when starting
hanging mirror Two-piece desk set Handmade Gifts Photo: John Tetreault
 hanging mirror Two-piece desk set Handmade Gifts 44 FINE woodworking Photo: John Tetreault Flatware carrier Tea light candle holder 4 Tasteful projects made quickly from scraps BY CHRISTIAN BECKSVOORT
PLANS BY TOM BURY MURPHY WORKTABLE TOTAL DIMENSIONS: FOLDED UP 30 X 48 X 0 FOLDED DOWN 30 X 58 X 84
 MURPHY WORKTABLE TOTAL DIMENSIONS: FOLDED UP 30 X 48 X 0 FOLDED DOWN 30 X 58 X 84 MATERIALS LIST: (2) 2 x8 x8 (3) 2 x4 x8 (1) 1 x2 x8 (1) 48 x96 3/4 plywood (2) 1-1/2 x30 continuous hinge (1) Left-side
Framework joints FABRICATION - WOOD JOINTS. Corner joints. Tee joints. Worksheet 15a. Cable Educational Ltd
 FABRICATION - WOOD JOINTS The word: fabricate means to join together. Most wooden products are held together with adhesive. Adhesive works very well when the edge of a piece of wood is being glued to the
Woodcraft, 210 Wood County Industrial Park, P.O. Box 1686, Parkersburg, WV
 Hancock Wall Clock Assembly Instructions 77A50 07/28/94 Product #C7611X Introduction Before beginning the assembly of your Woodcraft precut clock kit, read these instructions and become familiar with the
Dining Table with Two-Way Drawers
 Dining Table with Two-Way Drawers DOUBLE-FRONTED DRAWERS MAKE THIS PIECE UNIQUE With two drawer fronts, a center beam, plywood bottoms, and custom pulls, these drawers are both distinctive and durable.
Shaker Classic Change the legs to change the look
 Shaker Classic Change the legs to change the look 2 Ways B Y C H R I S T I A N BECKSVOORT not long ago, a couple ordered a set of cherry side tables from me, one for each side of their pencil-post bed.
HANDCRAFTED LIDDED CHEST IN CHERRY With Red Cedar Lining
 HANDCRAFTED LIDDED CHEST IN CHERRY With Red Cedar Lining Design A chest was desired as a gift to family. The Shaker style of furniture was identified as a pleasing style. After viewing a number of pictures
Patrol Box Plans by David J. Yarusso Troop 609
 Patrol Box Plans by David J. Yarusso Troop 609 Materials List: 1. One 4 x8 sheet of ½ thick cabinet grade (birch or oak) or AC plywood. If using AC grade, use the A grade surface on the outside for a clean
Next-Generation Router Table
 Next-Generation Router Table Make more accurate cuts with a flat, solid-surface top. by John English 2 AmericanWoodworker.com 9 Key Features 1. Hinged Top. Bit changes are much easier. 2. Pivot Control.
Workbench. Process Guide
 Workbench Process Guide Design, Lumber, Tools & Nails Made entirely from 2x and 4x construction lumber Hardware speeds up the consturction while also reduces the amount of planing we have to do by using
Dress up your dining room with this Southern delicacy. that was used to serve drinks after a hunt. Breeches and jodhpurs are optional.
 Dress up your dining room with this Southern delicacy that was used to serve drinks after a hunt. Breeches and jodhpurs are optional. Huntboard Classic Six-Legged My dad has been making this six-legged
PROJECT PLAN OUTFEED TABLE
 BUILD IT WITH ROCKLER PROJECT PLAN OUTFEED TABLE BUILD Stock # Item 00 ' Universal T-Track () 0 T-Track Intersection Kit 70 JIG IT Universal Drawer Slide Jig 0 " Drawer Slides () 77 Auto-Adjust Jig Clamp
Cabinetmaking & Millwork CIP Task Grid
 1 Secondary Task List 100 FOLLOW RULES FOR WORKING IN THE CABINETMAKING LAB. 101 Review and discuss school rules. 102 Review and demonstrate knowledge of cabinetmaking lab rules. 103 Complete all theory
Durable Outdoor Table
 54 F I N E W O O D W O R K I N G Durable Outdoor Table Ipé table will seat six and weather many seasons B Y D A V I D B E D R O S I A N Last summer brought a new pool to our backyard. With it came more
Router Table-Mate. Everything you'd want in a router table for just $50.
 Router Table-Mate Everything you'd want in a router table for just $50. Commercially made router tables are everywhere these days. Some of them come with more gizmos and gadgets than a 59 Edsel. By the
Reasons to Own a Shoulder Plane
 9 Reasons to Own a Shoulder Plane Fine-tune your joinery with these tips and techniques B y C h r i s G o c h n o u r It s easy to dismiss the shoulder plane as a specialty plane, another way of saying
The Hive Bodies. Hive Body (Super) Hive Bodies
 Hive Bodies") The Hive Bodies The hive body is the heart of a managed bee hive colony (Figure 1). It is where the queen lays her eggs, the house bees raise the brood and the workers store the pollen and nectar (converted
The Hive Bodies The hive body is the heart of a managed bee hive colony (Figure 1). It is where the queen lays her eggs, the house bees raise the brood and the workers store the pollen and nectar (converted
I I. . i1 AD JUSTABLE SHELVES
 ADJUSTABLE SHELVES HAD BEEN TRYNG TO WORK out a really simple (read "fast") way to make an elegant wooden version of the old standby, metal standards and brackets. Although have seen many commercial versions
Kitchen Upper Cabinet: Double Doors Cabinets from Scratch
 Kitchen Upper Cabinet: Double Doors by Cabinets from Scratch Our Home from Scratch LLC Page 1 Disclaimer Our Home from Scratch LLC and its legal owners cannot be held responsible for any loss, damage,
PROJECT PLAN TOOL CHEST
 BUILD IT WITH ROCKLER PROJECT PLAN TOOL CHEST FEATURING ROCKLER S BUILD QUESTIONS? Go to www.rockler.com or call 800-279-4441 Stock # Item 63420 1/4" x 24" x 30" Baltic Birch Plywood 63446 1/2" x 24" x
Shaker Lap Desk. The classic Shaker lap desk, designed two centuries ago to. Celebrate pen and ink with this quintessential case
 Shaker Lap Desk Celebrate pen and ink with this quintessential case BY CHRISTIAN BECKSVOORT The classic Shaker lap desk, designed two centuries ago to function as a miniature traveling office, was the
Kentucky 4H Wood Science Plans Notebook. Plans Level 4
 Kentucky 4H Wood Science Plans Notebook Plans Level 4 MATERIALS NEEDED: Note: 1" wood may be 3/4" thick and 2" x 2" may be 1 1/2" x 1 1/2" 2 pieces wood 1 x 3 x 17 1 piece wood 1 x 3 x 14 3/4" 2 pieces
Arched. Building an. Passageway. Although my company specializes in high-end jobs
 Building an Arched Passageway All photos by Brian Striegler This straightforward approach combines basic shop methods with simple site joinery to create an elegant frame-and-panel archway by Gary Striegler
Heirloom Tool Chest. This classic chest offers a lesson in efficient woodworking
 Heirloom Tool Chest This classic chest offers a lesson in efficient woodworking BY CH R I S G O C H N O U R A COMFORTABLE HOME FOR TOOLS Made of cherry and constructed entirely with hand tools, the tool
Pivot-Door Downdraft Cabinet Plans
 Pivot-Door Downdraft Cabinet Plans Finished Cabinet Closed Open Exploded View Introduction This simple downdraft-style dust collection cabinet is a great way to keep your shop cleaner and keep your router
Chapter 18. Interior Doors
 Chapter 18. Interior Doors 18.1 SWINGING DOORS 18.2 SLIDING DOORS 18.3 BIFOLD DOORS Tools needed by volunteers: Hammer Nail apron Tape measure Square Pencil Tools and equipment needed: Extension cords
A Shaker Sewing Stand
 America s leading woodworking authority Step by Step construction instruction. A Shaker Sewing Stand A complete bill of materials. Exploded view and elevation drawings. How-to photos with instructive captions.
INSTALLATION INSTRUCTIONS REPLACING EXISTING DEADBOLT ASSEMBLY
 INSTALLATION INSTRUCTIONS REPLACING EXISTING DEADBOLT ASSEMBLY A B C L M N D E F G O P Q H I J Tools provided in Amesbury installation kit: (A) door router fixture, (B) doorframe router fixture, (C) ½
Arts & Crafts with an English Accent
 Arts & Crafts with an English Accent Desk and wall cabinet make an elegant matched set B y N a n c y H i l l e r For several years around the turn of the 20th century, an English manufacturing firm, Harris
Suspension/Flogging Rack Design
 This is a rack that can be transported and set up by one person, requires no tools for set up and has no bolts. Structurally it goes together using mortis and tenon joints. It can be used for suspensions
Mortisting Stand. Premium Plan. In this plan you ll find: America s leading woodworking authority
 America s leading woodworking authority Premium Plan In this plan you ll find: Mortisting Stand Step-by-step construction instruction. A complete bill of materials. Construction drawings and related photos.
Media Center Woodworking Plans Our Home from Scratch
 Media Center Woodworking Plans by Our Home from Scratch Our Home from Scratch LLC Page 1 Disclaimer Our Home from Scratch LLC and its legal owners cannot be held responsible for any loss, damage, injury
You Can Build a Bedside Table
 You Can Build a Bedside Table Jeff Branch WOODWORKING If you like making panels, you ll love this project. By JEFF BRANCH M y current home is a modest one. But it is a big improvement over our small starter
Kitchen Upper Cabinet: Single Door Cabinets from Scratch
 Kitchen Upper Cabinet: Single Door by Cabinets from Scratch Our Home from Scratch LLC Page 1 Disclaimer Our Home from Scratch LLC and its legal owners cannot be held responsible for any loss, damage, disappointment,
Agricultural Mechanics and Technology Power Tool Safety Rules
 Agricultural Mechanics and Technology Power Tool Safety Rules Name: BAND SAW Use: Cutting curves, circles and irregular shapes. 1. Use clean SHARP blades. 2. The teeth should always point DOWN. 3. Adjust
15 Dovetail Jig. Instruction Manual. Part # 3452
 15 Dovetail Jig Instruction Manual Part # 3452 CAUTION: Please read, understand, and follow all manufacturers instructions, guidelines and owners manuals that come with your power tools. Peachtree Woodworking
Sliding Glass Door Assembly and Installation Guide
 Sliding Glass Door Assembly and Installation Guide Index Door System Components and Hardware The following components are needed to complete the installation of your Sliding Patio Door unit. Check all
Ultimate Crosscut sled
 Ultimate Crosscut sled Achieve the accuracy of a sliding tablesaw for a fraction of the price BY JOHN M C CORMACK with a bit of support at the outfeed end, most tablesaws excel at ripping whether wide
Tool Box. Process Guide
 Tool Box Process Guide Design, Lumber, & Nails Needed Designed from typical big box lumber dimensional lumber to minimize the rip cuts Added feet to allow the box to sit on uneven surfaces Add a sliding
Total Test Questions: 74 Levels: Grades Units of Credit:.50
 DESCRIPTION The third in a sequence of assessments, Cabinetmaking prepares students to apply technical knowledge and skills to set up and operate industrial woodworking machinery and to use such machinery
GARDEN SCREEN FENCE 232
 GARDEN SCREEN FENCE 232 233 Materials List--Privacy Screen Key No. Size and description (use) A 16 3/4 x 1 x 53" cedar (horizontal slat) B 14 3/4 x 1 x 72" cedar (vertical slat) C 4 3/4 x 2-1/2 x 53" cedar
How to Mitre Mouldings
 How to Mitre Mouldings About Window and Door Mouldings Mitre cuts are a basic operation in most moulding installation. Mitre cuts are typically 45 degree angles, however many installations require minor
Performance Rating Scale: Limited Skills... Moderate Skills..High Skills
 PERFORMANCE STANDARD EVALUATION CHECKLIST Student Name Instructor s Name School District Performance Rating Scale: 1 2 3 4 5 6 7 8 9 10 Limited Skills..... Moderate Skills..High Skills Performance assessments
Building Instructions
 Building Instructions Tools Required Tape measure Straight edge Pencil/pen Jigsaw Table Saw Circular Saw Electric drill 1 Hole saw bit Saw horses/table Protractor Staple gun Caulk gun Paint brush Wrenches
ROUTER BITS. Rabbeting Bits. Rabbeting Bits with Bearing Set Comes with interchangeable bearings to cut rabbets of different depths.
 32-098 ROUTER BITS 42 32-504 Rabbeting Bits Produces super smooth cuts on both surfaces of the rabbet. Can be used for joining boards and for letting in back panels. Steel pilots can be removed from bits
Hudson Dresser [1] Hudson Dresser Published on Ana White ( Submitted by dan-k [2] on Fri, :43 [1]
![Hudson Dresser [1] Hudson Dresser Published on Ana White ( Submitted by dan-k [2] on Fri, :43 [1]](/thumbs/90/102626096.jpg "Hudson Dresser [1] Hudson Dresser Published on Ana White ( Submitted by dan-k [2] on Fri, :43 [1]") [1] Submitted by dan-k [2] on Fri, 2011-03-11 11:43 [1] If you plan on staining this piece, it is recommended that you stain all of the drawer face materials before assembly for a more professional look.
[1] Submitted by dan-k [2] on Fri, 2011-03-11 11:43 [1] If you plan on staining this piece, it is recommended that you stain all of the drawer face materials before assembly for a more professional look.
135 ROLLTOP DESK 515
 135 ROLLTOP DESK 515 For the person who hates to clear off a desk, who wants to leave everything where it is overnight yet still have the clutter hidden, a rolltop desk is a godsend. The tambour hides
WOOD MANUFACTURING 30
 WOOD MANUFACTURING 30 Description This course is designed to introduce to the student the processes and techniques of leg and rail construction. Student skills will be developed through tool and machine
Classic Project. Two-drawer Platform Bed. In this plan you ll find: Step-by-step construction instruction. A complete bill of materials.
 America s leading woodworking authority Classic Project In this plan you ll find: Step-by-step construction instruction. Two-drawer Platform Bed A complete bill of materials. Construction drawings and
DIY Full-Size Captain s Bed with Storage. Addicted2DIY.com
 DIY Full-Size Captain s Bed with Storage Addicted2DIY.com Before beginning this project Please read through all of the plans as well as the blog post associated with this project. Always use safety precautions
Copyright 1998 KDE Technologies
 Modular Computer Corner Desk Unit Copyright 1998 KDE Technologies http://members.tripod.com/~kdetech/ 1. Introduction 2. Plans Sheet one - Isometric Sheet two - Top Detail / Corner Unit Sheet three - Leg
Ahead of the curve 2 Part
 F&C PROJECT Ahead of the curve 2 Part In the second part of this series, Chris Tribe constructs the table for his stylised cabinet which we looked at last month in F&C Accuracy in turning the legs for