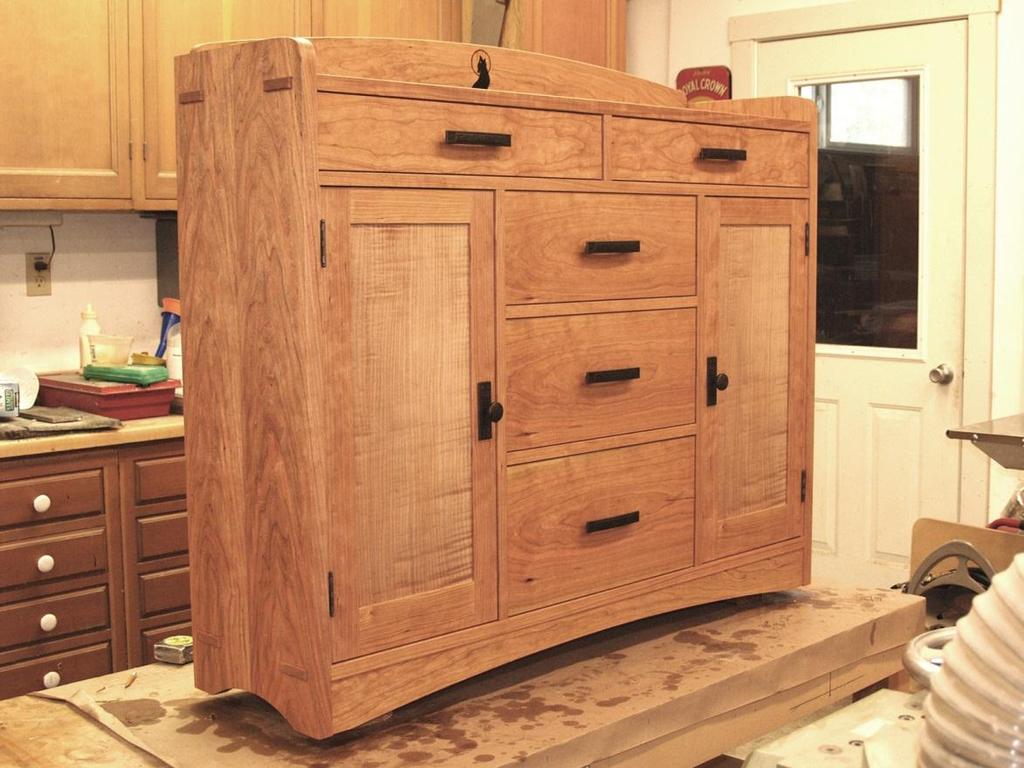
This is a solid wood cabinet. The only plywood used is for the back and drawer bottoms.
|
|
|
- Mildred Chandler
- 5 years ago
- Views:
Transcription
1 Sideboard
2 Sideboard Overview: This project requires basic woodworking skills and access to woodworking machines. Woodworking machines have sharp cutting edges and are NOT forgiving. You should be properly trained in the use of these machines. Ensure that you wear safety glasses and hearing protection, use push sticks, hold-downs, clamps and a cutting sled to cut the project parts safely. This is a solid wood cabinet. The only plywood used is for the back and drawer bottoms. The overall size of this project is 48 wide, 38 ½ tall and 13 deep. It has 5 drawers and 2 doors. The primary wood is cherry. The door panels are tiger maple. Any hardwood can be used for this project. Through mortise and tenon joints are used to hold the case together and add a decorative element. Drawers are constructed using both half-blind and through dovetail joints. The doors are frame and panel construction. On a scale of 1-10, 10 being very difficult, this project is a 7. Materials Needed: Approximately 48 board feet of rough sawn 1 thick cherry hardwood. (dividers, drawer fronts, backsplash and stretchers). Approximate 8 board feet of rough sawn 1 ¼ cherry hardwood (cabinet sides). 4 x 8 x ¼ cherry plywood (drawer bottoms and cabinet back) Approximately 13 board feet of ¾ maple (drawer sides) Approximately 6 board feet of 1 rough sawn poplar (web frames) Figured hardwood for door panels 12 x 22 ) 150 and 180 grit sandpaper and 0000 steel wool. Glue (Titebond III) Bees wax and mineral oil Tools & Equipment Needed: Table saw with a cross cut sled Band saw Hand held jig saw 8 jointer Biscuit joiner Planner or flat bed drum sander Router (hand held and router table) Block plane Bar or pipe clamps
3 Project Plan 1 1 ¾ Through Mortises 2 wide 18 ½ Frame & Panel doors (right door removed in drawing to show shelves) ¾ ¾ Adjustable shelves Blind Mortises Through Mortises 2 wide 13 This is the front and side elevations of the project. You may decide to change the dimensions to better suit your needs. While I was building the project I decided to alter the backsplash and make it a little taller than this plan shows.

4 Bill of Materials The sizes of the cabinet parts are based on the exact measurements from the project plan. The component parts for the doors and drawers should NOT be cut to final sizes until the cabinet is assembled and the pockets are established. This will ensure that they fit properly. NOTE: The length of the drawer sides may have to be altered based on the joinery.


5 Stock Preparation #1 #2 #3 #4 Step #1: I started with rough cut boards that were a little less than 1 ½ thick and varied in width from 6 to 12. The purpose of this step is to surface the boards in order to identify the best pieces of lumber for the component parts. Surfacing the boards will display the grain patterns and color of the wood. Almost all of the components of the case will require 2 pieces of wood because of the depth of the cabinet is 13. Careful grain matching is critical for all the external component parts. Photo #1. #5 Photo #1 shows two 7 ¾ pieces laid side by side in order to achieve a 13 wide piece for a cabinet side. Both pieces were from the same piece of lumber. I did this to ensure a good color match. Size pieces to 7 ¾ wide so they can be joined on an eight inch jointer. Photo #2 shows a board being cut to < 8 wide on a band saw. Make one face flat using a jointer for each piece of wood. Photo #3. Use a planner to make the opposite face flat. Photo #4. Do not concern yourself with dimensioning the lumber to the exact thickness at this time. Use a jointer to make on edge 90 degrees to the face. Photo #5.


6 Cut Stock to Rough Size #1 #2 #3 Step #2: The purpose of this step is to cut to rough size all the component parts for the cabinet. #4 Rough cutting generates parts that are several inches longer, wider and thicker than the finishes sizes. It is always best to generate extra pieces in case you make a mistake. It is easier and more efficient to have a few extra pieces that can be used as test pieces when cutting joinery. NOTE: It is not safe to use a table saw to rip rough cut boards. Lumber should be flat and have a square, straight edge to place against the table saw fence. The boards should be flat on both faces with square edges. Photo #1 shows a board being ripped to approximate width. Photos #2-4 show parts that have been milled to rough size and labeled on the ends. Make sure that you account for all the parts in the bill-of-materials list.

. Mill the boards flat and square the edges to the faces. Remove milling marks with a hand plane.")
7 Gluing up Panels Step #3: The cabinet sides, top, bottom and dividers will require gluing up two boards. Select the boards carefully to ensure that the grain and color are well matched. You need a finished width of 13. I start with gluing up two boards that are 7 ½ wide, giving me a panel that is 15 wide. It will be cut to final width later in the construction process. I leave the boards oversized (length, width and thickness). Mill the boards flat and square the edges to the faces. Remove milling marks with a hand plane. Prepare clamps and do a dry glue up to ensure that the joined edges mate without any gaps. Apply yellow wood glue to both edges and clamp boards together. Allow at least 2 hours for glue to set.


8 Templates #1 #2 #3 Step #4: There are several parts of this project that are shaped. There are two ways to cut these parts. One is to make templates using ¼ MDF and shape the parts with a hand-held router. The other way is to generate the parts using a CNC router. In this case I used 100kgarages.com (photo #1) to find a local CNC fabricator to generate the templates. I provided them line drawings of each part and they generated the templates accordingly as shown in photos #2 & 3. I was so impressed with the work they did, I took it a step further and had them cut the joinery and shape the sides. I also had them create an inlay for the backsplash. I provided the CNC fabricator the actual milled wood cut to rough size for the sides. I also provided them the wood for the backsplash for the inlay (see step #5). The shapes for front stretcher and backsplash I cut using the templates they generated. I did this because I wanted to build the case first to ensure a tight fit of these pieces.


9 Shopbot CNC Fabrication #2 #1 #3 #4 Step #5: I provided the CNC fabricator a JPEG file of the artwork and they generated the inlay using ebony and maple that I supplied. Photos #1-3. #5 They also generated the side pieces as shown in photo #5. They cut the through-mortises, the blind-mortises and dados on the inside face and the curved shapes for the top and bottom. The tool path of the CNC router is depicted in photo #4. I had to square the corners of the mortises as shown in photo #6 but using a Shopbot CNC fabricator saved lots of time and more importantly provided exact placement of the joinery. #6


. These pieces need to be cut exactly the same.")


10 Cutting the Tenon Shoulders #1 #2 Step #6: Layout the tenons on the boards as shown in photo #1.Since the tenons go through the sides you want a very accurate fit. The best way to achieve this is to use the mortises in the sides as a guide as shown in step #5. The top and bottom are 7/8 thick. The mortises are 5/8 tall. That means that there is a 1/8 shoulder on each tenon. These tenons are through-tenons and are proud of the sides by ¼. Photo #7. #3 #4 The top, bottom and middle divider should be cut to length, 48 ½ (this measurement takes into account the 1 thickness of the sides and the ¼ extensions). These pieces need to be cut exactly the same. Use a cross cut sled to do so. #6 After you layout the tenons, make a 1/8 deep cut 1 ¼ from the end on all three boards. Use a cross cut sled with a stop block as shown in photo #2. After the shoulder cut is made, raise the blade to 1, set the board on edge and cut the shoulders without changing the position of the stop block as shown in photo #3. Photo #4 shows both cuts. Use a band saw or jig saw and cut the ends off as shown in photo #5 & 6. #5 #7


11 Making the Tenons #1 #2 #3 #4 Step #7: There are several ways to size the tenons to fit the mortises to 5/8. You can use a dado blade set on the table saw, a shoulder or rabbet hand plane or use a router with a jig as I did. I made a simple jig using ¼ MDF and some scrap wood. The jig fits across the boards as shown in photo #2. The jig has a stop that sets it 1 ¼ from the end. The jig is held in place with a clamp. It is important that the jig lays flat across the board, otherwise the tenon will not be routed to a consistent depth. Use a router with a guide bushing and a ½ straight bit as shown in photo #1. Set the depth of cut to < 1/8 when the router is on the jig. #5 #6 NOTE: Make a test cut to make sure the depth of cut is set correctly. You do NOT want to take too much material off the tenons. You want the tenons to end up being a little thicker than the mortises. You want to reduce the thickness of the tenons a little at a time. Use a shoulder plane to smooth the tenon as shown in photo #4. After the waste is removed you will use the shoulder plane to accurately size the tenons to fit the mortises. You need to ensure that you take the same amount of material off both sides of the board, otherwise the board will not be perpendicular to the sides. Once the thickness is close to the height of the mortises, then you need to remove the waste a shown in photo #5. Use a jig saw to remove the waste in order to leave a stub tenon that fits inside a dado in the sides. Photo #6. Achieve the finish size of the tenon as shown in photo #8 by using a shoulder plane. #7 #8


12 Dry Fit the Case to Ensure Accurate Measurements #1 #2 Step #8: You need to dry assemble the case in order to take accurate measurements for the vertical dividers, backsplash and front and back stretchers. These measurements must be precise. I used cleats to help me position and balance the long bar clamps as highlighted in photo #1. Ensure that the cabinet is square. Notice the corner braces highlighted in photo #2. These corner braces are cut to exactly 90 degrees. When clamped in the corners of the cabinet, they establish a square corner. Also make sure that the horizontal dividers seat tight to the sides. This will also ensure that the tenons are cut accurately. Make adjustments to the joinery as necessary. While the cabinet is clamped measure the distance between the sides for the front and back stretcher and the backsplash. These measurement should all be the same length (46 ), but check each location to ensure that they are. Measure the distance between the top and middle horizontal divider (4 ½ ) and then the distance between the middle horizontal divider and the bottom (26 ). The measurements stated above are from the project plan. But should be confirmed when the case is assembled. Keep the case assembled. NOTE: Mark with a pencil both the top and bottom intersections of the horizontal dividers on the side pieces. These will serve as reference lines in future steps.

13 Cutting the Backsplash, Dividers and Stretchers to Length Step #9: TIP: Use scrap pieces of wood as a test pieces to ensure a perfect fit for each different measurement. Set the stop block and cut a test piece slightly longer than your measurement and then test fit it. Sneak up in very small increments until a perfect fit is achieved, resetting the stop block each time. Once the perfect length has been established you can cut the real stock. TAKE YOUR TIME TO ENSURE A TIGHT FIT! Use a cross cut sled and cut one end of each of the boards that will be used for the backsplash, front and rear stretchers, and vertical dividers square. Mark that edge so you know it has been cut square. The two stretchers and backsplash should be the same length, 46. Reference the tip above. Set the stop block, highlighted in photo, to the correct length and cut each board. The lengths of the two vertical dividers for the middle drawers are the same length. Set the stop guide to the correct length and cut each board. The vertical divider for the top drawers is done using the same procedure.


14 Mortising the Backsplash & Stretchers #1 #2 #3 Step #10: TIP: It is always best to leave the boards with straight edges until all the joinery is completed. The straight edges ensure accurate registration. The backsplash and front & back stretchers are attached to the case sides with loose tenons. All of these pieces are 7/8 thick so the height setup on the horizontal mortiser is the same. The loose tenons will be 3/8 thick, so you will need a 3/8 straight router bit. This will leave a ¼ shoulder on each side of the tenon. #4 The width of each of the mortises is dependent on the piece and where it connects to the case. You should leave at least 3/8 shoulder on the top and bottom of the mortises. Photo #1. Layout the tenons on each piece before making any cuts. Find the center thickness of the boards, (7/16 ) and mark it. Measure 3/16 on each side, that will leave a 3/8 mortise as shown in photo #2. Using a horizontal router, setup the height and width of the cuts. Test with a test strip that is the same thickness and width as the real pieces. Photo #3 show a mortise being cut in a stretcher. Photo #4 shows the mortise in the front stretcher. #5 NOTE: The backsplash extends above the sides (photo #5) so the mortise on the backsplash has to be positioned accordingly.


15 Shaping the Backsplash & Front Stretcher #1 #2 #3 Step #11: Now that the mortises have been cut you can trim the backsplash and the stretchers. You will want to use a band saw or a jig saw to cut the waste. Cut about 1/8 outside your line into the waste material as shown in photo #1. Photos #2 & 3 show the backsplash and front stretcher being trimmed. NOTE: Save the cutoffs from both the backsplash and front stretcher. These cutoffs will be used during the gluing of these pieces to the top and bottom respectively.


 to ensure that you do not cut into your work surface.")


16 Shaping the Backsplash & Front Stretcher #1 #2 #3 #4 Step #12: Now that the mortises have been cut and the pieces have been trimmed you are now ready to use the templates to finish the shaping. Use double sided tape to attached the pieces to their respective templates. Make sure the pieces are positioned correctly. Secure the template and board to a scrap piece of wood placed under the template (highlighted in photos #1 & 3) to ensure that you do not cut into your work surface. Use 3/4 flush cutting trim router bit with a top bearing shown in photo #5. The length of the router bit should be 1 or longer. Position router bit so bearing is contacting the template and the cutting edge of the router bit is engaging the full thickness of the board. #5 In order to avoid creating tear out along the edge, you will need to do a climb cut. The stretcher is concave and the backsplash is convex, the direction of the cuts are opposite. Notice in photo #5 the arrows marked on the templates that denote the direction of the router travel. On the backsplash, work from the center and move to the ends. On the front stretcher, start from an end and stop at the center, then go to the other end and repeat the process. Photos #2 & 3. Photo #6 shows the direction travel that is marked on the templates. #6


17 Marking the Positions of the Mortises for the Front Stretcher #1 #2 #3 Step #13: I cut off the bottom edge of the front stretcher as shown in photo #3. Both the front and rear stretchers should be set about an 1/8 up from the sides so that they do not compete with the sides as the cabinet feet. Place the front stretcher on the cabinet and mark where it intersects with the bottom of the side piece. Set the table saw fence and cut the front stretcher as shown in photo #2. The front stretcher is inset ¼ from the side pieces. In order to accurately establish the position of the front stretcher mortises on the side panels, set the front stretcher in place and mark the outside position of the sides with a pencil. Make sure you also mark the bottom edge. The back stretcher and backsplash are flush to the sides.


18 Cutting the Mortises for the Backsplash and Stretchers #1 #2 #3 Step #14: NOTE: The front stretcher is inset ¼ from the sides, so the position of the mortise on the sides needs to be adjusted accordingly. You will need to cut mortises in the side pieces for the backsplash, front and back stretchers as highlighted in photo #1. All these mortises are 3/8 wide and ½ deep. The length of the mortises is dependent on the part. Layout the mortises using the reference marks you made in step #6 that indicate the intersection of the horizontal dividers to the sides. Use the mortises on the backsplash and stretchers to ensure that the placement of the mortises is correct. #4 Setup your router table with a 3/8 straight cutting bit. The mortises for the stretchers and backsplash are blind mortises so you need to mark the start and stop positions of these mortises as shown in photo #5. Raise the end of the board and gently set the board onto the bit as shown in photo #3. Hold the board secure and move the board the length of the cut using the start/stop marks you have on the board and on the router fence as shown in photos #2-4. Repeat this process making a series of shallow 1/16 cuts until you reach a depth of ½. The setup for the backsplash and rear stretcher are the same since both are flush to the sides. The front stretcher requires a different setup since it is inset ¼ from the sides. #5


.")
19 B A B Cutting the Grooves for the Top Drawer s Vertical Divider #1 B B #2 #3 #4 #5 Step #15: The top, middle horizontal divider and the bottom require a ¼ x 5/16 stopped grooves to accommodate the vertical dividers. The location of the grooves are highlighted in illustration #1. NOTE: These grooves run from the back but stop 3/4 from the front edge of the case. It is critical that these grooves are aligned square and the pieces are mirrored accurately. If they are not positioned precisely the vertical dividers will not be square to the horizontal dividers and the drawers will not fit correctly. Correspondently, the top center divider needs to be centered between the sides. If it is not centered, the top drawers will be different widths. The top and the top face of the middle divider have a single groove for the top drawer divider ( A in illustration #1). The bottom face of the middle divider and the top face of bottom have two grooves for the middle set of drawers ( B in illustration #1). In order to accomplish this, place the top board face down and the middle divider board face up with the back edges butting up to each other. Align the ends of both boards flush. Clamp these two pieces together to ensure that they do not move. Photo #3. Mark the center of the boards as shown in photo #2. I also placed a piece of blue masking tape at each end of the center line and wrote on it STOP. This is the indicator that the groove does not go all the way through the end. This is the position of the groove for the top vertical divider. Allow for the ¼ width of the groove and the guide bushing diameter. Use a ¼ sheet of MDF as a router guide and position it square to the line you marked for the groove. Use a square to ensure that MDF guide is perfectly square to the center line. Photo #3. A consistent depth of 5/16 is critical so I used another piece of ¼ MDF opposite the center line to provide a level surface for the router base to ride on. I also clamped cauls across the width of the boards to ensure that the boards and MDF guides where lying flat on the work surface. Any irregularities would translate to the router and the groove would not be cut to a consistent depth. Photo #4. Use a plunge router fitted with a guide bushing and a ¼ straight router bit. Make a series of shallow cuts until you reach a depth of 5/16. Photo #5.


20 Cutting the Grooves for the Middle Drawer s Vertical Dividers A B B B B #1 #2 #3 Step #16: Repeat the same process as described in step #15 for the bottom of the middle horizontal divider and the top face of the bottom. You will be making 2 grooves ( B in illustration #1) for the middle drawer dividers. The final position of these vertical dividers are 18 ½ apart. Since the dividers are ¾ thick, the center of the grooves are 19 ¼ apart (18 ½ + 3/8 + 3/8 = 19 ¼ ). Measure twice and cut once.
.")


21 Rabbet Joints for the Back Panel Through rabbet joint Stopped rabbet joint Stopped rabbet joint #3 #1 #2 Step #17: The sides, top and bottom require a rabbet joint (photo #3). The rabbet joints on the top and bottom go from end to end and a through rabbet joints (photo #2). They are ¼ deep and ½ wide. The rabbet joints on the side pieces are stopped rabbet joints and are ¼ deep and 5/8 wide. They DO NOT go all the way to the end. (photo #2). The best way to cut the through rabbet joints is on a table saw. You can also cut the stopped dado joints on the table saw but I suggest you cut them on a router table or with a hand held router. The middle divider does not have a rabbet joint since its overall depth is 12 ½, allowing for the back panel to fit flush.


22 Shelf Pin Holes #1 #2 Step #18: Shelf holes need to be drilled on the insides of the sides and vertical drawer dividers. These holes have to align from side to side so careful layout is critical. The best way to do this is to use a drilling jig as shown in photo #1. The front holes will need to be placed 1 ½ from the front edge of the cabinet to allow for the ¾ door. The back set of holes should be 1 from the back edge of the boards. Photo #2. I only put holes in the middle of the boards. That gives me the option of placing 2 shelves will ample room above and below. The holes are ¼. I use brass pins as shown in the inset photo. There are a variety of shelf pins available. NOTE: The depth of the drill bit has to be set to drill deep enough for the shelf pins to seat. I put masking tape on the drill bit to indicate the depth as highlighted in photo #1. You can also use a drill stop, but be careful not to drill through the boards.


23 Loose Tenons for the Backsplash and Stretchers #1 Step #19: Mill several pieces of hard maple to 3/8 thick for the loose tenons as shown in photo #2. The width and length is dependent on the mortises they fit. Cut a series of 1/16 th deep grooves along the length on both sides to allow for glue squeeze out. Photo #2 displays the loose tenon stock before they are cut to length. Use a quarter round-over bit to ease the edges once the width is determined. Test fit the tenons to ensure a snug fit; not too tight but not so loose they fall out. Insert an adjustable square into a mortise and measure the depth of the mortise. Transfer the measurement to the face of the board as shown in photo #1. Use the same technique to determine the depth of the mating mortise. Add the two measurements to determine the length of the tenons. Use a cross cut sled to cut tenons to length as shown in photo #4. Loose tenons will also need to be made for the doors and the web frames. Those component parts are ¾ thick so the loose tenons will be ¼. You should consider milling the wood for both 3/8 and ¼ loose tenons at the same time. Photo #3 shows the loose tenon glued into the front stretcher mortise. Test the fit of the tenons into their mating pieces. Make sure they do NOT bottom out. #2 #3 #4


24 Gluing the Backsplash & Stretchers #2 #3 #1 ¼ setback from the front edge Step #20: The backsplash and both front and rear stretchers need to be attached to the top and bottom respectively. Biscuits are used to attached the backsplash and stretchers as shown in photo #1. I used #20 biscuits spaced every 6. Photo #4 shows the biscuit cutter and a #20 biscuit. Layout the biscuits on the top and bottom pieces then transfer the positions to the backsplash and stretchers. The backsplash and rear stretcher are flush to the back end of the top and bottom respectively. NOTE: The biscuit slots for the bottom where the front stretcher attaches needs to be setback from the front edge as specified in step #13. Use the cutoffs from step #10 as gluing cauls. Use blue masking tape to cover the edges of the cutoffs. The tape provides a little cushion since the edges of the cutoffs are rough from the bandsaw. These cauls provide a flat surface for the clamps as shown is photos #1 & 2. #4 Photo #3 shows both the front and rear stretchers attached to the bottom. NOTE: Make sure the backsplash and stretchers are glued flush to the ends of the top and bottom.


25 Gluing the Case #1 #2 #3 #4 Step #21: NOTE: These photos were taken earlier in the assembly and fitting process and do not show the backsplash and the stretchers glued in position. However, the case glue up process is the same as these photos illustrate. The joinery and shelf pins holes have been completed on the sides of the case and on the vertical dividers. The front and rear stretchers have been glued to the bottom and the backsplash glued to the top. It is time to glue the case. Sand all the component parts with a random orbit sander and a sanding block with 220 grit sand paper. Photo #1. Ease the edges with a sanding block. #5 This glue up requires two people. The bar clamps are heavy and long and need to be positioned accurately as shown in photos #3-5. The top with the backsplash attached, the middle horizontal divider and the bottom with both the front and rear stretchers are glued to the sides. Layout all the component parts and start with one of the sides flat on a surface as shown in photo #2. Use yellow glue applied to the inside dado. Apply glue to the tenons on the inside edge to avoid excessive glue squeeze out. Position the other side over the tenons. With two people, stand the case up and position the cleats. Refer to step #7. The bar clamps need to be position at the ends of the horizontal pieces, photo #4. In order to eliminate racking, tighten the clamps a little at a time, alternating positions until all the clamps are tight. Check to make sure that each joint is closed and tight. Put the corner braces in place and secure with clamps to ensure that the case is square as shown in photo #4.


26 Spline Joints #1 #2 Step #22: I used spline joints to connect the vertical dividers and the web frame middle drawer dividers to the case and vertical dividers respectively. Photos #1 & 2. The splines are made from hard maple. They are ¼ thick and 5/8 wide as shown in photo #3. #3


27 Cutting the Splines in the Vertical Dividers #1 #2 Step #23: The vertical dividers need to be sized to fit tightly between the horizontal dividers. Start with the vertical divider that separates the two top drawers. Size the divider and then route the groove as described in this step. Once this divider is glued in place, size the other two vertical dividers and route those grooves. The stopped grooves in the ends of the vertical dividers are cut on the router table with a ¼ straight bit. The groove is 5/16 deep and is centered in the thickness of the ¾ boards. Setup the router table with a ¼ straight bit. Mark the router bit width on a piece of tape as shown in photo #1. Feed the board through the router bit and stop when the marks lineup. Photo #2 shows the stopped groove ¾ from the front edge.


28 Grooves for Web Frames in the Vertical Dividers #1 #2 #3 #4 Step #24: The position of the grooves for the web frames are determined by the drawer heights as shown in the illustration #1 and photo #2. Using the same process as defined in steps #15 & 16, cut stopped grooves in the vertical dividers for the web frames as shown in photo #3. NOTE: The vertical dividers also have holes for the shelf pins on the opposite side of the grooves, photo #4. See step #18.


29 Gluing the Vertical Dividers #1 #2 #3 Step #25: Use yellow glue to secure the vertical dividers. Spread glue in the joint and on the spline. Use glue sparingly, you do not want the glue to squeeze out onto the horizontal dividers. Make sure that the dividers are flush to the front of the horizontal dividers. Glue the vertical divider for the top drawers first, photo #1. Let the glue set for several hours. Glue the lower set of vertical dividers using bar clamps to secure them from both the front and back, photos #2 & 3. Use the cut-off from the front stretcher, photo #3, to create a flat surface for the clamps.


30 Making the Web Frame Dividers #1 #2 #3 Step #26: Two web frames are used as the middle drawer dividers/runners, photo #6. These web frames are made of ¾ x 2 ½ poplar. Mill wood accordingly. The front edge of each web frame will have a ¾ cherry piece attached after the web frames are assembled. #4 The construction is mortise and loose tenons as shown in photos #1 & 4. The overall width of the web frames is dependent on the positioning of the vertical drawer dividers. The project plan specifies 18 ½ width, but I would make them 19 wide and 12 ½ deep. An exact fit is necessary so making them a little wider and deeper provides you the opportunity to accurately size them once the vertical dividers are installed. #5 The rails and stiles for the web frames are 2 ½ wide. The mortises are ¼ tall, 1 deep and 1 ¾ wide as shown in photo #1. Layout the mortises and use a horizontal router to cut the mortises as shown in photos #2 & 3. Make the loose tenons as indicated in step #19. Photo #4. Glue the frames together ensuring that they are square. Photo #5. #6


31 Making the Web Frame Dividers #1 #2 #3 Step #27: The web frames have a ¾ piece of cherry attached to the front edge. Select pieces of wood that best match the edges of the case to ensure a good grain and color match. Photo #1. Glue the edging strip to the web frame as shown in photo #2. Use a cross cut sled to cut the web frames to size. Use a stop block to ensure both web frames are cut to the exact size as highlighted in photo #3. Photo #4 shows the completed web frame with the cherry facing and spline. #4


32 Gluing the Splines #3 #1 #2 #4 Step #28: Cutting the splines in the vertical dividers is best done on a router table because these are stopped grooves. As with all the spline grooves, they are ¼ wide and 5/16 deep and are centered in the thickness of the ¾ boards Mark the width of the router bit on piece of tape attached to the router table and cut the groove, stopping at the end mark as shown in photo #1. Setup the router table with a ¼ straight bit. Mark the end of the groove on the web frame as shown in photo #2. Ease the edges of the maple splines with a sanding block. This will make the splines slide smoothly in the grooves, photo #3. Fit the splines into the groove and glue into place. Secure with blue masking tape, photo #5. Make sure that the splines are fully seated in the groove. #5

33 Gluing the Web Frames Step #29: Spread glue sparingly in the grooves of the vertical dividers and on the web frame splines. Use bar clamps on both the front and back of the cabinet to secure the web frames. Make sure the web frames are flush to the front of the vertical dividers.


34 Cutting the Veneers for the Door Panels #1 #2 Step #30: The door panels are made of two pieces of hand-cut veneer glued to a substrate of ¼ MDF. In this case I used tiger maple as the front of the panel and cherry for the back of the panel. Any figured wood can be used. Both sides of the panel needs to be veneered or the panel will warp. The finished size of the panel will be 10 x 22 but it is best to cut the veneers oversized by at least 1. On a band saw, cut veneers 1/8 thick. You will need two pieces of tiger maple and cherry veneers. Cut all the veneers at the same time. To remove band saw marks, use a flat bed drum sander and sand the veneers until smooth. Use 120 grit sandpaper. The veneers will be sanded again once glued to the substrate. The final thickness of the veneers will be between 1/16 to 3/32 when done. You do not want the veneers to be thicker than 1/8.

 and 6 bar clamps. The cauls are planed so that the center is 1/16 higher, photo #4.")


35 Making the Door Panels #1 #2 #3 #4 Step #31: I use my workbench as a clamping surface to glue the veneers to the substrate. The key is to provide a flat surface and equal clamping pressure to the entire surface of the panel. Basically you are creating a sandwich of four ¾ MDF boards with the veneers and substrate in between. In order to do this, you will need three 4 x 4 X 25 cauls (length equals workbench width) and 6 bar clamps. The cauls are planed so that the center is 1/16 higher, photo #4. This ensures that there is pressure in the center when clamped. You will also need 4 pieces of ¾ MDF boards the same length as your workbench and a few inches wider than the panel being veneered. Photo #3 shows the sandwich. I use yellow glue. You will also need blue masking tape and a couple sheets of craft paper. Photo #1. Have all your materials staged for a successful glue-up. Yellow glue starts drying in about 15 minutes so you have to work with purpose. Apply glue to the substrate using a 4 or 6 paint roller with a ¼ nap. DO NOT APPLY GLUE TO THE VENEERS! Lay a piece of craft paper under the substrate. Any glue squeeze out will go onto the paper and will prevent you from gluing the panel to the MDF platform. Lay the veneer on the glued substrate, flush the edges and then turn it over and repeat the glue application process for the other veneer. Apply blue masking tape on each corner and in the middle to keep the veneers from moving when the clamps are tightened. Photo #2. Place another sheet of craft paper on top and then 2 pieces of ¾ MDF on top. Position the 4 x 4 cauls and clamp to the workbench as shown in photo #3. Start with tightening the center cauls and then work to either side one at a time. Apply even pressure to all the clamps. Let dry at least 8 hours before removing clamps. Repeat process with other panel.


36 Making the Door Panels #1 #2 #3 Step #32: Once the veneered panels are dry, remove the masking tape and any tape residue. Use the jointer to create one square and straight edge. Cut the opposite edge parallel on the table saw. Remove as little material as possible. NOTE: This procedure is not intended to cut the panels to size, it is just to create straight and parallel edges. The panels will be cut to size after the door frames are made. Sand the panel on a flat bed drum sander starting with 120 grit sandpaper and ending with 180 grit sandpaper. Photo #1. Sand both sides equally. The panels will be sanded again with a random orbit sander to 220 grit once they are cut to final size. I applied mineral spirits in photo #2 & 3 to display the grain. This simulates what the panels will look like when the oil finish is applied. Wiping the panels with mineral spirits also cleans the surface. I also added the carpenters triangle to ensure that the orientation of the panels are maintained when I glued them into the door frames. Photo #3.


37 Groove for Door Panel #1 #2 #3 #4 Step #33: The door rails and stiles have a 3/8 groove for the door panel. The rails have a through groove and the stiles have a stopped groove. I use a router table to cut the grooves. I do this because cutting a stopped groove on a router table is more accurate and safer than doing it on a table saw. First layout the position of the groove on the both the end and the face of the stiles as shown in photo #1. The bottom rail is 3 wide so measure 2 5/8 from the bottom of the stile. The top rail is 2 wide so measure 1 5/8 from the top end. These measurements define the stopping points of the groove. Mark the position of the router bit on a piece of tape that will be used as a bit reference as shown in photo #2. In order to avoid tear-out, raise the router bit only 1/16. Lift one end of stile and push it down onto the router bit. Move the stile until the layout mark is matched to the router bit mark on the fence. Photos #2 &3. Repeat the process on all four stiles raising the router bit 1/8 increments until you reach a depth of 3/8. Photo #4. For the door rails, since these are through grooves, you can push them through end-to-end. Again take small bites to avoid tear-out.


38 Making the Doors #1 #2 #3 Step #34: NOTE: The doors should be made slightly oversized so they can be custom fit. Do not trim the doors until the vertical dividers are in place. The door margins should be the same as the drawer margins. The doors are made with 2 wide stiles and top rails. The bottom rail is 3 wide. All the door frames are ¾ cherry. The door frames are made the same way as the web frames in step #26 were made. Mortises in both the door stiles and rails with loose tenons. Follow the same layout procedures and use a horizontal router or a hand held router to cut the mortises. The mortises for the top of the doors are ¼ high, 1 ¼ wide and ¾ deep. The mortises for the bottom of the doors is 2 wide. Photo #1 shows a mortise being cut into the end of a door rail. Photo #2 shows the loose tenons being glued into the rails. Make sure the tenons are seated to the bottom of the mortises. Let the tenons dry. Photo #3 shows a dry fit of the door frames. The length of the tenons may need to be trimmed. Ensure that the joints come together tight.


39 Making the Doors #1 #2 #3 Step #35: Assemble the door without the panel. At this time the panel is oversized and needs to be cut to final size. Measure from the inside of the grooves to determine the panel size. Cut the door panels 1/16 less than the actual measurement in both the width and length, photo #1 & 2. This will ensure that the panel will not bind and inhibited tight fitting joints, photo #1. Use a sanding block and ease the edges of the panels. Assemble the top and bottom rails to one of the stiles. Slide the door panel into position and then attach the other stile, photo #3. Dry clamp the door and make sure that the joints are tight. Make adjustments as necessary. NOTE: Use glue sparingly to avoid unnecessary squeeze out. Apply glue inside the mortises and tenons of the bottom rail. Position the rail into the stile. Apply glue in the grooves for the panel. Slide the panel into position. Apply glue in the mortise, on the tenon and in the groove for top rail. Position the top rail. Glue the other rail in position and clamp across the rails. Make sure that the rails are flush to the ends of the stiles. Measure diagonally to ensure that the frame is square.


40 Making the Drawers #1 #2 #3 Step #36: You cannot cut the drawer components to final size until the web frames are in place and the drawer pockets are defined. Photo #1 shows the rough sized drawer components including the web frames marked and staged. I used a Leigh dovetail jig to make the drawers. The front of the drawers are made with half blind dovetails. The back of the drawers are made with through dovetails. Follow the instructions on your dovetail jig as shown in photos #2 & 3. Dry fit the drawers as shown in photo #4. The sides and back of the drawers are ½ thick, the front is ¾. #4 Measure and cut the component parts to size. Since the drawers do not have mechanical slides the fit of the drawers has to be tight. NOTE: Cut the width and the height of the drawer components 1/8 oversize. You can use a hand plane to shave a little off to ensure a tight fit.
. A groove in the bottom edges of the drawer sides and front needs to be cut.")


41 Drawer Bottoms #1 #2 #3 Step #37: The bottom drawer panel is a ¼ thick cherry plywood (plywood varies in thickness depending on manufacture. Use a scrap piece of the plywood you are going to use as a thickness gauge). A groove in the bottom edges of the drawer sides and front needs to be cut. The back of the drawer will not require a groove because it will be trimmed above the groove. The best way to cut the groove is with the table saw. NOTE: It is easy to make a mistake and cut the groove on the wrong side or edge. Before you make any cuts, assemble all the drawers and place a pencil mark to indicate the placement of the grooves on each piece. Reference these marks when making the cuts to ensure that you are cutting in the correct place. The sides are ½ thick. You want to set the depth of the groove at 5/16 and a ¼ wide. It will require multiple cuts on the table saw to achieve the correct width of cut. Use a sample piece of wood as a test piece (photos #1 & 3). Set the height of the saw blade to 5/16. The drawer bottom should be about ½ from the bottom edge so set the table saw fence at ½. NOTE: You want the groove on the drawer front to be positioned inside the tail slot. This way the tail of the side piece will hide the groove. Make the first cut as shown in photo #2. Reset the table saw fence by 1/8 and make another cut photo #3. Repeat this process for all the drawer fronts and sides. Continue moving in the fence in very small increments. Test the fit of the bottom panel after each cut. You want the bottom panel to fit snug but still will slide in the groove with gentle hand pressure.


42 Drawer Assembly #1 #2 #3 #4 Step #38: The bottom of each drawer slides into the groove after the drawer is assemble. In order for this to happen, the drawer backs will need to be cut to the top of the groove. Photo #1 shows a measurement being taken for setting the table saw fence to cut the back of the drawer to size. Each drawer back will have to be cut precisely. Assemble the drawers and mark the intersection of the back and top of the groove. Cut the backs of each drawer so the groove in unobstructed when the drawer is assembled. Do a dry fit to ensure it is so. #5 Once the drawer backs are sized you are ready to glue the drawers without the bottom panel. I use yellow glue applied with a small brush. Apply glue to the joints. You want to avoid squeeze out so spread glue judicially. Photos #2-5. Before you start gluing, prepare the clamps. I use parallel bar clamps. The top tow drawers are only 4 ½ tall and will need fewer clamps. The other drawers are taller and will require clamps on both the top and bottom as picture in photo #6. #6


43 Drawer Assembly #1 #2 Step #39: There are two things that you must concern yourself with gluing up the drawers. The first is to ensure that the drawers are square. The second is that the dovetail joints are squeezed tight and there are no gaps. I used 2 corner braces as highlighted in photo #1. These braces are clamped to the sides once the outside clamps are tight. The corner braces ensure that the drawer is square. Notice in both photos #1 & 2 that clamps are placed beneath and on top to ensure that the joints are closed and tight. You should also measure the diagonals to check square. Let the glue dry for at least 8 hours. The bottoms are not glued in.


44 Drawer Fitting #1 #2 #3 Step #40: After the glue dries you need to clean up the dovetails. Following the instructions on dovetail jigs, the pins will be a little proud. Extend a piece of ¾ MDF across your workbench provides a platform to clamp the bottomless drawers, photo #4. This will provide easy access to the dovetail joints. The pins are end grain, you need to use a low angle block plane to make the pins flush as shown in photo #4. Sand the joints and the sides of the drawers. The bottom is a ¼ cherry plywood panel, photos #2 & 3. Measure from the inside of the grooves to determine the size of the bottom panel. #4 Make the bottom panel 1/16 shorter and narrower than the exact measurements. Ease the edges to ensure an easy fit. The bottom is screwed to the drawer back as shown in photo #2 with #6 wood screws. Do not glue the bottom panel.
 is consistent. I try to maintain between 1/16 to 1/8. Photo #4.")


45 Fitting the Drawers #1 #2 #3 Step #41: The objective is to ensure that the margins (the space between the dividers and the drawers) is consistent. I try to maintain between 1/16 to 1/8. Photo #4. After cleaning up the joints, check the fit of the drawers as shown in photo #3. Odds are they will be a little tight or slightly larger than the drawer pockets. You may have to plane the edges or the face of the sides to achieve a proper fit. Since the drawers do not have mechanical slides, you will want to plane the bottom edge of the drawer front at least 1/16, photo #2. This will mean the bottom edges of the sides will be higher than the front, thus leaving a 1/16 to 1/8 margin at the bottom of the drawers. Adjust the drawer size to achieve an even margin around the drawer pocket, photo #4. The draw should glide easily in and out of the pocket. #4


46 Drawer Stops #1 #2 #3 Step #42: Since the drawers do not utilize a mechanical drawer slide, you need to make a drawer stop to keep the drawers from being pulled all the way out. One way to accomplish this is to make a turn-post that is mounted on the dividers as shown in photo #3. Mill a piece of hardwood ½ square. Cut five 1 long pieces and drill a 1/8 hole in each. Countersink the holes. On the top back edge, centered on each drawer, cut a 5/8 wide by 5/8 deep slot as shown in photo #2. The best way to do this is on the table saw using a cross cut sled, photo #2, with the drawer bottom removed, set the saw blade 5/8 high and make a series of saw cuts to cut the slot. Ease the edges of the slot. Mark the center of each drawer pocket and mount the turn-posts on the dividers with a wood screw, photo #3. Leave the screw a little loose so the turn-post can be turned once the drawer has been installed.


47 Cutting the Hinge Mortises & Hanging the Doors #1 #2 #3 Step #43: A ¼ x ¾ wood strip is attached to the hinge side of the cabinet to accommodate the barrel of the door hinge, photo #1. Mill the strip and size to fit the door openings. You want the strip to fit tight. Layout the hinge placement on this strip of wood, photo #2. I placed the hinges 3 from the top and bottom of the door pocket. Using the router table with a ½ straight bit, mark the width of the bit on a piece of tape placed on the table. Raise the bit 1/16. Carefully lower the wood strip over the bit in-between the marks. Move the wood back and forth within the layout lines,. Photo #3. Repeat on both strips of wood for all four hinges. #4 #5 Raise the bit to the thickness of the hinges and repeat the process. Use a bench chisel and square the ends of the mortises for an exact fit of the hinges. Glue the strips of wood on the case ¼ from the front edge of the case, photo #5.


48 Cutting the Hinge Mortises & Hanging the Doors #1 #2 #3 #4 Step #44: I used 3 antique solid brass barrel hinges from Lee Valley hardware. The part number is listed in the bill-of-materials. These are mortise hinges. Layout the hinge placement on the doors by setting the door in the case. Set a thin strip of wood (1/16 to 1/8 ) under the bottom of the door as the door margin. Mark the placement of the hinges using the strip you glued in the preceding step. Setup the router table with a straight bit and set the bit height to the thickness of the hinge as described in the preceding step. Test the depth setting on a scrap piece of wood. Use tape to define the start and stop positions on the door and proceed in cutting the mortises. #5 Square the ends and clean up the mortises with a bench chisel as shown in photos #1 & 2. Mount the hinges on the doors as shown in photos #3 & 4. Place the door in the pocket and screw the hinges to the wood strip, photo #5.

49 Fitting the Back Panel Step #45: The back panel is ¼ cherry plywood. It fits inside a 5/8 wide ¼ deep rabbit. The back is nailed to the horizontal and vertical dividers with ¾ brass brads. The panel can be glued in the rabbet joint but I don t glue it. I rationalize that I may need to access the cabinet from the back sometime down the road. That rarely happens.
, a cup to hold the magnet (B), a steel plate (C) and a rubber")


50 Door Catch A B C D #1 #2 #3 #4 #5 Step #46: The door catch is composed of four parts: a rare earth magnet (A), a cup to hold the magnet (B), a steel plate (C) and a rubber cover (D). Photo #1. I purchased these at Lee Valley hardware. The url is listed below. The rare earth magnet fits inside the cup. In order to mount he cup, you need to mill a 1 piece of hardwood 1 ½ long and 1 deep for a mounting block photo #2. I laid out both of the door stops on one piece of wood. This makes it easier to drill the holes. #6 Drill a 5/8 hole with a Forstner or spade drill bit (flat bottom drill bits). The depth of the hole is the same as the thickness of the cup as shown in photo #3. In addition you will need to drill two holes for wood screws to attach the mounting block to the underside of the middle horizontal divider as shown in photo #4. Use a bit with a countersink. Use a cross cut sled to cut the individual blocks as shown in photo #5. You now have two door stops milled. Photo #6.


51 Door Catch #1 #2 #3 #4 Step #47: Secure the mounting block to the divider. The door stop should be set in from the edge of the divider by 7/8 (the door is inset by 1/8 and the door is ¾, thus the total is 7/8 ). Ease the edges of the blocks with sand paper or a hand plane. In order to determine the placement of the steel plate that is mounted on the door, drill a 1/16 hole in the center of the hole for the magnet cup. Tap in a small finishing nail as shown in photo #1. Cut the head off the finishing nail. Close the door so that the nail that protrudes from the magnet cup hole strikes the door. The indentation that is made is the center of the recess for the steel plate. Use the same Forstner or spade drill bit and drill a recess in the top of the door frame where the mark was left. The depth of the recess is the same as the thickness of the steel plate. Use #6 wood screws to mount the magnet cup and the steel plate. Insert the rare earth magnet in the cup and the steel plate in the door frame. Cover the steel plate with the rubber cover.


52 Shelves #1 #2 Step #48: I made four shelves ¾ cherry. Photo #1. Mill the boards to ¾ x 12 15/16 long and 11 ¾ wide as shown in photos #3 & 4. #3 #4 I routed indentations in the bottom of the shelves for the shelf pins to seat, photo #7. These indentations are ½ wide and ½ long. Photo #4 shows the pins and the shelf alignment. Mark the pin locations are indicated in photo #5. Use a ½ router bit and mark the fence accordingly as shown in photo #6. Route stop grooves are shown in photo #7. The front edge has been chamfered with a block plane. If evenly spaced, there is a little more than 8 between the shelves, photo #8. #7 #5 #6 #8

53 Finishing Step #49: I used a wipe-on poly because I wanted the natural wood grain to be displayed and a good protective surface but you can use any clear finish. The photo above displays a few finishes. Wipe-on polyurethane is easy to apply. Follow the instructions on the can. Sand or steel wool between coats. I recommend a minimum of three coats.


54 Drawer & Door Hardware Step #50: I used Arts & Crafts style door knobs and handles for this cabinet because they compliment the overall design of the cabinet. This hardware is mounted through the drawer fronts and door stiles with screws. There are literally thousands of hardware selections. Below are the urls for a few companies that sell cabinet hardware
Instructables Butcher Block Top
 Instructables Butcher Block Top Project Overview: This project requires basic woodworking skills and access to woodworking machines. Woodworking machines have sharp cutting edges and are NOT forgiving.
Display Case (for J&S)
") Display Case (for J&S) This is constructed of maple plywood with solid maple (soft maple) edge banding. It was made to fit between a door and a kitchen cabinet, and has an elegant circular taper between
Display Case (for J&S) This is constructed of maple plywood with solid maple (soft maple) edge banding. It was made to fit between a door and a kitchen cabinet, and has an elegant circular taper between
Traditional glass-pane and wood-muntin doors highlight this free-standing piece.
 Bookcase Traditional glass-pane and wood-muntin doors highlight this free-standing piece. As the saying goes, there's nothing like good books. But they can present some storage problems--especially if
 America s leading woodworking authority To download these plans, you will need Adobe Reader installed on your computer. If you want to get a free copy, visit: http://adobe.com/ reader. Having trouble downloading
Nojo Design: Large Step Cabinet: February 2012
 Nojo Design: Large Step Cabinet: February 2012 The largest single piece of furniture I ve ever made is this stepped cabinet. Finished piece is 8! tall and over 10 long. This project has been great, although
Corner Cupboard. This space-saving piece enhances any room 46 FINE WOODWORKING
 Corner Cupboard This space-saving piece enhances any room BY G A R R E T T H A C K On every trip to the Shelburne Museum near Burlington, Vt., I visit a favorite object a small hanging corner cabinet.
129 KITCHEN BASE CABINET 480
 129 KITCHEN BASE CABINET 480 There are two sorts of kitchen cabinets: base cabinets, which sit on the floor, and wall cabinets. Base cabinets provide both storage space and work surfaces. They often house
Mid-Century Credenza Thoughtful details and modern joinery merge in this sleek design
 Mid-Century Credenza Thoughtful details and modern joinery merge in this sleek design BY LIBBY SCHRUM Mid-Century Modern furniture has not been wildly popular since, well, the mid-century. But fashion
Silverware Chest Plan
 Silverware Chest Plan 05L14.01 Introduction 1. Measure the space required for your cutlery before beginning this project to be sure that it will fit in the drawers and top compartment. The best way to
Jeff Branch WOODWORKING YOU CAN BUILD A. By adding subtle design elements, a traditional furniture style becomes decidedly modern.
 Jeff Branch WOODWORKING YOU CAN BUILD A By adding subtle design elements, a traditional furniture style becomes decidedly modern. Jeff Branch WOODWORKING Publisher: Jeff Branch Editor: Jeff Branch Art
Grade 11 Woods Lift Lid Coffee Table. Based on Under the big Top from Popular Mechanics Website
 Grade 11 Woods Lift Lid Coffee Table Based on Under the big Top from Popular Mechanics Website TABLE TOP 1. Select enough lumber to construct a top that is between 22 ½ and 24 wide after jointing. Ensure
BUILDING A STORM DOOR
 BUILDING A STORM DOOR BY NEAL BARRETT Illustrations by George Retseck If you're in the market for a storm door, you probably know that there are many styles and models available. However, most of them
Kitchen Step Stool. Premium Plan. In this plan you ll find: America s leading woodworking authority
 America s leading woodworking authority Premium Plan In this plan you ll find: Step-by-step construction instruction. A complete bill of materials. Construction drawings and related photos. Tips to help
About.com :
 http://woodworking.about.com/gi/dynamic/offsite.htm?sit...//www.popularwoodworking.com/features/fea.asp%3fid=1088 (1 of 8)1/28/2004 12:05:01 AM Modern Storage Tower The last thing I want to do when starting
135 ROLLTOP DESK 515
 135 ROLLTOP DESK 515 For the person who hates to clear off a desk, who wants to leave everything where it is overnight yet still have the clutter hidden, a rolltop desk is a godsend. The tambour hides
Pivot-Door Downdraft Cabinet Plans
 Pivot-Door Downdraft Cabinet Plans Finished Cabinet Closed Open Exploded View Introduction This simple downdraft-style dust collection cabinet is a great way to keep your shop cleaner and keep your router
Complete Dovetail Jig Instructions
 Complete Dovetail Jig Instructions 15 18 4 3 1 12 13 8 19 17 16 6 14 5 9 11 10 2 9 PARTS LIST - Complete Dovetail Jig Introduction Your new dovetail jig will cut Full Through Dovetails and three varieties
Copyright 2007 MLCS 1
 Copyright 2007 MLCS 1 REFERENCE GUIDE and SPECIFICATIONS: Edge Guides: This 12 Dovetail Template comes complete with 2 Edge Guide Sets one set for Half Blind and one set for Rabbeted Half Blind Dovetails.
ULTIMATE ROUTER TABLE PLANS. By Dan Phalen
 ULTIMATE ROUTER TABLE PLANS By Dan Phalen January 2017 Ultimate Router Table Plans. Copyright 2012-2017 by Daniel Phalen. Published by Creston Hall Publishing Company. All rights reserved. No part of this
Butterfly Leaf Dining Table Plans
 Butterfly Leaf Dining Table Plans Part 1 An attractive dining table with a secret: the leaf folds and stores inside the table. Season 1, Episode 7 P a g e 2 I first saw a butterfly leaf table in a back
Demilune 4. Apron Joinery. Curved Apron Tenon. Bridle Joint Legs. Bridle Joint Front Apron
 Demilune Email 4 Apron Joinery There are two types of joints used in connecting the aprons and legs. The rear legs use conventional mortise and tenon joints, while the front legs use the less conventional
ARTS AND CRAFTS CHAIR
 ARTS AND CRAFTS CHAIR 491 MATERIALS LIST--DINING CHAIR Key No. Size and description (use) A 2 1-3/4 x 1-3/4 x 16-1/4'' oak (front leg) B 2 1-3/4 x 3-3/4 x 40-1/2'' oak (rear leg) C 1 1-3/4 x 3-3/16 x 15''
Project 13586EZ: Writing Desk. Writing Desk Materials List
 Project 13586EZ: Writing Desk This writing desk will make a handsome addition to just about any room in the house. The one shown is made of cherry, a logical choice for a piece like this, but mahogany
The WoodWorker s Edge
 The WoodWorker s Edge Draw-leaf Game Table 1. 2. Layout the area for the tenons. The tenons are 3/8 thick x 4-1/2 long x 1-1/4 deep and offset to the inside. Create the tenons using the step method to
Hinge Mortising Jig. One of the make it or break it parts of building a. 6 ShopNotes No. 74
 Hinge Mortising Jig A Mortise for a Hinge. Quick, clean, and accurate that s the only way to describe the mortise you get with a trim router and this hinge mortising jig. One of the make it or break it
WOODWORKING GUIDE: BASIC JOINERY
 WOODWORKING GUIDE: BASIC JOINERY Close isn't really good enough. A perfect fit is what counts. When building furniture, there are many ways to construct joints. The simplest are those that use mechanical
Router bit cabinet August Home Publishing Co.
 Router bit cabinet 2011 ugust Home Publishing Co. Feature Project Router Bit Cabinet Dovetail keys at the corners reinforce the joints to make a stronger cabinet. Plus, a clear, plastic door panel lets
Shaker Classic Change the legs to change the look
 Shaker Classic Change the legs to change the look 2 Ways B Y C H R I S T I A N BECKSVOORT not long ago, a couple ordered a set of cherry side tables from me, one for each side of their pencil-post bed.
A Shaker Sewing Stand
 America s leading woodworking authority Step by Step construction instruction. A Shaker Sewing Stand A complete bill of materials. Exploded view and elevation drawings. How-to photos with instructive captions.
While creating a two-wall
 Ready-To-Assemble Cabinets Outfit your shop in a weekend or less. By Gary Lombard with Jim Harrold 32 woodcraftmagazine.com Aug/Sept 2013 While creating a two-wall or larger shop (or a kitchen, for that
Dress up your dining room with this Southern delicacy. that was used to serve drinks after a hunt. Breeches and jodhpurs are optional.
 Dress up your dining room with this Southern delicacy that was used to serve drinks after a hunt. Breeches and jodhpurs are optional. Huntboard Classic Six-Legged My dad has been making this six-legged
End-On-End Dovetails D4R - CHAPTER 12
 D4R - CHAPTER End-On-End Dovetails 4 While you have the router set up for half-blind dovetails, it is a good time to try end-on-end dovetails. If you have not yet routed half-blind dovetails or read through
ENJOY THIS SELECTION FROM. Woodworking 101. Includes Step-by-Step Instructions for 8 Projects. Woodworking
 W ENJOY THIS SELECTION FROM Woodworking 101 Includes Step-by-Step Instructions for 8 Projects Woodworking 101 Aimé Fraser, Matthew Teague, and Joe Hurst-Wajszczuk To purchase your copy of Woodworking 101,
Project 17884EZ: Shaker End Table
 Project 17884EZ: Shaker End Table With its clean, simple lines, this piece is unmistakably Shaker style. Ours is made from cherry, a wood commonly used by Shaker craftsman, but we ve also seen this piece
Plans. Easy-to-Build Full-size Deluxe Murphy Bed Plan. For more plans, tools and hardware visit rockler.com
 Easy-to-Build Full-size Deluxe Murphy Bed Plan Build a full-size Deluxe Murphy Bed complete with decorative molding and matching side cabinets! Plans For more plans, tools and hardware visit rockler.com
15 Dovetail Jig. Instruction Manual. Part # 3452
 15 Dovetail Jig Instruction Manual Part # 3452 CAUTION: Please read, understand, and follow all manufacturers instructions, guidelines and owners manuals that come with your power tools. Peachtree Woodworking
Carcase Construction. Choosing and making the right joints. by Tage Frid
 Carcase Construction Choosing and making the right joints by Tage Frid Furniture construction is broken down into two main categories: frame and carcase. In frame construction, relatively narrow boards
DOCUMENT CHEST. Curly Maple, White Pine
 25 DOCUMENT CHEST Curly Maple, White Pine 100 MAKING THE DOCUMENT CHEST After the stock has been thicknessed, ripped to width, and cut to length, plough a 1/4" X 3 /8" groove on the inside faces of the
Woodline USA Woodline Spacer Fence System
 Woodline USA Woodline Spacer Fence System MADE IN THE USA Includes: (1) ¼ Spacer Fence (1) 3/8 Spacer Fence (1) ½ Spacer Fence (1) Hardware Package (1) 3 Piece Brass bar set (2) Setup Blocks Visit Us Online
Kitchen Upper Cabinet: Double Doors Cabinets from Scratch
 Kitchen Upper Cabinet: Double Doors by Cabinets from Scratch Our Home from Scratch LLC Page 1 Disclaimer Our Home from Scratch LLC and its legal owners cannot be held responsible for any loss, damage,
Adjustable Box Joint Jig. Richard Hicks on 8/24/2015. Box or Finger Joints
 Adjustable Box Joint Jig Richard Hicks on 8/24/2015 Box or Finger Joints Adjustable Box Joint Jig Richard Hicks on 8/24/2015 Box Joints are also called Finger Joints Because they have interlocking fingers
Dining Table with Two-Way Drawers
 Dining Table with Two-Way Drawers DOUBLE-FRONTED DRAWERS MAKE THIS PIECE UNIQUE With two drawer fronts, a center beam, plywood bottoms, and custom pulls, these drawers are both distinctive and durable.
Greene & Greene. Mailbox. by Seth Keller. Signature details create an elegant box. 2 AmericanWoodworker.com
 Greene & Greene Mailbox by Seth Keller Signature details create an elegant box. 2 AmericanWoodworker.com We needed a new mailbox, but I couldn t find an off-the-shelf version that I liked. So I decided
Classic Kitchen Island
 America s leading woodworking authority Step by Step construction instruction. A complete bill of materials. Classic Kitchen Island Exploded view and elevation drawings. How-to photos with instructive
Chess board. The true origins of chess are. from old wood scraps Michael T Collins makes a chessboard and a box to store the pieces
 What you will need: Combination plane with 3mm, 6mm and 13mm cutters Rip and cross cut saw Block and jack plane Marking gauge and knife Card scraper optional and try square Chess board from old wood scraps
Ahead of the curve 2 Part
 F&C PROJECT Ahead of the curve 2 Part In the second part of this series, Chris Tribe constructs the table for his stylised cabinet which we looked at last month in F&C Accuracy in turning the legs for
Congratulations on your purchase of the Divided Light Door Set. This set will help you create beautiful cabinet doors with true divided light panels.
 Divided Light Door Set User Instructions Congratulations on your purchase of the Divided Light Door Set. This set will help you create beautiful cabinet doors with true divided light panels. Following
Essential BOX JOINT JIG
 Essential BOX JOINT JIG Home in on precise finger joints with this table saw sled. By Ken Burton The box (or finger) joint is a remarkably strong, interlocking corner joint that can be quickly made on
Durable Outdoor Table
 54 F I N E W O O D W O R K I N G Durable Outdoor Table Ipé table will seat six and weather many seasons B Y D A V I D B E D R O S I A N Last summer brought a new pool to our backyard. With it came more
Serving Tray. When some good friends got married recently, An exercise in template-making yields a great gift project that s easy to duplicate
 Serving Tray An exercise in template-making yields a great gift project that s easy to duplicate END Create from 3 8 2 8" piece. By Geoff Noden When some good friends got married recently, I decided to
DIY Full-Size Captain s Bed with Storage. Addicted2DIY.com
 DIY Full-Size Captain s Bed with Storage Addicted2DIY.com Before beginning this project Please read through all of the plans as well as the blog post associated with this project. Always use safety precautions
Make a cupboard as a BCATS
 National Certificate in Building, Construction, and Allied Trades Skills (BCATS) Make a cupboard as a BCATS project Unit Standard 25921 Level 2, Credit 6 Name: Contents Reference Page What you need to
Modern Farmhouse Printer Cabinet. Addicted2DIY.com
 Modern Farmhouse Printer Cabinet Addicted2DIY.com Before beginning this project please read through all of the plans as well as the blog post associated with this project. Always use safety precautions
How to Build a Recessed Medicine Cabinet
 How to Build a Recessed Medicine Cabinet See post for install info http://www.hertoolbelt.com/recessed-medicine-cabinet/ Materials 6 Inset Cabinet Door Hinges 3 Latches 1 sheet Beadboard or 1/4 plywood
Kitchen Upper Cabinet: Single Door Cabinets from Scratch
 Kitchen Upper Cabinet: Single Door by Cabinets from Scratch Our Home from Scratch LLC Page 1 Disclaimer Our Home from Scratch LLC and its legal owners cannot be held responsible for any loss, damage, disappointment,
Patrol Box Plans by David J. Yarusso Troop 609
 Patrol Box Plans by David J. Yarusso Troop 609 Materials List: 1. One 4 x8 sheet of ½ thick cabinet grade (birch or oak) or AC plywood. If using AC grade, use the A grade surface on the outside for a clean
Single Pass Half-Blind Dovetails
 9 DR Pro - CHAPTER Single Pass Half-Blind Dovetails Why rout single pass dovetails on a variable spaced Leigh jig? Well, you just may need to reproduce or restore a late 9th or early 0th century drawer
I I. . i1 AD JUSTABLE SHELVES
 ADJUSTABLE SHELVES HAD BEEN TRYNG TO WORK out a really simple (read "fast") way to make an elegant wooden version of the old standby, metal standards and brackets. Although have seen many commercial versions
Kentucky 4H Wood Science Plans Notebook. Plans Level 3
 Kentucky 4H Wood Science Plans Notebook Plans Level 3 MATERIALS: 2 pieces wood 3/4 x 10 x 4 1 piece wood 3/4 x 12 x 4 2 pieces wood 3/4 x 3 x 2 5 1/2" 2 pieces wood 3/4 x 3 x 1 8 1 piece wood 2 x 4 x
Classic Project. Two-drawer Platform Bed. In this plan you ll find: Step-by-step construction instruction. A complete bill of materials.
 America s leading woodworking authority Classic Project In this plan you ll find: Step-by-step construction instruction. Two-drawer Platform Bed A complete bill of materials. Construction drawings and
craftsman rocker Classic style meets comfort in this sturdy oak rocking chair BY MICHAEL PEKOVICH 34 FiNE woodworking
 craftsman rocker Classic style meets comfort in this sturdy oak rocking chair BY MICHAEL PEKOVICH 34 FiNE woodworking photo, this page: Michael pekovich shape the rear legs designing a chair can be a tough
Router Table. In a recent article, I wrote about the router table I built for the Center. 5 Essential Jigs for the
 5 Essential Jigs for the Router Table Great fixtures and fences offer better control and new possibilities BY PETER SCHLEBECKER In a recent article, I wrote about the router table I built for the Center
Floating-Top Table. Creative joinery adds spark to this versatile piece
 Floating-Top Table Creative joinery adds spark to this versatile piece By Michael Pekovich 28 FINE woodworking This is one of those projects that almost wasn t. Rachel, my wife, had asked for a small,
Shaker Lap Desk. The classic Shaker lap desk, designed two centuries ago to. Celebrate pen and ink with this quintessential case
 Shaker Lap Desk Celebrate pen and ink with this quintessential case BY CHRISTIAN BECKSVOORT The classic Shaker lap desk, designed two centuries ago to function as a miniature traveling office, was the
Shoulder Plane. dovetailed. fine tools. Make an heirloom tool and learn the secret to creating double dovetails in metal it s easier than you think.
 fine tools dovetailed Shoulder Plane Make an heirloom tool and learn the secret to creating double dovetails in metal it s easier than you think. I ve always been fascinated by old, metal hand planes.
Ways to get the most out of your
 5 Ways to get the most out of your router table When you mount a router on a table, you expand your shop s potential. To help you take advantage of this potential, we assembled five router table techniques
30 FINE woodworking. Photo, this page: Michael Pekovich
 30 FINE woodworking Photo, this page: Michael Pekovich Arts & Crafts Bed White-oak bed is loaded with Stickley style and topped off with traditional inlay by Kevin Rodel This bed design is a close copy
Perfect Tapers. on the Tablesaw. Make tapered legs of all types, quickly and safely
 Perfect Tapers on the Tablesaw Make tapered legs of all types, quickly and safely B Y S T E V E L A T T A 30 F I N e W o o D W o r K I N G COPYRIGHT 2012 by The Taunton Press, Inc. Copying and distribution
Corner Cabinet. American. There is something about corner cabinets that spooks
 American Corner Cabinet The triangular shape of this project puts off most woodworkers. Here s a secret: It s actually quite easy to build. There is something about corner cabinets that spooks most woodworkers.
Tilt-Top Table Elegant project builds hand-tool and machine skills
 Tilt-Top Table Elegant project builds hand-tool and machine skills BY M A R I O R O D R I G U E Z As a woodworking instructor, I m always looking for interesting and challenging projects to present in
Copyright WilkerDos.com Dining Table. Project Designed By April Wilkerson - Plan Created By Jay Bates (jayscustomcreations.
 Copyright WilkerDos.com 2017 Project Designed By April Wilkerson - Plan Created By Jay Bates (jayscustomcreations.com) Layout & Shopping List Page 2 of 12 Layout & Shopping List Item Quantity Description
REINFORCING THE CORNERS OF FLAT FRAMES
 REINFORCING THE CORNERS OF FLAT FRAMES There are a number of different methods that may be used to join flat frame sides together. As most Woodworkers know, end grain glue joints are not nearly as strong
Framework joints FABRICATION - WOOD JOINTS. Corner joints. Tee joints. Worksheet 15a. Cable Educational Ltd
 FABRICATION - WOOD JOINTS The word: fabricate means to join together. Most wooden products are held together with adhesive. Adhesive works very well when the edge of a piece of wood is being glued to the
A Unique Cutting Board
 A Unique Cutting Board When I was asked to make a cutting board as a special gift, I wanted to do something new and eye-catching. Tired of squares and straight lines, I envisioned curving accents not shallow
Celebrate 100 years of PM with the fourth in our furniture series.
 Anniversary Desk Celebrate 100 years of PM with the fourth in our furniture series. With all the business involved in running a home, it's no wonder most of us run out of space to handle the paperwork.
Entrance Cabinet Plans
 Entrance Cabinet Plans www.andrewharriswoodwork.com Page 1 of 19 Introduction I have tried to ensure all steps are covered in these plans but if you find any errors in the plans or have a question then
Extendable Large Dovetail Jig
 Extendable Large Dovetail Jig Instruction Manual Part # 3458 CAUTION: Please read, understand, and follow all manufacturers instructions, guidelines and owners manuals that come with your power tools.
Ten Essential. These bits will conquer the majority of woodworking tasks. b y G a r y R o g o w s k i. Operating: handheld vs.
 Ten Essential Router Bits These bits will conquer the majority of woodworking tasks b y G a r y R o g o w s k i You ve bought a new router, unpacked it, and even found the switch on it. But that s only
Mortisting Stand. Premium Plan. In this plan you ll find: America s leading woodworking authority
 America s leading woodworking authority Premium Plan In this plan you ll find: Mortisting Stand Step-by-step construction instruction. A complete bill of materials. Construction drawings and related photos.
Project 11010EZ: Gun/Bookcase/Curio Cabinet
 Project 11010EZ: Gun/Bookcase/Curio Cabinet No man can be all things to all people, but this cabinet comes as close to fitting multiple uses as any inanimate object can. We ve pictured it as a gun cabinet
86N80.10 Economy Dovetail Jig
 86N80.10 Economy Dovetail Jig IMPORTANT: Before using your dovetail jig, it should be securely fastened to a workbench. For a temporary setup, attach the jig to a piece of ¾ thick plywood or MDF long and
Dovetail Saw Guides. Figure 1: Dovetail saw guide, exploded view. Guide Block. UHMW Friction Pad. Sliding Clamp. Rare-Earth Magnet
 Dovetail Saw Guides U.S. Pat. No. 6,607,016 Dovetail joints have traditionally been the hallmark of a cabinetmaker who had acquired an expert level of skill. They are also a mark of quality and attention
Workbench. Process Guide
 Workbench Process Guide Design, Lumber, Tools & Nails Made entirely from 2x and 4x construction lumber Hardware speeds up the consturction while also reduces the amount of planing we have to do by using
Build a Stout Workbench
 Build a Stout Workbench Tail vise is at the heart of this versatile bench by chris gochnour I ve done a fair amount of handplaning during my 32 years as a professional furniture maker, and I ve found that
Build a Bed Designed for Readers
 America s leading woodworking authority Step by Step construction instruction. Build a Bed Designed for Readers A complete bill of materials. Exploded view and elevation drawings. How-to photos with instructive
Classic Mitered Jewelry Box
 America s leading woodworking authority Premium Plan In this plan you ll find: Step-by-step construction instruction. A complete bill of materials. Construction drawings and related photos. Tips to help
Installation Guide. Pionite Decorative Surfaces One Pionite Road, Auburn, Maine PIONITE ( )
") Installation Guide A Subsidiary of Panolam Surface Systems SMPBRO00-012 6/14 Pionite decorative laminates are designed for finished interior surfaces which require high impact, wear and stain resistance
Installation Guide A Subsidiary of Panolam Surface Systems SMPBRO00-012 6/14 Pionite decorative laminates are designed for finished interior surfaces which require high impact, wear and stain resistance
MLCS Instructions for Bowl and Tray Template Kit #9176/#9179
 MLCS Instructions for Bowl and Tray Template Kit #9176/#9179 Tools Needed: Router 1-1/2 h.p. Minimum recommended with a 1/2 collet Forstner bit 3/4-2 recommended depending on template used Drill Press
ribbon handle box 2010 August Home Publishing Co.
 ribbon handle box 00 ugust Home Publishing Co. eature Project Ribbon Handle ox This imaginative design not only makes a wonderful gift, it s also a great way to build your woodworking skills. Ithink of
World. Old. Dining Table YOU CAN BUILD AN
 YOU CAN BUILD AN Old World Dining Table This design combines heavy oak timbers with period specific elements. The result brings an old world look to a modern sized dining table. Publisher: Jeff Branch
World. Old. Dining Table YOU CAN BUILD AN
 YOU CAN BUILD AN Old World Dining Table This design combines heavy oak timbers with period specific elements. The result brings an old world look to a modern sized dining table. Publisher: Jeff Branch
Arts & Crafts with an English Accent
 Arts & Crafts with an English Accent Desk and wall cabinet make an elegant matched set B y N a n c y H i l l e r For several years around the turn of the 20th century, an English manufacturing firm, Harris
MODERN BED FRAME ROCKLER BUILD IT WITH BUILD SIMPLIFY CUSTOMIZE. Plan Value $14.99
 BUILD Stock # Item 63446 Baltic Birch Plywood /2" x 24" x 30" (2 qty) Stick veneer - Maple 24" x 96" 3/8" Dowels - Birch Bed Connector Hardware I-Semble Platform Bed Frame - Queen 3/8" Beadlock Basic Starter
Flamingo. That s what I looked
 Plans N O W w w w. P l a n s N O W. c o m flip-seat Storage Bench Flamingo. That s what I looked like as I stood in the doorway perched on one leg, with my other foot raised so that I could untie the laces
Craftsman Clock. America s leading woodworking authority. Step by Step construction instruction. A complete bill of materials.
 America s leading woodworking authority Craftsman Clock Step by Step construction instruction. A complete bill of materials. Exploded view and elevation drawings. How-to photos with instructive captions.
Stand & Bowls. optional. Online Extra
 Online Extra optional Stand & Bowls Once you make a bowl using the jig and technique from Woodsmith No. 229, it s only natural to see what else you can do with it. The starting point is to make copies
Cherry Chest of Drawers. Dovetail joinery decorates this Shaker-inspired case piece
 Cherry Chest of Drawers Dovetail joinery decorates this Shaker-inspired case piece BY M I C H A E L P E K O V I C H DRESSER CONSTRUCTION Case top Rabbet, 9 6 in. deep 4 in. 0 7 8 in. 9 2 in. 4 in. Top
A quick and easy way to make a hidden reinforced miter joint
 A quick and easy way to make a hidden reinforced miter joint Text and photos by Jerry Work 2011 Carefully mitered corners add a touch of elegance to any square or rectangular piece. The problem is they
Join Neck and Body Wednesday, January 16, :08 PM
 ASL Breakdown Page 1 Join Neck and Body Wednesday, January 16, 2013 10:08 PM 1. 2. 3. 4. Charles did the following steps to speed things up: Lightly sanded the top of the lower bout with an orbital sander.
Jigsaw Puzzle Tray. Premium Plan. In this plan you ll find: America s leading woodworking authority
 America s leading woodworking authority Premium Plan In this plan you ll find: Step-by-step construction instruction. A complete bill of materials. Construction drawings and related photos. Tips to help