DARK EGYPT Hints, Tips & Tricks
|
|
|
- David Neal
- 5 years ago
- Views:
Transcription
1 DARK EGYPT Hints, Tips & Tricks Introduction I have created this PDF in order for you to get the maximum benefits and use from your copy of the Dark Egypt. During the creation of the pack I came across some great methods either by accident or by idea which can make even the most basic room segments come to life. With a little bit of thought and time you should be able to create some stunning environments with shape and density and above all great for simple or advanced game play. Dark Egypt was created with the thought in mind to be able to construct room segments for your environments that give you elements of real depth and fullness in order not to place so many entity s in a room which could give you some slow down if over-crowded. My main goal was to create a package that would give its user more elements of adventurous game play as used in games similar to Doom and Tomb Raider but with a different environment. Anyhow, please find time to have a look at this document whether you are stuck with a problem or if you are just after some ideas for your game. Have Fun Ross Hunt Aka.Rosstradamus Author of Dark Egypt *NOTE*- Images in this document do not represent the true colour and refinement of textures in the finished product.
2 Contents Entrance Doorways False Walls-(Inside-Outside-Inner Walls) False Corners-(Inside-Outside) Inner Walls Floor Based Units-(Extra Floors-Hatch s-grids-traps) Inner Doorways Corners-(Inside-Outside) Arches-(Entrance-Inside) Ceilings-(Extra-Floor Grids-Ceiling/Roof) Shaft Exits Credits Stairwells Pit Shaft Pit units
 depending on the effect you desire.")
3 Entrance Doorways (Entity) Firstly, use the B key on your keyboard to align the doorway with the room segment then depending on which room segment you are using. Just nudge the doorway either inwards or outwards (concave or convex) depending on the effect you desire. (see below)

4 Note: You may not need to do this with all of the doorways as some of them have been positioned already for a predefined effect. Entrance doorways were designed to be placed either at the entrance to rooms within a building or at the entrance to the building itself. They can also look good when doubled (one after another) or placed into corridors created by room segments. They are an alternative to arches which are also present in this package. See results below- (Concave effect) Screenshot taken from- Temple of Gold Back Room Return to Contents False Walls (Inside-Outside-Inner Walls) (Entity s) Firstly, false walls are walls which you can walk through just as if they weren t there. You can see the wall which looks solid but when you walk towards it and onwards you will see that you can pass straight through it.

5 They were created to give your games an extra element of adventure such as creating hidden rooms or corridors for your character to explore for or as entrances to trap rooms. Each false wall is slightly different from the others in the room you create with some kind of emblem or carving on them somewhere. All false wall icon s which appear in the entity editor of FPScreator are marked with the relevant emblem or carving to look for and you will find Map entity items in this package as well showing the signs to look for. (see below) False wall icon Screenshot taken from- Basic Room-01 False-Inside and Outside Walls Both inside and outside walls follow the same instructions for placement as the Entrance Doorways - (see above-page 3). *TIP*- I believe that these false walls must be placed with a room either side of them in order for them to fit perfectly, however they do work perfectly fine with a layout as shown in the image below.


6 This kind of layout works perfectly fine for false-inside & outside walls The result of this method can be viewed in the screenshot below. Screenshot taken from-temple of Gold-Back Room


7 False-Inner Walls The false inner walls work alongside the inner wall segments only within rooms constructed. There should be no need to nudge them backwards or forwards. You should, as with other entity segments, use the B key on your keyboard to align them with other segments. These walls can be coupled with any inside segment including inner rounded (corner) segments to create interesting inner rooms. *Tip*- If you change any of these false walls into Static Mode with the Y Key in the editor, they will become solid. Return to Contents False-Corners (Inside-Outside) Use the B key to align & the R key to rotate each corner unit in the editor. You can use false corners as you would do as normal corners, either as inwards or outwards (concave-convex). They can be placed anywhere within a room (if inside) or anywhere attached to a building (if outside). Just as all the false segments you can walk straight through them to lead you to hidden areas or possibly for your character to hide behind. (see below) Return to Contents Screenshot-taken from Hut 2-Pit level

8 Inner Walls (Segments) Inner walls are walls to be used within a room in a building and are a single unit (with no floor or ceiling segments attached). You must use the R key on your keyboard to rotate them & the B key to align, for the desired effect you would like. (see below) Some of the rooms are supplied with false inner wall units which are entity s so don t forget to have a look in the Entity Library to see if they are available for the section you are constructing. (see above) *TIP*- If you experiment a little with the inner walls you will find that they can be used in conjunction with corner units which can produce some great features to the interior of a room. (see below) The results of this editor can be seen in the screenshots below

 (Segments & Entity s) Make sure you")


9 Screenshots- Taken from Temple of Idol Worship-Style 1 Return to Contents Screenshots- Taken from Temple of Gold Floor Based Units (Extra Floors-Hatch s-grids-traps) (Segments & Entity s) Make sure you check out the various floor units in this package, whether segment or entity, as you will find that they will add much character to your room designs. Below, you will find a brief description of each unit type and a few tips for their usage.
.")
10 Extra Floors (Segments & Entity s) Extra floor units are really just units to add little changes to the floors within rooms and give a little more variety without spoiling the rooms overall looks. Some examples would be the base floor unit plus objects on them such as snakes, scorpions, prayer mats, damaged areas & hatch covers (explained later). To place a floor-extra as well as all other floor based units, you will have to use the F key on your keyboard, once you have chosen the desired unit, in order to place it without the FPSC editor created walls appearing around the unit. Then you can use the B key to align the unit in its desired placement. (Screenshots below) *TIP*- Remove any previous flooring in place already before you place your new floor units (especially when using entity floors). To do this, click the right mouse button on the unit you wish to remove when you are in floor mode (F key).

11 Screenshot-Taken from Temple of Idol Worship -Style 01 Floor Hatch s (Entity s) I designed the floor hatch units in order to cover up the ugly edges left on view, when a floor segment is removed for the purpose of creating a gateway for stairs or steps between two levels. The hatch s, I have found also give the floor in a room much more character. Most of the hatch units can be found in the entity library with the exception of those which do not carry any transparency elements. They come as either open-dynamic or closed-static. (screenshots-below) *TIP*- In the segment library, you will find some extra floor units which are designed to be placed alongside the floor hatch units. They contain the base floor for the room and the floor hatch cover in order to give the effect that the floor hatch can be closed. (screenshots-below) *TIP*- If you switch the floor hatch units from Dynamic mode to Static mode, you will no longer be able to pass through them. *TIP*- When using the B key to align the floor hatch with the main floor its best to push the B key twice for a snap into place fit.
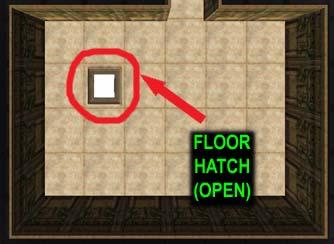


12 Floor Hatch s Screenshot-Taken from Temple of Gold -Back Room Screenshots-Taken from Temple of Gold -Back Room

 *TIP*- As with all extra floor based segments, they can only be placed in the rooms within the FPScreator environment, one floor unit away from the walls of the room.")
13 Floor Hatch plus Floor Extra Screenshot-Taken from Temple of Gold -Temple Floor Grids (Entity s) Floor grids were designed to give your character the chance to look down into the floor (level) below to view its contents. When placed well, they can add a real sense of depth to the environment you are creating as well as great game-play value. They can all be found in the Entity Library and most of them could be used within different rooms other than the rooms they are categorized in (just play around with them). (screenshots-below) *TIP*- As with all extra floor based segments, they can only be placed in the rooms within the FPScreator environment, one floor unit away from the walls of the room. *TIP*- All of the floor grids are in Static mode in the package but if you switch them to Dynamic mode you will be able to create Floor traps from them which you will be able to fall through to the floor (level) below. *TIP*- These grid floors could also become ceiling segments placed on single story buildings/rooms which I have found work well if used correctly.


14 The resulting screenshots from the layout of this editor can be viewed below. Top Level screenshots-taken from Temple of Detention -style-01

 and some of the traps are reasonably obvious which leave you with a feeling of caution.")
15 Bottom Level screenshots-taken from Temple of Gold -Back Room Floor Traps (Entity s) Floor traps do just what they are labelled as. They are simply floor segments that you can fall through to pits, tunnels, other traps or anything else you can think of. They are marked in the same way as the false walls as described on page 4 of this PDF. Some of the floor traps look just the same as other floor segments (making it harder to travel through rooms) and some of the traps are reasonably obvious which leave you with a feeling of caution. Overall, coupled with false walls, they can be great for making adventure games with an element of exploration involved. (screenshots-below) *TIP*- As mentioned before in this floor section the trap floor units can be placed by first switching to floor mode F key then aligned with the aid of the B key (pushed twice for best quick fit). *TIP*- Check out the pit levels in this package which were designed, with their shafts to fall through, to match up with trap floors. *TIP*- Again, if the trap floors are changed into Static mode (Y key) whilst in the editor, they will become solid so you can walk over them.


16 Typical Icon Return to Contents Screenshots-Taken from Temple of Idol Worship -Style-02 Inner Doorways (Entity s) Inner doorways are designed to fit in with the inner walls segments to give your room constructions a deeper sense of depth and realism. They can be used with corner segments as well to create great non-linear inner sections.


17 You can place them within any room and in any direction if used correctly by using the R key to rotate and the B key to align with other sections to achieve great results. (screenshots-below) *TIP*- Just try nudging these sections back and forth for different positions to see which you prefer and which work best. Screenshot-Taken from Temple of Gold Screenshots-Taken from Temple of Idol Worship -Style-02
 or at nearly any angle within a room.")


18 Return to Contents Screenshot-Taken from Temple of Idol Worship -Style-02 Corners-(Inside-Outside) (Segments) The corner segments in this package can be used in a variety of ways such as inwards or outwards (concave or convex) or at nearly any angle within a room. I have designed the corner segments to be of use in more ways other than just as corners so feel free to place them anywhere you think they might work well and take a look. The false corners (entity s) mentioned on page 7 can be used exactly in the way that these segment corners can be used. I feel that they can bring shape and depth to any interior or exterior segment configuration if experimented with. (screenshots-below) *TIP*- With certain barred corners try using a convex configuration against a flat room wall to create the effect of an outset cage.


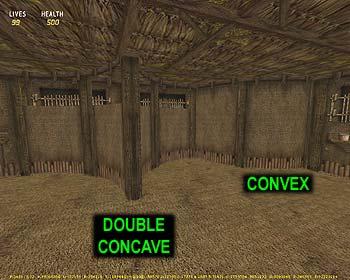
19 Screenshots above-taken from exterior of Basic Room -01 Interior-corner variations
. They are separated for a good reason which is that they both carry textures related to their own purpose.")

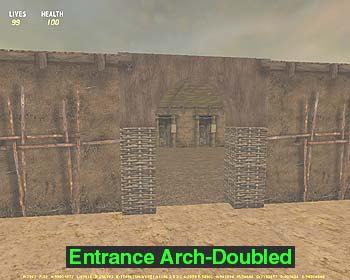
20 Return to Contents Screenshots-Taken from Village Hut -02 Arches-(Entrance-Inside) (Entity s) The arches supplied with this package have been put into two different categories (entrance arches & arches). They are separated for a good reason which is that they both carry textures related to their own purpose. The entrance arches have got textures relating to both the exterior and interior of the room segments they are placed under and the normal arches carry textures related to the interior only. Please feel free to try them all in different places as you might like the results that you come up with. The arches are best placed in the editor by using the B key for alignment but you may feel the need to nudge them inwards or outwards for better effect such as doubling up for the entrances which I have found looks very good. Use the R key to rotate the arches and try to fit them with corner units and inner walls at unusual angles. (screenshots-below)


21 Screenshots-Taken from Village Hut -Occupied Return to Contents Screenshots-Taken from Basic Room -03

 and some contain transparencies for your character to look out from (the sky) which are single textured.")
22 Ceilings-(Extra-Floor Grids- Ceiling/Roof) (Segments & Entity s) Even ceilings can be used to create some great effects for your environments. I have designed some extra ceilings which can be used just to add variation or stark difference. They can only be used on either single story buildings or as the ceiling leading to the roof of a building (highest point). Some of the ceilings have double textures (ceiling-roof) and some contain transparencies for your character to look out from (the sky) which are single textured. They should be used to suit the purpose of the room you are constructing. Even floor grids can be used for ceiling segments which give you great results to create an atmospheric room. (screenshots-below) Screenshot=Taken from Village Hut -02
 I have put together some single newly textured ceiling-roof")


.")
23 Screenshot-Taken from Temple of Detention Screenshot-Taken from Temple of Gold -Temple Ceiling/Roof (Segments) I have put together some single newly textured ceiling-roof segments so that your character can access the roof of a flat structure and use the tops of these structures for their game play, without having to see the floor texture from the room beneath them. They are also very useful when your character is at a high advantage point in a game and looking down at smaller buildings which will now look like they have a proper roof (even if flat). *TIP*- You could remove one of these segments from the ceiling/roof and replace it with one of the many floor hatch s provided in this pack to create an


24 entrance to the roof. You might also wish to, instead of a floor hatch, place a ceiling-sky view unit (from Entity s) and change it from static mode to dynamic mode using the Y key on your keyboard which will also give you access to the roof. *TIP*- These segments are best used by placing them last on the setup of your room structures. (screenshots-below) Return to Contents (Screenshots- hut-1-empty)
 the exit segment by 360 degrees.")

25 Shaft Exits (Entity s) Well, shaft exits just add a textured faceplate to the end of a shaft when placed at the end of a straight segment piece. *TIP*- They can become shaft entrances placed at the front of a straight segment piece, simply by rotating (R Key) the exit segment by 360 degrees. (screenshots-below) (Screenshots- Shaft-01) Return to Contents (Rotate 360 degrees to become a shaft entrance) Stairwells (Segments) Stairwell segments should save you time in creating a double set of steps leading either downwards or upwards. They are constructed as a single all in one unit with walls which can be placed between levels with no fuss. I realised that in doing this before in the conventional way (fitting walls to steps) was time consuming, fiddly and frustrating at times, so I decided to construct these units in a way which would save time and look quite good. These units come in many variations such as wooden steps with stone walls or wooden steps with organic walls and so on but they were designed to fit into the Dark Egypt pack with its textures. Obviously, feel free to try them with any other resources as

26 some of them might work well. They also work well with inner wall and corner segments attached to them if placed inside of a large room and with the addition of floor hatch s from the Entity library. I have drawn a diagram to show one of their uses which can be seen below. Return to Contents

27 Pit Shaft - Pit units (Segments) If you look into the Pit level folder in the segment library you will find two segments with the names Pit shaft & Pit shaft-long which are both all in one units that work in a vertical fashion. The Pit shaft unit is comprised of just one level height segment and the Pit shaft-long unit spans the height of two levels starting from the bottom and working upwards by two levels in the FPSCreator editor. These units can also save time in the same way as the Stairwell units work. They can be used to create a shaft to fall down through after stepping on a floor trap whether into another room (level) or into a Pit. Inside the same Pit level folder you will also find some more small Pit all in one unit s which can be added to the bottom of the Pit shaft units mentioned above or as separate smaller traps to fall into. As with the Pit shafts they can be used anywhere in your environment if used correctly. (Diagrams below) (Pit shaft demonstration)

28 (Pit shaft and Pit demonstrations) *TIP*- The Pit units are great for placing Hurt Zones in. Room objects such as crates could be placed in them in order for your character to climb out of the pit. *TIP*- Floor grids can be placed over them, within rooms or not, to give the impression of possible traps in the area surrounding your character and also for depth effects. Return to Contents
29 Credits Firstly, I wish to thank all at The Game Creators for creating an affordable product such as FPSCreator and for giving many the chance to build their own First Person Style games with ease. I would also like to thank Terry Schwarz of Data Tek for the program Signs which has been of great help in creating many of the segments seen in this pack and for any help and advise given on other issues. Big thanks to all in the FPSCreator Forums for their inspiration and I would like to wish them luck on their projects. All the best for the future Ross
30
DUNGEON FODDER MANUAL
 DUNGEON FODDER MANUAL INTRODUCTION This Model Pack was designed to create a basic Dungeon setting with Retro styled texturing for the user to create their Dungeon scenes with a RPG (Role Player Game) element
Tips & Guidelines. May your dungeons be beautiful! Square Tiles? Hand Drawn?
 Tips & Guidelines Square Tiles? We are aware of the large number of tile products available on the market for tabletop gaming, so we thank you for choosing to download this particular set. Until now Inked
ArchiCAD Tutorial: How to Trace 2D Drawings to Quickly Create a 3D Model
 ArchiCAD Tutorial: How to Trace 2D Drawings to Quickly Create a 3D Model Hello, this is Eric Bobrow of Bobrow Consulting Group, creator of the ArchiCAD MasterTemplate with another ArchiCAD video tip. In
FLAMING HOT FIRE TEXT
 FLAMING HOT FIRE TEXT In this Photoshop text effects tutorial, we re going to learn how to create a fire text effect, engulfing our letters in burning hot flames. We ll be using Photoshop s powerful Liquify
COURSE UNIT 3. Plan Creation. Messerli EliteCAD Version
 Messerli EliteCAD Version 13 27.09.2013 COURSE UNIT 3 Plan Creation Switzerland: Austria: Germany: Messerli Informatik AG Messerli Informatik GmbH Messerli Informatik GmbH Pfadackerstrasse 6 Hamoderstraße
Rendering a perspective drawing using Adobe Photoshop
 Rendering a perspective drawing using Adobe Photoshop This hand-out will take you through the steps to render a perspective line drawing using Adobe Photoshop. The first important element in this process
Getting Started. with Easy Blue Print
 Getting Started with Easy Blue Print User Interface Overview Easy Blue Print is a simple drawing program that will allow you to create professional-looking 2D floor plan drawings. This guide covers the
House Design Tutorial
 House Design Tutorial This House Design Tutorial shows you how to get started on a design project. The tutorials that follow continue with the same plan. When you are finished, you will have created a
House Design Tutorial
 Chapter 2: House Design Tutorial This House Design Tutorial shows you how to get started on a design project. The tutorials that follow continue with the same plan. When you are finished, you will have
House Design Tutorial
 House Design Tutorial This House Design Tutorial shows you how to get started on a design project. The tutorials that follow continue with the same plan. When you are finished, you will have created a
Floorplanner Editor Manual
 Editor Manual Floorplanner Editor Manual 1 Overview 2 Canvas a 2D view b View Settings 3 3D view a Orbital and walkthrough mode b How to navigate c Adding cameras d Scenery image e Create a render 4 Sidebar
Training Guide 1 Basic Construction Overview. (v1.1)
") Training Guide 1 Basic Construction Overview (v1.1) Contents Training Guide 1 Basic Construction Overview... 1 Creating a new project... 3 Entering Measurements... 6 Adding the Walls... 10 Inserting Doors
Training Guide 1 Basic Construction Overview (v1.1) Contents Training Guide 1 Basic Construction Overview... 1 Creating a new project... 3 Entering Measurements... 6 Adding the Walls... 10 Inserting Doors
Kitchen and Bath Design Tutorial
 Adding Cabinets Chapter 5: Kitchen and Bath Design Tutorial This tutorial continues where the Materials Tutorial left off. You should save this tutorial using a new name to archive your previous work.
lindab comfort Step by step manual DIMcomfort 4.0
 Step by step manual DIMcomfort 4.0 1 Contents Start-up DIMcomfort 4.0 3 Room Setup 4 Room information 4 Dimensions 5 Comfort zone 6 Dimension criteria 7 Selection of air terminal devices 8 Product search
Floorplanner Drawing Manual
 Floorplanner Floorplanner Drawing Manual Drawing Manual Floorplanner lets you easily create interactive floorplans and publish them online. This manual explains the floorplanner drawing tool. For details
House Design Tutorial
 Chapter 2: House Design Tutorial This House Design Tutorial shows you how to get started on a design project. The tutorials that follow continue with the same plan. When you are finished, you will have
House Design Tutorial
 Chapter 2: House Design Tutorial This House Design Tutorial shows you how to get started on a design project. The tutorials that follow continue with the same plan. When we are finished, we will have created
ACAD-BAU TUTORIAL For BricsCAD platform
 ACAD-BAU TUTORIAL WWW.ARHINOVA.SI For BricsCAD platform August 06 WORKSPACE ACAD-BAU RIBBON ACAD-BAU CONTROL BAR F ACAD-BAU PALETTES BASIC SETTINGS Use New command and open the template called ACB_International.DWT.
Cato s Hike Quick Start
 Cato s Hike Quick Start Version 1.1 Introduction Cato s Hike is a fun game to teach children and young adults the basics of programming and logic in an engaging game. You don t need any experience to play
33-2 Satellite Takeoff Tutorial--Flat Roof Satellite Takeoff Tutorial--Flat Roof
 33-2 Satellite Takeoff Tutorial--Flat Roof Satellite Takeoff Tutorial--Flat Roof A RoofLogic Digitizer license upgrades RoofCAD so that you have the ability to digitize paper plans, electronic plans and
Customized Foam for Tools
 Table of contents Make sure that you have the latest version before using this document. o o o o o o o Overview of services offered and steps to follow (p.3) 1. Service : Cutting of foam for tools 2. Service
Getting Started Guide
 SOLIDWORKS Getting Started Guide SOLIDWORKS Electrical FIRST Robotics Edition Alexander Ouellet 1/2/2015 Table of Contents INTRODUCTION... 1 What is SOLIDWORKS Electrical?... Error! Bookmark not defined.
Version 14 COURSE UNIT 5. Work Drawings
 Version 14 COURSE UNIT 5 Work Drawings Table of Contents Introduction... 2 Preparation... 3 Switch representation mode... 5 Parameter representation mode... 7 Change imaging depth... 10 Modify external
Instruction Manual. 1) Starting Amnesia
 Starting Amnesia") Instruction Manual 1) Starting Amnesia Launcher When the game is started you will first be faced with the Launcher application. Here you can choose to configure various technical things for the game like
Instruction Manual 1) Starting Amnesia Launcher When the game is started you will first be faced with the Launcher application. Here you can choose to configure various technical things for the game like
Penumbra - Requiem. Game introduction and walkthrough
 Penumbra - Requiem Game introduction and walkthrough Introduction Penumbra Requiem is an expansion to Penumbra Black Plague and is to be considered an epilogue to that game and not as a new episode in
Annex IV - Stencyl Tutorial
 Annex IV - Stencyl Tutorial This short, hands-on tutorial will walk you through the steps needed to create a simple platformer using premade content, so that you can become familiar with the main parts
Landscaping Tutorial. Adding a Driveway Adding Library Objects to Your Plan
 Landscaping Tutorial This tutorial describes how to use Home Designer Pro s Terrain Tools. In it, you will learn how to add elevation information to your terrain, how to create terrain features, and how
ARCHLine.XP Interior Windows. Learning Interior. Learning material for the basics of ARCHLine.XP Interior. ARCHLine.
 ARCHLine.XP Interior 2010 Windows Learning Interior Learning material for the basics of ARCHLine.XP Interior ARCHLine.XP Interior Information in this document is subject to change without notice and does
Unit 6.5 Text Adventures
 Unit 6.5 Text Adventures Year Group: 6 Number of Lessons: 4 1 Year 6 Medium Term Plan Lesson Aims Success Criteria 1 To find out what a text adventure is. To plan a story adventure. Children can describe
Landscaping Tutorial
 Landscaping Tutorial This tutorial describes how to use Home Designer Architectural s Terrain Tools. In it, you will learn how to add elevation information to your terrain, how to create terrain features,
Landscaping Tutorial. Chapter 5:
 Chapter 5: Landscaping Tutorial This tutorial was written to help you learn how to use Home Designer Landscape and Deck s Terrain tools. In this tutorial, you will learn how to add elevation information
Advance Concrete. Tutorial
 Advance Concrete Tutorial Table of contents About this tutorial... 9 How to use this guide... 10 Lesson 1: Creating a building grid... 11 Step 1: Create a default building grid... 11 Step 2: Set the distances
Deck Tutorial. Decks and Porches. Drawing Decks
 Deck Tutorial The Deck Tutorial continues where the Landscaping Tutorial left off, and explains how to create a deck off the back of the house and connect it to the terrain with an exterior staircase.
Making Your World - the world building tutorial
 Making Your World - the world building tutorial The goal of this tutorial is to build the foundations for a very simple module and to ensure that you've picked up the necessary skills from the other tutorials.
The purpose of this document is to help users create their own TimeSplitters Future Perfect maps. It is designed as a brief overview for beginners.
 MAP MAKER GUIDE 2005 Free Radical Design Ltd. "TimeSplitters", "TimeSplitters Future Perfect", "Free Radical Design" and all associated logos are trademarks of Free Radical Design Ltd. All rights reserved.
New Sketch Editing/Adding
 New Sketch Editing/Adding 1. 2. 3. 4. 5. 6. 1. This button will bring the entire sketch to view in the window, which is the Default display. This is used to return to a view of the entire sketch after
Chief Architect X3 Training Series. Layers and Layer Sets
 Chief Architect X3 Training Series Layers and Layer Sets Save time while creating more detailed plans Why do you need Layers? Setting up Layer Lets Adding items to layers Layers and Layout Pages Layer
AreaSketch Pro Overview for ClickForms Users
 AreaSketch Pro Overview for ClickForms Users Designed for Real Property Specialist Designed specifically for field professionals required to draw an accurate sketch and calculate the area and perimeter
Deck Tutorial. Decks and Porches. Drawing Decks
 Deck Tutorial The Deck Tutorial continues where the Landscaping Tutorial left off, and explains how to create a deck off the back of the house and connect it to the terrain with an exterior staircase.
Ornamental Pro 2010 Component Drawing Manual
 Ornamental Pro 2010 Component Drawing Manual Introduction This manual explains the methods for creating your own components for the component library. Component mode is for advanced users only. You must
ARCHICAD Introduction Tutorial
 Starting a New Project ARCHICAD Introduction Tutorial 1. Double-click the Archicad Icon from the desktop 2. Click on the Grey Warning/Information box when it appears on the screen. 3. Click on the Create
Getting Started in Eagle Professional Schematic Software. Tyler Borysiak Team 9 Manager
 Getting Started in Eagle 7.3.0 Professional Schematic Software Tyler Borysiak Team 9 Manager 1 Executive Summary PCBs, or Printed Circuit Boards, are all around us. Almost every single piece of electrical
CC3 and Perspectives A Campaign Cartographer 3/3+ Tutorial. Part 1 - Basics
 CC3 and Perspectives A Campaign Cartographer 3/3+ Tutorial by Joachim de Ravenbel Part 1 - Basics Conventions Throughout this tutorial, I will use a color coding to clearly identify all the keywords: Sheet
Sketch-Up Guide for Woodworkers
 W Enjoy this selection from Sketch-Up Guide for Woodworkers In just seconds, you can enjoy this ebook of Sketch-Up Guide for Woodworkers. SketchUp Guide for BUY NOW! Google See how our magazine makes you
CAD Tutorial 24: Step by Step Guide
 CAD TUTORIAL 24: Step by step CAD Tutorial 24: Step by Step Guide Level of Difficulty Time Approximately 40 50 minutes Lesson Objectives To understand the basic tools used in SketchUp. To understand the
How to Draw a Cartoon Castle
 How to Draw a Cartoon Castle Easy Fast Massive castles are a sight to behold. At first they were build to protect the inhabitants and the surrounding areas. Later they evolved into decorated residents
The Revolve Feature and Assembly Modeling
 The Revolve Feature and Assembly Modeling PTC Clock Page 52 PTC Contents Introduction... 54 The Revolve Feature... 55 Creating a revolved feature...57 Creating face details... 58 Using Text... 61 Assembling
Deck Tutorial. Chapter 8: Decks and Porches
 Chapter 8: Deck Tutorial Now we ll continue where the Landscaping Tutorial left off and create a deck off the back of the house, connecting it to the terrain with an exterior staircase. You may want to
Introduction Choose and Tell: Legends
 Introduction This beautifully illustrated story program allows the learner to select a legendary hero and create their own adventure. This CD takes your learners on a magical adventure based on legends
Using Google SketchUp
 Using Google SketchUp Opening sketchup 1. From the program menu click on the SketchUp 8 folder and select 3. From the Template Selection select Architectural Design Millimeters. 2. The Welcome to SketchUp
Deck Tutorial. Chapter 6: Decks and Porches
 Chapter 6: Deck Tutorial Now we ll continue where the Landscaping Tutorial left off and create a deck off the back of the house, connecting it to the terrain with an exterior staircase. You may want to
Using Dynamic Views. Module Overview. Module Prerequisites. Module Objectives
 Using Dynamic Views Module Overview The term dynamic views refers to a method of composing drawings that is a new approach to managing projects. Dynamic views can help you to: automate sheet creation;
Getting Started with. Vectorworks Architect
 Getting Started with Vectorworks Architect Table of Contents Introduction...2 Section 1: Program Installation and Setup...6 Installing the Vectorworks Architect Program...6 Exercise 1: Launching the Program
Quilt Pro 6 Lesson Quilt in a Quilt
 Quilt Pro 6 Lesson Quilt in a Quilt Quilt in a Quilt The Inner Quilt This quilt is a very complex design. We will cover a unique technique not covered in the manual. While any one can master the techniques
Kitchen and Bath Design Tutorial
 Kitchen and Bath Design Tutorial This tutorial continues where the Interior Design Tutorial left off. You should save this tutorial using a new name to archive your previous work. The tools and techniques
Drawing a Living Room and Family Room Floorplan
 Appendix C Drawing a Living Room and Family Room Floorplan In this chapter, you will learn the following to World Class standards: Draw a Living Room and Family Room Floorplan Draw the Walls and Stairs
Introduction. The basics
 Introduction Lines has a powerful level editor that can be used to make new levels for the game. You can then share those levels on the Workshop for others to play. What will you create? To open the level
Kitchen and Bath Design Tutorial
 Kitchen and Bath Design Tutorial This tutorial continues where the Interior Design Tutorial left off. You should save this tutorial using a new name to archive your previous work. The tools and techniques
BSketchList 3D. BSoftware for the Design and Planning of Cabinetry and Furniture RTD AA. SketchList Inc.
 1 BSketchList 3D 1 BSoftware for the Design and Planning of Cabinetry and Furniture 2 RTD10000651AA 2 Overview of SketchList 3D SketchList 3D is a software program that aids woodworkers in the design and
G54GAM Lab Session 1
 G54GAM Lab Session 1 The aim of this session is to introduce the basic functionality of Game Maker and to create a very simple platform game (think Mario / Donkey Kong etc). This document will walk you
[INTERMEDIATE 3D MODELING IN TINKERCAD]
![[INTERMEDIATE 3D MODELING IN TINKERCAD]](/thumbs/72/67480326.jpg "[INTERMEDIATE 3D MODELING IN TINKERCAD]") [INTERMEDIATE 3D MODELING IN TINKERCAD] WHAT IS ADVANCED 3D MODELING? The basics of 3D modeling will only get you so far; in order to model more complex and unique items you ll need to learn how to use
[INTERMEDIATE 3D MODELING IN TINKERCAD] WHAT IS ADVANCED 3D MODELING? The basics of 3D modeling will only get you so far; in order to model more complex and unique items you ll need to learn how to use
Intro to One Point Perspective
 Intro to One Point Perspective Horizon Line - The horizon line in perspective drawing is a horizontal line across the picture. It is always at eye level - its placement determines where we seem to be looking
AECOsim Building Designer. Quick Start Guide. Chapter 2 Making the Mass Model Intelligent Bentley Systems, Incorporated.
 AECOsim Building Designer Quick Start Guide Chapter 2 Making the Mass Model Intelligent 2012 Bentley Systems, Incorporated www.bentley.com/aecosim Table of Contents Making the Mass Model Intelligent...3
Sketch technique. Introduction
 Sketch technique Introduction Although we all like to see and admire well crafted illustrations, as a professional designer you will find that these constitute a small percentage of the work you will produce.
Game Maker Tutorial Creating Maze Games Written by Mark Overmars
 Game Maker Tutorial Creating Maze Games Written by Mark Overmars Copyright 2007 YoYo Games Ltd Last changed: February 21, 2007 Uses: Game Maker7.0, Lite or Pro Edition, Advanced Mode Level: Beginner Maze
Student + Instructor:
 BLUE boxed notes are intended as aids to the lecturer RED boxed notes are comments that the lecturer could make Show 01 Solid Modeling Intro slides quickly. SolidWorks Layout slides are on EEIC for reference
Chapter 6 Title Blocks
 Chapter 6 Title Blocks In previous exercises, every drawing started by creating a number of layers. This is time consuming and unnecessary. In this exercise, we will start a drawing by defining layers
QUICKSTART COURSE - MODULE 1 PART 2
 QUICKSTART COURSE - MODULE 1 PART 2 copyright 2011 by Eric Bobrow, all rights reserved For more information about the QuickStart Course, visit http://www.acbestpractices.com/quickstart Hello, this is Eric
84 part video tutorial training course. The course is 100% free with no catches or exclusions. You don
 Please Note: If you're new to Revit, you may be interested in my " Beginner's Guide to Revit Architecture " 84 part video tutorial training course. The course is 100% free with no catches or exclusions.
CODINCA. Print & Play. Contained in this document are the files needed to print out and make the following game components:
 CODINCA Print & Play Contained in this document are the files needed to print out and make the following game components: 1 Playing Board 16 Playing Tiles 24 Key Discs 24 Trap Cards 4 Luck Action Cards
A Training Course in Visual Building. Visual Building. A Training Course in Visual Building
 Visual Building A Training Course in Visual Building 1 Credits Copyright Copyright Visual Building Ltd 2013 Visual Building is a registered trademark of Visual Building Ltd This document can be downloaded,
Starting a 3D Modeling Part File
 1 How to Create a 3D Model and Corresponding 2D Drawing with Dimensions, GDT (Geometric Dimensioning and Tolerance) Symbols and Title Block in SolidWorks 2013-2014 By Edward Locke This tutorial will introduce
Replacing Pool Walls. by Tiko, 25 November Introduction
 Introduction I m often asked how we can replace the game s default swimming pool walls with new ones of our own, in versions of the game prior to the Seasons expansion (which allows us to replace just
2D Platform. Table of Contents
 2D Platform Table of Contents 1. Making the Main Character 2. Making the Main Character Move 3. Making a Platform 4. Making a Room 5. Making the Main Character Jump 6. Making a Chaser 7. Setting Lives
Heavy Station Kit base 2
 The huge loads are distributed on the strong support pillars, securing space for the bunker or the center of operations. This heavy looking interior/exterior/top-down Kit is made to suit extreme environments
How to assemble the Reims Gueux Pit Centre Module #005
 How to assemble the Reims Gueux Pit Centre Module #005 We recommend quick drying super glue for our models. Just a few drops on the joining edges, press and hold them for a few seconds and the connection
ExtrAXION. Extracting Drawing data. Benefits.
 ExtrAXION Extracting Drawing data ExtrAXION is the simplest and most complete quantity takeoff software tool for construction plans. It has the ability to measure on vector files CAD (dwg, dxf, dgn, emf,
1 Sketching. Introduction
 1 Sketching Introduction Sketching is arguably one of the more difficult techniques to master in NX, but it is well-worth the effort. A single sketch can capture a tremendous amount of design intent, and
Applied Precast Concrete Detailing
 Applied Precast Concrete Detailing Tekla Structures 11.0 August 30, 2005 Copyright 2005 Tekla Corporation Copyright 2005 Tekla Corporation Applied Precast Concrete Detailing i Copyright 2005 Tekla Corporation
Tutorial 2: Setting up the Drawing Environment
 Drawing size With AutoCAD all drawings are done to FULL SCALE. The drawing limits will depend on the size of the items being drawn. For example if our drawing is the plan of a floor 23.8m X 15m then we
Photoshop Elements Hints by Steve Miller
 2015 Elements 13 A brief tutorial for basic photo file processing To begin, click on the Elements 13 icon, click on Photo Editor in the first box that appears. We will not be discussing the Organizer portion
Tutorial: Creating maze games
 Tutorial: Creating maze games Copyright 2003, Mark Overmars Last changed: March 22, 2003 (finished) Uses: version 5.0, advanced mode Level: Beginner Even though Game Maker is really simple to use and creating
REVIT - RENDERING & DRAWINGS
 TUTORIAL L-15: REVIT - RENDERING & DRAWINGS This Tutorial explains how to complete renderings and drawings of the bridge project within the School of Architecture model built during previous tutorials.
A Quick Spin on Autodesk Revit Building
 11/28/2005-3:00 pm - 4:30 pm Room:Americas Seminar [Lab] (Dolphin) Walt Disney World Swan and Dolphin Resort Orlando, Florida A Quick Spin on Autodesk Revit Building Amy Fietkau - Autodesk and John Jansen;
Kitchen and Bath Design Tutorial
 Kitchen and Bath Design Tutorial This tutorial continues where the Interior Design Tutorial left off. You should save this tutorial using a new name to archive your previous work. The tools and techniques
Deck Tutorial. Chapter 8: Decks and Porches
 Decks and Porches Chapter 8: Deck Tutorial Now we ll continue where the Landscaping Tutorial left off and create a deck off the back of the house, connecting it to the terrain with an exterior staircase.
FLORAL CLUTCH SEWING SUPPLIES
 creative 1.5 FLORAL CLUTCH Create this beautiful floral clutch decorated with embroideries from the PFAFF creative 1.5 sewing and embroidery machine. The Embroidery Intro PC Software makes it easy to combine
How to assemble the Reims Gueux Pit End Modules #005
 How to assemble the Reims Gueux Pit End Modules #005 Depending on which kit you have purchased you will either have a pair of end sections, some centre sections or both. We will describe building of the
Scaffolding Software iscaf - Design v6.50. New Features. August 2015
 Scaffolding Software iscaf - Design v6.50 August 2015 2010-2015 iscaf - Design : 6.5 (August, 2015) Windows 10 No Problem! All our software runs on Windows 10. iscaf is also optimized for 64-bit operating
aspexdraw aspextabs and Draw MST
 aspexdraw aspextabs and Draw MST 2D Vector Drawing for Schools Quick Start Manual Copyright aspexsoftware 2005 All rights reserved. Neither the whole or part of the information contained in this manual
EG1003 Help and How To s: Revit Tutorial
 EG1003 Help and How To s: Revit Tutorial Completion of this tutorial is required for Milestone 1. Include screenshots of it in your Milestone 1 presentation. Downloading Revit: Before beginning the tutorial,
A Training Course in Visual Building. Visual Building. A Training Course in Visual Building
 Visual Building A Training Course in Visual Building 1 Credits Copyright Copyright Visual Building Ltd 2014 Visual Building is a registered trademark of Visual Building Ltd This document can be downloaded,
Movie Merchandising. Movie Poster. Open the Poster Background.psd file. Open the Cloud.jpg file.
 Movie Poster Open the Poster Background.psd file. Open the Cloud.jpg file. Movie Merchandising Choose Image>Adjustments>Desaturate to make it a grayscale image. Select the Move tool in the Toolbar and
Advance Dimensioning and Base Feature Options
 Chapter 4 Advance Dimensioning and Base Feature Options Learning Objectives After completing this chapter you will be able to: Dimension the sketch using the autodimension sketch tool. Dimension the sketch
Learning Guide. ASR Automated Systems Research Inc. # Douglas Crescent, Langley, BC. V3A 4B6. Fax:
 Learning Guide ASR Automated Systems Research Inc. #1 20461 Douglas Crescent, Langley, BC. V3A 4B6 Toll free: 1-800-818-2051 e-mail: support@asrsoft.com Fax: 604-539-1334 www.asrsoft.com Copyright 1991-2013
We hope you enjoy the set. Good luck for the Indian Puzzle Championship! 3 A B C 4 H D 5 G F E 7 A B 8 H 9 G F
 Notes:. All Puzzle rules have been copied from the IP 0 Instruction booklet. Participants are advised to have a look at the booklet before trying out these puzzles, as they contain easier examples with
Modeling Basic Mechanical Components #1 Tie-Wrap Clip
 Modeling Basic Mechanical Components #1 Tie-Wrap Clip This tutorial is about modeling simple and basic mechanical components with 3D Mechanical CAD programs, specifically one called Alibre Xpress, a freely
Official Documentation
 Official Documentation Doc Version: 1.0.0 Toolkit Version: 1.0.0 Contents Technical Breakdown... 3 Assets... 4 Setup... 5 Tutorial... 6 Creating a Card Sets... 7 Adding Cards to your Set... 10 Adding your
AutoCAD Tutorial First Level. 2D Fundamentals. Randy H. Shih SDC. Better Textbooks. Lower Prices.
 AutoCAD 2018 Tutorial First Level 2D Fundamentals Randy H. Shih SDC PUBLICATIONS Better Textbooks. Lower Prices. www.sdcpublications.com Powered by TCPDF (www.tcpdf.org) Visit the following websites to