REVIT - RENDERING & DRAWINGS
|
|
|
- Esther Sanders
- 5 years ago
- Views:
Transcription

1 TUTORIAL L-15: REVIT - RENDERING & DRAWINGS This Tutorial explains how to complete renderings and drawings of the bridge project within the School of Architecture model built during previous tutorials. This tutorial is number 15 out of 14 previous video-style tutorials. The following topics will be explained in the next pages: 1) Applying materials to items within the Conceptual Design Environment. 2) Bringing a Conceptual Mass Bridge into the Project Environment. 3) Camera Views & Successful Render Setup. 4) 11x17 Titleblocks & Drawings By Jeremy L Roh, Professor of BIMethods & Co-Professor of Computational Practice UNC Charlotte s School of Architecture
 Once the element is selected, in the Properties Box under Material, left-click on the phase <By Category>. Then click on the gray button that shows up in the right side of that box.")
2 3) In the Material Dialog box, click on Default as the material. 4) Click on the Duplicate icon. 2) Once the element is selected, in the Properties Box under Material, left-click on the phase <By Category>. Then click on the gray button that shows up in the right side of that box. 1) Select the element that you want to apply a material to by tabbing over and left-clicking as necessary. Note that if the element is a Curtain Panel Family, there are other steps associated with that process that will be covered in future slides. This step covers elements directly modeled in this file.
3 1) Type a new unique name for the material and choose OK.
 Either choose a material from the Autodesk Library or click on the Color and choose a new RGB value from the pop-up dialog box.")
4 1) Click on the Appearance Tab. 2) Either choose a material from the Autodesk Library or click on the Color and choose a new RGB value from the pop-up dialog box. Sometimes colors go a long way instead of always relying on materials, but it is your choice. 3) Then choose OK

 The materials that you select in the Appearance tab only show up if your view is set to Realistic which is")
5 2) In order to apply materials to other components that have been loaded into this file such as Curtain Panel Pattern Based Families and Adaptive Components, you need to first select the component by tabbing over the item and left-clicking as necessary. 3) Select Edit Family. 1) The materials that you select in the Appearance tab only show up if your view is set to Realistic which is also how the material will show in the final rendering.

6 1) Once in the family file, go through the same steps as selecting the element, clicking on the material, duplicating an existing material name, and choose the appearance tab.


7 This, time for a different example, I have chosen a Plastic Smooth - Amber as the material.

8 When done adding materials, click on Load Into Project and choose to Overwrite the Version and Its Parameters.
9 Once complete with the parametric bridge component, and while having your SoA Project Model open in the background, you can also choose to Load Into Project. This will bring the Bridge into your project file as a family component.
 Choose the Floor Plan View to place your bridge on. 4) Place the bridge.")
10 2) Click on Home and then Component. 3) From the pull-down Properties Box, choose the Component Bridge File Name. 1) Choose the Floor Plan View to place your bridge on. 4) Place the bridge. Notice my bridge is too big for the space.
 If you set up your bridge to be parametric with parameters to change, you can make your change in the dialog box that pops-up.")
11 2) Click on Edit Type 1) To adjust the bridge to fit, click on the bridge component. to select it. 3) If you set up your bridge to be parametric with parameters to change, you can make your change in the dialog box that pops-up. This is the same as selecting Edit Family going back into the Family Environment File, changing the parameters there, and reloading it/overwriting it back into this file. Here I changed my Length parameter from 75 to 55 and then finally to 50. Note: If you didn t model your bridge parametrically, you would have to remodel everything by hand!
12 1) To setup a perspective camera view, select, View and then in the 3D View pulldown, select, Camera 4) A new view is added under 3D Views 2) Place the Camera Position 3) Plase the Camera Target

 Then select Scale (locked proportions) and type in the Width or the Height that you want the final output rendered view size")
13 4) To make sure the image is the correct size for printing, click on Size Crop 1) While in the 3D View, you can adjust the Eye and Target Elevation here. 3) Change how far the Far Clip Plane occurs or uncheck the box to make it infinite 2) You can also adjust the crop boundary with the drag handles 5) Then select Scale (locked proportions) and type in the Width or the Height that you want the final output rendered view size to be. Since the final project requirements is 11x17 drawings, you probably want dimensions close to that to be efficient.
14 2) Then select Switch Windows and select a view that is open in the background such as the Floor Plan View. 1) To make camera placement adjustments after the camera has been placed, select the crop region border.

15 1) Make adjustments in placement as needed.
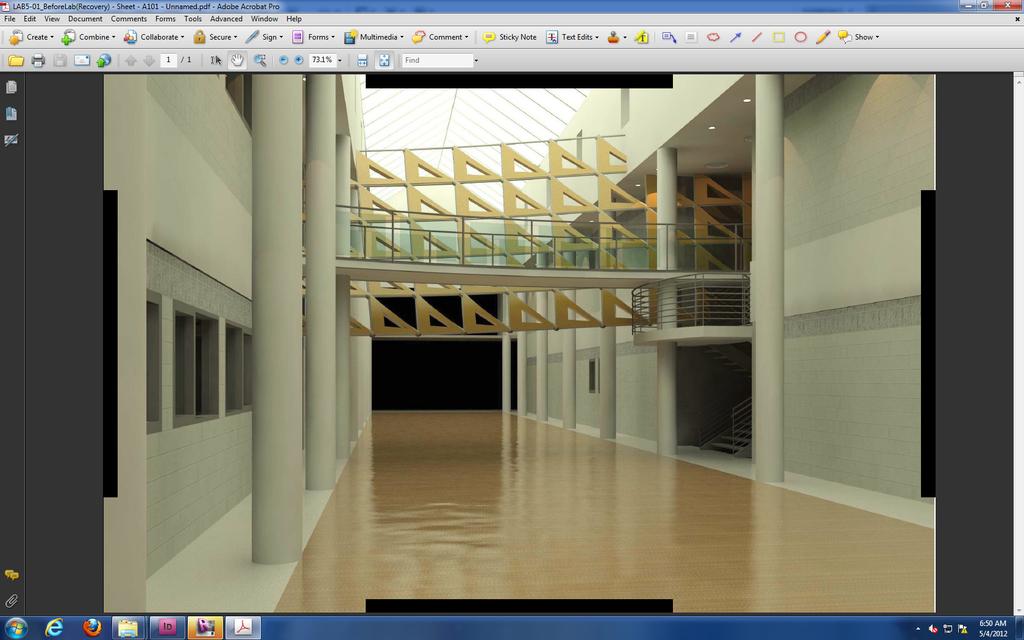
16 NOTE: The next steps are all you need to know for rendering a good interior shot in the SoA Model. I am not going to expand on other lighting concepts or setups. If you want to know more visit various video classes in the BIMethods portion of the class website for interior lighting, exterior solar setups, more on materials, and interior rendering setups. Also in the Resources section under Articles & Papers a lot more information is available in PDF format. The next slides also assume that you have setup a Translucent skylight material like we did in a previous class and it also assumes that you have set up your materials throughout the SoA Model. By the way, my model is missing something that should have been modeled in the Atrium Space. You should add in the boxed soffits that engage the columns at the 2nd Floor line to better complete your model. TIP: Photorealistic renderings can take anywhere from 1 to 5+ hours depending on your computer. Only render the views that present your project the best. All other views can be shown in other view display methods: Hidden Line, Hidden Line with Shadows On, Shaded or Realistic Display with or without shadows, etc. You can also copy your file over to another computer and render other views. Then export the renderings as images to file and then import them just like one of the first classes where we inserted an image of a floor plan. If you follow the next steps as I present them, any interior shot within the Salon should match the quality that will be shown herein.


17 1) Click on Manage 2) Click on Materials 3) Find your material and make sure that in the Appearance tab it has the following settings. Essentially, we are turning the skylight into one big interior light for a better photorealistic rendering.

18 Note: When in your 3D Perspective View, make sure in Massing & Site you click on Show Mass and the icon matches what is on my screen. Then goto your VG or Visibility Graphics and make sure Mass is checked.
19 3) Click Render 1) Next Click on View and then Render 2) Make sure your render settings match this dialog box.
 Rendering is added to the Project Browser 1) When rendering is done be sure to click Save to Project.")
20 3) Once you have saved to project, click close. 2) Rendering is added to the Project Browser 1) When rendering is done be sure to click Save to Project. If you do not and you close this render box, you will lose your rendering.
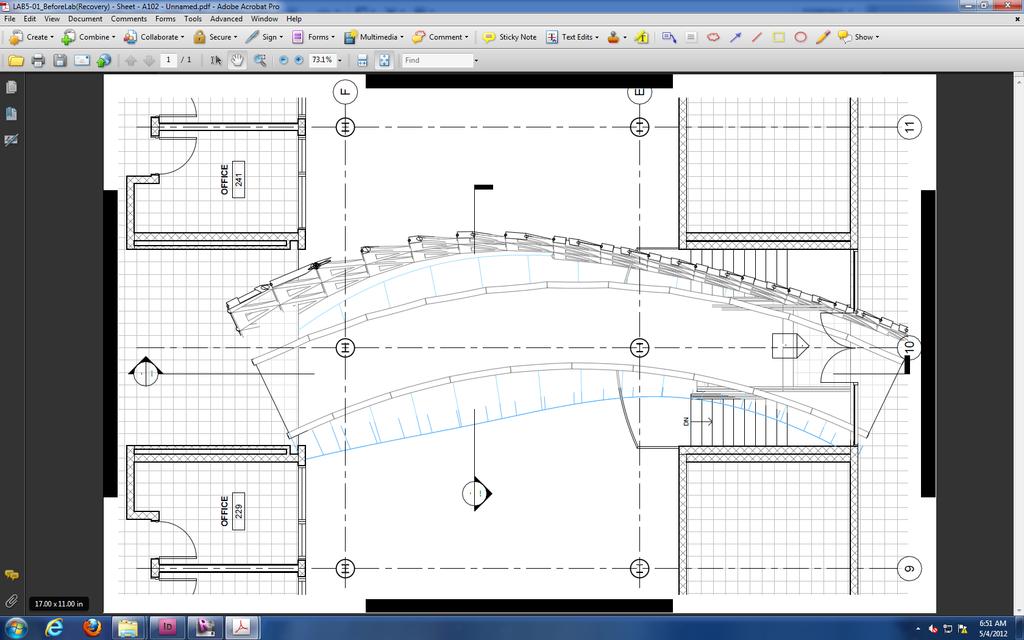
21 1) To begin creating drawings and renderings to be placed on 11x17 sheets, click View and then Sheet.
22 1) Click Load
23 1) Double-click into the folder Titleblocks

24 1) Select the B-size 11x17 titleblock
")
25 1) Select the B-size 11x17 titleblock 2) Select OK
 Left-click on the")
26 3) Click on Edit Family 1) Sheets are added to the Project Browser 2) Left-click on the Titleblock

27 1) Window around all the items except the border lines and hit Delete on your keyboard. 2) Click Load into Project

28 1) If you have multiple files open, you will be asked which file to load into. Choose your Project File

29 1) Overwrite the titleblock family file.
 You are now ready to drag and drop drawings and renderings onto this sheet.")
30 Note: To add more sections and other types of views including sheets, use the View tab. Sections and Callouts are available when in model views. 1) You are now ready to drag and drop drawings and renderings onto this sheet. 2) To place any drawing/model view or rendering onto a sheet, left-click and hold the name of the view from the Project Browser and drag it onto the sheet. Release the mouse button and then leftclick where to place it on the sheet. Note: For and view that is already made, you can right-click on the view and select Duplicate to create another view for cropping and scaling for a sheet. This is good if you want to maintain the original view in its original format. You will have to crop and scale for 11x17 sheets.
31 3) Or if you don t want to rename the view but want a different title, leftclick on the view and type a title here. 1) Viewport titles show the name of the View as the title. To change the name, see steps 2 and 3 2) You can either right-click on the view name and select rename.
 If you don t want a title, left-click")

32 3) Duplicate the Viewport Family Type 2) Select Edit Type 4) Give it a unique name 1) If you don t want a title, left-click on the viewport 4) Change Show Title from Yes to No by selecting the options in the drop-down menu once you left-click on the word Yes

33 1) For renderings, just be sure you made them slightly larger than the titleblock border and then what ever overlaps will not print. 2) Now lets setup a drawing, create a new Sheet

34 1) Again, select the B-size titleblock.
 Again, drag and drop drawing onto sheet")
35 2) You can rotate the drawing 90 degrees either way. 1) Again, drag and drop drawing onto sheet
 Right-click on the drawing on the screen and select Activate View to return to Paper space right-click")
36 1) Activate the View so that you can go through the Paper and back into the Model view all in the same screen. Click Activate View here OR 2) Right-click on the drawing on the screen and select Activate View to return to Paper space right-click again and select Deactivate View

37 1) Once in the activated view, Change the scale of the drawing as needed to fit the border.

 Check Annotation Crop to make sure you don t have floating")
38 2) Select and Drag the border shape handles to crop the drawing down to the sheet size. Select and Drag annotation items like column bubble and section marker ends. 3) Check Annotation Crop to make sure you don t have floating room names outside of the border. 1) Turn-on the Crop Region

39 1) When you are ready to print sheets, select Print from the applications menu. Note: If you made anything such as the bridge path with a conceptual mass family, be sure you have the Mass turned on in your VG visibility graphics in each view. Revit likes to turn masses off a lot.

40 If you have a mass family, when you hit print, you will get this dialog box which essentially says the same thing as my previous note. Just click Close. It is just telling you to double-check that your drawing looks right.
41 2) Select, create separate files or you can combine into one PDF if you want 3) Make sure printer is set to Adobe PDF and then choose Properties 4) Select 11x17 for PDF Page size. 1) Choose Selected views/sheets

42 1) Make sure Layout is Landscape and hit OK. 2) Select Setup
 Make sure the settings are Offset from Corner and No Margin and")
43 3) Give it a name and hit OK 2) Save printer settings as... 1) Make sure the settings are Offset from Corner and No Margin and Zoom is 100%
44 2) Check all the sheets that you want to print and hit OK 1) Click Select 3) Then select OK again here to start printing.

45 1) Click Save and Adobe Acrobat Printer should print your 11x17 and show you the final in Acrobat. These steps will repeat for each sheet to print. 2) Once you have your PDFs saved, send the PDFs to a printer to print.
46
47
48
49 END: NOTE: To learn more about construction documents view the class video at << >>. Essentially, construction documents are a way to present your project on paper like you would in studio by showing renderings, floor plans, sections, etc. The only difference is you would have more text, tags, and dimensions shown on the drawings like you will see in the link mentioned.
A Quick Spin on Autodesk Revit Building
 11/28/2005-3:00 pm - 4:30 pm Room:Americas Seminar [Lab] (Dolphin) Walt Disney World Swan and Dolphin Resort Orlando, Florida A Quick Spin on Autodesk Revit Building Amy Fietkau - Autodesk and John Jansen;
Revit Structure 2012 Basics:
 SUPPLEMENTAL FILES ON CD Revit Structure 2012 Basics: Framing and Documentation Elise Moss autodesk authorized publisher SDC PUBLICATIONS www.sdcpublications.com Schroff Development Corporation Structural
Rhinoceros modeling tools for designers. Using Layouts in Rhino 5
 Rhinoceros modeling tools for designers Using Layouts in Rhino 5 RH50-TM-LAY-Apr-2014 Rhinoceros v5.0, Layouts, Training Manual Revised April 8, 2014, Mary Fugier mary@mcneel.com Q&A April 8, 2014, Lambertus
EG1003 Help and How To s: Revit Tutorial
 EG1003 Help and How To s: Revit Tutorial Completion of this tutorial is required for Milestone 1. Include screenshots of it in your Milestone 1 presentation. Downloading Revit: Before beginning the tutorial,
Drawing Layouts Paper space & Model Space
 Drawing Layouts Paper space & Model Space Users of Bricscad will have seen the tabs at the bottom left of the drawings area labelled: Model, Layout1, Layout2 but may not know how to use them or what they
Kitchen and Bath Design Tutorial
 Adding Cabinets Chapter 5: Kitchen and Bath Design Tutorial This tutorial continues where the Materials Tutorial left off. You should save this tutorial using a new name to archive your previous work.
SMALL OFFICE TUTORIAL
 SMALL OFFICE TUTORIAL in this lesson you will get a down and dirty overview of the functionality of Revit Architecture. The very basics of creating walls, doors, windows, roofs, annotations and dimensioning.
Kitchen and Bath Design Tutorial
 Kitchen and Bath Design Tutorial This tutorial continues where the Interior Design Tutorial left off. You should save this tutorial using a new name to archive your previous work. The tools and techniques
AECOsim Building Designer. Quick Start Guide. Chapter 2 Making the Mass Model Intelligent Bentley Systems, Incorporated.
 AECOsim Building Designer Quick Start Guide Chapter 2 Making the Mass Model Intelligent 2012 Bentley Systems, Incorporated www.bentley.com/aecosim Table of Contents Making the Mass Model Intelligent...3
Zooming in on Architectural Desktop Layouts Alexander L. Wood
 December 2-5, 2003 MGM Grand Hotel Las Vegas Alexander L. Wood Code BD41-3L Take advantage of both AutoCAD and Autodesk Architectural Desktop Layout features. We'll look at the basics of setting up AutoCAD
ARCHICAD Introduction Tutorial
 Starting a New Project ARCHICAD Introduction Tutorial 1. Double-click the Archicad Icon from the desktop 2. Click on the Grey Warning/Information box when it appears on the screen. 3. Click on the Create
Materials Tutorial. Setting Materials Defaults
 Materials Tutorial Materials display on the surfaces of objects in 3D views and can make a 3D view appear highly realistic. When applied to most objects, material quantities will also be calculated in
Kitchen and Bath Design Tutorial
 Kitchen and Bath Design Tutorial This tutorial continues where the Interior Design Tutorial left off. You should save this tutorial using a new name to archive your previous work. The tools and techniques
Materials Tutorial. Chapter 6: Setting Materials Defaults
 Setting Materials Defaults Chapter 6: Materials Tutorial Materials display on the surfaces of objects in 3D views and can make a 3D view appear highly realistic. When applied to most objects, material
You can easily print images using the Capture NX print function. Here we will explain the process for printing
 Printing - Print Size Request How do you print images to fit on particular paper sizes. Response You can easily print images using the Capture NX print function. Here we will explain the process for printing
Three Steps to Dynamic View for BIM Applications
 Three Steps to Dynamic View for BIM Applications The process of creating and using dynamic views can seem daunting to even the most experienced user. The Bentley BIM applications provide tools to somewhat
AECOsim Building Designer. Quick Start Guide. Chapter A06 Creating a Master Model Bentley Systems, Incorporated.
 AECOsim Building Designer Quick Start Guide Chapter A06 Creating a Master Model 2012 Bentley Systems, Incorporated www.bentley.com/aecosim Table of Contents Creating a Master Model...3 References... 4
Chapter 6 Title Blocks
 Chapter 6 Title Blocks In previous exercises, every drawing started by creating a number of layers. This is time consuming and unnecessary. In this exercise, we will start a drawing by defining layers
Autodesk Revit Architecture 2014
 ISI ACADEMY Autodesk Revit Architecture 2014 Getting Started Starting Revit Starting Revit for the First Time Opening a Project File Identifying the User Interface Managing User Interface Understanding
CAD Tutorial. CAD Detail Windows. In this tutorial you ll learn about: CAD Detail Windows Exploding and Modifying a CAD Block
 CAD Tutorial In this tutorial you ll learn about: CAD Detail Windows Exploding and Modifying a CAD Block Creating a New CAD Block CAD Detail from View Creating a Plot Plan CAD Detail Windows CAD Details
Getting Started. with Easy Blue Print
 Getting Started with Easy Blue Print User Interface Overview Easy Blue Print is a simple drawing program that will allow you to create professional-looking 2D floor plan drawings. This guide covers the
Kitchen and Bath Design Tutorial
 Kitchen and Bath Design Tutorial This tutorial continues where the Interior Design Tutorial left off. You should save this tutorial using a new name to archive your previous work. The tools and techniques
Materials Tutorial. Chapter 6: Setting Materials Defaults
 Setting Materials Defaults Chapter 6: Materials Tutorial Materials display on the surfaces of objects in 3D views and can make a 3D view appear highly realistic. When applied to most objects, material
Revit Structure 2014 Basics
 Revit Structure 2014 Basics Framing and Documentation Elise Moss Authorized Author SDC P U B L I C AT I O N S Better Textbooks. Lower Prices. www.sdcpublications.com Powered by TCPDF (www.tcpdf.org) Visit
CBCL Limited Sheet Set Manager Tutorial 2013 REV. 02. CBCL Design Management & Best CAD Practices. Our Vision
 CBCL Limited Sheet Set Manager Tutorial CBCL Design Management & Best CAD Practices 2013 REV. 02 Our Vision To be the most respected and successful Atlantic Canada based employeeowned firm, delivering
SETTING UP YOUR PAGE LAYOUT:
 In this workshop we will look at: Setting up your drawing sheet Viewports Printing your work Once you ve drawn your work in the Model space and you re ready to print, you need to set up your Drawing Sheet
Autodesk Medical Center
 Autodesk Medical Center Page 1 Contents Autodesk Medical Center... 1 Revit Projects... 3 Exercise 1 Create a new project file... 3 Datum Elements... 4 Exercise 2 Add Grids... 5 Exercise 3 Edit Levels...
BIM. e Submission Guideline Structural. Annex 1a. Recommended Process Revit 2010
 BIM e Submission Guideline Structural Annex 1a Recommended Process Revit 2010 Building and Construction Authority 5 Maxwell Road #16-00 Tower Block MND Complex Singapore 069110 www.bca.gov.sg Revision
Revit Structure 2013 Basics
 Revit Structure 2013 Basics Framing and Documentation Elise Moss Supplemental Files SDC P U B L I C AT I O N S Schroff Development Corporation Better Textbooks. Lower Prices. www.sdcpublications.com Tutorial
Getting Started with Revit
 AUTODESK Autodesk REVIT Revit TRAINING Training TUTORIAL Tutorial Getting Started with Revit FOCUS Focus KUWAIT Kuwait CAD Cad Team 2012-13 Step 01 02 Grid & levels Grid create 5 vertical grid lines grid
Ensure that you have downloaded all the dataset files from your course Resources, and that they are extracted to the route of your C: drive.
 Lights and Cameras Before you begin Ensure that you have downloaded all the dataset files from your course Resources, and that they are extracted to the route of your C: drive. In this exercise, you will
1Getting set up to start this exercise
 AutoCAD Architectural DesktopTM 2.0 - Development Guide EXERCISE 1 Creating a Foundation Plan and getting an overview of how this program functions. Contents: Getting set up to start this exercise ----
digitization station DIGITAL SCRAPBOOKING 120 West 14th Street
 digitization station DIGITAL SCRAPBOOKING 120 West 14th Street www.nvcl.ca techconnect@cnv.org DIGITAL SCRAPBOOKING With MyMemories Suite 6 The MyMemories Digital Scrapbooking software allows you to create
METAL FRAMING Wall+ SHOP DRAWINGS
 METAL FRAMING Wall+ SHOP DRAWINGS Shop Drawings Finish your modeling with built-in shop drawing generator and deliver your wall framing estimation the same hour. Build your complete shop drawings with
Autodesk University Project Navigator to the Rescue in AutoCAD Architecture: Fix Standard Mismatches in a Project
 Autodesk University Project Navigator to the Rescue in AutoCAD Architecture: Fix Standard Mismatches in a Project Good afternoon. Thank you for choosing the class Project Navigator to the Rescue in AutoCAD
Adobe Photoshop CS5 Tutorial
 Adobe Photoshop CS5 Tutorial GETTING STARTED Adobe Photoshop CS5 is a popular image editing software that provides a work environment consistent with Adobe Illustrator, Adobe InDesign, Adobe Photoshop
Deck Tutorial. Decks and Porches. Drawing Decks
 Deck Tutorial The Deck Tutorial continues where the Landscaping Tutorial left off, and explains how to create a deck off the back of the house and connect it to the terrain with an exterior staircase.
BlopHome Help. How to get started. 1 of 5. If you are not logged in blophome
 How to get started New If you are not logged in blophome Open 1 of 5 My site How to get started New If you are logged in blophome Open 1 of 5 My site How to get started 2 of 5 With one click move and modify
House Design Tutorial
 Chapter 2: House Design Tutorial This House Design Tutorial shows you how to get started on a design project. The tutorials that follow continue with the same plan. When you are finished, you will have
Deck Tutorial. Decks and Porches. Drawing Decks
 Deck Tutorial The Deck Tutorial continues where the Landscaping Tutorial left off, and explains how to create a deck off the back of the house and connect it to the terrain with an exterior staircase.
House Design Tutorial
 House Design Tutorial This House Design Tutorial shows you how to get started on a design project. The tutorials that follow continue with the same plan. When you are finished, you will have created a
Creo Extrude Tutorial 2: Cutting and Adding Material
 Creo Extrude Tutorial 2: Cutting and Adding Material 1. Open Creo Parametric 2. File > Open > extrudeturial (From Creo Extrude Tutorial 1) 3. Cutting Material a. Click Extrude Icon > Select the following
Inserting and Creating ImagesChapter1:
 Inserting and Creating ImagesChapter1: Chapter 1 In this chapter, you learn to work with raster images, including inserting and managing existing images and creating new ones. By scanning paper drawings
Introduction to Autodesk Inventor for F1 in Schools (Australian Version)
") Introduction to Autodesk Inventor for F1 in Schools (Australian Version) F1 in Schools race car In this course you will be introduced to Autodesk Inventor, which is the centerpiece of Autodesk s Digital
Introduction to Autodesk Inventor for F1 in Schools (Australian Version) F1 in Schools race car In this course you will be introduced to Autodesk Inventor, which is the centerpiece of Autodesk s Digital
Copyright 2014 SOTA Imaging. All rights reserved. The CLIOSOFT software includes the following parts copyrighted by other parties:
 2.0 User Manual Copyright 2014 SOTA Imaging. All rights reserved. This manual and the software described herein are protected by copyright laws and international copyright treaties, as well as other intellectual
Appendix to Chapter 1 Release 3
 Appendix to Chapter 1 Release 3 Introduction to AutoCAD Architectural Desktop Release 3 Enhancements to AutoCAD Architectural Desktop Release 3 include changes in the content of the menu bar, toolbars,
Impress Guide Chapter 4 Adding and Formatting Pictures
 Impress Guide Chapter 4 Adding and Formatting Pictures This PDF is designed to be read onscreen, two pages at a time. If you want to print a copy, your PDF viewer should have an option for printing two
Creo Revolve Tutorial
 Creo Revolve Tutorial Setup 1. Open Creo Parametric Note: Refer back to the Creo Extrude Tutorial for references and screen shots of the Creo layout 2. Set Working Directory a. From the Model Tree navigate
AutoCAD Architecture 2014
 CADLearning for AutoCAD Architecture 2014 Course Details 19+ hours of training 325 video tutorials Exercise files included Instructor: Reid Addis Course Description CADLearning for AutoCAD Architecture
Getting Started with. Vectorworks Architect
 Getting Started with Vectorworks Architect Table of Contents Introduction...2 Section 1: Program Installation and Setup...6 Installing the Vectorworks Architect Program...6 Exercise 1: Launching the Program
House Design Tutorial
 House Design Tutorial This House Design Tutorial shows you how to get started on a design project. The tutorials that follow continue with the same plan. When you are finished, you will have created a
Archicad Layout of Drawings
 Archicad Layout of Drawings NOTE: It is important that house features (Walls, Cabinets, Floors, etc.) Have been placed on the proper layer and layer combination for ease of transferring your final drawings
Chapter 4 Adding and Formatting Pictures
 Impress Guide Chapter 4 Adding and Formatting Pictures OpenOffice.org Copyright This document is Copyright 2007 by its contributors as listed in the section titled Authors. You can distribute it and/or
Revit Architecture Student Workbook
 Revit Architecture Student Workbook Building Information Modeling with Revit Architecture Contents Introduction... 5 Unit 1... 9 Theory: CAD Versus BIM... 9 Revit Architecture: Introduction, Interface,
Engineering Technology
 Engineering Technology Introduction to Parametric Modelling Engineering Technology 1 See Saw Exercise Part 1 Base Commands used New Part This lesson includes Sketching, Extruded Boss/Base, Hole Wizard,
1. Setup Output mode. 2. Using a Fixed tile size
 Tutorial Tiling Software version: Asanti 2.0 Document version: June 23, 2015 This tutorial demonstrates how to use tiling with Asanti. Tiling can only be executed on a system where Acrobat Pro X or later
Managing images with NewZapp
 Managing images with NewZapp This guide is for anyone using the NewZapp Fixed editor as opposed to the Drag and Drop editor. The Image Manager is where images are uploaded and stored in your NewZapp account
House Design Tutorial
 Chapter 2: House Design Tutorial This House Design Tutorial shows you how to get started on a design project. The tutorials that follow continue with the same plan. When you are finished, you will have
House Design Tutorial
 Chapter 2: House Design Tutorial This House Design Tutorial shows you how to get started on a design project. The tutorials that follow continue with the same plan. When we are finished, we will have created
Landscaping Tutorial
 Landscaping Tutorial This tutorial describes how to use Home Designer Essentials s Terrain Tools. In it, you will learn how to add elevation information to your terrain, how to create terrain features,
GIMP WEB 2.0 ICONS. Web 2.0 Icons: Paperclip Completed Project
 GIMP WEB 2.0 ICONS WEB 2.0 ICONS: PAPERCLIP OPEN GIMP or Web 2.0 Icons: Paperclip Completed Project Step 1: To begin a new GIMP project, from the Menu Bar, select File New. At the Create a New Image dialog
AUTODESK INVENTOR Trial Projects
 AUTODESK INVENTOR Trial Projects Drawing Creation Create detailed drawings of a collar flange PART 1: CREATING DRAWING VIEWS page: 2 1. 2. 3. Start by clicking the Projects icon in the ribbon. Navigate
Archicad Layout of Drawings
 Archicad Layout of Drawings NOTE: It is important that house features (Walls, Cabinets, Floors, etc.) Have been placed on the proper layer and layer combination for ease of transferring your final drawings
Working With Drawing Views-I
 Chapter 12 Working With Drawing Views-I Learning Objectives After completing this chapter you will be able to: Generate standard three views. Generate Named Views. Generate Relative Views. Generate Predefined
Autodesk Revit : Burning CDs That Even Your Contractor Can Use
 December 2-5, 2003 MGM Grand Hotel Las Vegas Autodesk Revit : Burning CDs That Even Your Contractor Can Use Speaker: Assistants: Paul Francis Loreto, AAC, OAA, MRAIC Clyne Curtis Peter Funk Course ID:
Step 1: Create A New Photoshop Document
 Film Strip Photo Collage - Part 2 In part one of this two-part Photoshop tutorial, we learned how Photoshop s shape tools made it easy to draw a simple film strip which we can then use as a photo frame,
Guidance on Using Scanning Software: Part 5. Epson Scan
 Guidance on Using Scanning Software: Part 5. Epson Scan Version of 4/29/2012 Epson Scan comes with Epson scanners and has simple manual adjustments, but requires vigilance to control the default settings
University Libraries ScanPro 3000 Microfilm Scanner
 University Libraries ScanPro 3000 Microfilm Scanner Help Guide Table of Contents Getting Started 3 Loading the Film 4-5 Viewing Your Film 6-7 Motorized Roll Film Control 6 Crop Box 7 Using the Toolbar
Quick Start for Autodesk Inventor
 Quick Start for Autodesk Inventor Autodesk Inventor Professional is a 3D mechanical design tool with powerful solid modeling capabilities and an intuitive interface. In this lesson, you use a typical workflow
Walls. Section. Walls. When you finish this section, you should understand the following:
 GOLDMC03_132283433X 8/24/06 2:23 PM Page 123 Section 3 Walls When you finish this section, you should understand the following: How to place a wall object. How to change walls by dynamically pulling on
Architecture 2012 Fundamentals
 Autodesk Revit Architecture 2012 Fundamentals Supplemental Files SDC PUBLICATIONS Schroff Development Corporation Better Textbooks. Lower Prices. www.sdcpublications.com Tutorial files on enclosed CD Visit
Tiling. 1. Overlapping tiles with fixed number of tiles. Tutorial
 Tutorial Tiling Software version: Asanti 3.0 Document version: April 3, 2017 This tutorial demonstrates how to use tiling within Asanti. Download the Asanti Sample Files via the Asanti Client (Help > Asanti
Autodesk Revit MEP 2014
 ISI ACADEMY Autodesk Revit MEP 2014 Getting Started Starting Revit Starting Revit for the First Time Opening a Project File Identifying the User Interface Components Managing User Interface Components
Modeling Basic Mechanical Components #1 Tie-Wrap Clip
 Modeling Basic Mechanical Components #1 Tie-Wrap Clip This tutorial is about modeling simple and basic mechanical components with 3D Mechanical CAD programs, specifically one called Alibre Xpress, a freely
Autodesk Revit Architecture 2014
 CADLearning for Autodesk Revit Architecture 2014 Course Details 52+ hours of training 534 video tutorials Exercise files included Instructor: Jason Boehning Course Description CADLearning for Autodesk
Generations Automatic Stand-Alone Lace By Bernie Griffith Generations Software
 We are going to create an open Italian lace. Generations software products provide advanced image processing features allowing for the creation of stand-alone lace with just a few simple techniques. A
Ansoft Designer Tutorial ECE 584 October, 2004
 Ansoft Designer Tutorial ECE 584 October, 2004 This tutorial will serve as an introduction to the Ansoft Designer Microwave CAD package by stepping through a simple design problem. Please note that there
Preparing Photos for Laser Engraving
 Preparing Photos for Laser Engraving Epilog Laser 16371 Table Mountain Parkway Golden, CO 80403 303-277-1188 -voice 303-277-9669 - fax www.epiloglaser.com Tips for Laser Engraving Photographs There is
Autodesk Revit Building. Getting Started with
 Autodesk Revit Building Getting Started with Autodesk Revit Building April 2006 Copyright 2006 Autodesk, Inc. All Rights Reserved This publication, or parts thereof, may not be reproduced in any form,
GIS Module GMS 7.0 TUTORIALS. 1 Introduction. 1.1 Contents
 GMS 7.0 TUTORIALS 1 Introduction The GIS module can be used to display data from a GIS database directly in GMS without having to convert that data to GMS data types. Native GMS data such as grids and
Creating a Slide Show with Background Music in Adobe Lightroom January 2017 Maryann Flick
 Creating a Slide Show with Background Music in Adobe Lightroom January 2017 Maryann Flick Adobe Lightroom is widely used by many photographers for image organization and editing. If you are already using
Landscaping Tutorial. Chapter 5:
 Chapter 5: Landscaping Tutorial This tutorial was written to help you learn how to use Home Designer Landscape and Deck s Terrain tools. In this tutorial, you will learn how to add elevation information
Ribbon (Panels) + Options Bar + Contextual Tabs (tools based on selection)
 + Options Bar + Contextual Tabs (tools based on selection)") Week 11 Revit, Basics Building Information Modeling (BIM) - Parametric 3D Model File Types: Projects RVT (template = RTE) Families - RFA (template = RFT), "Symbols" Layout Workspace - Elevation Markers
Week 11 Revit, Basics Building Information Modeling (BIM) - Parametric 3D Model File Types: Projects RVT (template = RTE) Families - RFA (template = RFT), "Symbols" Layout Workspace - Elevation Markers
Floorplanner Drawing Manual
 Floorplanner Floorplanner Drawing Manual Drawing Manual Floorplanner lets you easily create interactive floorplans and publish them online. This manual explains the floorplanner drawing tool. For details
Getting Started with. Vectorworks Architect
 Getting Started with Vectorworks Architect Table of Contents Introduction...2 Section 1: Program Installation and Setup...6 Installing the Vectorworks Architect Program...6 Exercise 1: Launching the Program
What is a Survey? The site plan is usually based on an professional land survey.
 Site Plan: Illustrates the existing natural and built features of a site and describes proposed construction in relation to the existing features. The site plan is essential for studying the influence
Adobe Photoshop CC 2018 Tutorial
 Adobe Photoshop CC 2018 Tutorial GETTING STARTED Adobe Photoshop CC 2018 is a popular image editing software that provides a work environment consistent with Adobe Illustrator, Adobe InDesign, Adobe Photoshop,
Chief Architect X3 Training Series. Layers and Layer Sets
 Chief Architect X3 Training Series Layers and Layer Sets Save time while creating more detailed plans Why do you need Layers? Setting up Layer Lets Adding items to layers Layers and Layout Pages Layer
Advance Concrete. Tutorial
 Advance Concrete Tutorial Table of contents About this tutorial... 9 How to use this guide... 10 Lesson 1: Creating a building grid... 11 Step 1: Create a default building grid... 11 Step 2: Set the distances
Deck Tutorial. Chapter 6: Decks and Porches
 Chapter 6: Deck Tutorial Now we ll continue where the Landscaping Tutorial left off and create a deck off the back of the house, connecting it to the terrain with an exterior staircase. You may want to
v. 8.0 GMS 8.0 Tutorial GIS Module Shapefile import, display, and conversion Prerequisite Tutorials None Time minutes
 v. 8.0 GMS 8.0 Tutorial Shapefile import, display, and conversion Objectives Learn how to import and display shapefiles with and without ArcObjects. Convert the shapefiles to GMS feature objects. Prerequisite
1 ImageBrowser Software User Guide 5.1
 1 ImageBrowser Software User Guide 5.1 Table of Contents (1/2) Chapter 1 What is ImageBrowser? Chapter 2 What Can ImageBrowser Do?... 5 Guide to the ImageBrowser Windows... 6 Downloading and Printing Images
TruEmbroidery Software Program
 Page 1 Get to Know TruE Create, an Application of the TruEmbroidery Software Program By Janie Lantz TruE Create is easy yet feature-rich digitizing software with an automated Assistant, plus many manual
Creating a light studio
 Creating a light studio Chapter 5, Let there be Lights, has tried to show how the different light objects you create in Cinema 4D should be based on lighting setups and techniques that are used in real-world
Autodesk. AutoCAD Architecture Fundamentals. Elise Moss SDC PUBLICATIONS. Schroff Development Corporation
 Autodesk AutoCAD Architecture 2008 Fundamentals Elise Moss SDC PUBLICATIONS Schroff Development Corporation www.schroff.com www.schroff-europe.com Lesson 3 Floor Plans The floor plan is central to any
ACAD-BAU TUTORIAL For BricsCAD platform
 ACAD-BAU TUTORIAL WWW.ARHINOVA.SI For BricsCAD platform August 06 WORKSPACE ACAD-BAU RIBBON ACAD-BAU CONTROL BAR F ACAD-BAU PALETTES BASIC SETTINGS Use New command and open the template called ACB_International.DWT.
The Revolve Feature and Assembly Modeling
 The Revolve Feature and Assembly Modeling PTC Clock Page 52 PTC Contents Introduction... 54 The Revolve Feature... 55 Creating a revolved feature...57 Creating face details... 58 Using Text... 61 Assembling
SAVING, LOADING AND REUSING LAYER STYLES
 SAVING, LOADING AND REUSING LAYER STYLES In this Photoshop tutorial, we re going to learn how to save, load and reuse layer styles! Layer styles are a great way to create fun and interesting photo effects
Organizing artwork on layers
 3 Layer Basics Both Adobe Photoshop and Adobe ImageReady let you isolate different parts of an image on layers. Each layer can then be edited as discrete artwork, allowing unlimited flexibility in composing
CONTENTS CHAPTER 1 WHAT THIS IS ALL ABOUT...
 CONTENTS CHAPTER 1 WHAT THIS IS ALL ABOUT... 17 INTRODUCTION... 17 Terminology... 18 MACINTOSH AND WINDOWS... 20 CONVENTIONS USED IN THIS TUTORIAL... 21 Command Menu Title And Pull-Down Menu... 22 Commands,