Introduction to AutoCAD 2012
|
|
|
- Frank Welch
- 5 years ago
- Views:
Transcription

1 Page 1 Introduction to AutoCAD 2012 Alf Yarwood Chapter 16 Exercise 1 1. Open AutoCAD 2012 with a double-click on its shortcut icon in the Windows desktop. 2. Open the template acadiso.dwt. 3. Construct the required building symbol drawings to a scale of 1: Save each symbol as a block within the drawing. 5. Save the drawing to the file name blocks for all exercises.dwg and close the drawing. 6. Open another acadiso.dwt template. 7. Left-click the DesignCenter icon in the View/Palettes panel and select from its Folder List the drawing blocks for all exercises.dwg. 8. Left-click the cross to the left of the drawing name and left-click again on Blocks. The building symbols appear in the right-hand side of the DesignCenter palette. 9. Working to the scale 1:50, construct an outline of the required building plan using the Polyline tool set to a Width of 1. Make the outer walls from plines 5 units apart and the partitions from plines at 2 units apart. 10. Drag the necessary symbols from the DesignCenter into the drawing. 11. Because the symbols dragged into the drawing area are blocks they may need to be exploded (Explode tool from the Home/Modify panel) and some trimming and stretching may be necessary in order to clear unnecessary details or to change the scale of some symbols - e.g. windows. 12. When completed save your drawing to a memory stick with the file name 16_Exercise01.dwg. 13. Close the drawing window.
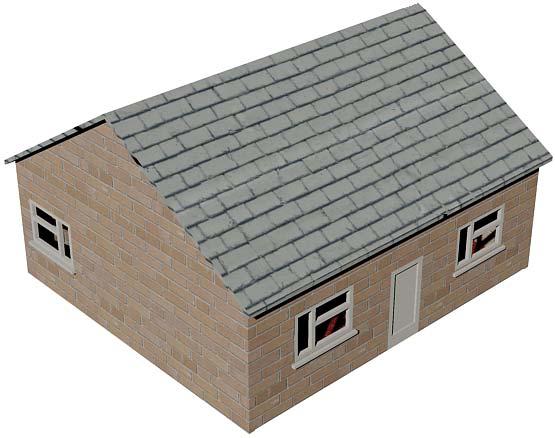
2 Page 2 Chapter 16 Exercise 2 1. Open AutoCAD 2012 with a double-click on its shortcut icon in the Windows desktop. 2. Open the template acadiso.dwt. 3. Following the same procedures as described for the drawing in answer to Exercise 1, construct the required drawing. The two floor plans below show one possible answer to the exercise. 4. Save your drawing to a memory stick with the file name 16_Exercise02.dwg. 5. Close the drawing window.

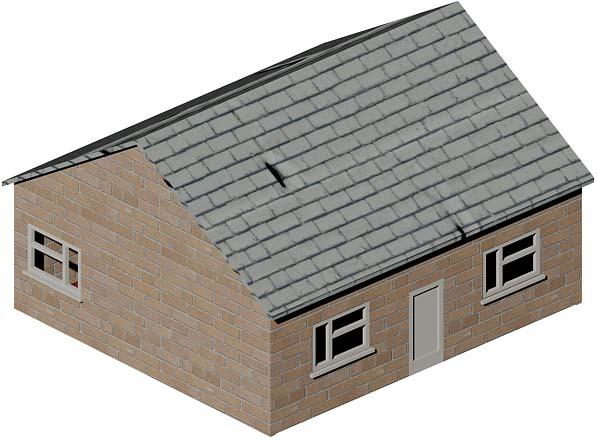
3 Page 3 Chapter 16 Exercise 3 1. Open AutoCAD 2012 with a double-click on its shortcut icon in the Windows desktop. 2. Open the template acadiso.dwt. 3. Following the same procedures as described for the drawing in answer to Exercise 1, construct the required drawing. The floor plan on the right shows the resulting drawing. 4. Save your drawing to a memory stick with the file name 16_Exercise03.dwg. 5. Close the drawing window. Chapter 16 Exercise 4 The illustrations throughout this and Exercise 5 before rendering are in Visual Style/Conceptual. 1. Open AutoCAD 2012 with a double-click on its shortcut icon in the Windows desktop. 2. Open the template acadiso3d.dwt. 3. Open the Layer Manager palette and make four new layers Blue, Green, Magenta and Red with colours the same as the layer names. 4. Make layer Red current. 5. Assuming the front wall height is m and working to a scale of 1:50 construct the front wall from an extrusion of height Then construct the rear wall. 7. Make layer Blue current and construct the window frames for the front and rear walls and the door for the front wall.


4 Page 4 8. Make layer Magenta current and construct the end walls, followed by making layer Blue current and constructing the end wall windows. 9. Place in the SW Isometric view and make a union of the four walls. 10. Make layer Green current and construct the roof from a pline of the end of the roof which is extruded. 11. Make layer 0 current and construct a floor for the house - an extrusion of height Features such as a paths, guttering can be added if thought fit. Published by Elsevier Ltd. All rights reserved

5 Page Turn off all layers other than Red. 14. Click the arrow at the bottom right-hand corner of the Render/Materials panel to bring the Materials Editor palette on screen. Click button at the bottom right-hand corner of the palette to bring the Materials Browser palette on screen. In the Autodesk Library list click Masonry-Brick. In the Sort list of brick icons which appears select Flemish and when the icon appears in the Different Materials area of the palette, drag the icon on to the wall. 15. With the Render Region tool from the Render/Render panel render the wall model. The wall will render with the bricks showing too large. 16. Double-click in the Image area of the Materials Editor. The Texture Editor palette appears. In the Scale filed enter 50 in the Sample Size/Width field, the Height figure automatically changes to retain the balance between width and height. 17. Render the walls model again. The result is shown on page Turn layer Red off. 19. Turn layer Green on. Add the material Roofing/Slate Blue to the roof model using the same procedures as when adding a material to the walls. 20. Turn layer Green off and layer 0 on and add the material Flooring-Carpet/Berber Pattern 3 to the floor. 21. Turn layer 0 off and layer Blue on and apply the material Paint/Paint to the door and windows. 21. With the 3DOrbit tool place the model in a new position. 22. Turn all layer on and render. 23. Change to perspective view and render again. 24. The results of items 21 to 23 are shown on Page 6.
6 Page 6


7 Page 7 Chapter 16 Exercise 5 1. Open AutoCAD 2012 with a double-click on its shortcut icon in the Windows desktop. 2. Open the template acadiso3d.dwt. 3. ViewCube//Front. On layer 0 construct polyline outlines of the front wall of the house, one of the windows and the door. Each rectangle must be a closed polyline. 4. Copy the door panels to one side of the door and extrude them to a height of Extrude all other closed plines to a height of Subtract the door panel extrusions of height 1 from the main door outline 7. Extrude the copied door panels to a height of Subtract the door and window outline extrusions from the wall outline. 9. Subtract the window panes from the main window outline. 10. Move the door panels of height 0.5 back to their correct positions in the door outline. 11. Form a union of the door outline and the door panels. 12. ViewCube/Isometric. Home/View/Visual Styles/ Conceptual to check the results. 13. ViewCube//Front. Move the door and window to their correct positions in the wall and copy the window to three other positions within the wall. 14. ViewCube/Isometric. Check again that the model is correct.


8 Page ViewCube//Right. Construct the right-hand wall using similar methods as when constructing the front wall. 16. ViewCube/Left. Construct the left-hand wall. 17. ViewCube/Isometric. To check. 18. Using similar methods, construct the rear wall. 19. ViewCube//Top. Form a union of the four walls. 20. Layer Blue. Construct the garage walls in a similar manner and add the doors on layer Magenta.


9 21. ViewCube/Right. Layer Green. Construct a pline along wedges of roof of main building. Offset by 2. Add vertical lines each end of the two plines and form a closed pline to extrude to a height of Repeat for the roof of the garage, extruding to a height of ViewCube/Top. With Ortho Mode set on move the roofs to their correct positions on the main building and garage. 24. ViewCube/Isometric. Check that the roofs are in position. 25. ViewCube/Right. Layer 0. Construct the brickwork for the chimney. 26. ViewCube/Top. Layer Red. Construct two cylinders for the chimney pot, subtracting the smaller from the large. Page ViewCube/Top. Turn layer Green off. On layer Cyan. Construct the ground floor - an extrusion 0.5 high. 28. ViewCube/Front. Copy the ground floor to form the first floor. 29. Turn layer Green back on. ViewCube/ Isometric. Check. 30. ViewCube/Top. Layer Green off. Layer Red current. Construct the concrete foundation and paths - an extrusion 0.5 high. 31. Turn all layers back on. ViewCube/ Isometric. Check.

10 Page D Navigate/Top. Layer Green. Construct garden - an extrusion of height ViewCube/Top. Layer Yellow. Construct a post with a fence. Post 3 square and 20 high extrusion. Fence 30 x 1 and 17 high. Form a union of the two extrusions, copy and rotate to form a fence around the garden, leaving spaces for doorway and garage entrance. Turn all layers other than Yellow off and form a union of all the parts of the fence. 34. ViewCube/Isometric. Check. 35. Partly open the front and garage doors by rotation in Top and Right views. The result is shown on Page 7 in a ViewCube/Isometric view. Note The model is now ready for rendering. 1. Turn off all layers other than 0 and Blue.


11 Page Set Sun Status on in the Render/Sun & Location panel, 3. In the Material Browser select Masonry and from the Masonry Brick from the Autodesk Library and select English. 4. Drag the English brick icon on to the drawing and with the Render Region tool from the Render/Render panel check the rendering. 5. Drag the English brick icon into the Materials Browser palette, click the Image.


12 Page The Texture Editor - Color palette appears. Reset the Scale in the palette. 7. Call Render Region and render the walls and chimney. 8. Adjust scale and colour in the palettes if necessary until satisfied with the rendering.. 9 Turn all layers except Magenta and Red off and apply the material Paint/Paint to the doors and windows, but change the colour to Blue.

13 Page On layer Green apply the material Roofing/Shingle-Half-Round Light Brown to the roofs of the house and garage. Adjust the colour. 11. Apply the material Flooring-Tile/Square Tan to the floors and adjust the tiling size. 12. Apply the material Concrete/Rough Tan to the paths and adjust colour. 13. Render the model using the Render/Render Region tool. 14. Check and adjusting lighting if needed. 15. Save your drawing to a memory stick with the file name 16_Exercise05.dwg. 16. Close the drawing window. Chapter 16 Exercise 6 1. Open AutoCAD 2012 with a double-click on its shortcut icon in the Windows desktop. 2. Open the template acadiso3d.dwt. 3. Layer 0. In a similar manner to the construction of the walls in Exercise 4, construct the walls of the garage, working to a scale of 1:50. Form a union of the walls using the Union tool. 4. On layer Blue construct the window frames and the door frame..


14 Page On layer Green construct an extrusion for the roof. 6. On layer Magenta, construct the floor - an extrusion of height On layer Blue construct the door. 8. Apply materials as follows: Walls: Masonry-Brick-Flemish-Diagonal. Roof: Roofing/Shingle-Composition. Floor: Concrete/Exposed Aggregate. Window frames, door and door frame: Wood- Painted White.. 9. Render the model. 10. Save your drawing to a memory stick with the file name 16_Exercise06.dwg. 11. Close the drawing window. Material accompanying Introduction to AutoCAD 2012, ISBN Copyright 2011, Alf Yarwood.
15 Page 15 Chapter 16 Exercise 7 1. Open AutoCAD 2012 with a double-click on its shortcut icon in the Windows desktop. 2. Open the template Imperial.dwt. 3. Reset Limits to Upper right corner , and Zoom to In the ViewCube/End view, construct a full scale end view of the garden seat. 5. Using the Polyline Edit (pedit) tool ensure each part of the end view is a closed polyline. 6. Extrude each part of the end view to the sizes given in the front view. 7. Place in the ViewCube/Front view.

16 Page Make sure that Ortho is set on. 9. With the Copy tool, copy the end frame 42 inches to the right. 10. With the Move tool, move the other parts of the seat to their correct positions relative to the end frames. 11. Place in the View/Views/NE isometric view. 12. With the Union tool form a union of the parts of the chair. 13. Place in the Visual Style/ Shaded. 14. At the command line: Command: enter change right-click CHANGE Select objects: pick the seat 1 found Select objects: right-click 1 found Specify change point or [Properties]: enter p right-click Enter property to change [Color/Elev/LAyer/LType/ltScale/LWeight/Thickness/TRansparency/Material/Annotative]: enter c right-click New color [Truecolor/COlorbook] <BYLAYER>: enter 44 right-click Enter property to change [Color/Elev/LAyer/LType/ltScale/LWeight/Thickness/TRansparency/Material/Annotative]: right-click Command: 15.. Save your drawing to a memory stick with the file name 16_Exercise??.dwg. 16. Close the drawing window.
17 Page 17 Chapter 16 Exercise 8 1. Open AutoCAD 2012 with a double-click on its shortcut icon in the Windows desktop. 2. Open the template Imperial.dwt. 3. Reset Limits to Upper right corner , and Zoom to 1 and Zoom to In the ViewCube/Front view and working to full scale, construct the front view of the front of the table legs and rail lots. 5. Extrude the outline to a height of Construct a pline of the end of one of the top slats. Extrude it to a height of With the Copy tool, copy the extrusions to fill the other slots in the top rail. 8. Construct a pline outline of the ends of the end rails and extrude them to a height of Place in the ViewCube/Top view. 10. Make sure Ortho is set on. Copy the legs and front rail to the other end of the table slots. 11. Move the end rails to their correct positions in between the top rails. 12. Place in the ViewCube/Isometric view. 13. With the Union tool, form the construction into a union. 14. Change to the Visual Style/Shaded style. 15. With the Change to change the colour of the table to green. 16. Readjust the pictorial position of the table using the 3dorbit tool.

18 Page Save your drawing to a memory stick with the file name 16_Exercise??.dwg. 18. Close the drawing window
19 Page 19 Additional exercise The first of the three drawings below is a site location plan which includes a small bungalow to be built on Plot 5. The second drawing is a site plan for the development and the third drawing on Page 15 is a second site plan for the bungalow on Plot 5 showing more detail. Construct the three drawings working to suitable scales. Material accompanying Introduction to AutoCAD 2012, ISBN Copyright 2011, Alf Yarwood.
20 Page 20
Introduction to AutoCAD 2010
 Page 1 Introduction to AutoCAD 2010 Alf Yarwood Chapter 14 Notes about renderings 1. Two exercises in this chapter require a knowledge of adding materials and lighting before rendering the models. To see
Introduction to AutoCAD 2012
 Page 1 Introduction to AutoCAD 2012 Alf Yarwood Chapter 12 Exercise 1 3. Click on Top in the ViewCube. 4. Call the Polyline tool from the Home/Draw panel and construct the pline outline. 5. Call the Polysolid
Introduction to AutoCAD 2010
 Page 1 Introduction to AutoCAD 2010 Alf Yarwood Chapter 8 Exercise 1 2. Open the template acadiso.dwt. 3. Construct the drawing as shown in Fig. 8.20, but change the front view to a sectional view A-A.
Introduction to AutoCAD 2012
 Page 1 Introduction to AutoCAD 2012 Alf Yarwood Chapter 19 Exercise 1 1. Open AutoCAD 2012 with a double-click on its shortcut icon in the Windows desktop. 2. Open the template acadiso3d.dwt. 3. Change
Introduction to AutoCAD 2010
 Page 1 Introduction to AutoCAD 2010 Alf Yarwood Chapter 17 Exercise 1 1. Open AutoCAD 2010 with a double-click on its shortcut icon in the Windows desktop. 3. Use the two layers 0 and Cyan. 4. Set the
Introduction to AutoCAD 2012
 Page 1 Introduction to AutoCAD 2012 Alf Yarwood Answers to Multiple choice questions Chapter 1 1. The toolbar at the top of the AutoCAD 2012 window is: (a) The Draw toolbar (b) The Modify toolbar (c) The
Introduction to AutoCAD 2012
 Page 1 Introduction to AutoCAD 2012 Alf Yarwood Chapter 17 Exercise 1 1. Open AutoCAD 2012 with a double-click on its shortcut icon in the Windows desktop. 3. Use the two layers 0 and Cyan. 4. Set the
Introduction to AutoCAD 2010
 Page 1 Introduction to AutoCAD 2010 Alf Yarwood Chapter 7 Exercise 1 1. Open AutoCAD 2010 with a double-click on its shortcut icon in the Windows desktop. 2. Open the template acadiso.dwt. 3. Call the
Introduction to AutoCAD 2010
 Page 1 Introduction to AutoCAD 2010 Alf Yarwood Chapter 5 Exercise 1 1. Open AutoCAD 2010 with a double-click on its shortcut icon in the Windows desktop. 2. Call the Polyline tool, either by entering
Introduction to AutoCAD 2012
 Page 1 Introduction to AutoCAD 2012 Alf Yarwood Chapter 10 Exercise 1 1. Open AutoCAD 2012 with a double-click on its shortcut icon in the Windows desktop. 2. Open the template acadiso.dwt. 3. Construct
Autodesk AutoCAD Architecture 2015 Fundamentals
 Autodesk AutoCAD Architecture 2015 Fundamentals Elise Moss SDC P U B L I C AT I O N S Authorized Author Better Textbooks. Lower Prices. www.sdcpublications.com Powered by TCPDF (www.tcpdf.org) Visit the
Revit Structure 2012 Basics:
 SUPPLEMENTAL FILES ON CD Revit Structure 2012 Basics: Framing and Documentation Elise Moss autodesk authorized publisher SDC PUBLICATIONS www.sdcpublications.com Schroff Development Corporation Structural
Table of Contents PART I INTRODUCTION TO CORELCAD Introducing CorelCAD About CorelCAD Benefits of Using CorelCAD...
 Table of Contents PART I INTRODUCTION TO CORELCAD.... 1 1 Introducing CorelCAD.... 3 About CorelCAD... 3 Benefits of Using CorelCAD....4 Impressive Compatibility... 4 Familiar User Interface.... 4 Drafting
Part I Introduction to CorelCAD
 Table of Contents Part I Introduction to CorelCAD 1 Introducing CorelCAD for Mac... 3 About CorelCAD... 3 Benefits of Using CorelCAD....4 Impressive Compatibility... 4 Familiar User Interface.... 4 Drafting
ACAD-BAU TUTORIAL For BricsCAD platform
 ACAD-BAU TUTORIAL WWW.ARHINOVA.SI For BricsCAD platform August 06 WORKSPACE ACAD-BAU RIBBON ACAD-BAU CONTROL BAR F ACAD-BAU PALETTES BASIC SETTINGS Use New command and open the template called ACB_International.DWT.
Tutorial Building the Nave Arcade
 Tutorial: Digital Gothic AH C117B (Winter 2017) Tutorial Building the Nave Arcade Overview: Step 1: Determining and Drawing The Arch (Quinto Arch) Step 2: Extrude Molding Profile Step 3: Adding Walls Step
Revit Structure 2014 Basics
 Revit Structure 2014 Basics Framing and Documentation Elise Moss Authorized Author SDC P U B L I C AT I O N S Better Textbooks. Lower Prices. www.sdcpublications.com Powered by TCPDF (www.tcpdf.org) Visit
AutoCAD Architecture 2018 Fundamentals
 Elise Moss Autodesk AutoCAD Architecture 2018 Fundamentals SDC P U B L I C AT I O N S Better Textbooks. Lower Prices. www.sdcpublications.com Powered by TCPDF (www.tcpdf.org) Visit the following websites
Walls. Section. Walls. When you finish this section, you should understand the following:
 GOLDMC03_132283433X 8/24/06 2:23 PM Page 123 Section 3 Walls When you finish this section, you should understand the following: How to place a wall object. How to change walls by dynamically pulling on
Block References and Attributes
 CHAPTER 11 Block References and Attributes PROJECT EXERCISE 11A This project exercise provides point-by-point instructions for creating the objects shown in Figure P11A 1. In this exercise, you will apply
AUTODESK INVENTOR Trial Projects
 AUTODESK INVENTOR Trial Projects Drawing Creation Create detailed drawings of a collar flange PART 1: CREATING DRAWING VIEWS page: 2 1. 2. 3. Start by clicking the Projects icon in the ribbon. Navigate
Tutorial 2: Setting up the Drawing Environment
 Drawing size With AutoCAD all drawings are done to FULL SCALE. The drawing limits will depend on the size of the items being drawn. For example if our drawing is the plan of a floor 23.8m X 15m then we
Autodesk. AutoCAD Architecture Fundamentals. Elise Moss SDC PUBLICATIONS. Schroff Development Corporation
 Autodesk AutoCAD Architecture 2008 Fundamentals Elise Moss SDC PUBLICATIONS Schroff Development Corporation www.schroff.com www.schroff-europe.com Lesson 3 Floor Plans The floor plan is central to any
Table of Contents. Part I Introduction to CorelCAD Introducing CorelCAD About CorelCAD Benefits of Using CorelCAD...
 Table of Contents Part I Introduction to C 2013.... 1 1 Introducing C 2013.... 3 About C... 4 Benefits of Using C....4 Impressive Compatibility... 4 Familiar User Interface.... 5 Drafting Tools.... 5 Collaboration....
Inventor-Parts-Tutorial By: Dor Ashur
 Inventor-Parts-Tutorial By: Dor Ashur For Assignment: http://www.maelabs.ucsd.edu/mae3/assignments/cad/inventor_parts.pdf Open Autodesk Inventor: Start-> All Programs -> Autodesk -> Autodesk Inventor 2010
Autodesk Architectural Desktop Functionality for the Autodesk Building Systems User
 11/28/2005-1:00 pm - 2:30 pm Room:N. Hemispheres (Salon A1) (Dolphin) Walt Disney World Swan and Dolphin Resort Orlando, Florida Autodesk Architectural Desktop Functionality for the Autodesk Building Systems
S206E Lecture 6, 5/18/2016, Rhino 3D Architectural Modeling an overview
 Copyright 2016, Chiu-Shui Chan. All Rights Reserved. S206E057 Spring 2016 This tutorial is to introduce a basic understanding on how to apply visual projection techniques of generating a 3D model based
Vectorworks / MiniCAD Tutorials
 Vectorworks / MiniCAD Tutorials Tutorial 1: Construct a simple model of a little house Tutorial 2: Construct a 4 view Orthographic drawing of the Model These tutorials are available as Adobe Acrobat 4
Dean Muccio. AutoCAD 2018 for the. Interior Designer. AutoCAD for Mac and PC SDC. Better Textbooks. Lower Prices.
 Dean Muccio AutoCAD 2018 for the Interior Designer AutoCAD for Mac and PC SDC P U B L I C AT I O N S Better Textbooks. Lower Prices. www.sdcpublications.com Powered by TCPDF (www.tcpdf.org) Visit the following
Revit Structure 2013 Basics
 Revit Structure 2013 Basics Framing and Documentation Elise Moss Supplemental Files SDC P U B L I C AT I O N S Schroff Development Corporation Better Textbooks. Lower Prices. www.sdcpublications.com Tutorial
Introduction to Autodesk Inventor for F1 in Schools (Australian Version)
") Introduction to Autodesk Inventor for F1 in Schools (Australian Version) F1 in Schools race car In this course you will be introduced to Autodesk Inventor, which is the centerpiece of Autodesk s Digital
Introduction to Autodesk Inventor for F1 in Schools (Australian Version) F1 in Schools race car In this course you will be introduced to Autodesk Inventor, which is the centerpiece of Autodesk s Digital
ArchiCAD Tutorial: How to Trace 2D Drawings to Quickly Create a 3D Model
 ArchiCAD Tutorial: How to Trace 2D Drawings to Quickly Create a 3D Model Hello, this is Eric Bobrow of Bobrow Consulting Group, creator of the ArchiCAD MasterTemplate with another ArchiCAD video tip. In
Dean Muccio AutoCAD Interior Designer. for the. AutoCAD for Mac and PC SDC. Better Textbooks. Lower Prices.
 Dean Muccio AutoCAD 2020 for the Interior Designer AutoCAD for Mac and PC SDC P U B L I C AT I O N S Better Textbooks. Lower Prices. www.sdcpublications.com Powered by TCPDF (www.tcpdf.org) Visit the following
AEROPLANE. Create a New Folder in your chosen location called Aeroplane. The four parts that make up the project will be saved here.
 AEROPLANE Prerequisite Knowledge Previous knowledge of the following commands is required to complete this lesson. Sketching (Line, Rectangle, Arc, Add Relations, Dimensioning), Extrude, Assemblies and
Getting Started. Chapter. Objectives
 Chapter 1 Getting Started Autodesk Inventor has a context-sensitive user interface that provides you with the tools relevant to the tasks being performed. A comprehensive online help and tutorial system
Create a Simple Architectural Structure (Architectural CAD)
") Description In this activity the teacher will demonstrate how to transform the 2D floor plan into a 3D structure, using the plan created in the Drawing of a Simple Building activity. Lesson Objectives
Description In this activity the teacher will demonstrate how to transform the 2D floor plan into a 3D structure, using the plan created in the Drawing of a Simple Building activity. Lesson Objectives
Here is a front view of the objects before and after the loft command:
 Lecture 9: 3D Modeling Modify Commands 1. LOFTING The loft command is similar to the extrude command, but much more versatile. Instead of extruding a single shape, the loft command allows you to extrude
Solid Part Four A Bracket Made by Mirroring
 C h a p t e r 5 Solid Part Four A Bracket Made by Mirroring This chapter will cover the following to World Class standards: Sketch of a Solid Problem Draw a Series of Lines Finish the 2D Sketch Extrude
ARC By default AutoCAD will draw an ARC through three selected points. Options can be set at the start and within the command.
 DFTG 1309 Final Review Notes I. Draw commands: LINE (draws a series of lines) Valid input: Pick button Cartesian coordinates Absolute (2,3) Relative rectangular (@2,3) Relative polar (@ 2
Tutorial Guide to AutoCAD 2014
 Tutorial Guide to AutoCAD 2014 2D Drawing, 3D Modeling Shawna Lockhart SDC P U B L I C AT I O N S For Microsoft Windows Better Textbooks. Lower Prices. www.sdcpublications.com Visit the following websites
AutoCAD Lab 1 Basics and Drawing Fundamentals. EGS 1007 Engineering Concepts and Methods
 AutoCAD Lab 1 Basics and Drawing Fundamentals EGS 1007 Engineering Concepts and Methods Will the Computer Ever REPLACE Pencil and Paper Drawings? Maybe someday When a computer becomes as light, small,
Autodesk Inventor. In Engineering Design & Drafting. By Edward Locke
 Autodesk Inventor In Engineering Design & Drafting By Edward Locke Engineering Design Drafting Essentials Working Drawings: Orthographic Projection Views (multi-view, auxiliary view, details and sections)
Tutorial Guide to AutoCAD 2013
 Tutorial Guide to AutoCAD 2013 2D Drawing, 3D Modeling Shawna Lockhart SDC P U B L I C AT I O N S Schroff Development Corporation For Microsoft Windows Better Textbooks. Lower Prices. www.sdcpublications.com
Contents. Prologue 27. Chapter 1: Introducing AutoCAD 29 Introduction 30. Getting Started with the Set-Up 31
 vii Contents Prologue 27 Chapter 1: Introducing AutoCAD 29 Introduction 30 Downloading a Free Copy of AutoCAD 30 Getting Started with the Set-Up 31 Launching AutoCAD 31 The Welcome Screen 31 The Application
Drawing a Foundation or Basement Plan
 Appendix F Drawing a Foundation or Basement Plan In this chapter, you will learn the following to World Class standards: Draw a Foundation or Basement Plan Draw the Basement Walls Draw the Pilasters on
Dharmapuri LAB MANUAL. : B.E. - Civil Engineering Year & Semester : I Year / II Semester
 Dharmapuri 636 703 LAB MANUAL Regulation : 2013 Branch : B.E. - Civil Engineering Year & Semester : I Year / II Semester CE6261-COMPUTER AIDED DRAFTING AND MODELLING LABORATORY ICAL ENG VVIT DEPARTMENT
Tutorial Guide to AutoCAD 2015
 Tutorial Guide to AutoCAD 2015 2D Drawing, 3D Modeling Shawna Lockhart SDC P U B L I C AT I O N S For Microsoft Windows Better Textbooks. Lower Prices. www.sdcpublications.com Powered by TCPDF (www.tcpdf.org)
Autodesk Revit Building. Getting Started with
 Autodesk Revit Building Getting Started with Autodesk Revit Building April 2006 Copyright 2006 Autodesk, Inc. All Rights Reserved This publication, or parts thereof, may not be reproduced in any form,
Drawing a Living Room and Family Room Floorplan
 Appendix C Drawing a Living Room and Family Room Floorplan In this chapter, you will learn the following to World Class standards: Draw a Living Room and Family Room Floorplan Draw the Walls and Stairs
Appendix B: Autocad Booklet YR 9 REFERENCE BOOKLET ORTHOGRAPHIC PROJECTION
 Appendix B: Autocad Booklet YR 9 REFERENCE BOOKLET ORTHOGRAPHIC PROJECTION To load Autocad: AUTOCAD 2000 S DRAWING SCREEN Click the start button Click on Programs Click on technology Click Autocad 2000
Clock Exercise (Inserting Planes)
") Clock Exercise (Inserting Planes) Prerequisite Knowledge To complete this exercise you will need to be familiar with Sketching, Applying relations, Extrude Boss/ Base, Extrude cut, Applying Textures, Renaming
Clock Exercise (Inserting Planes) Prerequisite Knowledge To complete this exercise you will need to be familiar with Sketching, Applying relations, Extrude Boss/ Base, Extrude cut, Applying Textures, Renaming
Chapter 2. Modifying, Extruding and Revolving the Sketches. Learning Objectives. Commands Covered AMMODDIM AMEXTRUDE AMREVOLVE
 Chapter 2 Modifying, Extruding and Revolving the Sketches Learning Objectives After completing this chapter, you will be able to: Modify the desired sketch using the AMMODDIM command. Extrude the desired
Project Booklet. Structural Drafting with AutoCAD
 Project Booklet Structural Drafting with AutoCAD Introduction 1 General Setup 2 Border and Title Block 3 Drafting the Foundation Plan (Plate 1) 8 Drafting the South Elevation (Plate 2) 11 Drafting Section
CAD Tutorial 24: Step by Step Guide
 CAD TUTORIAL 24: Step by step CAD Tutorial 24: Step by Step Guide Level of Difficulty Time Approximately 40 50 minutes Lesson Objectives To understand the basic tools used in SketchUp. To understand the
Chapter 7 Isometric Drawings
 Chapter 7 Isometric Drawings In this assignment, we are going to look at creating isometric drawings with AutoCAD. These drawing appear to be three dimensional but they are not. An AutoCAD isometric drawing
Creating a 3D Assembly Drawing
 C h a p t e r 17 Creating a 3D Assembly Drawing In this chapter, you will learn the following to World Class standards: 1. Making your first 3D Assembly Drawing 2. The XREF command 3. Making and Saving
Basic 2D drawing skills in AutoCAD 2017
 Basic 2D drawing skills in AutoCAD 2017 This Tutorial is going to teach you the basic functions of AutoCAD and make you more efficient with the program. Follow all the steps so you can learn all the skills.
Module 1G: Creating a Circle-Based Cylindrical Sheet-metal Lateral Piece with an Overlaying Lateral Edge Seam And Dove-Tail Seams on the Top Edge
 Inventor (10) Module 1G: 1G- 1 Module 1G: Creating a Circle-Based Cylindrical Sheet-metal Lateral Piece with an Overlaying Lateral Edge Seam And Dove-Tail Seams on the Top Edge In Module 1A, we have explored
Table of Contents. Templates to download. Configuring your system Customizing your wheel mouse System Requirements
 Table of Contents Introduction About this book Templates to download About the Author Configuring your system Customizing your wheel mouse System Requirements Intro-1 Intro-1 Intro-1 Intro-2 Intro-8 Intro-9
Revit Architecture Student Workbook
 Revit Architecture Student Workbook Building Information Modeling with Revit Architecture Contents Introduction... 5 Unit 1... 9 Theory: CAD Versus BIM... 9 Revit Architecture: Introduction, Interface,
Quick Start for Autodesk Inventor
 Quick Start for Autodesk Inventor Autodesk Inventor Professional is a 3D mechanical design tool with powerful solid modeling capabilities and an intuitive interface. In this lesson, you use a typical workflow
Table of contents. User interface 1: Customizable tool palette... 6 User interface 2: General GUI improvements... 7
 Table of contents WELCOME TO ADVANCE CONCRETE 2014... 5 USER INTERFACE ENHANCEMENTS... 6 User interface 1: Customizable tool palette... 6 User interface 2: General GUI improvements... 7 MODELING... 10
How to create a cove for cove lighting in DIALux In this tutorial you will learn how to make a cove similar to the one in the following image
 How to create a cove for cove lighting in DIALux In this tutorial you will learn how to make a cove similar to the one in the following image The cove dimension will be 4 meter by 5 meter and the other
SMALL OFFICE TUTORIAL
 SMALL OFFICE TUTORIAL in this lesson you will get a down and dirty overview of the functionality of Revit Architecture. The very basics of creating walls, doors, windows, roofs, annotations and dimensioning.
1Getting set up to start this exercise
 AutoCAD Architectural DesktopTM 2.0 - Development Guide EXERCISE 1 Creating a Foundation Plan and getting an overview of how this program functions. Contents: Getting set up to start this exercise ----
AutoCAD Architecture 2015 Step-by-Step Tutorial My First Project
 AutoCAD Architecture 2015 Step-by-Step Tutorial My First Project (Metric Version) by 2 590 While the Publisher and the Author have used their best efforts in preparing this book, they make no representations
Introduction to Parametric Modeling AEROPLANE. Design & Communication Graphics 1
 AEROPLANE Design & Communication Graphics 1 Object Analysis sheet Design & Communication Graphics 2 Aeroplane Assembly The part files for this assembly are saved in the folder titled Aeroplane. Open an
1: INTRODUCTION TO AUTOCAD
 AutoCAD syllabus 1: INTRODUCTION TO AUTOCAD Starting AutoCAD AutoCAD Screen Components Drawing Area Command Window Navigation bar Status bar Invoking Commands in AutoCAD Keyboard Ribbon Application Menu
SolidWorks Design & Technology
 SolidWorks Design & Technology Training Course at PHSG Ex 5. Lego man Working with part files 8mm At first glance the Lego man looks complicated but I hope you will see that if you approach a project one
UNIVERSITY OF SHEFFIELD; LANDSCAPE DEPARTMENT AUTOCAD 2013/14/15 TUTORIALS - SESSION 2 SESSION TWO
 SESSION TWO In this session we will look at another drawing tool HATCH and some more modifying / editing tools EXTEND, FILLET, MIRROR, SCALE and RECTANGULAR ARRAY. We will also look at LAYERS, LINETYPE,
Part 8: The Front Cover
 Part 8: The Front Cover 4 Earpiece cuts and housing Lens cut and housing Microphone cut and housing The front cover is similar to the back cover in that it is a shelled protrusion with screw posts extruding
Landscaping Tutorial
 Landscaping Tutorial This tutorial describes how to use Home Designer Essentials s Terrain Tools. In it, you will learn how to add elevation information to your terrain, how to create terrain features,
Creating a 2D Drawing in Paper Space
 C h a p t e r 16 Creating a 2D Drawing in Paper Space In this chapter, we will learn the following to World Class standards: 1. Converting 3D Solids to 2D Orthographic Views 2. Open the Solid Part Drawing
Draw IT 2016 for AutoCAD
 Draw IT 2016 for AutoCAD Tutorial for System Scaffolding Version: 16.0 Copyright Computer and Design Services Ltd GLOBAL CONSTRUCTION SOFTWARE AND SERVICES Contents Introduction... 1 Getting Started...
midas Dshop (Basic Tutorial) Basic Tutorial Reinforced Concrete Structure - 1 -
 Basic Tutorial Reinforced Concrete Structure - 1 -") midas Dshop (Basic Tutorial) midas DrawingShop Basic Tutorial Reinforced Concrete Structure - 1 - Index Ch.1 Summary of Design 1. Summary of Building Model 2. Standards of Structural Design 3. Structural
midas Dshop (Basic Tutorial) midas DrawingShop Basic Tutorial Reinforced Concrete Structure - 1 - Index Ch.1 Summary of Design 1. Summary of Building Model 2. Standards of Structural Design 3. Structural
Midterm Exam_STUDY GUIDE_70 questions
 Class: Date: CADD 2 Midterm Exam_STUDY GUIDE_70 questions Multiple Choice Identify the choice that best completes the statement or answers the question. 2. 3. 4. 5. 6. 7. 8. 9. 10. 1. Producing computer
Model House Exercise-( Extrude)
") -( Extrude) Prerequisite knowledge Focus of the lesson Commands Used This lesson requires an understanding of using the sketch commands including Inserting a new sketch Adding sketch geometry Understanding
-( Extrude) Prerequisite knowledge Focus of the lesson Commands Used This lesson requires an understanding of using the sketch commands including Inserting a new sketch Adding sketch geometry Understanding
Landscaping Tutorial. Adding a Driveway Adding Library Objects to Your Plan
 Landscaping Tutorial This tutorial describes how to use Home Designer Pro s Terrain Tools. In it, you will learn how to add elevation information to your terrain, how to create terrain features, and how
Lesson 6 2D Sketch Panel Tools
 Lesson 6 2D Sketch Panel Tools Inventor s Sketch Tool Bar contains tools for creating the basic geometry to create features and parts. On the surface, the Geometry tools look fairly standard: line, circle,
Managing images with NewZapp
 Managing images with NewZapp This guide is for anyone using the NewZapp Fixed editor as opposed to the Drag and Drop editor. The Image Manager is where images are uploaded and stored in your NewZapp account
What's New in Autodesk Architectural Desktop 2004? Kelcey Lemon
 December 2-5, 2003 MGM Grand Hotel Las Vegas What's New in Autodesk Architectural Desktop 2004? Kelcey Lemon BD31-5L Autodesk Architectural Desktop 2004 has well over 300 new features and enhancements.
Landscaping Tutorial
 Landscaping Tutorial This tutorial describes how to use Home Designer Architectural s Terrain Tools. In it, you will learn how to add elevation information to your terrain, how to create terrain features,
SAULT COLLEGE OF APPLIED ARTS AND TECHNOLOGY SAULT STE. MARIE, ONTARIO COURSE OUTLINE. Introduction to Computers and AutoCAD
 SAULT COLLEGE OF APPLIED ARTS AND TECHNOLOGY SAULT STE. MARIE, ONTARIO COURSE OUTLINE COURSE TITLE: Introduction to Computers and CODE NO. : SEMESTER: 2 PROGRAM: AUTHOR: Civil Engineering Technician Construction
Modeling an Airframe Tutorial
 EAA SOLIDWORKS University p 1/11 Difficulty: Intermediate Time: 1 hour As an Intermediate Tutorial, it is assumed that you have completed the Quick Start Tutorial and know how to sketch in 2D and 3D. If
AutoCAD 2D. Table of Contents. Lesson 1 Getting Started
 AutoCAD 2D Lesson 1 Getting Started Pre-reqs/Technical Skills Basic computer use Expectations Read lesson material Implement steps in software while reading through lesson material Complete quiz on Blackboard
2809 CAD TRAINING: Part 1 Sketching and Making 3D Parts. Contents
 Contents Getting Started... 2 Lesson 1:... 3 Lesson 2:... 13 Lesson 3:... 19 Lesson 4:... 23 Lesson 5:... 25 Final Project:... 28 Getting Started Get Autodesk Inventor Go to http://students.autodesk.com/
Principles and Applications of Microfluidic Devices AutoCAD Design Lab - COMSOL import ready
 Principles and Applications of Microfluidic Devices AutoCAD Design Lab - COMSOL import ready Part I. Introduction AutoCAD is a computer drawing package that can allow you to define physical structures
Anna Gresham School of Landscape Design. CAD for Beginners. CAD 3: Using the Drawing Tools and Blocks
 Anna Gresham School of Landscape Design CAD for Beginners CAD 3: Using the Drawing Tools and Blocks Amended for DraftSight V4 October 2013 INDEX OF TOPICS for CAD 3 Pages ESnap 3-5 Essential drawing tools
8 Working Drawings in AutoCAD
 8 Working Drawings in AutoCAD Most engineering designs consist of more than a single part. Usually there are a several or many parts that must fit and work together. When we are creating the drawings of
Parametric Drawing Using Constraints
 CHAPTER 10 Parametric Drawing Using Constraints PROJECT EXERCISE This project exercise provides point-by-point instructions for creating the objects shown in Figure P10 1. In this exercise, you will apply
Autocad Basics 7/28/2009. Chapter 14 - Learning Objectives
 Chapter 14 - Learning Objectives Autocad Basics Chapter 14 July 28, 2009 Use grips to stretch, copy, move, rotate, scale, and mirror objects. Edit objects using the Quick Properties panel and the Properties
Rendering a perspective drawing using Adobe Photoshop
 Rendering a perspective drawing using Adobe Photoshop This hand-out will take you through the steps to render a perspective line drawing using Adobe Photoshop. The first important element in this process
Advance Concrete. Tutorial
 Advance Concrete Tutorial Table of contents About this tutorial... 9 How to use this guide... 10 Lesson 1: Creating a building grid... 11 Step 1: Create a default building grid... 11 Step 2: Set the distances
Constructing a Wedge Die
 1-(800) 877-2745 www.ashlar-vellum.com Using Graphite TM Copyright 2008 Ashlar Incorporated. All rights reserved. C6CAWD0809. Ashlar-Vellum Graphite This exercise introduces the third dimension. Discover
Hexagons for Art and Illusion Part II Get ready Start a new project FILE New Open Faced Cube Import the hexagon block LIBRARIES
 Hexagons for Art and Illusion Part II In our last lesson, we constructed the perfect hexagon using EasyDraw. We built a six pointed star, a solid faced cube, and put the cube inside the star. This lesson
Ball Valve Assembly. On completion of the assembly, we will create the exploded view as shown on the right.
 Ball Valve Assembly Supplied are the main components of a ball valve. In this exercise you will assemble the valve as shown below Left. (N.B. Socket head cap screws are not supplied these will be created
Autodesk Medical Center
 Autodesk Medical Center Page 1 Contents Autodesk Medical Center... 1 Revit Projects... 3 Exercise 1 Create a new project file... 3 Datum Elements... 4 Exercise 2 Add Grids... 5 Exercise 3 Edit Levels...
TOY TRUCK. Figure 1. Orthographic projections of project.
 TOY TRUCK Prepared by: Harry Hawkins The following project is of a small, wooden toy truck. This exercise will provide you with the procedure for constructing the various parts of the design then assembling
Product Modelling in Solid Works
 Product Modelling in Solid Works In the following exercise you will use solid works to construct the computer mouse shown opposite. In this exercise you will use a number of advanced features to achieve