Rim Wednesday, January 16, :35 PM
|
|
|
- Virgil Jonah Bryan
- 5 years ago
- Views:
Transcription


1 ASL Breakdown Page 1 Rim Wednesday, January 16, :35 PM Similar to the plates, begin with the side blanks, determining the "show face" and taper angle. Then make the taper cut. The diagram shows these considerations when laying out the side blanks. Sides: Heel Top X Butt Back Orient the sweep of the grain to sweep up with the taper of the side. Side should be thickness sanded to 0.085" (about 2mm) X marks the following: Show face Lower bout Soundboard edge Decide this when you evaluate the side blanks Sled with side taper template in place for locating taper cut. When this cut is made, the edge that will join to the soundboard is inboard on the sled. The saw cuts the edge that will join to the back. NOTE: before this step, figure out which side will show, which will be front and back, etc (see above).
 of Masonite conform to the contour of the waist as given by the guitar form in the bender.")

: Best material is copper, but")

2 ASL Breakdown Page 2 Side bender, waist compression. On each side of waist, 7 small panels (1/8" each?) of Masonite conform to the contour of the waist as given by the guitar form in the bender. Once the contour is set, tighten the bolts to hold the Masonite "leaves" to the correct shape. Note 3 parallel cutouts for the guitar shape. separated by dowels. Fox bender Another view of bender machine at waist. Note on pipe bender (to tune up sides after they have been on the Fox bender): Best material is copper, but aluminum is good. Bending machine is heated with the metal and heat blankets fully bent in order to have metal contact the heat as much as possible. Note the (very) small red arrow at the waist pointing to the upper bout. The work should have this spot marked as well. The sides to be bent are placed (one at a time) between pieces of butcher paper. This prevents wood resin
.")

3 ASL Breakdown Page from building up on the metal in the bender. The paper is marked, using the side template, to indicate the waist and the spot corresponding to the red arrow (above). The sides must be bent considering that one is left and one is right - line them up on the workbench correctly and don't move them out of the correct configuration (use the X mark made previously). Soak the wood and paper with a spray bottle. The bender is loaded with the sides between the 2 metal strips underneath the heating blanket. A 3rd metal piece goes over the heating blanket. Make sure the straight (soundboard) edge of the side piece is square with the bending jig so the side does not come out with a twist in it. Ideally, the heating blanket can be controlled with a switch similar to a stovetop cook unit. A probe, like a digital oven meat thermometer, can be used to check temperatures. The bending cycle is: Pre-heat to 300 degrees Insert piece to bend. Bring the waist down and then back off 1 1/2 turns. Bend the upper bout, then the lower bout. Re-tighten waist. Set heat blanket for 250 degrees for 15 minutes. Allow to cool to room temp With the sides still in place, go through a second heating (250 degrees) and cooling cycle View of completed sides showing curvature from dish. Note that the butt end (foreground) is lower than the sides at the waist. Also note X mark indicating top/butt end/show face.


4 ASL Breakdown Page 4 Setting up the mold for a specific body shape. The large dowels are pieces of closet pole. All Charles' guitars have a 20" radius at the head and foot blocks. Building mold and center caul Make sure head and tail blocks are properly aligned and tightened in place. Properly adjusted mold with guitar sides and caul spanning the waist in place. Note that in the form, the guitar is build face down with the floor square to the reference plane. My mold with head block bolted in place. When working with the mold, adjust the bent wood work pieces (sides, linings) to find the "natural" spot for the waist. Then work out from there to determine where the pieces will intersect the other sides or the neck and tail blocks. Blocks are covered with packing tape and side of head block is taped as well to help clean up glue run out. Head block inner curve is fine sanded for appearance.


![A caul shaped like an ] is used to spread clamping](/docs-images/81/84373772/images/5-2.jpg "force to bottom of tail block.")
5 ASL Breakdown Page 5 Radiusing rear of tail block to 20" radius prior to gluing in mold. Tail block radius sander Tail block clamping. Like head block, tail block is raised on 3/16" shim. A caul shaped like an ] is used to spread clamping force to bottom of tail block. Cam clamps used - one on either side of cauled (lower) clamp.


 fully")
6 ASL Breakdown Page 6 Final clamping Note cams of clamps are all outboard of the mold in a position to be (nearly) fully thrown.


7 ASL Breakdown Page 7 To fit linings: - Find "natural" waist. - Compress lining along the sides toward the front of the guitar. Cut front of kerfed lining at the kerf closest to the head block. If possible, cut the kerfed piece at an angle to fit closely to the head block. - Cut solid lining so it is proud of the head block and roughly at the angle needed to meet the head block to make a clean joint. Trim with sandpaper until the solid lining and head block join well. - Repeat this process at the tail, making sure to keep the linings solidly butted against the sides so that the overall length is correct when gluing. <--- Completely installed and clamped top lining. Note spreader at waist. Be as conservative as possible with glue when gluing in linings. It leaves less to clean up.


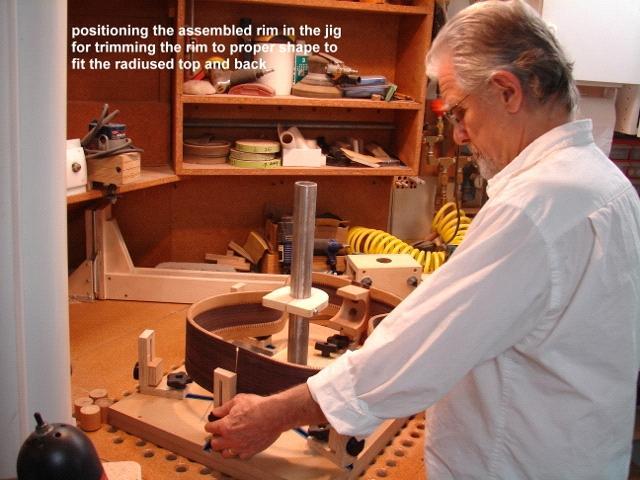
8 ASL Breakdown Page 8 Next, the frame is cut down to size and to a 12' radius on the back side. This begins with a rough cut of the frame using a scribed mark and a plane. My frame with a peep hole cut to the depth of the head block. Such a hole is cut into both head and tail blocks. The scribe tool should be set to scribe a line at the height of this window. This should be the same at both the head and tail blocks. If it is not, raise the lower of the 2 sides with shims until the proper cut can be scribed with minimal loss of side material. Scribing 25' radius line around sides when top is face down on the dish. The line is drawn with a white pencil held in a protractor-like jig with a flat bottom that moves across the surface of the dish.


9 ASL Breakdown Page 9 Preparing to plane the top to the scribed line with a block plane. Taking off top side of frame with a block planer. The waist is not much accessible to the plane, but the rest planes nicely. Keep the plane at a tilt so that the lining is proud of the sides themselves. Also, plane across the lining at an angle so as not to split it.


10 ASL Breakdown Page 10 After the rough planing, the frame can be cut so as to put a the 12' radius arc on the lining, which will be the gluing surface for the radiused back plate. <--- Setting frame into radius fixture for cutting the back to a 12' radius arc. Radiusing the frame can be done with an electric potter's wheel and a radius plate. The wheel can be mounted sideways on a wall to take up less room. New wheels aren't cheap! Guitar frame aligned in fixture so as to be level. Adjusting router cut to be just proud of the head and tail block surfaces. The reference plane is to the top of the guitar. When routing the back (as here), the top of the frame is face down in the jig. The supports are adjusted so the sides and lining that face the back of the guitar are level to the router. Rim trimmer fixture with router Router head of radius fixture. Note the arm that controls the distance of the bit from the guitar is radiused. As the bit travels closer to and further from the center pole, it travels along the radiused guide beams.

11 ASL Breakdown Page 11


12 ASL Breakdown Page 12 Final radius shaping on 12' radius dish with course paper. Use the pencil test to be sure sanding is complete. More fixture pix.


13 Finished frame. ASL Breakdown Page 13
Fretboard Wednesday, January 16, :36 PM
 ASL Breakdown Page 1 Fretboard Wednesday, January 16, 2013 9:36 PM - - To prepare the fretboard for cutting fret slots: True one edge of the fretboard blank on the jointer. True one of the other edges
Finish Neck and Fretboard Wednesday, January 16, :36 PM
 ASL Breakdown Page 1 Finish Neck and Fretboard Wednesday, January 16, 2013 9:36 PM Layer on the fret board, making sure registration pins are in place and everything lays flat. The 3/16" aluminum nutsurrogate
Join Neck and Body Wednesday, January 16, :08 PM
 ASL Breakdown Page 1 Join Neck and Body Wednesday, January 16, 2013 10:08 PM 1. 2. 3. 4. Charles did the following steps to speed things up: Lightly sanded the top of the lower bout with an orbital sander.
Display Case (for J&S)
") Display Case (for J&S) This is constructed of maple plywood with solid maple (soft maple) edge banding. It was made to fit between a door and a kitchen cabinet, and has an elegant circular taper between
Display Case (for J&S) This is constructed of maple plywood with solid maple (soft maple) edge banding. It was made to fit between a door and a kitchen cabinet, and has an elegant circular taper between
Build Table of Contents. 1. Introduction
 Build Table of Contents 1. Introduction... 1-2 2. A Brief Review of Assembly Systems... 2-2 2.1. Free Assembly Methods... 2-3 2.2. Constrained Assembly Methods... 2-4 3. Our Approach to Building... 3-2
Arched. Building an. Passageway. Although my company specializes in high-end jobs
 Building an Arched Passageway All photos by Brian Striegler This straightforward approach combines basic shop methods with simple site joinery to create an elegant frame-and-panel archway by Gary Striegler
Chapter Four, Fitting out the Shell
 Chapter Four Fitting out the Shell This chapter outlines the process for fitting the parts that go into a round or stave back shell. Square back sound boxes usually have the cap and base of the sound box
BUILDING A SELMER MACCAFERRI GUITAR
 BUILDING A SELMER MACCAFERRI GUITAR A step-by-step guide to building a laminated body Selmer-Maccaferri guitar Michael Collins The Heel The heel should now be prepared to be glued to the neck shaft. Using
BUILDING MARTIN-STYLE ACOUSTIC GUITAR KITS 41
 Braces To Be Tucked Into Lining The braces in the photo at right with circles at the ends are those that will be notched into the lining of the guitar. In this procedure, the end of the brace is trimmed
Piper Cherokee /3 scale. Construction Manual
 Piper Cherokee 140 1/3 scale Construction Manual STAB CONSTRUCTION 1. Remove foam cores from cradle and place on flat surface. Inspect pieces before you epoxy halves together making sure leading and trailing
FORWARD FUSELAGE SIDES & REAR TOP SKINS
 FORWARD FUSELAGE SIDES & REAR TOP SKINS WORK REPORT Step No. Check Parts / Tools Qty Preparations. 1 [ ] 6F5-3 Upper Front Longerons 2 2 [ ] 6F5-5 Heel Support 1 3 [ ] 6F5-2 Front Floor Skin 1 3 [ ] Firewall
An Inner Hive Cover. In the Beekeeper s Work Shop. Building a Bee Hive: The Inner Hive Cover. by Stephen E. Tilmann
 An Inner Hive Cover In the Beekeeper s Work Shop The project for this article is an inner hive cover. The inner cover sits on top of the topmost hive body (super) and underneath the telescoping top cover
Instructables Butcher Block Top
 Instructables Butcher Block Top Project Overview: This project requires basic woodworking skills and access to woodworking machines. Woodworking machines have sharp cutting edges and are NOT forgiving.
craftsman rocker Classic style meets comfort in this sturdy oak rocking chair BY MICHAEL PEKOVICH 34 FiNE woodworking
 craftsman rocker Classic style meets comfort in this sturdy oak rocking chair BY MICHAEL PEKOVICH 34 FiNE woodworking photo, this page: Michael pekovich shape the rear legs designing a chair can be a tough
Demilune 4. Apron Joinery. Curved Apron Tenon. Bridle Joint Legs. Bridle Joint Front Apron
 Demilune Email 4 Apron Joinery There are two types of joints used in connecting the aprons and legs. The rear legs use conventional mortise and tenon joints, while the front legs use the less conventional
Bandsawn curves, Precise and repeatable
 Bandsawn curves, Precise and repeatable Template-guided techniques from a master of the machine BY BRIAN BOGGS In 35 years working wood I ve gradually acquired many machines, but the bandsaw remains at
Router Table. In a recent article, I wrote about the router table I built for the Center. 5 Essential Jigs for the
 5 Essential Jigs for the Router Table Great fixtures and fences offer better control and new possibilities BY PETER SCHLEBECKER In a recent article, I wrote about the router table I built for the Center
Copyright WilkerDos.com Dining Table. Project Designed By April Wilkerson - Plan Created By Jay Bates (jayscustomcreations.
 Copyright WilkerDos.com 2017 Project Designed By April Wilkerson - Plan Created By Jay Bates (jayscustomcreations.com) Layout & Shopping List Page 2 of 12 Layout & Shopping List Item Quantity Description
Contents. pages 20-24: Installing Edge sinks into. custom laminate countertops page 8: Installing Edge sinks into postform laminate countertops
 Contents pages 2-8: Installing Edge sinks into custom laminate countertops page 8: Installing Edge sinks into postform laminate countertops pages 9-14: Installing Acrylic sinks into custom laminate countertops
A Unique Cutting Board
 A Unique Cutting Board When I was asked to make a cutting board as a special gift, I wanted to do something new and eye-catching. Tired of squares and straight lines, I envisioned curving accents not shallow
Traditional Undermount: S Method (Undermount):
:") TOOLS REQUIRED 15.1 TOOLS REQUIRED The installation of Corian shape product must be a precise and exacting process to ensure that a good fit is always created. Using the correct tools is essential. In
TOOLS REQUIRED 15.1 TOOLS REQUIRED The installation of Corian shape product must be a precise and exacting process to ensure that a good fit is always created. Using the correct tools is essential. In
GENERAL NOTES: Page 1 of 9
 Laminating A Zia Into A Turning Blank by W. H. Kloepping, Jan. 2009 This describes how a zia (the New Mexico state symbol) can be laminated into a turning blank. Materials needed: Square Turning Block
Stand & Bowls. optional. Online Extra
 Online Extra optional Stand & Bowls Once you make a bowl using the jig and technique from Woodsmith No. 229, it s only natural to see what else you can do with it. The starting point is to make copies
Redwood strips are tacked to the templates, and edge-glued. Drive brads through into the templates before putting on fiberglass doth.
 1 Make the building form and attach templates to the crosspieces. Nail a strip down the center to hold the stems and templates in position. prototype canoe took about three weekends to build. She's broad
CENTER WING SECTION (CWS) WORK REPORT
 WORK REPORT") CENTER WING SECTION (CWS) WORK REPORT No. Check Parts / Description Qty PHASE 1: Preparations 1 [ ] 6V1-3 Rear ribs 2R & 2L 1 [ ] L Angle 6 2 [ ] 6V2-1 Rear Ribs.032 2R & 2L 2 [ ] 6V5-1 Gear Rib Doubler
CENTER WING SECTION (CWS) WORK REPORT No. Check Parts / Description Qty PHASE 1: Preparations 1 [ ] 6V1-3 Rear ribs 2R & 2L 1 [ ] L Angle 6 2 [ ] 6V2-1 Rear Ribs.032 2R & 2L 2 [ ] 6V5-1 Gear Rib Doubler
BUILDING A STORM DOOR
 BUILDING A STORM DOOR BY NEAL BARRETT Illustrations by George Retseck If you're in the market for a storm door, you probably know that there are many styles and models available. However, most of them
Silverware Chest Plan
 Silverware Chest Plan 05L14.01 Introduction 1. Measure the space required for your cutlery before beginning this project to be sure that it will fit in the drawers and top compartment. The best way to
COMPLIMENTARY WOODWORKING PLAN
 COMPLIMENTARY WOODWORKING PLAN ORIENTAL GARDEN ARBOR PLAN This downloadable plan is copyrighted. Please do not share or redistribute this plan in any way. It has been paid for on your behalf by JET Tools,
Grade 11 Woods Lift Lid Coffee Table. Based on Under the big Top from Popular Mechanics Website
 Grade 11 Woods Lift Lid Coffee Table Based on Under the big Top from Popular Mechanics Website TABLE TOP 1. Select enough lumber to construct a top that is between 22 ½ and 24 wide after jointing. Ensure
BONDO PROCESS. Installation Guide.
 BONDO PROCESS Installation Guide www.karran.com BONDO PROCESS This Installation Guide demonstrates simple methods and proven techniques for seamlessly installing Karran undermount sinks in laminate countertops.
Installing your new Bevella Top. L Shaped Countertop with Joints No Finished Ends (Fits Between Four Walls)
") Installing your new Bevella Top L Shaped Countertop with Joints No Finished Ends (Fits Between Four Walls) Bevella RTI Countertops are engineered and manufactured to the highest quality standards, built
Installing your new Bevella Top L Shaped Countertop with Joints No Finished Ends (Fits Between Four Walls) Bevella RTI Countertops are engineered and manufactured to the highest quality standards, built
Tilt-Top Table Elegant project builds hand-tool and machine skills
 Tilt-Top Table Elegant project builds hand-tool and machine skills BY M A R I O R O D R I G U E Z As a woodworking instructor, I m always looking for interesting and challenging projects to present in
Assembly Manual - Flamenco Guitar Kit
 Assembly Manual - Flamenco Guitar Kit Index Contents (pg. 3) Soundboard assembly (pg. 4) Neck to top assembly (pg. 5) Preparation of the sides (pg. 6) Preparation of the back (pg. 7) Body assembly (pg.
LAYOUT & ROUTING TEMPLATES Electric Guitars
 1/8 Clear Acrylic Templates Violin Makers Template Set 1 All of the essential templates for bridge shape, 55.00 fingerboard radius & string spacing for nut and bridge. 11 JAZZ BASS ½ BASS 1/4 BASS CELLO
Laminated Furniture Components
 Laminated Furniture Components Dec 2010 Woodworkers Simple Round Cherry Table Fritz Smith Cherry - 2008 Woodworkers 2 Snowboard Bench Fritz Smith White Oak Snowboard - 2009 Woodworkers 3 Fritz Smith Shell
Chili Pepper Routed Bowl
 Chili Pepper Routed Bowl MLCS Items Needed: Chili Pepper Bowl and Tray Template #9189 Top Mounted Bearing Dish Cutter Router Bit #7817 1/2 Router Collet Extension and Wrenches #9465 3/16 Radius Round Over
Note - the nose ribs and are thinner than the main ribs. These nose ribs will use a thinner rib cap than the ribs. This is per design.
 Stabilizer rev 1.2 The SE5a stabilizer is the heartbeat of the tail and is recreated like the full scale version. All tail pieces depend on the stabilizer. It uses the steel fittings, pulleys, inspection
Front Vise 70G G08.02
 Front Vise 70G08.01 70G08.02 The following instructions guide you through the installation of either the Regular Front Vise (70G08.01) or the Large Front Vise (70G08.02). The first step is to determine
Instructions for Turning Laminated Bracelets
 Instructions for Turning Laminated Bracelets 1. Start with Design 1. Make a paper template circle for the bracelet. Use this to check the fit on the person you are making the bracelet for. After checking
Scratchbuild A Backwoods Water Tank Part V - Making the Frost Box and Hanging the Water Spout
 Scratchbuild A Backwoods Water Tank Part V - Making the Frost Box and Hanging the Water Spout By Dwight Ennis In this section, we're going to make the Frost Box, and we'll build the Spout Hanger Assembly
Building Tips This model can be built using the following types of adhesives:
 Page 1 Building Tips This model can be built using the following types of adhesives: Epoxy (with or without microballons) Odorless cyanoacrylate (CA) with accelerator UHU Creativ for Styrofoam (or UHU
Complete Dovetail Jig Instructions
 Complete Dovetail Jig Instructions 15 18 4 3 1 12 13 8 19 17 16 6 14 5 9 11 10 2 9 PARTS LIST - Complete Dovetail Jig Introduction Your new dovetail jig will cut Full Through Dovetails and three varieties
Copyright 1998 KDE Technologies
 Modular Computer Corner Desk Unit Copyright 1998 KDE Technologies http://members.tripod.com/~kdetech/ 1. Introduction 2. Plans Sheet one - Isometric Sheet two - Top Detail / Corner Unit Sheet three - Leg
Curved Pieces are a Common Woodworking Challenge
 Curved Pieces are a Common Woodworking Challenge I recently created a set of four dining chairs that required three curved back rest pieces each. On the top piece of each chair I wanted to inlay a marquetry
Installation Guide 1
 1 2 Contents Before you begin Storage & preparation Tools & materials you may need Getting started Sink & cooktop cut-outs Cabinet Joins for 20mm benchtops Joining & installation of 20mm benchtops Joining
Layout and Fitting. Chapter 6 Layout and Fitting
 6 Layout and Fitting A. RESILIENT SHEET FLOORING Layout and Fitting There are three general methods of fitting resilient sheet flooring into a room: freehand knifing, direct (or straight) scribing and
Installation Guide. Pionite Decorative Surfaces One Pionite Road, Auburn, Maine PIONITE ( )
") Installation Guide A Subsidiary of Panolam Surface Systems SMPBRO00-012 6/14 Pionite decorative laminates are designed for finished interior surfaces which require high impact, wear and stain resistance
Installation Guide A Subsidiary of Panolam Surface Systems SMPBRO00-012 6/14 Pionite decorative laminates are designed for finished interior surfaces which require high impact, wear and stain resistance
FLAT TO FABULOUS Make a Bowl from a Single Flat Board - Or How to Eat Salad off of Scrap Wood
 FLAT TO FABULOUS Make a Bowl from a Single Flat Board - Or How to Eat Salad off of Scrap Wood Let s face it: Woodworkers are frugal people. In fact, if you are anything like me, you have a hard time throwing
This is a solid wood cabinet. The only plywood used is for the back and drawer bottoms.
 Sideboard Sideboard Overview: This project requires basic woodworking skills and access to woodworking machines. Woodworking machines have sharp cutting edges and are NOT forgiving. You should be properly
30 FINE woodworking. Photo, this page: Michael Pekovich
 30 FINE woodworking Photo, this page: Michael Pekovich Arts & Crafts Bed White-oak bed is loaded with Stickley style and topped off with traditional inlay by Kevin Rodel This bed design is a close copy
Tools and Tips: ( 1 )
") Tools and Tips: As you build instructions will show in my many picture manual how to assemble. You can use your own methods as you desire, my results are very good. A smooth, flat work surface is very
Tools and Tips: As you build instructions will show in my many picture manual how to assemble. You can use your own methods as you desire, my results are very good. A smooth, flat work surface is very
About.com :
 http://woodworking.about.com/gi/dynamic/offsite.htm?sit...//www.popularwoodworking.com/features/fea.asp%3fid=1088 (1 of 8)1/28/2004 12:05:01 AM Modern Storage Tower The last thing I want to do when starting
Action Frame Inspection and Repair. DEFINITIONS action spread vertical height differential rake
 Action Frame Inspection and Repair DEFINITIONS action spread vertical height differential rake MAKING A FOOT PRINT mark the position of all action brackets, rails, and screws make screw hole spacing template
COMPLIMENTARY WOODWORKING PLAN
 COMPLIMENTARY WOODWORKING PLAN COFFEE TABLE PLAN This downloadable plan is copyrighted. Please do not share or redistribute this plan in any way. It has been paid for on your behalf by JET Tools, a division
Layout and Fitting. Chapter 6 Layout and Fitting 6. 1
 6 Layout and Fitting Chapter 6 Layout and Fitting 6. 1 Layout and Fitting A. RESILIENT SHEET FLOORING There are three general methods of fitting resilient sheet flooring into a room: freehand knifing,
COMET 24" HELLCAT REPRODUCTION ASSEMBLY GUIDE
 COMET 24" HELLCAT REPRODUCTION A RUBBER POWERED 24" WING SPAN MODEL BY PAUL BRADLEY ASSEMBLY GUIDE AUGUST 2016 CHANGES MADE TO THE ORIGINAL The following changes were made to the original Comet kit structural
For Barrel Tapers. Installation and Operating Instructions for use with table saws and large disk sanders
 Tim s Taper Tool For Barrel Tapers Installation and Operating Instructions for use with table saws and large disk sanders Your taper tool is capable of making barrel tapered shafts. The term barrel is
Essential BOX JOINT JIG
 Essential BOX JOINT JIG Home in on precise finger joints with this table saw sled. By Ken Burton The box (or finger) joint is a remarkably strong, interlocking corner joint that can be quickly made on
SZD-10 bis CZAPLA ASSEMBLY MANUAL IN PICTURES
 1 RUDDER Plan and parts: 2 Assembly steps: Photo above: glue together rudder spar, ribs and trailing edge. Clamp spar to a flat surface (chipboard on the photo) and make sure the straight aligment of the
LARK. Classic Legal Precision Stunter RSM DISTRIBUTION. presents. Charles Mackey. Wing Area 570sq. Wingspan 52.
 RSM DISTRIBUTION presents LARK By Charles Mackey Photo _ Bob Hunt Classic Legal Precision Stunter Wingspan 52 Length 39.5 Wing Area 570sq Motor 35-46 www.rsmdistribution.com Page 2 Thank you for purchasing
CA to each one. You may have to hold the end down while to glue sets or use an accelerator like I did.
 The following information and photographs are what I did to build the kit. Your methods and needs may differ from this which is fine. There is no right or wrong way if you are used to scratch building.
6625 WEST WILSHIRE BLVD. OKLAHOMA CITY, OK (405) FAX (405)
 FAX (405)") INSTALLATION INSTRUCTIONS FOR BEDSIDE INNER REPAIR PANELS 67-72 GM FLEETSIDES This instruction illustrates the removal and replacement of the often rusted and damaged lower inner flanges on the 1967-1972
INSTALLATION INSTRUCTIONS FOR BEDSIDE INNER REPAIR PANELS 67-72 GM FLEETSIDES This instruction illustrates the removal and replacement of the often rusted and damaged lower inner flanges on the 1967-1972
STOL CH 701. Layout the cut line along the bend tangent line on the web. 7V6-1 and 7V6-2SP
 Layout the cut line along the bend tangent line on the web. 7V6-1 and 7V6-2SP ORIENTATION: 90 degree flange is up Layout the bend line, 20mm from the end. Ref. bottom right diagram 7-V-6 Use a square to
Building the Wee Lassie Canoe. A Michigan Woodworkers Guild Presentation by Bob Mills
 Building the Wee Lassie Canoe A Michigan Woodworkers Guild Presentation by Bob Mills So you want to build a boat, eh? Ok, how about this for starters? Carved by Livio De Marchi, Woodcarver Extraordinaire
Turning a Fast Joint dovetailed vase on a lathe
 Turning a Fast Joint dovetailed vase on a lathe Contributed by customer Brian H from Knoxville TN The MLCS Fast Joint precision joinery system offers a broad range of dovetail patterns that can be created
Charles Neil Dovetail Jig Instructions
 Charles Neil Dovetail Jig Instructions Thank you for purchasing the Charles Neil (CN) Dovetail Jig. This is an easy to use and flexible jig for cutting through dovetails. These instructions complement
SE5a Wing Panels rev 1.0
 SE5a Wing Panels rev 1.0 The top and bottom wings are different. They might look the same but the bottom wing has one less rib and some rib spacing difference. This is due to where the wooden interplane
How to install backchecks
 How to install backchecks Note: All pictures can be enlarged for better clarification. Revision 7 8/2009 Backchecks wear out in a piano much like brake pads in an automobile. While wear is a valid reason
ZODIAC CH 601 Series Kit Aircraft
 ZODIAC CH 601 Series Kit Aircraft THE FOLLOWING IS A DRAFT MANUAL This manual has been written and published strictly for informational purpose. It has been prepared as a guide to facilitate the assembly
Pro-Doweling Kit USER S MANUAL #840. Visit us at
 Pro-Doweling Kit USER S MANUAL #840 99 Washington Street Melrose, MA 02176 Phone 781-665-1400 Toll Free 1-800-517-8431 Visit us at www.testequipmentdepot.com Please read this manual carefully and thoroughly
Adjustable Hammered Dulcimer Stand
 Adjustable Hammered Dulcimer Stand Musicmaker s Kits (Hwy 36 behind Joseph s Restaurant) P.O. Box 2117 Stillwater MN 55082 651 439 9120 www.harpkit.com PARTS LIST: 1 Set of Assembly Instructions A. 2 front
Hinge Mortising Jig. One of the make it or break it parts of building a. 6 ShopNotes No. 74
 Hinge Mortising Jig A Mortise for a Hinge. Quick, clean, and accurate that s the only way to describe the mortise you get with a trim router and this hinge mortising jig. One of the make it or break it
How to make tailwheel shock rubber donuts and aluminum shims with formed flange
 How to make tailwheel shock rubber donuts and aluminum shims with formed flange The following shows how to form a flange on the inner hole of aluminum shims to go between the rubber donuts for the tailwheel
Instructions for use: 650mm, 700mm & 1000mm Versions.
 Instructions for use: 650mm, 700mm & 1000mm Versions. These New Compact Multifunction jigs offer all the cuts & facilities as the larger traditional worktop jigs. The compact design make them very light
Cowper From Steve Wolverton on the T&TTT forum, Feb 2005 For Reference Only Do not use to build a trailer. Check on Teardrop and Tiny Travel Trailers
 Cowper From Steve Wolverton on the T&TTT forum, Feb 2005 For Reference Only Do not use to build a trailer. Check on Teardrop and Tiny Travel Trailers for up to date building information; http://www.mikenchell.com/forums
Ahead of the curve 2 Part
 F&C PROJECT Ahead of the curve 2 Part In the second part of this series, Chris Tribe constructs the table for his stylised cabinet which we looked at last month in F&C Accuracy in turning the legs for
Agricultural Mechanics and Technology Power Tool Safety Rules
 Agricultural Mechanics and Technology Power Tool Safety Rules Name: BAND SAW Use: Cutting curves, circles and irregular shapes. 1. Use clean SHARP blades. 2. The teeth should always point DOWN. 3. Adjust
B-BENDER Do It Yourself Installation Instructions
 (Parsons/Green) B-BENDER Do It Yourself The Hipshot (Parsons/Green) B-Bender is designed and manufactured to provide decades of trouble free service when it is properly adjusted and installed. These installation
 America s leading woodworking authority To download these plans, you will need Adobe Reader installed on your computer. If you want to get a free copy, visit: http://adobe.com/ reader. Having trouble downloading
12. Wings, Flaps, Ailerons and Struts
 12. Wings, Flaps, Ailerons and Struts Fit Aileron Hinges Reference: Drawing 20270K2 Photo 12.1 Parts Required: 2007092 Aileron LS 200809N Aileron RS 2001394 Hinge 3/16 A1 (4) 2001694 Hinge Pin (4) PH0059N
Making a Cement Upper Molding Surface for Compression Molding of Shape&Roll Prosthetic Foot Cores
 Making a Cement Upper Molding Surface for Compression Molding of Shape&Roll Prosthetic Foot Cores Andrew Hansen, PhD Steven Steer, MS Kerice Tucker Elizabeth Klodd Craig Heckathorne, MS Northwestern University
Make a cupboard as a BCATS
 National Certificate in Building, Construction, and Allied Trades Skills (BCATS) Make a cupboard as a BCATS project Unit Standard 25921 Level 2, Credit 6 Name: Contents Reference Page What you need to
router table sled 2012 August Home Publishing Co.
 router table sled 2012 August Home Publishing Co. best-built jigs & fixtures router Table Sled Packed with features, this sled makes it easy to rout perfect-fitting joints. A router table is a great tool
Slide the stock rubber tank mount caps onto the ends of the CS-1 tank mount:
 RYCA CS-1 BODY PARTS INSTALLATION GUIDE [The CS-1 installation guides should be used as supplements to the videos found on our Youtube Channel. There is no strict order to the build process, but it is
WOOD TOY NEWS SANDING DRUMS & JIGS ISSUE
 WOOD TOY NEWS SANDING DRUMS & JIGS ISSUE toymakingplans.com June 11, 2014 Wednesday How to Make a Sanding Drum Jig for Smarter Toymaking. By Imants Udris Udie Our discussion begins based on the 5 piece
Tall Outdoor Chair Set March/April 2018
 Tall Outdoor Chair Set March/April 2018 Traditional, low-slung Adirondack chairs are an enduring favorite among woodworkers, because their casual styling makes them easy to build. But, once you re seated
INSTALLATION GUIDE VERSION 11/14
 INSTALLATION GUIDE VERSION 11/14 In this guide we will demonstrate effective techniques and methods for installing EDGE stainless steel sinks seamlessly in both laminate and solid surface. These techniques
Chapter 18. Interior Doors
 Chapter 18. Interior Doors 18.1 SWINGING DOORS 18.2 SLIDING DOORS 18.3 BIFOLD DOORS Tools needed by volunteers: Hammer Nail apron Tape measure Square Pencil Tools and equipment needed: Extension cords
Obtained from Omarshauntedtrail.com
 DaveintheGrave's Halloween Props Animated Crawling Skeleton Build a life-size skeleton torso that realistically crawls across the lawn one arm at a time. 1. Motor Base and Linkage Assembly BASE - I used
The Festool Parallel Guides Take Guided Rail Cutting and Routing to a Whole New Level
 The Festool Parallel Guides Take Guided Rail Cutting and Routing to a Whole New Level Text and photos by Jerry Work Copyright 2009, The Dovetail Joint Those familiar with the Festool guided rail cutting
135 ROLLTOP DESK 515
 135 ROLLTOP DESK 515 For the person who hates to clear off a desk, who wants to leave everything where it is overnight yet still have the clutter hidden, a rolltop desk is a godsend. The tambour hides
4. Bevel the LE face of HS1-HS11 to match the horizontal stab leading edge sweep angle.
 BEFORE YOU BUILD 1. Unroll each sheet of the plans. Roll them inside out so that they will lie flat on the building surface. 2. Assemble the tools that you will need to build each section so that they
Authors: Max Guzman, Donna Delahanty Guzman, Steve Hottinger. Teak & Aspen Sole Installation
 Forward Authors: Max Guzman, Donna Delahanty Guzman, Steve Hottinger Teak & Aspen Sole Installation The original teak plywood floor on our 1976 T34C needed an extreme makeover. The dark stained areas refused
ULTIMATE ROUTER TABLE PLANS. By Dan Phalen
 ULTIMATE ROUTER TABLE PLANS By Dan Phalen January 2017 Ultimate Router Table Plans. Copyright 2012-2017 by Daniel Phalen. Published by Creston Hall Publishing Company. All rights reserved. No part of this
ZODIAC CH 601 Series Kit Aircraft
 ZODIAC CH 601 Series Kit Aircraft THE FOLLOWING IS A DRAFT MANUAL This manual has been written and published strictly for informational purpose. It has been prepared as a guide to facilitate the assembly
3Insert the second rod no. 4
 Yamato: Step-by-step 37 The stern block and searchlight control towers a b c d e f Recommended tools and materials Wood glue Sandpaper (no. 800 grain) Metal file Putty Craft knife For metal: Super Glue
Dreadnought Acoustic Guitar Kit #5295 Assembly Instructions stewmac.com
 Dreadnought Acoustic Guitar Kit #5295 Assembly Instructions Table of contents Getting started Welcome to guitar building!... 2 Recommended tools and supplies... 2 Kit parts list... 3 Side Assembly Assembling
ARTS AND CRAFTS CHAIR
 ARTS AND CRAFTS CHAIR 491 MATERIALS LIST--DINING CHAIR Key No. Size and description (use) A 2 1-3/4 x 1-3/4 x 16-1/4'' oak (front leg) B 2 1-3/4 x 3-3/4 x 40-1/2'' oak (rear leg) C 1 1-3/4 x 3-3/16 x 15''
RSM DISTRIBUTION Presents
 RSM DISTRIBUTION Presents MOSQUITO By Jack Sheeks Photo _ Jack Sheeks Semi Scale Twin Stunter Wing Span: 58" Length: 37-3/4 Area: 579 sq. in. Engine: Two.35 -.40 www.rsmdistribution.com Call (951) 678
PROJECT PLAN TRAVEL CRIBBAGE BOARD
 BUILD IT WITH ROCKLER PROJECT PLAN TRAVEL CRIBBAGE BOARD BUILD Stock # Item Stock # Item 59160 Small Cribbage Board Template, 2-Player, Straight Track 90638 3/4" Dia. Straight Router Bit (1/2" shank) 21026