ASAP Sr. A Strap and Pole. Magic Christmas. Single Stage. Walter Monkhouse. Alexandria, La. Version 1.2.
|
|
|
- Brianna Hancock
- 5 years ago
- Views:
Transcription


1 ASAP Sr Single Stage A Strap and Pole Version 1.2 Walter Monkhouse Walter@MagicChristmas.org Magic Christmas Alexandria, La.
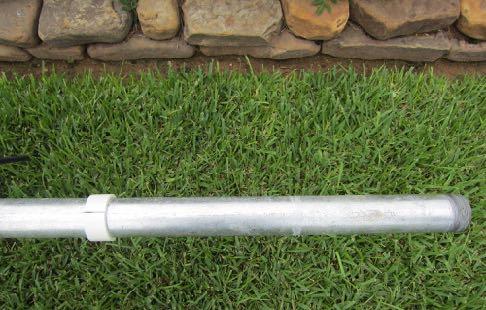
2 Description The ASAP Sr, single stage, has the same concept as the ASAP Jr. The outer and inner poles are larger than the Jr providing more hardiness, heavier load capacity and more wind resistance. When mounted on a Portable Hole a total height of 19 1 can be reached. If additional height is desired, pipe extensions can be added to the 1 1/2 inner pole. 2
3 ASAP Sr (Single Stage) Diagram and Measurements 1 EMT Push Pole 2 X 1 1/2 Slip Bushing 2 Rigid Coupling Banding Clamp 1 PVC (Grey) Coupling Upper Rod Guide 2 Outer Pole Rigid Elec Conduit 1 1/2 Rigid Coupling Topper / Prong (Use for heights to 15 ) 1 1/2 Inner Pole Rigid Elec Conduit 4 3 Slip Ring / Prong Winch 2 Centers /4 Holes (Use for heights to 19 ) Winch Bottom Clamp Goes Here 5 1/4 Hole 4 3 Pin 1/4 X 4 Bolt 2 Required 1 6 Portable Hole II Poles Needed: 1-2 X 10 (9 11 ) Rigid Elec Conduit. Comes with a 2 Rigid Coupling /2 X 10 (9 11 ) Rigid Elec Conduit. Comes with a 1 1/2 Rigid Coupling. 1-1 X 10 EMT. NOTE: Rigid Elec Conduit has a smooth Bore. Galvanized pipe has an internal weld protruding on the inside. 3
 1-1 1/2 X 10 Rigid Elec Conduit (comes with 1 1/2 Rigid Coupling 1-1")
4 Poles and Pipe Needed 1-2 X 10 Rigid Elec Conduit. Should come with a 2 Rigid Coupling. (Do Not Substitute Gal Pipe) 1-1 1/2 X 10 Rigid Elec Conduit (comes with 1 1/2 Rigid Coupling 1-1 X 10 EMT 4
5 ASAP Sr. 1000# Winch Assembly The ASAP Sr uses the 1000# Marine Raider Strap Winch, available from Academy Sports and Outdoors - The winch cost $24.99 and ships free. Other winches might work if the mounting hole pattern is the same. The winch requires mounting on an adaptor plate as shown below. 5
6 Parts Needed: Quantity Description Price 1 Winch w/strap, 1000# Marine Raider. Available from Academy Sports and Outdoors. 1 Winch Adaptor Plate. Available from Boscoyo Studios. 4 Exhaust Clamp, 2 $3.59 Use the one that have 3/8 U Bolts. The U Bolts are not used but the washer nuts are used. Available from Auto Supply Stores. 4 3/8 X 5 All Thread $.73 Available from Home Depot. 4 3/8" X 2 All Thread $.34 Available from Home Depot. 1 3/8" X 3/4 $.25 Ace Hardware Store. 17 3/8" Hex $.12 Available from Home Depot. 4 5/16 Flat $.12 Available from Home Depot. 4 3/8" X 3/4 Steel $.40 (can sub 2-3/8 nuts and 1 5/16 washer per spacer) Available from Ace Hardware. $ /2 X 1 C PVC $.27 Available from Home Depot. Total $

7 Parts Plate Top Tools Needed for Assembly: 2-9/16 Box End Wrenches 1 - Needle Nose Pliers 7
. Tighten.")
8 Step 1 Install 4-3/8 X 5 All Thread Bolts in Plate Corners using 5/16 washers, 3/8 Hex Nuts, Spacers and 3/8 Hex Nuts. (Can sub 2-3/8 Hex Nuts and 1-5/16 washer for the spacers). Tighten. 8
. Tighten. 9")
9 Step 2 Install 2-3/8 X 2 All Thread Bolts in top of plate using 2-3/8 Washer-Nuts (From Exhaust Clamps). Tighten. 9


10 Step 3 Place 2-3/8 X 2 All Thread Bolts into Lower Winch holes and attach winch to plate using 2-3/8 Washer- Nuts from Exhaust Clamps. DO NOT TIGHTEN. 10

11 Step 4 Install a 3/8 X 3/4 Bolt into upper winch plate and winch frame as shown. Use needle nose pliers to help start 3/8 Hex Nut onto Bolt. Tighten all 3 winch Bolts and Nuts. 11

12 Step 5 Turn Assembly over and slide 4-1/2 X 1 C PVC Couplings onto the 3/8 X 2 Bolts. These couplings will act as EMT Push Pole Guides. 12

13 Step 6 Screw 3/8 Washer Nuts into the C PVC Couplings using Needle Nose Pliers. 13

14 Step 7 Screw 4-3/8 Hex Nuts onto all 2 Bolts as keepers. Tighten. 14

15 Step 8 Install 4-2 1/4 Exhaust Clamps onto the 3/8 X 5 Bolts using 4-3/8 Hex Nuts. To install on pipe remove Hex Nuts and Back Half of Clamp. Be sure to tighten Back Half of Clamp evenly and securely to pipe. 15


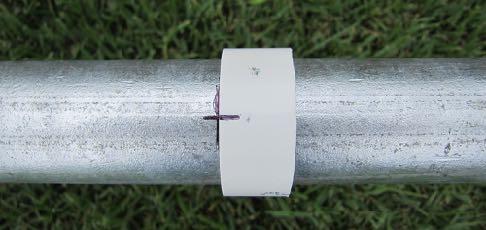
16 Slip Ring / Prong The Slip Ring / Prong slides over the 1 1/2 inner pole and allows the push pole to raise the inner telescoping pole up in steps of 4 3 each. The prong fits down inside of the 1 EMT push pole. 2 Pipe Gate Hinge Zinc Coated National Hardware N BC (Google National Hardware for supply outlets.) *1/2 X 4 All Thread Bolt (Home Depot) *2-1/2 Washers (AGB) (Home Depot) *3-1/2 Nuts (Home Depot) *2-9/16 Nuts (Ace Hardware) Caution: There are other Pipe Gate Hinges available but most do not have the structural integrity as the one listed above. Place the 1/2 bolt snugly outboard in the hole before tightening the 3/8 nut. Add 9/16 nut. This nut does not fit the 1/2 bolt but loosely screws onto it. Then add the following nuts in this order: 3/8, 9/16, 3/8. 16


17 File slight taper on top inside edges of the gate hinge to prevent hang up on the 1 1/2 inner pole. Tighten carriage bolt until the 1 1/2 pole slides through the hinge freely. Click Link to see Video: 17

 1-3 1/2 dia Hose Clamp (Home Depot) Pins 2 Pins required for 19 high")
18 Other Parts Slip Bushing X Slip Bushing for 1 1/2 Pole is made from a 2 X 1 1/2 galvanized bushing. Do not use PVC due to heavy pipe. Grind out the threads so that the 1 1/2 inner pole slides through freely but slightly snug. 1 EMT Guide 1-1 Elec PVC coupling (Grey) 1-3 1/2 dia Hose Clamp (Home Depot) Pins 2 Pins required for 19 high operation. Use 1/4 X 4 or 4 1/2 Bolts. File the tips to a point for ease of insertion into pipe holes. 18

19 Outer Pole Orientation 1. Screw the 2 Outer Pole snugly into the base with a pipe wrench. Use Teflon Tape on the threads. 2. Screw the 2 Rigid Coupling onto the 2 Outer Pole snugly. 3. Screw the 2 X 1 1/2 Slip Bushing into the 2 Rigid Coupling and snug it up until one of the Hex tips on the Bushing faces forward and the opposite tip faces backward. This places 2 Bushing Flats facing sideways. 4. File or grind off the Hex Bushing Tip facing to the rear so the Slip Ring / Prong will seat correctly. 5. The flats on the Bushing allow a bolt with washers to be placed thru an inner pole hole to limit the pole s rotation. Front Back Remove about 1/8 of the Hex tip. 19


20 Hand Drilling Accurate Holes in Pipe Look for seam marks along the length of the pipe for longitudinal alignment. Measure and mark hole locations on one side of the pipe. 20


21 Cut a piece of notebook paper about 1 wide and longer than the pipe circumference. Tape one end of the paper at a marked hole location and overlap the paper around the pipe as shown below. 21


22 Cut off the overlapped paper at pipes s circumference. Fold the paper in half either over or under taped end. 22

23 The doubled paper is the distance around 1/2 of the pipe. After the hole locations are marked: 1. Punch indentation at hole mark. 2. Drill small 1/8 pilot hole. 3. Drill larger hole. 4. Remove drill burrs and remove cuttings on inside of pipe by standing pipe up and tapping on side. 23

24 How to Make a Hole Marking Jig Out of PVC Note: Use a 1 1/2 PVC coupling for 1 1/2 pipe and 1 PVC coupling for 1 pipe. Cut a 3/4 piece off of the coupling with a hack saw. 24

25 Use the paper method as shown previously to mark hole locations on each side of the PVC slice. 25


26 Cut across the PVC slice at one of the markings so it will open up enough to slide onto the pipe. Slide PVC slice onto pipe to desired location. The marking on the other side of the PVC slice is the correct spot for the hole on the other side. If done carefully, accuracy is +/- 1/32. 26
27 27

28 Chairs can be used to hold pipe while marking and drilling. 28


29 Inner Pole Extensions Additional height can be gained by adding short sections to the existing inner telescoping pole. Prefabricated sections (nipples) are available in lengths of 12, 8, 6, 4, 3 and 2 from electric and plumbing supply stores. Other custom sections can be fabricated to meet specific height requirements. Slip Ring / Prong Screw the extra section into the coupling above the Slip Ring / Prong. 29

30 1 1/2 Inner Pole File Points Some of the slack of the inner telescoping pole can be removed by adding a Centralizer to the bottom of the pole. A 1 1/4 PVC Male Adapter can be driven into the bottom of the pole and secured with JB Weld or equivalent. File down enough of the PVC points to allow the pole to slide smoothly inside the 2" outer pole. 30
31 Contact Info: Walter Monkhouse Phone: Website: ASAP Video: 31
32 Disclaimer This Document explains how I built the ASAP Pole for my own personal use. Anyone building or using the ASAP pole from these plans and information does so at their own discretion and liability. Walter B. Monkhouse July 2,
Kwik-Lock. Installation Instructions. Attention Dealers: Please give this owners manual to the customer when the product is delivered.
 Serving the Truck & Trailer Industry Since 1944 Installation Instructions Attention Dealers: Please give this owners manual to the customer when the product is delivered. Call 800-535-9545 www.aeroindustries.com
Classic Roll Tarp. Installation Instructions. Attention Dealers: Please give this owners manual to the customer when the product is delivered.
 Serving the Truck & Trailer Industry Since 1944 Classic Roll Tarp Attention Dealers: Please give this owners manual to the customer when the product is delivered. Call 800-535-9545 www.aeroindustries.com
INSTALLATION OF WELLS SUPER QUICK CHUCK LEFT HAND ON BALDOR LATHE
 DENTAL, INC. TECHNICAL BULLETIN Q832-022510 5860 FLYNN CREEK ROAD READ ALL INSTRUCTIONS P.O. BOX 106 BEFORE PROCEEDING COMPTCHE, CALIFORNIA, U.S.A. 95427 SAVE THIS FOR FUTURE REFERENCE THIS PRODUCT IS
The Queen Quilter Professional Quilters Kit Frame
 The Queen Quilter Professional Quilters Kit Frame Assembly Instructions Table of Contents: Before you begin......................... Pg. 2 Wood parts............................. Pg. 3 Hardware..............................
END FRAMES. End frames built using pressure treated 2x4 (1 1/2" x 3 1/2") 36" 34" 7/16" pilot hole. 5 1/2" x 1/2" lag bolt 8" wheel 23"
 36 34 7/16 pilot hole. 5 1/2 x 1/2 lag bolt 8 wheel 23") END FRAMES End frames built using pressure treated 2x4 (1 1/2" x 3 1/2") 23" 17 1/2" (B) (B) Measure from the bottom of your stone to 1" below the lip to get your measurement. 17 1/2"(B) 36" 34" 1/2" flat
END FRAMES End frames built using pressure treated 2x4 (1 1/2" x 3 1/2") 23" 17 1/2" (B) (B) Measure from the bottom of your stone to 1" below the lip to get your measurement. 17 1/2"(B) 36" 34" 1/2" flat
Classic Roll Tarp. Installation Instructions. Attention Dealers: Please give this owners manual to the customer when the product is delivered.
 Serving the Truck & Trailer Industry Since 1944 Classic Roll Tarp Attention Dealers: Please give this owners manual to the customer when the product is delivered. Call 800-535-9545 www.aeroindustries.com
Hardware and Components:
 Hardware and Components: (A) 5/16 x 2 Hex Bolt (B) 5/16 x 2-1/4 Hex Bolt (C) 5/16 x 2-1/2 Hex Bolt (D) 4X 5/16 x 3/4 Hex Bolt (E) 4X 5/16 x 1-1/4 Hex Bolt (F) 11X 5/16 Flat Washer (G) 12X 5/16 Nylock Nut
Modern Gatherings 60" TV Console Assembly Instructions
 Parts List Page 1 of 6 No. Description Sketch Quantity A Console 1 B Door 1 Thank you for purchasing this quality product. Be sure to check all packing material carefully for small parts that may have
Hardware and Components:
 Hardware and Components: (A) 4X 5/16 x 1 Carriage Bolt (B) 2X 5/16 x 2-1/4 Carriage Bolt (C) 2X 5/16 x 3-1/4 Hex Bolt (D) 2X 5/16 x 3/4 Hex Bolt (E) 2X 5/16 x 1-1/4 Hex Bolt (F) 5/16 x 2-1/4 Hex Bolt (G)
Page 1. SureMotion Quick-Start Guide: LARSACC_QS 1st Edition - Revision A 03/15/16. Standard Steel Bolt/Screw Torque Specifications
 R K C T I Repair Kit Product Compatibility Repair Kit # Linear Actuator Assembly # LARSACC-013 LARSACC-014 LARSD2-08T12BP2C (12-in travel) LARSD2-08T24BP2C (24-in travel) C P I R K 1 ea Ball Screw with
Gared Pro-S Portable Backstop
 Models: 9616 & 9618 Installation, Operation and Maintenance Instructions Please read all instructions before attempting installation or operation of these units SAVE THESE INSTRUCTIONS FOR FUTURE USE PUBLICATION
INSTALLATION MANUAL WEEKENDER STEEL LADDER RACK
 TRUCK STORAGE SOLUTIONS SECURING YOUR REPUTATION INSTALLATION MANUAL WEEKENDER STEEL LADDER RACK STEEL & ALUMINUM SIDE BOX WITH PACK RAT DRAWER UNITS MODELS ATTENTION: PLEASE READ AND UNDERSTAND ALL INSTRUCTIONS
LOFT DOOR HANGER BARN DOORS & HARDWARE. Hardware Installation Instructions. Page
 LOFT DOOR HANGER Page 1 Specifications 2 7/16" 3/8" 1-1/2 1-3/4 Ø3 3 7/8" 11-1/16 Page 2 Parts and Tools Tools Needed Tape Measure Pencil Drill with 1/8, 1/4 and 3/8 bits, 1 spade bit and Phillips bit
Assembly Instructions 10 X 10 Aluminum Roof Support
 Assembly Instructions 10 X 10 Aluminum Roof Support Aluminum Roof Support Bolt Package 16-5/16 X 2 ¼ SS Bolt 24-5/16 X 1 SS Bolt 40-5/16 SS Nylon Lock Nuts 16-5/16 SS Flat Washers 28-4 ½ Wood Screws 36-1
Hullavator Gas Spring Replacement (simplified)
") Hullavator Gas Spring Replacement (simplified) Some Thule Hullavators came with (original owner) lifetime warranties if you are the original owner of a defective Hullavator and can provide proof of purchase
Hullavator Gas Spring Replacement (simplified) Some Thule Hullavators came with (original owner) lifetime warranties if you are the original owner of a defective Hullavator and can provide proof of purchase
The Portable Open Source 3D Printer
 http://web.archive.org/web/201502142011/http://www.tantillus.org/build_3.html Page 1 of 12 captures 12 Oct 12 - Feb 15 The Portable Open Source 3D Printer Home Start Case X/Y Axis Extruder Z Axis Electronics
18000 HDL FOUR POST LIFT LB CAPACITY INSTALLATION AND OWNER'S MANUAL
 18000 HDL FOUR POST LIFT 18000 LB CAPACITY INSTALLATION AND OWNER'S MANUAL WARNING! Do not raise a vehicle unless the front stops are in place, the parking brake is set, and the wheels are chocked. Stay
RH-412 STEEL DOORS INSTALLATION INSTRUCTIONS
 RH-412 STEEL DOORS INSTALLATION INSTRUCTIONS By following the steps outlined below, the assembly, installation and adjustment of the steel doors, will be a simple process. Let s start with the Driver Side.
INSTALLATION INSTRUCTIONS RH 412 STEEL DOORS
 By following the steps outlined below, the assembly, installation and adjustment of the steel doors, will be a simple process. Let s start with the Driver Side. Note: Having the hood open makes the job
Paul Kilduff Installing nestbox and Kingston predator guard. December 30, 2014
 Kingston guard provides good protection for your nest box against snakes and raccoons. The stove pipe baffle must wobble in order to deter raccoons from climbing up the box. The hardware cloth mesh inside
RBP-1215B-RX DODGE RAM QUAD CAB RX3
 RBP-1215B-RX3 2002-2017 DODGE RAM 15-3500 QUAD CAB RX3 Passenger side RX-3 Side Step Drill Template Passenger side rear Modular Bracket (6) L Support Brackets Driver side rear Modular Bracket Driver side
This instruction manual is an in-depth look and explanation of how to assemble and install the Murphy Bed properly and efficiently.
 This instruction manual is an in-depth look and explanation of how to assemble and install the Murphy Bed properly and efficiently. Don t be put off by the size of the instruction manual as the large diagrams
Ford Pick Up Rear leaf Spring Kit Installation Instructions
 1948-1956 Ford Pick Up Rear leaf Spring Kit Installation Instructions 1-800-984-6259 www.totalcostinvolved.com Parts 48 inch leaf (2) springs (4) U-bolts 3/8-24 x l 1/4bolts (16) & nuts (2) 1/2-20 x 4
MACHINE QUILTING FRAME
 MACHINE QUILTING FRAME YOU WILL NEED TO PURCHASE: 5 pieces of 1-1/4 thin wall metal conduit (EMT) cut to your preferred length for the rollers. (Maximum 120 ) DETERMINING YOUR ROLLER LENGTH: Determine
Assembly Instructions
 18' W x 10' H or 12' H Peak Style Frame Assembly Assembly Instructions Before you start: 2+ individuals recommended for assembly, approximate time 3 hours. Recommended tools: Power Drill, Safety Glasses,
Boat Lift Canopy Frame Assembly Instructions
 Patriot Docks Boat Lift Canopy Frame Assembly Instructions Helpful Tips: Assembling and installing the canopy frame and cover is a two person job. Additional help makes installation easier and is recommended.
7x --Tailstock Cam Lock
 7x --Tailstock Cam Lock By Magic Brian magicbrian40@yahoo.com Probably the most pleasing mod to have, but often not done through lack of milling facility s This version does NOT require a mill. MATERIALS
Heavy Duty Ceiling Tilt Mount Installation Manual
 HD-CTM-5580 Heavy Duty Ceiling Tilt Mount Installation Manual *This Installation requires a minimum of two people. For your safety: Read the complete instruction manual before starting an installation
INSTALLING YOUR NEW SPRING LIFT ARM KIT
 INSTALLING YOUR NEW SPRING LIFT ARM KIT 1. Measure the distance that the roof is to be raised. [If your lift system is completely non-functional, you will need to calculate or estimate this distance as
Calf-Tel Pen System Assembly Instructions
 Calf-Tel Pen System Assembly Instructions (Instructions work for 4, 6, and the 7 Pen Systems) 1 ASSEMBLY OF PEN FRONT AND WALLS START THE ASSEMBLY BY LINING UP THE TWO UNI-DIRECTIONAL ARROWS IN THE TOP,
Woodline USA Woodline Spacer Fence System
 Woodline USA Woodline Spacer Fence System MADE IN THE USA Includes: (1) ¼ Spacer Fence (1) 3/8 Spacer Fence (1) ½ Spacer Fence (1) Hardware Package (1) 3 Piece Brass bar set (2) Setup Blocks Visit Us Online
RIPPER PEDAL. Bearing / Axle Replacement. ( Disassembly )
") RIPPER PEDAL Bearing / Axle Replacement ( Disassembly ) 1 1. Use good quality tools to avoid stripping screw sockets. 2. When servicing your pedals, work on one side at a time to prevent parts from mixing
RIPPER PEDAL Bearing / Axle Replacement ( Disassembly ) 1 1. Use good quality tools to avoid stripping screw sockets. 2. When servicing your pedals, work on one side at a time to prevent parts from mixing
Free Standing Frame and Canopy
 Patriot Docks Free Standing Frame and Canopy Required Tools: Cordless Drill, 3/8 drill bit, 17mm wrench, 18mm wrench, 6mm hex key (included), 8mm hex key (included) Helpful Tips: Assembling and installing
PO BOX 130 CLEAR LAKE, MN
 WWW.WALKSONWATER.COM PO BOX 130 CLEAR LAKE, MN 55319 320-743-3333 PARTS LIST FOR 30115# VERTICAL BOAT LIFT 2-Back Leg Uprights 1 right, 1 left (BL) 1-Front Leg Upright (FL) 1-Winch Leg Upright (WU) 2-Bottom
Technicians of Terror. This is the air valve we make to use with our air
 These are pictures of our scissor prop. Technicians of Terror http://www.halloweenfear.com/scissorprop.html props. This is the air valve we make to use with our air This pictures the duel door closer cylinders
Outdoor Cooler Cart. Outdoor Cooler Cart Construction Instructions
 Outdoor Cooler Cart Outdoor Cooler Cart Construction Instructions Make the Legs and Side Panels. Cut the eight long and short leg pieces to length. See Material List on next page.. Apply a bead of glue
Before returning this product to the store of purchase
 Before returning this product to the store of purchase Contact Dee Zee if you experience the following problems: Missing Parts Installation Problems/Questions Warranty Questions 1.800.779.2102 Hours of
Installation Instructions
 Installation Instructions 000964 Revision F Installation Instructions for PIRIT Read this manual fully prior to starting installation. Call American eating Customer ervice with any questions. What you
INSTALLATION INSTRUCTIONS
 INSTALLATION INSTRUCTIONS Trans4mer Grille Guard/Winch Mount For Chevrolet Silverado 1500HD & 2500 Kit 68162 This WARN Trans4mer system can be customized to give your Chevy Silverado a wide variety of
PAK Drum Roll Top Assembly Instructions. Note: 2 people will be required to assemble roll top
 PAK901 4 Drum Roll Top Assembly Instructions Note: 2 people will be required to assemble roll top PLEASE READ ASSEMBLY INSTRUCTIONS CARFULLY Tools required: 5/8 Socket & Ratchet 9/16 Deep Well Socket &
Otter Pro XT Cottage Installation and Set-Up Instructions
 Otter Pro XT Cottage Installation and Set-Up Instructions Otter Pro XT Cottage Fits Small Ultra-Wide Otter Pro and Otter II Sled Only Parts Identification and Check List MODEL NUMBERS: Complete Pkg Pro
WPS crew Doors Installation instructions
 WPS-132-133 crew Doors Installation instructions ORDER OF INSTALLATION FOR A COMPLETE ENCLOSURE OF A CREW WPS (Weather Protection System) IS AS FOLLOWS: 1. Heater 2. Rear Thresholds - Right Hand & Left
Installation Instructions
 Installation Instructions For Models: Model Number / Description File Name 1540 Classic Series P-Lam Toilet Partitions 1540.pdf 1 INSTALLATION INSTRUCTIONS LAMINATED PLASTIC TOILET PARTITIONS 1540 Classic
FIRST TEAM SPORTS, INC.
 FIRST TEAM SPORTS, INC. INVADER EZ-CRANK PORTABLE BASKETBALL GOAL ASSEMBLY INSTRUCTIONS Revised - 08/04/10 BILL OF MATERIALS (1) BASE TANK (1) BACKBOARD MOUNT (2) 5/16 X ¾ HEX BOLT (1) LOWER POST (2) SPRING
Warnings. Description. Prior to Installation Tools Needed
 Warnings Failure to act in accordance with the following may result in death or personal injury. The JT Strong Arm Stabilizer System is intended to eliminate chassis movement in travel trailers and fifth
BEAST THE. Tube and Pipe Notcher Operating Instructions. Notches In Bends Straight Notches. Angled Notches. Offset Notches
 Copyright (c) 2007 J D SQUARED INC. www.jd2.com THE BEAST Tube and Pipe Notcher Operating Instructions Notches In Bends Straight Notches Angled Notches PATENT PENDING Offset Notches Assembly After unpacking
INSTALLATION INSTRUCTIONS
 INSTALLATION INSTRUCTIONS SOLID PHENOLIC TOILET PARTITIONS 1080 DuraLineSeries Class-A Fire Rated Includes Institutional Hardware Option.67 IMPORTANT: Storage and Handling Information on last page. Review
PowerLock. Installation Instructions. Attention Dealers: Please give this owners manual to the customer when the product is delivered.
 Serving the Truck & Trailer Industry Since 1944 PowerLock Attention Dealers: Please give this owners manual to the customer when the product is delivered. Call 800-535-9545 www.aeroindustries.com Indianapolis,
Side Mount INSTRUCTION BOOKLET #C122 BED STYLE: PARK CITY
 Side Mount BED STYLE: PARK CITY INSTRUCTION BOOKLET #C1 WARNING! ALL MURPHY/WALLBED SYSTEMS CONTAIN STORED ENERGY. FAILURE TO USE AND FOLLOW THESE INSTRUCTIONS DURING THE INSTALLATION PROCESS COULD RESULT
Parts list Instruction guide Warnings Please read carefully before assembling and using product.
 Parts list Instruction guide Warnings Please read carefully before assembling and using product. Jet Rail XL Part Number 27377 Tools required for assembly Hammer 9/16 Wrench 3/4 Wrench Ratchet 9/16 Socket
Motorcycle Lift Assembly Instructions
 Motorcycle Lift Assembly Instructions Copyright JCS 2009 Rev1M Page 1 Lift Table Assembly Instructions The following pages will assist you in the construction of your Motorcycle Lift Table. You will find
6625 WEST WILSHIRE BLVD. OKLAHOMA CITY, OK (405) FAX (405)
 FAX (405)") INSTALLATION INSTRUCTIONS FOR THE TAILGATE WITH LATCH AND LINK ASSEMBLY 76-87 FORD SHORT & 53-87 FORD LONG FLARESIDES 1. Assemble the bed and make sure the box is square. Measure the distance between the
INSTALLATION INSTRUCTIONS FOR THE TAILGATE WITH LATCH AND LINK ASSEMBLY 76-87 FORD SHORT & 53-87 FORD LONG FLARESIDES 1. Assemble the bed and make sure the box is square. Measure the distance between the
16. Wing Final Assembly and Installation
 Section Objective: Installation and rigging of ailerons. Pitot tube install, and any other wing related items. Required Parts: Left aileron push rod ALA-0072, Right aileron push rod ALA-0073, Push tube
Model 209 Fireback Replacement
 Model 209 Fireback Replacement Please read all the instructions before you begin the procedure. Confirm that you have all the necessary tools and materials. If you have any questions, technical support
Large Wood Windmill Assembly Instructions
 CROW S NEST (TOP VIEW) TOWER (SIDE VIEW) 0 QTY 2 2 ITEM QTY 2 QTY QTY 8 QTY 8 QTY 4 TOP TOP TOP 47 9 QTY 4 QTY 4 QTY 4 QTY 4 QTY 4 ITEM 6 ITEM 7 ITEM 8 ITEM 3 ITEM 9 ITEM 4 ITEM 2 ITEM 5 47 Leg QTY 4 42.5
This manual will aid in the assembly of the FireBall V90 and FireBall X90. The assembly of both machines will be identical, unless specified.
 This manual will aid in the assembly of the FireBall V90 and FireBall X90. The assembly of both machines will be identical, unless specified. Step #1 Lay all parts out to verify quantities. (2) 2 x 25-1/4
Quick-Release Sliding Tail Vise 05G30.01
 Quick-Release Sliding Tail Vise 05G30.01 U.S. Des. Pat. No. D671,812 U.S. Pat. No. 9,050,710 Introduction The Veritas Quick-Release Sliding Tail Vise is a reworked version of the well-known tail vise that
Plans & Materials List for Handwashing Station
 Plans & Materials List for Handwashing Station Required Tools Arc Welder (mig or stick) Chop or metal band saw Grinder (bench and/or handheld) 3/8" Drill 1/8", 1/4", 5/16" Drill Bits Copper Pipe Cutter
Page 1. SureMotion Quick-Start Guide: LACPACC_QS 1st Edition - Revision A 03/15/16
 R K C T I Repair Kit Product Compatibility Repair Kit # Linear Actuator Assembly # LACPACC-002 LACPACC-003 LACP-16TxxLP5 (0.5-in lead screw pitch) LACP-16TxxL1 (1-in lead screw pitch) C P I R K 4 ea Flanged
Q-Zone Hoop-Frame. Assembly Instructions. Copyright July 11, 2018 Grace Company (Reproduction Prohibited) Version 1.8
 Version 1.8") Q-Zone Hoop-Frame Assembly Instructions Copyright July 11, 2018 Grace Company (Reproduction Prohibited) Version 1.8 Table of Contents Table of Contents... i Warranty... ii Parts List Box 1...iii Box 2...
Q-Zone Hoop-Frame Assembly Instructions Copyright July 11, 2018 Grace Company (Reproduction Prohibited) Version 1.8 Table of Contents Table of Contents... i Warranty... ii Parts List Box 1...iii Box 2...
J D SQUARED INC. NOTCH MASTER Tube and Pipe Notcher Operating Instructions
 Copyright (c) 2006 J D SQUARED INC. www.jd2.com NOTCH MASTER Tube and Pipe Notcher Operating Instructions Angled Notches PATENT PENDING Straight Notches Offset Notches Tube Clamp Slider Tube Clamp Exploded
Low/High Tunnel Greenhouse Plans
 Low/High Tunnel Greenhouse Plans Tools Needed (See the complete list of Greenhouse Tools) Hacksaw or Reciprocating Saw Socket Wrench, Adjustable Wrench or Nut Drivers Electric Drill with Drill Bits Sledge
Elevator Assembly. To assemble the SR3500 Elevator, you will need the following tools:
 Elevator Assembly To assemble the SR3500 Elevator, you will need the following tools: 1. Drill 2. Tape Measure 3. Felt Marker 4. #40, #30, 3/16, #11 Drill Bits 5. #40, #30 and 3/16 Clecos 6. Cleco Pliers
6' Wide Premium Greenhouse Benches
 6' Wide Premium Greenhouse Benches Premium Greenhouse Bench with Stationary Top 2015 FarmTek All Rights Reserved. Reproduction is prohibited without permission. STK# DIMENSIONS 112416S6X08 6' W x 3' H
Dura-Lock Roof System
 DLR-14 Dura-Lock Roof System Assembly and Installation Instructions Read the instructions before starting the job. They explain the steps required to produce a finished product that will meet factory specifications.
Chain Drive Vise. Installation Instructions. (revised 05/04/2016)
") Chain Drive Vise Installation Instructions (revised 05/04/2016) Lie-Nielsen Chain Drive Vise Instructions Table of Contents page About Your Chain Drive Vise 3 Parts List 4 Exploded Parts Diagram 5 step
Chain Drive Vise Installation Instructions (revised 05/04/2016) Lie-Nielsen Chain Drive Vise Instructions Table of Contents page About Your Chain Drive Vise 3 Parts List 4 Exploded Parts Diagram 5 step
INSTALLATION INSTRUCTIONS
 INSTALLATION INSTRUCTIONS SOLID PHENOLIC TOILET PARTITIONS 1080 DuraLine Series 1180 DuraLine Series Class-A Fire Rated IMPORTANT: Review these instructions thoroughly prior to installation. FLOOR ANCHORED
CountryAccents Pergola Assembly Instructions
 CountryAccents Pergola Assembly Instructions Options 11 2" Squares Lattice Railing Gingerbread Scroll (For 5" Posts Only) Site Preparation Site preparation for either the round column or the 5" post pergola
HD installation guide
 JANUS INTERNATIONAL 1 866 562 2580 www.janusintl.c o m 1950 1950HD installation guide RIGHT DRIVE END SHOWN LH OPPOSITE LEFT TENSION END SHOWN RH OPPOSITE PUSH-UP OPERATION 1950 1950HD SHOWN A rolling
MITCHELL WREATH RINGS NO-HAMMER ASSEMBLY INSTRUCTIONS
 MITCHELL WREATH RINGS NO-HAMMER ASSEMBLY INSTRUCTIONS METAL STAND WITH WOOD STAND WITH PAGE 2 OF 10 MASTER PARTS LIST HEAD ASSEMBLY LINKAGE ASSEMBLY HOOK LEVER ASSEMBLY FOOT PEDAL ASSEMBLY ALL FASTENERS
Continuum Frame Assembly Instructions
 Continuum Frame Assembly Instructions Copyright January 1, 2017 Jim M. Bagley, GraceWood, Inc (Reproduction Prohibited) Version 2.2 Table of Contents Continuum Frame Table of Contents... i Warranty...ii
MINI-LATHE QUICK CHANGE TOOL POST
 MINI-LATHE QUICK CHANGE TOOL POST Cutting and assembly details Machinists should familiarize themselves with the contents of this section before jumping in to the drawings. Many details are described here
Model #SH & CH SH Pine CH Naturaline
 Model #SH304-101 & CH304-101 Assembly Manual SH304-101 Pine CH304-101 Naturaline Component Parts A 2 ea. Angled Rail - 2 x 4 x 107-1/8" B 1 ea. Center Angled Rail - 2 x 4 x 107-1/8" C 9 ea. Rock Board
Chain Drive Vise. Installation Instructions. (revised 11/29/2018)
") Chain Drive Vise Installation Instructions (revised 11/29/2018) Lie-Nielsen Chain Drive Vise Instructions Table of Contents page About Your Chain Drive Vise 3 Parts List 4 Exploded Parts Diagram 5 step
Chain Drive Vise Installation Instructions (revised 11/29/2018) Lie-Nielsen Chain Drive Vise Instructions Table of Contents page About Your Chain Drive Vise 3 Parts List 4 Exploded Parts Diagram 5 step
START HERE BEFORE YOU BEGIN FIG 1 STEP 2
 PROFESSIONAL INSTALL RECOMMENDED REAR MODULAR / MULTI LED ROOF MOUNTS PART#: Z350040 / Z350050 REAR ROOF LED LIGHT MOUNTS Parts included (1) - Driver Side Roof Mount Upright (1) - Passenger Side Roof Mount
Traditional Wall Mounted Potfiller
 TOOLS NEEDED FOR INSTALLATION 1/4 hex wrench (provided in installation kit) 3/32 hex wrench (provided in installation kit) Pencil or marker PTFE tape Small level, or carpenters square Power Drill with
INSTALLATION INSTRUCTIONS
 INSTALLATION INSTRUCTIONS HIGH PRESSUE LAMINATE (HPL) TOILET PARTITIONS 1030 TrimLineSeries 1040 DesignerSeries Includes continuous hardware option.65. IMPORTANT: Storage and Handling Information on last
INSTALLATION OF WELLS SUPER QUICK CHUCK LEFT HAND ON RED WING LATHE
 DENTAL, INC. TECHNICAL BULLETIN Q824-022510 5860 FLYNN CREEK ROAD READ ALL INSTRUCTIONS P.O. BOX 106 BEFORE PROCEEDING COMPTCHE, CALIFORNIA, U.S.A. 95427 SAVE THIS FOR FUTURE REFERENCE www.wellsdental.com
Making Simple Bookbinding Equipment. A Lying Press. Making Simple Bookbinding Equipment. A Lying Press. Tony Firman
 Making Simple Bookbinding Equipment Tony Firman 28 1 2 27 Notes Making Simple Bookbinding Equipment Tony Firman Tony Firman Bookbinding 26 3 Making Simple Bookbinding Equipment: 2012 Tony Firman Bookbinding
SE5a Instrument Board part 2 - rev 1.1
 SE5a Instrument Board part 2 - rev 1.1 Fuel (Petrol) Valve This valve uses two circular name plates, eight brass screws, one black plastic base, copper wire and two black plastic risers. You can pick any
PowerLock. Installation Instructions. Attention Dealers: Please give this owners manual to the customer when the product is delivered.
 Serving the Truck & Trailer Industry Since 1944 FOR Attention Dealers: Please give this owners manual to the customer when the product is delivered. Call 800-535-9545 www.aeroindustries.com Indianapolis,
======================================================================================== ( DR / DR) JK WRANGLER MOD RACK
 JK WRANGLER MOD RACK") (10984 4DR / 10982 2DR) JK WRANGLER MOD RACK INSTALLATION SHEET Important Notes: Some brands of windshield light brackets and snorkels may not be compatible with the 10984 MOD Rack System. Body lifts are
(10984 4DR / 10982 2DR) JK WRANGLER MOD RACK INSTALLATION SHEET Important Notes: Some brands of windshield light brackets and snorkels may not be compatible with the 10984 MOD Rack System. Body lifts are
6a. Eight Steps to Chain-Link Fence Installation
 6a. Eight Steps to Chain-Link Fence Installation Before You Start You will need the following tools to install your chain-link fence: Post hole digger Wheelbarrow, shovel and hoe for mixing concrete Tape
A SRF/SERF A SRF/SERF
 A1100-055SRF/SERF A1100-056SRF/SERF Remote Fill Assembly INSTALLATION INSTRUCTIONS **CRITICAL - MUST READ** This unit can only be used for new installations or tank level retrofits that allow access to
The ability to make basic voltage and resistance measurements using a digital multimeter
 Congratulations on your purchase of a new OneShot chassis! The PC01 OneShot combines a rugged enclosure, power supply, and discrete instrument DI in a compact 1/4U package. A few minutes of assembly are
Installation for Full Size Polaris Ranger Crew Doors
 Installation for Full Size Polaris Ranger Crew Doors Order of Installation: Heater Doors Wiper on to Windshield Windshield Top & Back Panel Note: Most of the steps in these instructions need to be repeated
INSTALLATION INSTRUCTIONS FOR INSTALLING T-SERIES EXTRA HEAVY DUTY LEVER LOCKSET
 HIGH EDGE 2 1/4"(57mm) 03079400070 INSTALLATION INSTRUCTIONS FOR INSTALLING T-SERIES EXTRA HEAVY DUTY LEVER LOCKSET IMPORTANT: THIS LOCK IS NON-HANDED. LOCK IS FACTORY PACKED PREADJUSTED FOR 1³ ₄" (45mm)
U.S. Rack, Inc Falcon Drive, Madera, CA APR17 INSTALLATION AND USE INSTRUCTIONS for SIDE-MOUNT LADDER RACK
 U.S. Rack, Inc. 2850 Falcon Drive, Madera, CA 93637 15APR17 INSTALLATION AND USE INSTRUCTIONS for SIDE-MOUNT LADDER RACK WARNING: Do NOT attempt to install or use this rack without following all instructions.
INSTALL INSTRUCTIONS WELCOME TO THE NEWAGE PERFORMANCE CABINETRY SERIES NEWAGE STEEL WELDED CABINETRY
 NEWAGE STEEL WELDED CABINETRY WELCOME TO THE NEWAGE PERFORMANCE CABINETRY SERIES ALL CABINETS MUST BE MOUNTED TO STUDS ON A SECURE WALL, AS PER THESE INSTRUCTIONS. FAILURE TO DO SO MAY RESULT IN SERIOUS
Steel Frame Assembly
 Steel Frame Assembly The Alpha Steel Frame is adaptable as vertical or horizontal bed. Note: A leg connector rod extension bar is required for a horizontal bed. Hardware Card #3 is used for Steel Frame
** Do Not Contact the Store ** For Assistance, including missing or broken parts, Call Customer Service at:
 3/01/2007 VISIT THE LITIME WEB SITE: WWW.LITIME.COM ** Do Not Contact the Store ** For Assistance, including missing or broken parts, Call Customer Service at: 1 (800) 225-3865 Double Shed Doors for Back
Mechanical Frappe Press
 Mechanical Frappe Press Operation Manual CONTENTS OPERATIONAL INSTRUCTIONS PRECAUTIONS PART NAMES INCLUDED ITEMS BASIC OPERATION MAINTENANCE REPLACEMENT PARTS Thank you for using The Frapptastic Five Mechanical
Privacy Wall & Glass Selections Pivot-Hinged Door (For products manufactured after September 14, 2009)
") Privacy Wall & Glass Selections Pivot-Hinged Door (For products manufactured after September 14, 2009) 3/16" HEX BIT #2 ACR BIT 3/8" HEX SOCKET Full-Height (No Switch) Transom (No Switch) Full-Height (With
Privacy Wall & Glass Selections Pivot-Hinged Door (For products manufactured after September 14, 2009) 3/16" HEX BIT #2 ACR BIT 3/8" HEX SOCKET Full-Height (No Switch) Transom (No Switch) Full-Height (With
Side Winder R o u t e r L i f t.
 Woodpeckers PRECISION WOODWORKING TOOLS Side Winder R o u t e r L i f t. INSTALLATION INSTRUCTIONS The wrench handle must be pointing left in order to fully insert or remove it. Lift Wrench Once fully
8.5 Ton Assembly Instructions
 8.5 Ton Assembly Instructions Parts list for assembly. 6- Legs 2 1/2 Angle X 92 Long 6- Cone Supports 2 Angle X 60 Long 6-1 1/4 Angle X 27 1/4 Long. 12-1 1/4 Angles X 42 Long 6-1 Flat Straps 23 3/4 Long
PowerLock. Installation Instructions. Attention Dealers: Please give this owners manual to the customer when the product is delivered.
 Serving the Truck & Trailer Industry Since 1944 FOR Attention Dealers: Please give this owners manual to the customer when the product is delivered. Call 800-535-9545 www.aeroindustries.com Indianapolis,
MM540 Installation Instructions IMPORTANT SAFETY INSTRUCTIONS - SAVE THESE INSTRUCTIONS
 MM50 Installation Instructions IMPORTANT SAFETY INSTRUCTIONS - SAVE THESE INSTRUCTIONS Please read this entire manual before you begin. Do not unpack any contents until you verify all requirements on PAGE.
INSTALLATION INSTRUCTIONS
 INSTALLATION INSTRUCTIONS LAMINATED P LASTIC TOILET PArTITIONS 1540 ClassicSeries with Options IMPORTANT: Storage and Handling Information on last page. For faster, easier installation, please review these
Workbench Instructions for Assembly
 Workbench Instructions for Assembly Technical Electronic Workstations and Industrial Workbenches Includes: Cabinets Privacy Panels Stringers Bottom Shelves Table of Contents Tools Required for Assembly...
C L A S S I C. Deluxe. Snow Thrower Cab. Assembly and Care Instructions
 C L A S S I C Deluxe Snow Thrower Cab Assembly and Care Instructions Deluxe Snow Thrower Cab Assembly and Care Instructions Before you begin please unpack the carton and check that you have all your parts.