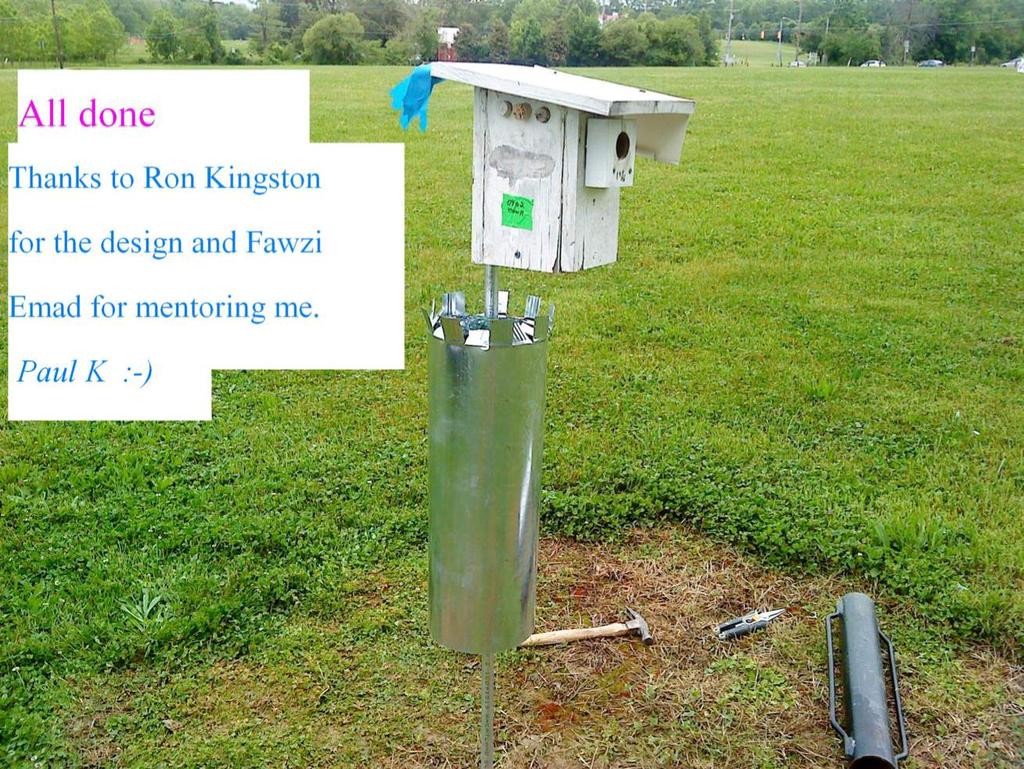
Paul Kilduff Installing nestbox and Kingston predator guard. December 30, 2014
|
|
|
- Katrina Arnold
- 6 years ago
- Views:
Transcription

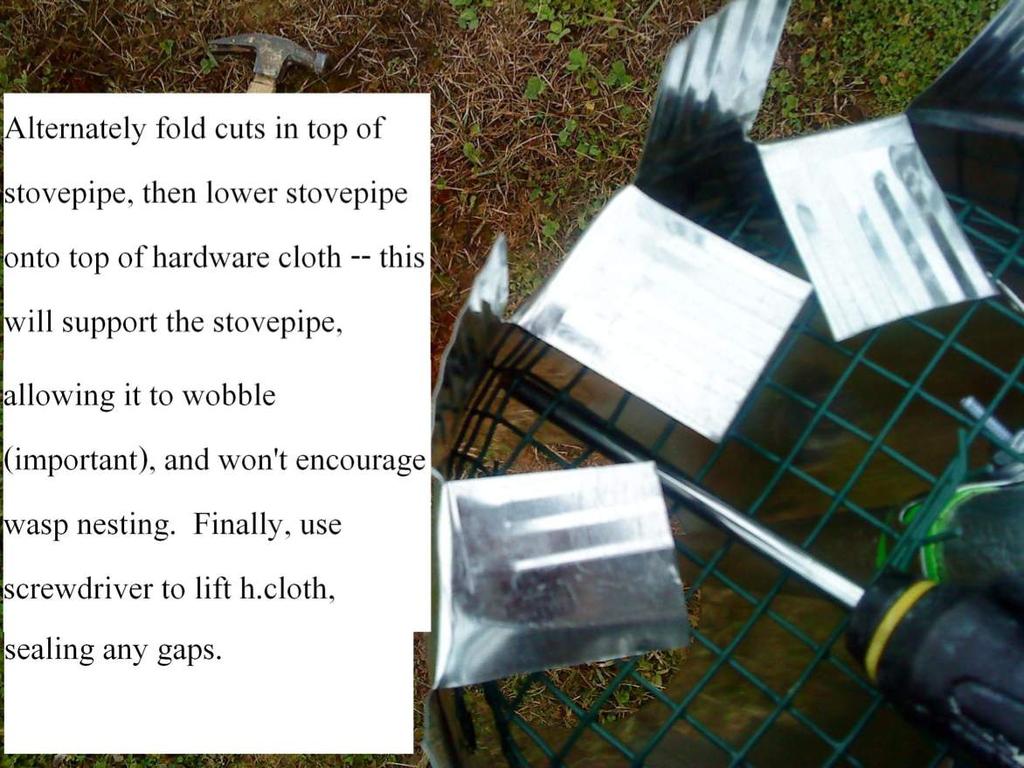
1 Kingston guard provides good protection for your nest box against snakes and raccoons. The stove pipe baffle must wobble in order to deter raccoons from climbing up the box. The hardware cloth mesh inside the baffle stops snakes from slithering all the way up the pole and allows them to smell the nest box's contents as they approach the nest box. The closer they get, the stronger the smell becomes. fence post driver is indispensable. Found in garden section of hardware store (such as Home Depot), or farm supply store. Make sure mounting pole is contained within driver before pulling it down; otherwise, injury could occur. Paul Kilduff 01
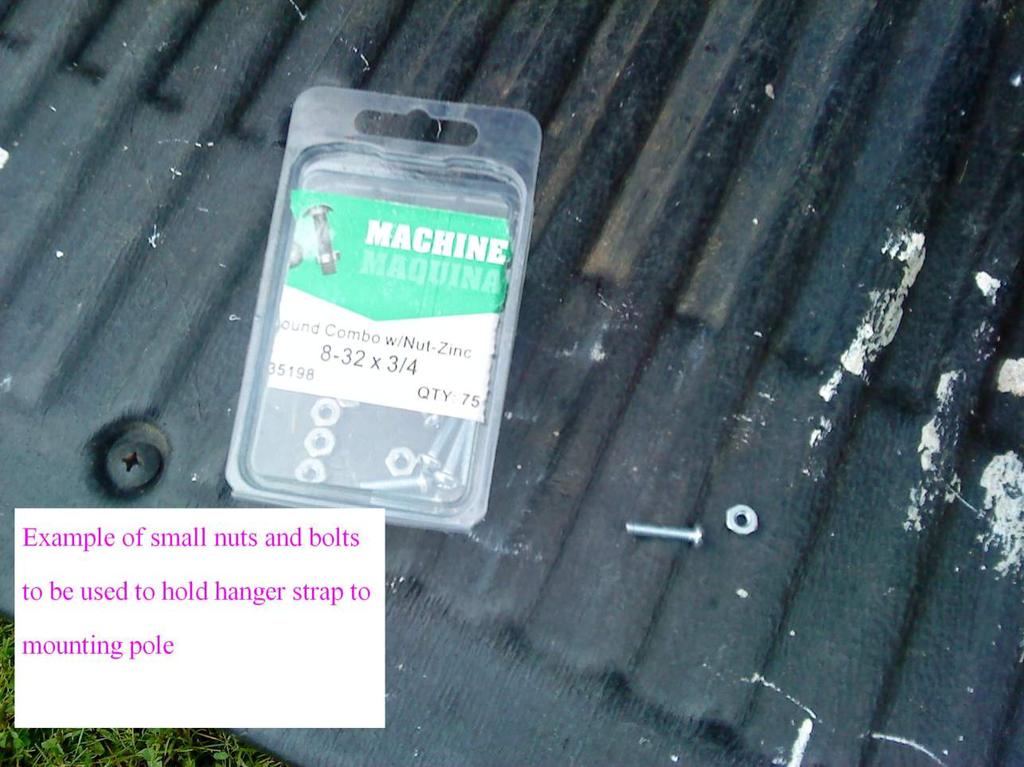
2 Qty Material Use 28" Galvanized steel hanger strap Supports hardware cloth mesh 16x16 1/2" hardware cloth (coated is preferred) Supports vent pipe baffle 1 8" x 24" round galvanized duct pipe Baffle 1 Electric Metallic Tube Conduit, 3/4" or 1" Mounting pole Small screws and nuts, e.g., 11/64" x 1-1/4" Carriage bolt, 1/4" x 2-1/2" & 1/4" nut Deck screw, 1-1/2" Wine cork Tools: Snips Fence post driver Screwdrivers 7/16" nut driver Hammer ssemble hanger strap support Fasten box to pole Fasten box to pole Seal top of mounting pole Paul Kilduff plkldf@gmail.com Cordless drill/driver: Phillips bit; 1/16" drill; 1/4" drill #1 Irwin Unibit recommended; center punch recommended Pipe wrench recommended compass recommended Duct tape 02

3 Make a mounting pole from Electric Metallic Tube Conduit (EMT) found in building supply stores in the Electrical section. 3/4" is good for most purposes -- use 1" for heavier boxes Galvanized steel hanger strap, found in the Plumbing section Duct tape beneath hanger strap 1/2" Hardware Cloth, found in the Lumber section. Coated cloth lasts longer than galvanized. 8" x 24" "Galvanized Duct" (Lowe's) or "Round Metal Duct Pipe" (Home Depot), found in the Heating and ir Conditioning section. Paul Kilduff plkldf@gmail.com Cut conduit to about 6' to 6-1/2' length. Use post driver to drive conduit into ground to a height which allows the observer to look into the mounted box from the top. Wind a thick layer of duct tape around the pole beneath the hanger strap (not shown) to ensure hanger strap will not slip down. 03
4 04

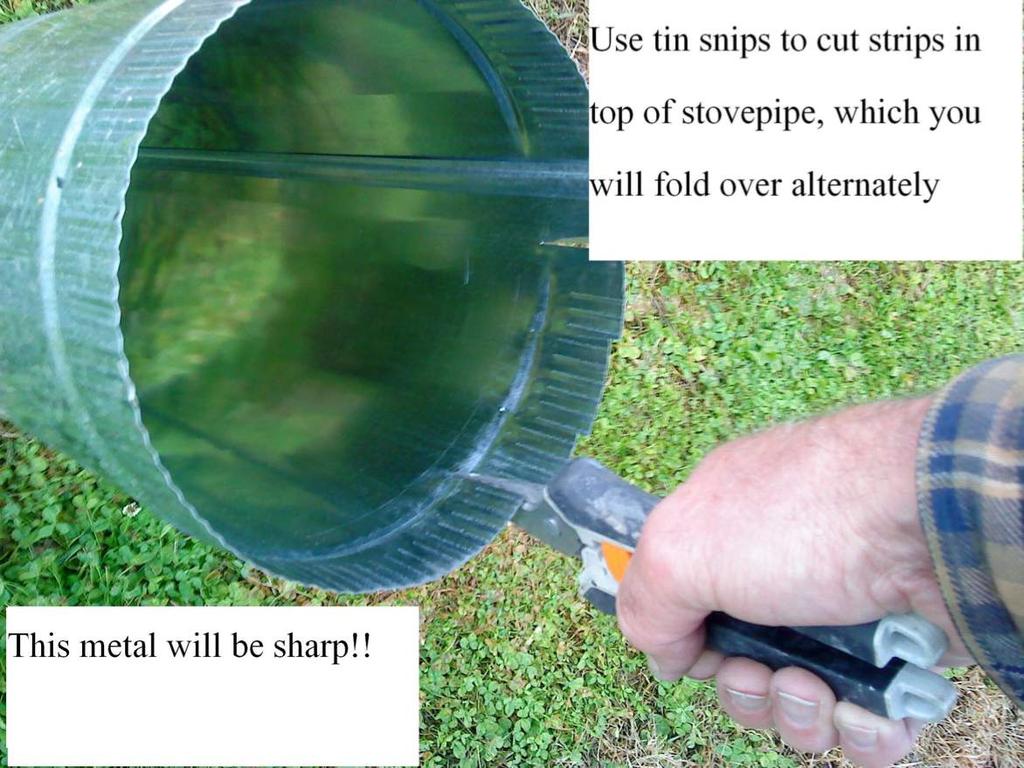
5 8 inch by 2 feet "round metal duct pipe," or "galvanized duct," found in heating and air conditioning section of building supply stores, such as Home Depot or Lowe's. Join the seams together carefully. Once they are joined, it's hard to get them apart Paul Kilduff plkldf@gmail.com 05

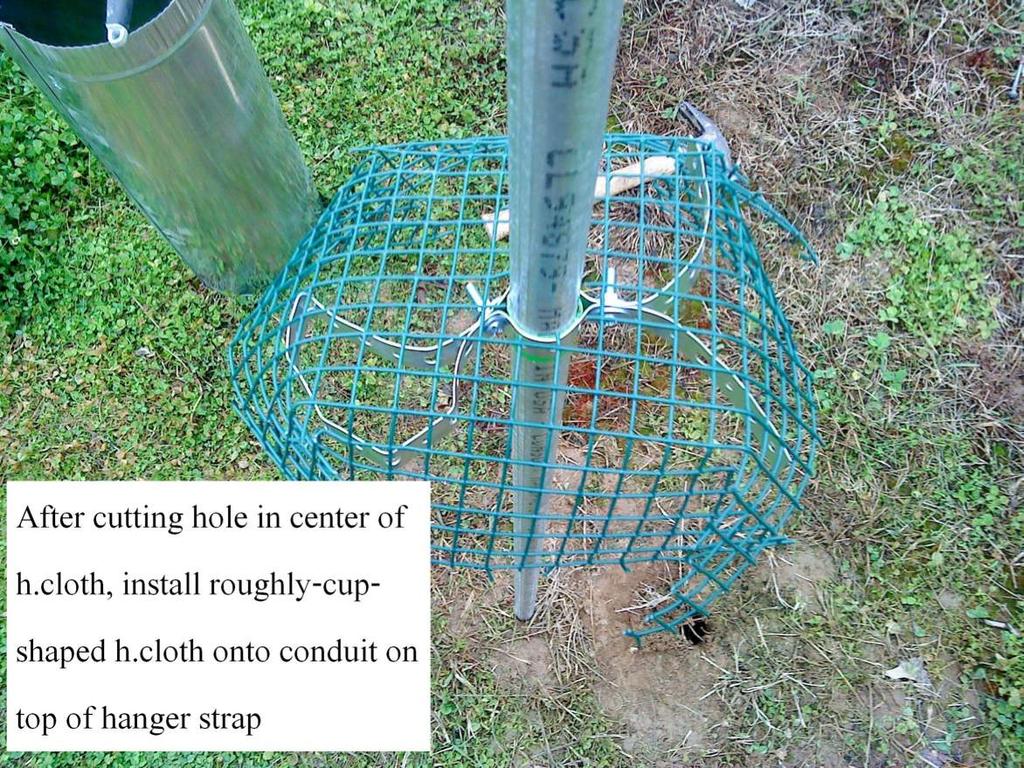
6 Cut hole in center for mounting pole (EMT conduit) Paul Kilduff Use 1/2" hardware cloth for a snake barrier and baffle support. Coated hardware cloth lasts longer in the weather. For 8" vent pipe a section 16 squares by 16 squares works well. Cut off the corners, then fold the mesh into roughly cup shape, with the "opening of the cup" facing down. 06

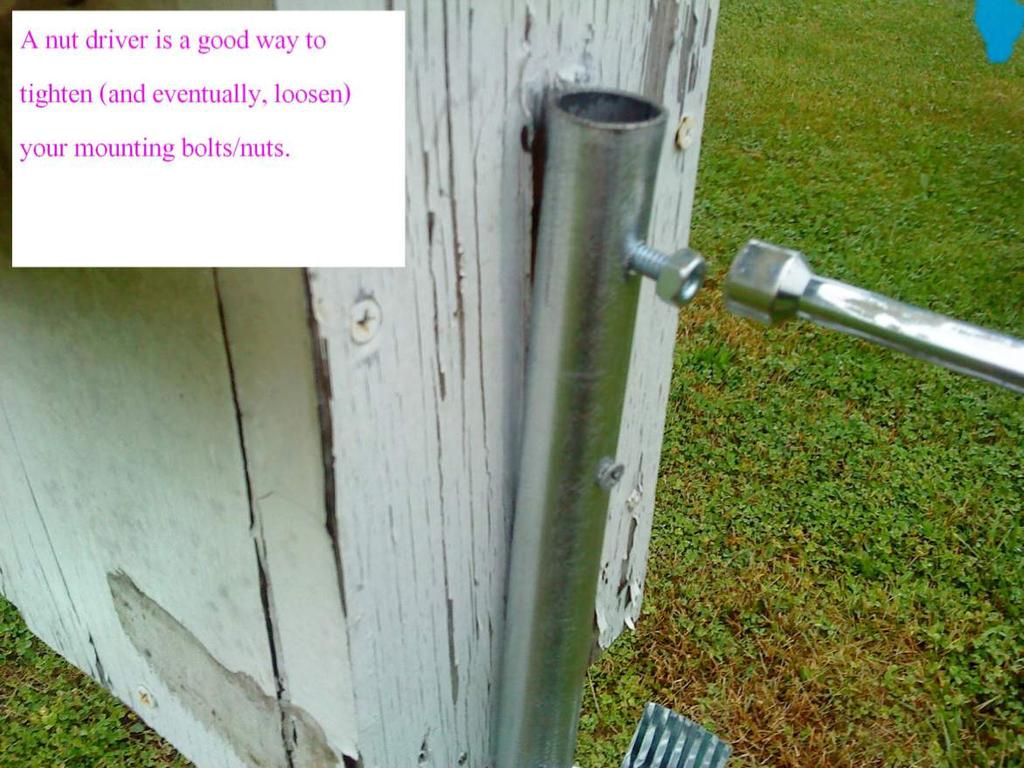
7 Cut a length of hanger strap about 28" long. Fasten the two ends together with a screw and nut. Then use two other screws and nuts to tighten the strap around the mounting pole. 07
8 08
9 09
10 10

11 11

12 12
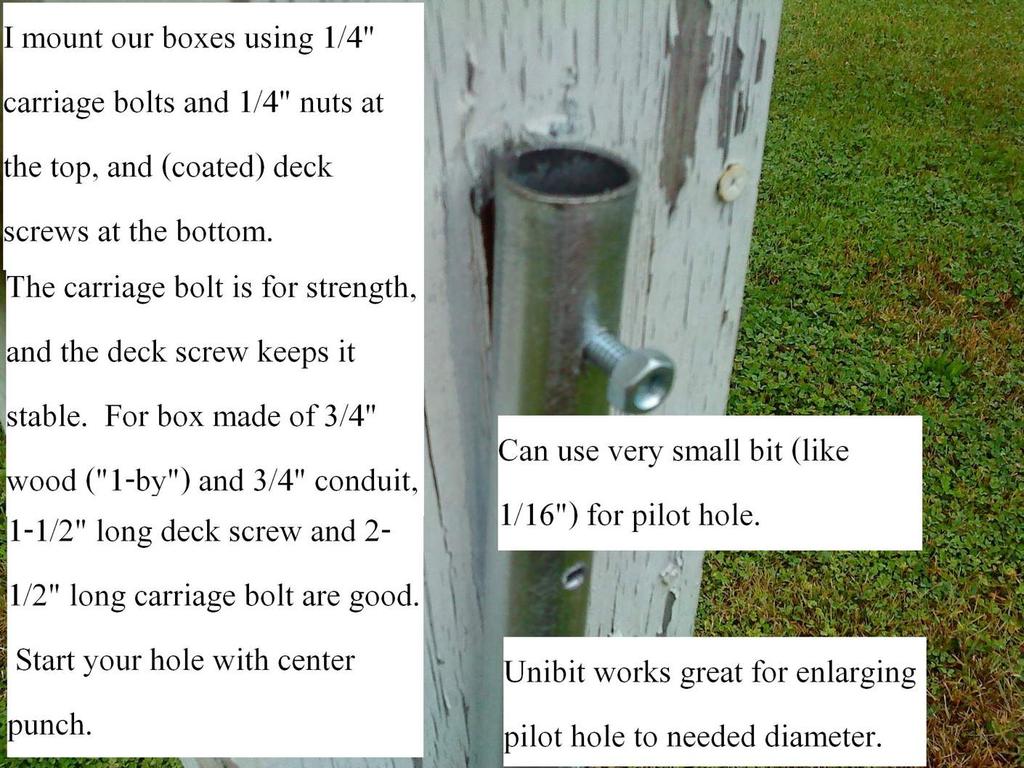
 and a smaller hole for the deck screw (stabilizes).")
13 Irwin Unibits make drilling holes in EMT conduit easy. Here, a #1 Unibit is used to expand a pilot hole. Make a big hole for the carriage bolt (strength) and a smaller hole for the deck screw (stabilizes). Make a hole in the top of the mounting pole (EMT) by making a dimple with center punch, then drilling a small pilot hole, then using a Unibit to expand the hole to about 1/4". Paul Kilduff plkldf@gmail.com Then hold box up to mounting pole and use a 1/4" drill bit through the mounting pole into the back of the box. Push carriage bolt through the resulting hole in back of box from inside, and fasten with matching nut. 13
14 14
15 15

16 Half a wine cork does a good job of keeping water out of the conduit: water will freeze in cold weather, cracking the pipe, and become fetid at other times. Paul Kilduff plkldf@gmail.com 16

17 s the roof swings open for observation, it must clear the top of the mounting pole. Paul Kilduff 17
. Paul Kilduff plkldf@gmail.")
18 pipe wrench is great for orienting your box (we use NNE or NE). Paul Kilduff 18
19 19

20 20
ASAP Sr. A Strap and Pole. Magic Christmas. Single Stage. Walter Monkhouse. Alexandria, La. Version 1.2.
 ASAP Sr Single Stage A Strap and Pole Version 1.2 Walter Monkhouse Walter@MagicChristmas.org Magic Christmas Alexandria, La. Description The ASAP Sr, single stage, has the same concept as the ASAP Jr.
Low/High Tunnel Greenhouse Plans
 Low/High Tunnel Greenhouse Plans Tools Needed (See the complete list of Greenhouse Tools) Hacksaw or Reciprocating Saw Socket Wrench, Adjustable Wrench or Nut Drivers Electric Drill with Drill Bits Sledge
END FRAMES. End frames built using pressure treated 2x4 (1 1/2" x 3 1/2") 36" 34" 7/16" pilot hole. 5 1/2" x 1/2" lag bolt 8" wheel 23"
 36 34 7/16 pilot hole. 5 1/2 x 1/2 lag bolt 8 wheel 23") END FRAMES End frames built using pressure treated 2x4 (1 1/2" x 3 1/2") 23" 17 1/2" (B) (B) Measure from the bottom of your stone to 1" below the lip to get your measurement. 17 1/2"(B) 36" 34" 1/2" flat
END FRAMES End frames built using pressure treated 2x4 (1 1/2" x 3 1/2") 23" 17 1/2" (B) (B) Measure from the bottom of your stone to 1" below the lip to get your measurement. 17 1/2"(B) 36" 34" 1/2" flat
SwingSafe Swing-Away Mailbox Support Diagram
 SwingSafe Swing-Away Mailbox Support Diagram Wood Mounting Plates Top Arm (B) Muffler Clamps (A) Carriage Bolts and Nuts Bottom Arm 4-Foot U-Channel Post USPS Recommended 42-44 Height Ground Slope Hex
Grade 8 Enriched Math Catapult Project 2012 Step by Step Instructions to building a catapult
 Grade 8 Enriched Math Catapult Project 2012 Step by Step Instructions to building a catapult Grade 8 Enriched Math Project INSTRUCTION SHEET FOR CATAPULT Procedures, materials and tools: below is a step-bystep
Ambient Weather EZ Stable Mounting Kit with Mast for AcuRite Weather Stations User Manual
 Ambient Weather EZ-30-12-100 Stable Mounting Kit with Mast for AcuRite Weather Stations User Manual Table of Contents 1. Introduction... 1 2. Accessories... 1 3. Parts... 2 4. Warnings... 2 5. Recommended
INSTALLATION MANUAL WEEKENDER STEEL LADDER RACK
 TRUCK STORAGE SOLUTIONS SECURING YOUR REPUTATION INSTALLATION MANUAL WEEKENDER STEEL LADDER RACK STEEL & ALUMINUM SIDE BOX WITH PACK RAT DRAWER UNITS MODELS ATTENTION: PLEASE READ AND UNDERSTAND ALL INSTRUCTIONS
Dura-Lock Roof System
 DLR-14 Dura-Lock Roof System Assembly and Installation Instructions Read the instructions before starting the job. They explain the steps required to produce a finished product that will meet factory specifications.
Ledgewood Farm greenhouse. construction
 Ledgewood Farm greenhouse How do I Start? construction to I m Finished! Post layout The string will be 7 above the ground and the posts will be driven until the proper drill hole is at the string. Spacing
DOCK WEDGE - STANDARD
 DOCK WEDGE - STANDARD INSTALLATION INSTRUCTIONS WOOD HEADER READ ALL INSTRUCTIONS BEFORE INSTALLING SEAL. SUPER SEAL MFG. LTD. WILL NOT BE HELD RESPONSIBLE FOR IMPROPER INSTALLATION OF ANCHORING DEVICES,
Osprey Platform Assembly Guide. Menunkatuck Audubon Society. Rev 1.0
 Osprey Platform Assembly Guide Menunkatuck Audubon Society Rev 1.0 1 Menunkatuck Audubon Society is a local chapter of National Audubon Society. We serve the shoreline towns of West Haven, New Haven, East
INSTALLATION INSTRUCTIONS KK-K9-C12-K CHEVY IMPALA
 INSTALLATION INSTRUCTIONS KK-K9-C12-K 2000-2005 CHEVY IMPALA READ ALL INSTRUCTIONS PRIOR TO INSTALLATION TOOLS REQUIRED: Power Drill Drill bits1/4 and 5/32 7/l6 wrench and socket 15,18 and\or 19mm socket
Introduction. Depending on your kennel project, you may have some or all of the following hardware: Part # Description Part # Description 1468
 Introduction Thank you very much for your investment in Mason kennels. We take great pride in providing our customers with the highest quality animal enclosures combined with an enjoyable ordering experience.
FLOE DOCK FURNITURE WARNING ASSEMBLY INSTRUCTIONS
 FLOE DOCK FURNITURE ASSEMBLY INSTRUCTIONS KIT P/N 510-00400-02 KIT P/N 510-00405-02 KIT P/N 510-00406-02 KIT P/N 510-00410-02 WARNING IT IS THE INSTALLER S RESPONSIBILITY TO PROPERLY INSTALL this chair
Ambient Weather EZ Weather Station Tripod and Mast Assembly for AcuRite Weather Stations User Manual
 Ambient Weather EZ-48-100 Weather Station Tripod and Mast Assembly for AcuRite Weather Stations User Manual Table of Contents 1. Introduction... 1 2. Accessories... 1 3. Parts... 2 4. Warnings... 2 5.
Assembly Instructions for model: VMPR1
 Assembly Instructions for model: VMPR1 Congratulations on your purchase! The VMPR1 ceiling mount provides a unique, simplified method of ceiling mounting inverted LCD/DLP projectors. Its low profile design
Building + Mounting Learn about Rooftop Mounts
 Building + Mounting Learn about Rooftop Mounts A Build-It-Ourselves Guide to Wireless Mesh Networks 1 Introduction For the best network connections to your neighbors, the best place to put a wireless router
PROTECT-A-POOL INGROUND REMOVABLE SAFETY FENCE
 PROTECT-A-POOL INGROUND REMOVABLE SAFETY FENCE I N S T A L L A T I O N I N S T R U C T I O N S INSTALLATION TOOLS The following tools are required for installation. Chalk Pencil Utility Knife Tape Measure
FACTORY STRETCH INSTALLATION INSTRUCTIONS
 !! Important!! Make sure all power is disconnected prior to installation. Wiring to be done according to Local and National Electric Codes by a qualified electrician. Make sure the building and/or structure
MOBILE POLE FOR A HAM RADIO ANTENNA By Cordell Vail KE7ZBQ
 MOBILE POLE FOR A HAM RADIO ANTENNA By Cordell Vail KE7ZBQ I wanted to build a mobile pole for my 2 meter J-pole Ham Radio antenna so I could take it with me anywhere I needed to go in an emergency. Here
The Festival Assembly Instructions
 The Festival Assembly Instructions Toll Free: 866.768.8465 Hours: 9-5 Monday-Friday EST www.homeplacestructures.com Package ships as shown CONTACT INFORMATION: HomePlace Structures 301 Commerce Drive New
floe dock steps for roll-in and sectional docks
 floe dock steps for roll-in and sectional docks ASSEMBLY INSTRUCTIONS kit P/N 510-2000-00 -Step kit P/N 510-2010-00 6-Step kit P/N 510-2016-00 8-Step MULTIPLE PINCH POINTS KEEP HANDS & FEET CLEAR OF ALL
Al Keller s Inexpensive Backyard Greenhouse Plans
 Al Keller s Inexpensive Backyard Greenhouse Plans There are many ways to construct low cost greenhouses for your property. This is just one man s design, using easily obtainable and fairly inexpensive
MONKEY BARS OVERHEAD RACK INSTALLATION
 MONKEY BARS OVERHEAD RACK INSTALLATION Thank you for purchasing the New Monkey Bars Overhead storage rack. The most innovative overhead rack on the market WARNING THE PROPER INSTALLATION OF THIS STORAGE
CYCL E STAT IO N. High Capacity
 CYCL E STAT IO N High Capacity The Dero Cycle Station provides high-capacity, covered bike parking for bicycle commuters. With a high roof and open platform, the Dero Cycle Station allows bike corrals,
Walk-in Configurations
 Walk-in Configurations Includes Wall-to-Open, Corners, and Corner Rounder Bars INSTALLATION INSTRUCTIONS Tools needed: Tape measure, level, pencil, #2 Phillips head screw driver or power drill with a 6"
TURBOTWISTER TM ASSEMBLY AND INSTALLATION INSTRUCTIONS
 TURBOTWISTER TM ASSEMBLY AND INSTALLATION INSTRUCTIONS CORPORATE HEADQUARTERS WESTERN SALES AND MANUFACTURING PLANT P.O. Box 400 1017 SW Berg Parkway Canby, Oregon 97013 Phone: (503) 266-2231 Fax: (503)
1531 Fort Add On **!!IMPORTANT-PLEASE READ!!**
 1531 Fort Add On **!!IMPORTANT-PLEASE READ!!** This Add-On kit will require you to deviate from the main instruction manual. Please follow the outline below so that you will know what steps to be aware
How To Measure Your Finished Opening
 3000 Series Bifold Doors How To Measure Your Finished Opening MEASURE FROM RIGHT TO LEFT 2 PLACES (WIDTH) MEASURE FROM TOP TO BOTTOM 2 PLACES (HEIGHT) Tools Required for Assembly: Tools Needed: Phillips
TURBOTWISTER ASSEMBLY AND INSTALLATION INSTRUCTIONS
 TURBOTWISTER ASSEMBLY AND INSTALLATION INSTRUCTIONS CORPORATE HEADQUARTERS WESTERN SALES AND MANUFACTURING PLANT P.O. Box 400 1017 SW Berg Parkway Canby, Oregon 97013 Phone: (503) 266-2231 Fax: (503) 266-4334
FLOE DOCK STEPS FOR ROLL-IN AND SECTIONAL DOCKS
 FLOE DOCK STEPS FOR ROLL-IN AND SECTIONAL DOCKS ASSEMBLY INSTRUCTIONS KIT P/N 510-2000-00 -STEP KIT P/N 510-2010-00 6-STEP KIT P/N 510-2016-00 8-STEP MULTIPLE PINCH POINTS KEEP HANDS & FEET CLEAR OF ALL
ClearSpan PolyMax Windbreak Wall
 ClearSpan PolyMax Windbreak Wall Photo may show a different but similar model. 2007 ClearSpan All Rights Reserved. Reproduction is prohibited without permission. Revision date: February 2007ldg STK# DIMENSIONS
Kwik-Lock. Installation Instructions. Attention Dealers: Please give this owners manual to the customer when the product is delivered.
 Serving the Truck & Trailer Industry Since 1944 Installation Instructions Attention Dealers: Please give this owners manual to the customer when the product is delivered. Call 800-535-9545 www.aeroindustries.com
CONTINUED. TABLE TOPS: 1. Sort one 2x6x8 piece from your lumber. 2. Measure and mark two 48 pieces from each, then cut.
 # Materials: Quantity Each: Total Quantity: x4x8 7 x6x8 1 TIPS FOR SUCCESSFUL PREP WORK: Before starting, carefully read through the entire instruction sheet. Refer to the material list to the left and
400A 40113V, 401A 40120V, & 401AL 40120VL ALUMINUM VERTICAL 4000 LB LIFT INCLUDES SCREW LEG ASSEMBLY INSTRUCTIONS
 12/11/07 PAGE 1 OF 12 400A 40113V, 401A 40120V, & 401AL 40120VL ALUMINUM VERTICAL 4000 LB LIFT INCLUDES SCREW LEG ASSEMBLY INSTRUCTIONS Thank you for purchasing our product! *Please read these instructions
BOX-118 E-Z-Go TXT Utility Box Mounting Kit Installation Instructions
 BOX-118 E-Z-Go TXT Utility Box Mounting Kit Installation Instructions Contents of BOX-118 Utility Box Mounting Kit: a (1 ea.) Utility Box Support Frame, Driver Side b (1 ea.) Utility Box Support Frame,
TYPHOON ASSEMBLY AND INSTALLATION INSTRUCTIONS
 TYPHOON ASSEMBLY AND INSTALLATION INSTRUCTIONS CORPORATE HEADQUARTERS WESTERN SALES AND MANUFACTURING PLANT P.O. Box 400 1017 SW Berg Parkway Canby, Oregon 97013 Phone: (503) 266-2231 Fax: (503) 266-4334
General Features. Low Profile. The SMART BOXX stands only 1.5 off of the bed of your truck so cargo space is maximized
 General Features Low Profile. The SMART BOXX stands only 1.5 off of the bed of your truck so cargo space is maximized Two Sizes Short Box :74 L X 47 W X 7 T and Long Box 92 L X 47 W X 7 T All Aluminium
SAVE THESE INSTRUCTIONS DEALER/INSTALLER: GIVE TO HOMEOWNER POOL ENTRY SYSTEM
 SAVE THESE INSTRUCTIONS DEALER/INSTALLER: GIVE TO HOMEOWNER POOL ENTRY SYSTEM ADJUSTS TO FIT 48 TO 54 POOLS AND DECKS ASSEMBLY AND INSTALLATION MANUAL Assembly video available online: www.conferplastics.com
Model #SH & CH SH Pine CH Naturaline
 Model #SH304-101 & CH304-101 Assembly Manual SH304-101 Pine CH304-101 Naturaline Component Parts A 2 ea. Angled Rail - 2 x 4 x 107-1/8" B 1 ea. Center Angled Rail - 2 x 4 x 107-1/8" C 9 ea. Rock Board
GlideRite Retractable Cover System For HotSpring & Tiger River Spas (except Classic & pre-2000 Landmark Spas)
") List of Contents Quantity Description 12 #10 x 1 ½ Flat Head Phillips Screw (see pg. 2) 2 #10 x ½ Pan Head Phillips Screw (see pg. 2) 8 ¼ x 2 ½ Lag Bolt (see pg. 2) 7 ¼ 20 x 5 / 8 Hex Head Bolt (see pg.
List of Contents Quantity Description 12 #10 x 1 ½ Flat Head Phillips Screw (see pg. 2) 2 #10 x ½ Pan Head Phillips Screw (see pg. 2) 8 ¼ x 2 ½ Lag Bolt (see pg. 2) 7 ¼ 20 x 5 / 8 Hex Head Bolt (see pg.
6a. Eight Steps to Chain-Link Fence Installation
 6a. Eight Steps to Chain-Link Fence Installation Before You Start You will need the following tools to install your chain-link fence: Post hole digger Wheelbarrow, shovel and hoe for mixing concrete Tape
Playground Assembly Instructions
 Before You Begin Playground Assembly Instructions Locate the playground set on firm, level ground. Assemble the playground on or close to its permanent location Two people are recommended to assemble the
x2 1/4 (6mm) Floor Anchor
 Floor Anchor") INSTALLATION GUIDE Main Components x1 Rail x5 Wall Spacer x2 Anti-jump Block x2 Straight Strap x1 Right Stopper x1 Left Stopper x5 5/16 (8mm x 60mm) Carriage Bolt x5 5/16 (8mm x25mm) Anchor x5 5/16 (8mm
INSTALLATION GUIDE Main Components x1 Rail x5 Wall Spacer x2 Anti-jump Block x2 Straight Strap x1 Right Stopper x1 Left Stopper x5 5/16 (8mm x 60mm) Carriage Bolt x5 5/16 (8mm x25mm) Anchor x5 5/16 (8mm
OUTDOOR GAZEBO ITM./ART MODEL#L-GZ682PCO-I ASSEMBLY INSTRUCTIONS
 OUTDOOR GAZEBO ITM./ART. 966731 MODEL#L-GZ62PCO-I ASSEMBLY INSTRUCTIONS IMPORTANT: RETAIN FOR FUTURE REFERENCE. READ CAREFULLY. Please check with your local governing authority / local municipal codes
Otter Pro XT Cottage Installation and Set-Up Instructions
 Otter Pro XT Cottage Installation and Set-Up Instructions Otter Pro XT Cottage Fits Small Ultra-Wide Otter Pro and Otter II Sled Only Parts Identification and Check List MODEL NUMBERS: Complete Pkg Pro
Making Simple Bookbinding Equipment. A Lying Press. Making Simple Bookbinding Equipment. A Lying Press. Tony Firman
 Making Simple Bookbinding Equipment Tony Firman 28 1 2 27 Notes Making Simple Bookbinding Equipment Tony Firman Tony Firman Bookbinding 26 3 Making Simple Bookbinding Equipment: 2012 Tony Firman Bookbinding
K9 KIT INSTALLATION INSTRUCTIONS CROWN VIC with Fire Suppression System Model KK-K9-F7-K-FS
 K9 KIT INSTALLATION INSTRUCTIONS 2005-2011 CROWN VIC with Fire Suppression System Model KK-K9-F7-K-FS TOOLS REQUIRED: Power Drill (Cordless preferable) Drill Bit Set Standard Wrench and Socket Set Metric
Wood Duck Nest Box Design & Assembly Directions
 Wood Duck Nest Box Design & Assembly Directions Instructions, Illustrations & Photos Courtesy of MWDI and Scott Jasion, Harford County Chapter, Ducks Unlimited Side door opening design for easy mounting
ASSEMBLY INSTRUCTIONS FOR STORETTE STA42
 ASSEMBLY INSTRUCTIONS FOR STORETTE STA42 A01 CAUTION: Some parts have sharp edges. Care must be taken when handling the various pieces to avoid a mishap. For safety sake, please read the safety information
How to Build a Fold- Down Greenhouse
 How to Build a Fold- Down Greenhouse This simple, inexpensive greenhouse folds down to protect your plants during early frosts and cold snaps, then can be raised up on warmer days. Made with PVC pipe and
LOFT DOOR HANGER BARN DOORS & HARDWARE. Hardware Installation Instructions. Page
 LOFT DOOR HANGER Page 1 Specifications 2 7/16" 3/8" 1-1/2 1-3/4 Ø3 3 7/8" 11-1/16 Page 2 Parts and Tools Tools Needed Tape Measure Pencil Drill with 1/8, 1/4 and 3/8 bits, 1 spade bit and Phillips bit
Showpiece Cabinet Integrated Stand For 32" - 52" LCD HDTV
 Showpiece Cabinet Integrated Stand For 32" - 52" LCD HDTV Installation and Assembly Instructions 2009 Incredible Technologies Inc. Version 0109 Showpiece Cabinet Integrated Stand for 32" - 52" LCD HDTV
ASSEMBLY INSTRUCTIONS
 MODEL: FH144119 ASSEMBLY INSTRUCTIONS FINGERHUT ATTENTION DO NOT RETURN TO THE STORE Contact MD Sports Customer Service * For additional resources and Frequently Ask Questions, please visit us at themdsports.com
Bulkhead Model Number and
 Bulkhead Model Number 96141-3-01 and 96142-3-01 Installing your ProMaster bulkhead is very clear cut following these instructions. Before cutting or drilling in the floor, verify the location of you gas
Large Wood Windmill Assembly Instructions
 CROW S NEST (TOP VIEW) TOWER (SIDE VIEW) 0 QTY 2 2 ITEM QTY 2 QTY QTY 8 QTY 8 QTY 4 TOP TOP TOP 47 9 QTY 4 QTY 4 QTY 4 QTY 4 QTY 4 ITEM 6 ITEM 7 ITEM 8 ITEM 3 ITEM 9 ITEM 4 ITEM 2 ITEM 5 47 Leg QTY 4 42.5
Next Level Security. This 2-tier locker ships flat to save on freight, comes in galvanized and powder coat finish options, and has a modular design.
 T WO - T I E R B IK E LO C K E R Next Level Security We take long-term bicycle storage to new heights with the new Dero Two-Tier Bike Locker. It is easy to load and provides a space-saving solution to
INSTRUCTIONS High Tech II Unit Assembly
 INSTRUCTIONS High Tech II Unit Assembly The following instruction is a guideline, illustrating suggested methods, assembly sequence, and tool selection. Actual assembly may vary by each situation. Careful
Tools: Sharpie, Square, Vise, Hack saw, Ruler, Punch, Hammer, File. 2. Cut the stock Place stock in vise and cut with hack saw
 Purpose: MAKE CATAPULT ARM Step 1 Tools: Sharpie, Square, Vise, Hack saw, Ruler, Punch, Hammer, File Materials: Flat aluminum ½ inch stock (see picture below) Gloves required 1. Pick up the aluminum ½
SAVE THESE INSTRUCTIONS DEALER/INSTALLER: GIVE TO HOMEOWNER POOL ENTRY SYSTEM
 prpd.confer_modelpes-8-r_pes-/pes-dbl Final TS 8// 9: PM Page Step. Note: Two people are required for this operation Step. Water fill openings on both side panels. To prevent algae, add a cup of household
Installing AZEK Evolutions Rail
 Installing Evolutions Rail TM Contemporary Installing AZEK Evolutions Rail Installing Evolutions Rail Contemporary Style... 2 Installing CableRail by Feeney for Evolutions Rail Contemporary Style... 8
Spiral Slide
 IMPORTANT Page 1 PLEASE READ THESE INSTRUCTIONS BEFORE COMMENCING ASSEMBLY. All equipment must be installed in accordance with these instructions. Check your shipment against Bill of Lading and Parts list.
Hoop House Plans By Steve Robinson
 Hoop House Plans By Steve Robinson This Ebook is Shareware It is meant to be shared by farmers alike. I give you permission to share this EBook to as many people as you like. It can not be sold, but it
YJ Bow Assembly. Installation Instructions INSTALLATION TIME SKILL LEVEL TOOLS. Vehicle Application: Jeep Wrangler YJ Part Number: 55004
 Installation Instructions YJ Bow Assembly Vehicle Application: Jeep Wrangler YJ 1988 1995 Part Number: 55004 INSTALLATION TIME SKILL LEVEL 2 Hours 2 - Moderately Easy TOOLS 1/8" Bit 10' #2 #50, #45, #50
TURBOTWISTER ASSEMBLY AND INSTALLATION INSTRUCTIONS
 TURBOTWISTER ASSEMBLY AND INSTALLATION INSTRUCTIONS CORPORATE HEADQUARTERS WESTERN SALES AND MANUFACTURING PLANT P.O. Box 400 1017 SW Berg Parkway Canby, Oregon 97013 Phone: (503) 266-2231 Fax: (503) 266-4334
INS T A L L A TIO N INS T R U C TIO N S. Ceiling Mount Track System
 Ceiling Mount Track System 10.26.2016 Specifications Ceiling Post: Unassembled 2-7/8 Assembled 1-11/16 7/8 7-9/16 5-7/8 3/8 2 Tubes 1/2 2-3/8 5 Parts and Tools Tools Needed Tape Measure Pencil Drill with
ROCKWELL 4-IN-1 DOOR. Two Panel Door. Half X Door. Z Combination Door. Double X Door
 ROCKWE 4-IN-1 DOOR Two Panel Door Half X Door Double X Door Z Combination Door Choose between four door styles with this Door Kit. Our versatile Rockwell Door Kit is very easy to assemble. All materials
INSTALLATION INSTRUCTIONS INS T A L L A TIO N INS T R U C TIO N S THE MAVERICK HANGER R H
 INS T A L L A TIO N INS T R U C TIO N S THE MAVERICK HANGER 10.6.2016 PARTS INSTALLATION SPECIFICATIONS AND TOOLS INSTRUCTIONS 2-1/4" 2-7/8 11-3/8" 1/4" 2-1/8 PARTS INSTALLATION AND INSTRUCTIONS TOOLS
K9 KIT INSTALLATION INSTRUCTIONS CROWN VIC KK-K9-F7-K
 K9 KIT INSTALLATION INSTRUCTIONS 1998-2011 CROWN VIC KK-K9-F7-K TOOLS REQUIRED: Power Drill (Cordless preferable) Drill Bit Set Standard Wrench and Socket Set Metric Socket Set Screwdriver Set Torx Bit
INSTALL/REMOVAL INSTRUCTIONS: WINDOW LIFT MOTOR
 REMOVAL/INSTALL OF WINDOW LIFT MOTOR (655-1503) Chevrolet S10 Blazer/Pickup, GMC S15 Jimmy/Pickup 1995 2004, Oldsmobile Bravada 1996 2001, GMC Envoy 1998 2000, Isuzu Hombre 1998 2000 General Tech Tips:
V nyl Gazebo truct c it Assembly Instr ons
 V nyl Gazebo Vi Assembly Instr ct tr t u ru ons ct c i ti Pre-assembly Instructions A C B #1 - Site properly prepared. 4" - 6" clean stone 9 linear blocks 2" x 8" x 16" C C A A B B #1a - 12" sauna tubes,
Portable System Owners Manual Customer Service Center N53 W24700 South Corporate Circle Sussex, WI U.S.A.
 Portable System Owners Manual Customer Service Center N53 W24700 South Corporate Circle Sussex, WI 53089 U.S.A. Adult Assembly Required. This manual, accompanied by sales receipt, should be saved and kept
10 x 10 Flat Top Two Tone Pergola
 0 x 0 Flat Top Two Tone Pergola Models: Bordeaux ASSEMBLY GUIDE OPTIONAL ACCESSORIES Arch Kit System ( Arches) Privacy Fence Panel System ( Panels & Middle Post) Bolt Down Bracket Kit ( for Pergola) Ver.0-00
GARAGE DOOR WITH TORSION SPRING
 GARAGE DOOR WITH TORSION SPRING DIMENSIONS 9 WIDTH X 7 HEIGHT (2.74m x 2.13m) IMPORTANT SAFETY INSTRUCTIONS WARNING: Read all instructions and warnings before use. Failure to follow all instructions may
ASSEMBLY INSTRUCTIONS
 TM MODEL: 44119-1 ASSEMBLY INSTRUCTIONS Blain's Please contact us before returning the product to the store. Toll Free: 877-82-814 Register Now on themdsports.com and Earn a One-Year Warranty for Free!
Installation Manual Flat Track Series
 Manual Flat Track Series Contents Safety...1 Parts...2 Hardware.......................................... 2 Tools Required..................................... 4.............................................
Salter Industries Spiral Stair
 Salter Industries Spiral Stair The Leader in Spiral Staircases Continuous Sleeve Stair Installation Instructions TOOLS NEEDED: 1. Electric drill with hex chuck and Phillips bit 2. Drill bits 1/8", 1/4",
Outdoor Water Solutions, Inc. Small Backyard Windmill. Installation Manual
 Outdoor Water Solutions, Inc. Small Backyard Windmill Installation Manual Customer Service: 1-866-471-1614 Website: www.outdoorwatersolutions.com Springdale, Arkansas 72764 Phone: 1-866-471-1614 Fax: 1-479-750-9178
PowerLock. Installation Instructions. Attention Dealers: Please give this owners manual to the customer when the product is delivered.
 Serving the Truck & Trailer Industry Since 1944 PowerLock Attention Dealers: Please give this owners manual to the customer when the product is delivered. Call 800-535-9545 www.aeroindustries.com Indianapolis,
Closet System Installation Manual
 Closet System Manual Thank you For choosing our Custom Closet Collection to fit all your needs Closets come fully assembled to make your project an enjoyable and satisfying experience. With quality Custom
Sentinel Electronic Safe Installation Guide
 Sentinel Electronic Safe Installation Guide by Rev 07/12/2004 P/N 100020 Table of Contents 1. OVERVIEW...3 2. SAFE INSTALLATION...3 2.1. TOOLS REQUIRED...3 2.2. SELECTING THE MOUNTING LOCATION...3 2.3.
OPERATORS MANUAL WEEKENDER STEEL LADDER RACK
 OPERATORS MANUAL WEEKENDER STEEL LADDER RACK WWW.WEATHERGUARD.COM MODELS 1450 & 1475 1475 Shown INSTALLATION TIME Approximate installation time: 60 minutes (depending on truck equipment installation experience
GlideRite Retractable Cover System For Hot Spot Spas (SE & SLX only)
") List of Contents Quantity Description 12 #10 x 1 ½ Flat Head Phillips Screw (see pg. 2) 2 #10 x ½ Pan Head Phillips Screw (see pg. 2) 8 ¼ x 2 ½ Lag Bolt (see pg. 2) 7 ¼ 20 x 5 / 8 Hex Head Bolt (see pg.
List of Contents Quantity Description 12 #10 x 1 ½ Flat Head Phillips Screw (see pg. 2) 2 #10 x ½ Pan Head Phillips Screw (see pg. 2) 8 ¼ x 2 ½ Lag Bolt (see pg. 2) 7 ¼ 20 x 5 / 8 Hex Head Bolt (see pg.
Classic Roll Tarp. Installation Instructions. Attention Dealers: Please give this owners manual to the customer when the product is delivered.
 Serving the Truck & Trailer Industry Since 1944 Classic Roll Tarp Attention Dealers: Please give this owners manual to the customer when the product is delivered. Call 800-535-9545 www.aeroindustries.com
Assembly Instructions
 18' W x 10' H or 12' H Peak Style Frame Assembly Assembly Instructions Before you start: 2+ individuals recommended for assembly, approximate time 3 hours. Recommended tools: Power Drill, Safety Glasses,
KWIK-KIT KK-S INSTALLATION INSTRUCTION PACKAGE
 KWIK-KIT KK-S-120-02 INSTALLATION INSTRUCTION PACKAGE INSTALLATION INSTRUCTIONS HAVIS KWIK-KIT KK-S-120-02 2002-2007 DODGE/FREIGHTLINER SPRINTER VAN PLEASE READ COMPLETE INSTRUCTIONS PRIOR TO INSTALLATION
H20. ISOTOPE FUME HOOD with Vertical Rising Sash. Fume Hoods. Installation Instructions. 48"- 60"- 72"- 96" long
 Installation Instructions Supreme Air ISOTOPE FUME HOOD with Vertical Rising Sash H20 S T Y L E Fume Hoods 48"- 60"- 72"- 96" long Publication No. IIH20-SA 5/96 Part Number: IMAN-H20 FUME HOOD END PANEL
Motorcycle Lift Assembly Instructions
 Motorcycle Lift Assembly Instructions Copyright JCS 2009 Rev1M Page 1 Lift Table Assembly Instructions The following pages will assist you in the construction of your Motorcycle Lift Table. You will find
NON-ELECTRIC DOG FENCES
 NON-ELECTRIC DOG FENCES Thank you! Thank you for ordering your non-electric dog fence kit from Pet Playgrounds. In less than a day you will have your very own personal dog park installed on your property.
How to Build a Raised Bed Cold Frame
 How to Build a Raised Bed Cold Frame Protect your plants from frost with a cold frame that sits right on top of your existing 4' x 4' raised bed. The lid is held open with screen door closers, and the
INSTALLATION GUIDE. C20-FTL STRAIGHT PARTITION Transit Partition ( Perforated Window, No Access, Steel )
") INSTALLATION GUIDE C20-FTL STRAIGHT PARTITION Transit Partition ( Perforated Window, No Access, Steel ) QUICK START GUIDE Phase 1 - Assembly q 1.1 Setup... q 1.2 Partition Assembly... 3-5 5-6 Phase 2 -
INSTALLATION GUIDE C20-FTL STRAIGHT PARTITION Transit Partition ( Perforated Window, No Access, Steel ) QUICK START GUIDE Phase 1 - Assembly q 1.1 Setup... q 1.2 Partition Assembly... 3-5 5-6 Phase 2 -
FOR PROFESSIONAL GARAGE DOOR INSTALLERS
 Composite Garage Doors Installation Instructions FOR PROFESSIONAL GARAGE DOOR INSTALLERS Tools required Screwdriver Claw Hammer Locking Pliers Power Drill Level with a 3/32" Drill Bit Utility Knife 9/16",
Heavy-Duty Bypass Track System
 Heavy-Duty Bypass Track System Please Note: This track system must be installed with the screws going into a solid surface such as studs or a header. Due to the spacing of the holes on these Brackets,
TABLE OF CONTENTS REQUIRED TOOLS
 TABLE OF CONTENTS SECTION SECTION TITLE PAGE NO. 1 2 3 4 5 Assembling Mounting Structure Installing Bicycle Supports Mounting Rack to Wall Adding Sections Customizing Rack Configuration REQUIRED TOOLS
Installation manual: Tähtisaunat Moderni/Elegance Benches.
 Installation manual: Tähtisaunat Moderni/Elegance Benches. Thank you for ordering a Tähtisaunat bench package! This manual contains installation instructions for the Moderni and Elegance model. In addition
E N G L I S H GARDEN SHED. Assembly Instructions. Suitable for Models WITH VARYING DEPTHS
 GARDEN SHED Assembly Instructions Suitable for Models 6' Wide 8' Wide 0' Wide WITH VARYING DEPTHS GI0003 November 0 INSTALLATION ADVICE It's Not That Difficult! The construction of your shed isn't as complicated
Installation Manual. This installation is for the Odyssey H1800 Series Ventilation System.
 Installation Manual This installation is for the Odyssey H1800 Series Ventilation System. This installation is limited to roofs with pitches between 3 and 35. This instruction assumes that there is a power
INSTALL/REMOVAL INSTRUCTIONS: WINDOW REGULATOR
 REMOVAL/INSTALL OF WINDOW REGULATOR (740-666) Lincoln Town Car 1990 94 General Tech Tips: Use painter s tape rather than duct tape to secure window. It will not damage paint or leave sticky residue. A
Homestead Bar Cabinet IMPORTANT NOTE Carefully remove all the parts from the carton and put them individually on a soft cloth to prevent s
 88 5527 991 Homestead Bar Cabinet IMPRTANT NTE Carefully remove all the parts from the carton and put them individually on a soft cloth to prevent scratches or other damages occuring to the wood parts.
Roof Only Lean-to Instruction Manual
 Roof Only Lean-to Instruction Manual for 10 x 20 2 x 8 /10 6 covers Our unique assembly process quickly transforms the individual pieces into a finished structure that will give you a lifetime of service.