Effective April 1, 2013
|
|
|
- Dennis Bishop
- 5 years ago
- Views:
Transcription


1 Effective April 1, 2013
2 Table of Contents Ensuring System Performance 1 Components 2 Frequently Asked Questions 3 List of Tools 3 Before you Begin Preparation 3 Quality Tips 4 Cold Weather Tips 4 Cleaning 4 Water Management System 5 Cutting & Fastening 5 Trim, Casings, Corners & Caps 6 Trim Installation Alignment Keys & Trim 6 Edge Trim 6 Starter Strip & Stud Marking 7 Installing the First Lap 7 Siding Installation Seam Flashing 8 Installing Siding Around Windows & Doors 8 Installing the Final Lap 9 Installation Over Rigid Foam Board 9 Miscellaneous Individual Outside Corners & Gables 9 Simple Frieze Applications 10


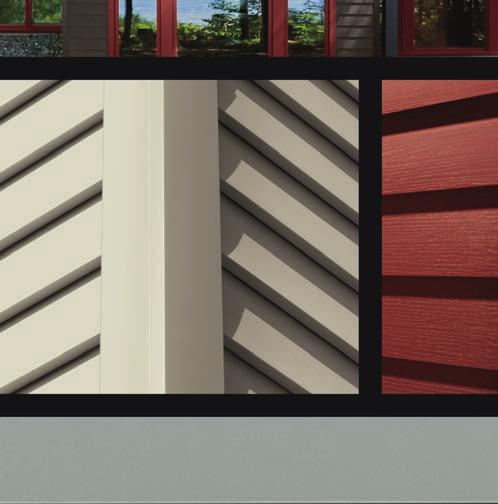
3 Ensuring System Performance Sheathing Weather Barrier Casing Water Management Clip Finish Trim Seam Flashing APEX s manufacturing facility maintains ISO 9001:2008 certification for quality management standards that foster consistent, high quality products and services. APEX Siding is ICC: ESR certified for compliance with the 2006 International Building Code (IBC) and 2006 International Residential Code (IRC). Visit for more information. 1. APEX siding and trim products must be lifted out of the box. Do not slide out of box as this may damage the finish. 2. Proper cutting of APEX products, requires the use of a sharp continuous rim diamond tile blade. 3. Fasteners must be corrosion resistant and penetrate the stud at least 1-inch. 4. Always ensure the starter strip is level and water management clips have been installed. 5. Mark all studs prior to installation. Fastening through studs is necessary for best system performance. 6. Siding and starter strip must be fastened through factory applied water management clips and into the stud or sill plate. 7. Seams must be placed at a stud. 8. Seam flashing must be used for proper seam installation. 9. Ensure the back of the siding at seams is wiped free from dust, dirt or moisture before flashing adhesive is applied to ensure adhesion. 10. Fasteners at a seam flashing should be angled slightly up and toward butt edge to help maintain the interlock and tight seams. 11. Check each lap during installation for correct reveal height and ensure each lap is fully interlocked with the next. 12. It is not necessary to caulk seams or end butt joints. INSTALLER NOTE: For optimal seam appearance, laps may require piece selection to ensure best seam alignment. PRODUCT MUST BE INSTALLED IN ACCORDANCE WITH APPLICABLE BUILDING CODES AND APEX SIDING SYSTEM INSTALLATION INSTRUCTIONS. FAILURE TO DO SO MAY VIOLATE LOCAL BUILDING CODES, AFFECT SYSTEM PER- FORMANCE AND VOID THE PRODUCT WARRANTY. For a copy of our current MSDS, please visit APEX Installation Instructions Rev. 9 Page 1 of 10


4 Components Images are not to scale SIDING & STARTER STRIP Lap Siding Lap Siding OUTSIDE CORNERS /2 Starter Strip /2 Starter Strip INSIDE CORNERS Water Management Clip NOTE: Water management clips are pre-installed on siding and starter strip /2 Receiver Corner /2 Outside Corner Post CORNER KEYS 9312 Inside Corner Inside Corner TRIM Outside Corner Post /2 Outside Corner Post 3-1/2 Casing Corner Key Brickmould Corner Key SEAM FLASHING /2 Casing 9316 Brickmould 9334 Edge Trim 9324 Receiver Trim 9032 Simple Frieze/Belly Board 9317 Finish Trim 4 Seam Flashing 7 Seam Flashing ALIGNMENT KEYS END CAPS 5.5 Outside Corner Alignment Key 5-1/2 Outside Corner End Cap Receiver Corner End Cap 3.5 Outside Corner Alignment Key 3-1/2 Casing Alignment Key 3-1/2 Outside Corner End Cap 3-1/2 Casing End Cap 45 Inside Corner End Cap 45 Outside Corner End Cap APEX Installation Instructions Rev. 9 Page 2 of 10


5 Frequently Asked Questions Q. Where do I need to use seam flashing? A: Seam flashing must be used behind every siding seam. It can also be installed where support for non-apex components is needed. Q: How much seam flashing will I need? A: The quantity of seam flashing needed will vary due to house design and number of seams. Typically a good starting point is 2 bags of 10 for every square of 4 siding and 1 bag of 10 for every square of 7 siding. Q: How many end caps will I need for the corner posts? A: You will need two end caps for every corner unless you are tying directly into a soffit. Q: What are the water management clips used for? A: Siding: Water management clips are factory applied to each lap of siding and starter strip. They hold the siding away from the house wrap to create the water management drainage and back ventilation plane. Water management clips are fastened through the siding and stud. finish trim stud Finish Trim: When using finish trim as a starter strip, water management clips must be installed to maintain the water management and back ventilation plane. Shimming: Water management clips can be used in any application that List of Tools Sliding Compound Miter Saw (10 min.; 12 recommended) Continuous Rim Diamond Tile Blades. DO NOT use a segmented (serrated) blade. See page 5 for image Required Tools requires shimming. They can be used on nailing flanges where butyl tape and nailing fins cause uneven spaces around windows and doors. Q: Will I need to order extra water management clips? A: Typically it is a good idea to have one extra bag (200/bag) of water management clips per 15 squares of siding. They also make excellent shims. Q: When will I need to use an alignment key? A: An alignment key should be used when end joining casing or outside corner posts. Q: Does the siding need to be caulked? A: The APEX Siding System is designed to be caulk free. Face caulking is not necessary for performance. Q: How should I clean the siding and components? A: Remove installation related dust with an automotive car duster or micro-fiber cloth as siding is installed. Remove wet dust or heavier dirt with water and a mild detergent. Refer to the APEX Care and Maintenance guide for approved cleaners at Q: Can APEX be installed over rigid foam board insulation? A: Yes. However care should be taken to maintain the drainage plane. The APEX Installation tool is recommended for best results and to avoid over driving nails. Fasteners must also penetrate the stud a minimum of 1. Recommended/Optional Tools Appropriate Length Corrosion-Resistant Fasteners Cordless Drill Ladder Mitten High-Quality Utility Knife/Blades Mini Grinder 7-1/4 Circular Saw Safety Glasses Metal Clippers/Snips Levels (Torpedo, 4 ) Pop Rivet Gun Pop Rivets Hammer Screw Bit Set With Extensions Speed Square Dust Mask Adhesive/Caulk Gun Tape Measure Gloves Rigid Construction Adhesive Pneumatic Roofing Nailer/Air Supply Chalk Line Automotive Car Duster APEX Installation Tool (over foam board) Micro-fiber Cloths Preparation Do not begin installation until structure has been properly prepared according to local building codes. It is not recommended to install APEX siding over existing siding. Ensure stability when stacking boxes, crates and pallets. Do not stack crates or pallets more than 4 high. Weather-resistive barrier and proper opening treatments need to be installed according to the manufacturer s requirements and applicable building codes. Do not install over inadequate structural framing or over buckled or wet material. APEX is designed for best performance over 7/16 or greater sheathing. A level starter strip with water management clips must be used to begin every siding installation in order to maintain a proper drainage plane. Siding and components must be lifted out of the box. Do not slide out of box as this may damage the finish. APEX Installation Instructions Rev. 9 Page 3 of 10


6 Quality Tips INSTALLATION BETWEEN EDGE TRIM Cut siding 1/4 longer than opening between the inside opening of the edge trim. Slide siding fully into side (B). Center between (A) & (B). Lift to interlock. Fasten through water management clips and on each end. A B used as a starter strip in combination with water management clips to create the water management plane. MATCHING LAPS AROUND PORCHES AND BRICK A proper water management plane must be maintained when installing APEX Siding ongrade or in contact with other materials. In cases where porches, overhangs or brick interfere with siding lap heights, remove the butt/heel of the siding and slide into finish trim to match the laps on adjacent walls of the structure. Water management clips must be used with the finish trim as you would for starter strip to maintain water management plane. FINISH TRIM OVER DECK BAND JOISTS Use the proper flashing per local building codes over any deck band joist. finish trim location of ledger board USING FINISH TRIM AS A finish trim STARTER STRIP For improved aesthetics in areas where the heel of siding must be removed, finish trim may be stud location Finish Trim Finish trim was used as a starter strip where the siding meets the brick. Finish Trim Finish trim was used as a starter strip where the siding meets a porch. Cold Weather Tips Store seam flashing, paint pens and caulking in a temperature controlled area above 50 F. Keep seam flashing warm by placing in a coat pocket until ready to use. Do not expose flashing adhesive until ready to be applied. Cleaning Micro-fiber cloths are recommended for cleaning the back of siding where seam flashing will be adhered and for light surface cleaning. To remove loose dry dust use an automotive car duster. Water mixed with a mild detergent is recommended for general cleaning. Apply with non-abrasive applicators or spray and rinse thoroughly with clear water. See the APEX Care and Maintenance guide for a list of approved cleaners. Ensure back of siding is clean and free of ice, frost, dirt and moisture. Once the protective film is removed, protect the surface of the adhesive from any snow, dust or dirt. Due to lower temperatures, additional pressure when installing seam flashing is required to activate adhesive. Using clear water through a home use pressure washer also works well for general cleaning. NOTE: Scrubbing with abrasives or applying extreme pressure can alter the finish. For more information on cleaning APEX siding and trim, consult the APEX Care and Maintenance guide available at APEX Installation Instructions Rev. 9 Page 4 of 10


7 Water Management System WATER MANAGEMENT SYSTEM When properly installed, the water management system creates an effective water drainage (rain screen) and ventilation plane. water management clip fastener Top View Sheathing Stud drainage plane water management clip NOTE: Water management clips should be used anywhere the water management plane must be maintained including lap side and starter strips. When installing over foam products take extra care to maintain the drainage plane. Adjust pressure accordingly to avoid over driving nails. Cutting & Fastening CUTTING Proper cutting of siding and trim components requires the use of a sharp continuous rim diamond tile blade. This will produce the highest quality cuts and the lowest cost per cut. Dull blades should not be used to cut APEX products. With proper care, high quality blades will have a long service life that can exceed 100 to 200 squares. Improperly cared for blades will prematurely dull and should not be used. Diamond cut-off wheels should be used in hand held grinders for detail cuts. Siding may need to be trimmed horizontally when installing the final lap or for cut-outs around windows and doors. Siding can be scored along the horizontal direction of the siding with a sharp utility blade and broke similar to gypsum board. 7-1/4 circular saw also works well for ripping siding. FASTENING Fasteners must be corrosion resistant and fastened through factory applied water management clips. Siding and trim components should be hand or pneumatically hard fastened to the structure. Fasteners should penetrate through the sheathing and into the wood stud a minimum of 1-inch for best installation practices. Steel structures with sheathing overlay: Use #8 or greater exterior grade self tapping screws that penetrate the steel stud a minimum of 1/2-inch. When installing over SIP/ICF panels use screws or ring shank fasteners. Starter strips must be fastened through factory applied water management clips and into the stud or sill plate. Trim components should be nailed through the trim nailing fin and sheathing and into the stud. Trim components installed vertically do not require water management clips. Maintain a minimum distance of 1/4 from the nail shank to the outer edge of the siding or trim nailing fin. Due to extremely low thermal expansion and stud weather barrier sheathing drainage plane NOTE: Interlock allows for 1/16 maximum drop per lap for course adjustment. contraction, (similar to pine & fir in length), joints and seams should abut, not gap or be forced. APEX Installation Instructions Rev. 9 Page 5 of 10


8 Trim, Casings, Corners & Caps INSTALLING END CAPS Prior to installing trim, you will need to attach end caps to trim. End caps will fit into either end of their respective trim profile. Apply an adequate amount of rigid construction adhesive to the inside of the trim before inserting the end cap. Once end caps have been installed, fasten the trim components to the structure using attached nailing fin. NOTE: Water management clips are not necessary on When mitering casings, back-cut the 45 degree miter at 5 degrees on one side for a tight fit. Make certain that all trim is installed level. Alignment Keys & Trim When end-joining outside corners and casing, an alignment key must be used to ensure proper alignment of the joining pieces. For best joints, butt factory cuts to factory cuts. CASING OUTSIDE CORNERS Use the alignment key as a guide to Place the outside mark the tab location on one of the corner alignment 3-1/2 OUTSIDE CORNER POST parts to be aligned. key into one of the Use a grinder, saw or snips to notch out the wall where parts to be aligned. the notch will rest. Mark the area Insert the alignment key and push the two parts over where the middle the key until properly aligned. of the key hits the Place the parts together against the structure where the inside of the corner. 3-1/2 RECEIVER CORNER part will be installed. Use a grinder, saw Plumb and fasten in place. or snips to notch out the wall where CASING the key will rest. Place the other part over the key until 5-1/2 OUTSIDE CORNER POST properly aligned. Plumb and fasten in place. WINDOWS & DOORS For best aesthetics and ease of installation, install finish trim along the header and sill of the window or door and install the edge trim along the jambs. Cut two pieces of edge trim the same height as the window. Fasten in place along the jambs of the window. vertical trim components, however they may be used when the application requires shimming. casing corner key MITERING CASING NOTE: Corner keys should be used when aligning 45 miters on casing and brickmould. Edge Trim Edge trim is recommended for optimal aesthetics around windows and doors to conceal tear off paint, caulk and mortar with minimal overlap of adjacent siding. Install typical flashing per local building codes. Follow guidelines on page 8 for proper installation of finish trim over the finish trim window. edge trim Use a color matched paint pen to touch up the exposed cut ends of the trim. NOTE: Face caulking is not necessary for performance. APEX Installation Instructions Rev. 9 Page 6 of 10

.")


9 Starter Strip & Stud Marking MARK THE STUDS Prior to installing the starter strip ensure the studs are accurately marked. STANDARD STARTER STRIP INSTALLATION Once all trim has been installed, you can then begin installing the siding. Begin with the starter strip. fastener Fasten starter strip through the water management clips and into the stud or sill plate a minimum of 1-inch. NOTE: When installing 3-1/2 starter strip, nail directly below the WMC on every other stud for additional support (see image on left). ALTERNATIVE STARTER STRIP INSTALLATION 1-1/2-inch starter strip is designed for use with 4-inch siding. However, if you are installing 4-inch siding below the sheathing you can use the 3-1/2 starter strip as follows. Slightly bend the legs of the water management clip outwards. Using tin snips cut each WMC completely in half. water management clip stud location Place behind the 3-1/2 starter strip at every stud and fasten ensuring the starter strip remains level. Ensure that the starter strip is level and the water management clips are in place at every stud. Installing the First Lap Once you have marked the studs, installed starter strip, corners and window trim, you can begin installing the siding. Install the first lap of siding by firmly lifting up on the butt of the siding to ensure that the entire piece is interlocked with the starter strip. Slide a water management clip to the location of the stud and fasten through clip, siding, and sheathing into the stud. Siding needs to be fastened through the water management clips to all possible studs. Water management clips are not necessary when fastening through trim nailing fins or over seam flashings. Continue installing each lap of siding ensuring each piece is interlocked with the previous lap. NOTE: Seams on adjacent rows should not be aligned. The seams should be staggered a minimum of three courses in height and 32 in width. Avoid placing seams above windows and doors. See steps on following page for proper seam assembly. NOTE: Seam flashing or blocking can be installed where support for non-apex components is needed, i.e. doorbell button. Due to extremely low thermal expansion and contraction (similar to pine & fir in length), joints and seams should abut, not gap or be forced. APEX Installation Instructions Rev. 9 Page 7 of 10


10 Seam Flashing Seam flashing must be used behind every siding seam. Best seams will be factory to factory cuts. When making site cuts, ensure both seam cuts are made with the same saw with the same orientation, (saws may be off angle, however if the parts are cut on the same saw, the angles should match up). For adequate contact of the flashing adhesive, the back of each piece of siding at the seam must be wiped clean. Seam Dry assemble the seam to achieve optimal seam appearance before fastening laps. Fasten the first lap everywhere but the seam end. Align the second lap at the seam and fasten everywhere but the seam end. This will allow for flexibility when installing the seam flashing. Angle fastener slightly up and towards seam for a tight lock. Due to extremely low thermal expansion and contraction, (similar to pine & fir in length), joints and seams should abut, not gap or be forced. Seams must be placed at a stud. Installing Siding Around Doors and Windows ABOVE WINDOWS AND DOORS A 1/2 gap will allow part (A) to be interlocked with the lap below it. Finish trim can be installed on part (A) before it is put on the wall, then the finish trim can be pulled down to conceal the 1/2 gap. A A Remove the protective film from the adhesive. Pull both laps away from sheathing and slide the seam flashing behind the two laps so it is centered on the seam. Align the top of the seam flashing with the siding. Use the divot at the top of the seam flashing as a guide to centering. Fasten through seam flashing and press firmly on the siding for proper adhesion of the flashing tape. Avoid rubbing the seams as this may alter the sheen. Due to the structural rigidity of APEX siding, fasteners should be slightly toed-in towards each seam to maintain seam integrity. INTEGRATED RECEIVER CHANNEL, EDGE OR RECEIVER TRIM When a door or window has an integrated receiver channel or APEX edge or receiver trim has been installed, 3- inches of the interlock on the siding on each side of the window or door must be removed to provide proper clearance for the siding. Remove Interlock finish trim 1/2 gap 3 3 NOTE: If finish trim is not being used, gap can be as small as 3/8. APEX Installation Instructions Rev. 9 Page 8 of 10


11 Installing the Final Lap The last piece of siding will include a piece of finish trim and a trimmed lap of siding. Fasten finish trim to top of sheathing. It may be necessary to install a furring strip for proper angle of the reveal. Trim the siding lengthwise to achieve the appropriate height for the last piece. Ensure the lap is wide enough to reach the pinch points of the finish trim. See page 3 for proper cutting techniques. Apply construction adhesive to the backside along the top of the final (ripped) piece of siding and insert into finish trim a minimum of 1/2-inch. Rigid construction adhesive or fastener must be used to install the last lap. Installation Over Rigid Foam Board Use the APEX installation tool when installing over rigid foam board. The tool will distribute the load of the nail impact to maintain the drainage cavity. For best installation practices do not install APEX siding over non-rigid foam products. Place the tool so the flat prongs are When installing over rigid foam board take on each side of the water management clips or seam flashing and Adjust pressure accordingly to avoid over extra care to maintain the drainage cavity. behind the siding nailing fin. Fasten driving nails. securely. Nails must penetrate studs at least The siding installation tool can also be used to tap the siding for a good interlock. Inch 1- inch. marks on the side of the tool are for assisting with proper interlock of the siding. Individual Outside Corner & Gables 7 INDIVIDUAL OUTSIDE CORNER The individual outside corner support needs to be installed as the siding goes up (height alignment of siding from wall to wall is critical for proper corner Fastener installation). Siding must be cut 3/8 +/- 1/8 short of the corner for proper alignment. Align siding first, then slide support in. NOTE: Support should be flush with the top of the siding. Fasten through siding and corner support. When installing the last corner support and cap, you will need to trim it accordingly and mechanically fasten. Apply rigid construction adhesive to the back of each cap and snap into place from bottom to top. GABLE Use one fastener to mechanically secure the final piece of siding in a gable peak. Use a color matched APEX paint pen to paint the head of the fastener. APEX Installation Instructions Rev. 9 Page 9 of 10


12 Simple Frieze Applications SIMPLE FRIEZE & WATER TABLE Flashing should be inserted over the top of the cut edge of water table. Channel is trimmed for this application. Trimmed Channel SIMPLE FRIEZE & SOFFIT Insert soffit into channel of frieze. SIMPLE FRIEZE & GABLE RAKE Insert soffit into channel of frieze. SIMPLE FRIEZE CORNER CAP Mitering makes for a better area for rivet placement. When joining two simple frieze at a corner, you can either square the ends or miter them prior to installing the corner cap. Rivets can be used on the top or side of cap. The frieze/belly board cap has two snap on connection flanges on the bottom of cap as shown. NOTE: For other applications bottom rivets may also be used. Before installing the end cap, the frieze should be brought as close to the end of the structure as possible for the caps to fit properly. Placement of rivets can be along the top of the cap or the face. They should be installed parallel to one another for aesthetic purposes. Flanges should snap around into the bottom of the frieze. APEX Installation Instructions Rev. 9 Page 10 of 10
Effective February, 2015
 Effective February, 2015 Table of Contents Ensuring System Performance 1 Components 2 Frequently Asked Questions 3 List of Tools 3 Before you Begin Preparation 3 Quality Tips 4 Cold Weather Tips 4 Cleaning
Tape Measure Metal Clippers Screw Bit Set With Extensions
 IMPORTANT: Read through instructions thoroughly before beginning to replace any damaged material. Minor damage can be fixed with a fiberglass repair kit and color matched paint. Tools Required Tape Measure
INSTALLATION PROCEDURE
 Vinyl Siding INSTALLATION PROCEDURE Tools Needed and Preparation MOST ESSENTIAL TOOLS The proper tools, materials and equipment can make the installation of Durabuilt Vinyl Siding much easier. Here are
COMPOSITE SIDING INSTALLATION GUIDE
 CENTURY HOME LIVING COMPOSITE SIDING INSTALLATION GUIDE Read all instructions prior to installing any siding product. Failure to install and finish this product in accordance with all local building codes,
Installation Manual SOLID CORE SIDING
 Installation Manual SOLID CORE SIDING SOLID CORE SIDING Installation Information contained in this manual can be viewed in video form at: www.youtube.com/epbc CONTENTS Important Notes...2-4 Weather Protective
CONTENTS. Transitions Board and Batten Vertical Installation... 10,11
 INSTALLATION MANUAL CONTENTS Important Notes... 2-4 Weather Protective Barriers... 2 Storage and Transportation... 2 Tools and Equipment... 2 Fastener Choices... 3 Wall Preparation... 3,4 Flashing... 4
Installation Instructions Split Shake, Staggered Shake, Shingle, Perfection Shingle, and Shapes
 Installation Instructions Split Shake, Staggered Shake, Shingle, Perfection Shingle, and Shapes General Guidelines These instructions show one type of installation and are intended for the professional
Best Materials LLC distributes backer rod, caulking and sealants for all types of EIFS joints and penetration sealing applications.
 Best Materials LLC distributes backer rod, caulking and sealants for all types of EIFS joints and penetration sealing applications. EXTERIOR INSULATION & FINISH SYSTEM CONSTRUCTION Data Published Courtesy
Adorn Mortarless Stone Veneer Installation Natural Concrete Products
 Adorn Mortarless Stone Veneer Installation Adorn Mortarless Stone Veneer can be used on new or existing construction. Adorn is nailed or screwed onto the wall; therefore no brick ledge is required. Adorn
Shapes Siding. Perfection Shingles. Chalk Line
 Snap a Chalk Line Shapes Siding Perfection Shingles Chalk Line To establish a straight reference line to guide the positioning of the starter strip and the first course of siding, snap a chalk line. starter
PRIMED STRAND REVERSIBLE SHAKE
 PRIMED STRAND REVERSIBLE SHAKE PRIOR TO INSTALLATION Inspect product for any issues before installing (breakage, surface defects, foreign objects). Do not install questionable product. Report any problems
3.1 Continuous top and bottom lock 3.2 Engineered nailing hem 3.3 Temperature markings
 AOBP recommends 2-1/2 ring shank nails be used. Installation over foam will require longer fasteners to assure a penetration of at least 3/4 into a structural member (stude or nail base). Corner accessories
Installation Guide - Evolution Series Wood Siding
 Installation Guide - Evolution Series Wood Siding The following instructions pertain to the installation of Fraser Wood Siding Evolution Series on a typical wood frame construction allowing for nail penetration
Pocket Door Installation Instructions
 Installation Instructions Before getting started: Read instructions thoroughly. Be sure that you have the necessary tools and materials before starting the installation. Consult your local building code
Flashing Materials. Rough Opening Preparation
 Installation Instructions for CertainTeed New Construction Windows Handling vinyl windows CAUTION: Always store vinyl windows and doors in an upright position on a slight angle. Never lay them flat or
EXHIBIT B TO AGREEMENT BETWEEN PENSACOLA HABITAT FOR HUMANITY AND SUBCONTRACTOR. Scope of Work. Vinyl Siding Labor Division 190. General Requirements
 EXHIBIT B TO AGREEMENT BETWEEN PENSACOLA HABITAT FOR HUMANITY AND SUBCONTRACTOR Scope of Work Vinyl Siding Labor Division 190 General Requirements 1. All Work shall be performed in accordance with manufacturer
Installation Instructions for Standard Lap and Self-Aligning Lap Siding
 Installation Instructions for Standard Lap and Self-Aligning Lap Siding 7/16 in. Standard Laps Include: All Old Mill Widths, Cedar Shake Lap and Smooth Lap 1/2 in. Self-Aligning Include: 8 in. and 12 in.
STACKING MULTI-SLIDE DOOR SYSTEM INSTALLATION INSTRUCTIONS
 STACKING MULTI-SLIDE DOOR SYSTEM INSTALLATION INSTRUCTIONS 1290363 Revision 1 12/16 Page 1 Weather Shield Mfg., Inc. NOTICE CAUTION! Failure to install and maintain our product according to these instructions
Ulltraclad Aluminium Cladding. Contents. 1.0 General Information Design Information Installation Information 7. 4.
 Ulltraclad Aluminium Cladding Contents 1.0 General Information 2 2.0 Design Information 4 3.0 Installation Information 7 4.0 Maintenance 10 5.0 Health & Safety 10 1 1.0 General Information 1.1 Introduction
DW HORIZONTAL INSTALLATION
 AR-PJ-01-DW2H 2" HORIZONTAL PANEL JOINT AR-PJ-02-DW2H 2" VERTICAL PANEL JOINT AR-PJ-03-DW2H 3" HORIZONTAL PANEL JOINT AR-PJ-04-DW2H 3" VERTICAL PANEL JOINT AR-PJ-05-DW2H CUSTOM REVEAL AR-PJ-06-DW2H DW-2000S
ASC Building Products. Table of Contents
 Table of Contents Section Page(s) Introduction........................................1 Minimum Recommended Tools & Equipment.............2 Delivery, Handling and Storage.........................3 Safety
TYPAR WEATHER PROTECTION SYSTEM TABLE OF CONTENTS. SPECIAL INSTALLATION CONSIDERATIONS Stucco** Brick** Stone Veneer** Wood Siding**
 TYPAR WEATHER PROTECTION SYSTEM INSTALLATION GUIDE TABLE OF CONTENTS Table of Contents...01 Special Installation Considerations...01 Code Requirements...02 Approvals and Reports...02 Recommended Materials...02
Installation Instructions for Old Mill Shingle and Designer Shake Lap Siding
 Installation Instructions for Old Mill Shingle and Designer Shake Lap Siding Includes: Cove, Craftsmen Staggered, Diamond, Fish Scale, Octagon, Round and Old Mill Shingle Lap Important: Read and understand
SECTION 4 Preparation for Horizontal Siding
 SECTION 4 Preparation for Horizontal Siding Preparing Wall Surfaces Sheathings In new construction, apply sheathing first, then nail accessories over it. In home improvement projects, you can apply sheathing
INSTALLATION, STORAGE AND WALL CONSTRUCTION DETAILS
 www.capecodsiding.com INSTALLATION, STORAGE AND WALL CONSTRUCTION DETAILS IMPORTANT READ THE FOLLOWING INSTRUCTIONS CAREFULLY BEFORE INSTALLING YOUR WOOD SIDING. FAILURE TO STRICTLY FOLLOW THESE INSTALLATION,
Sun Windows General Information New Construction Sliding Door Installation Instructions H F
 A G B D C H F H E H A. Apply Weather Resistive Barrier B. Apply Bottom Flashing Tape C. Install Sill Pan End Caps & Pan D. Caulk Sides & Top Nailing Surface, Set Door, Fasten E. Apply Side Flashing Tape
Sun Windows General Information New Construction Hinged Door Installation Instructions
 A G H F H H A. Apply Weather Resistive Barrier B. Apply Bottom Flashing Tape C. Install Sill Pan End Caps & Pan D. Caulk Sides & Top Nailing Surface, Set Door, Fasten E. Apply Side Flashing Tape F. Apply
Vinyl Windows and Doors Manufactured by Pella Corporation
 Vinyl Windows and Doors Manufactured by Pella Corporation Part Number: V981255 2009 Pella Corporation INSTALLATION INSTRUCTION - INSTRUCCIONES DE INSTALACIÓN FOR BOW WINDOWS WITHOUT HEAD AND SEAT BOARD
Installation Guide. Shingles. Classical. Shingles. Warning. Storage. Cutting Shingles. Touch-Up. Eastern White Cedar
 Installation Guide Before you begin, take the time to read this entire guide to clearly understand the requirements and steps to follow for proper installation. The Fastening Make shingle fastening simpler
INSTALLATION INSTRUCTIONS IMPERVIA (Vent and Fixed) AWNING, CASEMENT, and LARGE AWNING WINDOW WITH FINS
 AWNING, CASEMENT, and LARGE AWNING WINDOW WITH FINS") 2012 Pella Corporation Part Number: 80WH0101 INSTALLATION INSTRUCTIONS IMPERVIA (Vent and Fixed) AWNING, CASEMENT, and LARGE AWNING WINDOW WITH FINS Installation Instructions for Typical Wood Frame Construction.
2012 Pella Corporation Part Number: 80WH0101 INSTALLATION INSTRUCTIONS IMPERVIA (Vent and Fixed) AWNING, CASEMENT, and LARGE AWNING WINDOW WITH FINS Installation Instructions for Typical Wood Frame Construction.
KuraStone TM Installation Guide
 Installation Guide Read these installation guidelines completely and thoroughly before beginning installation. Construction Requirements KuraStone pieces can be installed on braced wood or steel stud (18
Dura-Lock Roof System
 DLR-14 Dura-Lock Roof System Assembly and Installation Instructions Read the instructions before starting the job. They explain the steps required to produce a finished product that will meet factory specifications.
Vinyl Windows Manufactured by VPI Quality Windows
 Vinyl Windows Manufactured by VPI Quality Windows Part Number: 531&591 Installation 531 & 591 SERIES SLIDING AND HUNG WINDOW INSTALLATION INSTRUCTIONS Installation Instructions for Typical Construction.
Installation Guide 2016
 Installation Guide 2016 BUILDERS EDGE INSTALLATION GUIDE This guide will show you the products of the Builders Edge family. It provides specific installation steps and application details. Our main goal
Installation Guide. Step 3. Valley Flashing. Step 7. Transition Flashings and Accessories. Step 6. Hip and Ridge Installation
 Step 7. Transition s and Accessories Step 3. Valley Step 6. Hip and Ridge Installation Step 2. Rake Trim Step 5. Installing the Shingles Step 1. Eave Starter Installation Step 4. Endwall s Installation
Installation Guidelines For Quaker Window Products Aluminum flange fin sub sill & receptor system using a T mulled twin window unit.
 Installation Guidelines For Quaker Window Products Aluminum flange fin sub sill & receptor system using a T mulled twin window unit. Installer: Read these instructions completely before starting any installation.
INSTALLATION INSTRUCTIONS
 CERBER FIBER CEMENT SIDING - SIERRA PREMIUM SHAKE Construction Requirements Sierra Premium Shake boards must be installed over vertical wood framing spaced no greater than 16 oc. with an APA rated 7/16
40mm Thermoclick. Type II Class 1 Clear Satin Anodize - 201R1 (Mid Grade Commercial)
") http://www.sundancesupply.com 40mm Thermoclick Type II Class 1 Clear Satin Anodize - 201R1 (Mid Grade Commercial) U-Profile 12' Lengths $39 Out System offers a complete set of extrusions and accessories
http://www.sundancesupply.com 40mm Thermoclick Type II Class 1 Clear Satin Anodize - 201R1 (Mid Grade Commercial) U-Profile 12' Lengths $39 Out System offers a complete set of extrusions and accessories
SIDING-MASTER VINYL SIDING ATTACHMENT & ALIGNMENT SYSTEM & OVERHANG ATTACHMENT & ALIGNMENT SYSTEM INSTALLATION INSTRUCTIONS
 Patent Pending SIDING-MASTER & OVERHANG ATTACHMENT & ALIGNMENT SYSTEM INSTALLATION INSTRUCTIONS Overview... SIDING-MASTER Strip Diagram... How to cut strips for length... Accessory Diagrams... How to (and
Siding Components. Installation Guide
 Siding Components Installation Guide 2016 MID-AMERICA SIDING COMPONENTS INSTALLATION GUIDE This guide will show you the products of the Mid-America Siding Components family. It provides specific installation
Aluminum Siding System
 Aluminum Siding System Do It Yourself Installation Guide For New Construction and Remodeling The Sell-Even Aluminum Siding System is manufactured to professional tolerences, yet it s designed to be fast
900 SERIES WALL PANELS
 CI-DS-01-900 CI-PP-01-900 CI-PJ-01-900 CI-PJ-02-900 CI-PJ-03-900 CI-BS-01-900 CI-BS-02-900 CI-BS-03-900 CI-BS-04-900 CI-BS-05-900 CI-OC-01-900 CI-OC-02-900 CI-IC-01-900 CI-FO-01-900 CI-FO-02-900 CI-FO-03-900
ForceField Air & Water Barrier System. installation instructions
 ForceField Air & Water Barrier System installation instructions Protection and Performance inside and out The ForceField air and water barrier system consists of engineered wood sheathing panels laminated
InstallationGuide. Stackable brick system Novabrik hangs on the wall No bricks ledge is required Can be installed on various types of structures
 Stackable brick system Novabrik hangs on the wall No bricks ledge is required Can be installed on various types of structures Installation is as easy as... InstallationGuide 1. Complete the prep work 2.
Vinyl Windows and Doors
 Vinyl Windows and Doors Manufactured by Pella Corporation Installation Instructions for Replacement of Aluminum Sliding Doors in Hard Coat Stucco Applications. Part Number: V981555 2009 Pella Corporation
Roofing Training - Basics. Sandy Wesch
 Roofing Training - Basics Sandy Wesch Tools Hammer Measuring Tape Chalk Line & Chalk Speed Square Framing Square Utility Knife Metal Snips Extension Ladder(s) 2 Safety Any tools or material up on the roof
CONTENTS OVERVIEW. For a complete set of CAD drawing details, please visit LaminatorsInc.com. 1 Essential Equipment. 1 Essential Supplies
 LaminatorsInc.com CONTENTS 1 Essential Equipment 1 Essential Supplies 2 Panel Preparation 4 Panel Extrusion Preparation 5 Panel Assembly 6 Wall Sheathing Preparation (Over Plywood) 6 Wall Sheathing Preparation
application instructions
 application instructions architectural collection cedar shake 76 series lap siding General At the time of manufacture, siding meets or exceeds the performance standards set forth in Composite Panel Association
Installation Guidelines
 Installation Guidelines Tando Building Products provides these instructions as general guidelines only. Tando Building Products neither installs exterior cladding nor has any control over any installation.
Installation Instructions for Panel Siding and Soffit
 Installation Instructions for Panel Siding and Soffit 7/16 in. Panels Include: Sturdy Panel, Square Edge, 3/4 in. Channel and Reverse Board and Batten (RB&B) 1/2 in. Panels Include: Adobe Shiplap and 808
Best Barns USA. the Brookhaven 10' x 16' Assembly Book. revised March 23, 2016
 Best Barns USA Assembly Book revised March 23, 2016 the Brookhaven 10' x 16' Manufactured by Reynolds Building Systems, Inc. 205 Arlington Drive Greenville, PA 16125 724-646-3775 This manual is copyrighted.
Frameless Inline Door With Return QCI5263
 INSTALLATION INSTRUCTIONS Frameless Inline Door With Return QCI5263 WALL MOUNT HINGES FRAMELESS DOOR / PANEL / RETURN PANEL QCI5263 REV. 0 Page 1 Certified 06/17/2016 Parts List with wall mount hinges
Curtain Wall Installation Guide
 Curtain Wall Installation Guide Curtain Wall Installation Guide 1 IMPORTANT NOTICES! Important Notices & Information Manufacturer s Notes: The building envelope must be correctly prepared with weather
Building An Outdoor Playhouse
 Building An Outdoor Playhouse If you want to give the children in your family their own retreat and improve your do-it-yourself skills at the same time, this playhouse is the perfect project for you. Not
LUX INSTALLATION GUIDE. LUX Panel V Groove Installation. Installation Guide. February
 LUX Panel V Groove Installation Installation Guide February 2017 www.luxpanel.ca LUX Panel V Groove Installation LUX panel steel cladding is designed to be installed vertically, horizontally, diagonally
Installation Instructions Double-Hung, Single-Hung, Casement, Awning, Sliding, Picture & Shapes Non-Impact & Impact Resistant Nailing Fin Windows
 Installation Instructions Double-Hung, Single-Hung, Casement, Awning, Sliding, Picture & Shapes Non-Impact & Impact Resistant Nailing Fin Windows americancraftsmanwindows.com Project Requirements: Read
Installation of Fiberglass Windows
 Installation of Fiberglass Windows Before you begin please read and understand these installation instructions. The following installation instructions are recommended by Norwood and failure to follow
ULTRA WINDOW & DOOR EXPANDERS AND RECEIVERS INSTALLATION INSTRUCTIONS
 ULTRA WINDOW & DOOR S AND RECEIVERS INSTALLATION INSTRUCTIONS! CAUTION: *REMEMBER SAFETY FIRST* Proper Eye and! Hearing Protection must always be worn during installation of all window and door products.
Installation Guide (888)
") BamDeck Installation Guide (888) 788-2254 The Collection Decking Systems BAMDECK 3G 5-7/16 Wide Plank Dims: 96 L x 5-7/16 W x 13/16 H BAMDECK 3G 16FT. 5-7/16 Wide Plank Dims: 192 L x 5-1/2 W x 13/16 H
BamDeck Installation Guide (888) 788-2254 The Collection Decking Systems BAMDECK 3G 5-7/16 Wide Plank Dims: 96 L x 5-7/16 W x 13/16 H BAMDECK 3G 16FT. 5-7/16 Wide Plank Dims: 192 L x 5-1/2 W x 13/16 H
4. Partially open the operating panel and tilt the top toward the interior of the door (Figure 4). Lift the panel off the sill and set it aside.
. Lift the panel off the sill and set it aside.") Effective Date: 10/1/2017 Tools Needed Kit Contents Hardware Kit Safety Glasses Cordless drill Phillips screw bit Two-step drill bit (3/8-1/8 ) utility knife Interior Mullion Exterior Mullion Cover clamps
Effective Date: 10/1/2017 Tools Needed Kit Contents Hardware Kit Safety Glasses Cordless drill Phillips screw bit Two-step drill bit (3/8-1/8 ) utility knife Interior Mullion Exterior Mullion Cover clamps
Make every component count.
 Make every component count. Technical Bulletin Installation Instructions ABOUT THE MATERIAL The frame and material have been thoroughly tested for strength, durability and low maintenance, offering a never
Metal & Vinyl, Flush Mount and Recessed Fin Windows Recommended Installation Instructions
 PO Box 480 Ph: 417-235-7821 Monett, MO 65708 Fax: 417-737-7140 Metal & Vinyl, Flush Mount and Recessed Fin Windows Recommended Installation Instructions These installation instructions are recommendations
Installation Guide (888)
") BamDeck Installation Guide (888) 788-2254 The Collection Decking Systems BAMDECK 4G 5-7/16 Wide Plank Dims: 192 L x 5-7/16 W x 13/16 H BAMDECK 4G WIDE 8-1/4 Wide Plank Dims: 96 L x 8-1/4 W x 13/16 H BAMDECK
BamDeck Installation Guide (888) 788-2254 The Collection Decking Systems BAMDECK 4G 5-7/16 Wide Plank Dims: 192 L x 5-7/16 W x 13/16 H BAMDECK 4G WIDE 8-1/4 Wide Plank Dims: 96 L x 8-1/4 W x 13/16 H BAMDECK
Installation Materials Required: Tools Required: 6" self-adhesive flashing. Shims. 3-foot level 6-foot level Tape measure 1/8" drill bit
 installation instructions for CUSTOM WOOD & FIBERGLASS EXTERIOR FOLDING DOOR SYSTEMs (JII101) Thank you for selecting JELD-WEN products. Attached are JELD-WEN s recommended installation instructions for
Installation Guidelines for all Quaker products with nail fins New Construction nail fin installation with a Zip sheathing system.
 www.quakerwindows.com www.quakercommercialwindows.com PO Box 128 504 Highway 63 South Freeburg, MO 65035 800-347-0438 573-469-4151 (fax) Installation Guidelines for all Quaker products with nail fins New
INSTALLATION INSTRUCTION - INSTRUCCIONES DE INSTALACIÓN FOR CLAD CASEMENT & AWNING WINDOW VENTANA DE DOS HOJAS CON REVESTIMIENTO
 2008 Pella Corporation Part Number: 801P0101 INSTALLATION INSTRUCTION - INSTRUCCIONES DE INSTALACIÓN FOR CLAD CASEMENT & AWNING WINDOW VENTANA DE DOS HOJAS CON REVESTIMIENTO Corner Corner Top Fin Corner
Versette Cultured Stone Installation Instructions with Universal Corner
 Versette Cultured Stone Installation Instructions with Universal Corner Personal Protective Equipment: 1. Safety Glasses/Goggles 2. NIOSH approved N-95 Series disposable particulate filtering face piece
400 SERIES VERTICAL INSTALLATION
 CI-DS-01-400V CI-PJ-01-400V CI-PJ-02-400V CI-PJ-03-400V CI-BS-01-400V CI-BS-02-400V CI-BS-03-400V CI-BS-04-400V CI-BS-05-400V CI-OC-01-400V CI-OC-02-400V CI-IC-01-400V CI-IC-02-400V CI-FO-01-400V CI-FO-02-400V
KS42 MF SERIES - HORIZONTAL INSTALLATION
 CI-DS-01-KSMF H CI-PJ-01-KSMF H CI-PJ-02-KSMF H CI-PJ-03-KSMF H CI-PJ-04-KSMF H CI-PJ-05-KSMF H CI-PJ-06-KSMF H CI-PJ-07-KSMF H CI-PJ-08-KSMF H CI-PJ-09-KSMF H CI-PJ-10-KSMF H CI-PJ-11-KSMF H CI-PJ-12-KSMF
DW VERTICAL INSTALLATION
 AR-PJ-01-DW5V AR-PJ-02-DW5V AR-PJ-03-DW5V AR-PJ-04-DW5V AR-BS-01-DW5V AR-BS-02-DW5V AR-OC-01-DW5V AR-OC-02-DW5V AR-OC-03-DW5V AR-IC-01-DW5V AR-IC-02-DW5V AR-IC-03-DW5V AR-FO-01-DW5V AR-FO-02-DW5V AR-FO-03-DW5V
Tools required by installer: Materials required by installer:
 Installation Guidelines For Quaker Window Products Vinyl product line (Single Hung, Double Hung, Sliding Window, Fixed Window, Casement, Awning, and Hopper) Installer: Read these instructions completely
14.0 SIDING AND SOFFITS SECTION
 14.0 SIDING AND SOFFITS SECTION 1. Introduction At the present time, Habitat homes in St. Louis are being sided in vinyl. This is to keep the price down, and to provide the homeowner with a relatively
MULTISHAKE LAP SIDING INSTALLATION GUIDE STORAGE AND HANDLING: PACKAGING:
 MULTISHAKE LAP SIDING INSTALLATION GUIDE Read all instructions prior to installing any siding product. Failure to install and finish this product in accordance with all local building codes, regulations
How To Install Windows: Nail-Fin Application
 How To Install Windows: Nail-Fin Application Required Tools & Materials: Materials: 1 3/4" galvanized roofing nails. Nails must penetrate at least 1" into framing For mulled and/or DP50 or above units:
Installation Guide Classic Series Wood Siding
 Installation Guide Classic Series Wood Siding Please read the following instructions prior to beginning your installation. The following installation guidelines have been produced in accordance with the
INSTALLATION MANUAL STORAGE
 IMVersion 1.1 INSTALLATION MANUAL GENERAL GUIDE: The information in this IM is intended to serve as a general guide to proper installation with no warranties intended or implied. Prime Panels assumes no
Vinyl Windows and Doors Manufactured by VPI Quality Windows
 Vinyl Windows and Doors Manufactured by VPI Quality Windows Part Number: 511_Installation ENDURANCE CASEMENT\AWNING\PW INSTALLATION INSTRUCTIONS Installation Instructions for Typical Construction These
WINDOW REPLACEMENT INSTRUCTIONS FOR CASEMENT, DOUBLE-HUNG AND CLAD FRAME WINDOWS USING FRAME SCREWS
 WINDOW REPLACEMENT INSTRUCTIONS FOR CASEMENT, DOUBLE-HUNG AND CLAD FRAME WINDOWS USING FRAME SCREWS These instructions were tested developed for replacing windows in wood-frame wall construction systems
Installation Instructions for. Before You Begin TOOLS REQUIRED
 Composite Railing System STEP-BY-STEP Installation Instructions for Spectrum Composite Railing Virtually maintenance free 20-year warranty EverNew Spectrum Railing system is designed to work with a number
THERMO-FIT REPLACEMENT WINDOW INSTALLATION INSTRUCTIONS (BRICKMOULD / NO NAILING FLANGE)
") THERMO-FIT REPLACEMENT WINDOW INSTALLATION INSTRUCTIONS (BRICKMOULD / NO NAILING FLANGE) fig.3 Casement, Awning, Fixed Casement, Direct-Set, Double-Hung, Single-Hung & Horizontal Slider Windows Materials
THERMO-FIT REPLACEMENT WINDOW INSTALLATION INSTRUCTIONS (BRICKMOULD / NO NAILING FLANGE) fig.3 Casement, Awning, Fixed Casement, Direct-Set, Double-Hung, Single-Hung & Horizontal Slider Windows Materials
Frameless Inline Door QCI5248
 INSTALLATION INSTRUCTIONS Frameless Inline Door QCI5248 FRAMELESS PANEL / DOOR / PANEL QCI5248 REV. 0 Page 1 Certified 06/16/2016 Parts List with glass to glass hinges *Quantities may vary. **Support Bar
Installation Guidelines For ALUMINUM M-SERIES 3 PANEL SLIDING DOOR
 www.quakerwindows.comv www.quakercommercialwindows.com PO Box 128 504 Highway 63 South Freeburg, MO 65035 800-347-0438 573-469-4151 (fax) Installation Guidelines For ALUMINUM M-SERIES 3 PANEL SLIDING DOOR
NEW HOME WARRANTY A REFERENCE GUIDE FOR TYPICAL WALL AND WINDOW DETAILS (RAINSCREEN SYSTEM) SHOWN AS FIBRE CEMENT CLADDING
 SHOWN AS FIBRE CEMENT CLADDING") NEW HOME WARRANTY A REFERENCE GUIDE FOR TYPICAL WALL AND WINDOW DETAILS (RAINSCREEN SYSTEM) SHOWN AS Reference Guide 0.1 GENERAL 0.1 Reference Guide 0.2 Index 0.3 Disclaimer & Limitations 0.4 General Notes
NEW HOME WARRANTY A REFERENCE GUIDE FOR TYPICAL WALL AND WINDOW DETAILS (RAINSCREEN SYSTEM) SHOWN AS Reference Guide 0.1 GENERAL 0.1 Reference Guide 0.2 Index 0.3 Disclaimer & Limitations 0.4 General Notes
Inspire Slate Starter Piece Hip and Ridge. 13 1/2" Height: 13 ½" Width: 12" Squares/ Pallet. Bundles/ Square
 December 2017 Classic Slate Application Guidelines Only Basic Roofing Tools Required Hand fastened or fastened with a pneumatic nail gun Utility knife or a standard circular saw Tape measure, pry bar,
MAXISHINGLE LAP SIDING INSTALLATION GUIDE
 MAXISHINGLE LAP SIDING INSTALLATION GUIDE Read all instructions prior to installing any siding product. Failure to install and finish this product in accordance with all local building codes, regulations
INSTALLATION INSTRUCTIONS FOR REPLACEMENT FORGENT WOOD GLASTRA WINDOWS RECOMMENDATIONS FOR COMMON INSTALLATION OF ALL REPLACEMENT WINDOWS.
 INSTALLATION INSTRUCTIONS FOR REPLACEMENT FORGENT WOOD GLASTRA WINDOWS RECOMMENDATIONS FOR COMMON INSTALLATION OF ALL REPLACEMENT WINDOWS. Installer: DO NOT DISCARD Please leave the Installation Guide
UNIT 5: EXTERIOR DOORS AND WINDOWS
 KEY CONCEPTS 1. Identify tools needed for exterior door and window installation 2. Last step to weather proofing the home 3. Steps to installing exterior doors and windows 4. Maintenance and safety of
INSTALLATION INSTRUCTIONS for Wood/Clad Wood Windows without Exterior Trim or Nailing Fin (JII025) ImpOrTaNT INFOrmaTION & GlOssary.
 ImpOrTaNT INFOrmaTION & GlOssary.") for Wood/Clad Wood Windows without Exterior Trim or Nailing Fin (JII025) Thank you for selecting JELD -WEN products. Attached are JELD-WEN s recommended installation instructions for metal clad wood windows
for Wood/Clad Wood Windows without Exterior Trim or Nailing Fin (JII025) Thank you for selecting JELD -WEN products. Attached are JELD-WEN s recommended installation instructions for metal clad wood windows
Installation Guidelines
 Installation Guidelines Exteria Building Products provides these instructions as general guidelines only. Exteria Building Products neither installs siding nor has any control over any installation. The
Aluminum Clad Wood Window 1/2 Reinforced Field Mulling and Stacking Supplement
 Aluminum Clad Wood Window 1/2 Reinforced Field Mulling and Stacking Supplement 1 Aluminum Clad Wood Window 1/2 Reinforced Field Mulling and Stacking Supplement The following instructions are a supplement
ROYAL HOW TO INSTALL VINYL SIDING
 ROYAL HOW TO INSTALL VINYL SIDING TM siding, SOFFIT AND ACCESSORIES Vinyl Fascia 5/8 T-Trim Matte 5/8 Inside Corner Matte 5/8 Outside Corner Post Double 5 Soffit Vented Drip Cap Finish Trim Double 4 Traditional
Block Frame Inovo Patio Door/Transom/Sidelite Field Mulling Instructions. simonton.com/installation. If mulling sidelites, skip to Step 5.
 Effective Date: 10/1/17 Tools Needed Kit Contents Safety Glasses Cordless Drill Phillips Screw Bit Two-step Drill Bit (3/8-1/8 ) Utility Knife Interior Mullion Exterior Mullion Cover Hardware Kit Clamps
Kinro Metal, Vinyl, Flush Mount and Recessed Fin Windows OEM INSTALLATION MANUAL
 Kinro Metal, Vinyl, Flush Mount and Recessed Fin Windows OEM INSTALLATION MANUAL TABLE OF CONTENTS Introduction 2 Safety Requirements 2 Fasteners 3 Preparation 3 Rough Opening Preparation 3 Resources Required
INSTALLATION INSTRUCTIONS FRAMELESS CONTINUOUS HINGE SHOWER ENCLOSURE QCI5233
 INSTALLATION INSTRUCTIONS FRAMELESS CONTINUOUS HINGE SHOWER ENCLOSURE QCI5233 QCI5233 Rev 0 Page 1 Certified 06/20/2016 INSTALLATION NOTES: Unpack your unit carefully and inspect for freight damage. Lay
Installation Manual for Thermo Panel
 Installation Manual for Thermo Panel 1 About Thermo Panel is a building wrap, insulation, air and water barrier, mold inhibitor and cold bridge eliminator all-in-one. Delivering an R-value of up to 5 on
Installation Guide for Andersen 400 Series Tilt-Wash Transom and 200 Series Narroline Transom Windows
 for Andersen 400 Series Tilt-Wash Transom and 200 Series Narroline Transom Windows Congratulations! You have just purchased one of the many fine Andersen products. Proper assembly, installation and maintenance
Mach Wall Installation Instructions
 Mach Wall Installation Instructions Planning the Job Since Mach Wall is an innovative product that accomplishes 3 tasks at the same time (frame, insulate and drywall) and it replaces traditional framing,
All Window Installation Instruction
 1 All Window Installation Instruction Hurd Window Installation Instructions for Nail Fin & Wood Brick Mould Units Nail Fin Windows See Pages 2-11 Wood Brick Mould Windows See Pages 2-6, 8 & 12BM - 14BM
Install Windsor Corners
 Install Windsor Corners Tools and Supplies You'll Need 1. Exterior Grade Screws use screws that are long enough to go through the FauxPanel and firmly attach to the wall behind the FauxPanel. We recommend
ICC-ES Evaluation Report Reissued September 1, 2012 This report is subject to renewal September 1, 2013.
 ICC-ES Evaluation Report www.icc-es.org (800) 423-6587 (562) 699-0543 ESR-1790 Reissued September 1, 2012 This report is subject to renewal September 1, 2013. A Subsidiary of the International Code Council