INSTALLATION MANUAL BRACKET MOUNT FOR DOG-EAR PICKETS & SQUARE TOP PICKETS
|
|
|
- Caroline Lewis
- 5 years ago
- Views:
Transcription

1 STYLE BOARD ON BOARD (Privacy) SHADOWBOX (Semi-Private) TRADITIONAL (Semi-Private) INSTALLATION MANUAL BRACKET MOUNT FOR DOG-EAR PICKETS & SQUARE TOP PICKETS Questions, problems, missing parts? Before returning to the store, call Fiberon Customer Service 8 a.m. - 7 p.m., EST, Monday - Friday, 9 a.m. - 6 p.m., EST, Saturday FIBERONFENCING.COM THANK YOU We appreciate the trust and confidence you have placed in Fiberon through the purchase of this fencing. We strive to continually create quality products designed to enhance your home. Visit us online to see our full line of products available for your home improvement needs. Thank you for choosing Fiberon!
2 Pre-Installation TOOLS REQUIRED Air compressor Tape Measure Wheel Barrow Post Hole Digger Saw SUPPLIES Staple Gun Hammer Clamp Level Power Drill Rail & Bracket Locator Template (provided) Quick Set Concrete Gravel Twine or String Stakes Spray Paint Galvanized Staples Leg: 1 1/4 / 1 1/2 in. Work Gloves Brackets Pencil PRIOR TO INSTALLING THE FENCING IMPORTANT: Please read and follow the instructions in this section before you begin installation of your fencing products. NOTE: Prior to digging, confirm location of underground utilities with local authorities. Apply for permits if required by local authorities and codes. Local zoning laws, neighborhood associations and/or historic districts my regulate size, type placement and ability of fencing. Ensure compliance prior to installation. NOTE: Due to variation in picket width, minor adjustments to gapping may be required. Care should be taken to ensure that spacing does not result in too large of gap at the end posts. PLANNING: Determine total area to be fenced. Site-Built installation: Ensure the right amount of pickets and rails per section. Make adjustments for odd widths at the back corners or build partial sections equally. Example: If you have 8 feet left in a run, consider building two 4 ft. sections rather than a 6 ft. and a 2 ft.. Determine the number of posts including gate post and gate location (if applicable). Installations are facilitated with the use of an air compressor or air driven staple gun. Recommendation fasteners include 1-1/4-1-1/2 in. long x 1/4-7/16 in. crown galvanized and oiled or stainless steel staples, gauge. Name brand staples are more reliable. Air compressor set to PSI.
3 Pre-Installation (continued) PRIOR TO INSTALLING THE FENCING LAYOUT (See Diagram): 2A. Establish total area to be fenced. Insert stakes 6 in. inside of proposed area extending an additional 3 ft. laterally so as not to disturb string lines when digging post holes. 2B. Attach string line to staked area. Verify corners are square using the 3 ft. x 4 ft. x 5 ft. method. 2C. Fence corners are determined by where strings intersect. 2D. Mark locations for subsequent posts starting with the first location and measuring the appropriate distance determined by install method. 2D-1. Bracket Side Mount - Maximum of 72 in. post-center to post-center Mark gate location and size. Minimum 44 in. inside posts when using Adjustable Gate Frame. Place proper post at each location. NOTE: When marking measurements with spray paint, mark both the ground and string (See illustration) Corner Post 2C 3ft 2A 2B 2D1 72in or 68in center 6in 2D 4ft 5ft 3ft 2A 2B Measurement is only correct if corner is square 6in FIBERONFENCING.COM Please contact for further assistance.
4 All Purpose Post Installation 1 2 Dig hole: Dig hole 12 in. wide x 30 in. deep. Add Gravel Add 6 in. gravel (depth now = 24 in.) 30 in. 12 in. 3 Set Post Add 160 lbs of concrete. 6 in. 4 Next Post Set post at a maximum of 72 in. post-center to post-center. Cross Rail Installation IMPORTANT: Through temperature changes of seasonal weather, Wood Composite Fencing will experience thermal expansion in the pickets and cross rails. To anticipate this expansion movement, our instructions include installation steps which need to be followed to prevent pressure from building in the fence during the hot summer months. Following these preventive steps will ensure a long lasting fence through the years. Avoid installing below 40 degrees. USE RAIL & BRACKET LOCATOR Place Rail and Bracket Locator template square against the post. Slide Bracket into location. Attach with provided screws. ADD CROSS RAILS IN BRACKETS Slide Cross Rails into Brackets. Attach with provided screws through bracket screw slots. Skip using screw where picket covers bracket. Screw/Bracket Slot Locations: Top Rail = Tighten screws into slot-top Middle Rail = Touch Tighten into slot bottom Bottom Rail = Touch Tighten into slot bottom NOTE: Avoid applying screws to top 5 Inches of post tops. Cross Rails Side Mount Brackets All Purpose Posts Rail & Bracket Locator Template Ground to post top 72 in.

5 Cross Rail Installation NOTE: For sloping landscape, step brackets down. Picket Installation STAPLES Holding the staple gun sideways, shoots 4 staples in a box pattern in each picket and cross rail intersection so the staples hide vertically in the grain of the picket. To prevent staple buckling when fired into pickets, go slow, push the staple gun firmly and make sure the fence panel is not bouncing back towards the gun. Shorter 1 1/4 in., 16 gauge staples are also used frequently in low-temperature installation to help prevent staple buckling. Set air-compressor to PSI. Staple Pattern FIBERONFENCING.COM Please contact for further assistance.

 Pickets install 1 in. below post top and 2 in. above the ground Staples 1 1/2 in.")

. Spread pickets evenly across both sides of rail Pickets install 1 in. below post top and 2 in.")


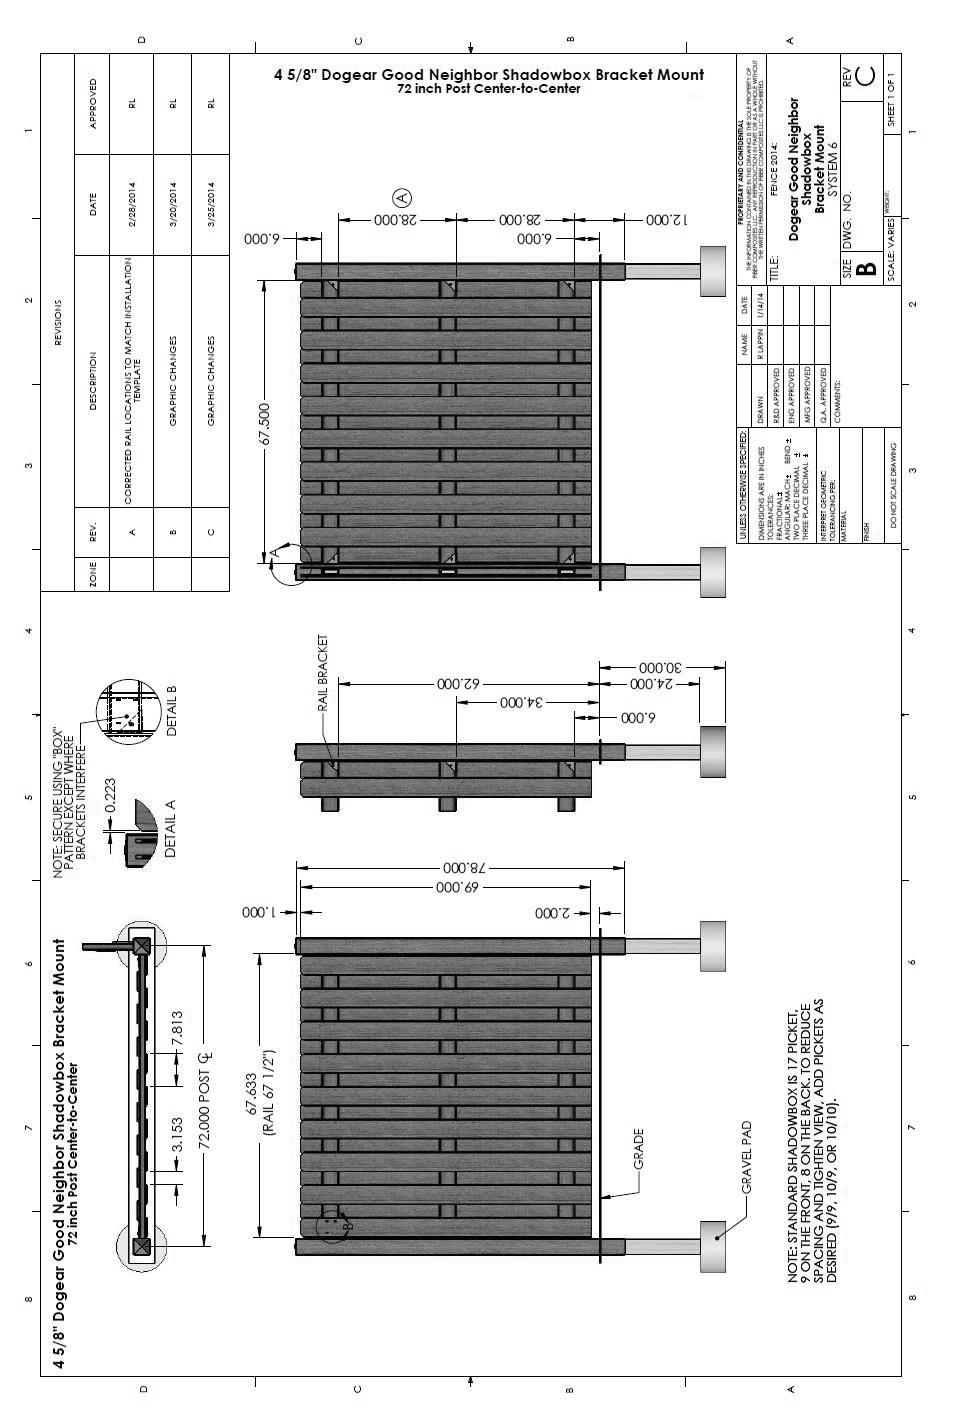
6 TRADITIONAL PICKET STYLE Traditional style consists of 14 Dog-ear and 10 Square Top pickets between posts, and it is important to leave a 1/8 in. space in between each picket. A minimum of 1/8 in. picket spacing is a necessary precaution to avoid the thermal expansion of the pickets, from pushing into each other and building pressure. A small space in between the pickets will prevent the pickets from ever touching. The Traditional Picket Style is more of a semi-private fence. 1/8 in. spacing between pickets. Traditional (semi-private) Pickets install 1 in. below post top and 2 in. above the ground Staples 1 1/2 in. Galvanized or Stainless Steel, 4 staples per picket and rail crossing Dog-ear Picket 4 5/8 in. x 69 in. Square Top Picket 6 5/8 in. x 69 in. SHADOW BOX PICKET STYLE For an easier semi-private installation, we recommend a Good Neighbor Shadow box Picket Style. You don t need to be precise with the spacing, and it looks great from both sides. Shadow Box style consists of 17 to 21 Dog-ear and 13 Square Top pickets per 6 ft. section (depending on the look you want). Spread pickets evenly across both sides of rail Pickets install 1 in. below post top and 2 in. above the ground Shadow Box (semi-private) Staples 1 1/2 in. Galvanized or Stainless Steel, 4 staples per picket and rail crossing Dog-ear Picket 4 5/8 in. x 69 in. Square Top Picket 6 5/8 in. x 69 in. BOARD ON BOARD PICKET STYLE Board on Board is a full privacy fence with 17 to 21 Dog-ear and 13 Square Top pickets per 6 ft. section. It s the strongest picket style of the 3, with all of the pickets stapled together in an overlapping picket method. The Board on Board picket style is also the easiest to install. You don t need precise spacing, plus during the entire installation you only need to stand on one side of the fence. Normal spacing between pickets is 2 3/4 in. Spread pickets evenly overlapping on 1 side of rail Board on Board (private) Pickets install 1 in. below post top and 2 in. above the ground Staples 1 1/2 in. Galvanized or Stainless Steel, 4 staples per picket and rail crossing Dog-ear Picket 4 5/8 in. x 69 in. Square Top Picket 6 5/8 in. x 69 in.
7 Gate Frame Kit Installation Follow the Gate Frame Kit instructions in the box to install each gate. All hardware is included. Use 1 gate frame kit for a single gate; use 2 gate frame kits for a double drive gate. Gates are designed to swing in. Gate pickets need a minimum of 4 in. above the ground grade to swing properly. Pickets should be installed in a single layer Tradition Picket Style row for gates only. Shadow Box and Board on Board Styles add too much extra weight to the frame and hinges of the gate. In general, the shorter and lighter it is, the stronger the gate will be. Gates that exceed 4 1/2 feet wide require a support wheel for weight distribution and stability. Attach the support wheels directly to the metal gate frame kit only. Support wheels are sold separately. Helpful Tips for Bracket Mount Fence Styles 1. The Board on Board is the only style that provides tight visual privacy and is relatively easy to install. 2. Shadow Box provides a similar look on either side of the fence, thus the name Good Neighbor. Some communities require a same look on each side. 3. While we recommend 17 Dog-ear and 13 Square Top pickets per 6 ft. for the Shadow Box and/or the Board on Board, you can use more than that to achieve a tighter look, reducing the spacing between the pickets. This especially changes the Shadow Box look. 4. The recommended gap of 1/8 in. (it can be more than 1/8 in. if you wish) between the pickets in the Traditional one sided is not optional but necessary to accommodate possible thermal expansion. 5. In a typical fence run, it is common to have sections less than 6 ft. We recommend a symmetrical look when possible. E.G. a 20 ft. run could be 6 ft. - 6 ft. - 6 ft. - 2 ft., however 4 ft. - 6 ft. - 6 ft. - 4ft. would look better. In a 10 ft. run, 2 each 5 ft. sections usually looks better than a 6 ft. and a 4 ft. 6. Sometimes it becomes necessary to rip a picket to fill a space, at the end of the fence. If you see that you will need to rip a picket, it always looks better to rip more than one. The material is easy to rip with a standard table saw. E.G. if a short section will require a 2 inch filler strip to complete the infill, instead of making an ugly 2 in. filler, rip 1/2 in. off 4 pickets and scatter the slightly more narrow ripped pickets throughout the section. The eye won t notice and the fence will look great. 7. Use the recommended gravel and concrete quantities, don t cheat below the ground. The gravel isn t just for drainage, it also provides a base for the fence foundation. 8. The maximum post heights should be 70 in. above grade as the fence top remains parallel to the ground - flat, upgrade, or downgrade. The goal is to hide all of the posts behind the view of the pickets. 9. Your fence will settle a bit, keep the picket bottoms up off the ground or they will buckle. Recommended distance is 2 in. 10. When a picket is to cover a bracket, leave that side s screw out - do not use it. FIBERONFENCING.COM Please contact for further assistance.
8 Warranty 15 & 10 YEAR PERFORMANCE LIMITED WARRANTY WHAT IS COVERED Fiberon Fencing is backed by a 15-year limited pro-rated warranty on fence pickets and backer rails. Fence posts are covered by a 10-year limited pro-rated warranty. When installed correctly, your composite fencing is guaranteed to remain free from rot, fungal degradation, checking, splintering and delamination. Fiberon Fencing is a system of pickets, rails, and posts and must be installed according to guidelines to validate the warranty. Substitution of wood or other materials for any portion of the system will void the warranty. WHAT IS NOT COVERED In no event will the manufacturer be liable for any direct, indirect, incidental, special, consequential, punitive, exemplary, statutory, special, or other, damages based upon the manufacturer products or manufacturer fasteners or resulting, directly or indirectly, from any defect in the manufacturer products or fasteners, including but not limited to damage to, diminution in value of and/or loss of use or enjoyment of, any property or part thereof, whether based on contract, tort, strict liability, statute, regulation or otherwise, even if the manufacturer is expressly advised about the possibility of such damages. Some states do not allow the exclusion or limitation of incidental or consequential damages in certain circumstances, so the above limitation may not apply to you. In addition, this Limited Warranty does not cover and the manufacturer shall not be liable for any installation, removal or reinstallation costs. The manufacturer does not warrant against and is not responsible for, and no express or implied warranty shall be deemed to cover, any condition attributable to: (1) improper installation of products and/or failure to abide by the manufacturer s written instructions and any applicable laws or building codes, including but not limited to improper structural support, fastening, ventilation or gapping; (2) use of the manufacturer s products beyond normal use or in an application not recommended or permitted by the manufacturer s written instructions and applicable laws and building codes; (3) movement, distortion, collapse or settling of the ground or the supporting structure on which the manufacturer s products are installed; (4) Defects in or failure arising from decking structure resulting from water caused by improper installation, workmanship, maintenance or repair; (5) any Act of God (including but not limited to flooding, hurricane, tornado, wind, earthquake, lightning, hail, etc.); (6) discoloration, fading, spotting or staining from or caused, in whole or in part, by mold, mildew, other fungal growth, organic materials, metallic oxides or particles (including but not limited to rust or corrosion of any fasteners), dirt, other atmospheric or environmental pollutants, foreign substances such as grease or oil, chemicals (including but not limited to those found in cleaners), or normal weathering (defined as natural efflorescence, exposure to sunlight, weather and atmospheric conditions which causes any colored surface to gradually fade, flake, chalk, or accumulate dirt or stains); (7) damage resulting from casualty, fire or exposure to heat sources such as cooking devices or retro-reflective surfaces; (8) the application of paints, stains, surface treatments or other chemical substances including but not limited to cleaners or pesticides; (9) fading, flaking or other deterioration of any paints, stains or other coatings placed on the manufacturer s products; (10) climate change, environmental conditions, static electricity or any cause beyond the control of the manufacturer; (11) variations or changes in color of the manufacturer s products; (12) improper handling, maintenance, storage, abuse or neglect of the manufacturer s products by Purchaser or others; (13) ordinary wear and tear; (14) impact from objects; or (15) any fasteners not supplied or approved by the manufacturer. No warranty is given with respect to any fasteners other than the fasteners produced by the manufacturer. Other fasteners, whether approved fasteners or otherwise, are subject to only the warranties provided by the manufacturer of the fastener and Purchaser s sole warranty and remedy is with that manufacturer. Contact the Customer Service Team at or visit

9 PAGE 8
10 PAGE 9

11 PAGE 10

12 PAGE 8

13 PAGE 9
14 PAGE 10
15 STYLE BOARD ON BOARD (Privacy) SHADOWBOX (Semi-Private) TRADITIONAL (Semi-Private) INSTALLATION MANUAL FACE MOUNT FOR DOG-EAR & SQUARE TOP PICKETS Questions, problems, missing parts? Before returning to the store, call Fiberon Customer Service 8 a.m. - 7 p.m., EST, Monday - Friday, 9 a.m. - 6 p.m., EST, Saturday FIBERONFENCING.COM THANK YOU We appreciate the trust and confidence you have placed in Fiberon through the purchase of this fencing. We strive to continually create quality products designed to enhance your home. Visit us online to see our full line of products available for your home improvement needs. Thank you for choosing Fiberon!
16 Pre-Installation TOOLS REQUIRED Air compressor Tape Measure Wheel Barrow Post Hole Digger Saw SUPPLIES Staple Gun Hammer Clamp Level Power Drill Rail & Bracket Locator Template (provided) Quick Set Concrete Gravel Twine or String Stakes Spray Paint 4 in. Lag Screw (for Face Mount Install) Galvanized Staples Leg: 1 1/4 / 1 1/2 in. Work Gloves Pencil PRIOR TO INSTALLING THE FENCING IMPORTANT: Please read and follow the instructions in this section before you begin installation of your fencing products. NOTE: Prior to digging, confirm location of underground utilities with local authorities. Apply for permits if required by local authorities and codes. Local zoning laws, neighborhood associations and/or historic districts my regulate size, type placement and ability of fencing. Ensure compliance prior to installation. NOTE: Due to variation in picket width, minor adjustments to gapping may be required. Care should be taken to ensure that spacing does not result in too large of gap at the end posts. PLANNING: Determine total area to be fenced. Site-Built installation: Ensure the right amount of pickets and rails per section. Make adjustments for odd widths at the back corners or build partial sections equally. Example: If you have 8 feet left in a run, consider building two 4 ft. sections rather than a 6 ft. and a 2 ft.. Determine the number of posts including gate post and gate location (if applicable). Installations are facilitated with the use of an air compressor or air driven staple gun. Recommendation fasteners include 1-1/4-1-1/2 in. long x 1/4-7/16 in. crown galvanized and oiled or stainless steel staples, gauge. Name brand staples are more reliable. Air compressor set to PSI.
17 Pre-Installation (continued) PRIOR TO INSTALLING THE FENCING LAYOUT (See Diagram): 2A. Establish total area to be fenced. Insert stakes 6 in. inside of proposed area extending an additional 3 ft. laterally so as not to disturb string lines when digging post holes. 2B. Attach string line to staked area. Verify corners are square using the 3 ft. x 4 ft. x 5 ft. method. 2C. Fence corners are determined by where strings intersect. 2D. Mark locations for subsequent posts starting with the first location and measuring the appropriate distance determined by install method. 2D-1. Face Mount 68 in. post-center to post-center Mark gate location and size. Minimum 44 in. inside posts when using Adjustable Gate Frame. Place proper post at each location. NOTE: When marking measurements with spray paint, mark both the ground and string (See illustration) Corner Post 2C 3ft 2A 2B 2D1 72in or 68in center 6in 2D 4ft 5ft 3ft 2A 2B Measurement is only correct if corner is square 6in FIBERONFENCING.COM Please contact for further assistance.
18 All Purpose Post Installation 1 2 Dig hole: Dig hole 12 in. wide x 32 in. deep. Add Gravel Add 6 in. gravel (depth now = 26 in.) 32 in. 12 in. 3 Set Post Add 160 lbs of concrete. 6 in. 4 Next Post Set post at a maximum of 68 in. post-center to post-center. Cross Rail Installation IMPORTANT: Through temperature changes of seasonal weather, Wood Composite Fencing will experience thermal expansion in the pickets and cross rails. To anticipate this expansion movement, our instructions include installation steps which need to be followed to prevent pressure from building in the fence during the hot summer months. Following these preventive steps will ensure a long lasting fence through the years. Avoid installing below 40 degrees. USE RAIL & BRACKET LOCATOR Pre-drill rail ends first, centering hole 1 in. from rail ends with 1/2 in. drill bit. Slightly angling the hole toward post center. Place Rail & Bracket Locator template square against the post. Slide rail into location of the pre-drilled holes, touch tighten only. Use 4 1/2 in. HeadLOK Fasten-Masters, Heavy Duty Flathead Screws. Apply screws to bottom of the pre-drilled rail holes, leave screws loose, touch tighten. No nails or deck screws. Space rail ends 1/4 in. apart. This is necessary for the thermal expansion of the rails and pickets, which you can read below. NOTE: Avoid applying screws to top 5 Inches of post tops. Cross Rails HeadLOK Fasten-Masters Heavy Duty Flathead Screws All Purpose Posts Rail & Bracket Locator Template Picket Post Ground View

19 Picket Installation NOTE: Face Mounting the backer rails makes the installation of each picket style much easier. There is no fitting a fixed number of pickets between the posts, just remember to cover each of the rail seams with some portion of a picket during installation. NOTE: For sloping landscape, angle cut rail ends. STAPLES Holding the staple gun sideways, shoots 4 staples in a box pattern in each picket and cross rail intersection so the staples hide vertically in the grain of the picket. To prevent staple buckling when fired into pickets, go slow, push the staple gun firmly and make sure the fence panel is not bouncing back towards the gun. Shorter 1 1/4 in., 16 gauge staples are also used frequently in low-temperature installation to help prevent staple buckling. Set air-compressor to PSI. Staple Pattern FIBERONFENCING.COM Please contact for further assistance.

 Staples 1 1/2 in.")

 Dog-ear Picket 4 5/8 in. x 69 in.")

20 TRADITIONAL PICKET STYLE It is important to leave a 1/8 in. space in between each picket. A minimum of 1/8 in. picket spacing is a necessary precaution to avoid the thermal expansion of the pickets, from pushing into each other and building pressure. A small space in between the pickets will prevent the pickets from ever touching. The Traditional Picket Style is more of a semi-private fence. 1/8 in. spacing between pickets. Pickets install 1 in. above post top and 2 in. above the ground Traditional (semi-private) Staples 1 1/2 in. Galvanized or Stainless Steel, 4 staples per picket and rail crossing Dog-ear Picket 4 5/8 in. x 69 in. Square Top Picket 6 5/8 in. x 69 in. SHADOW BOX PICKET STYLE For an easier semi-private installation, we recommend a Good Neighbor Shadow box Picket Style. You don t need to be precise with the spacing, and it looks great from both sides. Spread pickets evenly across both sides of rail Pickets install 1 in. above post top and 2 in. above the ground Staples 1 1/2 in. Galvanized or Stainless Steel, 4 staples per picket and rail crossing Shadow Box (semi-private) Dog-ear Picket 4 5/8 in. x 69 in. Square Top Picket 6 5/8 in. x 69 in. BOARD ON BOARD PICKET STYLE Board on Board is a full privacy fence. It s the strongest picket style of the 3, with all of the pickets stapled together in an overlapping picket method. The Board on Board picket style is also the easiest to install. You don t need precise spacing, plus during the entire installation you only need to stand on one side of the fence. Normal spacing between pickets is 2 3/4 in. Spread pickets evenly overlapping on 1 side of rail Pickets install 1 in. above post top and 2 in. above the ground Board on Board (private) Staples 1 1/2 in. Galvanized or Stainless Steel, 4 staples per picket and rail crossing Dog-ear Picket 4 5/8 in. x 69 in. Square Top Picket 6 5/8 in. x 69 in.
21 Gate Frame Kit Installation Follow the Gate Frame Kit instructions in the box to install each gate. All hardware is included. Use 1 gate frame kit for a single gate; use 2 gate frame kits for a double drive gate. Gates are designed to swing in. Gate pickets need a minimum of 4 in. above the ground grade to swing properly. Pickets should be installed in a single layer Tradition Picket Style row for gates only. Shadow Box and Board on Board Styles add too much extra weight to the frame and hinges of the gate. In general, the shorter and lighter it is, the stronger the gate will be. Gates that exceed 4 1/2 feet wide require a support wheel for weight distribution and stability. Attach the support wheels directly to the metal gate frame kit only. Support wheels are sold separately. Helpful Tips for Face Mount Fence Styles 1. The Board on Board is the only style that provides tight visual privacy and is relatively easy to install. 2. Shadow Box provides a similar look on either side of the fence, thus the name Good Neighbor. Some communities require a same look on each side. 3. While we recommend 17 Dog-ear and 13 Square Top pickets for the Shadow Box and/or the Board on Board, you can use more than that to achieve a tighter look, reducing the spacing between the pickets. This especially changes the Shadow Box look. 4. The recommended gap of 1/8 in. (it can be more than 1/8 in. if you wish) between the pickets in the Traditional one sided is not optional but necessary to accommodate possible thermal expansion. 5. In a typical fence run, it is common to have sections less than 6 ft. We recommend a symmetrical look when possible. E.G. a 20 ft. run could be 6 ft. - 6 ft. - 6 ft. - 2 ft., however 4 ft. - 6 ft. - 6 ft. - 4ft. would look better. In a 10 ft. run, 2 each 5 ft. sections usually looks better than a 6 ft. and a 4 ft. 6. Sometimes it becomes necessary to rip a picket to fill a space, at the end of the fence. If you see that you will need to rip a picket, it always looks better to rip more than one. The material is easy to rip with a standard table saw. E.G. if a short section will require a 2 inch filler strip to complete the infill, instead of making an ugly 2 in. filler, rip 1/2 in. off 4 pickets and scatter the slightly more narrow ripped pickets throughout the section. The eye won t notice and the fence will look great. 7. Use the recommended gravel and concrete quantities, don t cheat below the ground. The gravel isn t just for drainage, it also provides a base for the fence foundation. 8. It looks best if all post tops hide 1-3 inches below the top line of the pickets. This means the maximum post heights should be 70 in. above grade as the fence top remains parallel to the ground - flat, upgrade, or down-grade. The goal is to hide all of the posts behind the view of the pickets. 9. Your fence will settle a bit, keep the picket bottoms up off the ground or they will buckle. Recommended distance is 2 in. FIBERONFENCING.COM Please contact for further assistance.
22 Warranty 15 & 10 YEAR PERFORMANCE LIMITED WARRANTY WHAT IS COVERED Fiberon Fencing is backed by a 15-year limited pro-rated warranty on fence pickets and backer rails. Fence posts are covered by a 10-year limited pro-rated warranty. When installed correctly, your composite fencing is guaranteed to remain free from rot, fungal degradation, checking, splintering and delamination. Fiberon Fencing is a system of pickets, rails, and posts and must be installed according to guidelines to validate the warranty. Substitution of wood or other materials for any portion of the system will void the warranty. WHAT IS NOT COVERED In no event will the manufacturer be liable for any direct, indirect, incidental, special, consequential, punitive, exemplary, statutory, special, or other, damages based upon the manufacturer products or manufacturer fasteners or resulting, directly or indirectly, from any defect in the manufacturer products or fasteners, including but not limited to damage to, diminution in value of and/or loss of use or enjoyment of, any property or part thereof, whether based on contract, tort, strict liability, statute, regulation or otherwise, even if the manufacturer is expressly advised about the possibility of such damages. Some states do not allow the exclusion or limitation of incidental or consequential damages in certain circumstances, so the above limitation may not apply to you. In addition, this Limited Warranty does not cover and the manufacturer shall not be liable for any installation, removal or reinstallation costs. The manufacturer does not warrant against and is not responsible for, and no express or implied warranty shall be deemed to cover, any condition attributable to: (1) improper installation of products and/or failure to abide by the manufacturer s written instructions and any applicable laws or building codes, including but not limited to improper structural support, fastening, ventilation or gapping; (2) use of the manufacturer s products beyond normal use or in an application not recommended or permitted by the manufacturer s written instructions and applicable laws and building codes; (3) movement, distortion, collapse or settling of the ground or the supporting structure on which the manufacturer s products are installed; (4) Defects in or failure arising from decking structure resulting from water caused by improper installation, workmanship, maintenance or repair; (5) any Act of God (including but not limited to flooding, hurricane, tornado, wind, earthquake, lightning, hail, etc.); (6) discoloration, fading, spotting or staining from or caused, in whole or in part, by mold, mildew, other fungal growth, organic materials, metallic oxides or particles (including but not limited to rust or corrosion of any fasteners), dirt, other atmospheric or environmental pollutants, foreign substances such as grease or oil, chemicals (including but not limited to those found in cleaners), or normal weathering (defined as natural efflorescence, exposure to sunlight, weather and atmospheric conditions which causes any colored surface to gradually fade, flake, chalk, or accumulate dirt or stains); (7) damage resulting from casualty, fire or exposure to heat sources such as cooking devices or retro-reflective surfaces; (8) the application of paints, stains, surface treatments or other chemical substances including but not limited to cleaners or pesticides; (9) fading, flaking or other deterioration of any paints, stains or other coatings placed on the manufacturer s products; (10) climate change, environmental conditions, static electricity or any cause beyond the control of the manufacturer; (11) variations or changes in color of the manufacturer s products; (12) improper handling, maintenance, storage, abuse or neglect of the manufacturer s products by Purchaser or others; (13) ordinary wear and tear; (14) impact from objects; or (15) any fasteners not supplied or approved by the manufacturer. No warranty is given with respect to any fasteners other than the fasteners produced by the manufacturer. Other fasteners, whether approved fasteners or otherwise, are subject to only the warranties provided by the manufacturer of the fastener and Purchaser s sole warranty and remedy is with that manufacturer. Contact the Customer Service Team at or visit

23 PAGE 8

24 PAGE 9

25 PAGE 10

26 PAGE 8

27 PAGE 9

28 PAGE 10

29 STYLE GOTHIC PANEL RANCH RAIL (2 Rail) RANCH RAIL (3 Rail) INSTALLATION MANUAL GOTHIC PICKETS AND RANCH RAIL Questions, problems, missing parts? Before returning to the store, call Fiberon Customer Service 8 a.m. - 7 p.m., EST, Monday - Friday, 9 a.m. - 6 p.m., EST, Saturday FIBERONFENCING.COM THANK YOU We appreciate the trust and confidence you have placed in Fiberon through the purchase of this fencing. We strive to continually create quality products designed to enhance your home. Visit us online to see our full line of products available for your home improvement needs. Thank you for choosing Fiberon!
30 Pre-Installation TOOLS REQUIRED Air compressor Tape Measure Wheel Barrow Post Hole Digger Saw SUPPLIES Staple Gun Hammer Clamp Level Power Drill Rail & Bracket Locator Template (provided) Quick Set Concrete Gravel Twine or String Stakes Spray Paint Galvanized Staples Leg: 1 1/4 / 1 1/2 in. Work Gloves Brackets Pencil PRIOR TO INSTALLING THE FENCING IMPORTANT: Please read and follow the instructions in this section before you begin installation of your fencing products. NOTE: Prior to digging, confirm location of underground utilities with local authorities. Apply for permits if required by local authorities and codes. Local zoning laws, neighborhood associations and/or historic districts my regulate size, type placement and ability of fencing. Ensure compliance prior to installation. NOTE: Due to variation in picket width, minor adjustments to gapping may be required. Care should be taken to ensure that spacing does not result in too large of gap at the end posts. PLANNING: Determine total area to be fenced. Site-Built installation: Ensure the right amount of pickets and rails per section. Make adjustments for odd widths at the back corners or build partial sections equally. Example: If you have 8 feet left in a run, consider building two 4 ft. sections rather than a 6 ft. and a 2 ft.. Determine the number of posts including gate post and gate location (if applicable). Installations are facilitated with the use of an air compressor or air driven staple gun. Recommendation fasteners include 1-1/4-1-1/2 in. long x 1/4-7/16 in. crown galvanized and oiled or stainless steel staples, gauge. Name brand staples are more reliable. Air compressor set to PSI.
31 Pre-Installation (continued) PRIOR TO INSTALLING THE FENCING LAYOUT (See Diagram): 2A. Establish total area to be fenced. Insert stakes 6 in. inside of proposed area extending an additional 3 ft. laterally so as not to disturb string lines when digging post holes. 2B. Attach string line to staked area. Verify corners are square using the 3 ft. x 4 ft. x 5 ft. method. 2C. Fence corners are determined by where strings intersect. 2D. Mark locations for subsequent posts starting with the first location and measuring the appropriate distance determined by install method. 2D-1. Bracket Side Mount - Maximum of 72 in. post-center to post-center Mark gate location and size. Minimum 44 in. inside posts when using Adjustable Gate Frame. Place proper post at each location. NOTE: When marking measurements with spray paint, mark both the ground and string (See illustration) Corner Post 2C 3ft 2A 2B 2D1 72in or 68in center 6in 2D 4ft 5ft 3ft 2A 2B Measurement is only correct if corner is square 6in FIBERONFENCING.COM Please contact for further assistance.


32 All Purpose Post Installation Dig hole: Dig hole 12 in. wide x 26 in. deep. Add Gravel Add 4 in. gravel (depth now = 22 in.) Set Post Add 80 lbs of concrete. Next Post Set post at a maximum of 72 in. post-center to post-center. 26 in. 12 in. 4 in. Cross Rail Installation IMPORTANT: Through temperature changes of seasonal weather, Wood Composite Fencing will experience thermal expansion in the pickets and cross rails. To anticipate this expansion movement, our instructions include installation steps which need to be followed to prevent pressure from building in the fence during the hot summer months. Following these preventive steps will ensure a long lasting fence through the years. Avoid installing below 40 degrees. USE RAIL & BRACKET LOCATOR Place Rail and Bracket Locator template square against the post. Slide Bracket into location. Attach with provided screws. ADD CROSS RAILS IN BRACKETS Slide Cross Rails into Brackets. Attach with provided screws through bracket screw slots. Skip using screw where picket covers bracket. Screw/Bracket Slot Locations: Top Rail = Tighten screws into slot-top Middle Rail = Touch Tighten into slot bottom Bottom Rail = Touch Tighten into slot bottom NOTE: Avoid applying screws to top 5 Inches of post tops. Cross Rails Side Mount Brackets All Purpose Posts
33 Cross Rail Installation 2 Rail 3 Rail 48 in. 42 in. 32 in. 40 in. 24 in. 10 in. 10 in. Ground NOTE: For sloping landscape, step brackets down. Picket Installation STAPLES Holding the staple gun sideways, shoots 3 staples into each picket and cross rail intersection so the staples hide vertically in the grain of the picket. To prevent staple buckling when fired into pickets, go slow, push the staple gun firmly and make sure the fence panel is not bouncing back towards the gun. Shorter 1 1/4 in., 16 gauge staples are also used frequently in low-temperature installation to help prevent staple buckling. Set air-compressor to PSI. Staple Pattern FIBERONFENCING.COM Please contact for further assistance.
34 Gate Installation Construct a gate using 2 or 3 rails plus an additional 3 rails. Build a square design, then add a diagonal rail for support to strengthen the gate. Purchase separately heavy duty gate hardware. Ground FIBERONFENCING.COM Please contact for further assistance.
35 Warranty 15 & 10 YEAR PERFORMANCE LIMITED WARRANTY WHAT IS COVERED Fiberon Fencing is backed by a 15-year limited pro-rated warranty on fence pickets and backer rails. Fence posts are covered by a 10-year limited pro-rated warranty. When installed correctly, your composite fencing is guaranteed to remain free from rot, fungal degradation, checking, splintering and delamination. Fiberon Fencing is a system of pickets, rails, and posts and must be installed according to guidelines to validate the warranty. Substitution of wood or other materials for any portion of the system will void the warranty. WHAT IS NOT COVERED In no event will the manufacturer be liable for any direct, indirect, incidental, special, consequential, punitive, exemplary, statutory, special, or other, damages based upon the manufacturer products or manufacturer fasteners or resulting, directly or indirectly, from any defect in the manufacturer products or fasteners, including but not limited to damage to, diminution in value of and/or loss of use or enjoyment of, any property or part thereof, whether based on contract, tort, strict liability, statute, regulation or otherwise, even if the manufacturer is expressly advised about the possibility of such damages. Some states do not allow the exclusion or limitation of incidental or consequential damages in certain circumstances, so the above limitation may not apply to you. In addition, this Limited Warranty does not cover and the manufacturer shall not be liable for any installation, removal or reinstallation costs. The manufacturer does not warrant against and is not responsible for, and no express or implied warranty shall be deemed to cover, any condition attributable to: (1) improper installation of products and/or failure to abide by the manufacturer s written instructions and any applicable laws or building codes, including but not limited to improper structural support, fastening, ventilation or gapping; (2) use of the manufacturer s products beyond normal use or in an application not recommended or permitted by the manufacturer s written instructions and applicable laws and building codes; (3) movement, distortion, collapse or settling of the ground or the supporting structure on which the manufacturer s products are installed; (4) Defects in or failure arising from decking structure resulting from water caused by improper installation, workmanship, maintenance or repair; (5) any Act of God (including but not limited to flooding, hurricane, tornado, wind, earthquake, lightning, hail, etc.); (6) discoloration, fading, spotting or staining from or caused, in whole or in part, by mold, mildew, other fungal growth, organic materials, metallic oxides or particles (including but not limited to rust or corrosion of any fasteners), dirt, other atmospheric or environmental pollutants, foreign substances such as grease or oil, chemicals (including but not limited to those found in cleaners), or normal weathering (defined as natural efflorescence, exposure to sunlight, weather and atmospheric conditions which causes any colored surface to gradually fade, flake, chalk, or accumulate dirt or stains); (7) damage resulting from casualty, fire or exposure to heat sources such as cooking devices or retro-reflective surfaces; (8) the application of paints, stains, surface treatments or other chemical substances including but not limited to cleaners or pesticides; (9) fading, flaking or other deterioration of any paints, stains or other coatings placed on the manufacturer s products; (10) climate change, environmental conditions, static electricity or any cause beyond the control of the manufacturer; (11) variations or changes in color of the manufacturer s products; (12) improper handling, maintenance, storage, abuse or neglect of the manufacturer s products by Purchaser or others; (13) ordinary wear and tear; (14) impact from objects; or (15) any fasteners not supplied or approved by the manufacturer. No warranty is given with respect to any fasteners other than the fasteners produced by the manufacturer. Other fasteners, whether approved fasteners or otherwise, are subject to only the warranties provided by the manufacturer of the fastener and Purchaser s sole warranty and remedy is with that manufacturer. Contact the Customer Service Team at or visit
36 PAGE 5
INSTALLATION MANUAL FACE MOUNT FOR DOG-EAR & SQUARE TOP PICKETS. STYLE BOARD ON BOARD (Privacy) SHADOWBOX (Semi-Private) TRADITIONAL (Semi-Private)
 SHADOWBOX (Semi-Private) TRADITIONAL (Semi-Private)") STYLE BOARD ON BOARD (Privacy) SHADOWBOX (Semi-Private) TRADITIONAL (Semi-Private) INSTALLATION MANUAL FACE MOUNT FOR DOG-EAR & SQUARE TOP PICKETS Questions, problems, missing parts? Before returning to
STYLE BOARD ON BOARD (Privacy) SHADOWBOX (Semi-Private) TRADITIONAL (Semi-Private) INSTALLATION MANUAL FACE MOUNT FOR DOG-EAR & SQUARE TOP PICKETS Questions, problems, missing parts? Before returning to
INSTALLATION MANUAL BRACKET MOUNT FOR DOG-EAR PICKETS & SQUARE TOP PICKETS
 STYLE BOARD ON BOARD (Privacy) SHADOWBOX (Semi-Private) TRADITIONAL (Semi-Private) INSTALLATION MANUAL BRACKET MOUNT FOR DOG-EAR PICKETS & SQUARE TOP PICKETS Questions, problems, missing parts? Before
INSTALLATION MANUAL VERANDA ENCLAVE RAILING. Model # SEC17 EW R15 PRE W/H SEC17 EW R15 KD W/HW SEC17 EWS R13 KD W/H
 Model # SEC17 EW R15 PRE W/H SEC17 EW R15 KD W/HW SEC17 EWS R13 KD W/H INSTALLATION MANUAL VERANDA ENCLAVE RAILING Questions, problems, missing parts? Before returning to the store, call Veranda Customer
INSTALLATION MANUAL VERANDA REGENCY RAILING WITH METAL BALUSTERS. Model # SEC17 RW U8 W/MTL KD SEC17 RWS U8 W/MT KD
 Model # SEC17 RW U8 W/MTL KD SEC17 RWS U8 W/MT KD INSTALLATION MANUAL VERANDA REGENCY RAILING WITH METAL BALUSTERS Questions, problems, missing parts? Before returning to the store, call Veranda Customer
INSTALLATION MANUAL POST SLEEVE SURFACE MOUNT WITH WOOD INSERT. Model # BKT SLV MT W/WD KT V HOMEDEPOT.COM/VERANDA
 Model # BKT SLV MT W/WD KT V INSTLLTION MNUL POST SLEEVE SURFCE MOUNT WITH WOOD INSERT Questions, problems, missing parts? Before returning to the store, call Veranda Customer Service 8 a.m. - 7 p.m.,
Veranda Decorative Lattice & Deck Skirting Special Order Catalog
 Veranda Products. Built by Barrette. Veranda Decorative Lattice & Deck Skirting Special Order Catalog NEW! Designer Series Deck Skirting in 4 styles V1 2/17 1 Your Decorative Lattice Options Choose the
FENCE INSTALLATION GUIDE 8 HIGH WALLS
 FENCE INSTALLATION GUIDE 8 HIGH WALLS 1.866.648.9336 www.simtekfence.com INSTALLATION GUIDE These instructions are designed to assist both professional installers and do-it-yourselfers of SimTek decorative
ALUMINUM FENCE. Additional freight charges may apply depending on order size. Please call for quote at
 ALUMINUM FENCE Additional freight charges may apply depending on order size. Please call for quote at 1-888-662-1788 Powder Coat Finish FORGERIGHT Fences are offered in the choice of three colors: Black,
FENCE INSTALLATION GUIDE 6 HIGH FENCE
 FENCE INSTALLATION GUIDE 6 HIGH FENCE 1.866.648.9336 www.simtekfence.com INSTALLATION GUIDE These instructions are designed to assist both professional installers and do-it-yourselfers of SimTek decorative
PRIVACY INSTALLATION FOR: Standard 6 H x 8 W Privacy Fence 4 x 4 Post Sleeve & Brackets Dog Ear or Straight-Edge Pickets 1.75 x 3.
 PRIVACY INSTALLATION FOR: Standard 6 H x 8 W Privacy Fence 4 x 4 Post Sleeve & Brackets Dog Ear or Straight-Edge Pickets 1.75 x 3.5 Rail Storage and Handling Fence Preparation and Layout Locate and Set
Installation Instructions. Tools Needed. Tape measure. Level. Shovel or Post hole digger. Concrete. Drill. Stakes. Mallet or hammer.
 Installation Guide EcoStone Fence 1330 West 400 North Orem, UT 84057 Toll Free 1.866.648.9336 Tel. 1.801.655.5236 Fax 1.801.655.5240 www.ecostonefence.com Installation Instructions Introduction. These
SHADOWBOX INSTALLATION FOR: Standard 6 H x 8 W Shadowbox Fence 5 x 5 Routed Posts Dog Ear or Straight-Edge Pickets 1.75 x 3.5 Rail
 SHADOWBOX INSTALLATION FOR: Standard 6 H x 8 W Shadowbox Fence 5 x 5 Routed Posts Dog Ear or Straight-Edge Pickets 1.75 x 3.5 Rail Storage and Handling Fence Preparation and Layout Locate and Set Posts
Installation Guide. Capped Cellular PVC Fencing. Table of Contents. Storage and Handling Tools Needed Fence Layout and Locating Posts
 Capped Cellular PVC Fencing Installation Guide Table of Contents Storage and Handling Tools Needed Fence Layout and Locating Posts Installation instructions 4 x 4 Over Sleeve Post - 3.5 Rail Privacy Shadowbox
Universal Top 3 Rail, Flush Bottom Rail - Black
 Create a stylish space for entertaining and relaxing. Add curb appeal and charm to your home. Gain peace-of-mind by keeping children and pets safe. Independence offers fencing to meet your every need.
Queensbrook Pergola. General Information. Tools Required. Model# Assembly Instructions. Qty
 Queensbrook Pergola Model# 11301 Assembly Instructions General Information PLEASE READ THROUGH BEFORE BEGINNING ASSEMBLY. IMPORTANT: Check boxes for Contents Listed Check inside of parts as some parts
The Heritage Pergola
 Eye Level Corporation One Trefoil Drive Trumbull, CT 06611 USA Phone: 888.782.1760 Fax: 888.782.1761 www.@eyelevelliving.com The Heritage Pergola Installation Instructions ARBORS COLUMNS HOSE REELS MAILBOX
Wood Fencing Special Order Catalog
 Built by Barrette Outdoor Living Wood Fencing Special Order Catalog 1 V1 2/17 Your Fencing Options Buying wood fencing is as easy as 1-2-3. 1 Choose the panel style you prefer. 2 Choose your available
Installa on Guide: Fence Distributors. YourNextFence.com
 TM YourNextFence.com Plan Your Fence each line by dividing the length of each line in inches by 97. Round any remainder up. 2 Calculate Materials Tools Needed Stakes Circular Saw String Line Drill Marking
1.0. Aluminum Prebuilt Fence. Owner's Manual. Version. For Home, Haven, Select & Premier Series. Installation Instructions
 Owner's Manual Aluminum Prebuilt Fence Installation Instructions For Home, Haven, Select & Premier Series Version 1.0 ALUMFENCEA_BOM V1 2/12 PLEASE READ OWNER'S MANUAL COMPLETELY BEFORE ASSEMBLING YOUR
Need a little help installing your railing?
 Need a little help installing your railing? www.rdirail.com/support/installation-videos.html Post Installation LAG BOLT APPLICATION Determine the desired rail placement and snap a line on to the deck to
Installa on Guide: Fence Distributors. YourNextFence.com
 YourNextFence.com Plan Your Fence each line by dividing the length of each line in inches by 96. Round any remainder up. 2 Calculate Materials * For standard single gates (46 1/4 opening) : (1) small Trex
Universal Top 3 Rail, Flush Bottom Rail - Black
 Create a stylish space for entertaining and relaxing. Add curb appeal and charm to your home. Gain peace-of-mind by keeping children and pets safe. Independence offers fencing to meet your every need.
FENCE INSTALLATION GUIDE 3, 4, & 6 HIGH FENCE
 FENCE INSTALLATION GUIDE 3, 4, & 6 HIGH FENCE 1.866.648.9336 www.simtekfence.com INSTALLATION GUIDE These instructions are designed to assist both professional installers and do-it-yourselfers of SimTek
CertainTeed INSTALLATION GUIDE SIMTEK FENCE PRODUCTS. Fence Installation Guide 3', 4' & 6' High
 CertainTeed INSTALLATION GUIDE SIMTEK FENCE PRODUCTS Fence Installation Guide 3', 4' & 6' High INSTALLATION GUIDE These instructions are designed to assist both professional installers and do-it-yourselfers
Ready-To-Assemble VersaRail INSTALLATION INSTRUCTIONS
 Ready-To-Assemble VersaRail INSTALLATION INSTRUCTIONS Read all instructions prior to installing product. Refer to manufacturers safety instructions when operating any tools. To register your product, please
Installation Instructions Free-Standing Pergola
 Outdoor Distinctions 303 W. Carmel Drive Carmel, IN 46032 844.345.2424 www.outdoordistinctions.com Free-Standing Pergola Harmony Series (14 x 10, 14 x 12, 14 x 14, 14 x 16, 14 x 18, 14 x 20) 1 (14 x 10,
PRO-RIB FENCE PANELS INSTALLATION GUIDELINES. Virtually Maintenance Free Available in 24 Colors Custom Heights Available by the Inch
 PRO-RIB FENCE PANELS INSTALLATION GUIDELINES Virtually Maintenance Free Available in 24 Colors Custom Heights Available by the Inch www.midwestmanufacturing.com Page 2 TOOLS NEEDED Measuring Tape Drill
Installation Guide (888)
") BamDeck Installation Guide (888) 788-2254 The Collection Decking Systems BAMDECK 3G 5-7/16 Wide Plank Dims: 96 L x 5-7/16 W x 13/16 H BAMDECK 3G 16FT. 5-7/16 Wide Plank Dims: 192 L x 5-1/2 W x 13/16 H
BamDeck Installation Guide (888) 788-2254 The Collection Decking Systems BAMDECK 3G 5-7/16 Wide Plank Dims: 96 L x 5-7/16 W x 13/16 H BAMDECK 3G 16FT. 5-7/16 Wide Plank Dims: 192 L x 5-1/2 W x 13/16 H
Installation Guide (888)
") BamDeck Installation Guide (888) 788-2254 The Collection Decking Systems BAMDECK 4G 5-7/16 Wide Plank Dims: 192 L x 5-7/16 W x 13/16 H BAMDECK 4G WIDE 8-1/4 Wide Plank Dims: 96 L x 8-1/4 W x 13/16 H BAMDECK
BamDeck Installation Guide (888) 788-2254 The Collection Decking Systems BAMDECK 4G 5-7/16 Wide Plank Dims: 192 L x 5-7/16 W x 13/16 H BAMDECK 4G WIDE 8-1/4 Wide Plank Dims: 96 L x 8-1/4 W x 13/16 H BAMDECK
IMPORTANT: Read all sections before you start
 1 IMPORTANT: Read all sections before you start For the most up to date information please visit our website @ www.newtechwood.com Prior to installing the railing, please consult local zoning laws in regards
Vinyl Picket Gates BOM To register your product, please visit: barretteoutdoorliving.com INSTALLATION INSTRUCTIONS
 BOM-34107163 Vinyl Picket Gates INSTALLATION INSTRUCTIONS Read all instructions prior to installing product. Refer to manufacturers safety instructions when operating any tools. To register your product,
Ranch Rail Vinyl Fence
 Ranch Rail Vinyl Fence INSTALLATION INSTRUCTIONS These instructions are to be used as general guidelines for the installation of your vinyl fence under normal installation conditions. Local conditions
PRIVACY FENCE WITH LATTICE INSTALLATION INSTRUCTIONS
 PRIVACY FENCE WITH LATTICE INSTALLATION INSTRUCTIONS These instructions are to be used as general guidelines for the installation of your vinyl fence under normal installation conditions. Local conditions
INSTALLATION INSTRUCTIONS PRAVOL DURA-SHIELD COMPOSITE DECK RAILINGS
 INSTALLATION INSTRUCTIONS PRAVOL DURA-SHIELD COMPOSITE DECK RAILINGS Important: Read all sections before you start Prior to installing railing, please consult local zoning laws in regards to load requirements
PRIVACY FENCE WITH SCALLOPED PICKET INSTALL INSTRUCTIONS
 PRIVACY FENCE WITH SCALLOPED PICKET INSTALL INSTRUCTIONS These instructions are to be used as general guidelines for the installation of your vinyl fence under normal installation conditions. Local conditions
ADJUSTABLE MOUNTING POST
 C Part Number 069 B EACH CARTON CONTAINS D Floor Mounting Kit A. Bottom Post Assembly B. Top Post Assembly C. Flange Head Bolts (x2) D. Floor Mounting Kit. 5/8 Wx/6 Hx0 L framing channels (x2) 2. /8-6x4
INSTALLATION GUIDE CABINETRY
 INSTALLATION GUIDE CABINETRY The instructions given here serve as general guidelines on how to install full-access cabinets in a reasonably simple installation. Many cabinet designs and installations may
ITEMS USED IN A 6 SECTION: SUPPLIES: INSTALLATION TOOLS:
 Composite Fencing Installation Instructions ITEMS USED IN A 6 SECTION: SUPPLIES: INSTALLATION TOOLS: www.fiberonfencing.com or call customer service at: 800-215-2740 Prior to installing fencing: Prior
SUGGESTED RETAIL PRICING AUGUST, 2018
 AUGUST, 08 Today s Standard Fixed Solar Screens OPTEX Fixed Solar Screens The look of Plantation Shutters on your windows! OPTEX is a Fixed Solar Screen for use on the outside of windows. Outdoor Solar
Installation Instructions for. Before You Begin TOOLS REQUIRED
 Composite Railing System STEP-BY-STEP Installation Instructions for Spectrum Composite Railing Virtually maintenance free 20-year warranty EverNew Spectrum Railing system is designed to work with a number
60 DIRECT-TO-STUD SHOWER WALL SET
 60 DIRECT-TO-STUD SHOWER WALL SET 60 X 30 MODEL # DKW6008-XX 60 X 32 MODEL # DKW6028-XX 60 X 36 MODEL # DKW6068-XX Unit consists of Model DB608-XX Backwall, and requires one of the following Side Panel
PATRIOT DOCKS ASSEMBLY INSTRUCTIONS
 6/1/2008 PATRIOT DOCKS ASSEMBLY INSTRUCTIONS Congratulations on your new Patriot Dock purchase. This manual contains instructions to assemble basic dock configurations for use at typical shoreline application.
INSTALLATION INSTRUCTIONS
 New installation instructions effective May 1, 2001 TimberTech Deck/Railing INSTALLATION INSTRUCTIONS ANDWARRANTY General Information TOOLS For all TimberTech Engineered Decking Systems products, standard
orientation Conergy SunTop Instructions for professional installation
 On-roof Framed modules Portrait orientation Landscape Three-tab Shingle Plain tile Slate Double Roman tile Metal roof Material warranty orientation Conergy SunTop Instructions for professional installation
SEMI-PRIVACY PANEL AND GATE INSTALLATION INSTRUCTIONS
 SEMI-PRIVACY PANEL AND GATE INSTALLATION INSTRUCTIONS 1 BEFORE YOU START, IT S IMPORTANT TO CHECK: That fence or the fence post footings do not exceed your lot lines of your property. If you can locate
2.0. Select Rail & Stair Kit Assembly and Installation Instructions BOM V2 5/13. Owner's Manual. Version
 Select Rail & Stair Kit Assembly and Installation Instructions PLEASE READ OWNER'S MANUAL COMPLETELY BEFORE ASSEMBLING YOUR RAIL OR STAIR KIT. 34106886BOM V2 5/13 Models 73012418 / 73012436 / 73012424
INSTALLATION GUIDE OUTDOOR CABINETRY
 INSTALLATION GUIDE OUTDOOR CABINETRY BEFORE YOU BEGIN IMPORTANT NOTES Always wear gloves and safety glasses when handling and installing aluminum cabinetry. Patio surfaces are typically uneven and may
Vinyl Fence Gates. Assembly and Installation Instructions PLEASE READ OWNER'S MANUAL COMPLETELY BEFORE ASSEMBLING YOUR FENCE.
 Vinyl Fence Gates Assembly and Installation Instructions PLEASE READ OWNER'S MANUAL COMPLETELY BEFORE ASSEMBLING YOUR FENCE. ALL STATED SIZES ARE NOMINAL DIMENSIONS. 34106493BOM V2 11/12 Models 73013273
SECTION 19: Endwood Fusion Welded Gate Installation Guide
 SECTION 19: Endwood Fusion Welded Gate Installation Guide ASSEMBLY AND INSTALLATION FOR: Fusion Welded Gates Gate Frame with Full Size Pickets Privacy & Board on Board California & Shadowbox Gate width
INSTALLATION SUGGESTIONS LEVEL APPLICATION LIMITED WARRANTY
 INSTALLATION SUGGESTIONS LEVEL APPLICATION LIMITED WARRANTY L.J. Smith, Inc. issues the following Limited Warranty: The product(s) furnished hereunder are warranted to be free from defects in material
Flex Fence Instruction Manual
 The Safer Stronger Smarter Choice Flex Fence Instruction Manual Table of contents 2 3 4 4 5 5 6 7 8 10 10 11 11 12 13 13 15 18 18 19 20 22 Table of contents Supplies, tools and equipment Introduction Laying
BASE & WALL CABINET SETUP GUIDE BY SUNSTONE
 BASE & WALL CABINET SETUP GUIDE BY SUNSTONE Read all instructions before you install cabinet. Very important to follow each step in order as detailed in this Instruction Guide!!! To installer or person
Installation Fence Guide Kodiak Iron. Exceptional Fencing Extraodinary Customer Service
 Installation Fence Guide Kodiak Iron Exceptional Fencing Extraodinary Customer Service Kodiak Fence System Installation Guide Thank you for the purchasing the Kodiak Fence System. Fence installation is
VersaRail Gate Kit. freedomproduct.com. To register your product, please visit: INSTALLATION INSTRUCTIONS
 VersaRail Gate Kit INSTALLATION INSTRUCTIONS Read all instructions prior to installing product. Refer to manufacturers safety instructions when operating any tools. To register your product, please visit:
Installation Manual XRL Solar Rail System
 Installation Manual XRL Solar Rail System Solar Mounting Solutions June 2009 www.ironridge.com 2009 IronRidge, Inc. All Rights Reserved Version 1.0 2 XRL Solar Rail System Installation Guide Introduction
INSTALL INSTRUCTIONS WELCOME TO THE NEWAGE PERFORMANCE CABINETRY SERIES NEWAGE STEEL WELDED CABINETRY
 NEWAGE STEEL WELDED CABINETRY WELCOME TO THE NEWAGE PERFORMANCE CABINETRY SERIES ALL CABINETS MUST BE MOUNTED TO STUDS ON A SECURE WALL, AS PER THESE INSTRUCTIONS. FAILURE TO DO SO MAY RESULT IN SERIOUS
Tilting, Swiveling & Rotating Flat Panel Wall Mount
 Tilting, Swiveling & Rotating Flat Panel Wall Mount Model: VXA980TC +5 to -5 +5 to -5 Supports most 0-80 Flat Panel TVs Maximum Weight Capacity: 32 lbs. Supports VESA Sizes up to 600x500 For technical
Full Height Ladder Safety Gate
 Full Height Ladder Safety Gate Installation Instructions/Operation and Maintenance Manual Models Powder Coat Yellow (PCY) 304 Stainless Steel (SS) Hot Dipped Galvanized (GAL) Table of Contents Product
FXL-168 FIXED RACK ASSEMBLY INSTRUCTIONS SALES ORDER #
 ZOMEWORKS FXL-168 FIXED RACK ASSEMBLY INSTRUCTIONS SALES ORDER # 1 1011 Sawmill Road NW, PO Box 25805, Albuquerque, NM 87125 USA (505) 242-5354 / (800) 279-6342 / FAX (505) 243-5187 E-mail: zomework@zomeworks.com
Vista SCREEN. Installation Manual for. For left hinged doors. Quick and Easy to Size and Install
 Installation Manual for Vista SCREEN For left hinged doors Quick and Easy to Size and Install Durable. Reliable. Attractive. For door openings up to 36 (914mm) wide and 81 3 /16 (2,062mm) high QC03-0512L
Installation Manual Tilt Leg
 Installation Manual Tilt Leg Solar Mounting Solutions March www.ironridge.com 2010 IronRidge, Inc. All Rights Reserved Version 2.0 2 Tilt Leg Installation Guide Introduction The Tilt Leg is a flexible
INSTALLATION. A Crane Plastics Company
 INSTALLATION A Crane Plastics Company Maximum Vinyl Products offers a complete line of durable, attractive vinyl fencing and railings a wise investment adding both beauty and value to your home. Contents
Single Arm Pole Mount. Installation Manual Edition v1.01. For models: UNI-SA/14 UNI-SA/21.5 UNI-SA/26 UNI-SA01-MAN
 Pole Mount Installation Manual 2016 Edition v1.01 For models: UNI-SA/14 UNI-SA/21.5 UNI-SA/26 UNI-SA01-MAN Table of Contents 1 1 2 3 4 5 5 Introduction Customer Support Project Essentials Assembly: Steps
Page 1 of 18. SunRail System Installation Instructions
 Page 1 of 18 SunRail System Installation Instructions Page 2 of 18 SunRail Stainless Steel Railing Installation Guide Table of Contents Before You Begin 3 Installing Surface Mount Bases for a Two Rail
KNEEWALL APPLICATION
 INSTALLATION SUGGESTIONS KNEEWALL APPLICATION LIMITED WARRANTY L.J. Smith, Inc. issues the following Limited Warranty: The product(s) furnished hereunder are warranted to be free from defects in material
A Quick Reference Guide to Planning an Installation
 PAGE 1 A Quick Reference Guide to Planning an Installation Plan and Measure Your Aluminum Fence Layout Before installing your fence, draw a plan to scale on a piece of graph paper as shown in the example.
Aluminum Pre-Built Fence For Standard & Heavy-Duty Series
 ALUMFENCEA-BOM Aluminum Pre-Built Fence For Standard & Heavy-Duty Series INSTALLATION INSTRUCTIONS Read all instructions prior to installing product. Refer to manufacturers safety instructions when operating
> Installation Instructions
 SmarterFence BY BEDFORD TECHNOLOGY > Installation Instructions BEFORE YOU START > Check to see if a permit is needed in your area. > Check with your local utility companies to locate any underground utilities.
MATERIALS PREPARATION SETTING FENCE POSTS 01 TIP
 Skill Level: INTERMEDIATE Give these projects a try if you're a confident DIYer with a good working knowledge of a variety of tools. They can take a day or more to complete. If you can build a birdhouse
Tilting Flat Panel Wall Mount Installation Guide
 Tilting Flat Panel Wall Mount Installation Guide Model: A580TM Easy installation Built-in level for easy positioning Safety bolts lock the TV on the mount Easy to adjust tilt angles: +5 to -15 degrees
UltraDeck. Decking & Railing Installation Guide.
 UltraDeck Decking & Railing Installation Guide www.midwestmanufacturing.com Table of Contents: General Guidelines for Deck Installation 4 Plank Board Installation 6 QuickCap Installation 8 Cladding & Endcap
DOOR SECURITY AND REPAIR KIT
 DOOR SECURITY AND REPAIR KIT MODEL #S SET-SLP-X0552 SET-STD-X0552 SET-UNI-X0002 SET-ULT-X0002 R Questions? Call customer service at -888-582-2294 or visit www.armorconcepts.com PACKAGE CONTENTS A B C E
Loading Dock Safety Gate
 Installation Instructions/Operation and Maintenance Manual Models LDSG-120-PCY LDSG-144-PCY Table of Contents Product Information...2 Parts List...3 Installation Instructions...5 Operation...13 Inspection
Vinyl Fence and Railing
 Vinyl Fence and Railing WHY PRO ELITE & PRO GUARD VINYL? Virtually maintenance free Weather resistant Safe, strong, durable, and ideal for all climates No painting, sanding, or maintenance required Easy
CXT PRO RAILING INSTALLATION INSTRUCTIONS For Installations Using Aluminum and Glass Balusters Sold Separately
 CXT PRO RAILING INSTALLATION INSTRUCTIONS For Installations Using Aluminum and Glass Balusters Sold Separately CCRR-0171 PFS AA-652 Drill/power screwdriver Assorted drill bits Hammer Miter or circular
YUKON PATIO COVER INSTALLATION INSTRUCTIONS
 YUKON PATIO COVER INSTALLATION INSTRUCTIONS Before You Begin: Consult your local building department for any required permits You may be required to obtain a building permit for this structure. Contact
The following instructions will guide you through the installation of your new vinyl railing stair kit.
 Installation Guide Vinyl Standard Stair Railing Tools Required Protective eye glasses Tape measure Variable speed drill/screwdriver Rotary hammer or hammer drill and masonry percussion bit recommended
WARNING! Important Information regarding the care, use and warranty of this vinyl product is included in this set of instructions
 WARNING! Important Information regarding the care, use and warranty of this vinyl product is included in this set of instructions It is imperative that the homeowner gets this document after installation
U. M. ARMY Texas Conference. Wheel Chair Ramp Manual
 U. M. ARMY Texas Conference Wheel Chair Ramp Manual June 2014 U. M. ARMY Texas Conference Building & Repair Tips Wheelchair Ramps Complete a site survey to determine the design and layout of the ramp.
Tool Kit. DIY Installation Guide NECESSARY
 DIY Installation Guide Please note that theses instructions are meant as a guideline. Your requirements may vary depending on ground structure. If you are unsure, please consult a reputable builder. Erecting
Sonoma Outdoor Kitchen Pergola. Assembly Instructions
 Sonoma Outdoor Kitchen Pergola Assembly Instructions Introduction Thank you for your purchase from The Outdoor GreatRoom Company. This pergola has been engineered and manufactured in the USA. This user
10 x 10 Flat Top Two Tone Pergola
 0 x 0 Flat Top Two Tone Pergola Models: Bordeaux ASSEMBLY GUIDE OPTIONAL ACCESSORIES Arch Kit System ( Arches) Privacy Fence Panel System ( Panels & Middle Post) Bolt Down Bracket Kit ( for Pergola) Ver.0-00
10 x 10 Arch Top Pergola
 0 x 0 Arch Top Pergola I N S T A L L A T I O N G U I D E O P T I O N A L A C C E S S O R I E S Privacy Fence Panel System ( Panels & Middle Post Included) Bolt Down Bracket Kit (Set of ) Additional Shade
OWENS FLOORING LLC MAINTENANCE AND WARRANTY
 OWENS FLOORING LLC MAINTENANCE AND WARRANTY Wood Floor Care and Maintenance Your new wood floor is an important investment, and must be properly cared for and maintained in order for you to enjoy its full
Installation instructions for: Visi-Guard and EZ-Guard Pool Fence Kits
 Installation instructions for: Visi-Guard and EZ-Guard Pool Fence Kits Planning: Layout Your Pool Fence Planning is the first step of any successful project. Decide where you would like your fence to surround;
Roof Only Lean-to Instruction Manual
 Roof Only Lean-to Instruction Manual for 10 x 20 2 x 8 /10 6 covers Our unique assembly process quickly transforms the individual pieces into a finished structure that will give you a lifetime of service.
12ft Octagon Bayside Gazebo Assembly Manual
 We recommend reviewing this Assembly Manual thoroughly before starting this project. Become familiar with the tools required and where and when assistants are necessary. If you re planning on finishing
Assembly Instructions. Item# L-GZ704PST
 Assembly Instructions Item# L-GZ704PST GAZEBO ASSEMBLY INSTRUCTIONS Our clear, easy-to-follow, step-by-step instructions will guide you through the project from start to finish. The final product will
Installation Operation Care
 Installation Operation Care Designer Banded Shades Cassette with Custom Clutch and UltraGlide CONTENTS Getting Started Product View Custom Clutch... 1 Product View UltraGlide... 2 Tools and Fasteners Needed...
Installation Manual. Tamarack Solar Products. Top of Pole Mount Edition v1.01. For models:
 Mount Installation Manual 2016 Edition v1.01 For models: UNI-TP/06 UNI-TP/06LL UNI-TP/08 UNI-TP/08LL UNI-TP/10 UNI-TP/10LL UNI-TP/12 UNI-TP/12LL UNI-TP02-MAN Table of Contents 1 Introduction 1 2 Customer
INSTALLATION INSTRUCTIONS Scout II - Fast Trac PART #
 INSTALLATION INSTRUCTIONS Scout II - Fast Trac PART #442-210 Thank you for purchasing Specialty s Convertible Top for your Scout vehicle. It has been designed for great fit and long wear. Please read and
10 x 10 Flat Top Pergola
 0 x 0 Flat Top Pergola A S S E M B L Y G U I D E Models: Venetian, Tuscany, Luxor, Acadia O P T I O N A L A C C E S S O R I E S Arch Kit System ( Arches) Privacy Fence Panel System ( Panels & Middle Post)
Installation Instructions/Operation and Maintenance Manual. PS DOORS Contact Information. Website psdoors.com
 Ladder Safety Gate Installation Instructions/Operation and Maintenance Manual Models All Models: LSG-5 to LSG-48 Table of Contents Product Information...2 Inspection & Mainteance...2 Warranty Information...2
MODEL T28000 HEAVY-DUTY MOBILE BASE INSTRUCTIONS
 MODEL T28000 HEAVY-DUTY MOBILE BASE INSTRUCTIONS For questions or help with this product contact Tech Support at (570) 546-9663 or techsupport@grizzly.com Introduction Your new Model T28000 Heavy-Duty
12ft X 12ft Attached Breeze Pergola Assembly Manual. Outdoor Living Today. (For Both 9 and 12 High Posts) June 1st/2012 Version #4
 June 1st/2012 Version #4") 12ft X 12ft Attached Breeze Pergola Assembly Manual (For Both 9 and 12 High Posts) Outdoor Living Today June 1st/2012 Version #4 Note: Installation of Wall Side Girders (P) and Wall Mount Brackets (M)
12ft X 12ft Attached Breeze Pergola Assembly Manual (For Both 9 and 12 High Posts) Outdoor Living Today June 1st/2012 Version #4 Note: Installation of Wall Side Girders (P) and Wall Mount Brackets (M)
Post & Rail Crossbuck
 Post & Rail Crossbuck 1. Getting Started 6. Crossbuck Be sure to call underground prior to digging Assemble gates (if necessary) and decide where they will be located Stake out the fence line Space and
Assembly Instructions
 Thank You For Purchasing The Best Overhead Storage Rack Assembly Instructions Overhead Storage Rack 8 x 4 8 x 3 8 x 2 6 x 4 6 x 3 6 x 2 4 x 4 Two 8 x4 Racks Pictured P.O. Box 714, El Cerrito, CA 94530
12 x 12 Flat Top Pergola
 x Flat Top Pergola Model: Regency, Roosevelt A S S E M B L Y G U I D E O P T I O N A L A C C E S S O R Y Bolt Down Bracket Kit ( for Pergola) Ver./MAR 0 Ta b l e o f Co n t e n t s PAGE x Flat Top Pergola
Please Do Not Return This Product To The Store!
 MODEL NOS. T81 TABLE TENNIS TABLE OWNER'S MANUAL 1. Read this manual carefully before starting assembly. Read each step completely before beginning each step.. Some smaller parts may be shipped inside
Grounding and Utility Enclosure
 Grounding and Utility Enclosure UE-1P UE-1P-INS Revision 1 DX Engineering 2006 P.O. Box 1491 Akron, OH 44309-1491 Phone: (800) 777-0703 Tech Support and International: (330) 572-3200 Fax: (330) 572-3279