Datasheet: Douglas Fir Swing Frame suspension height 2,50 m (Art.-No ) incl. post shoes
|
|
|
- Roderick Horn
- 5 years ago
- Views:
Transcription
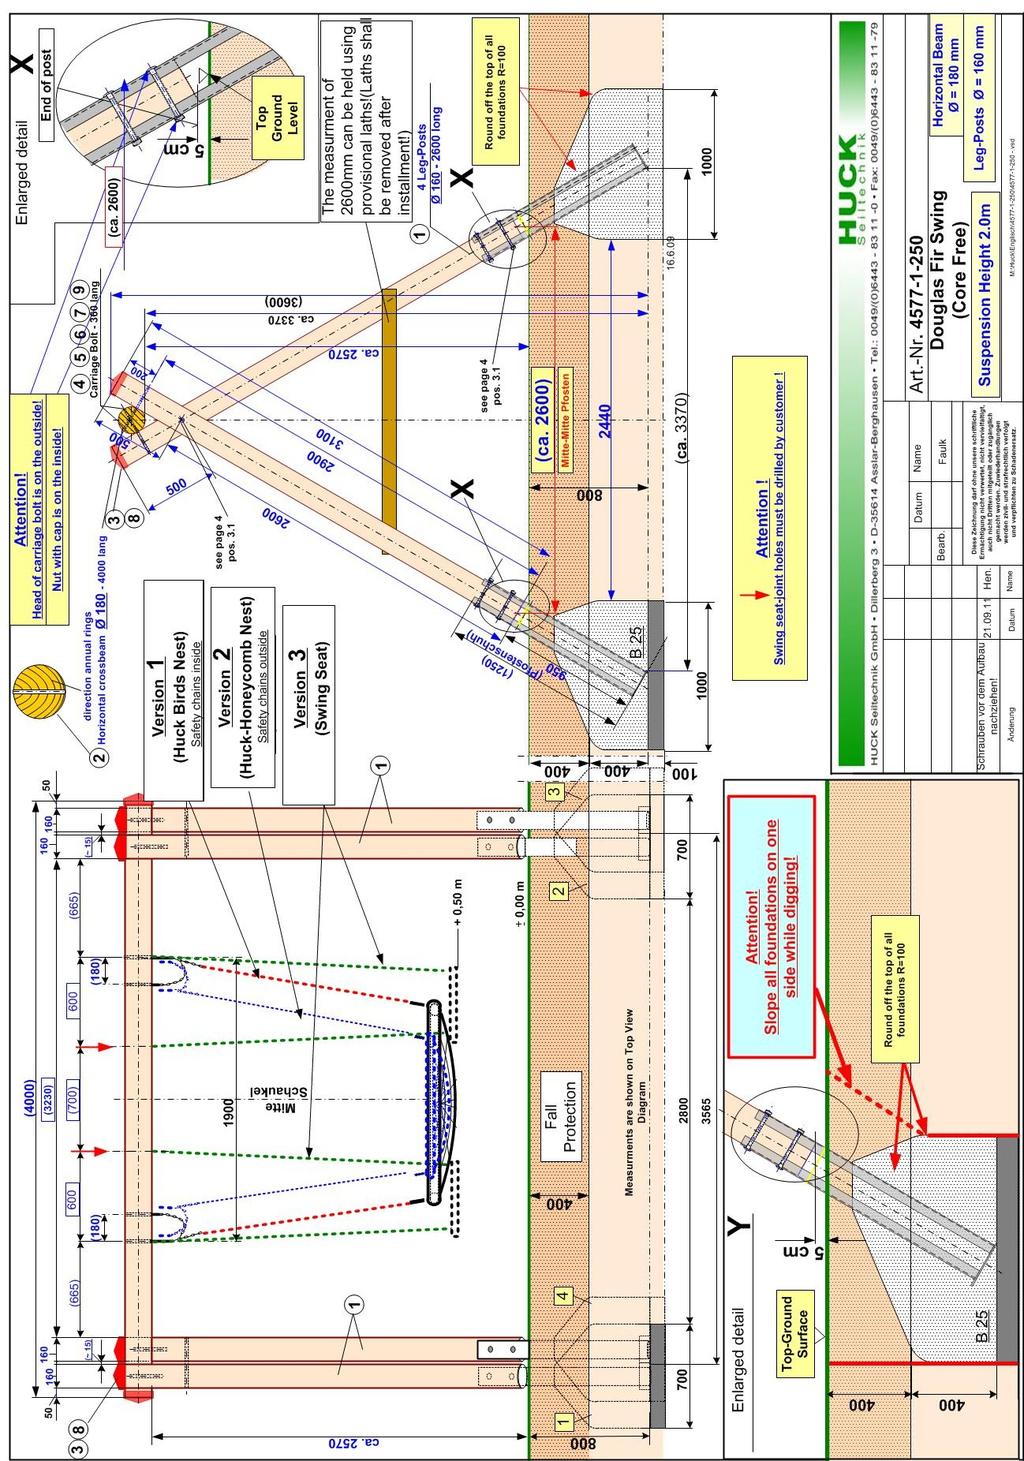
1 Datasheet: Douglas Fir Swing Frame suspension height 2,50 m (Art.-No ) incl. post shoes 1 Space required: 4.20 x 4.00 m, safety area: 4.20 x 8.20m Height of fall 2.35 m 2 Surface material Description Minimum Maxim height og drop thickness mm of layer (mm) mm Grass / topsoil <= 1000* Chipped bark granular size 20 to <= 3000 Wood chippings granular size 5 to <= 3000 Sand granular size 0.2 to <= 3000 Gravel granular size 2 to <= 3000 other surface materials as tested in accordance with HIC critical drop height as tested 3 Name and overall dimension of the largest item of equipment: 1 Wooden post, Length 4,00 m, Ø 18 cm, (72 kg) 4 Weight of the heaviest item of equipment: 1 pack Douglas posts; 230 kg (set of two scissor frames incl. Post shoes) 5 Attention! System for concrete foundation! Concrete: C25/30 Concrete necessary: 1.25 m³ Round off foundation edges (min. R = 100 mm)! Sizes of foundations are 7-8 (natural ground). Soil class 4: soft to medium plasticity, interleave bound, with minor portion of stone (portion < 30% with bigger diameter of 63 mm grain size) Soil class 5 : ground with soil class 3 and 4 with big portion of stones (portion > 30% with bigger diameter of 63 mm grain size) In case of sandy and soft soils, the surface measure of foundations have to be enlarged for about 50%! 6 Size of foundations: depth 0.90m, width 70 cm x 100 cm (incl. Drainage layer of 0.10m height) concrete foundation block of 40 cm Seite 1
2 7 Any spare parts which may be needed can be obtained directly from your supplier or from your manufacturer. 8 We hereby confirm that this item of play equipment has been tested and certified in accordance with the new play equipment standard EN Drawings / Views All optical drawings are showing only the measurements/dimensions and are no mandatory technical views of the complete item. We reserve the right to change technical details of our articles which are serving for the further development of our articles and are reasonable for the customer. Measurement tolerances Because of the properties and characteristics of the components, minor measurement tolerances compared to the indication on the sketches are possible. This concerns all shown measurements except the foundation measurements resp. Measurements below upper edge ground level/play. Seite 2
3 - ASSEMBLY INSTRUCTIONS - Multiple swing frame Art. No , made of douglas fir with a suspension height of 2.50m Package contents: Play equipment: - 4 wooden posts, Ø 16cm, 4.05m long, installed like scissors (incl. post shoes ) - 1 cross beam, Ø 18cm, 4.00m long, - 1 carton of accessories: - 4 cover caps, Ø 16cm, red + screws - 2 cover caps, Ø 18cm, red + screws - 4 bolts M16 x 360mm - 4 washers for M16-4 stop nuts M16-4 cover caps for M16 different play equipments (therefore see package contents and freight documents) Required devices: 1 wood drilling machine, Ø 17 / 18 x 350mm Required assembly space: 4.20 x 4.00m / 4.20 x 8.20m incl. safety area Height of fall: 2.35m Recommended ground surface: Sand, gravel, chipped bark, etc. Round off foundation edges (min.r = 100 mm)! Sizes of fundations are 4-5 (natural ground). Soil class 4: soft to medium plasticity, interleave bound, with minor portion of stone (portion < 30% with bigger diameter of 63 mm grain size) Soil class 5 : ground with soil class 3 and 4 with big portion of stones (portion > 30% with bigger diameter of 63 mm grain size) Seite 3
4 In case of sandy and soft soils, the surface measure of foundations have to be enlarged for about 50 % Assembly instruction: 1. Measure out the assembly space including required safety area. Dig out the foundations in accordance to the foundation plan. Take care that rubble drain bed is 10cm (see sketch). Attention! Treat the wooden parts as described in the enclosed leaflet (maintenance tips for handling the douglas wood). 2. Lay the cross beam on the ground. (Attention: do not remove the steel belt!). 3. Lay the uprights on the ground and stretch them in accordance to the measurement. 3.1 Before assembling the bolts at the connection of the pair of stand poles and the carriage bolts of the post shoes have to be retightened. 4. For stabilization of the scissors position during the installation 5. For stabilization of the scissors position during the installation, fit a temporary lath on the upper edge of the marking tape and nail it to the upper edge of the playing level! Measuring of the temporary lath is 2.60m (middle post to middle post). 6. Set down the two scissors frames into the foundation. 7. Put on the top beam with a projecting end on both sides of 1.49m (fix them rectangular to the uprights posts; see sketch). Attention! The drillings are Ø 17cm in vertical line! Go through the existing drillings of the wood post to set the drillings on the cross beam. To avoid that the wood tears out while drilling, you should hold a board against it, secure the cross beam with the 4 bolts M16 x 360, the washers, the lock nuts and cover caps. Attention! The lock nuts have to point to the top! 8. Set in concrete C25/30 in accordance with the foundation plan, at least 40cm deep (see enclosed sketch). 9. After the setting time (at least 8 days) fix the swing bearing. Take care that bearing is fastened straight, so that you can attach the play equipment. For the big Bird s Nest Art. No (bearing on the inside) and for the Huck Honeycomb Art. No (bearing on the outside) you always have to fit in the double joint bearing Art. No (pay attention to the turn direction of the main bearing: upper axis shows askance to the swing direction; lower axis shows in swing direction). We recommend to use a jigsaw with a steel saw blade for the bolt length -adjusting of the joints. If an angle grinder is used, the surface of the wood can get dark because of chemical reaction by contact with flying sparks (no impairment to the safety ness and durability of the frame). Install it with the enclosed safety chain. The safety chain is prepared so that you only have to fit in the eye bolts (turn direction shows to swing direction) which are installed in the drillings accordance to the foundation plan. Hang up the free end of the chain on the second link from the equipment chain (counted from the top) with the already installed shackle. For the safety swing seat Art. No is the simple bearing enough! Seite 4
5 ATTENTION! For the use of other hanging up-equipments (as bird s nest Art. No. 4650/ 4550) you can take the drillings distance for the bearing from the enclosed foundation plan. 10. For all swings you have to take care that there is at least a distance of 45cm measured from the bottom to the deepest point of the swing. Possibly it is necessary to short the chain! 11.Fix the enclosed cover caps with VA- wood screws at the top of the wooden posts. 12.Fit all screwed connections additional with the enclosed glue. Secure the bolts with a knock. 13.Cover all left drillings (from above) with the plastic caps. At the projecting ends (left and right side) of the top beam it is possible to install an equipment like the pendulum seat, swing seat, rope ladder and other one-point-bearing equipment. Attention! You are only allowed to fix the one-point- bearing equipment on the exterior drillings. The fixing of the climbing net is even possible. Tips for maintenance Latest after 3 days check all bearings and suspension-connections. Retighten if necessary. All bolts must be periodically tightened due to wood shrinking. The bearings are maintenance-free and depending on the use-frequency. We recommend to check them regularly of wear and tear. We recommend you to use a silicon spray for the plastic socket from time to time. From our years of experience, we recommend to check the complete item each week. You have to block off the complete item in case of incompleted installation, dismanteling or during repair of the play equipment. Seite 5

6 Seite 6
7 Seite 7
8 Seite 8
, if you let in the foundation 20 cm deep under the upper edge of the")
9 1.Post 2.Playing surface 3.Top of foundation 4.Basic level mark If the playing surface is sand you have to make the top of foundation round (as you see in the upper sketch), if you let in the foundation 20 cm deep under the upper edge of the playing surface. In any case it is very important that you slop the top of foundation to prevent accumulation of water (danger of rotting). Seite 9
10 GENERAL TIPS FOR MAINTENANCE Wood as a construction material is a problem for evaluation because it is a vividness material. As we know from experience you cannot prevent children from running in splinters. But by the splinting of beams, children can get hurt badly. You cannot avert cracks in the wood. You will find a reduction of the safety in the following cases: General cracks through the cross beam of a swing or ropeway (especially by torch growth and twisted growth). If the wood center rots because it got wet on a non impregnated part. Cracks in the climbing area where children can get stuck with their fingers (>8mm) and in the same time there is a risk of breaking. There is not a danger if there are cracks in the uprights in the following case. You should not fill up cracks with elastic material. Otherwise the water, which gets in, cannot dry out and you have the risk of rotting. We recommend treating the swing frame with a water resistant varnish every 3 years! Seite 10
11 Periodic Maintenance Instructions Douglas swing frame Art. No w = weekly m = monthly y = yearly w m 1/4y 1/2y 14.Check the area where persons using the equipment might fall or slip for hard objects or foundations which have worn free. 15.Check stability of the uprights. 16.Check all connection components and fittings for wear and see that they fit firmly; tighten up if necessary. Exchange damaged parts. 17.Check moving metal parts for easy movement and wear; exchange if necessary. There is no need to lubricate joints since only maintenance free joints are used. 18.Check all attachments, such as chains, ropes, nets, etc. for damage and renew if necessary. 19.Check rubber parts, sleeves, etc. for wear or damage and exchange if necessary. 20.Check the surface quality of plastic and metal components for damage and exchange if necessary. 21.Check the surface quality of wooden parts for damage caused by weathering or other external factors and rectify, exchanging if necessary. It is recommended that the checking and maintenance work is carried out at the intervals shown, since wear and tear,which reduces safety and the equipment s ability to function properly, will be caused by normal play use, the effects of the weather and also by malicious damage.where faults adversely affect safety, urgent action is required either by immediate repair work or by dismantling the equipment or taking it out of use. Those faults which affect the way the equipment functions reduce its play value and incite malicious damage, possibly rendering it unsafe. Here, too, immediate repairs should be undertaken. Maintenance and repairs should only be carried out by trained personnel.general: Any item of play equipment which is regulary checked cannot become so damaged as to be dangerous. This presumes, of course, that regular checks are followed, where necessary, by repair work. Seite 11
12 Maintenance Record Day of Equipment is Inspection Inspector s Name OK Useable Out of order Faults Faults rectified by Date Seite 12
13 Hand over document After the installation of the equipment pass the installation and maintenance documents to the operator. The operator has to receive the hand over documents. The complete filled and signed hand over document should be sent to the supplier. Art.-No.: Type of item: Douglas swing frame Serial number: Customer or operator (Town, Council, School, etc.): Competent person in charge: Installation Company (address): Responsible assistant (assembler): Received the complete assembly instructions, maintenance instructions and maintenance printout. (Signature of operator) (Signature of Installation Company) (Stamp) Date: Seite 13
INSTALLATION GUIDE DUOFUSE SLAT WALL SYSTEM
 06/2013 ENG 1 INSTALLATION GUIDE DUOFUSE SLAT WALL SYSTEM The Duofuse wood composite slat wall system is much more durable than wooden fences, and correct installation is necessary to enjoy the fences
MERRY GO ROUND ITEM NO: 8030
 MERRY GO ROUND ITEM NO: 8030 OWNER S MANUAL CAUTION: This unit is designed to be used safely by up to 4 children between the ages of 3 years to 8 years old with a maximum weight of 00 pounds (45.4 kgs)
H HD Adult Wheelchair Swing Frame & Hangers(perm) IMPORTANT
 IMPORTANT") Page 1 IMPORTANT PLEASE READ THESE INSTRUCTIONS BEFORE COMMENCING ASSEMBLY. All equipment must be installed in accordance with these instructions. Check your shipment against Bill of Lading and Parts list.
Page 1 IMPORTANT PLEASE READ THESE INSTRUCTIONS BEFORE COMMENCING ASSEMBLY. All equipment must be installed in accordance with these instructions. Check your shipment against Bill of Lading and Parts list.
Tool Kit. DIY Installation Guide NECESSARY
 DIY Installation Guide Please note that theses instructions are meant as a guideline. Your requirements may vary depending on ground structure. If you are unsure, please consult a reputable builder. Erecting
The Festival Assembly Instructions
 The Festival Assembly Instructions Toll Free: 866.768.8465 Hours: 9-5 Monday-Friday EST www.homeplacestructures.com Package ships as shown CONTACT INFORMATION: HomePlace Structures 301 Commerce Drive New
104 PORCH SWING ASSEMBLY INSTRUCTIONS
 104 PORCH SWING ASSEMBLY INSTRUCTIONS Thank you for purchasing a quality porch swing. The product you have purchased requires some assembly. This item has been carefully inspected before packing to ensure
John Deere 9570STS, 9650STS, 9660STS, and 9750STS Grain Tank Cross Auger Trough Liner EXOPLATE INSTRUCTION MANUAL
 PLEASE READ THE ENTIRE INSTRUCTION SHEET BEFORE STARTING INSTALLATION. PLEASE REFER TO THE OPERATORS MANUAL FOR YOUR SPECIFIC COMBINE FOR PERTINENT SAFETY PRECAUTIONS THE TERMS. LEFT, RIGHT, FRONT, & REAR
User Guide. 10ft (3.05m) Jumpking Classic Premium. Got a Problem building your trampoline? Call us on and we can help
 Jumpking Classic Premium. Got a Problem building your trampoline? Call us on and we can help") User Guide 10ft (3.05m) Jumpking Classic Premium Got a Problem building your trampoline? Call us on 0344 800 4060 and we can help Patent no: DE602006006495D1, EP1721640B1 and US7628731 WARNING: Read these
User Guide 10ft (3.05m) Jumpking Classic Premium Got a Problem building your trampoline? Call us on 0344 800 4060 and we can help Patent no: DE602006006495D1, EP1721640B1 and US7628731 WARNING: Read these
Junglenastix. Instruction Manual. Technical Support: Riaan Prinsloo Do-It-Yourself Jungle Gym Kits
 Junglenastix Do-It-Yourself Jungle Gym Kits Instruction Manual Technical Support: Riaan Prinsloo 0828039217 Thank you for choosing Junglenastix as your way to make a very positive contribution to your
ClearSpan PolyMax Windbreak Wall
 ClearSpan PolyMax Windbreak Wall Photo may show a different but similar model. 2007 ClearSpan All Rights Reserved. Reproduction is prohibited without permission. Revision date: April 2007ldg STK# DIMENSIONS
ClearSpan End Frame Kit 26' Wide x 12' High
 ClearSpan End Frame Kit 26' Wide x 12' High Diagram shows the end frame kit for an end wall without a door. (Door and end panel are purchased separately.) Rafter and struts shown in the above diagram are
Owner s Manual and Assembly Instruction
 Owner s Manual and Assembly Instruction Model #: 22-PS120 Model Name: Verona III Swing Set Manual Date: September, 2007 Important: Keep this owner s manual; do not discard in case you need to contact Pacific
10x10 Trellis Pergola
 0x0 Trellis Pergola ASSEMBLY GUIDE Ver.0-7 Table of Contents PAGE Introduction & Overview...................................................... Pergola Materials Overview..............................................................
User Guide. 12ft (3.66m) Jumpking Classic Premium. Got a Problem building your trampoline? Call us on and we can help
 Jumpking Classic Premium. Got a Problem building your trampoline? Call us on and we can help") User Guide Made In China 12ft (3.66m) Jumpking Classic Premium Got a Problem building your trampoline? Call us on 0344 800 4060 and we can help Patent no: DE602006006495D1, EP1721640B1 and US7628731 WARNING:
User Guide Made In China 12ft (3.66m) Jumpking Classic Premium Got a Problem building your trampoline? Call us on 0344 800 4060 and we can help Patent no: DE602006006495D1, EP1721640B1 and US7628731 WARNING:
Rolling Curtain door Manual
 Rolling Curtain door Manual Installation Maintenance parts Model 944 PHONE 800 448 8979 FAX 800 236 8722 website www.tracrite.com EMAIL tr@tracrite.com ADDRESS 216 Wilburn Road Sun Prairie, WI 53590 This
A Disc Golf Course Is Built in Three Phases
 Instructions for Building a DiscGolfPark This guide contains detailed installation instructions for each DiscGolfPark product: DisCatcher target, InfoBoard, TeeSign and TeePad. Installing DiscGolfPark
ClearSpan PolyMax Windbreak Wall
 ClearSpan PolyMax Windbreak Wall Photo may show a different but similar model. 2007 ClearSpan All Rights Reserved. Reproduction is prohibited without permission. Revision date: February 2007ldg STK# DIMENSIONS
10 x 10 Flat Top Two Tone Pergola
 0 x 0 Flat Top Two Tone Pergola Models: Bordeaux ASSEMBLY GUIDE OPTIONAL ACCESSORIES Arch Kit System ( Arches) Privacy Fence Panel System ( Panels & Middle Post) Bolt Down Bracket Kit ( for Pergola) Ver.0-00
Safety Guidelines and Assembly Instructions
 Play Action Air Rider TM Safety Guidelines and Assembly Instructions Maximum Weight Limit: 210 pounds We re Here To Help! Call Toll Free 1-888-752-9782 Customer Service: Monday - Friday, 8:00 A.M. to 5:00
ClearSpan Attached-Style Awning
 ClearSpan Attached-Style Awning Photo may show a different but similar model. 2007 ClearSpan All Rights Reserved. Reproduction is prohibited without permission. Revision date: July 2007ldg STK# DIMENSIONS
Before you start Warnings Never use scourers, abrasives or chemical cleaner. IMPORTANT, RETAIN FOR FUTURE REFERENCE READ CAREFULLY See enclosed instru
 Product size: L150*W90*H72 cm The frame of this product is manufactured from mild steel coated with a weather resistant paint. Steel has a natural tendency to rust over time and, whilst we expect you to
Manual for Shelter W3,5xL8,0xH3,8m
 Manual for Shelter W3,5xL8,0xH3,8m 22-11-2016 Congratulations on your purchase of our instant shelter. This unit is a combination of excellent manufacturing and design. It is comprised of a rigid frame
ANGLE GRINDER STAND USER GUIDE AFTER SALES SUPPORT
 ANGLE GRINDER STAND USER GUIDE Important: retain for future reference - please read carefully. Now you have purchased a WORKZONE product you can rest assured in the knowledge that as well as your 1 year
11 x11 Pergola. Assembly Instructions. Paragon Group USA cm cm cm
 FABRIC x Pergola Assembly Instructions 0cm 9 2cm 0cm 0 20cm Paragon Group USA Customer Service:(8) 82 82 Email:cs-outdoors@paragongroupusa.com Introduction Thank you for purchasing the x Pergola. When
Football Goal Posts MODEL SERIES: FGP400 and FGP600 series
 Football Goal Posts MODEL SERIES: FGP400 and FGP600 series Installation and Maintenance Instructions Please read all instructions before attempting installation of these units SAVE THESE INSTRUCTIONS FOR
ClearSpan End Frame Kit 30' Wide x 11' High
 ClearSpan End Frame Kit 30' Wide x 11' High Diagram shows the end frame kit for an end wall without a door. (Door and end panel are purchased separately.) Rafter and mounting feet shown in the above diagram
400A 40113V, 401A 40120V, & 401AL 40120VL ALUMINUM VERTICAL 4000 LB LIFT INCLUDES SCREW LEG ASSEMBLY INSTRUCTIONS
 12/11/07 PAGE 1 OF 12 400A 40113V, 401A 40120V, & 401AL 40120VL ALUMINUM VERTICAL 4000 LB LIFT INCLUDES SCREW LEG ASSEMBLY INSTRUCTIONS Thank you for purchasing our product! *Please read these instructions
PREASSEMBLED ELEMENTS FOR LIFTING AND SLIDING DOORS
 PROFILE SYSTEM PRE-ASSEMBLED ELEMENTS FOR LIFTING AND SLIDING DOORS s r ood gni d i l s dna gni t f i l r o f s t neme l e de l bme s s a - er P PREASSEMBLED ELEMENTS FOR LIFTING AND SLIDING DOORS MINITEC
Installation instructions AZ120 (Anchor foot with placement hinge, to be embedded: type Albatros)
") Installation instructions AZ120 (Anchor foot with placement hinge, to be embedded: type Albatros) The following instructions include all information necessary for the installation and operation of this
Installation instructions AZ120 (Anchor foot with placement hinge, to be embedded: type Albatros) The following instructions include all information necessary for the installation and operation of this
Assembly instructions Pantograph shutters
 Assembly instructions Pantograph shutters Read these instructions, observe the contents and the warning notes prior to assembly. The information is very important for installation and correct use of the
2 Section Slider Loft Ladder Instructions
 WARNING! - Safety information 2 Section Slider Loft Ladder Instructions All ladders have potential injury risks, before installing this loft ladder carefully read and follow all of the safety, installation
I N S TA L L AT I O N & M A I N T E N A N C E G U I D E
 I N S TA L L AT I O N & M A I N T E N A N C E G U I D E E N V I R O B U I L D. C O M + 4 4 ( 0 ) 2 0 8 0 8 8 4 8 8 8 Version 3.2 EnviroBuild 2018 C O N T E N T S Storage & Handling 03 Tools 04 Calculating
INSTRUCTION MANUAL DWX723-XE HEAVY-DUTY MITER SAW STAND FINAL PAGE SIZE : 8.5IN X 5.5IN
 INSTRUCTION MANUAL DWX723-XE HEAVY-DUTY MITER SAW STAND FINAL PAGE SIZE : 8.5IN X 5.5IN DWX723-XE MITER SAW STANDS Components List A. Beam B. DW7231 Miter saw mounting brackets C. Extension arm D. DW7232
MODEL PS10CLASB ASSEMBLy MAnuAL
 Assembly Manual By If you have problems or questions about your Creative Playthings Play Set, DO NOT CALL THE RETAILER. Contact Creative Playthings Customer Service at 1-800-833-4001 or customerservice@creativeplaythings.com
English/French 06/04
 E000 PLEASE READ ASSEMBLY INSTRUCTIONS COMPLETELY BEFORE ASSEMBLING YOUR BUILDING CAUTION: Some parts have sharp edges. Care must be taken when handling the various pieces to avoid a mishap. For safety
U. M. ARMY Texas Conference. Wheel Chair Ramp Manual
 U. M. ARMY Texas Conference Wheel Chair Ramp Manual June 2014 U. M. ARMY Texas Conference Building & Repair Tips Wheelchair Ramps Complete a site survey to determine the design and layout of the ramp.
User Manual and Installation Instructions
 Nivano CTe height adjustable Changing Table User Manual and Installation Instructions Guarantee This product is guaranteed against all defects in manufacture for a period of one year This does not affect
Cut-Off Machine Model CC 14SE
 Cut-Off Machine Model CC 14SE Handling instructions NOTE: Before using this Electric Power Tool, carefully read through these HANDLING INSTRUCTIONS to ensure efficient, safe operation. It is recommended
ASSEMBLY INSTRUCTIONS FOR STORETTE STA42
 ASSEMBLY INSTRUCTIONS FOR STORETTE STA42 A01 CAUTION: Some parts have sharp edges. Care must be taken when handling the various pieces to avoid a mishap. For safety sake, please read the safety information
Salter Industries Spiral Stair
 Salter Industries Spiral Stair The Leader in Spiral Staircases Continuous Sleeve Stair Installation Instructions TOOLS NEEDED: 1. Electric drill with hex chuck and Phillips bit 2. Drill bits 1/8", 1/4",
ENGLISH (Original instructions) INSTRUCTION MANUAL. Drill DS4012 DOUBLE INSULATION. IMPORTANT: Read Before Using.
 INSTRUCTION MANUAL. Drill DS4012 DOUBLE INSULATION. IMPORTANT: Read Before Using.") ENGLISH (Original instructions) INSTRUCTION MANUAL Drill DS402 05402 DOUBLE INSULATION IMPORTANT: Read Before Using. ENGLISH (Original instructions) SPECIFICATIONS Model DS402 Capacities Steel 3 mm Wood
ENGLISH (Original instructions) INSTRUCTION MANUAL Drill DS402 05402 DOUBLE INSULATION IMPORTANT: Read Before Using. ENGLISH (Original instructions) SPECIFICATIONS Model DS402 Capacities Steel 3 mm Wood
Parts list continues on Page 2 HOUSE PARTS PACKED IN HOUSE BOX PARTS IN SMALL PLASTIC BAG (HARDWARE) POST PARTS PACKED IN THIS BOX (LARGE PLASTIC BAG)
 POST PARTS PACKED IN THIS BOX (LARGE PLASTIC BAG)") Form 05-07 Instructions and Parts List MSS- Martin Safety System NOTES: () A complete system is packed in two boxes post box and house box. House box contains hardware for both post and house assembly.
Form 05-07 Instructions and Parts List MSS- Martin Safety System NOTES: () A complete system is packed in two boxes post box and house box. House box contains hardware for both post and house assembly.
Sport-Thieme Safety Aluminium Mini Training Goal
 Assembly instructions Art.-Nr.: 116 3852 Sport-Thieme Safety Aluminium Mini Training Goal 0218214 2018 Sport-Thieme GmbH D-38367 Grasleben Germany sport-thieme.com info @sport-thieme.com Phone: +49 53
Mounting of poles and foundations Rette produkt Til rette opgave
 Mounting of poles and foundations Rette produkt Til rette opgave 12/04/2018 Burying and mounting poles General When mounting poles, the door of the pole must always match the specific pole, with which
UNIVERSAL STAND. Owner s Manual. Visit us on the web at QUESTION Model No. UT1002
 Owner s Manual Model No. UT1002 UNIVERSAL STAND QUESTION... 1 877 393 7121 Visit us on the web at www.southerntechllc.com You will need this manual for safety instructions, operating procedures, and warranty.
CARPORT/SHELTER JIT-1333HZ. L10.0xW4.0xH4.5M Installation Manual MODEL:
 CARPORT/SHELTER MODEL: JIT-1333HZ L10.0xW4.0xH4.5M www.vikre.no Installation Manual Congratulations on your purchase of our instant shelter. This unit is a combination of excellent manufacturing and design.
 GENERAL OPERATIONAL PRECAUTIONS WARNING! When using electric tools, basic safety precautions should always be followed to reduce the risk of fire, electric shock and personal injury, including the following.
Sport-Thieme. Handball Goal. Assembly instruction. 3x2 m, Free-standing with Fixed Net Brackets
 Assembly instruction Sport-Thieme Handball Goal Cat.-no.: 115 0953 2392905 239 2918 113 6500 239 2400 239 2413 3x2 m, Free-standing with Fixed Net Brackets Thanks for choosing Sport-Thieme equipment! In
AGILITY. ROTA WEB CLIMBER 3.3m PROD. CODE SIZE AGE RANGE F/ FALL HEIGHT HEAVIEST PART TOTAL WEIGHT ROTAWEB33. 8 TO mm 73kg 115kg
 AGILITY ROTA WEB CLIMBER.m PROD. CODE SIZE AGE RANGE F/ FALL HEIGHT HEAVIEST PART TOTAL WEIGHT Dia. m x.m High 8 TO 4 00mm 7kg 5kg SPECIFICATION Centre Upright: Made from 6" diameter aluminium tube to
ROUND TOP RV SHELTER
 ROUND TOP RV SHELTER 94182 ASSEMBLY AND OPERATING INSTRUCTIONS Visit our website at: http://www.harborfreight.com Read this material before using this product. Failure to do so can result in serious injury.
Installation Guide. deckorum Composite Decking
 Installation Guide deckorum Composite Decking 1. Introduction Welcome to Deckorum installation Guide Please fully read the installation guide before commencing any installation works. This will provide
CAVALIER. Shower Door Installation Instructions
 CAVALIER Shower Door Installation Instructions IMPORTANT DreamLine reserves the right to alter, modify or redesign products at any time without prior notice. For the latest up-to-date technical drawings,
HOME GYM Owner s Manual
 HOME GYM Owner s Manual Content Content-------------------------------------------------------------1 Safety precautions----------------------------------------------------2 Assembly instruction-------------------------------------------------3-12
Art Thatch TM Umbrella Kit Installation Guide
 Art Thatch TM Umbrella Kit Installation Guide www.artificialthatch.com (858) 643-9030 sales@artthatch.com Parts List Part # Description Name Qty. #1 Main Frame 1 #2 Small Cross Bar 8 #3 Medium Cross Bar
TOYOTA MOTOR EUROPE CA Products Division Tel : Fax :
 TOYOTA MOTOR EUROPE CA Products Division Tel : + 32 2 745 26 77 Fax : + 33 2 745 26 99 Ordering part numbers Comments Part Numbers Wooden floor one hatch PZ449-D3C42-11 one hatch with carpet PZ449-D3C42-01
Sport-Thieme Safety Aluminium Mini Training Goal
 Assembly instructions Art.-Nr.: 116 3881 Sport-Thieme Safety Aluminium Mini Training Goal 0218214 2018 Sport-Thieme GmbH D-38367 Grasleben Germany sport-thieme.com info @sport-thieme.com Phone: +49 53
Sport-Thieme. Handball Goal. Assembly instruction. 3x2 m, without net brackets, in ground sockets
 Assembly instruction Cat.-no.: 113 6526 Sport-Thieme Handball Goal 3x2 m, without net brackets, in ground sockets Thanks for choosing Sport-Thieme equipment! In order to enjoy this product please note
GENERAL OPERATIONAL PRECAUTIONS
 GENERAL OPERATIONAL PRECAUTIONS WARNING! When using electric tools, basic safety precautions should always be followed to reduce the risk of fire, electric shock and personal injury, including the following.
Basketball Unit completely welded for playground goals
 Assembly instructions Art.-Nr.: 111 4616 111 4629 Basketball Unit completely welded for playground goals 0218214 2018 Sport-Thieme GmbH D-38367 Grasleben Germany sport-thieme.com info @sport-thieme.com
Classic Tire Swing Set
 Owners & Instruction Manual Classic Tire Swing Set This instruction booklet is to be used exclusively for Eastern Jungle Gym customers only. It is not to be handed out to the general public. Any duplication
Cedar fence. Construction plan. fence with shutters of which you. can decide the angle, allowing to create the required amount of privacy.
 4" STEP BY STEP Guide Construction plan Cedar fence A fence with shutters of which you can decide the angle, allowing to create the required amount of privacy. 4" X 4" 76 1 /2" Diffi culty level: 1 2 3
TITAN INDUSTRIAL RACK 4-FOOT TALL / 3-SHELF
 TITAN INDUSTRIAL RACK 4-FOOT TALL / 3-SHELF DXST4500 IMPORTANT: Please read this manual carefully before assembling this storage rack and save it for reference INSTRUCTION MANUAL 3 TABLE OF CONTENTS TECHNICAL
BARRIER FREE SHOWER PAN INSTALLATION INSTRUCTIONS
 BARRIER FREE SHOWER PAN INSTALLATION INSTRUCTIONS 1. 2. 3. 4. 5. 6. READ ALL INSTRUCTIONS BEFORE INSTALLATION Avoid exposure to weather. Product carton is not waterproof. Carton exposed to rain or snow
TABLE OF CONTENTS. Impregnated... 1 NORDIC FENCE Fynbo FSC Certified... 1
 TABLE OF CONTENTS Impregnated... NORDIC FENCE Fynbo FSC Certified... Iron... NORDIC FENCE Lightweight model, GENERAL... NORDIC FENCE Lightweight model, with a grid filled... NORDIC FENCE Lightweight model,
southpaw enterprises, inc.
 southpaw enterprises, inc. Instruction Sheet C-STAND 7100 Store these instructions in a safe place or with the enclosed maintenance checklist Take time to familiarize yourself with the use and maintenance
Model No. EP84-A, EP84AR-A, P84L
 E000 Model No. EP84-A, EP84AR-A, P84L PLEASE READ ASSEMBLY INSTRUCTIONS COMPLETELY BEFORE ASSEMBLING YOUR BUILDING CAUTION: Some parts have sharp edges. Care must be taken when handling the various pieces
WeatherShield Covered Walkway and Connect-A-Building
 WeatherShield Covered Walkway and Connect-A-Building Photo may show a different but similar model. 2014 ClearSpan All Rights Reserved. Reproduction is prohibited without permission. STK# DIMENSIONS 104303
INSTALLATION & OWNER S MANUAL
 Rev. O p. 1 of 16 INSTALLATION & OWNER S MANUAL V4213 BALL CAGE KIT INSTALLATION & OWNER S MANUAL The contents of this envelope are the property of the owner. Be sure to leave with the owner when installation
CARPORT/SHELTER MODEL: JIT L12.0xW6.2xH4.0M Installation Manual
 CARPORT/SHELTER MODEL: JIT-2040 L12.0xW6.2xH4.0M www.vikre.no Installation Manual Congratulations on your purchase of our instant shelter. This unit is a combination of excellent manufacturing and design.
Mounting instructions SZ210 Full-frame pedestal with screw-on tube with placement hinge, for type SCHATTELLO
 This height will be made to order. Mounting instructions SZ210 Full-frame pedestal with screw-on tube with placement hinge, for type SCHATTELLO The following instructions include all information necessary
Installation Manual. for. Kroftman Storage Tent T520
 Installation Manual for Kroftman Storage Tent T520 Congratulations on your purchase of our instant shelter. This unit is a combination of excellent manufacturing and design. It is comprised of a rigid
Beds may be put up or taken down quickly by use of a simple bolted connection at rails and uprights. MATERIALS LIST
 CANPLY This design has been made both functional and attractive by use of pattern cut-outs in head and foot uprights, which serve as ladders. Since most children love to climb, getting them to bed will
Sport-Thieme Handball Goal, 3x2 m, Free-Standing or socketed
 Assembly instructions Art.-Nr.: 201 0915 203 4502 Sport-Thieme Handball Goal, 3x2 m, Free-Standing or socketed 0218214 2018 Sport-Thieme GmbH D-38367 Grasleben Germany sport-thieme.com info @sport-thieme.com
ASSEMBLY INSTRUCTIONS FOR 2B3004 DELUXE EURO CLUB SOCCER GOAL
 Most Kwik Goal products carry a Lifetime Guarantee. For details or claims, visit kwikgoal.com or contact customer service at 1-800-531-4252. ASSEMBLY INSTRUCTIONS FOR 2B3004 DELUXE EURO CLUB SOCCER GOAL
12mm (Max) 6mm (Max) 82mm (Max) 12mm (Max) 6mm (Max)
 6mm (Max) 82mm (Max) 12mm (Max) 6mm (Max)") 1 1 2 2 3 3 82mm (Max) 12mm (Max) 12mm (Max) 6mm (Max) 4 4 5 6 8 6mm (Max) 0.5 0mm 1 5 6 7 7 8 9 9 A = B 10 11 12 D B 1 13 14 15 0 C A D E 16 17 18 F G D B N H J G I K 19 A 20 G L 21 C K 1mm L M 1mm 22
1 1 2 2 3 3 82mm (Max) 12mm (Max) 12mm (Max) 6mm (Max) 4 4 5 6 8 6mm (Max) 0.5 0mm 1 5 6 7 7 8 9 9 A = B 10 11 12 D B 1 13 14 15 0 C A D E 16 17 18 F G D B N H J G I K 19 A 20 G L 21 C K 1mm L M 1mm 22
Downtown Rack. Custom logo option available
 Custom logo option available Downtown Rack The Downtown Rack uses thick, square-tube construction that can t be cut with a pipe cutter. The extended width of the Downtown Rack makes for easy bike parking
SlipGrip Data Sheet & Installation Guide
 SlipGrip Data Sheet & Installation Guide Stair Treads Landing Covers Flat Sheets 9/2015 SlipGrip Technical Data Description SlipGrip products are high performance safety stair treads, landing covers and
SMALL GAUGE NIBBLER ASSEMBLY & OPERATING INSTRUCTIONS Mission Oaks Blvd., Camarillo, CA Visit our Web Site at
 SMALL GAUGE NIBBLER 91739 ASSEMBLY & OPERATING INSTRUCTIONS 3491 Mission Oaks Blvd., Camarillo, CA 93011 Visit our Web Site at www.harborfreight.com Copyright 2004 by Harbor Freight Tools. All rights reserved.
SC02 BOAT SANDPIT COVER OWNER'S MANUAL
 SC02 BOAT SANDPIT COVER OWNER'S MANUAL WARNING! The disassembled product may contain small parts which pose a choking hazard to children under 3. IMPORTANT: This product may contain sharp points and small
ClearSpan Grab Bag Canopy
 ClearSpan Grab Bag Canopy Photo may show a different but similar model. 2008 ClearSpan All Rights Reserved. Reproduction is prohibited without permission. STK# DIMENSIONS 104385 10 W x 20 L 1 YOU MUST
Model #SH & CH SH Pine CH Naturaline
 Model #SH304-101 & CH304-101 Assembly Manual SH304-101 Pine CH304-101 Naturaline Component Parts A 2 ea. Angled Rail - 2 x 4 x 107-1/8" B 1 ea. Center Angled Rail - 2 x 4 x 107-1/8" C 9 ea. Rock Board
16ft Polytunnel Assembly Instructions
 CONTENTS Section Page 1. FOUNDATION TUBES: Option A Ground Anchor Plates 3 2. FOUNDATION TUBES: Option B Concreted Foundation Tubes 5 3. STEEL FRAME ASSEMBLY & INSTALLATION 6 4. CROP BARS 8 5. TIMBER END
PRODUCT: LOKI INSTALLATION INSTRUCTIONS. Product is covered by U.S. patents. For more information visit
 R INSTALLATION INSTRUCTIONS PRODUCT: LOKI CONFIGURATION: SINGLE DOOR MOUNT: GLASS MOUNT Product is covered by U.S. patents. For more information visit www.krownlab.com . TOOLS + MATERIALS REQUIRED TOOLS
Opslagtent/Lagerzelt/Storage tent/abri de stockage. Kroftman T825. (7,90 x 25 m)
") Opslagtent/Lagerzelt/Storage tent/abri de stockage Kroftman T825 (7,90 x 25 m) Montagehandleiding (Engels) Montageanleitung (Englisch) Installation manual Manuel de montage (Anglais) V03.01KR 190122 Congratulations
Opslagtent/Lagerzelt/Storage tent/abri de stockage Kroftman T825 (7,90 x 25 m) Montagehandleiding (Engels) Montageanleitung (Englisch) Installation manual Manuel de montage (Anglais) V03.01KR 190122 Congratulations
ORP-R1 Mini/Regular: Basic / J-Connection / M-Connection
 ORP-R1 Mini/Regular: Basic / / Construction Manual Thank you for purchasing our product. The indication symbols in this construction manual are for you to construct the product safely and properly and
Swerve Rack CUSTOM RACKS AVAILABLE
 CUSTOM RACKS AVAILABLE Swerve Rack The design of the Swerve mirrors the bike frame, thus providing superior bike support while making it easy to secure both the bike frame and wheel with a standard u-lock.
REV: 1.2 TRAMPOLINE MANUAL
 REV: 1.2 TRAMPOLINE MANUAL TRAMPOLINE PARTS LIST: Item 8FT 10FT 12FT 14FT 16FT A 1 1 1 1 1 B 1 1 1 1 1 C 6 8 12 12 12 E 48 64 72 96 108 F 6 8 12 12 12 G 3 4 6 6 6 H 12 16 24 24 24 I 1 1 1 1 1 DIAGRAMS
Pergola PR100N1. Assembly Instructions. Systems Trading Corporation Customer service: (877)
") FABRIC Pergola PR00N Assembly Instructions Systems Trading Corporation Customer service: (8)82 82 of 20 Introduction Thank you for purchasing the Pergola PR00N. When properly assembled and maintained,
FABRIC Pergola PR00N Assembly Instructions Systems Trading Corporation Customer service: (8)82 82 of 20 Introduction Thank you for purchasing the Pergola PR00N. When properly assembled and maintained,
PAT installation of a Sun Dome over a in-ground
 PAT. 3766573 Installation of Sun Domes for in-ground pool GENERAL INSTRUCTIONS: STEP 1. Read thru the entire instructional materials before beginning any installation. You will find that the installation
Chapter 1. Beam and Sill Plates
 Chapter 1. Beam and Sill Plates 1.1 ESTABLISHING SQUARE SILL PLATE CHALK LINES 1.2 INSTALLING TREATED SILL PLATES 1.3 INSTALLING LAMINATE BEAM Tools needed by volunteers: Hammer Nail apron Tape measure
Bianco Bistro Set Assembly instructions
 Product size: Coffee Table: Dia50*H50 cm Chair: W72*D77*H86 cm The frame of this product is manufactured from mild steel coated with a weather resistant paint. Steel has a natural tendency to rust over
FITNESS PLAYGROUND ITEM NO: 8202
 FITNESS PLAYGROUND ITEM NO: 8202 OWNER S MANUAL CAUTION: This unit is designed to be used safely by up to 6 children between the ages of 3 years to 8 years old with a maximum weight of 80 pounds (36.3kgs)
Session: Introduction to PPE and T&P
 Session: Introduction to PPE and T&P Learning Objectives Explain what safety PPE, tools and plants are, their purpose and their uses Evaluation Criteria Interactive Questioning Duration Resources Facilitator
WeatherShield Daddy Long Legs Canopy
 WeatherShield Daddy Long Legs Canopy Photo may show a different but similar model. 2010 ClearSpan All Rights Reserved. Reproduction is prohibited without permission. Revision date: 06.210 STK# 1220RV10W10
YUKON PATIO COVER INSTALLATION INSTRUCTIONS
 YUKON PATIO COVER INSTALLATION INSTRUCTIONS Before You Begin: Consult your local building department for any required permits You may be required to obtain a building permit for this structure. Contact
INSTALLATION GUIDE CLIMB HIGHER, SAFER AND MORE EFFICIENTLY
 INSTALLATION GUIDE CLIMB HIGHER, SAFER AND MORE EFFICIENTLY The newest version of this document shall be followed at all times. The newest version of this document can always be found on the Eltel website.
College of Forestry 610: Power Tools
 College of Forestry 610: Power Tools Safety Policy & Procedure Manual Section 600: Workshops and Shop Tools Effective: 01 January 2007 Revised: August 2014 PURPOSE The purpose of this section is to provide
Installation Guide. English. English
 Installation Guide Safety Instructions For your safety, read all the instructions in this guide before using the setting plate. Incorrect handling that ignores instructions in this guide could damage the
100LB WEIGHT BENCH SET SF-BH6510 USER MANUAL
 100LB WEIGHT BENCH SET SF-BH6510 USER MANUAL IMPORTANT: Please read this manual carefully before using the product. Retain owner s manual for future reference. For Customer Service, please contact: support@sunnyhealthfitness.com
PARALINE - MONO OWNER S MANUAL G L I D E L I F T HILLS GUARANTEE IMPORTANT: READ OWNER S MANUAL AND WARNINGS BEFORE ASSEMBLING AND USING THIS PRODUCT
 HILLS GUARANTEE HILLS INDUSTRIES LIMITED undertake that if any part of its manufacture has failed to o p e rate correctly due to faulty wo rkmanship or defe c t i ve material, it will repair or replace