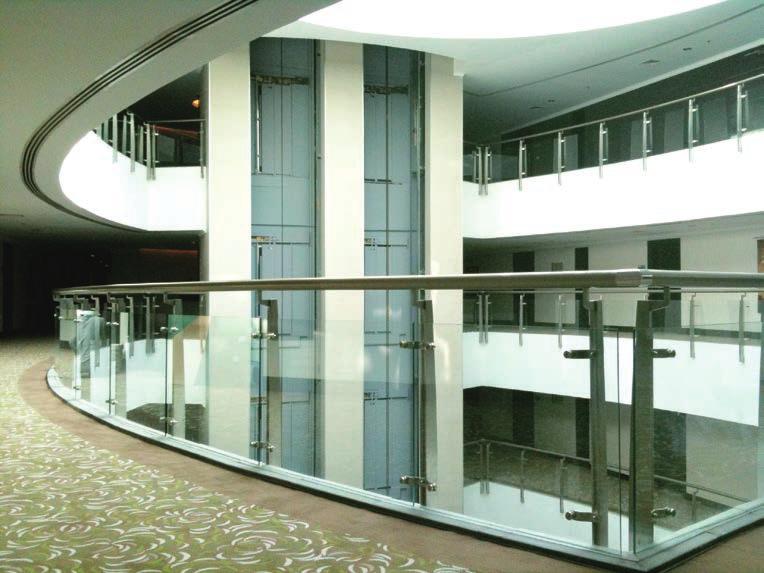
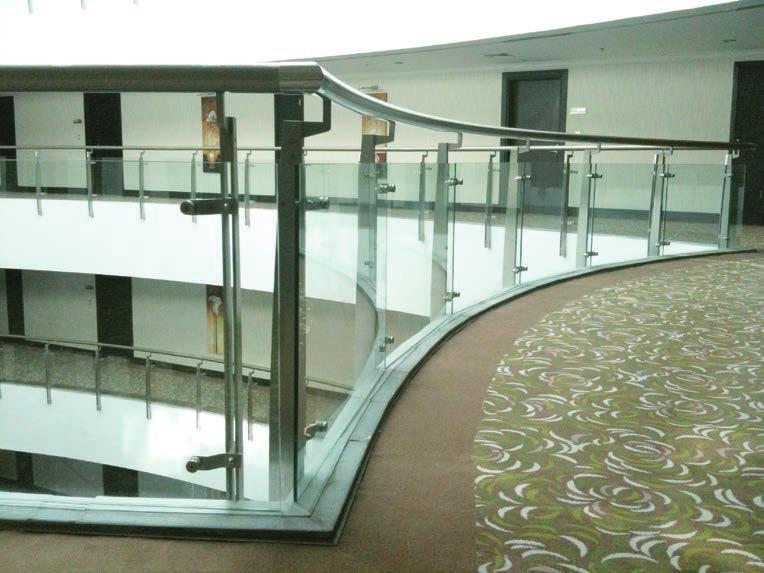
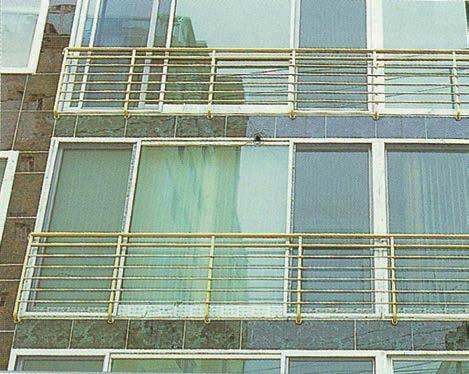
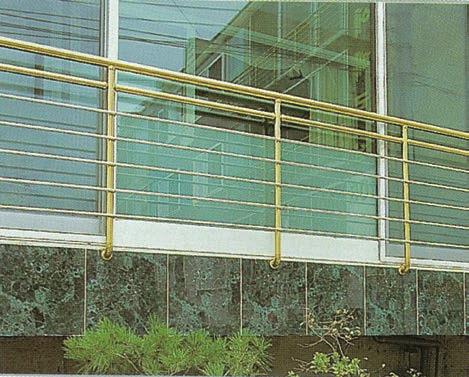
Ti-Color STAINLESS STEEL HANDRAIL
|
|
|
- Cori Haynes
- 6 years ago
- Views:
Transcription
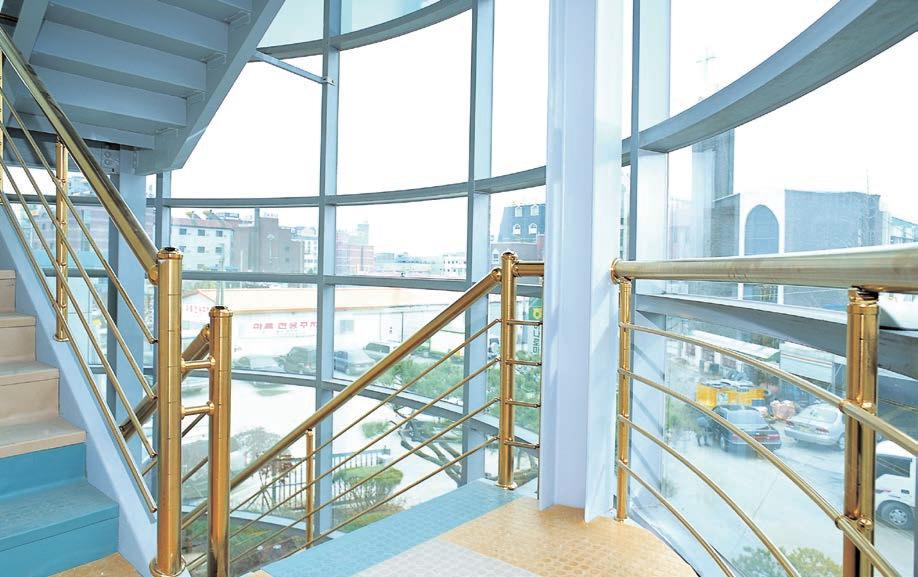
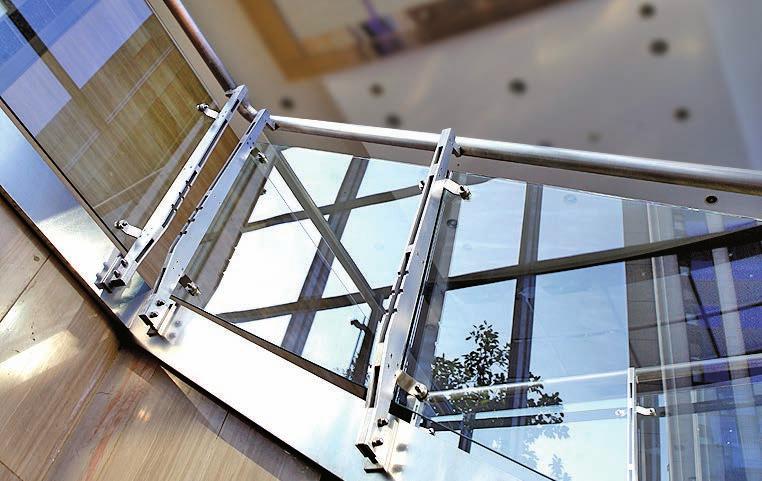
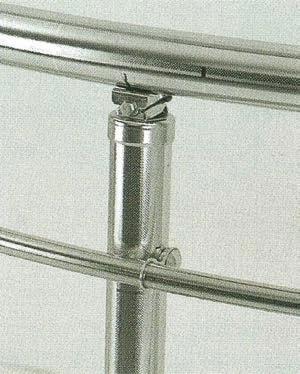
1 Ti-Color STINLESS STEEL HNDRIL Handrail Custom-made Rail
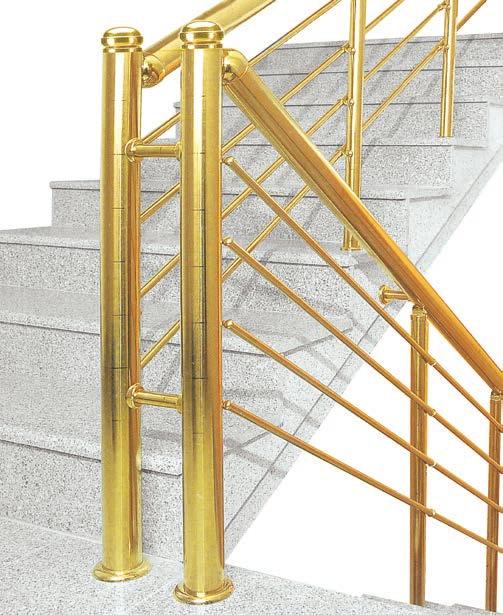
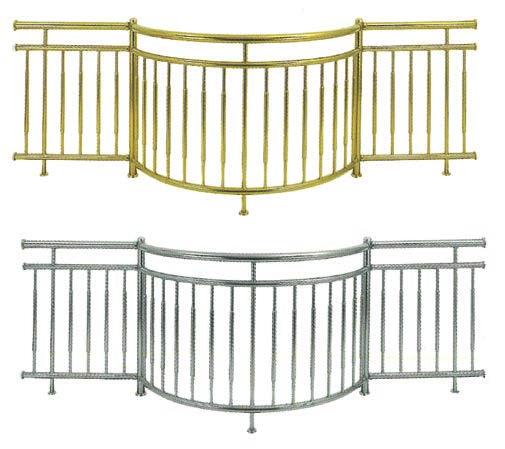
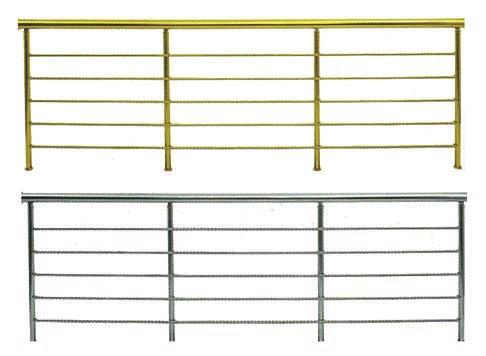
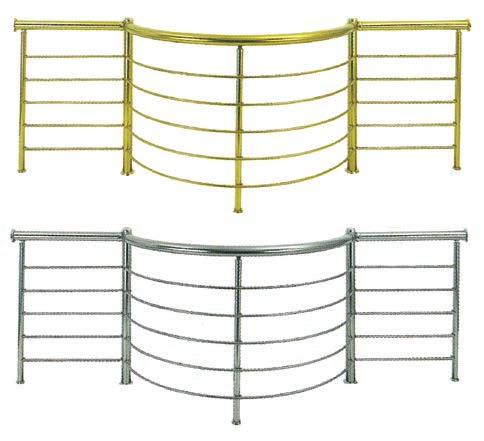
2 HNDRIL STNDRD Handrail Custom-made rail Vertical Type Horizontal Type Elegance Type


3 HNDRIL TYPE Vertical Type 5001 / / / 6004

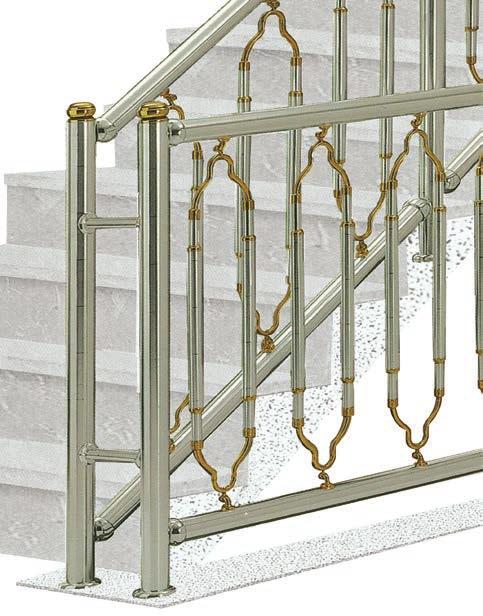
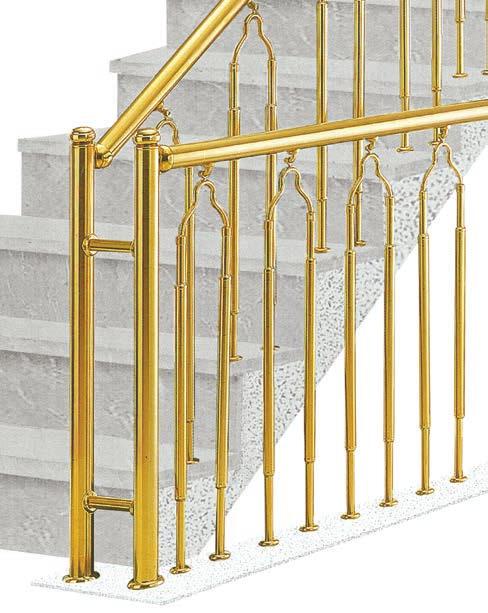
4 HNDRIL TYPE Horizontal Type Elegance Type 5003 /

 Hill-top Connecting Infill rail to Main Post")


5 HNDRIL INSTLLTION Handrail to Mani Post Connection Method Socket 45º Type Socket 90º Type DIY & Handrail Main Post Connecting Hill-top to Main Post pplicable to any grade of stairs. Basic ngle : 33º (±15º) Hill-top Connecting Infill rail to Main Post Main Post Joint Hill-top Main Post I f diameter of infill rail is Φ15.8 weld or rivet a jointer to the main post and twist it parallel to the stairs. Insert the Hill-top bolt into the upper hole of the main post and weld it to the post. Screw the Hill-top to the Hill-top bolt. Hill-top will be locked when screwed. Connecting Middle Post to Handrail Connecting Infill rail to Middle Post Middle Post Joint Handrail Middle Post Disassemble the upper portion of the main joint and weld it to the handrail securely. the middle post at an angle smaller Twist than that parallel to the stairs. (Use tools such as tongs)
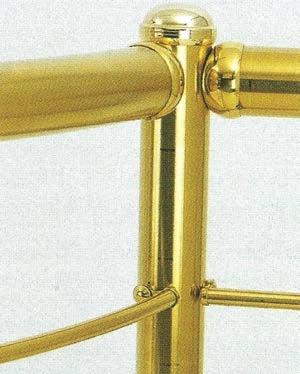
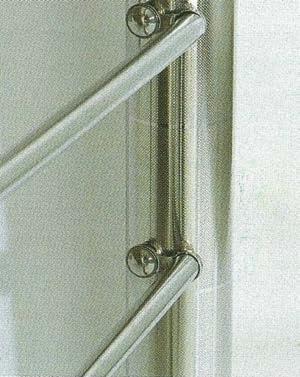
 Hair Line (#200) vailable Ti-Colors Silver Gold")
 Length (m) Plain")
 Ø 19.1 0.6 5 (0.9) Ø 25.4 0.9 4 Ø 38.1 0.8 5 Ø 50.")

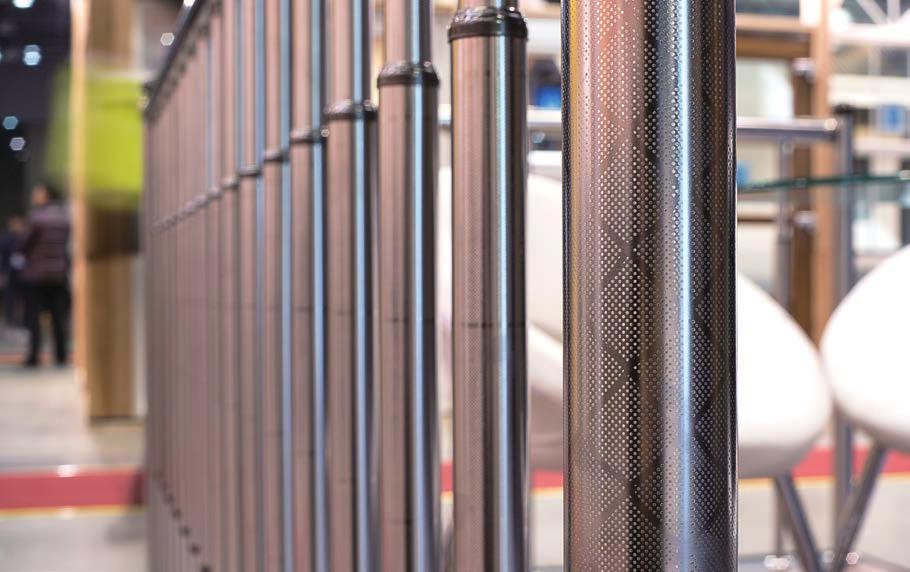
6 HNDRIL SPECIFICTION Plain Pipe Polish (#800) Plain (#600) Hair Line (#200) vailable Ti-Colors Silver Gold Bronze Black Pattern Pipe Specification Dot Dia Dot ngle Check Diameter Thickness (mm) Length (m) Plain Dot Dia Pattern Dot ngle Pattern Check Pattern Ø (4) Ø (0.9) Ø Ø Ø Ø Ø Ø / Ø / Customized logos and symbols are available.


7 HNDRIL STNDRD

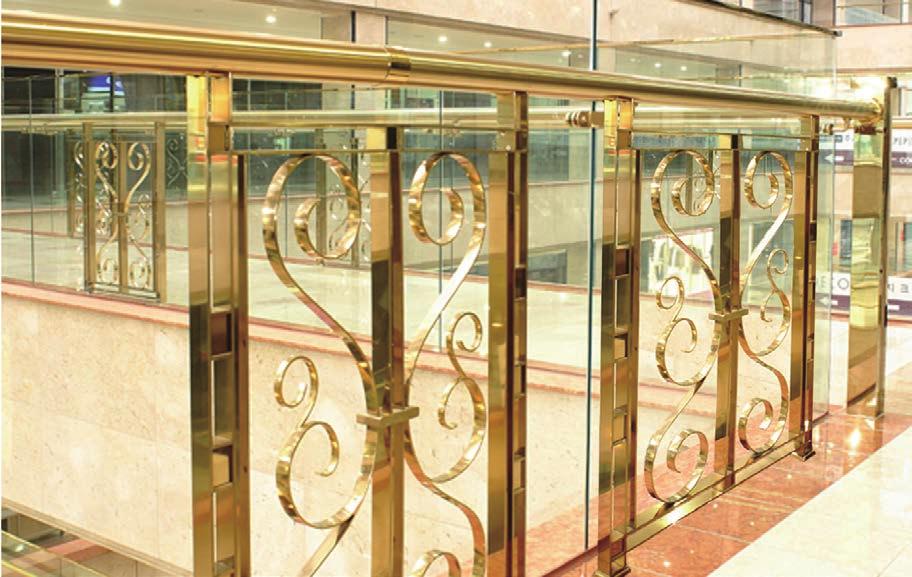
8 HNDRIL CUSTOM

9 CUSTOM-MDE RIL STNDRD Handrail Custom-made rail Vertical Type Horizontal Type Elegance Type

10 Vertical / Vertical Round Type CUSTOM-MDE RIL TYPE Horizontal / Horizontal Round Type Elegance Type
11 CUSTOM-MDE RIL INSTLLTION ssembly Instructions-Vertical Type Balcony Washer 2 10mm Set nchor Post washer ø38.1 ø50 ø50.8 ø60 ø63.5 ø70 ø76.3 ø80 Drill evenly spaced holes between the main posts. Place an anchor in each hole and connect a washer to the anchor with a bolt Fixed 1 welding Separated bolt Main joint Twin socket assembly hole Main joint Middle post Twin socket assembly hole Measure the distance between the edges of the main post sockets using a measuring rope. Cut the pipe 15mm longer than the length of the measured distance. B Fixed B welding Separated bolt Twin Socket Socket Screw the socket onto the middle post. Weld the M socket to the main post at the same height as the middle post socket. Bottom Cap Post & Washer welded stiffener Washer 2 10mm Set nchor Post cap fixed pin Fixed welding Spot welding Socket 2 Plant the post perpendicular to the ground and weld it to the washer securely. Put a cap on it. 3 Insert the ball-top bolt into the upper hole of the post and weld the bolt to the post. Weld the inner socket to the post. Please refer to the diagram. * Please note that argon welding is more effective and produces less welding stains than other welding methods. Insert the pipe into one side of the socket. Then do the same to the other side. (You need to slightly pull the post towards you.) Weld the undersid of the pipe to the socket securely as indicated in the diagram. Fixed welding Separated bolt 1 Main joint Twin socket assembly hole Main joint Middle post Twin socket assembly hole 5 Measure the distance between the underside of the handrail and the washer at the bottom, Make a hole for each of the sockets on the middle-post and cut the pipe 16mm shorter than the measured length. Put the post into the main joint using a rubber hammer. (Strike the joint with the hammer.) Disassemble the upper portion of the main joint and weld it to handrail securely. Put the lower cap into the post and then place the post into its repective hole. Reassemble the main joint. Weld the post to the washer securely and put the cap on. Straight type SET (Standard goods) 7 Insert a balcony into one side of the sockets and do the same with the other side. (You need to slightly pull the post towards you.) Weld the underside of the pipe to the socket securely. If the length of the balcony exceeds the space between the sockets, cut or trim the edge of the balcony. Straight type Balcony Hill top Ø Screw the Hill-top to the ball-top bolt. Note that applting a bonding agent on the bolt will strengthen the connection. (Refer to diagram )
12 CUSTOM-MDE RIL INSTLLTION ssembly Instrutions-Horizontal Type Balcony Washer 2 10mm Set nchor Post washer ø38.1 ø50 ø50.8 ø60 ø63.5 ø70 1 Drill holes at evenly spaced points along the main posts, middle poston the floor and horizontal handrail on the side wall. Place an washer into each hole and connect a washer to the anchor with a bolt. The height of the horizontal handrail should be 1,000mm above the floor. Socket Spot welding 4 Measure the ditance between the main posts and the distance between side wall using measuring rope. Cut the pipe into the length of the measured distance. Insert the pipe into one side of the socket. Then do the same with the other side. Use a bended pipe instead of the regular one for the curved portion of the railing. (You need to slightly pull the post towared you.) Bottom Cap Post & Washer welded stiffener Washer 2 10mm Set nchor Weld the underside of the pipe to the socket securely. For the handrail to the wall, weld the pipe to the washers on the wall and put a cap on it. Connection socket(90 ) Post cap fixed pin Fixed welding Post cap & Washer welded stiffener 2 Plant the post perpendicular to the ground and weld it to the washer securely. Then put a cap on it. 3 Insert the ball-top bolt into the upper hole of the post and weld the bolt to the post. Weld inner socket to the post. Please refer to the diagram. * Please note that argon welding is more effective and produces less welding stains than other welding methods. Fixed welding Main joint 1 Main joint Middle Post 5 Measure the distance between the underside of the horizontal pipe and the washer at the bottom. Cut a mm pipe 16mm shorter than the measured length. Put the post into the main joint using a rubber hammer. Disassemble the upper portion of the main joint and weld to the handrail securely. Put the lower cap into the post and then place the post into its respective hole. Reassemble the main joint. Weld the post to the washer and put the cap on.
13 CUSTOM-MDE RIL INSTLLTION B Welding Main post joint Main Post B 6 Wled the post joints to the main post and middle posts(φ15.8) securely. * Do not center the supporting handrails to avoid their being too close to each other. Middle post joint 1 2 Middle post joint 8 Twist the middle post joint using tools like a spring clamp. (Refer to the diagram 1) Push and Weld Push the handrail to the middle post and weld them with post joints. (Refer to the diagram 2) Main post joint B 7 9 Joint cap Main Post Ø15.8 B Main Post Ø15.8 Measure the distance between the edges of the main post joints. Cut Ø15.8 pipe 8mm longer than the measured length. Put the middle post joints into the supporting handrails (Refer to the diagram B) Put the joint cap into the middle post joint using a rubber hammer (Strike the joint with a hammer.) * Note that applying a bonding agent on the bolt will strengthen the connection. (Refer to the diagram.) Insert the supporting handrails to the post joints of the mail posts. Because the length of each handrail exceeds the given space by 8mm, the post joints will be twisted, causing the joints hold the handrails more securely. Hill top 10 Screw the Hill-top to the ball-top bolt. Note that applying a bonding agent on the bolt will strengthen the connection. (Refer to the diagram.)

14 CUSTOM-MDE RIL IMGE

15 CUSTOM-MDE RIL IMGE


16 HNDRIL CCESSORY Combi Pipes B763 H635 S763 B763 TW381 J158 L635 L254E TH635 CON763-I CON508T JE763 C318 Combi Posts C318 GC381 D254 D318 C318 C318 SC381SC381 C318 SC381 GC318C318 SC381 GC318 GC381GC318 SC381 GC318 GC381 D254 GC318 GC381 C318 D254 GC381 SC381 D318 D254 C318 D318 D254 GC318 SC381 GRC660 D318 GC381 GC318 GRC660 D318 GC381 D254 SRC760 GRC660SRC760 GRC660 D254D318 SRC760 GTP925SRC760 GTP925 D318 GRC660 STC925 GTP925GRC660 STC925 GTP925 SRC ST Round Combi Pipes FL508 Elegance Twin Combi Pipes CON763L C318 GC318 SC381GC381 GC318 C318 GC381 C318 D254 GC318 SC381 GC318 D318 GC381 D254 GRC660 D254 D318 SRC760 D318 GRC660 GTP925 GRC660 SRC760 STC925 SRC760 GTP925 STC925 STC925 GRP760 SRC760 GTP925GTP925 STC925 SC381 D254SC381 D318 GC381 GRC660 SRC760 GTP925 STC925
Clearview Railing System Installation Instructions
 Clearview Railing System Installation Instructions Disclaimer: AGS Stainless, Inc. has its Clearview Railing Systems designed by a professional engineer to meet the requirements of the latest national
Kwik-Lock. Installation Instructions. Attention Dealers: Please give this owners manual to the customer when the product is delivered.
 Serving the Truck & Trailer Industry Since 1944 Installation Instructions Attention Dealers: Please give this owners manual to the customer when the product is delivered. Call 800-535-9545 www.aeroindustries.com
The following instructions will guide you through the installation of your new vinyl railing.
 Installation Guide St. James Vinyl T-Rail Tools Required Protective eye glasses 3/8 x 3 Concrete Anchors/Fasteners (for Tape measure concrete installations) Variable speed drill/screwdriver Philips Driver
Classic Roll Tarp. Installation Instructions. Attention Dealers: Please give this owners manual to the customer when the product is delivered.
 Serving the Truck & Trailer Industry Since 1944 Classic Roll Tarp Attention Dealers: Please give this owners manual to the customer when the product is delivered. Call 800-535-9545 www.aeroindustries.com
ATLANTIS RAIL Contact Information
 ATLANTIS RAIL Contact Information Customer Service (800) 541-6829 (508) 732-9191 Spectrum System Installation Instructions Atlantis Rail s Spectrum System is an easy to install, universal cable railing
PORCH-LOC INSTALLATION INSTRUCTIONS
 PORCH-LOC INSTALLATION INSTRUCTIONS 2017 HB&G Building Products, Inc. Porch-Loc Installation Instructions NOTE: DISCARD THE INSTALLATION INSTRUCTIONS AND HARDWARE THAT CAME IN YOUR PERMAPOST PACKAGING
Classic Roll Tarp. Installation Instructions. Attention Dealers: Please give this owners manual to the customer when the product is delivered.
 Serving the Truck & Trailer Industry Since 1944 Classic Roll Tarp Attention Dealers: Please give this owners manual to the customer when the product is delivered. Call 800-535-9545 www.aeroindustries.com
Fortress Fe Posts must always be secured to the deck framing. Fortress Fe Posts should never be attached to only the deck boards.
 Installation Instructions for FortressCable V-Series Cable Stair Panel System with UB-05 With ngle dapter and Fe Posts It is the responsibility of the installer to meet all code and safety requirements,
Plain Jane Vinyl Gate REALLY. Important stuff to know about installing your WamBam gate
 Plain Jane Vinyl Gate RELLY Important stuff to know about installing your WamBam gate. 1-877-778-5733 www.wambamfence.com CLEVER JOE Your Installation Buddy 02.2017 Reality Check 1 - Read Over Fence Instructions
Stair Parts Installation. Tricks
 Stair Parts Installation Tips & Tricks Introduction Your DIY staircase guide Welcome to the Stairpart home installation guide. Your stairway is both a functional and focal point in your home, so keeping
Ford Pick Up Rear leaf Spring Kit Installation Instructions
 1948-1956 Ford Pick Up Rear leaf Spring Kit Installation Instructions 1-800-984-6259 www.totalcostinvolved.com Parts 48 inch leaf (2) springs (4) U-bolts 3/8-24 x l 1/4bolts (16) & nuts (2) 1/2-20 x 4
The Safe Solution for Stainless Steel Balustrade Systems
 M E R G I N G S A F E T Y W I T H S T Y L E The Safe Solution for Stainless Steel Balustrade Systems KEE STAINLESS is the most exclusive product in the Kee Safety handrail and balustrade product range.
INSTALLATION INSTRUCTIONS
 Tools required for the installation. A. Core Drill 87mm Drill bit B. Tape measure C. Spirit Level D. Marking pen E. Caulking gun F. Cutting Pliers G. Cordless Drill and Philips head bit, 5mm Drill bit.
INSTALLATION INSTRUCTIONS SIDE BAR FORD ESCAPE & MAZDA TRIBUTE PART #
 INSTALLATION INSTRUCTIONS SIDE BAR 2008-2010 FORD ESCAPE & MAZDA TRIBUTE PART # 50136 50137 PARTS LIST: 1 Driver/Left Sidebar 2 10-1.50mm x 35mm Bolt Plate 1 Passenger/Right Sidebar 2 10-1.50mm x 30mm
ALL SEASON PATIO COVER
 ALL SEASON PATIO COVER 61 Where the All Season Patio Cover is to be attached to the home, create a level line showing where the top of the mounting rail is to be located. Install each section with the
Assembly Instructions
 18' W x 10' H or 12' H Peak Style Frame Assembly Assembly Instructions Before you start: 2+ individuals recommended for assembly, approximate time 3 hours. Recommended tools: Power Drill, Safety Glasses,
Grade 8 Enriched Math Catapult Project 2012 Step by Step Instructions to building a catapult
 Grade 8 Enriched Math Catapult Project 2012 Step by Step Instructions to building a catapult Grade 8 Enriched Math Project INSTRUCTION SHEET FOR CATAPULT Procedures, materials and tools: below is a step-bystep
LocoGear. Technical Bulletin - 14 November 28, 2003 Copyright 2003 by LocoGear LIVE STEAM CASTINGS. Tech Bulletin - 14
 LIVE STEAM CASTINGS LocoGear Tech Bulletin - 14 John D.L. Johnson 3879 Woods Walk Blvd Lake Worth, FL 33467-2359 jjohnson@locogear.com www.locogear.com Technical Bulletin - 14 November 28, 2003 Copyright
Fortress Fe Posts must always be secured to the deck framing. Fortress Fe Posts should never be attached to only the deck boards.
 Installation Instructions for FortressCable H-Series Stair Panels with Simplified Stair Bracket SSB-05 and Fe Posts It is the responsibility of the installer to meet all code and safety requirements, and
A-SL-1 A-SL-1 HAND RAIL STAIRS STRUCTURE/ ARCH SLIDE FOUNDATION 12" ROUND PIER 20" SQUARE PIER CAP DRILL AND EPOXY BOLTS *SEE FOUNDATION DETAILS
 2X2 SQUARE TUBING /" WALL ON STRUCTURAL FRAME /8" WALL RAFTERS & INFILL NO. ISSUE HOUSE # GALVANIZED STEEL STAIRS SLIDE 2 GA SS POLISHED FINSHED LASER CUT FOUNDATION 2" ROUND PIER 20" SQUARE PIER CAP DRILL
Dura-Lock Roof System
 DLR-14 Dura-Lock Roof System Assembly and Installation Instructions Read the instructions before starting the job. They explain the steps required to produce a finished product that will meet factory specifications.
FUSION JULIETTE BALCONIES FITTING INSTRUCTIONS
 FUSION JULIETTE BALCONIES FITTING INSTRUCTIONS The Richard Burbidge FUSION Juliette Balcony System comprises a combination of timber and aluminium rails, glass infill panels and brackets designed for use
Aluminum Railing Installation. Glass Railing Spindle Railings Intimacy Railings and Panels
 Aluminum Railing Installation Glass Railing Spindle Railings Intimacy Railings and Panels This information in this manual will help you to Better understand our product line. Give you guidelines for an
A Step-by-Step How To Guide
 HOW TO REMODEL YOUR STAIR A Step-by-Step How To Guide Add new life to your staircase and achieve professional results. 1 Renovating your staircase is more than a remodel, it s a transformation of your
Assembly Instructions 10 X 10 Aluminum Frame Building
 Assembly Instructions 10 X 10 Aluminum Frame Building 27 97 9 8 47 36 74 52 10 10 X 10 Square Building W/ Dome Includes: The Steel Entry Door with a Dead Bolt Lock assembly and Aluminum Door Frame. Metal
IIHS Side Impact Outrigger
 IIHS Side Impact Outrigger Assembly Procedure Base Assembly (14.3 lbs) The base assembly consists of a ¼ thick steel plate, a ¼ thick piece of polyethylene, and mounting fixtures for the upper and lower
CXT PRO RAILING INSTALLATION INSTRUCTIONS For Installations Using Aluminum and Glass Balusters Sold Separately
 CXT PRO RAILING INSTALLATION INSTRUCTIONS For Installations Using Aluminum and Glass Balusters Sold Separately CCRR-0171 PFS AA-652 Drill/power screwdriver Assorted drill bits Hammer Miter or circular
Installation of Balustrade Systems
 Installation of Balustrade Systems IMPORTANT: Be sure to mark the center point of each newel post's location prior to installation to insure proper spacing. All product interfaces must use PL Premium Adhesive
Salter Industries Spiral Stair
 Salter Industries Spiral Stair The Leader in Spiral Staircases Continuous Sleeve Stair Installation Instructions TOOLS NEEDED: 1. Electric drill with hex chuck and Phillips bit 2. Drill bits 1/8", 1/4",
Nervous Nelly Vinyl Gate REALLY. Important stuff to know about installing your WamBam gate
 Nervous Nelly Vinyl Gate RELLY Important stuff to know about installing your WamBam gate. 1-877-778-5733 www.wambamfence.com CLEVER JOE Your Installation Buddy 02.2017 Reality Check 1 - Read Over Fence
Slide the stock rubber tank mount caps onto the ends of the CS-1 tank mount:
 RYCA CS-1 BODY PARTS INSTALLATION GUIDE [The CS-1 installation guides should be used as supplements to the videos found on our Youtube Channel. There is no strict order to the build process, but it is
THE ROGUE TM FUNSLIDE TM
 THE ROGUE TM FUNSLIDE TM ASSEMBLY AND INSTALLATION INSTRUCTIONS * * C A U T I O N * * S.R. SMITH ROGUE TM FUNSLIDES TM ARE MANUFACTURED FOR INSTALLATION AND USE ON RESIDENTIAL INGROUND POOLS ONLY. ROGUE
Installation Instructions for. Handrail Component System
 Handrail STEP-BY-STEP Installation Instructions for Handrail Component System Rise in Inches Run in Inches 8 8.5 9 9.5 10 10.5 11 11.5 12 12.5 13 13.5 14 14.5 15 8.5 47 45 43 42 40 39 38 36 35 34 33 32
The following instructions will guide you through the installation of your new vinyl railing stair kit.
 Installation Guide Vinyl Standard Stair Railing Tools Required Protective eye glasses Tape measure Variable speed drill/screwdriver Rotary hammer or hammer drill and masonry percussion bit recommended
COMPOSITE RAILING INSTALLATION
 COMPOSITE RAILING INSTALLATION Tools All you ll need is a hammer and screw gun, circular saw (carbidetipped blade with fewer than 20 teeth is recommended), level, tape measure, rasp and blue chalk line.
Downtown Rack. Custom logo option available
 Custom logo option available Downtown Rack The Downtown Rack uses thick, square-tube construction that can t be cut with a pipe cutter. The extended width of the Downtown Rack makes for easy bike parking
Staircase and Handrail Parts
 Staircase and Handrail Parts hammersmith.com.au 2 CONTENTS HANDRAIL & BRACKETS Designer Rail page 3 Ezirail 2.0 page 4-5 Heritage Rail page 6 Zipbolt page 7 Victorian Rail page 8 Mono Rail page 8 Handrail
THE ROGUE TM GRAND RAPIDS TM ASSEMBLY AND INSTALLATION INSTRUCTIONS
 THE ROGUE TM GRAND RAPIDS TM ASSEMBLY AND INSTALLATION INSTRUCTIONS CORPORATE HEADQUARTERS WESTERN SALES AND MANUFACTURING PLANT P.O. Box 400 1017 SW Berg Parkway Canby, Oregon 97013 (503) 266-2231 (503)
Ordering Guide - Shaft Assemblies -
 Ordering uide - Shaft ssemblies - S & TRS Series TRS - - SS - 4 ssembly Type S TRS Shaft Diameter Overall Length xxx - inches Shaft Material - 00 Steel SS - 440C Stainless Steel CR - Chrome Plated 00 Steel
MODEL T28173/T28174 ROLLER TABLES INSTRUCTIONS
 MODEL T28173/T28174 ROLLER TABLES INSTRUCTIONS FOR MODELS MFD. SINCE 10/17 For questions or help with this product contact Tech Support at (570) 546-9663 or techsupport@grizzly.com Rails Rollers Reversible
INSTALLATION INSTRUCTIONS
 Tools required for the installation. A. Core Drill 87mm Drill bit B. Tape measure C. Spirit Level D. Marking pen E. Caulking gun F. Cutting Pliers G. Cordless Drill and Philips head bit, 5mm Drill bit.
THE INSTALLING INSTRUCTION FOR CONCEALED TANK
 THE INSTLLING INSTRUCTION FOR CONCELED TNK Important remind: FFL ccessories List:. Please read through this Instructions carefully prior to installation, and our company shall not be responsible for any
Bracket guide. LK Pipe Pole. LK Radiator fixture Uni
 Bracket guide LK Radiator fixture Uni LK Radiator fixture Uni c/c 40 (Article no. 481 43 92) LK Radiator fixture Uni c/c 50 (Article no. 481 44 03) LK Pipe Pole (Article no. 481 43 91, 481 43 90) Used
installation care & maintenance instructions lifecycledecking.com 25-year limited residential warranty 20-year limited commercial warranty
 installation care & maintenance instructions lifecycledecking.com 25-year limited residential warranty 20-year limited commercial warranty Installation Instructions As with any building project, use proper
INSTALLATION INSTRUCTIONS. Level Rail With Cap: Page 2 Level Rail Without Cap: Page 8 Stair Rail: Page 12
 INSTALLATION INSTRUCTIONS Level Rail With Cap: Page 2 Level Rail Without Cap: Page 8 Stair Rail: Page 12 LEVEL RAIL WITH CAP The testing was performed in accordance with procedures and methods referenced
installation care & maintenance instructions moistureshield.com limited lifetime warranty
 installation care & maintenance instructions 866.729.2378 moistureshield.com limited lifetime warranty It s comforting to know that you re about to build a deck that gives you every possible advantage.
Follow these steps to assemble your Hiddenbed 1 Construct the 3 main parts 2 Assemble them together 3 Add a mattress. YOUR HIDDENBED IS READY! 2
 Mounting Instructions Item No.: 271.97.300 Hiddenbed Furniture parts supplied by the customer Follow these steps to assemble your Hiddenbed 1 Construct the 3 main parts 2 Assemble them together 3 Add a
TREX REVEAL RAILING Installation Instructions
 TREX REVEAL RAILING BRACKET HARDWARE STAIR APPLICATIONS (INCLUDING STAIR SWIVEL BRACKETS, STAIR CROSSOVER BRACKET, AND COMPOUND SWIVEL BRACKETS) FIXED BRACKET Stair HARDWARE AA. Bottom Stair Bracket and
`48-`56 Ford Pickup Rear leaf Spring Kit Installation Instructions Tech Line:
 `48-`56 Ford Pickup Rear leaf Spring Kit Installation Instructions Tech Line: 1-855-693-1259 www.totalcostinvolved.com CHECK ALL PARTS INCLUDED IN THIS KIT TO THE PARTS LIST BEFORE INSTALLING THE KIT.
TABLE OF CONTENTS REQUIRED TOOLS
 TABLE OF CONTENTS SECTION SECTION TITLE PAGE NO. 1 2 3 4 5 Assembling Mounting Structure Installing Bicycle Supports Mounting Rack to Wall Adding Sections Customizing Rack Configuration REQUIRED TOOLS
Lid, Floor Monument and Two Installation Fixtures. Floor Monument Installed with Lid On and Off
 Monumentation Drilling Specifications: Floor Monuments: - Floor is drilled using 1 3/4" core drill bit to a depth of 2 with a Hilti rotary hammer drill - Quikrete is used to set monuments into the floor
STAINLESS STEEL BALUSTRADE SYSTEMS
 STAINLESS STEEL BALUSTRAE SYSTEMS PARTS CATALOGUE ALUMINIUM SOPFRONT MANUFACTURERS MIRROR WARROBES ARWOO AN OAK OORS PICTURE FRAMING MIRRORS PAINTE SPLASBACKS GLASS BALUSTRAES ECORATIVE GLASS 30 Tobago
Work Space Set-up. Slats will level the pipe during bending and help minimize twisting of the bow.
 Work Space Set-up Affix pipe bender to end of working surface Slats will level the pipe during bending and help minimize twisting of the bow. Make the slat height equal the distance from your work surface
Operating Instructions
 Operating Instructions Holding the material against the angle gauge slide it into the forming head. Be sure that the material remains against the gauge until work is finished. NOTE: This machine will handle
Fortress Fe Posts must always be secured to the deck framing. Fortress Fe Posts should never be attached to only the deck boards.
 Installation Instructions for Fortress Horizontal Cable Panel System with UB-05 Brackets and Fe Posts It is the responsibility of the installer to meet all code and safety requirements, and to obtain all
18600 Angular Momentum
 18600 Angular Momentum Experiment 1 - Collisions Involving Rotation Setup: Place the kit contents on a laboratory bench or table. Refer to Figure 1, Section A. Tip the angular momentum apparatus base on
Insertion Transducer On-line Install Instruction
 LOGO Insertion Transducer On-line Install Instruction Shanghai Dynameters Co., Ltd www.dynameters.com Insertion Transducer Installation Manual Installation steps 1. Locate Installing point 2. Weld mounting
INSTALLATION AND CARE INSTRUCTIONS
 INSTALLATION AND CARE INSTRUCTIONS Vertical Applications Honeycomb Shades 52 C8-10-3401 Rev 2/14 CONTENTS Introduction...2 Before You Begin...3 Vertical Application Parts Overview...4 Materials Required...5
RAPID-EPS SAFETY INSTRUCTIONS AND INSTALLATION GUIDE. American Standard OSHA
 RAPID-EPS QUICK REFERENCE GUIDE SAFETY INSTRUCTIONS AND INSTALLATION GUIDE Standards Tested and Certificated British Standard BS EN 13374:2013 CLASS A American Standard OSHA - 1926.502 Canadian/Ontario
ATTACH WALL PLATE TO WALL
 DANGER! The Elite ar m contains high p r e s s u r e g a s s p r i n g s. T h e following cautions MUST be observed to avoid serious injury. 1. Do not attempt to adjust your Elite arm until everything
PVC Composite Railing & Stair Kit
 FREEDOM-WEB PVC Composite Railing & Stair Kit INSTALLATION INSTRUCTIONS Read all instructions prior to installing product. Refer to manufacturers safety instructions when operating any tools. To register
PowerLock. Installation Instructions. Attention Dealers: Please give this owners manual to the customer when the product is delivered.
 Serving the Truck & Trailer Industry Since 1944 FOR Attention Dealers: Please give this owners manual to the customer when the product is delivered. Call 800-535-9545 www.aeroindustries.com Indianapolis,
Vertical Honeycomb Shades
 Step by Step Installation Instructions Vertical Honeycomb Shades Customer Service 800.248.8888 or visit us online at smithandnoble.com Thank you for purchasing from Smith+Noble. Your new shades have been
Locks and Catches Catches and Furniture Bolts
 Magnetic catch with low noise closure Material: Plastic housing Version: with closed surface and internal magnet, magnets no viewable : Press fixing Pull 0. kg, for drilling hole Ø8 mm white 26.01.701
SLIDING DOORS DIRECT ROLLER
 SLIDING DOORS Single door fixed to wall NFK s Direct Sliding Door system, for installation to a solid wall. Height adjustable track supports can be quickly mounted to a wall allowing the glass to pass
Mount to the Wall INSTALLATION MANUAL
 Mount to the Wall 15 Locate the Wooden Studs This step applies to wooden stud wall installation only. Determine and mark the exact locations of two stud centers on the wall. Wooden studs should be spaced
THE CASCADE & SLINGER FUNSLIDES
 THE CASCADE & SLINGER FUNSLIDES ASSEMBLY AND INSTALLATION INSTRUCTIONS * * C A U T I O N * * S.R. SMITH CASCADE TM & SLINGER TM FUNSLIDES TM ARE MANUFACTURED FOR INSTALLATION AND USE ON RESIDENTIAL INGROUND
Determine the proper ground fixing stair position, by using, as a reference, the landing tread [Fig. 7].
![Determine the proper ground fixing stair position, by using, as a reference, the landing tread [Fig. 7].](/thumbs/82/86224479.jpg "Determine the proper ground fixing stair position, by using, as a reference, the landing tread [Fig. 7].") METAL SPIRAL STAIR MOUNTING INSTRUCTIONS - ENGLISH - PRELIMINARY OPERATIONS Prior to fitting your staircase, please check the packaging content. You then place all components onto a wide surface in order
METAL SPIRAL STAIR MOUNTING INSTRUCTIONS - ENGLISH - PRELIMINARY OPERATIONS Prior to fitting your staircase, please check the packaging content. You then place all components onto a wide surface in order
ATLANTIS RAIL HandiSwage Installation Instructions ATLANTIS RAIL Contact Information Atlantis Rail Systems November, 2013
 ATLANTIS RAIL HandiSwage Installation Instructions ATLANTIS RAIL Contact Information Atlantis Rail Systems November, 2013 Atlantis Rail s HandiSwage System is an easy to use cable railing product utilizing
assembly instructions
 door opens outwards door opens inwards front cubicle door opens outwards or inwards with side panel seite 1 ensure that the supplied parts are complete by checking the packing list. make sure that tools
DIY Lowery Inspired Embroidery Floor Stand
 DIY Lowery Inspired Embroidery Floor Stand Below find the details on how to build your own embroidery floor stand. The Lowery Floor Stand inspired this design. Note using the following instructions will
8030 Synergy Jeep JK Rear Long Arm Frame Brackets
 General Notes: SYNERGY MFG. 870 INDUSTRIAL WAY, SAN LUIS OBISPO, CA (805) 242-0397 8030 Synergy Jeep JK Rear Long Arm Frame Brackets These instructions are also available on our website; www.synergymfg.com.
Installation And Care Instructions. Vertical Honeycomb Shades
 Installation And Care Instructions Vertical Honeycomb Shades Rev 5/2013 Table Of Contents Getting Started... 3 Parts Overview... 4 Materials Required... 5 Tools Required... 6 Outside Mount Installation...
Steady Freddy Vinyl Gate REALLY. Important stuff to know about installing your WamBam gate
 Steady Freddy Vinyl Gate RELLY Important stuff to know about installing your Wamam gate. 1-877-778-5733 www.wambamfence.com CLEVER JOE Your Installation uddy This Gate is lso Designed to Fit the ig en
SUREWOOD ~ LNL. How to build a staircase like a pro. Post-To-Post Staircase System. Identify Your Type of Post-to-Post Staircase: Landing Newel Post
 How to build a staircase like a pro. 1 Identify Your Type of Post-to-Post Staircase: Post-To-Post Staircase System Post Post SUREWOOD ~ LNL Rake Wall Rail Level Run Open Staircase with Square Top alusters
Interactive Monitor Arm
 Interactive Monitor Arm Tools Required -5mm Allen wrench -Phillips screwdriver -Plastic mallet There are two ways to attach a Monitor Arm to a Full Frame; with a Beam, or with a Post Mount. Both methods
Installation Manual Using Existing Handrail Version 4.0 Oct 2017
 Installation Manual Using Existing Handrail Version 4.0 Oct 2017 ORDER OF ASSEMBLY TOOLS YOU WILL NEED - Fine Saw - Sander - Wood Filler - Allen keys - Screw Driver - Drill - Suitable Screws PROTECTING
General Guidelines:
 ASSEMBLY INSTRUCTIONS Congratulations on your new Patriot Dock purchase. This manual contains instructions to assemble basic dock configurations for use at typical residential shoreline application. Please
INSTALLATION AND CARE INSTRUCTIONS
 INSTALLATION AND CARE INSTRUCTIONS Vertical Applications Honeycomb Shades CONTENTS Introduction...2 Before You Begin...3 Vertical Application Parts Overview...4 Materials Required...5 Tools Required...6
Assembly Instructions for 12x16 Floating Dock
 Assembly Instructions for 12x16 Floating Dock www.rollingbarge.com Congratulations on the purchase of your Floating Dock kit. This kit includes all the aluminum frame parts, and all the fasteners. You
Deck Mount Installation with Bench
 Deck Mount Installation with Bench 1. Mark track with square. 2. Cut tracks with saw. 3. Drill ¼ hole (if needed.) 4. Countersink track. 5. Countersink all track 6. File all track ends. ends. 7. Lay out
Sunrise Deck Assembly Instructions for Kingston Left
 Sunrise Deck Assembly Instructions for Kingston Left It s easiest to build the deck frame first like it will be lying on its back and then after all 4 legs and horizontals are in place, tip the deck toward
TYPICAL STANDOFF GLASS RAIL ELEVATION TYPICAL SECTION RS0B20 WITH RECTANGULAR BACK PLATE TYPICAL STAIRS
 Revisions By: CRL SRS STANDOFF RAILING SYSTEM CRL GLASS RAIL S RS0B20 w/ RECTANGULAR BACK PLATE CRL'S GLASS RAIL S CAN BE USED FOR MOUNTING GLASS PANELS UP TO 3/4" (19 MM) IN THICKNESS. THE 4" X 8" (102
Swerve Rack CUSTOM RACKS AVAILABLE
 CUSTOM RACKS AVAILABLE Swerve Rack The design of the Swerve mirrors the bike frame, thus providing superior bike support while making it easy to secure both the bike frame and wheel with a standard u-lock.
00108/00110 INSTRUCTION MANUAL
 00108/00110 INSTRUCTION MANUAL Removable and Adjustable Mudflap System IMPORTANT! Exhaust Systems Note: Any modifications to the factory installed exhaust system may void your manufacturer s warranty.
KWS Handrail Systems. Architectural Hardware
 KWS Handrail Systems Architectural Hardware Technical Information KWS Handrail-Systems - the flexible solution System for handrails in stainless steel and timber Completely pre-assembled or single components
ASSEMBLY INSTRUCTIONS TF Tent Flooring System. 125 Taylor Parkway Archbold, Ohio Phone: (419) Fax: (419)
 Fax: (419)") 125 Taylor Parkway Archbold, Ohio 43502 Phone: (419) 445-8915 Fax: (419) 445-0367 www.biljax.com TF-2100 Tent Flooring System ASSEMBLY INSTRUCTIONS ALL DRAWINGS ARE FOR ILLUSTRATION ONLY Revision: 1 1/21/16
125 Taylor Parkway Archbold, Ohio 43502 Phone: (419) 445-8915 Fax: (419) 445-0367 www.biljax.com TF-2100 Tent Flooring System ASSEMBLY INSTRUCTIONS ALL DRAWINGS ARE FOR ILLUSTRATION ONLY Revision: 1 1/21/16
HOMECREST STYLE SLING 3J300 Installation Instructions
 1 HOMECREST STYLE SLING 3J300 Installation Instructions Before beginning, take careful note of how the chaise is assembled, particularly the adjustment hardware. An additional set of hands to help during
MODEL 200/220 ASSEMBLY INSTRUCTIONS
 V-Twin MFG. Coats Tire Changer VT Part No. 16-0510 This tool should only be used by a knowledgeable and trained motorcycle technician V-Twin Mfg. accepts no responsibility for improper use. MODEL 200/220
THE AquaBlast & RocketRide FUNSLIDES
 THE AquaBlast & RocketRide FUNSLIDES ASSEMBLY AND INSTALLATION INSTRUCTIONS * * C A U T I O N * * S.R. SMITH AquaBlast TM & RocketRide TM FUNSLIDES TM ARE MANUFACTURED FOR INSTALLATION AND USE ON RESIDENTIAL
ClearSpan Twist-of-the-Wrist Assembly Instructions
 ClearSpan Twist-of-the-Wrist Assembly Instructions Curved-Wall for Roll-Up Side Flat-Wall for Curtain Application 2008 ClearSpan All Rights Reserved. Reproduction is prohibited without permission. Revision
PowerLock. Installation Instructions. Attention Dealers: Please give this owners manual to the customer when the product is delivered.
 Serving the Truck & Trailer Industry Since 1944 FOR Attention Dealers: Please give this owners manual to the customer when the product is delivered. Call 800-535-9545 www.aeroindustries.com Indianapolis,
BEST PRACTICE GUIDE. Socket Bases. Working with Concrete Slabs
 Working with Concrete Slabs When working with concrete slabs the barrier protection can be erected in three ways - with socket bases, adjustable slab edge brackets and multi slab clamps. Socket Bases 1
Topo Freestanding Applications - Private Office
 4 3 2 Topo Freestanding Applications - Private Office Combo Wrench If you have a problem, question, or request, call your local dealer, or Coalesse at 1.800.627.6770 Or visit our website: www.coalesse.com
The Festival Assembly Instructions
 The Festival Assembly Instructions Toll Free: 866.768.8465 Hours: 9-5 Monday-Friday EST www.homeplacestructures.com Package ships as shown CONTACT INFORMATION: HomePlace Structures 301 Commerce Drive New
Clopay Models 835/837 Sliding Door System Installation Guide
 Clopay Models 835/837 Sliding Door System Installation Guide The aim of this instruction is to guide you through the process of construction and fitting of Sliding Doors. Due to the number of sizes available
x2 1/4 (6mm) Floor Anchor
 Floor Anchor") INSTALLATION GUIDE Main Components x1 Rail x5 Wall Spacer x2 Anti-jump Block x2 Straight Strap x1 Right Stopper x1 Left Stopper x5 5/16 (8mm x 60mm) Carriage Bolt x5 5/16 (8mm x25mm) Anchor x5 5/16 (8mm
INSTALLATION GUIDE Main Components x1 Rail x5 Wall Spacer x2 Anti-jump Block x2 Straight Strap x1 Right Stopper x1 Left Stopper x5 5/16 (8mm x 60mm) Carriage Bolt x5 5/16 (8mm x25mm) Anchor x5 5/16 (8mm
Track Rack. * Track Racks are not lockable
 The Track Rack s unique staggered, sliding hook design creates the greatest parking efficiency while still providing easy access to any particular bike. When adding or removing a bike to the rack, simply
a.k.a. casegoods instructions
 a.k.a. casegoods instructions a a.k.a. workwall installation IMPORTANT NOTES Failure to install product according to installation instruction will result in loss of warranty. Tools required for assembly
PO BOX 130 CLEAR LAKE, MN
 WWW.WALKSONWATER.COM PO BOX 130 CLEAR LAKE, MN 55319 320-743-3333 PARTS LIST FOR 30115# VERTICAL BOAT LIFT 2-Back Leg Uprights 1 right, 1 left (BL) 1-Front Leg Upright (FL) 1-Winch Leg Upright (WU) 2-Bottom