INSTALLATION INSTRUCTIONS
|
|
|
- Godwin Norris
- 6 years ago
- Views:
Transcription
1 INSTALLATION INSTRUCTIONS


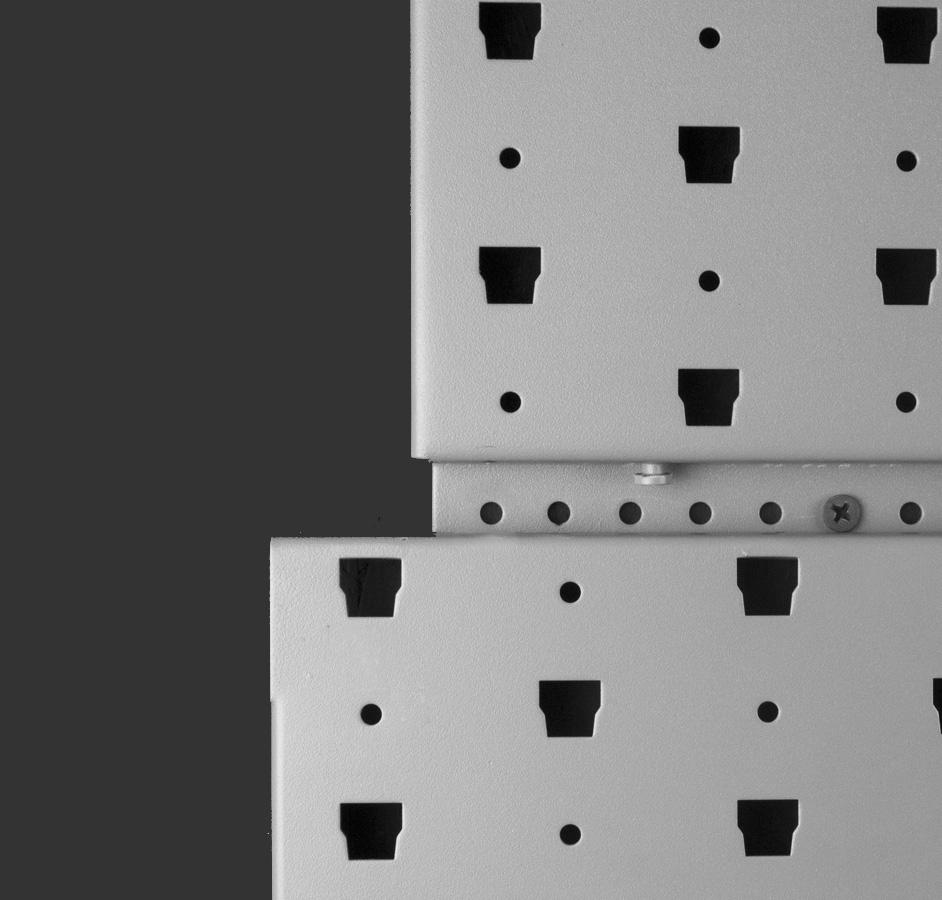
2 THANK YOU! Thank you for your purchase of a Gallow Technologies rack system! Watch a short video on how to install our innovative weapon storage solution by visiting the link: SB SCREWS WP SCREWS PANEL DIRECTION These screws are used to attach the wall panels (WP parts) to the support bar (SB parts). There are 4-6 pieces included depending on the width of the support bar. That is enough to secure the wall panel to the support bar. These screws are used to attached the hangers to the wall panels. We suggest laying out all the hangers and guns to make sure everything fits and looks like you want. Then remove the guns and secure the hangers to the wall panels using these screws. These screws are also used to attach some parts to the different hangers. For example, they are used to secure the base cups to the VH-SS hangers. The panel punch-outs need to look like the image above. This allows for rack accessories to be mounted properly and safely.


3 RACK INSTALLATION SPACING

 up.")
4 RACK INSTALLATION STEPS NOTE: The first step is indentifying the area you d like to install your rack. More than anything, THIS MUST be a secure location so your guns are safe and locked up away from anyone that should not have access to them. 1- PRE PLANNING When you are preparing to start the installation, make sure you have about 1" on the left hand side of the rack between it and the wall or cabinet etc... This will allow you to install the panels to each other. This will make more sense if you scroll down and see how they attach. 2- HANG SUPPORT BAR Put your first Support Bar (SB-36 or SB-72) up. Make sure it's level and the screws go all the way through into the 2x4's or wall supports. You will need to supply this hardware since we don't know what you are mounting to. NOTE: If you have custom cuts panels, its best to lay out the top row of your rack and get an exact width. This will make sure you center it properly on the wall where it will be installed. Because of how they mount, we leave about an inch open when making the custom cuts.


5 3- HANG FIRST WALL PANEL When you are preparing to start the installation, make sure you have about 1" on the left hand side of the rack between it and the wall or cabinet etc... This will allow you to install the panels to each other. This will make more sense if you scroll down and see how they attach. 4- SCREW BOTTOM OF WALL Put your first Support Bar (SB-36 or SB-72) up. Make sure it's level and the screws go all the way through into the 2x4's or wall supports. You will need to supply this hardware since we don't know what you are mounting to. NOTE: If you have custom cuts panels, its best to lay out the top row of your rack and get an exact width. This will make sure you center it properly on the wall where it will be installed. Because of how they mount, we leave about an inch open when making the custom cuts.


6 5- HANG NEXT SUPPORT BAR AND PANEL Now install your next Support Bar (either SB-36 or SB-72) and attach the first Wall Panel onto that. Make sure these panels are square and level to the Wall Panels on the first Support bar. If these need to be adjusted, the best way is to loosen the second Support Bar and just that up and down till all the Wall Panels are lined up. Once everything is good, screw in the bottom of the last 2 panels you mounted. 6- HANG LOWER PANELS Now connect your next row of Wall Panels to the bottom of the first row you just installed starting on the right side of the wall. There are mounting tabs on the bottom of the panels you just installed that fit into your next panel.


7 7- SCREW LOWER PANELS TO WALL Screw the bottom of that Wall Panel into the wall making sure to go into the 2x4's or wall supports. Do this till your rack is complete. 8- CONFIGURE & INSTALL Once the Panels are up, its time to configure and install all the hangers. Make sure they are all in the right place and fit your guns the way you want them. Use the supplied screws (short stubby ones) and secure the hangers onto the wall panels. If you have the trim strips, they can go installed now.
 ONE PANEL TWO PANEL THREE PANEL FOUR PANEL 26 50 74 98 TOTAL HEIGHT = 26 TOTAL HEIGHT = 50 TOTAL HEIGHT = 74 TOTAL")

8 RACK INSTALL HEIGHT FINAL INSTALL HEIGHT INCLUDING SUPPORT BAR & MOUNTING STRIP (WP or WP-24.23) ONE PANEL TWO PANEL THREE PANEL FOUR PANEL TOTAL HEIGHT = 26 TOTAL HEIGHT = 50 TOTAL HEIGHT = 74 TOTAL HEIGHT = 98 sales@gallowtech.com Scan the QR code on the right to watch a short video on how to install our innovative weapon storage solution. You can also go directly to the video by visiting the link:
Hatch Whiteboard: Portable Stand Installation Instructions
 Hatch Whiteboard: Portable Stand Installation Instructions Remove Projector Wall Plate 1. Open the wall mount for the projector. 2. Remove the shipping screw from the front center of the mount arm. 1 P
Aeon Series. EDGE FREE Fixed Frame Projection Screen. User s Guide
 Applies to all available screen materials: Aeon Series EDGE FREE Fixed Frame Projection Screen User s Guide CineGrey 3D, CineGrey and CineWhite Product Description: The Aeon Series is a fixed frame projection
Assembly Instructions
 1 27694 Trend Podium Assembly Instructions #27694 Trend Podium Part Drawing Description Qty Part Drawing Description Qty P-1 Base 1 EA Hardware List Screw M6x12mm 30 EA P-2 Right Side Panel 1 EA A2 Phil
Installation Instructions
 by Plato Woodwork Installation Instructions Plato Woodwork, Inc. 200 Third Street SW P.O. Box 98 Plato, MN 55370 www.platowoodwork.com 800.328.5924 SECTION GUIDE GETTING STARTED PAGE # Installation Methods...
Closet System Installation Manual
 Closet System Manual Thank you For choosing our Custom Closet Collection to fit all your needs Closets come fully assembled to make your project an enjoyable and satisfying experience. With quality Custom
How To Measure Your Finished Opening
 3000 Series Bifold Doors How To Measure Your Finished Opening MEASURE FROM RIGHT TO LEFT 2 PLACES (WIDTH) MEASURE FROM TOP TO BOTTOM 2 PLACES (HEIGHT) Tools Required for Assembly: Tools Needed: Phillips
======================================================================================== ( DR / DR) JK WRANGLER MOD RACK
 JK WRANGLER MOD RACK") (10984 4DR / 10982 2DR) JK WRANGLER MOD RACK INSTALLATION SHEET Important Notes: Some brands of windshield light brackets and snorkels may not be compatible with the 10984 MOD Rack System. Body lifts are
(10984 4DR / 10982 2DR) JK WRANGLER MOD RACK INSTALLATION SHEET Important Notes: Some brands of windshield light brackets and snorkels may not be compatible with the 10984 MOD Rack System. Body lifts are
Cabinet is 90% assembled, all you need to do is to attach the legs, lay the glass top on the cabinet, connect the faucet, drains & ptrap.
 Things you might need for the installation: vessel sink, plumber's putty(home depot), liquid nails(home depot), Bucket silicone caulk(home depot), Putty knife Plumber's putty Pipe wrench Channel-lock pliers
MANUAL e130. Wallstation
 MANUAL 07.29.13 e130 Wallstation The Enovate Medical e130 Wallstation was designed to set a new standard in quality. Enovate Medical s goal is to provide a wallstation that is ready for years of use,
LOCK ASSEMBLY INSTRUCTIONS
 LOCK ASSEMBLY INSTRUCTIONS Use the drawing below as a key to determine which lock assembly instruction to follow. There are three different types of locks used, and the instructions for each are on the
Installation Instructions for Zip Suspension Downlight with Remote Power and 4" Square or Round Canopy
 Doc # 90-ZS-SQ_0 W. Fullerton Chicago, IL 0 Ph:.0.9 Fax:.9. www.pureedgelighting.com info@pureedgelighting.com 0 PureEdge Lighting. All Rights Reserved. Installation Instructions for Zip Suspension Downlight
THE GREEN CLUB PROJECT
 tennis ball end cap finishing tape THE GREEN CLUB PROJECT duct tape How to make the ultimate recycled juggling club at home. BY JONATHAN POPPELE 16 or 20 oz bottle club body hardwood dowel collar finishing
Pet Door Panel Installation Manual
 Pet Door Panel Installation Manual 400-558-1 1 4/3/03, 3:26 PM Components: Pet Door Panel Panel Latch Assembly Foam Weather-stripping Glass Sweep (4) Binding Posts (6) #6 x 1/2 Sheet Metal Screws (4) 8-32
Assembly Instructions 10 X 10 Aluminum Frame Building
 Assembly Instructions 10 X 10 Aluminum Frame Building 27 97 9 8 47 36 74 52 10 10 X 10 Square Building W/ Dome Includes: The Steel Entry Door with a Dead Bolt Lock assembly and Aluminum Door Frame. Metal
INSTALLATION INSTRUCTIONS
 INSTALLATION INSTRUCTIONS TOOLS REQUIRED Rechargeable, variable speed drill 3/8 diameter drill bit 3 Robertson bits #0, #1 and #2 Slot screwdriver Non marring hammer with 1 head Level Caulk or sealant
Copyright 2009, Seymour Products LLC, All rights reserved. GET THE SCREEN, KEEP THE SOUND
 GET THE SCREEN, KEEP THE SOUND There are three boxes inside the outer box. The tube contains the screen, the large box contains the frame pieces, and the small box contains the small items. The corner
Walk-in Configurations
 Walk-in Configurations Includes Wall-to-Open, Corners, and Corner Rounder Bars INSTALLATION INSTRUCTIONS Tools needed: Tape measure, level, pencil, #2 Phillips head screw driver or power drill with a 6"
Make Your Own Personalized Clock!
 3-1-2010 This is info I got from a great site on-line called budget101.com. I have always wished there were clocks in the primary rooms. I got inexpensive plastic clocks at Wal-Mart for $4.00 each. After
Chicago Electric MIG B Gun Install
 Chicago Electric MIG 180 81295B Gun Install Step 1 First you will need to remove all the side panels on your machine. This is necessary to access everything for this install. Step 2 On the side with your
Copyright Black Box Corporation. All rights reserved Park Drive Lawrence, PA Fax
 Copyright 2004. Black Box Corporation. All rights reserved. 1000 Park Drive Lawrence, PA 15055-1018 724-746-5500 Fax 724-746-0746 JANUARY 2004 RF500A RF507A RF514A RF521A RF501A RF508A RF515A RF522A RF502A
Workbench Instructions for Assembly
 Workbench Instructions for Assembly FlexWorks is a trademark of Lista International Corporation. Making Workspace Work is a trademark of Lista International Corporation. Document Number: MD002A3 Print
Good In Shed. So Hutch for So Little! A perky shed to conceal homely garbage cans and frustrate furry scavengers.
 Good In Shed So Hutch for So Little! A perky shed to conceal homely garbage cans and frustrate furry scavengers. Materials: Tools 2x4 pressure treated or cedar 5-8' pieces 1/2" Exterior grade plywood 1-4x8
INSTALLATION INSTRUCTIONS
 www.marwincompany.com Kit Number Door Height Rough Opening Height KD200BB68 80 84 ½ KD200BB70 84 88 ½ KD200BB80 96 100 ½ INSTALLATION INSTRUCTIONS 200BB SERIES KD POCKET DOOR FRAME FOR 2 X 4 STUD WALLS
Heavy-Duty Bypass Track System
 Heavy-Duty Bypass Track System Please Note: This track system must be installed with the screws going into a solid surface such as studs or a header. Due to the spacing of the holes on these Brackets,
ULTRA SPACE SAVER SQUARED Installation Instructions
 Installation Instructions The Ultra Space Saver Squared has several steps for installation. Note that the single and double sided setups and parts are different. Make sure you follow the instructions according
INSTALLATION INSTRUCTIONS INS T A L L A TIO N INS T R U C TIO N S ROD IRON SCROLL HANGER R H
 INS T A L L A TIO N INS T R U C TIO N S ROD IRON SCROLL HANGER 10.5.2016 2-1- 3/16" 11/16" 8" 8 O 2-7/8 Ø2-7/8" 3-1/2 3-1/2" 12-9/16 12-9/16" PLEASE NOTE: These instructions are specific to a particular
Please read BOTH these Installation Instructions and the General Towing Instructions before attempting to install or operate this equipment.
 2005-08 Pontiac G6 GT Please read BOTH these and the General Towing Instructions before attempting to install or operate this equipment. 1. Blue Ox towing products and accessories are intended to be installed
Installation Manual for Metal Emperor Lockers
 P a g e 1 Table of Contents Page General Notes and Tools Required 2-3 Assemble Shelves with Coat Hooks/Coat Rods 4 Fastening Chart 5 Knock Down Locker Assembly (Banks of Three) 6-12 Appendix A: Dress End
LOFT DOOR HANGER BARN DOORS & HARDWARE. Hardware Installation Instructions. Page
 LOFT DOOR HANGER Page 1 Specifications 2 7/16" 3/8" 1-1/2 1-3/4 Ø3 3 7/8" 11-1/16 Page 2 Parts and Tools Tools Needed Tape Measure Pencil Drill with 1/8, 1/4 and 3/8 bits, 1 spade bit and Phillips bit
GearBoss II High Density storage
 Assembly/Owner s Manual GearBoss II High Density storage contents Safety...........................................2 General......................................2 Installation...................................2
INSTALLING YOUR SHUTTERS OUTSIDE MOUNT FULL HEIGHT SHUTTERS
 Shutters so good, you won t believe you ve done it yourself Installation is simple but a little preparation goes a long way to making it a smooth process. What You ll Have Shutter panels in big boxes Shutter
TRUCK BANNER INSTALLATION GUIDE
 TRUCK BANNER INSTALLATION GUIDE This method explains an inexpensive and easy way to install a vinyl billboard banner onto a box truck or trailer. This method uses simple tools and materials that you can
00108/00110 INSTRUCTION MANUAL
 00108/00110 INSTRUCTION MANUAL Removable and Adjustable Mudflap System IMPORTANT! Exhaust Systems Note: Any modifications to the factory installed exhaust system may void your manufacturer s warranty.
Assembly Instructions 10 X 10 Aluminum Roof Support
 Assembly Instructions 10 X 10 Aluminum Roof Support Aluminum Roof Support Bolt Package 16-5/16 X 2 ¼ SS Bolt 24-5/16 X 1 SS Bolt 40-5/16 SS Nylon Lock Nuts 16-5/16 SS Flat Washers 28-4 ½ Wood Screws 36-1
Billboard Installation Instructions
 Billboard Installation Instructions The 2012 billboard is a mandatory brand standard and replaces the old billboard sign. For easy installation, watch the video first! Scan the QR code below with your
MC-6 Cabinet / Work Center Assembly Instructions
 MC-6 Cabinet / Work Center Assembly Instructions Inspection Notice: Shipping damage is the responsibility of the freight company. Please inspect the cabinet for any visible signs of damage and notify the
Gambrel Barn with Overhang Manual
 Tools Needed: -Cordless Drill (12V or higher) -#2 Square Drive Bit -Hammer -6 Step Ladder -Tape Measure -Square utility knife w/ blade & hook blade -Speed Square Little Cottage Co. PO Box 455 Berlin, OH
EZ-SKIRT. Conveyor Skirting System. Installation and Users Manual. Manufactured by
 EZ-SKIRT Conveyor Skirting System Installation and Users Manual Manufactured by Nelson Williams Linings, Inc. 8330 Jasmine Street PO Box 476 Mountain Iron, MN 55768 218-741-1080 May 2011 INTRODUCTION The
INSTRUCTIONS FOR ATTACHING SUPERLITE SL27 / 37 / 47 / 57/37SS / 77 / 17K / 17C. RUBBER YOKES ( Art No ) TO HELMET RING ASSEMBLY
 TO HELMET RING ASSEMBLY") INSTRUCTIONS FOR ATTACHING SUPERLITE SL27 / 37 / 47 / 57/37SS / 77 / 17K / 17C RUBBER YOKES ( Art No. 112 271 001 ) TO HELMET RING ASSEMBLY These instructions are to be used as a basic guide for attaching
INSTRUCTIONS FOR ATTACHING SUPERLITE SL27 / 37 / 47 / 57/37SS / 77 / 17K / 17C RUBBER YOKES ( Art No. 112 271 001 ) TO HELMET RING ASSEMBLY These instructions are to be used as a basic guide for attaching
DeckRail A Product of DeckRite LLC 3912 East Progress North Little Rock, AR Phone: (501) Fax: (501)
 Fax: (501)") Disclaimer: Deck Rail Glass Railing Installation Guide This guide is not intended to replace a trained professional installer. The drawings and instructions contained within are for demonstration purposes
Disclaimer: Deck Rail Glass Railing Installation Guide This guide is not intended to replace a trained professional installer. The drawings and instructions contained within are for demonstration purposes
IDR assembly instructions:
 IDR assembly instructions: Required Tools: 2 X 12mm Open End Wrench 14mm open end wrench #2 Phillips Head Screw Driver (Drill with adjustable torque clutch recommended) 8mm nut driver (Supplied in IDR-AK)
Frameless Bypass Slider
 INSTALLATION INSTRUCTIONS Frameless Bypass Slider QCI-5301 Heavy Glass Bypass Slider with Exposed Rollers QCI5301 Rev 0 Page 1 Certified 11/1/2016 Tools: To install your New Shower Enclosure, you may need
How to make a numeral roll
 How to make a numeral roll A numeral roll shows the numerals in order with each numeral in a box. The numeral roll shown here uses color coding to emphasize the family decade. Specifically, the numerals
Flush Trimmer Jig By Santanu Lahiri
 Flush Trimmer Jig By Santanu Lahiri I found this jig in a book published by the Fine Woodworking people: Ingenious Jigs And Shop Accessories, publisher Taunton Press, ISBN# 1-56158-296-4. The Author is
western window systems westernwindowsystems.com installation instructions non-pocket 2-1/4 panels
 series 2600 multi-slide non-pocket 2-1/4 panels windowsystems.com windowsystems.com movement, which can cause warping and other problems. Frame kit components: Each door will have a head assembly, a threshold
Installation Instructions
 Installation Instructions 000964 Revision F Installation Instructions for PIRIT Read this manual fully prior to starting installation. Call American eating Customer ervice with any questions. What you
Item #BUILD SHED. build your shed today HOW TO BUILD A SHED. Copyright windows.
 WWW.SHED-WINDOWS.COM build your shed today Item #BUILD SHED HOW TO BUILD A SHED www.shed-windows.com 1 These shed plans will show you how to build a 10 x14 storage shed using T1 11 for sheathing and asphalt
Installation Guide. Tel: (519) Railway St. P.O Box 668 Seaforth, ON Canada N0K 1W0
 Railway St. P.O Box 668 Seaforth, ON Canada N0K 1W0") Installation Guide Tel: (519) 527-2470 92 Railway St. P.O Box 668 Seaforth, ON Canada N0K 1W0 www.sunnorth.com Table of Contents...1 I. Table of Contents... 2 II. Installation Preparation... 2 Items Included...
Installation Guide Tel: (519) 527-2470 92 Railway St. P.O Box 668 Seaforth, ON Canada N0K 1W0 www.sunnorth.com Table of Contents...1 I. Table of Contents... 2 II. Installation Preparation... 2 Items Included...
NORMAN SHUTTERS INSTALLATION INSTRUCTIONS. 4 sided Deco Frame. (Outside Mount - 2 Panel) Getting Started
 Getting Started") NORMAN SHUTTERS INSTALLATION INSTRUCTIONS 4 sided Deco Frame (Outside Mount - 2 Panel) Getting Started Recommended Tools: Nail Gun or Drill, Tape Measure, Torpedo Level, Box Knife, 6 Philips head driver
NORMAN SHUTTERS INSTALLATION INSTRUCTIONS 4 sided Deco Frame (Outside Mount - 2 Panel) Getting Started Recommended Tools: Nail Gun or Drill, Tape Measure, Torpedo Level, Box Knife, 6 Philips head driver
INOVO 2-LITE SLIDING PATIO DOOR
 INOVO 2-LITE SLIDING PATIO DOOR ASSEMBLY AND INSTALLATION INSTRUCTIONS IMPORTANT: READ THE INSTRUCTIONS AND FAMILIARIZE YOURSELF WITH THE DOOR PARTS AND PIECES BEFORE BEGINNING ASSEMBLY AND INSTALLATION.
JML " STOP. 254cm. 121lbs 55kg. AVF Group Ltd. Hortonwood 30, Telford, Shropshire, TF1 7YE, England. Leaflet No.
 JML8450 STOP Leaflet No. 464235 rev01 ## Read through ALL instructions before commencing installation. If you have any questions about this product or issues with installation contact the customer services
1 PREPARE HEADER AND ROUGH OPENING
 CONTENTS. HEADER & TRACK ASSEMBLY. END BRACKET PLAIN 3. FLOOR PLATE.. 8. 4. SPLIT STUD 6 5. CARRIER (987) 6. QUICK RELEASE PLATE (960) 7. DOOR GUIDE SET (9883) 3. 4. 7. 8. BUMPER KIT (988) 9. #8 X 3/4
Sentinel Series Cigar Humidor End Tables
 Sentinel Series Cigar Humidor End Tables Assembly Instructions Models: Sentinel 500, 1000 and 1500 Style: Traditional SENTINEL ASSEMBLY INSTRUCTIONS Congratulations! You have purchased a superior cigar
L182 - Installation Sheet Modular Wine Rack ( Wall Mount )
") Modular Wine Rack ( Wall Mount ) 1A 1B 2B 2A Cross Bar Options: 1A 2A 1B 2B Modular Wine Rack ( Wall Mount ) Parts Rail LED arm modules Wine bottle cross bars Rail cover Setscrew cover 1) Drill holes and
Modular Wine Rack ( Wall Mount ) 1A 1B 2B 2A Cross Bar Options: 1A 2A 1B 2B Modular Wine Rack ( Wall Mount ) Parts Rail LED arm modules Wine bottle cross bars Rail cover Setscrew cover 1) Drill holes and
PACKING LIST MACO V-5000
 PACKING LIST MACO V-5000 PART QTY O.D. SIZE LENGTH DESCRIPTION CHECKLIST T47P 4 5/8.050 36 Aluminum Tubing _ T43P 1 7/8.050 48 Aluminum Tubing _ T18P 1 3/4.050 48 Aluminum Tubing _ T15P 1 5/8.050 48 Aluminum
Box Track INSTALLATION INSTRUCTIONS
 Box Track INSTALLATION INSTRUCTIONS BOX TRACK Recommended Tools Level Tape Measure Pencil Drill with 1/8, and 1/4, Drill Bits, Phillips Bit and Slotted Bit Socket Wrench with 9/16 Socket 9/16 and 5/8 Wrench
Hodedah ASSEMBLY INSTRUCTION HI K78 (MICROWAVE CART)
") ASSEBLY INSTRUCTION HI K8 (ICROWAVE CART) ~ Before assembly, please read the instructions ~ ~ Keep these instructions for future reference ~ ~ Follow these steps to assemble the icrowave Cart ~ FRONT VIEW
ASSEBLY INSTRUCTION HI K8 (ICROWAVE CART) ~ Before assembly, please read the instructions ~ ~ Keep these instructions for future reference ~ ~ Follow these steps to assemble the icrowave Cart ~ FRONT VIEW
Studio Face Xtreme 6020 Installation Instructions (Nickel , Black )
") Packing List Face Trim (4 Pieces) (3) Hanging Brackets (9) 3/16 x 1-1/4 Masonry Screws 9/64 Drill Bit Compatibility (2) Lower Brackets w Magnets (2) Lower Facing Plates (4) 2 Drywall Screws Trim Hardware
Packing List Face Trim (4 Pieces) (3) Hanging Brackets (9) 3/16 x 1-1/4 Masonry Screws 9/64 Drill Bit Compatibility (2) Lower Brackets w Magnets (2) Lower Facing Plates (4) 2 Drywall Screws Trim Hardware
Ripple Hanger ASSEMBLY INSTRUCTIONS
 Ripple Hanger ASSEMBLY INSTRUCTIONS RIPPLE HANGER Recommended Tools Drill with 1/8, 1/4, and 1/2 Drill Bits, 1-1/8 Forstner Bit or 1-1/8 Spade Bit, and Phillips Bit 9/16 and 5/8 Combination Wrench Socket
Frameless Fixed Panel Slider
 INSTALLATION INSTRUCTIONS Frameless Fixed Panel Slider QCI-5279 SINGLE ROLLER WITH ANTI-JUMP DOUBLE ROLLERS QCI5279 Rev Page Certified 08/09/6 Tools: To install your New Shower Enclosure, you may need
KIT ASSEMBLY INSTRUCTIONS
 KIT ASSEMBLY INSTRUCTIONS We have designed these instructions as a stepby step procedure to simplify the assembly process. Nevertheless, we do recommend including someone with carpentry expertise on your
08+ KAWASAKI KLR PD NERF
 08+ KAWASAKI KLR PD NERF 0505-1299 Before you begin, place the bike on a hard level surface where you have room to work. Lay out the parts included in this kit and compare to the parts list on page 5 of
Introduction. Depending on your kennel project, you may have some or all of the following hardware: Part # Description Part # Description 1468
 Introduction Thank you very much for your investment in Mason kennels. We take great pride in providing our customers with the highest quality animal enclosures combined with an enjoyable ordering experience.
M4800 and M4800A Patch Panel Instructions
 Instruction Sheet 860462118 M4800 and M4800A Patch Panel Instructions General The M4800 and M4800A modular panels are highly flexible 48-port patch panel assemblies available in GigaSPEED, PowerSUM, or
CUSTOMER SERVICES HELP LINE NUMBER: +44 (0) (UK) (USA)
 (UK) (USA)") 465157 rev00 STOP ## Read through ALL instructions before commencing installation. If you have any questions about this product or issues with installation contact the customer services help line before
465157 rev00 STOP ## Read through ALL instructions before commencing installation. If you have any questions about this product or issues with installation contact the customer services help line before
Trim (Aluminum Substrate)
") CEILING SYSTEMS Between us, ideas become reality Trim (Aluminum Substrate) GENERAL Description WoodWorks Trim (aluminum substrate) is a unique system designed for use with Tegular, Vector, Linear and Channeled
CEILING SYSTEMS Between us, ideas become reality Trim (Aluminum Substrate) GENERAL Description WoodWorks Trim (aluminum substrate) is a unique system designed for use with Tegular, Vector, Linear and Channeled
Decorative Black Wall Hanging Quilt
 Decorative Black Wall Hanging Quilt Interactives has done it once again with a new plug-in. The new Decorative Quilting designs will motivate you with more inspiring possibilities than ever before. Unleash
WINE DISPENSING SYSTEM MODEL: DYWS4
 WINE DISPENSING SYSTEM MODEL: DYWS4 Trim Kit Part Number AWSTK24 INSTALLATION INSTRUCTIONS IMPORTANT: The wine dispensing utilizes a thermo-electric cooling system that can normally cool the bottle bay
System 3000 specifications
 System 3000 specifications Scope: Materials: Type of Bookstack: This specification covers delivery and installation of steel library shelving of the bracket type. Height, depth and accessories shall be
1 Mini Charm Pack {Nest by Lella Boutique} 2 Fat quarters of coordinating fabric (each a different print) 1/4 yard binding fabric
 1/4 yard binding fabric") Hi! It's Kristina from Center Street Quilts and today I'm sharing a fun way to use those darling mini charm packs we all love to collect. The Vinyl Project Pouch is a quick make that you'll love storing
Hi! It's Kristina from Center Street Quilts and today I'm sharing a fun way to use those darling mini charm packs we all love to collect. The Vinyl Project Pouch is a quick make that you'll love storing
Please read BOTH these Installation Instructions and the General Towing Instructions before attempting to install or operate this equipment.
 Serial Number BX3231 2005-08 Pontiac G6 GT Please read BOTH these and the General Towing Instructions before attempting to install or operate this equipment. 1. Blue Ox towing products and accessories
INS T A L L A TIO N INS T R U C TIO N S HORSESHOE W/ BAR HANGER
 INS T A L L A TIO N INS T R U C TIO N S HORSESHOE W/ BAR HANGER 6-1/2" 5" 2-7/16" 3-7/16" Ø2-7/8" 4-7/8" 11" 2" 3/16" 1/2" HORSESHOE W/ BAR S P ECIFICATIONS PARTS AND TOOLS Tools Needed Tape Measure Pencil
SpeedCell Installation Instructions
 SpeedCell Installation Instructions ***Installation typically requires two people*** Required Tools 1 2 3 (3a) 5 6 7 7(a) 8(a) 8(b) 8(c) 1. Philips Screw Driver 2. Crescent Wrench 3. 3/8 Socket Wrench
Sliding Door Kit
 YOU MUST READ THIS DOCUMENT BEFORE YOU BEGIN TO ASSEMBLE THE DOOR KIT. Thank you for purchasing this GrowSpan door kit. When properly assembled and maintained, this product will provide years of reliable
Installation Guide 888-4WB TRAY
 Installation Guide WBT has pioneered the innovation of cabletray/basket tray in the last decade. Products such as Shaped Tray, PreForm, WBTForm and NoSplice have allowed users and installers to provide
Corner Entertainment Center Plans
 Table of Contents Introduction... 3 Let s discuss the tools needed... 3 Let s discuss the materials needed... 4 Let s build it... 4 Attaching the 2x2's... 7 Determine the shelf spacing... 9 Scribing the
Wall Panel Installation Instructions
 Panel Installation Instructions Demolition - Common Tools Needed Reciprocating Saw Allen Wrench Set Hole Saw Set Pry Bar Dust Pan and Brush Putty Knife / Scraper Hex Bit Socket Set All Necessary Safety
Project Plans Kreg Tool Company / BuildSomething. All Rights Reserved.
 BY Project Plans HARDWARE ORGANIZER How easy is it top keep screws, hardware, and other small items organized instead of in the way? Just cut six identically sized pieces of plywood, add a 1x2 cleat, and
INSTALLATION INSTRUCTIONS INS T A L L A TIO N INS T R U C TIO N S THE MAVERICK HANGER R H
 INS T A L L A TIO N INS T R U C TIO N S THE MAVERICK HANGER 10.6.2016 PARTS INSTALLATION SPECIFICATIONS AND TOOLS INSTRUCTIONS 2-1/4" 2-7/8 11-3/8" 1/4" 2-1/8 PARTS INSTALLATION AND INSTRUCTIONS TOOLS
A524 ASSEMBLY & INSTALLATION INSTRUCTIONS BELLADONNA PENDANT CASTLETON, VERMONT USA SYNCHRONICITYLIGHTING.COM Rev A 1 OF 7
 1 OF 7 COMPONENT PARTS A B Canopy Mounting Bracket C Anchor (4) D #10 Wood Screw (4) E F G H Safety Cable Ground Screw Cupped Washer Safety Cable screw I Gripper (2) J Barrel Knob (4) K L Lightbar Fixture
JVice Care and Maintenance Thanks for purchasing a Jvice. If properly looked after your Jvice will give a lifetime of tying pleasure.
 JVice Care and Maintenance Thanks for purchasing a Jvice. If properly looked after your Jvice will give a lifetime of tying pleasure. Although it is manufactured from highest quality materials any metal
6 Foot/ 1800mm Aisle Width Net-Contain Aisle Containment for N-Type and S-Type Cabinets
 6 Foot/ 1800mm Aisle Width Net-Contain Aisle Containment for N-Type and S-Type Cabinets Panduit Corp. 2016 INSTALLATION INSTRUCTIONS Page 1 of 36 Component Guide for Doors Dual Sliding Containment Door
" BASE CABINET
 INSTALLATION GUIDE INSTALLATION GUIDE Before You Begin Installing Your Kitchen Cabinets 1. Read through installation guide to understand all steps and gather tools needed. 2. Verify that all of the hardware,
INOVO 4-LITE SLIDING PATIO DOOR ASSEMBLY AND INSTALLATION INSTRUCTIONS
 INOVO 4-LITE SLIDING PATIO DOOR ASSEMBLY AND INSTALLATION INSTRUCTIONS IMPORTANT: READ THE INSTRUCTIONS AND FAMILIARIZE YOURSELF WITH THE DOOR PARTS AND PIECES BEFORE BEGINNING ASSEMBLY AND INSTALLATION.
Simple Electric Hurricane Lamp No Open Flame to Worry About
 Simple Electric Hurricane Lamp No Open Flame to Worry About casestudy@mponstage.com Hello, I m John Maurer, artistic director of MPOnStage and in today's case study we will be talking about creating a
Installation Instructions
 Installation Instructions 30 Built-In Wall Oven with Microwave JTP86, JT965 If you have questions, call 1.800.GE.CARES or visit our website at: ge.com Before You Begin Read these instructions carefully
UNIT 12: INTERIOR DOORS AND TRIM
 KEY CONCEPTS 1. Identify tools needed for finishing and trim work 1. Cabinet and door hardware 2. Installation of doors 2. Identify common finishing tasks (trim, shelves, doorstops, bath accessories, etc.)
Revised
 Indentify Non-powered panels and separate from Powered panels. Non-powered panel shown at left.. Powered panel shown at left has powerway mounted at factory. Also separate panels by surface type, width
4-lite Patio Door. Installation Instructions
 4-lite Patio Door Installation Instructions IMPORTANT: Read the instructions and familiarize yourself with the door parts and pieces before beginning assembly and installation. Note: Only the 5-0 x 6-8
PULL-THRU USER S MANUAL
 PULL-THRU USER S MANUAL G14x Part # 310 120 177 G20 Part # 310 120 188 G20x Part # 310 120 186 G40x Part # 310 120 163 TABLE OF CONTENTS SECTION 1 PCB DESIGN AND MOUNTING SECTION 2 MOUNTING ADAPTER TO
SINGLE TRACK BYPASS (patent pending) barn door hardware
 barn door hardware") SINGLE TRACK BYPASS (patent pending) barn door hardware Installation Manual What is included in your kit: Part number Part name Quantity 1 Inner door hanger 2 2 Outer door hanger 2 3 5/16 x 1.5 lag bolts
SINGLE TRACK BYPASS (patent pending) barn door hardware Installation Manual What is included in your kit: Part number Part name Quantity 1 Inner door hanger 2 2 Outer door hanger 2 3 5/16 x 1.5 lag bolts
Aeon CLR Series EDGE FREE CLR Fixed Frame Screen w/ StarBright CLR (Ceiling Light Rejecting ) Front Projection Material
 Front Projection Material") Aeon CLR Series EDGE FREE CLR Fixed Frame Screen w/ StarBright CLR (Ceiling Light Rejecting ) Front Projection Material User s Guide Product Description: The Aeon CLR Series is an ultra-short throw fixed
Aeon CLR Series EDGE FREE CLR Fixed Frame Screen w/ StarBright CLR (Ceiling Light Rejecting ) Front Projection Material User s Guide Product Description: The Aeon CLR Series is an ultra-short throw fixed
NetRack. Please take a moment to make sure that you received everything that s included with your order. Each product is described below.
 What You Should Have Received NetRack DECEMBER 2002 RM500A-R3 RM507-R2 RM501-R3 RM508-R3 RM502-R2 RM314 RM503-R3 RM315-R2 RM505A-R3 RM615-R2 RM506-R3 Please take a moment to make sure that you received
2-PIECE STAIRWAY ASSEMBLY
 REVISED 2/12/15 2-PIECE STAIRWAY ASSEMBLY STEP 1: LAY OUT THE RIGHT AND LEFT SIDE TOP AND BOTTOM RISER PANELS AS SHOWN IN FIGURE 1. BOLT THE SPLICE PLATE (#15114C for OSHA F SERIES; #15412C for BOCA U
S H E L V I N G. More Value. More Options. More Quality ... A N D I T A S S E M B L E S I N A S N A P!
 A U R O R A Q U I K - L O K S H E L V I N G More Value More Options More Quality...... A N D I T A S S E M B L E S I N A S N A P! M O R E S T O R A G E, M O R E S P A C E Versatile Aurora Shelving for
PLANS BY TOM BURY MURPHY WORKTABLE TOTAL DIMENSIONS: FOLDED UP 30 X 48 X 0 FOLDED DOWN 30 X 58 X 84
 MURPHY WORKTABLE TOTAL DIMENSIONS: FOLDED UP 30 X 48 X 0 FOLDED DOWN 30 X 58 X 84 MATERIALS LIST: (2) 2 x8 x8 (3) 2 x4 x8 (1) 1 x2 x8 (1) 48 x96 3/4 plywood (2) 1-1/2 x30 continuous hinge (1) Left-side
JML " rev03 STOP. 121lbs 55kg. 254cm. AVF Group Ltd. Hortonwood 30, Telford, Shropshire, TF1 7YE, England
 JML8451 STOP 464236 rev03 Read through ALL instructions before commencing installation. If you have any questions about this product or issues with installation contact the customer services helpline before
Architectural Cable Railing Products
 Architectural Cable Railing Products August 1, 2017 ISO Certified U.S.A. Manufacturer www.ultra-tec.com TABLE OF CONTENTS ULTRA-TEC RAILING PRODUCTS Cable Type and Size... 3 Options for How to Receive
Wine Rack Assembly Instructions. Soffit Arch
 Wine Rack Assembly Instructions Soffit Arch Congratulations! You have purchased the finest wine racking available anywhere. Properly assembled, these Vigilant wine racks will outlast even your finest wines.
ASSEMBLY INSTRUCTION FOR WYTHE BURLED WOOD BAR
 ASSEMBLY INSTRUCTION FOR WYTHE BURLED WOOD BAR IMPORTANT SAFETY INSTRUCTIONS: Please read all instructions carefully before assembling. For your safety, assembly by two or more adults is strongly recommended.