Note: This is a draft chapter and is not for distribution.
|
|
|
- Lorraine Banks
- 6 years ago
- Views:
Transcription
 in Lexington, Ky., I bought a shiny red metallic toolbox, a hammer, screwdrivers and a miter box.")
1 Boarded Tool Chest Note: This is a draft chapter and is not for distribution. Every household even those devoid of a proper woodworker needs a tool chest. On the day we closed on our first house (correction: slightly frightening shell) in Lexington, Ky., I bought a shiny red metallic toolbox, a hammer, screwdrivers and a miter box. That metal box filled up within a month of work on the house and soon my tools took up two kitchen cabinets. A tool chest like this would have been a far superior choice, and it was in the range of my fresh-out-of-college skills (e.g. getting hammered and trying to nail something). This chest is based on a lot of agricultural examples I ve studied at antique stores, in private collections and at museums. It is designed to hold a kit of tools you need to maintain a household, farm or to begin woodworking. It is long enough to hold full-size handsaws which were more common than the panel saws used by joiners plus any planes, levels or bigger tools

2 you might need. And the two sliding trays and interior racks can swallow all the little hand tools. It s a great choice for a person who starts work on his or her house and makes the jump to furniture-maker the path that most North American woodworkers seem to take. How it s Built This chest is simple but, if made with care, stout enough to last a couple hundred years. The ends, front and back are rabbeted, glued and nailed and the type of nail you choose is the key to the chest s long life. The bottom is simply nailed to the underside of the carcase to make it easy to replace the bottom boards should they rot. As further protection against rot, there are two water-resistant rot strips screwed to the bottom to lift the chest off a wet floor. The lid is a simple panel of wood with a batten screwed on at either end. The battens help keep the lid flat and also repel dust from penetrating your chest. Inside the chest are two sliding trays also nailed together that slide on oak runners secured to the interior walls of the chest.
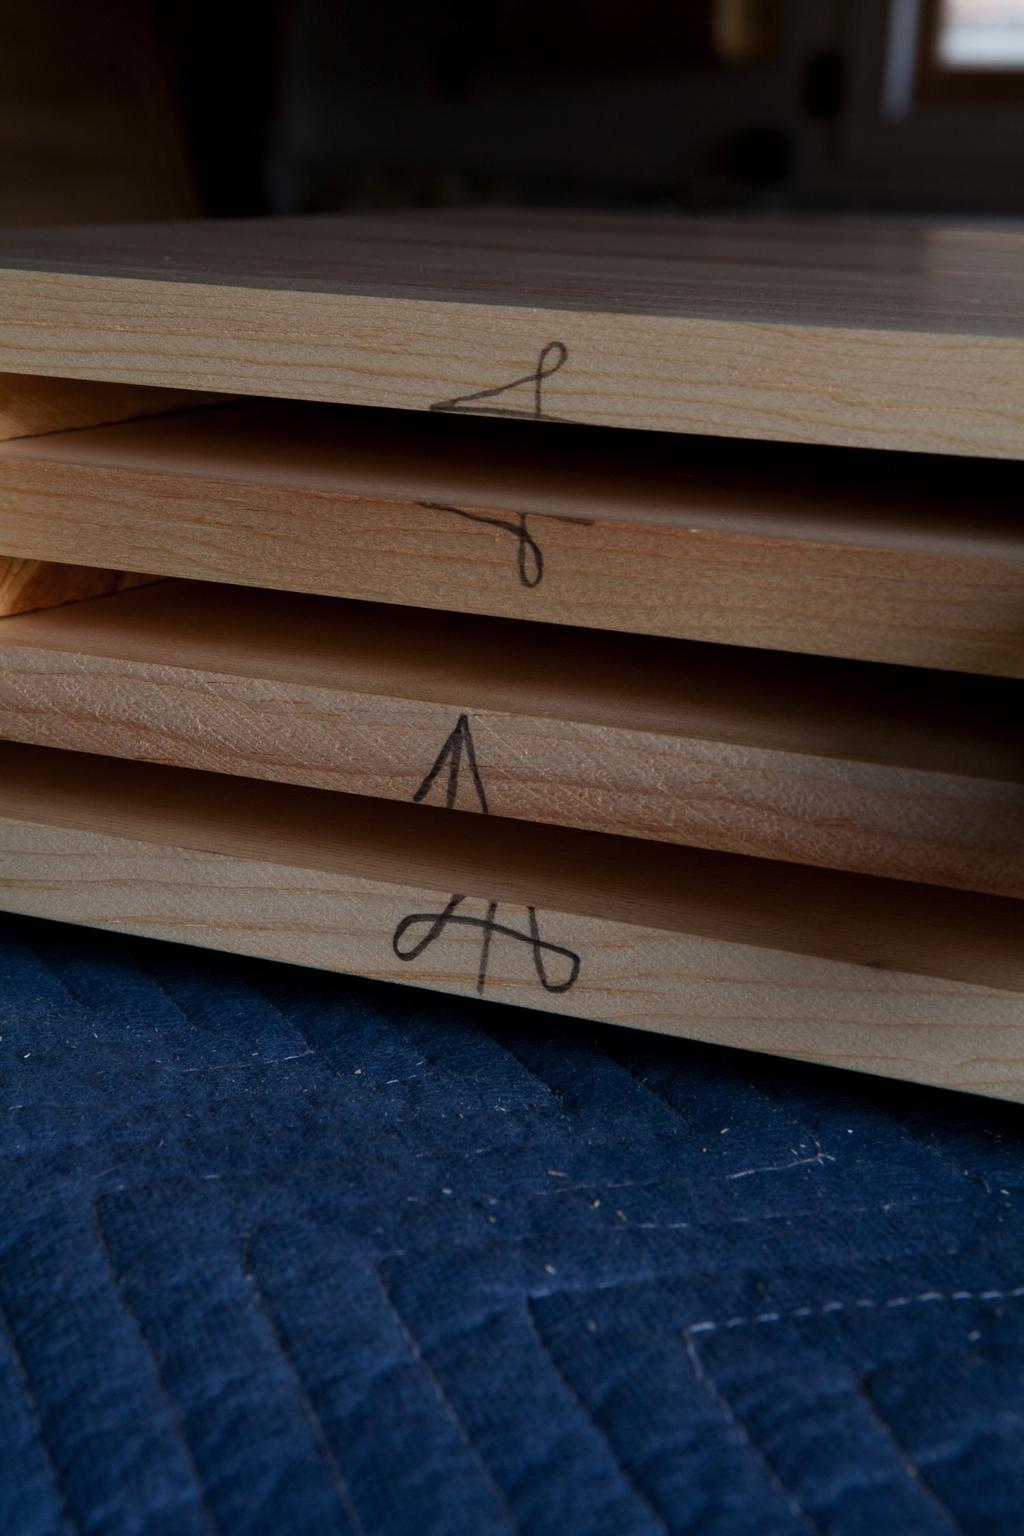
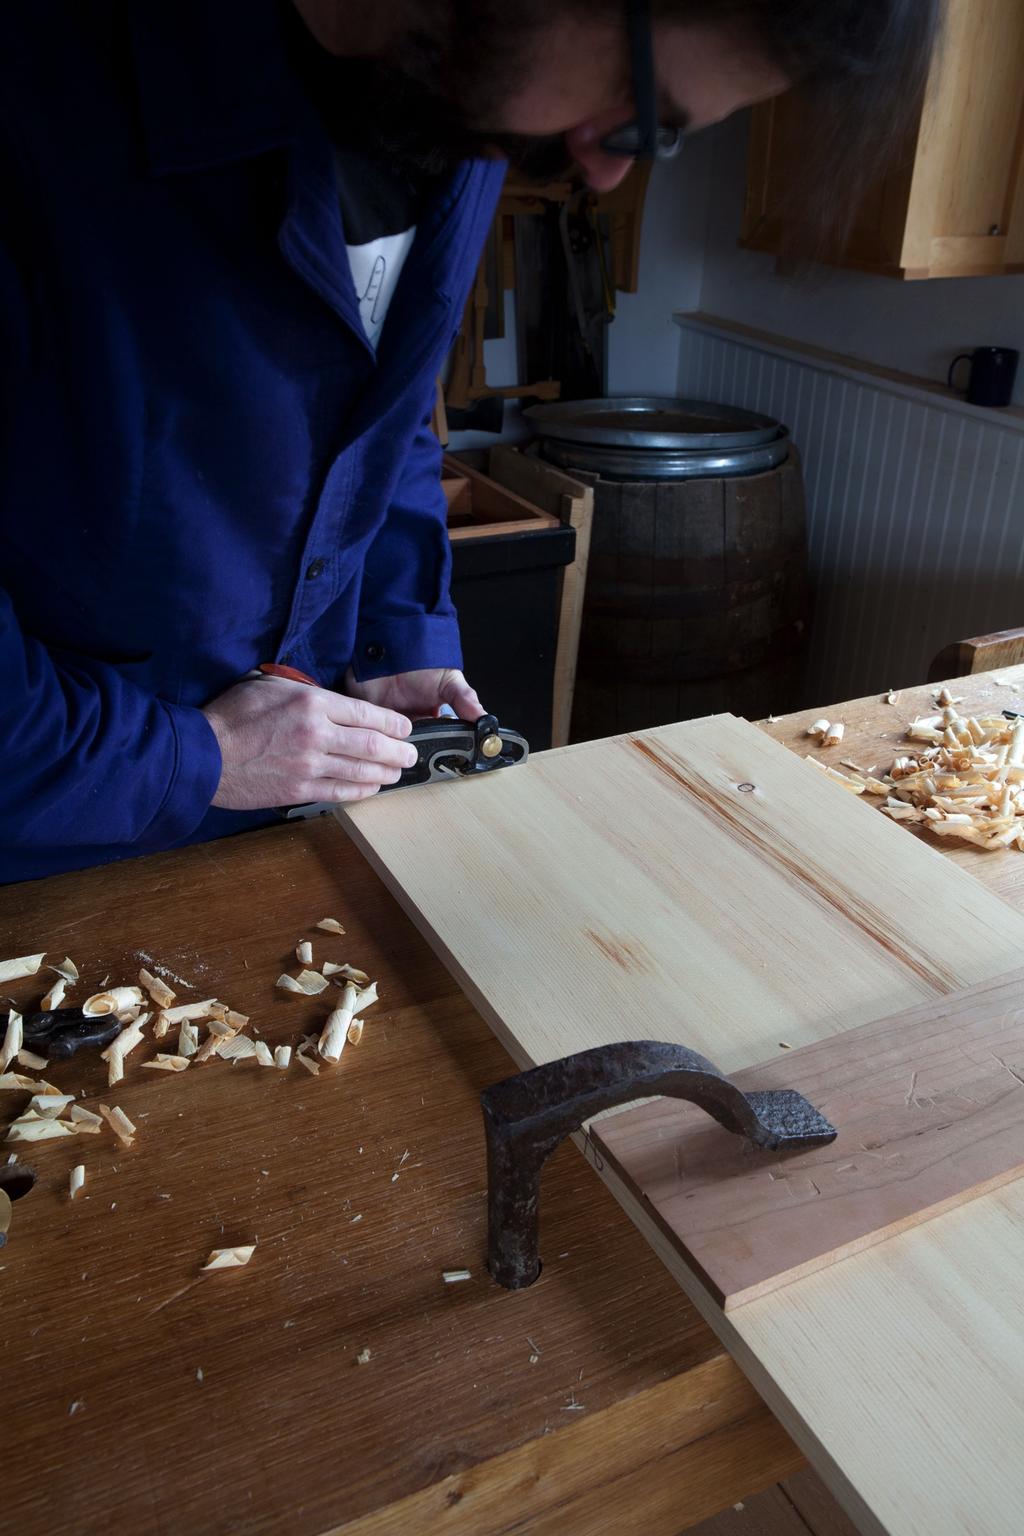
3 Woods for Building Chests To make the chest easy to move, use the lightest-weight species you can find. My first choice: One of the white pines. Clear cedar or cypress are almost as good. If you come up empty-handed, poplar will do. Tool chests get moved around. Even if you are a stay-at-home woodworker, you want a lightweight chest. That said, there are a few bits and pieces of the chest that need to be resistant to water, wear and whacking. The rot strips take the most abuse. Consider using white oak or even something exotic (purpleheart or teak) if you have some scraps lying about. The runners and the bottoms of the trays needs to resist wear, so white oak is a good choice for these thin bits. And the battens that restrain the lid need to be straight and stout oak again. Prepare the Panels Dress the stock for the front, back and end panels. If you need to glue up narrower boards to make your panels, see One Panel; One Clamp at <DIRECTION>. Cut the panels to width and length and remove any machine marks with a handplane. <INSERT edge jointing sidebar here> Before cutting any joinery, mark the four panels using a cabinetmaker s triangle, a simple but effective marking system that will reduce the chance of an error at joinery or assembly.
4
5 Two triangles. Mark the triangles on the top edge of your panels. Each triangle should point toward the front of the chest and be marked when the panel and its opposite part are placed together. Now lay out the rabbets on the ends of the front and back panels. The 3/4 - wide x 3/8 -deep rabbets will strengthen the corner joint and assist you when you align your corners at assembly time. This rabbet is cut across the grain of the panels, so you need to prevent the joint s shoulder from splintering as you cut it. A moving fillister plane has a nicker that knifes in a clean shoulder before the iron levers out the waste. So it s the best choice for this joint. Even if you use a moving fillister, I recommend you also use a cutting gauge to define the waste. The cutting gauge s lines act as further insurance against splintering. Plus they will point out if your plane s fence or depth stop have moved during the operation.

6 Extra step. Scribe in the width and depth of your rabbet with a cutting gauge. Then use these lines to guide you as you fine-tune the setting of your moving fillister plane. Even the best moving fillister planes are fussy. The tool s iron and nicker need to be in perfect alignment and extend out from the body of the tool the
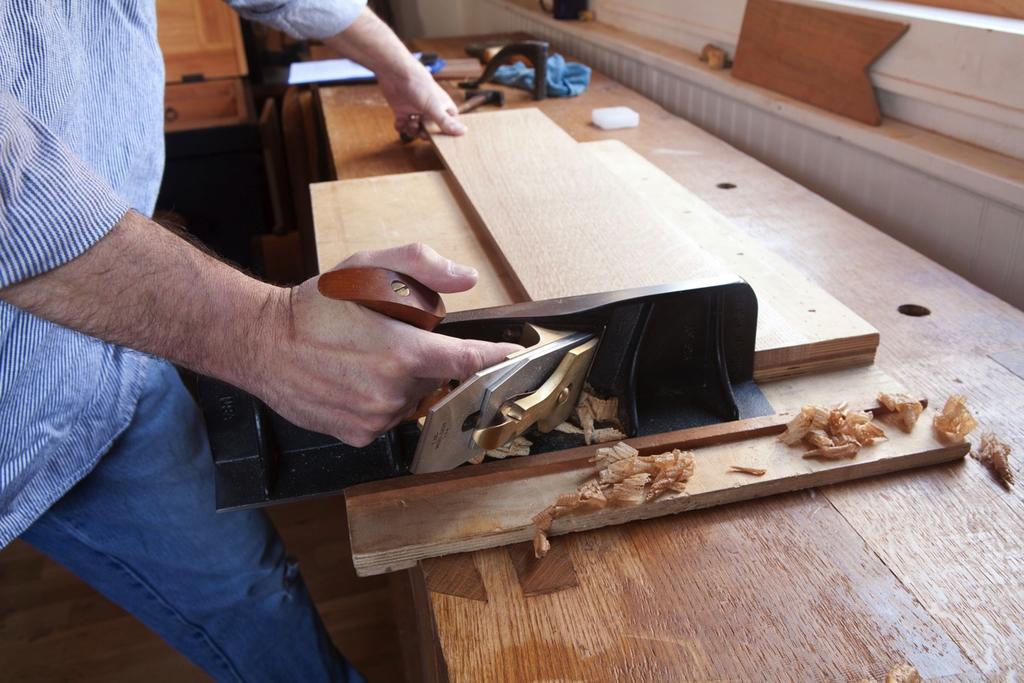
7 tiniest amount so the plane will cut a square shoulder. The fence and depth stop can slip. And even if they don t slip, they won t save you from making a sloping, out-of-90 rabbet. Making square rabbets requires practice and (until you are good) continuous inspection as you make the joint. How you hold the tool is important. The fingers at the front of the tool should press the fence against the work. That hand s thumb should be in front of the mouth of the tool. That hand at the rear of the tool should push the plane forward only. If you grip the tool too tightly you will tilt it and cut a sloping rabbet.
8
9 Head games. Get your head over the tool and use your hands to crowd the body of the tool against the work. Also important: Where you put your head. It sounds odd, but you are much less likely to tilt the tool if your head is over the tool and you are looking at the place where the tool s sidewall and the joint s shoulder meet. Get in position. Start the tool at the far end of the work and pull it backward toward you. The nicker and your scribe line should be one and the same. If they aren t, you need to adjust the plane s fence. If they are the same, then push the tool forward. When working across the grain you can take a thick shaving with ease. I usually start with a slightly thinner shaving on the first rabbet to make sure everything is in working order. After about four strokes, stop planing and check your work with a square. The floor of the rabbet needs to be 90 to the end of the board, and its shoulder should be perfectly vertical. If things are out of whack, adjust your hands, lean in or out slightly to correct the problem. Take two strokes to see how you did.
10 Verify. It s not a rabbet if it slopes down and the shoulder isn t 90. That s a beveled moulding, and it is no good for joinery. The step is to nail the carcase together, so this will be your last opportunity to clean up any dings on the interior faces of the case. Nail the Case The case is assembled with glue and nails. Considering all the end grain that is in these corner joints, you might not expect the box to be very strong. But if you apply the glue and nails in the correct way, it will outlive you. As to the glue, I prefer hide glue for furniture in almost all cases, but if you have only yellow or white glue, it will be fine here. What s most important about the glue is that you use it to size the end grain in the joint before adding glue to the face-grain surfaces. Sizing is simple. Paint a thin layer of glue on the end grain and let it sit for a minute, maybe two. This first application of glue will get sucked into the end grain and clog the wood s vessels. Then, when you apply the second batch of glue, the end grain will not be able to suck the glue away from the joint (that s what normally weakens a joint that uses end grain).

11 This procedure was developed by a glue scientist, but I ve tested it in the shop. When these sized joints are intentionally broken, you see a lot of wood failure and little glue failure. That s a good thing. The second factor is the nail you choose for the joint. You should use a tapered nail that has a significant head either a cut nail or a blacksmithmade wrought nail. These nails have a shank that tapers, and early 20thcentury studies showed that these nails hold as much as 400 percent better than a same-size wire nail. That s because the nail s tapered shank acts like a wedge. As to the size of nail, you can use a 4d, 5d or (in a pinch) 6d cut nail. The larger nails are more likely to split your work, but I m going to show you how to get around that. Lastly, you will strengthen the joint if you drill your pilot holes at alternating angles, kind of like dovetails. You don t want a lot of angle, just 5 or so. Mark out the locations of the five nails at each corner and get out the glue. Exposed joinery. You are going to see these nails every time you look at the chest, so I recommend spacing the five pilot holes at each corner with care.

12 The most difficult part of using cut (or wrought) nails is drilling the correct pilot both its diameter and length. The best way to approach the problem is to do some test joints in the same kind of material and get a feel for the correct diameter bit. With typical 4d and 6d nails I start with a 3/32 pilot hole and adjust up or down in size from there. The pilot depth should be about two-thirds the length of the nail. If you make the pilot the full length (like with a screw), the nail s hold will be weak. The nail has to do some of the work. Tape marks the stop. The pilot hole should stop short so the nail has to burrow its way into the material. Here I m using a tapered drill bit for the pilot holes. It isn t strictly necessary, but it helps. The last thing to remember before driving the nails is that the tapering action of the nail should be parallel to the grain of the top board. If you apply the wedge across the grain, it s like splitting firewood. This confuses some people at first until they do it wrong. Then they never forget the rule. Now it s time to put the box together. Begin by attaching the back to the ends.

13 Size the end grain of the end boards with a thin coat of glue and let it dry for a minute. In the meantime, apply a thicker coat of glue in the rabbets on the back panel. A minute for strength. The thin coat of glue size on the end grain is an important component of a strong rabbeted butt joint. Place the back panel on the end panels and drill your pilot holes don t forget to angle each hole slightly to increase the wedging action of the nails.

14 If you are even the slightest bit worried about splitting (and I am always worried), put a bar clamp across the joint to reduce (greatly) the chance of the work busting apart. A clamp for safety. Clamping across the joint significantly reduces the chance you will split the top part of the joint or the board below. Note the alternating slopes of the nails. Drive the nails and set the heads flush with the surface. Headed nails, such as clouts, roseheads and wrought-head nails, are not typically set below the surface of the work like a brad. Setting the head only increases the chance for splitting. Affix the back panel. Flip the carcase over and repeat the process for the front panel. When the glue is dry, level your joints with a plane, including the top and bottom rim of the carcase. Bottom Boards The bottom boards are merely nailed to the bottom rim of the case. The individual boards should have some sort of edge joint to allow for seasonal movement. I used a tongue-and-groove joint; shiplaps would be another good choice.

15 Note that the grain of the bottom boards runs from front to back, not side-toside. This is for strength. Special planes. While you can make a tongue-and-groove joint with plow and rabbet planes, it s much faster if you have a dedicated set of match planes or a metallic plane dedicated to the task. Cut the edge joints on your bottom boards and then remove the machine marks. If you d like to dress up the bottom boards, you can cut a small bead on the boards. If you are using a tongue-and-groove joint, cut the bead on the shoulder of the tongue section of the joint.

16 A strong bead. Bead the shoulder of the tongue section of the joint. If you bead the groove section you will weaken the joint. Now you can nail the bottom boards to the rim of the carcase using 6d clouts or rosehead nails. Use the same pilot hole you used earlier for the carcase and apply a clamp across the carcase if you want to prevent splits.

17 Nails all around. Don t glue the bottom boards, just use nails. I drive three nails into the ends of the carcase. Then I space the nails ever 4 or 5 when nailing into the front and back of the carcase. After the bottom is on, true up the carcase all around to flush the bottom boards to the carcase. The Rot Strips The last bit of work on the bottom is to affix the two rot strips to the underside of the bottom boards. There are two (at least) philosophies when it comes to rot strips. One philosophy is to make them from pine and nail them on with iron nails. If these start to rot, they will fall off and you will know it s time to replace them. The other philosophy is to make the rot strips from a water-resistant species, attach them with epoxy and brass screws. And then oil and wax them. These rot strips will refuse to rot or soak up water. Both methods protect the chest from moisture.

18 I had some teak scraps so I used those for the rot strips. After cutting them to size, I planed a small chamfer on the edges to make the chest easier to slide around on an uneven floor. Automatic chamfers. Consistent chamfers are easy with a block plane. Clamp the work in your face vise so it is about 3/8 above the benchtop. Rest one corner of the plane on the benchtop and plane for 20 strokes. Flip the board over and repeat. Glue the rots strips on with epoxy and screw the strips down with brass screws. A few coats of linseed oil on the teak and bottom boards will also help moisture from wicking into the carcase.

19 Waterproof. Teak and epoxy will prevent water from migrating from the floor into your bottom boards. Add the Chest Lifts The last bit of work before the lid is to make and attach the chest lifts on the ends. You can use metallic lifts or make your own using wood and some rope.

20 Your call. Chest lifts made from wood and rope, called beckets, are one traditional choice. Iron lifts are another. There is no real functional advantage to either. The Lid The chest s lid is a simple flat panel with battens screwed to the end. You can decorate the edges of the panel anyway you please a thumbnail profile was a typical edge treatment. To make the thumbnail profile, fetch your moving fillister plane. Use the same fence setting (a 3/4 -wide cut) as you did for the rabbet joinery. Adjust the depth stop so the plane takes a cut of about 1/8 deep. Cut the profile on the ends first. Then rabbet the front edge of the lid. To complete the profile, use a block plane to round over the top lip of the panel.

21 For decoration. It s OK if this rabbet slopes a bit. After cutting the rabbet on three sides, round over the sharp corner all around until it looks nice. Now affix the battens. On early chests, the battens were secured with clinched nails. This works really well, but it takes a little practice to get good at the operation. If you don t want to attempt clinched nails, the other option is to use wood screws in holes that are slightly elongated to allow for seasonal wood movement. The first step is to shape the battens. At the least, ease the lower corners to make them nicer to handle. I sawed a beveled on the corners and cleaned up the cut with a block plane.

22 Quick cut. Many early chests had a rounded corner. Or the batten would taper toward the front and then end in a rounded corner. Remove any machining marks and drill pilot holes and clearance holes for your wood screws. The clearance holes in the batten need to be slightly elongated parallel to the grain. This slight elongation allows the top to move without cracking.

23 Screws that move. By elongating the clearance holes in the battens the threads of the screw will stay tight in the lid without (usually) splitting. Elongating the holes is simple, quick work. After drilling each clearance hole, put the bit back into the hole. While the bit is spinning, tip the drill forward and then back about 10. That s enough. Screw the battens to the lid. Then attach the lid to the carcase with hinges. Interior Trays The two sliding tool trays hold all your small tools and grant you access to the large well below. The bottom tray sits on oak runners that are 5-1/2 above the floor of the chest. This space is critical because it allows you to put a typical bench plane on the floor of the chest with the sole of the tool flat on the bottom boards.

24 So the first task is to make a 5-1/2 -wide spacer so you can nail the lower runner in perfect position on either end of the carcase. Cut a scrap to this dimension and stand it on the floor of the chest. Place the lower runner on it. Then glue and nail it to the wall of the carcase. Permanent Jenga. The pine board shown at the bottom puts the lower runner in its correct position. After the first runner is in place, install the second runner on top of it. Then remove the spacer and repeat the process on the other end of the chest. With all the runners glued and nailed in, cut the bottom pieces for the trays to size and fit them to the inside of the carcase. It s easier to do this before you add the walls of the trays.
25

26 Shoot the bottom. After cutting the bottoms to a close size, shoot the ends until the bottom slides smoothly on its runners. The trays are built a lot like the carcase, with rabbets, glue and headed nails. The rabbets on the end boards are 1/2 wide and 1/8 deep. The only significant difference between the tray and the carcase is that you want the bottom of the tray to poke out of the end of the carcase by 1/16. This slight proudness makes the tray simple to fit and ensures the nail heads won t rub against the walls of the chest and jam the tray.

27 Familiar operation. The trays are assembled with the same joints and procedures as the carcase. You can attach the bottom to its tray with screws or nails. Just be sure to slightly elongate your clearance holes if you choose screws (nails will bend on their own without any further help).

28 Slightly proud. Leaving the bottom edge slightly proud of the tray solves a variety of potential problems. A little beeswax on the trays and runners will help them slide, but that s really all the finish you need on the inside of the case. On the outside, a few coats of a long-wearing paint is the typical choice for a tool chest. I used varnish only on the lid, though that doesn t offer near the same protection as paint. The rest is up to you. You can make racks for the inside walls to hold small tools. And there should be room to affix your handsaws to the inside of the lid. Christopher Schwarz, June 2015
Tool Box. Process Guide
 Tool Box Process Guide Design, Lumber, & Nails Needed Designed from typical big box lumber dimensional lumber to minimize the rip cuts Added feet to allow the box to sit on uneven surfaces Add a sliding
Shoulder Plane. dovetailed. fine tools. Make an heirloom tool and learn the secret to creating double dovetails in metal it s easier than you think.
 fine tools dovetailed Shoulder Plane Make an heirloom tool and learn the secret to creating double dovetails in metal it s easier than you think. I ve always been fascinated by old, metal hand planes.
ENJOY THIS SELECTION FROM. Woodworking 101. Includes Step-by-Step Instructions for 8 Projects. Woodworking
 W ENJOY THIS SELECTION FROM Woodworking 101 Includes Step-by-Step Instructions for 8 Projects Woodworking 101 Aimé Fraser, Matthew Teague, and Joe Hurst-Wajszczuk To purchase your copy of Woodworking 101,
Japanese carpenters are renowned for the sophistication of
 Hand-Built Home for Cut nails and a clever lid clinch a traditional Japanese toolbox Japanese carpenters are renowned for the sophistication of their wooden joinery, yet they typically build toolboxes
Corner Cupboard. This space-saving piece enhances any room 46 FINE WOODWORKING
 Corner Cupboard This space-saving piece enhances any room BY G A R R E T T H A C K On every trip to the Shelburne Museum near Burlington, Vt., I visit a favorite object a small hanging corner cabinet.
Moravian. Stool. By christopher schwarz. This traditional, lightweight stool is an excellent first step toward chairmaking.
 Moravian Stool By christopher schwarz This traditional, lightweight stool is an excellent first step toward chairmaking. 36 popular woodworking magazine December 2012 One highlight of a visit to historic
Hinge Mortising Jig. One of the make it or break it parts of building a. 6 ShopNotes No. 74
 Hinge Mortising Jig A Mortise for a Hinge. Quick, clean, and accurate that s the only way to describe the mortise you get with a trim router and this hinge mortising jig. One of the make it or break it
Cherry Chest of Drawers. Dovetail joinery decorates this Shaker-inspired case piece
 Cherry Chest of Drawers Dovetail joinery decorates this Shaker-inspired case piece BY M I C H A E L P E K O V I C H DRESSER CONSTRUCTION Case top Rabbet, 9 6 in. deep 4 in. 0 7 8 in. 9 2 in. 4 in. Top
Silverware Chest Plan
 Silverware Chest Plan 05L14.01 Introduction 1. Measure the space required for your cutlery before beginning this project to be sure that it will fit in the drawers and top compartment. The best way to
Greene & Greene. Mailbox. by Seth Keller. Signature details create an elegant box. 2 AmericanWoodworker.com
 Greene & Greene Mailbox by Seth Keller Signature details create an elegant box. 2 AmericanWoodworker.com We needed a new mailbox, but I couldn t find an off-the-shelf version that I liked. So I decided
Dutch Tool Chest. Not everyone has the time, This traditional traveling chest is faster and easier to build than a floor chest.
 Dutch Tool Chest By christopher schwarz This traditional traveling chest is faster and easier to build than a floor chest. Not everyone has the time, materials or skills to build a full-scale traditional
Shaker Classic Change the legs to change the look
 Shaker Classic Change the legs to change the look 2 Ways B Y C H R I S T I A N BECKSVOORT not long ago, a couple ordered a set of cherry side tables from me, one for each side of their pencil-post bed.
Heirloom Tool Chest. This classic chest offers a lesson in efficient woodworking
 Heirloom Tool Chest This classic chest offers a lesson in efficient woodworking BY CH R I S G O C H N O U R A COMFORTABLE HOME FOR TOOLS Made of cherry and constructed entirely with hand tools, the tool
Half-Blind Dovetails in Half the Time
 Half-Blind Dovetails in Half the Time Get the hand-cut look with the speed and consistency of machines B Y S T E P H E N H A M M E R Bandsawn tails Zip, zip. A simple jig delivers accurate and uniform
craftsman rocker Classic style meets comfort in this sturdy oak rocking chair BY MICHAEL PEKOVICH 34 FiNE woodworking
 craftsman rocker Classic style meets comfort in this sturdy oak rocking chair BY MICHAEL PEKOVICH 34 FiNE woodworking photo, this page: Michael pekovich shape the rear legs designing a chair can be a tough
This tailor s cabinet was brought to my attention by a customer
 So what if you don t sew? This authentic Shaker case piece is drop-dead gorgeous in any room. This tailor s cabinet was brought to my attention by a customer who wanted one just like it. She had seen the
Step-by-Step Instructions for Making the Wall-hung Bookcase
 Step-by-Step Instructions for Making the Wall-hung Bookcase When a piece of furniture has an air and look of simplicity, you can be sure that it deftly conceals the complexity of its making. I wanted this
Build a Stout Workbench
 Build a Stout Workbench Tail vise is at the heart of this versatile bench by chris gochnour I ve done a fair amount of handplaning during my 32 years as a professional furniture maker, and I ve found that
Reasons to Own a Shoulder Plane
 9 Reasons to Own a Shoulder Plane Fine-tune your joinery with these tips and techniques B y C h r i s G o c h n o u r It s easy to dismiss the shoulder plane as a specialty plane, another way of saying
Dress up your dining room with this Southern delicacy. that was used to serve drinks after a hunt. Breeches and jodhpurs are optional.
 Dress up your dining room with this Southern delicacy that was used to serve drinks after a hunt. Breeches and jodhpurs are optional. Huntboard Classic Six-Legged My dad has been making this six-legged
Carcase Construction. Choosing and making the right joints. by Tage Frid
 Carcase Construction Choosing and making the right joints by Tage Frid Furniture construction is broken down into two main categories: frame and carcase. In frame construction, relatively narrow boards
Mid-Century Credenza Thoughtful details and modern joinery merge in this sleek design
 Mid-Century Credenza Thoughtful details and modern joinery merge in this sleek design BY LIBBY SCHRUM Mid-Century Modern furniture has not been wildly popular since, well, the mid-century. But fashion
Flamingo. That s what I looked
 Plans N O W w w w. P l a n s N O W. c o m flip-seat Storage Bench Flamingo. That s what I looked like as I stood in the doorway perched on one leg, with my other foot raised so that I could untie the laces
Complete Dovetail Jig Instructions
 Complete Dovetail Jig Instructions 15 18 4 3 1 12 13 8 19 17 16 6 14 5 9 11 10 2 9 PARTS LIST - Complete Dovetail Jig Introduction Your new dovetail jig will cut Full Through Dovetails and three varieties
Jeff Branch WOODWORKING YOU CAN BUILD A. By adding subtle design elements, a traditional furniture style becomes decidedly modern.
 Jeff Branch WOODWORKING YOU CAN BUILD A By adding subtle design elements, a traditional furniture style becomes decidedly modern. Jeff Branch WOODWORKING Publisher: Jeff Branch Editor: Jeff Branch Art
Chess board. The true origins of chess are. from old wood scraps Michael T Collins makes a chessboard and a box to store the pieces
 What you will need: Combination plane with 3mm, 6mm and 13mm cutters Rip and cross cut saw Block and jack plane Marking gauge and knife Card scraper optional and try square Chess board from old wood scraps
About.com :
 http://woodworking.about.com/gi/dynamic/offsite.htm?sit...//www.popularwoodworking.com/features/fea.asp%3fid=1088 (1 of 8)1/28/2004 12:05:01 AM Modern Storage Tower The last thing I want to do when starting
15 Dovetail Jig. Instruction Manual. Part # 3452
 15 Dovetail Jig Instruction Manual Part # 3452 CAUTION: Please read, understand, and follow all manufacturers instructions, guidelines and owners manuals that come with your power tools. Peachtree Woodworking
Display Case (for J&S)
") Display Case (for J&S) This is constructed of maple plywood with solid maple (soft maple) edge banding. It was made to fit between a door and a kitchen cabinet, and has an elegant circular taper between
Display Case (for J&S) This is constructed of maple plywood with solid maple (soft maple) edge banding. It was made to fit between a door and a kitchen cabinet, and has an elegant circular taper between
Project 11010EZ: Gun/Bookcase/Curio Cabinet
 Project 11010EZ: Gun/Bookcase/Curio Cabinet No man can be all things to all people, but this cabinet comes as close to fitting multiple uses as any inanimate object can. We ve pictured it as a gun cabinet
The WoodWorker s Edge
 The WoodWorker s Edge Draw-leaf Game Table 1. 2. Layout the area for the tenons. The tenons are 3/8 thick x 4-1/2 long x 1-1/4 deep and offset to the inside. Create the tenons using the step method to
Floating-Top Table. Creative joinery adds spark to this versatile piece
 Floating-Top Table Creative joinery adds spark to this versatile piece By Michael Pekovich 28 FINE woodworking This is one of those projects that almost wasn t. Rachel, my wife, had asked for a small,
Shaker Lap Desk. The classic Shaker lap desk, designed two centuries ago to. Celebrate pen and ink with this quintessential case
 Shaker Lap Desk Celebrate pen and ink with this quintessential case BY CHRISTIAN BECKSVOORT The classic Shaker lap desk, designed two centuries ago to function as a miniature traveling office, was the
BUILDING A STORM DOOR
 BUILDING A STORM DOOR BY NEAL BARRETT Illustrations by George Retseck If you're in the market for a storm door, you probably know that there are many styles and models available. However, most of them
A Shaker Sewing Stand
 America s leading woodworking authority Step by Step construction instruction. A Shaker Sewing Stand A complete bill of materials. Exploded view and elevation drawings. How-to photos with instructive captions.
Perfect Hinges. Pick the. for Your Boxes. Selecting just the right hinges to fit each special box can be a daunting task.
 Pick the Perfect Hinges for Your Boxes The right choice will help you design and build better boxes by Doug Stowe Selecting just the right hinges to fit each special box can be a daunting task. There are
Framework joints FABRICATION - WOOD JOINTS. Corner joints. Tee joints. Worksheet 15a. Cable Educational Ltd
 FABRICATION - WOOD JOINTS The word: fabricate means to join together. Most wooden products are held together with adhesive. Adhesive works very well when the edge of a piece of wood is being glued to the
DOCUMENT CHEST. Curly Maple, White Pine
 25 DOCUMENT CHEST Curly Maple, White Pine 100 MAKING THE DOCUMENT CHEST After the stock has been thicknessed, ripped to width, and cut to length, plough a 1/4" X 3 /8" groove on the inside faces of the
 America s leading woodworking authority To download these plans, you will need Adobe Reader installed on your computer. If you want to get a free copy, visit: http://adobe.com/ reader. Having trouble downloading
woodworkersjournal.com MATERIAL LIST
 MATERIAL LIST T x W x L 1 Legs (2) 1 1 2" x 3 1 2" x 36 7 16" 2 End Uprights (2) 1 1 2" x 3 1 2" x 32 1 2" 3 Stringers (4) 1 1 2" x 3 1 2" x 42" 4 Top Cladding, Long (2) 3/4" x 7 1 4" x 65 3 4" 5 Side
Kitchen Step Stool. Premium Plan. In this plan you ll find: America s leading woodworking authority
 America s leading woodworking authority Premium Plan In this plan you ll find: Step-by-step construction instruction. A complete bill of materials. Construction drawings and related photos. Tips to help
135 ROLLTOP DESK 515
 135 ROLLTOP DESK 515 For the person who hates to clear off a desk, who wants to leave everything where it is overnight yet still have the clutter hidden, a rolltop desk is a godsend. The tambour hides
Hardware Cabinet. Part 3
 Hardware Cabinet Part 3 The vertical dividers are the next task on the cabinet and a bit of a trick to get right. The horizontal dividers are only ½ thick pine spanning the 31 width of the cabinet and
Butterfly Leaf Dining Table Plans
 Butterfly Leaf Dining Table Plans Part 1 An attractive dining table with a secret: the leaf folds and stores inside the table. Season 1, Episode 7 P a g e 2 I first saw a butterfly leaf table in a back
The dovetail joint looks deceptively easy to create. This feature takes you through the difficult process of making perfect, elegant dovetails.
 Home > Projects & Advanced Woodworking > Perfect Dovetails Perfect Dovetails AddThis Feature 5 The dovetail joint looks deceptively easy to create. This feature takes you through the difficult process
Copyright WilkerDos.com Dining Table. Project Designed By April Wilkerson - Plan Created By Jay Bates (jayscustomcreations.
 Copyright WilkerDos.com 2017 Project Designed By April Wilkerson - Plan Created By Jay Bates (jayscustomcreations.com) Layout & Shopping List Page 2 of 12 Layout & Shopping List Item Quantity Description
CROTCH-GRAINED CHESS TABLE. Walnut, Poplar
 3 CROTCH-GRAINED CHESS TABLE Walnut, Poplar 11 MAKING THE CHESS TABLE This piece is designed around a set of angles taken from the playing pieces, angles echoed in the fat dovetails holding the stretchers
hanging mirror Two-piece desk set Handmade Gifts Photo: John Tetreault
 hanging mirror Two-piece desk set Handmade Gifts 44 FINE woodworking Photo: John Tetreault Flatware carrier Tea light candle holder 4 Tasteful projects made quickly from scraps BY CHRISTIAN BECKSVOORT
Tongue & Groove Cabinet Doors Copyright 2014 JaysCustomCreations.com
 Tongue & Groove Cabinet Doors Copyright 2014 JaysCustomCreations.com A tongue and groove cabinet door is made up of at least 5 pieces. Two horizontal rails (blue), two vertical styles (green), and one
Building a Sawbench. Precision Sawing at The Woodwright's School August 2010
 Building a Sawbench Precision Sawing at The Woodwright's School August 2010 Introduction: Though I work with both machinery and hand tools, I consider a pair of traditional old-school sawbenches to be
curved-lid treasure box
 curved-lid treasure box 20 ugust Home Publishing o. Feature Project urved-lid Treasure Box The curved lid and ebonized sides of this attractive box show off the highly figured wood and your woodworking
Klondike Sled Project
 Klondike Sled Project By Steven Maxwell Illustrations by Len Churchill Cross-country sled races deliver adventure, endurance and a wilderness challenge. And these plans are your ticket to that world. This
Hone Your Hand-Tool Skills
 Hone Your Hand-Tool Skills A handful of exercises develops competence and confidence with chisels, planes, and saws B Y M I C H A E L P E K O V I C H Hand tools intimidated me for a long time. I knew I
Hand Dovetails. They're really not that hard to do. by Alphonse Mattia
 Hand Dovetails They're really not that hard to do by Alphonse Mattia Dovetailing is one of the strongest and most attractive methods of joining the ends of boards together. Traditionally, handcut dovetails
Stand & Bowls. optional. Online Extra
 Online Extra optional Stand & Bowls Once you make a bowl using the jig and technique from Woodsmith No. 229, it s only natural to see what else you can do with it. The starting point is to make copies
Extendable Large Dovetail Jig
 Extendable Large Dovetail Jig Instruction Manual Part # 3458 CAUTION: Please read, understand, and follow all manufacturers instructions, guidelines and owners manuals that come with your power tools.
MOXON VISE. History. Contents: (2) Cast iron handwheel (2) acme screw (4) acme nut (2) thick washer (1) Crubber jaw liner
 Cast iron handwheel (2) acme screw (4) acme nut (2) thick washer (1) Crubber jaw liner") Assembly & Installation Instructions For: MOXON VISE History Contents: (2) Cast iron handwheel (2) acme screw (4) acme nut (2) thick washer (1) Crubber jaw liner Joseph Moxon s double-screw vise described
Assembly & Installation Instructions For: MOXON VISE History Contents: (2) Cast iron handwheel (2) acme screw (4) acme nut (2) thick washer (1) Crubber jaw liner Joseph Moxon s double-screw vise described
Understanding Wood Movement
 Understanding Wood Movement Proven methods for dealing with expansion and contraction BY CH R I S T I A N B E C K S V O O R T For centuries, granite has been quarried along the Maine coast. Way back in
End-On-End Dovetails D4R - CHAPTER 12
 D4R - CHAPTER End-On-End Dovetails 4 While you have the router set up for half-blind dovetails, it is a good time to try end-on-end dovetails. If you have not yet routed half-blind dovetails or read through
Scratchbuild A Backwoods Water Tank Part V - Making the Frost Box and Hanging the Water Spout
 Scratchbuild A Backwoods Water Tank Part V - Making the Frost Box and Hanging the Water Spout By Dwight Ennis In this section, we're going to make the Frost Box, and we'll build the Spout Hanger Assembly
Sawhorses. for the Shop. Three horses that cover all of your shop needs
 w J ANUARY/FEBRUARY 2003 Sawhorses for the Shop Three horses that cover all of your shop needs BY CHRISTIAN BECKSVOORT Sawhorses are an indispensable part of my shop equipment. No matter what the process
Classic Mitered Jewelry Box
 America s leading woodworking authority Premium Plan In this plan you ll find: Step-by-step construction instruction. A complete bill of materials. Construction drawings and related photos. Tips to help
Shop Projects. Plans NOW. Each Built from One Sheet of Plywood!
 Plans NOW www.plansnow.com 5 Shop Projects Each Built from One Sheet of Plywood! Tool Tote - Sawhorse - Workbench - Wood Bin - Wall Cabinet PLUS: 7 SHOP SECRETS Working with Plywood Dread the thought of
Make a cupboard as a BCATS
 National Certificate in Building, Construction, and Allied Trades Skills (BCATS) Make a cupboard as a BCATS project Unit Standard 25921 Level 2, Credit 6 Name: Contents Reference Page What you need to
REINFORCING THE CORNERS OF FLAT FRAMES
 REINFORCING THE CORNERS OF FLAT FRAMES There are a number of different methods that may be used to join flat frame sides together. As most Woodworkers know, end grain glue joints are not nearly as strong
WOODWORKING GUIDE: BASIC JOINERY
 WOODWORKING GUIDE: BASIC JOINERY Close isn't really good enough. A perfect fit is what counts. When building furniture, there are many ways to construct joints. The simplest are those that use mechanical
custom Window Makeover Before After From Workbench magazine August Home Publishing Company All rights reserved
 custom Window Makeover efore After page of 10 Windows should be something more than just an interruption in the wall. They should be part of the wall: an architectural component and an integral part of
129 KITCHEN BASE CABINET 480
 129 KITCHEN BASE CABINET 480 There are two sorts of kitchen cabinets: base cabinets, which sit on the floor, and wall cabinets. Base cabinets provide both storage space and work surfaces. They often house
10 Easy-to-Build. Plywood Projects
 10 Easy-to-Build Plywood Projects Ten shop projects ten sheets of plywood. These rock-solid essentials take just a couple hours to build and will help you make the most of the space in your shop. All content
Pivot-Door Downdraft Cabinet Plans
 Pivot-Door Downdraft Cabinet Plans Finished Cabinet Closed Open Exploded View Introduction This simple downdraft-style dust collection cabinet is a great way to keep your shop cleaner and keep your router
Dovetail Saw Guides. Figure 1: Dovetail saw guide, exploded view. Guide Block. UHMW Friction Pad. Sliding Clamp. Rare-Earth Magnet
 Dovetail Saw Guides U.S. Pat. No. 6,607,016 Dovetail joints have traditionally been the hallmark of a cabinetmaker who had acquired an expert level of skill. They are also a mark of quality and attention
Project 17884EZ: Shaker End Table
 Project 17884EZ: Shaker End Table With its clean, simple lines, this piece is unmistakably Shaker style. Ours is made from cherry, a wood commonly used by Shaker craftsman, but we ve also seen this piece
Classic Kitchen Island
 America s leading woodworking authority Step by Step construction instruction. A complete bill of materials. Classic Kitchen Island Exploded view and elevation drawings. How-to photos with instructive
DVD Cabinet. rabbeting with a moving filletster plane At this point, the insides of the case, and the shelves 5-JAN-2005
 INTRODUCTION DVD Cabinet CHRISTOPHER SWINGLEY 5-JAN-2005 These plans are derived from Michael Dunbar s Colonial Cupboard hand tool project in Fine Woodworking, Number 151, October 2001, pages 64-71. The
The frame sections of the china hutch are assembled with the aid of glue and spiral dowels. Dowel centers are recommended to
 60 CHINA HUNT 282 ARE YOU LOOKING for a showpiece china hutch to display your elegant chinaware, antique vase, or collectibles? Here's the perfect cabinet for you, with lots of transparent glass to show
WESTERN PISTOL.22 CALIBER SINGLE SHOT. Entire pamphlet Copyrighted by JACO Designs 1972
 WESTERN PISTOL.22 CALIBER SINGLE SHOT Entire pamphlet Copyrighted by JACO Designs 1972 This pamphlet contains the plans and instructions necessary to construct the Western pistol. This pistol breaks open
Slicing Jig For Pen Inlays
 Slicing Jig For Pen Inlays By Randall Smith (randyrls) May 2008 This article has been downloaded from the library of the International Association of Penturners. www.penturners.org You are welcome to reproduce
Trimming Windows. Get the jambs flush with the drywall, and the miters come easily THE PARTS AND PIECES OF WINDOW TRIM BY JIM BLODGETT
 Trimming Windows Get the jambs flush with the drywall, and the miters come easily BY JIM BLODGETT THE PARTS AND PIECES OF WINDOW TRIM Traditional window trim includes a stool, which most people think of
Chapter 18. Interior Doors
 Chapter 18. Interior Doors 18.1 SWINGING DOORS 18.2 SLIDING DOORS 18.3 BIFOLD DOORS Tools needed by volunteers: Hammer Nail apron Tape measure Square Pencil Tools and equipment needed: Extension cords
Single Pass Half-Blind Dovetails
 9 DR Pro - CHAPTER Single Pass Half-Blind Dovetails Why rout single pass dovetails on a variable spaced Leigh jig? Well, you just may need to reproduce or restore a late 9th or early 0th century drawer
Woodware Designs -- Furniture Construction Hints
 Woodware Designs -- Furniture Construction Hints 1. Purpose The following are construction hints for woodworking details used in building many of our desks. We are providing them here free for our woodworking
You Can Build a Bedside Table
 You Can Build a Bedside Table Jeff Branch WOODWORKING If you like making panels, you ll love this project. By JEFF BRANCH M y current home is a modest one. But it is a big improvement over our small starter
An Inner Hive Cover. In the Beekeeper s Work Shop. Building a Bee Hive: The Inner Hive Cover. by Stephen E. Tilmann
 An Inner Hive Cover In the Beekeeper s Work Shop The project for this article is an inner hive cover. The inner cover sits on top of the topmost hive body (super) and underneath the telescoping top cover
Corner Entertainment Center Plans
 Table of Contents Introduction... 3 Let s discuss the tools needed... 3 Let s discuss the materials needed... 4 Let s build it... 4 Attaching the 2x2's... 7 Determine the shelf spacing... 9 Scribing the
Project 13519EZ: Shaker Sewing Desk
 Project 13519EZ: Shaker Sewing Desk This fine example of a Shaker sewing desk was measured and photographed at Hancock Shaker Village in Hancock, Massachusetts. On the original, the legs and various frame
Demilune 4. Apron Joinery. Curved Apron Tenon. Bridle Joint Legs. Bridle Joint Front Apron
 Demilune Email 4 Apron Joinery There are two types of joints used in connecting the aprons and legs. The rear legs use conventional mortise and tenon joints, while the front legs use the less conventional
Birdhouse Plan Combo Pack
 Birdhouse Plan Combo Pack Two Quick and Creative Projects for Your Yard PROJECT 17 Old Plane Birdhouse BY CHRISTOPHER SCHWARZ Every woodworker should spruce up the yard (or the shop) with this simple birdhouse.
CA to each one. You may have to hold the end down while to glue sets or use an accelerator like I did.
 The following information and photographs are what I did to build the kit. Your methods and needs may differ from this which is fine. There is no right or wrong way if you are used to scratch building.
Nineteenth-Century Dough Box
 Nineteenth-Century Dough Box T he dough box was a functional piece found in many a country kitchen. The idea was that the cook would make a large batch of bread dough, knead it on the large work surface
Workbench. Process Guide
 Workbench Process Guide Design, Lumber, Tools & Nails Made entirely from 2x and 4x construction lumber Hardware speeds up the consturction while also reduces the amount of planing we have to do by using
Project 13586EZ: Writing Desk. Writing Desk Materials List
 Project 13586EZ: Writing Desk This writing desk will make a handsome addition to just about any room in the house. The one shown is made of cherry, a logical choice for a piece like this, but mahogany
ARTS AND CRAFTS CHAIR
 ARTS AND CRAFTS CHAIR 491 MATERIALS LIST--DINING CHAIR Key No. Size and description (use) A 2 1-3/4 x 1-3/4 x 16-1/4'' oak (front leg) B 2 1-3/4 x 3-3/4 x 40-1/2'' oak (rear leg) C 1 1-3/4 x 3-3/16 x 15''
Plan #1 Wooden hinge, single action
 Plan #1 Wooden hinge, single action There are two types of wooden hinges, a single action hinge (that is in effect a finger joint with a pin through it) and a double action hinge which has two pins. The
Copyright 2007 MLCS 1
 Copyright 2007 MLCS 1 REFERENCE GUIDE and SPECIFICATIONS: Edge Guides: This 12 Dovetail Template comes complete with 2 Edge Guide Sets one set for Half Blind and one set for Rabbeted Half Blind Dovetails.
Woodline USA Woodline Spacer Fence System
 Woodline USA Woodline Spacer Fence System MADE IN THE USA Includes: (1) ¼ Spacer Fence (1) 3/8 Spacer Fence (1) ½ Spacer Fence (1) Hardware Package (1) 3 Piece Brass bar set (2) Setup Blocks Visit Us Online
How to Rehandle and Repair that Old Hammer - a Step by Step Tutorial by Bob Sturgeon
 How to Rehandle and Repair that Old Hammer - a Step by Step Tutorial by Bob Sturgeon There is a world of old collectible and user hammers out there floating around just waiting to be resurrected. Hammers
Kentucky 4H Wood Science Plans Notebook. Plans Level 3
 Kentucky 4H Wood Science Plans Notebook Plans Level 3 MATERIALS: 2 pieces wood 3/4 x 10 x 4 1 piece wood 3/4 x 12 x 4 2 pieces wood 3/4 x 3 x 2 5 1/2" 2 pieces wood 3/4 x 3 x 1 8 1 piece wood 2 x 4 x
Why are we giving this guidebook as a FREE download?
 Construction Guide Queen, Double & Twin Vertical 1 Note: This guide covers the construction steps for all 3 sizes of the vertical wall mount Easy DIY Murphy beds, Queen, Double and Twin. The construction
Nojo Design: Large Step Cabinet: February 2012
 Nojo Design: Large Step Cabinet: February 2012 The largest single piece of furniture I ve ever made is this stepped cabinet. Finished piece is 8! tall and over 10 long. This project has been great, although
Can-Do Can Crusher. America s leading woodworking authority. Step by Step construction instruction. A complete bill of materials.
 America s leading woodworking authority Can-Do Can Crusher Step by Step construction instruction. A complete bill of materials. Exploded view and elevation drawings. How-to photos with instructive captions.