INSTALL INSTRUCTIONS KK & KK KWIK-KIT PRISONER TRANSPORT INSERT FORD and CHEVY VAN PRISONER TRANSPORT
|
|
|
- Chrystal Knight
- 6 years ago
- Views:
Transcription
1 INSTALL INSTRUCTIONS KK & KK KWIK-KIT PRISONER TRANSPORT INSERT FORD and CHEVY VAN PRISONER TRANSPORT TOOLS REQUIRED: ¼ & 3/8 Ratcheting Wrenches ¼ & 3/8 Air Ratchets (recommended) 3/8 Impact Guns (recommended) ¼ & 3/8 Standard Socket Sets Powered Drill Powered Screwdriver (recommended) Drill Bit Set Tape Measure Screwdriver Set Awe or Scribe Pry-bar Wire Crimping tool Wire Stripping tool Wire Cutter Circular Saw (for plywood) Utility knife Caulking gun HARDWARE - 60 or 80 COMPARTMENT: Some hardware not used in all application: QTY DESCRIPTION PART # USED FOR: 80 ¼ Serrated nut GSM ¼ x ¾ Carriage bolt GSM #10 x 1 Phillips pan head sheet metal screw GSM33183 Floor/wall to ceiling 8 #8 x 3/8 Phillips flat head screw GSM33179 Vent plates/dome lights 32 ¼ x ¾ Phillips flat head machine screw GSM33087 Wall/Bench extension 25 ¼ x ¾ Hex head bolt GSM rd divider, 3 rd ceiling 25 ¼ Flat washer GSM rd divider, 3 rd ceiling 15 ½ Flat washer GSM31009 Grab straps/seat belts 15 ½ Lock washer GSM31030 Grab straps/seat belts 15 ½ x 1 ¼ Socket button head bolt GSM33310 Grab straps/seat belts 4 3/8 x 2 Hex head bolt GSM Bulkheads 4 3/8 Hex nut GSM30008 Bulkheads 4 3/8 Lock washer GSM31028 Bulkheads 4 3/8 x 2 Fender washer GSM31022 Bulkheads 2 White Silicone tube PRM97343 Seams & Gaps 4 Lock key PRM Doors 4 Vent block off plate KKM Ceiling (vent adapter kit) 2 A/C vent plate KKM Ceiling (vent adapter kit) 2 Dome light (2 per rear 60 or 80 inch Kit) KK-DOME-LED Ceiling HARDWARE - 40 COMPARTMENT: QTY DESCRIPTION PART # USED FOR: 90 ¼ x ¾ Carriage bolt GSM ¼ Serrated nut GSM30170
2 40 COMPARTMENT (cont): QTY DESCRIPTION PART # USED FOR: 40 #10 x 1 Phillips pan head sheet metal screw GSM33183 Floor, wall to ceiling 25 #8 x 3/8 Phillips flat head screw GSM33179 Vent plates/dome lights 5 ½ Flat washer GSM31009 Grab straps/seat belts 5 ½ Lock washer GSM31030 Grab straps/seat belts 5 ½ x 1 ¼ Socket button head bolt GSM33310 Grab straps/seat belts 5 3/8 x 2 Hex head bolt GSM Bulkheads 5 3/8 Hex nut GSM30008 Bulkheads 5 3/8 Lock washer GSM31028 Bulkheads 5 3/8 x 2 Fender washer GSM31022 Bulkheads 2 A/C Vent plate KKM Ceiling (vent adapter kit) 2 Dome light (2 per 100 and 120 inch kits) KK-DOME-LED Ceiling HARDWARE DIVIDER: QTY DESCRIPTION PART # USED FOR: 28 ¼ x 1 ½ Hex head lag bolt GSM33062 Divider to floor 14 ¼ x 5/8 Stainless socket button head bolt GSM33308 Divider 7 ¼ x ¾ Stainless socket button head bolt GSM33309 Divider 14 ¼ Stainless flat washer GSM31048 Divider 10 #10 x ½ Phillips flat head machine screw GSM33072 Door frame to divider 10 #10 Thin nylock nut GSM Door frame to divider Always! Read all instructions before installing any Havis, Inc. products. Check for obstructions (Wire, brake lines, fuel tank, etc.) before drilling any holes! Use hardware provided with install kit If this is your first time installing a Havis, Inc. Prisoner Transport, please contact the factory for tips and suggestions that will ease the installation. VEHICLE PREPERATION: 1. STEPS, HVAC, VAK, OPTIONS, ETC: Refer to the specific install instructions. Installing the steps prior to installing the Kwik Kit will ease installation and must be done on Chevy side step. Installing options may be necessary prior to installing the kit. 2. SOUND DEADENING & FLOORING: ½ PLYWOOD is Highly recommended to cover the entire cargo floor of the van. (1 ½) 48 x 96 sheets of plywood are needed. Havis, Inc. does not supply plywood floor kit. Draw a line on the rubber/wood floor from rear doorframe as shown on the following page. This will be the starting point of the kit. OPTIONAL # KK-SDI A self-adhesive sound deadening wall insulation is sold separately and will help deaden road noise. 54 x 20 foot roll of material is simple cut with a razor knife. Peel and stick to walls and ceiling. 2

 After plastic trim is cut and back in it s original location, you must measure 7 inches forward on both sides from newly cut trim to place")
3 Rear OEM Trim modifications 1997and Newer Chevrolet G-Series Van Installation of Kwik Kit is very similar in Ford and Chevy Vans. All kits start with a measurement at the rear floor. The rear plastic floor trim on Chevy vans must be cut straight across as shown in photo. Measure seven inches (7 1/4 ) from rear center of trim and cut straight-line full width. (Jig saw works well for this step) After plastic trim is cut and back in it s original location, you must measure 7 inches forward on both sides from newly cut trim to place rear Kwik Kit bulkhead. This is the starting position so parts fit into the correct locations. Note: With OEM rear AC/Heat, The kit will be shifted to passenger side. 3


4 Ford Driver-Side rear Ford Passenger-Side rear 8 inches 8 inches. *** Ford Van does NOT require rear trim modification*** ***Kwik kits are designed for cargo vans with no rear OEM trim, however they can be installed into passenger window vans. Some rear trim removal or modification is required. Do not remove all rear trim and headliner as this will aid in sound deadening & insulation 3. PASSENGER WINDOW VAN PREPARATIONS: Note: Kwik Kits are recommended for Cargo Vans. The installer must determine modifications to the interior of a window van. 1. Remove all rear bench seats from the vehicle. 2. Modify / remove interior parts as needed. 3. Remove floor mat/carpet and replace with ½ plywood or sound deadening material. (Recommended). 4. If installing KK-F-VAK, (OEM air conditioning adapter) cut or remove all plastic trim around the rear OEM system. UNPACKING AND INSTALLATION: ***Refer to exploded view drawing on page 22 to identify parts *** 4


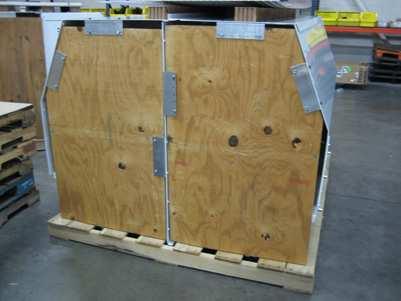
5 1. Remove clear shrinkwrap covering the prisoner transport assembly. 2. This is the rear 40/60/or 80 section of the kit. 3. Remove all black hardware, wood panels and brackets holding wood panels. 4. Remove bolts holding the kit to the wood pallet. 5. With all hardware removed the remaining sections should match the sub-assemblies on the following pages 1. Remove clear shrink-wrap covering from prisoner transport assembly. 2. This is the 3 rd compartment, 40 section 3. Remove all black hardware, wood fillers, and brackets holding assemblies. 4. Remove bolts holding the kit to the wood pallet. 5. With all hardware removed the remaining sections should match the sub-assemblies on the following pages 5


6 Remove all black hardware from assembled unit. This will give you the subassemblies as they are shown on the following pages. 6


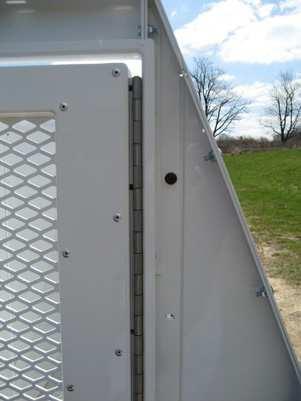
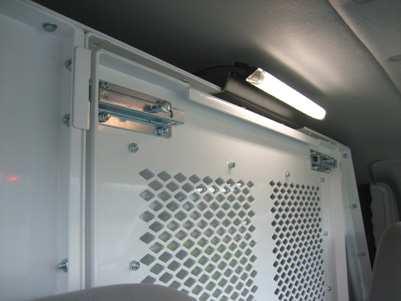
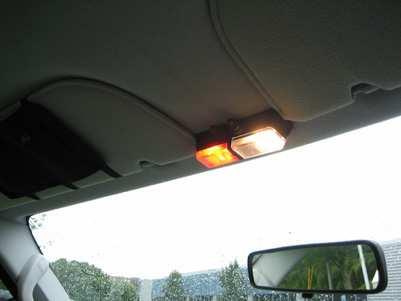
7 VERY IMPORTANT: Be sure that all Auxiliary lighting, video systems, Kwik kit options, and wiring are complete. Access is severely limited after kit is installed. Notch trim for wiring B Pillar 1 ½ Hole If optional rear load light(s) (KK-RLL) was ordered, install at this time. See KK-RLL install instructions Run all wiring for dome lights, power vents, video system, HVAC, etc. at this time. Tie to existing OEM harness For neatness of wiring, route all cables down driver-side B pillar. If going under hood for power to console, drill hole at location above. Be sure to tape harnesses to roof in approximate locations that accessories are being installed in Kwik kit. This will vary between the different model kits. At this time go to the KK- (x)-vak install instructions. This must be installed prior to Kwik Kit. If optional Power Vent(s) (KK-PVENT) was ordered, see those instructions at this time for necessary prep work that must be done prior to installing Kwik Kit 7


8 Item #1 Item #2 Place Driver-side Bench/Wall assembly into van so bench rests on wheel well Place Passenger-side Bench/Wall assembly into van so bench rests on wheel well Item #3 Item #3 Remove steel support bracket for Emergency Exit Hatch pin. Re-install when attaching Front Bulkhead to Bench/Wall assemblies Remove Emergency Exit Hatch from Front Bulkhead to ease installation Item #3 Item #3 Item #3 Place Front Bulkhead into vehicle Attach Front Bulkhead to Driver-side Bench/Wall assembly View of Emergency Exit Hatch support bracket assembled. 8


 Diamond Plate Floors between")


 will square the benches and")


9 Item #4 & #13 Be careful that exposed wires are not touching metal and optional KKx-VAK hoses are not completely crushed Note: Vent hose will be tight in spots. If hose are crushed to an oval shape the airflow will still be good. Avoid completely crushing hoses. Place (2) Diamond Plate Floors between Bench/Wall assemblies and Front bulkhead. Place cardboard along side of bench while positioning the floor to avoid scratching the bench. Item #3 Item #5 Item #5 Item #4 The floor(s) will square the benches and bulkheads to the kit. Item #5 to #3 Place Center Divider into vehicle. Item #7 NOTE: Some installers prefer to install ceiling prior to divider. Loosely bolt Center Divider to Front Bulkhead Current view of installation Carefully place Driver-side Ceiling section into vehicle. 9


10 Item #8 Item #8 Place Passenger-side Ceiling section into vehicle Do not attach any hardware at this time Route dome light wires, HVAC hoses, video cables, etc to their respective locations Current view of installation Item #7 & #8 Item #9 Item #7 & #8 Slide the ceiling sections out of the way in order to access A/C hoses, wires, etc. Note: These components will be hard to access once ceiling is mounted. Remove all slack from hoses to maximize airflow. Remove Bulkhead Emergency Exit Hatches to ease installation. Item #9 Item #12 Item # 10 Install forward compartment driver sidewall / bench assembly. Item 10. Install forward compartment ceiling assembly. Item 12. Place rear facing bench against front bulkhead. Item 16. Position Middle Bulkhead to separate front and rear compartments Item # 16 10


11 Rear Facing bench Use under seat flange holes to mark and Drill through front bulkhead with ¼ bit. Use ¼ x ¾ bolts and serrated to attach seat to bulkhead. Drill floor flange and side seat flange with a 5/32 drill bit. Attach floor flange and side seat flange with # 10 x ¾ pan head sheet metal screws. Attach seat cover plate with # 10 x ½ flat head sheet metal screws. Item #9 to #2 Loosely bolt Passenger-side rear ceilings, Bench/Wall assembly to Middle Bulkhead using ¼ x ¾ Carriage bolts and serrated nuts Note: An awe or scribe is recommended to help align holes. Bolt side door and door-frame assembly using ¼ x ¾ carriage bolts, washers and nuts. 11


12 Item #6 to #5 Item #6 Place Rear Bulkhead Doorframe into vehicle Item #6 Position between Driver and Passenger-side Bench/Wall assemblies Loosely attach Doorframe to Center divider using #10 x 3/8 flat head machine screws and nylock nuts Item #6 to #2 Item #11 Loosely bolt Rear Bulkhead Doorframe (at the door hinge) to Bench/Wall assemblies using ¼ x ¾ carriage bolts, washers and serrated nuts Note: It is recommended to put edge molding on the OEM door opening on the passenger side to avoid damaging the Kwik kit door. Place the 3 rd Compartment Doorframe assembly. Item #11 to #9 Item #12 to #11 Press doorframe to align with holes in Passenger-side Bench/Wall assembly. Align 3 rd Compartment Doorframe to 3 rd Compartment Ceiling and loosely attach ¼ x ¾ hex head bolts, washers and serrated nuts. 12


13 Item #7, #8, #12 to #3, & #6 Item #6 to #5 Continue around the entire kit bolting all Ceiling pieces to Bulkheads and Doorframes using ¼ x ¾ carriage bolts, washers, and serrated nuts An awe or scribe will help align the holes Tighten screws holding Rear Doorframe to Center Divider Pry bar Cut door gasket with utility knife. Cut gasket to the length of door acceptor frame. Attach as shown above. Position the entire unit according to the measurements on the following page. Note: Maneuver the kit into position. THE FOLLOWING STEPS ARE EXTREMLY CRITICAL FOR A SUCCESFULL INSTALLATION! PLEASE FOLLOW THESE INSTRUCTIONS CAREFULLY. Lower Driver-Side rear Lower Passenger-Side rear Item #1 Rear driver-side doorframe wing ¼ 8 inches 8 inches Position of driver-side Rear Doorframe when installing with factory rear air There should be at least ¼ of space between the A/C blower motor and wing Measurement from driver-side Rear Doorframe to vehicle doorframe shown above 13 Measurement from passenger-side Rear Doorframe to vehicle doorframe shown above

14 Top Driver-Side rear Top Passenger-Side rear Item #6 Approximately 3 inches 3 inches Item #6 Item #6 With unit positioned according to measurements on previous page, predrill and attach a #10 x 1 sheet metal screw to hold the rear Bulkhead in place while assembling the remainder of the unit. Item #7 to #1 Position Driver-side Ceiling section to mate with Bench/Wall assembly. Predrill 5/32 holes into Ceiling, using Bench/Wall assembly holes as a guide. Pull dome light wires through desired holes in ceiling and install dome lights with # 10 x 3/4" Flat head sheet metal screws. See dome light instructions for wiring and mounting details. 14


 using 3/16 drill bit and attach using ¼ x 1")


 w/ 3/16 hole and 1/8 hole through floor")

15 Be careful when predrilling not to hit hoses, wires, etc Note: Ceiling is behind wall Item #8 to #2 Pre-drill ceiling with 5/32 drill bit and attach #10 x 1 Phillips pan head sheet metal screws to hold Ceiling to Bench/Wall assembly. Repeat these steps on the Passenger-side Ceiling section Item #5 & #4 to van floor Be Sure Floor Is Square To Benches & Bulkheads. Attach Divider to vehicle. Pre-drill through floor(s) using 3/16 drill bit and attach using ¼ x 1 ½ hex head lag bolts Item #5 through #8 into #7 Item #4 through #1 into van floor Item 4 through #1 into van floor Pre-drill through Ceiling sections, (using Divider as a template), with 3/16 drill bit and attach using ¼ x 1 ½ hex head lag bolts Attach remainder of Diamond plate floor. Pre-drill diamond floor (only) w/ 3/16 hole and 1/8 hole through floor of vehicle Through Item #4, #1, & van floor Attach to wood floor or rubber floor mat using #10 x 1 Phillips pan head sheet metal screws Begin to tighten ALL loose hardware on the remainder of the unit, being sure to align edges and bends of materials being tightened. This will square the unit to itself. 15


16 On the Rear doorframe, remove the sheet metal screws installed earlier. Drill 3/8 holes through the doorframe, floor, and vehicle. Attach using 3/8 x 2 hex head bolts, washers, fender washers, lock washers, and hex nuts. Item #6 to van floor Item #11 to van floor 3/8 x 2 Hex head bolt, washers, and nut Item #11 to van floor On 3 rd Compartment Doorframe repeat the same steps done on Rear Doorframe. Only one bolt is used and must be located just to the left of the doors hinge as shown above. 3/8 x 2 hex head bolt, flat washer, fender washer, lock washer, and nut Item #11 Attach the doorframe to the vehicle using #10 x 1 Phillips pan head sheet metal screws Item #3 to van floor Secure the Front Bulkhead. Drill (2- one per-side) 3/8 holes through the frame, ½ plywood, and floor of vehicle Attach using 3/8 x 2 hex head bolt, flat washer, fender washer, and nut. 16


17 Socket Item #14 to doors and frames Pin Attach Ball & Socket Style Doorstop. 1 st Attach Pin portion of assembly. Attach to threaded hole on the door using a ¼ x 1 Hex head bolt. 2 nd Attach the Socket and bracket portion. Attach to doorframe using #8 x ¾ Phillips machine screws and keps nuts. Item #11 Item #15 In the upper corner of each side of the 3 rd Compartment Doorframe are small filler panels that need to be installed. Attach using ¼ x ¾ carriage bolts, washers, and serrated Place trim panels as shown above Pre-drill through trim panel (only) with 3/16. Pre-drill the vehicle w/ 1/8 hole and attach panels using #10 x 1 sheet metal screws Silicone all seems and joints. This will allow the unit to be hosed out. 17
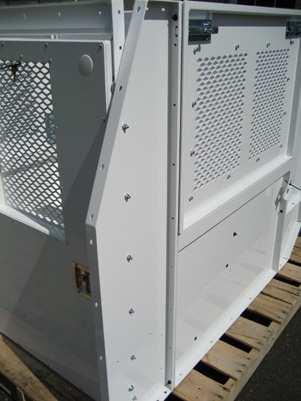
18 FINAL INSTALLATION PHOTOS Forward Compartment for models KK , KK , KK and KK Optional Storage Compartment (Sold Separately) 18


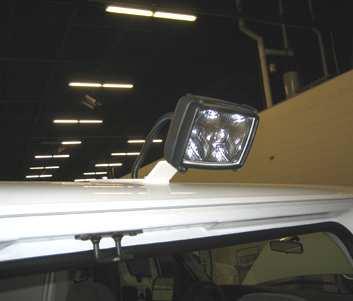
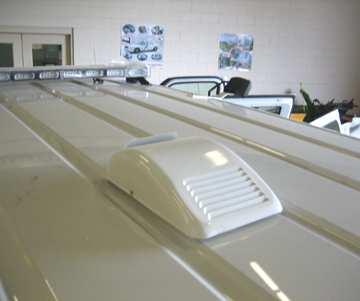
19 PRISONER TRANSPORT OPTIONS (All SOLD SEPERATLEY) KR-CCL-1 KR-DL KK-PVENT KK-RLL C-VS-1800-ECO w/ C-TCB-7 & C PT-VIDEO-X 19
20 Item 3 Item 1 Item 7 Item 12 ITEM DESCRIPTION 1 Driver-side Bench/Wall 2 Passenger-side Bench/Wall 3 Front Bulkhead 4 Diamond-plate Floor 5 Divider 6 Rear Bulkhead/ Doorframe Item 14 7 Driver-side Rear Ceiling 8 Passenger-side Rear Ceiling 9 Separator Bulkhead 10 Front Compartment L Bench 11 Front Compartment Doorframe 12 Front Compartment Ceiling 13 Front Compartment Floor 14 (2) Door Stops 15 Diamond-plate floor filler panel Item 8 Item 10 Item 9 Item 6 Item 4 Item 2 Item 15 Item 13 Item 14 Item 11
INSTALL INSTRUCTIONS KK-XXX-02 XX-Specify length: FORD and CHEVY VAN PRISONER TRANSPORT INSERT
 INSTALL INSTRUCTIONS KK-XXX-02 XX-Specify length: 80 100 120 FORD and CHEVY VAN PRISONER TRANSPORT INSERT TOOLS REQUIRED: ¼ & 3/8 Ratcheting Wrenches ¼ & 3/8 Air Ratchets (recommended) 3/8 Impact Guns
HARDWARE KIT # KKM or Rear Compartment: (Some hardware not used in all applications)
") PRISONER TRANSPORT INSTRUCTIONS for CHEVROLET EXPRESS VAN PT-C01-100-2A TOOLS REQUIRED: Standard and Metric Socket Sets Awe or Scribe Tape Measure Impact Gun (recommended) Pry-bar Caulk gun Drill & drill
PRISONER TRANSPORT INSTRUCTIONS for CHEVROLET EXPRESS VAN PT-C01-100-2A TOOLS REQUIRED: Standard and Metric Socket Sets Awe or Scribe Tape Measure Impact Gun (recommended) Pry-bar Caulk gun Drill & drill
General Prisoner Transport Install Instructions PT-2-INST
 General Prisoner Transport Install Instructions PT-2-INST 50 or 60 high x 80, 100 & 120 inch long / Double Compartment Inserts Also refer to PT-A-3XX instructions for vehicle specific mounting measurements
KWIK-KIT KK-S INSTALLATION INSTRUCTION PACKAGE
 KWIK-KIT KK-S-120-02 INSTALLATION INSTRUCTION PACKAGE INSTALLATION INSTRUCTIONS HAVIS KWIK-KIT KK-S-120-02 2002-2007 DODGE/FREIGHTLINER SPRINTER VAN PLEASE READ COMPLETE INSTRUCTIONS PRIOR TO INSTALLATION
INSTALLATION INSTRUCTIONS KK-K9-C12-K CHEVY IMPALA
 INSTALLATION INSTRUCTIONS KK-K9-C12-K 2000-2005 CHEVY IMPALA READ ALL INSTRUCTIONS PRIOR TO INSTALLATION TOOLS REQUIRED: Power Drill Drill bits1/4 and 5/32 7/l6 wrench and socket 15,18 and\or 19mm socket
INSTALLATION INSTRUCTIONS K9-C20-32 & K9-C CHEVROLET 4 DOOR TAHOE, GMC YUKON, SUBURBAN and YULON XL
 INSTALLATION INSTRUCTIONS K9-C20-32 & K9-C21-32 2007-2014 CHEVROLET 4 DOOR TAHOE, GMC YUKON, SUBURBAN and YULON XL TOOLS REQUIRED: Power drill Drill bit set Standard & metric socket sets Phillips screwdriver
K9 KIT INSTALLATION INSTRUCTIONS CROWN VIC KK-K9-F7-K
 K9 KIT INSTALLATION INSTRUCTIONS 1998-2011 CROWN VIC KK-K9-F7-K TOOLS REQUIRED: Power Drill (Cordless preferable) Drill Bit Set Standard Wrench and Socket Set Metric Socket Set Screwdriver Set Torx Bit
INSTALLATION INSTRUCTIONS KK-K9-F14-K K9 KIT FOR FORD EXPEDITION
 INSTALLATION INSTRUCTIONS KK-K9-F14-K-32 32 K9 KIT FOR 2003-2016 FORD EXPEDITION TOOLS REQUIRED: Power Drill Drill Bit Set Standard & Metric Socket Sets Phillips Screw Driver Open End Wrench Set Wire Cutters
K9 KIT INSTALLATION INSTRUCTIONS CROWN VIC with Fire Suppression System Model KK-K9-F7-K-FS
 K9 KIT INSTALLATION INSTRUCTIONS 2005-2011 CROWN VIC with Fire Suppression System Model KK-K9-F7-K-FS TOOLS REQUIRED: Power Drill (Cordless preferable) Drill Bit Set Standard Wrench and Socket Set Metric
INSTALL INSTRUCTIONS K9-F14-PT K9/PRISONER TRANSPORTATION SYSTEM FORD EXPEDITION
 INSTALL INSTRUCTIONS K9-F14-PT K9/PRISONER TRANSPORTATION SYSTEM 2003-2017 FORD EXPEDITION HARDWARE: QTY: DESCRIPTION: PART #: 28 ¼-20 x ½ Stainless carriage bolt GSM32022 8 ¼-20 x ¾ Stainless carriage
RH-412 STEEL DOORS INSTALLATION INSTRUCTIONS
 RH-412 STEEL DOORS INSTALLATION INSTRUCTIONS By following the steps outlined below, the assembly, installation and adjustment of the steel doors, will be a simple process. Let s start with the Driver Side.
INSTALLATION INSTRUCTIONS RH 412 STEEL DOORS
 By following the steps outlined below, the assembly, installation and adjustment of the steel doors, will be a simple process. Let s start with the Driver Side. Note: Having the hood open makes the job
Rear Mount Installation Instructions
 Rear Mount Installation Instructions Ford Transit Low Roof 130 WB Frame Kit Part #: DTC 0809-011 V1.0.10.12.18 IMPORTANT INSTALLATION STEPS ARE DENOTED USING A STOP SIGN. THESE STEPS MUST BE PERFORMED
INSTALLATION GUIDE. C20-FTL STRAIGHT PARTITION Transit Partition ( Perforated Window, No Access, Steel )
") INSTALLATION GUIDE C20-FTL STRAIGHT PARTITION Transit Partition ( Perforated Window, No Access, Steel ) QUICK START GUIDE Phase 1 - Assembly q 1.1 Setup... q 1.2 Partition Assembly... 3-5 5-6 Phase 2 -
INSTALLATION GUIDE C20-FTL STRAIGHT PARTITION Transit Partition ( Perforated Window, No Access, Steel ) QUICK START GUIDE Phase 1 - Assembly q 1.1 Setup... q 1.2 Partition Assembly... 3-5 5-6 Phase 2 -
Installation Guide 40670
 Installation Guide 40670 Kargo Master Rancho Cordova, CA 95742 800-343-7486 CustomerService@KargoMaster.com DATE: Installation Instructions 40670 *PLEASE READ ALL INSTRUCTIONS AND WARNINGS PRIOR TO ASSEMBLING,
PARTITION INSTALLATION INSTRUCTIONS
 PARTITION INSTALLATION INSTRUCTIONS 2015 Chevrolet Tahoe PPV / Part Number 5703FW, FWA & FEW Do not attempt to install this product on any vehicle equipped with third row seating! Parts List Distributed
INSTALLATION INSTRUCTIONS INTERIOR WINDOW GUARDS WGI-C1, C2, C3 & C CHEVROLET FULL SIZE WINDOW VANS
 INSTALLATION INSTRUCTIONS INTERIOR WINDOW GUARDS WGI-C1, C2, C3 & C4 1997-2019 CHEVROLET FULL SIZE WINDOW VANS TOOLS REQUIRED: Power drill Safety goggles Hand jig saw Pencil Drill Bit Set File Set Phillips
Bulkhead Model Number and
 Bulkhead Model Number 96141-3-01 and 96142-3-01 Installing your ProMaster bulkhead is very clear cut following these instructions. Before cutting or drilling in the floor, verify the location of you gas
WPS crew Doors Installation instructions
 WPS-132-133 crew Doors Installation instructions ORDER OF INSTALLATION FOR A COMPLETE ENCLOSURE OF A CREW WPS (Weather Protection System) IS AS FOLLOWS: 1. Heater 2. Rear Thresholds - Right Hand & Left
3/4 Rear DuraRac Installation Instructions
 3/4 Rear DuraRac Installation Instructions Ford Transit Low Roof 130 WB Frame Kit Part #: CRC 27-1010-001 V1.0.09.28.18 IMPORTANT INSTALLATION STEPS ARE DENOTED USING A STOP SIGN. THESE STEPS MUST BE PERFORMED
START HERE BEFORE YOU BEGIN FIG 1 STEP 2
 PROFESSIONAL INSTALL RECOMMENDED REAR MODULAR / MULTI LED ROOF MOUNTS PART#: Z350040 / Z350050 REAR ROOF LED LIGHT MOUNTS Parts included (1) - Driver Side Roof Mount Upright (1) - Passenger Side Roof Mount
Bushwacker Jeep Flat Style Fender Flares Front Pair
 Bushwacker Jeep Flat Style Fender Flares Front Pair Note: These instructions involve cutting parts of your vehicle. Please read all instructions prior to starting. Installation Time: 3-4 Hours Tools Required:
Installation for Full Size Polaris Ranger Crew Doors
 Installation for Full Size Polaris Ranger Crew Doors Order of Installation: Heater Doors Wiper on to Windshield Windshield Top & Back Panel Note: Most of the steps in these instructions need to be repeated
40670 Transit Connect/NV200/City Express/ProMaster City Partition
 40670 Transit Connect/NV200/City Express/ProMaster City Partition Top Panel (1) Bottom Panel (1) Transit Connect (2014) Top Angle (1) TC Top MNT BRKT (2) TC Bottom MNT PLT (2) NV200/City Express Top Mount
NISSAN NV200 CHEVY CITY EXPRESS WALL LINER KIT INSTALLATION INSTRUCTIONS
 NISSAN NV200 CHEVY CITY EXPRESS WALL LINER KIT INSTALLATION INSTRUCTIONS NOTES: 1. Before commencing, remove all wall liners and D Rings already installed in the vehicle. 2. Consult layout PDF and compare
INSTALLATION GUIDE PREMIUM FRONT BUMPER. AEV30103AE Last Updated: 09/08/14 US PATENTS: D683281, D CHINESE PATENT: ZL
 PREMIUM FRONT BUMPER US PATENTS: D683281, D697842 CHINESE PATENT: ZL 2012 3 0026081.4 AEV30103AE Last Updated: 09/08/14 INSTALLATION GUIDE PLEASE READ BEFORE YOU START TO GUARANTEE A QUALITY INSTALLATION,
INSTALLATION GUIDE N5-DS48-4
 INSTALLATION GUIDE N5-DS48-4 Shelving ( steel ) Transit High Roof & Medium Roof Promaster Standard Roof & High Roof Nissan NV High Roof Sprinter Low Roof & High Roof Box Truck / Trailer QUICK START GUIDE
INSTALLATION INSTRUCTIONS
 NOTE: Bolts should remain hand tight until all bolts are installed. STEP 1 Installing the door base (both sides). 1. Locate the outer, roll cage, mounting bolt (passenger side is shown in the illustration).
MM Strut Tower Brace, Cobra (MMSTB-7)
") The MM strut Tower Brace attaches to each strut tower and to the firewall. 3430 Sacramento Dr., Unit D San Luis Obispo, CA 93401 Telephone: 805/544-8748 Fax: 805/544-8645 www.maximummotorsports.com MM
The MM strut Tower Brace attaches to each strut tower and to the firewall. 3430 Sacramento Dr., Unit D San Luis Obispo, CA 93401 Telephone: 805/544-8748 Fax: 805/544-8645 www.maximummotorsports.com MM
GlideRite Retractable Cover System For HotSpring & Tiger River Spas (except Classic & pre-2000 Landmark Spas)
") List of Contents Quantity Description 12 #10 x 1 ½ Flat Head Phillips Screw (see pg. 2) 2 #10 x ½ Pan Head Phillips Screw (see pg. 2) 8 ¼ x 2 ½ Lag Bolt (see pg. 2) 7 ¼ 20 x 5 / 8 Hex Head Bolt (see pg.
List of Contents Quantity Description 12 #10 x 1 ½ Flat Head Phillips Screw (see pg. 2) 2 #10 x ½ Pan Head Phillips Screw (see pg. 2) 8 ¼ x 2 ½ Lag Bolt (see pg. 2) 7 ¼ 20 x 5 / 8 Hex Head Bolt (see pg.
Katerack Wagon Shelving System
 Ford Transit Connect Assembly Installation Instructions Sheet 1 of 14 BEFORE YOU START! IMPORTANT INSTALLATION STEPS ARE DENOTED USING A STOP SIGN. THESE STEPS MUST BE PERFORMED IN THE SPECIFIED ORDER
RangerWare Fiberglass Door System Installation Instructions P/N
 Page 1 of 9 RangerWare Fiberglass Door System Installation Instructions P/N 2878016 ORDER OF INSTALLATION Note: To assure proper order, read all Accessory Installation Instructions before beginning. 1.
Hatchback Wing Riser Kit
 Hatchback Wing Riser Kit 2015-06-11 Thank you for purchasing this PERRIN product for your car! Installation of this product should only be performed by persons experienced with installation of aftermarket
JK Front Crusher Flares
 INSTALLATION INSTRUCTIONS INST-17-03-030_A JK Front Crusher Flares IMPORTANT: Thank you for purchasing this Poison Spyder product. Please read through this entire document before proceeding with installation.
INSTALLATION INSTRUCTIONS CONTOURED LIGHT BAR APPLICATION: CHEVY EQUINOX/ GMC TERRAIN PART NUMBERS: ,
 INSTALLATION INSTRUCTIONS CONTOURED LIGHT BAR APPLICATION: 2010-2014 CHEVY EQUINOX/ GMC TERRAIN PART NUMBERS: 32-21020, 32-21025 ITEM QUANTITY DESCRIPTION TOOLS NEEDED 1 1 CONTOUR BAR TORQUE WRENCH 2 1
ATTENTION: PLEASE READ AND UNDERSTAND ALL INSTRUCTIONS AND WARNINGS BEFORE ASSEMBLING, INSTALLING OR USING THIS PRODUCT.
 VAN STORAGE SOLUTIONS FOR THE WAY YOU WORK TM INSTALLATION MANUAL BULKHEAD Model Number 96101-3-01 ATTENTION: PLEASE READ AND UNDERSTAND ALL INSTRUCTIONS AND WARNINGS BEFORE ASSEMBLING, INSTALLING OR USING
GlideRite Retractable Cover System For Hot Spot Spas (SE & SLX only)
") List of Contents Quantity Description 12 #10 x 1 ½ Flat Head Phillips Screw (see pg. 2) 2 #10 x ½ Pan Head Phillips Screw (see pg. 2) 8 ¼ x 2 ½ Lag Bolt (see pg. 2) 7 ¼ 20 x 5 / 8 Hex Head Bolt (see pg.
List of Contents Quantity Description 12 #10 x 1 ½ Flat Head Phillips Screw (see pg. 2) 2 #10 x ½ Pan Head Phillips Screw (see pg. 2) 8 ¼ x 2 ½ Lag Bolt (see pg. 2) 7 ¼ 20 x 5 / 8 Hex Head Bolt (see pg.
PAK Drum Roll Top Assembly Instructions. Note: 2 people will be required to assemble roll top
 PAK901 4 Drum Roll Top Assembly Instructions Note: 2 people will be required to assemble roll top PLEASE READ ASSEMBLY INSTRUCTIONS CARFULLY Tools required: 5/8 Socket & Ratchet 9/16 Deep Well Socket &
SUT-1000CLC ASSEMBLY REQUIREMENTS
 SUT-1000CLC Torque wrench, carpenters square, wire cutters, Phillips screwdriver, 7/16, 9/16, and 3/4 combination wrenches, ratchet, 9/16, 3/4, 13/16, and 7/8 sockets. ASSEMBLY REQUIREMENTS *Torque all
Medium HoneyBadger Chase Rack Installation Instructions
 PREPARATION Medium HoneyBadger Chase Rack Installation Instructions 1. Disconnect the negative terminal on the battery. Park the vehicle on level ground and set the emergency brake. 2. We recommend reading
INSTALLATION GUIDE. C20-FTM STRAIGHT PARTITION Transit Partition ( Perforated Window, No Access, Steel )
") INSTALLATION GUIDE C20-FTM STRAIGHT PARTITION Transit Partition ( Perforated Window, No Access, Steel ) QUICK START GUIDE Phase 1 - Assembly q 1.1 Setup... q 1.1.1 Unpack components; compare with the bill
INSTALLATION GUIDE C20-FTM STRAIGHT PARTITION Transit Partition ( Perforated Window, No Access, Steel ) QUICK START GUIDE Phase 1 - Assembly q 1.1 Setup... q 1.1.1 Unpack components; compare with the bill
D. Drill Bolt Holes Through Topper Shell and Bed Rails
 A. Check Mounting Kit Check to make sure that all of the following items are included in the mounting kit. Call 515-272-4372 if you need to obtain a part from BrandFX. Double-stick tape (1 roll) White
MM Strut Tower Brace, GT (MMSTB-5.1)
") 3430 Sacramento Dr., Unit D San Luis Obispo, CA 93401 Telephone: 805/544-8748 Fax: 805/544-8645 www.maximummotorsports.com MM Strut Tower Brace, 1996-97 GT (MMSTB-5.1) MMSTB-5.1 is for 1996-97 GT s with
3430 Sacramento Dr., Unit D San Luis Obispo, CA 93401 Telephone: 805/544-8748 Fax: 805/544-8645 www.maximummotorsports.com MM Strut Tower Brace, 1996-97 GT (MMSTB-5.1) MMSTB-5.1 is for 1996-97 GT s with
STYLE BAR & TONNEAU COVER INSTALLATION
 STYLE BAR & TONNEAU COVER INSTALLATION INSTALLATION MANUAL: 2005 to '09 Mustang P/N: 10-8002-C12071B Saleen Performance, Inc. 1225 East Maple Rd., MI 48083 800-888-8945 www.saleen.com 1 IF YOU ARE NOT
Be sure any accessory used will fit with the soft upper doors before installing. Not all accessories will be compatible.
 Company Name: Spike Power Sports Vehicle Name: Polaris General 2P Product Description: Soft Upper Doors Part Number: 58-1600 Revision: R01 09/19/2018 Contents: 655 Elm Ridge Ave, Canal Fulton OH, 44614
DuraRac Shelving System
 GM Full Size Van Assembly Installation Instructions Sheet 1 of 13 BEFORE YOU START! IMPORTANT INSTALLATION STEPS ARE DENOTED USING A STOP SIGN. THESE STEPS MUST BE PERFORMED IN THE SPECIFIED ORDER TO ENSURE
INSTALLATION MANUAL FRONT. See pages 2 and 3 of this manual for configuration options. Level of Difficulty. Product Photo (center section only)
") INSTALLATION MANUAL FRONT Level of Difficulty Moderate Product Photo (center section only) All hardware listed below will be provided with the bumpers center section. Additional hardware will be supplied
INSTALLATION MANUAL FRONT Level of Difficulty Moderate Product Photo (center section only) All hardware listed below will be provided with the bumpers center section. Additional hardware will be supplied
Rugged Ridge Body Armor Guard Kit, 5 Pieces, Black (07-Current JK 4-door)
") Rugged Ridge Body Armor Guard Kit, 5 Pieces, Black (07-Current JK 4-door) Installation Time: 60 Minutes Tools Required: Notes: Phillips head screwdriver 3/8 socket or Flat head screwdriver 1/2 socket 7
Rugged Ridge Body Armor Guard Kit, 5 Pieces, Black (07-Current JK 4-door) Installation Time: 60 Minutes Tools Required: Notes: Phillips head screwdriver 3/8 socket or Flat head screwdriver 1/2 socket 7
INSTALLATION INSTRUCTIONS
 INSTALLATION INSTRUCTIONS SNYPER TUBULAR FENDERS APPLICATION: 2007-2017 Jeep Wrangler JK PART NUMBER: 62-1005, 62-1015 ITEM QUANTITY DESCRIPTION TOOLS NEEDED 1,2 2 FRONT FENDERS, DRIVER (1) AND PASSENGER
Installation instructions, accessories. TV receiver, digital
 Installation instructions, accessories Instruction No 30756561 Version 1.1 5 Part. No. 30756181, 30756569 TV receiver, digital Volvo Car Corporation TV receiver, digital- 30756561 - V1.1 Page 1 / 36 Equipment
TOYOTA TACOMA LED BED LIGHTS Preparation
 Preparation Part Number: PT948-35160 Kit Contents Item # Quantity Reqd. Description 1 1 Hardware Kit 2 1 Driver Side LED assembly 3 1 Passenger Side LED assembly 4 1 Main Wire Harness Hardware Bag Contents
Signal Mirror Installation Instructions Honda Odyssey
 Signal Mirror Installation Instructions 2005-2009 Honda Odyssey THE safety accessory of the 21st Century. P/N 210-0122-0 Rev. A4 (6/9/09), BTV 2006 Muth Company, LLC PROFESSIONAL INSTALLATION RECOMMENDED
Instruction Guide 4A90L
 Instruction Guide 4A90L Kargo Master Rancho Cordova, CA 95742 800-343-7486 CustomerService@KargoMaster.com DATE: *PLEASE READ ALL INSTRUCTIONS AND WARNINGS PRIOR TO ASSEMBLING, INSTALLING, AND USING THIS
INSTALLATION GUIDE. C30-NH STRAIGHT PARTITION Nissan NV ( Swing Door, Steel )
") INSTALLATION GUIDE C30-NH STRAIGHT PARTITION Nissan NV ( Swing Door, Steel ) QUICK START GUIDE Phase 1 - Assembly q 1.1 Setup... q 1.2 Partition assembly... 3 to 4 5 to 6 Phase 2 - Installation q 2.1 Tips
INSTALLATION GUIDE C30-NH STRAIGHT PARTITION Nissan NV ( Swing Door, Steel ) QUICK START GUIDE Phase 1 - Assembly q 1.1 Setup... q 1.2 Partition assembly... 3 to 4 5 to 6 Phase 2 - Installation q 2.1 Tips
PROVEN WORLDWIDE SNORKEL FOR CHEVY COLORADO NEW PRODUCT
 AEV30272AC Last Updated: 10/09/18 PROVEN WORLDWIDE SNORKEL FOR CHEVY COLORADO NEW PRODUCT Please visit www.aev-conversions.com to view the most current installation guide for this product. This is a new
4832A Installation Sheet Part List
 4832A Installation Sheet Part List (1) 4016A-43-003 Qty 1- (2) 4016A-43-002 Qty 1- (3) 4016A-43-001 Qty 2- (4) 4016A-10-005 Qty 1- (5) 4016A-43-004L Qty 1- Mounting Bolt Kit (A) (K) Qty 2 - Qty 6 - M10
Toyota FJ Cruiser 2006-Up Set Part # Revision A
 Toyota FJ Cruiser 2006-Up Set Part # 31924 Revision A 03-31-08 Step 1: Prior to Installation: A) Fit: Verify the fit of the flares to vehicle. (Some filing, sanding, or cutting may be necessary to ensure
STEP 1 : DESTROYER FRONT BUMPER INSTALL GATHER YOUR TOOLS AND LAY OUT YOUR PARTS... *shorty bumper to show hardware* Tools Required:
 DESTROYER FRONT BUMPER INSTALL JL STEP 1 : GATHER YOUR TOOLS AND LAY OUT YOUR PARTS... Tools Required: - Utility knife - 11/16 Deep socket - Ratchet - 11/16 Crescent wrench - Ratchet Extension - 1/4 socket
Ford Police Interceptor Utility Vehicle
 Ford Police Interceptor Utility Vehicle 1 TOOLS NEEDED 13 MM Twelve Point Deep Socket Socket Wrench Extension Socket Wrench Hand Drill or Cordless Drill Phillips Head Screwdriver Measuring Tape or Ruler
CLUB-SPORT ROLL BAR: Volkswagen Mk4 Golf
 HPA Motorsports Inc. 604-888-7274 www.hpamotorsport.com CLUB-SPORT ROLL BAR: Volkswagen Mk4 Golf Congratulations on the purchase of your Club-Sport Roll Bar from HPA Motorsports! The engineering elements
Side DuraRac Installation Instructions
 Side DuraRac Installation Instructions Ford Transit Low Roof 130 /148 WB Frame Kit Part #: CRC 22-1010-002 V1.0.08.10.18 IMPORTANT INSTALLATION STEPS ARE DENOTED USING A STOP SIGN. THESE STEPS MUST BE
Side Katerack Installation Instructions
 Side Katerack Installation Instructions Ram ProMaster City 2015+ Frame Kit Part #: CRC 28-1000-001 V1.0.12.06.18 IMPORTANT INSTALLATION STEPS ARE DENOTED USING A STOP SIGN. THESE STEPS MUST BE PERFORMED
MODULAR BUMPER INSTALLATION MANUAL
 MODULAR BUMPER INSTALLATION MANUAL Parts List* 1 Center section 1 Side extension, passenger / right 1 Side extension, driver / left 1 Side cap, passenger / right 1 Side cap, driver / left 1 Brush guard,
Bushwacker Jeep Flat Style Fender Flares Rear Pair (JK Wrangler 2dr)
") Bushwacker Jeep Flat Style Fender Flares Rear Pair (JK Wrangler 2dr) Note: These instructions involve cutting parts of your vehicle. Please read all instructions prior to starting. Installation Time: 3-4
Bushwacker Jeep Flat Style Fender Flares Rear Pair (JK Wrangler 2dr) Note: These instructions involve cutting parts of your vehicle. Please read all instructions prior to starting. Installation Time: 3-4
Assembly Instructions 10 X 10 Aluminum Frame Building
 Assembly Instructions 10 X 10 Aluminum Frame Building 27 97 9 8 47 36 74 52 10 10 X 10 Square Building W/ Dome Includes: The Steel Entry Door with a Dead Bolt Lock assembly and Aluminum Door Frame. Metal
Mid Size Ranger Pro-fit Doors #06023 Installation & Operations Manual
 Mid Size Ranger Pro-fit Doors #06023 Installation & Operations Manual Before You Start: Please familiarize yourself with all the steps before beginning assembly. Compatibility Info: This Door System is
INSTALLATION GUIDE. C20-DH STRAIGHT PARTITION Sprinter Partition ( Perforated Window, No Access, Steel )
") INSTALLATION GUIDE C20-DH STRAIGHT PARTITION Sprinter Partition ( Perforated Window, No Access, Steel ) QUICK START GUIDE Phase 1 - Assembly q 1.1 Setup... q 1.2 Partition assembly... 3-4 5-6 Phase 2 -
INSTALLATION GUIDE C20-DH STRAIGHT PARTITION Sprinter Partition ( Perforated Window, No Access, Steel ) QUICK START GUIDE Phase 1 - Assembly q 1.1 Setup... q 1.2 Partition assembly... 3-4 5-6 Phase 2 -
Transit Connect Full/Half Installation Instructions
 GATHER THESE TOOLS FOR ASSEMBLY & INSTALLATION 7/16 wrench, T45 Torx socket, 7/16 socket, 3/8 drive ratchet - 3/8 socket One 1/8 square end driver bit provided - Electric drill/driver/18v cordless One
RBP-1215B-RX DODGE RAM QUAD CAB RX3
 RBP-1215B-RX3 2002-2017 DODGE RAM 15-3500 QUAD CAB RX3 Passenger side RX-3 Side Step Drill Template Passenger side rear Modular Bracket (6) L Support Brackets Driver side rear Modular Bracket Driver side
HONDA RIDGELINE (KIT #601) Installation Instructions (to be used in addition to owners manual)
 Installation Instructions (to be used in addition to owners manual)") HONDA RIDGELINE (KIT #601) Installation Instructions (to be used in addition to owners manual) IMPORTANT NOTE: Read before beginning installation. These instructions replace all of Step 1 of the instructions
HONDA RIDGELINE (KIT #601) Installation Instructions (to be used in addition to owners manual) IMPORTANT NOTE: Read before beginning installation. These instructions replace all of Step 1 of the instructions
Polaris General Doors #06016 Installation & Operations Manual Fits Polaris General
 Polaris General Doors #06016 Installation & Operations Manual Fits Polaris General Before You Start: Please familiarize yourself with all the steps before beginning assembly. Compatibility Info: This Door
INSTRUCTION BOOKLET #34. For Wallbed models: KING SIZE SIERRA WITH STORAGE HEADBOARD
 For Wallbed models: KING SIZE SIERRA WITH STORAGE HEADBOARD INSTRUCTION BOOKLET #34 WARNING! ALL MURPHY/WALLBED SYSTEMS CONTAIN STORED ENERGY. FAILURE TO USE AND FOLLOW THESE INSTRUCTIONS DURING THE INSTALLATION
HOUSE PARTS PACKED IN HOUSE BOX PARTS IN PLASTIC BAG (HARDWARE) PARTS IN SMALL PLASTIC BAG (FLOOR CLIPS) PARTS PACKED IN BUNDLE
 PARTS IN SMALL PLASTIC BAG (FLOOR CLIPS) PARTS PACKED IN BUNDLE") Check parts against this list before starting assembly. Refer to illustrations on pages 6 and 7 to view house parts. If any shortages are found, refer to Packing Slip for claim instructions. Item 3 5 6
Check parts against this list before starting assembly. Refer to illustrations on pages 6 and 7 to view house parts. If any shortages are found, refer to Packing Slip for claim instructions. Item 3 5 6
Pickup Box Utility Rack Package Installation (Instruction ID: )
") 017 Chevrolet Colorado Pickup - WD (VIN S) Canyon, Colorado Accessory Installation Manual N America Document ID: 3966961 Pickup Box Utility Rack Package Installation (Instruction ID:3144879) Installation
017 Chevrolet Colorado Pickup - WD (VIN S) Canyon, Colorado Accessory Installation Manual N America Document ID: 3966961 Pickup Box Utility Rack Package Installation (Instruction ID:3144879) Installation
INSTALLATION INSTRUCTIONS
 INSTALLATION INSTRUCTIONS SPORTSMAN WINCH MOUNT GRILLE GUARD APPLICATION: 2016-2018 Toyota Tacoma PART NUMBER: 40-93885, 45-93880, 46-23885 ITEM QUANTITY DESCRIPTION TOOLS NEEDED 1 1 WINCH TRAY 15MM SOCKET
Signal Mirror Installation Instructions
 Signal Mirror Installation Instructions 2006 2007 Honda Ridgeline THE safety accessory of the 21 st Century. P/N 210 0142 0 Rev. A (9/5/07), BTV 2007 Muth Company, LLC Professional Installation Recommended:
Installation Instructions
 Installation Instructions Follow these simple instructions to install your OneDayCab! IMPORTANT: Unpack and check shipment for damage. Verify color, size and parts before demolition. Installation of interiors
SAFETY THIS PRODUCT IS FOR OFFROAD USE ONLY. ALL LIABILITY FOR INSTALLATION AND USE RESTS WITH THE OWNER.
 SAFETY Your safety and the safety of others is very important. In order to help you make informed decisions about safety, we have provided installation instructions and other information. These instructions
INSTALLATION INSTRUCTIONS DODGE RAM 2 & 4WD 1500 PART # P5058
 INSTALLATION INSTRUCTIONS 2009-13 DODGE RAM 2 & 4WD 1500 PART # P5058 PARTS LIST: Qty Description Qty Description 1 Grille Guard 12 12-1.75mm Hex Nuts 2 Upper Frame Mounting s (for trucks without tow hooks
WATSON RACING 4- & 6-POINT ROLL BAR Mustang Coupe p/n WR-BOLTINCAGE p/n WR-BOLTINCAGE6PT
 WATSON RACING 4- & 6-POINT ROLL BAR 2005-2014 Mustang Coupe p/n WR-BOLTINCAGE p/n WR-BOLTINCAGE6PT The Watson Racing 4-Point & 6-Point Roll Bars were designed for superior strength while allowing for installation
INSTALLATION INSTRUCTIONS FOR FRONT CASTING DECK RAIL Ranger
 INSTALLATION INSTRUCTIONS FOR FRONT CASTING DECK RAIL Ranger TOOLS REQUIRED FOR INSTALLATION: Drill motor, (1) 5/16 inch drill bit, (1) 13/64 drill bit, (1) 3/16 inch hex wrench (1) 3/32 inch hex wrench.
Installation Instructions Kit, Base Rail Bracket Part # 31413
 Installation Instructions Kit, Base Rail Bracket Part # 31413 Dealer / Installer: Provide a copy of these Instructions to the end user of this product. These Instructions provide important operating and
TOYOTA MOTOR EUROPE CA Products Division Tel : Fax :
 TOYOTA MOTOR EUROPE CA Products Division Tel : + 32 2 745 26 77 Fax : + 33 2 745 26 99 Ordering part numbers Comments Part Numbers Wooden floor one hatch PZ449-D3C42-11 one hatch with carpet PZ449-D3C42-01
INSTALLATION GUIDE FTX FLOOR Ford Transit ( 148" Extended Wheelbase )
") INSTALLATION GUIDE 6540-FTX FLOOR Ford Transit ( 148" Extended Wheelbase ) QUICK START GUIDE Phase 1 - Assembly q 1.1 Setup... 3-4 Phase 2 - Installation q 2.1 Install Preparation... q 2.2 Floor Installation...
INSTALLATION GUIDE 6540-FTX FLOOR Ford Transit ( 148" Extended Wheelbase ) QUICK START GUIDE Phase 1 - Assembly q 1.1 Setup... 3-4 Phase 2 - Installation q 2.1 Install Preparation... q 2.2 Floor Installation...
TIRE RACK INSTALLATION INSTRUCTIONS Dodge Sprinter
 Aluminess Products Inc 9402 Wheatlands Ct. #A Santee, CA 92071 619-449-9930 TIRE RACK INSTALLATION INSTRUCTIONS 07-11 Dodge Sprinter Please read before beginning Stainless steel hardware may bind together
FENDER FLARE INSTALLATION
 : 2009 - UP Ram 1500 Fleetside. (Exclude R/T Models) Tools Required 1. #2 Phillips Driver 2. Socket Wrench 3. 8mm Socket 4. 1/2 Wrench 5. Utility Knife PRIOR TO INSTALLATION Hardware Kit Included 5/16
Polaris XP Doors (P144202) Installation Instructions
 Installation Instructions") Polaris XP4 000 Doors (P440) Installation Instructions WARNING Pro Armor Door and Net are designed to work together to replace your original equipment nets and/or door. Install both the Pro Armor Door
Polaris XP4 000 Doors (P440) Installation Instructions WARNING Pro Armor Door and Net are designed to work together to replace your original equipment nets and/or door. Install both the Pro Armor Door
INSTALLATION INSTRUCTIONS GRILLE GUARD 09-ON DODGE RAM PART #
 INSTALLATION INSTRUCTIONS GRILLE GUARD 09-ON DODGE RAM PART # PARTS LIST: Qty Description Qty Description 1 Grille Guard 8 12-1.75mm x 35mm Hex Bolts 2 Brackets (for trucks without 22 12mm x 30.1mm OD
Bi-Color Signal Mirror Installation Instructions
 Bi-Color Signal Mirror Installation Instructions 2005-2009 Toyota Tacoma THE safety accessory of the 21 st Century. P/N 210-0141-0 Rev. A2 (3/30/09), BTV 2007 Muth Mirror Systems, LLC Page 3 of 13PplPage
SAVVY OFF ROAD GAS TANK SKID INSTALLATION INSTRUCTIONS
 It is best to work with a fuel tank that has the least amount of fuel in it as possible. Thank you for purchasing the best skid on the market. Please follow these instructions and your installation should
Chevy Tahoe Utility Vehicle
 Chevy Tahoe Utility Vehicle 1 TOOLS NEEDED 5/8 Step Drill Bit Hand Drill or Cordless Drill Measuring Tape or Ruler Grease Pencil (White or Black) Small Tie Wraps Silicone Adhesive Sealant Phillips Screw
BOX-117 E-Z-Go RXV Utility Box Mounting Kit Installation Instructions
 BOX-117 E-Z-Go RXV Utility Box Mounting Kit Installation Instructions Contents of BOX-117 Utility Box Mounting Kit: a (1 ea.) Utility Box Support Frame, Driver Side b (1 ea.) Utility Box Support Frame,
USSC LLC 4 ONE LLC FIELD MODIFICATION INSTRUCTIONS
 1 OF 17 A 1. PURPOSE: Instructions for in field replacement of 9004 mechanical suspension top pan 2. SCOPE: 9004 mechanical suspension with legacy two point LX back frame and current LX back frame 3. PROCEDURE:
INSTALLATION GUIDE 3020-FTH CONTOURED PARTITION
 INSTALLATION GUIDE 3020-FTH CONTOURED PARTITION Transit Partition ( Tempered Glass Window, Aluminum ) QUICK START GUIDE Phase 1 - Assembly q 1.1 Setup... q 1.1.1 Unpack components; compare with the bill
======================================================================================== ( DR / DR) JK WRANGLER MOD RACK
 JK WRANGLER MOD RACK") (10984 4DR / 10982 2DR) JK WRANGLER MOD RACK INSTALLATION SHEET Important Notes: Some brands of windshield light brackets and snorkels may not be compatible with the 10984 MOD Rack System. Body lifts are
(10984 4DR / 10982 2DR) JK WRANGLER MOD RACK INSTALLATION SHEET Important Notes: Some brands of windshield light brackets and snorkels may not be compatible with the 10984 MOD Rack System. Body lifts are
INSTALLATION INSTRUCTIONS GRILLE GUARD RAM 1500 PART # 5058/5058-2
 INSTALLATION INSTRUCTIONS GRILLE GUARD PART # 5058/5058-2 PARTS LIST: Qty Description Qty Description 1 Grille Guard 8 12-1.75mm x 35mm Hex Bolts 2 Upper Frame Mounting s (for trucks without tow hooks
Ford F150 Front Bumper
 2009-2011 Ford F150 Front Bumper Warning! Read the instructions completely before beginning the installation. Before tightening bolts, drilling or cutting where required, check to make sure that there
 For Wallbed models: KING SIZE INSTRUCTION BOOKLET #C1 Watch step by step installation instructions at: https://www.wallbedsbywilding.com/wallbed-installation-studio-series/ WARNING! ALL MURPHY/WALLBED
Signal Mirror Installation Instructions Toyota Tacoma
 Signal Mirror Installation Instructions 2005-2015 Toyota Tacoma THE safety accessory of the 21 st Century. P/N 210-0115-0 Rev. A4 (3/11/15), BTV 2005 Muth Mirror Systems, LLC Page 3 of 12PplPage 3 of 12
INSTALLATION INSTRUCTIONS
 INSTALLATION INSTRUCTIONS Accessory FABRIC REAR DOORS (5P) P/N 0SR90-HL4-211B (BLACK) P/N 0SR90-HL4-211C (CAMO) Application SXS1000M5P/M5D Honda Dealer: Please give a copy of these instructions to your