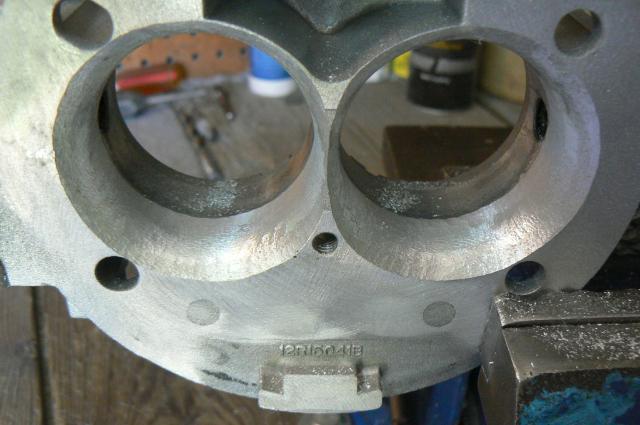
With a little time and effort, you can increase the performance of your engine by going from THIS.
|
|
|
- Robyn Wilkins
- 5 years ago
- Views:
Transcription

1 How-To Modify The V6 & V8 Throttle Body This modifying procedure is for the 5.2 and 5.9 V8 and the 3.9 V6 TB''s. With a little time and effort, you can increase the performance of your engine by going from THIS. TO THIS!
 -100 Grit Flap Wheel -150 Grit Flap")
2 These are the tools I recommend you have on hand before starting this project. -Hand Drill -Bench Vise -Hack Saw -Ro-Lock 36 Grit Sanding Disc -Dremel Tool w/cutting Disc -Spray Lube -T20 Torx Bit -T25 Torx Bit -Cutter Tool (Northern Tool) -100 Grit Flap Wheel -150 Grit Flap Wheel -240 Grit Flap Wheel -13/64th Drill Bit -8" Flat File -Points File -4mm Tap -Four (4) 4mm x 6mm screws -1/4-20 Flat Bottom Tap


3 Clamp the TB in the vise as shown and using the hack saw, begin removing ONLY the airhorns as shown in the pic. Use caution when clamping the TB in the vise applying enough pressure to hold it but not enough to crack the side of the TB because it can happen. Using the 36 grit sanding disc, begin smoothing the remaining parts of the air horns and also smooth out any hack saw marks.


4


5 Using the 13/64th drill bit, drill out the factory plug that covers the linkage adjusting screw.


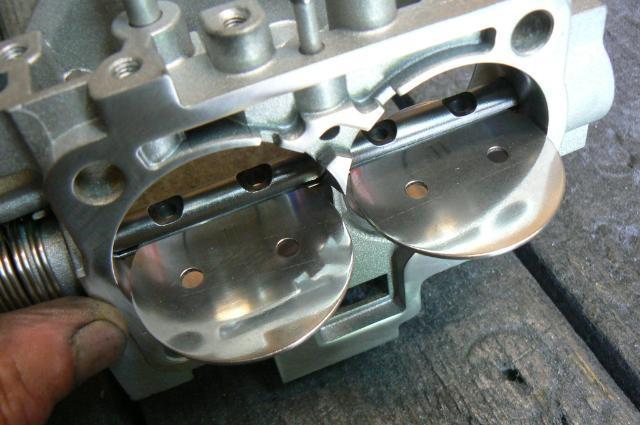
6 Using the dremel tool with the flat cutting disc, grind down the threaded end of the screws holding the blades in the throttle shaft. DO NOT attempt to remove these screws without doing this because the threaded ends are braded and the WILL twist off inside the throttle shaft and then there will be no way to remove the blade. Remove the four 4mm screws using a T20 torx bit paying very close attention to exactly how the blades are inserted in the throttle shaft because they WILL have to go back in EXACTLY the same way.


7 Using the 8" flat file and rotating the throttle shaft, file down any burrs that may be on the throttle shaft. Otherwise, the shaft will become stuck in the throttle shaft bearing when removing it from the TB.


8 Clamp the TB back in the bench vise and begin removing and tapering the top of the bores back to the TB mounting holes. This will be a rough cut only and will be smoothed up latter on in the process.


9 Using the 4mm tap, chase the threads in the throttle shaft to remove any messed up threads caused by removing the screws and use the flat file to smooth the shaft.


10 After you have throughly cleaned the TB, especially the IAC port, you have the option to leave the TB casing unpainted...


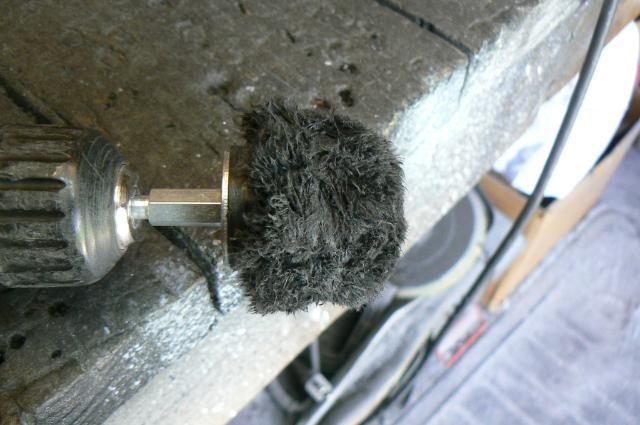
11 ...or you can paint it using any color high heat rattle can paint you desire. If you do decide to paint it, be sure to stuff something inside the IAC port to keep out the paint. I use a twisted up piece of steel wool but any type of paper or rag will work. You don't have to be to worried about any over spray on the top and bottom of the TB casing because you'll sand all that off later. Using the 24 grit flap wheel, very lightly sand both sides of the throttle blades and throttle spring. This will come in handy later on in the process if you decide to mirror polish the blades.


12 Clamp the TB in the vise with the bottom side up and first using the 150 grit flap wheel, remove the paint over spray and then come back with the 240 grit flap wheel and polish the gasket surface. Light pressure is all that's need here or you will distort the gasket surface.


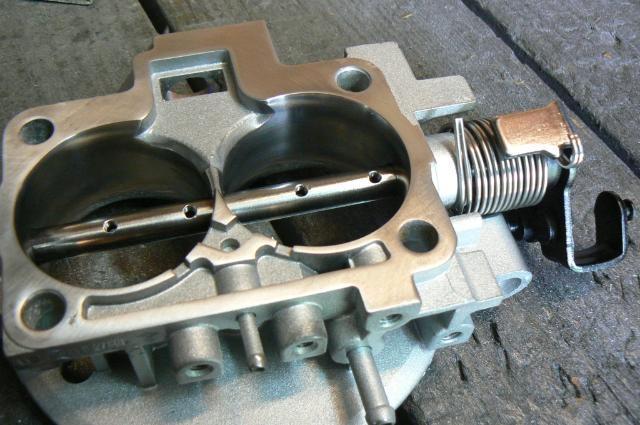
13 You are now about to begin the MOST CRITICAL part of the modification so TAKE YOU TIME AND DO NOT GET IN A HURRY!! Clamp the TB in the vise and using the cutter wheel, start removing the stepdowns inside the bores. SLOWLY start removing material until you can just barely feel a very small amount of the stepdown left. DO NOT use the cutter past the edge of the stepdown!! Rotate the TB in the vise to remove the stepdown all the way around the bores. Also use the cutter to complete the taper to the tops of the bores you created earlier.


14


15 On the base of the TB, you'll see a small ridge that can be removed if you desire using the 100 grit flap wheel. It's not 100% necessary but will greatly help with the air flow. I'm very anal about square edges inside the bores, but this step is totally up to you.


16 Using the 100 grit flap wheel, start sanding down the cutter marks starting on the outside and working your way inside the bore. Light pressure is all that's needed here so TAKE YOU TIME. Working to the inside, once you get to the edge of the stepdown, slowly and carefully smooth the cutter marks until you see the line disappear at the edge of bottom edge of the stepdown and then STOP. If you go too far and remove too much material, all the work up to this point will be for nothing and the TB will be junk. Using the 150 grit flap wheel, begin smoothing and blending the surface starting at the back and working you way to the front. Only very light pressure is needed here as you are only


17 wanting to blend the bore and not remove any more material inside the bore. Using the 240 grit flap wheel, very lightly smooth and polish the inside of the bore and blend the taper to the top of the bores.


18 Using the 150 grit flap wheel, begin removing the cutter marks at the top of the bores and rolling the edge to remove the sharp corner. Depending on how deep the sanding marks are that were left after using the 36 grit sand disc on the top of the TB, you may need to start with the 100 grit flap wheel or you may be able to start with the 150 grit. If you start with the 100 grit, DO NOT go inside the bores or on the rolled tapered edge.


19 Finish off the top and the top edge of the bores with the 240 grit flap wheel. Using the 1/4-20 bottom tap, straighten the threads at the top and tap as deep as the hole will allow. The threads are tapered inside the threaded hole and will cause a very tight situation later on when you bolt on the stock air hat assembly or the S-bolt if you bypass this step. Now here's where the MAGIC begins if you want the mirror polished surface on the top of the TB, inside of the bores and the blades. If not, then move on to the re-assembly process. Using a 2 1/2" mushroom polishing pad in you hand drill, apply the aluminum polish to the pad. I use the Busch Aluminum Polish but you can any brand you wish. Using you hand, work the polish into the pad because if you don't, when you pull the trigger on the drill you'll get to wear some of the polish home.


20


21 Apply just a couple drops of any type spray lube on the throttle shaft bearing and the center support between the bores. Begin reassembly by inserting the throttle shaft back into the TB and by inserting the blades into the shaft. The blades have to go back in the exact position as they came out or the holes will not line up for the screws. I highly recommend using 4 new 4mmx6mm screws for the blades and not reuse the old ones as the threads may be screwed up on the end. Start the screws in only a couple threads and the flip the TB over and apply a drop of blue locite into each threaded hole. The screw heads are facing down inside the TB and this step will insure they will not back out and cause you a big problem later on. Back the throttle linkage adjusting screw back until even with the TB case, snug the screws but do not tighten, then open the throttle blades and let them snap closed 3-4 time as this will center the blades inside the bores then tighten the 4 blades screws. Wipe off any access loctite on the throttl shaft. Slowly turn the adjusting screw out until you feel the blades working freely and then go an additional 1/4 turn. If the blades are working freely before turning the adjusting screw, then chances are you removed too much material and all you work has been wasted because the TB is now junk!

22

23 Your modified TB should look like this after you're finished if you decided to mirror polish. Congratulations and ENJOY!! DISCLAIMER: USE THIS WRITE-UP AT YOUR OWN RISK! I CAN NOT BE RESPONSIBLE FOR YOUR INABILITY TO FOLLOW INSTRUCTIONS!!
The Virgo/Libra Steam Engine
 The Virgo/Libra Steam Engine Congratulations on becoming the owner of a Virgo or Libra Steam Engine. With careful use and maintenance it will give many years of satisfying performance. Contents 1) Notes
For Barrel Tapers. Installation and Operating Instructions for use with table saws and large disk sanders
 Tim s Taper Tool For Barrel Tapers Installation and Operating Instructions for use with table saws and large disk sanders Your taper tool is capable of making barrel tapered shafts. The term barrel is
LU6X-130 Instructions and Parts List (including LU6X Basic) Operating Instructions
 Operating Instructions") LORTONE LU6X-130 Item # 061-092 LU6X Basic Item # 061-090 LU6X-130 Instructions and Parts List (including LU6X Basic) Operating Instructions Introduction The LU6X is one the most versatile pieces of equipment
LORTONE LU6X-130 Item # 061-092 LU6X Basic Item # 061-090 LU6X-130 Instructions and Parts List (including LU6X Basic) Operating Instructions Introduction The LU6X is one the most versatile pieces of equipment
It is highly recommended that you use a thread lock compound such as Loctite brand on all threads to keep them from vibrating loose.
 Installation instructions for JM1 Jerry Can Mount for Toyota FJ Cruiser It is highly recommended that you use a thread lock compound such as Loctite brand on all threads to keep them from vibrating loose.
4.4 PUMP MAINTENANCE MODELS: DB, DC, DF, DG, DJ, DL
 4.4 PUMP MAINTENANCE MODELS: DB, DC, DF, DG, DJ, DL 4.4.1 EXPLODED VIEW DRAWING REF. QTY. DB DC DF DG DJ DL DESCRIPTION PART # 1 1 ADAPTOR FRAME 034007 2 12 LOCK WASHER 3/8 x 1/8 S.S. 034004 3 12 HEX HEAD
Agricultural Mechanics and Technology Power Tool Safety Rules
 Agricultural Mechanics and Technology Power Tool Safety Rules Name: BAND SAW Use: Cutting curves, circles and irregular shapes. 1. Use clean SHARP blades. 2. The teeth should always point DOWN. 3. Adjust
Refurbishing Your Lincoln Mark VII Dew Wipes
 By Rick One_Way Eckenrode Refurbishing Your Lincoln Mark VII Dew Wipes A common flaw among Lincoln Mark VII s can be found at the top of both doors. The dew wipes (rubber weatherstrip that rests against
For Barrel Tapers. Installation and Operating Instructions For use with small combination belt & disk sanders. Assembled Taper Tool
 Tim s Taper Tool For Barrel Tapers Installation and Operating Instructions For use with small combination belt & disk sanders Assembled Taper Tool Your taper tool is capable of making barrel tapered shafts.
Replacing Original Starwind 19 Ports with Plexiglass:
 Replacing Original Starwind 19 Ports with Plexiglass: The OEM Beckson ports on my 1983 Starwind 19 were trashed they leaked excessively and the frames inside and out were cracked from a previous owner
CUSTOM SHUTTERS IN-A-BOX
 CUSTOM SHUTTERS IN-A-BOX SHUTTER ASSEMBLE INSTRUCTIONS & INSTALLATION INSTRUCTIONS 1. Inspect the contents of your package. Do not discard the shutter packaging box until you have started painting your
RTI TECHNOLOGIES, INC.
 RTI TECHNOLOGIES, INC. BRC500 & BRC550 Arbor/Spindle Mechanism Adjustment & Service Technical Instructions The arbor/spindle mechanism of the BRC500/550 is designed to be robust for long life. Occasionally
MINI-LATHE QUICK CHANGE TOOL POST
 MINI-LATHE QUICK CHANGE TOOL POST Cutting and assembly details Machinists should familiarize themselves with the contents of this section before jumping in to the drawings. Many details are described here
Travis Bishop. Submitted to: Dr. John Davis. Date: 3 December Course: ETME 310 Section: 004. Lab Topic: Milling Project (Vise)
") Travis Bishop Submitted to: Dr. John Davis Date: 3 December 2012 Course: ETME 310 Section: 004 Lab Topic: Milling Project (Vise) Introduction: Purpose of Experiment: This experiment was conducted to teach
Travis Bishop Submitted to: Dr. John Davis Date: 3 December 2012 Course: ETME 310 Section: 004 Lab Topic: Milling Project (Vise) Introduction: Purpose of Experiment: This experiment was conducted to teach
Legacy DaVinci Pen Kit
 Description: The DaVinci model is a single tube pen kit that uses a 3/8 tube and is a great starter kit for those new to pen turning. They are look similar to our Viceroy kit with a more intricate design.
Tools: Sharpie, Square, Vise, Hack saw, Ruler, Punch, Hammer, File. 2. Cut the stock Place stock in vise and cut with hack saw
 Purpose: MAKE CATAPULT ARM Step 1 Tools: Sharpie, Square, Vise, Hack saw, Ruler, Punch, Hammer, File Materials: Flat aluminum ½ inch stock (see picture below) Gloves required 1. Pick up the aluminum ½
Precision Steel Car s 100 T Steel Coil Car
 Precision Steel Car s 100 T Steel Coil Car Precision Steel Car www.precisionsteelcar.com info@precisionsteelcar.com Paul Vernon: (513) 571-5739 Revised 4/30/2009 Contents of Kit Main Tube Side Frame 2
QB78 CO 2 Pellet Rifle
 QB78 CO 2 Pellet Rifle Maintenance Instructions Text and photos by George Fox Lang The Chinese QB78 pellet rifle is one of the nicest and most popular CO 2 rifles ever produced. Here are the long-wanted
THE PODIUM MUSIC STAND
 THE PODIUM MUSIC STAND 1 Set Assembly Instructions Wooden Parts: a. 1 Column b. 2 Long Slide Pieces c. 2 Slide Spacers (1 long & 1 short) d. 4 Feet e. 2 Fork Pieces f. 1 Fork Spacer g. 2 Long Desk Frame
HOME WORKSHOP HANDBOOK Rugged BENCH GRINDER. By JOEL B. LONG
 6 HOME WORKSHOP HANDBOOK Rugged BENCH GRINDER W By JOEL B. LONG ITH this bench grinder you can keep your cutting tools sharp and do general offhand grinding, and can, with the aid of various attachments,
Clocking a TD-04 Turbo Compressor Housing. Appendix A : AWIC Silicone and Tubing Fitting
 Clocking a TD-04 Turbo Compressor Housing Appendix A : AWIC Silicone and Tubing Fitting Revision A: 7-13-2015 Tools: Metric Sockets (10, 12, 14, 17mm) 5mm Hex Key Large Internal Snap Ring Pliers 3/8 Socket
Legacy Polaris Pen Kit
 Description: The Polaris model is a single tube pen kit that uses a 3/8 tube and is a great starter kit for those new to pen turning. They look similar to our Viceroy kit but the body tube is longer which
16. Wing Final Assembly and Installation
 Section Objective: Installation and rigging of ailerons. Pitot tube install, and any other wing related items. Required Parts: Left aileron push rod ALA-0072, Right aileron push rod ALA-0073, Push tube
Legacy Slimline Pencil Kit
 Description: The model is considered one of the most basic pen kits and is a great starter kit for those new to pen turning. Many experienced pen turners use the kit to make elaborate and unusual pens
MATERIALS & TOOLS REQUIRED INTRODUCTION. Before you start turning, read and understand this entire procedure.
 INTRODUCTION This set of instructions shows one method to turn mills.there are many other possible variations and techniques. NOTE: These instructions are specific to 'Chef Specialties' mechanism. For
1984 to ZX (Z31) Rear Camber Modification Gary Molitor, March 1, 2009
 Rear Camber Modification Gary Molitor, March 1, 2009") 1984 to 1989 300ZX (Z31) Rear Camber Modification Gary Molitor, March 1, 2009 Step 1: Bushing Removal After removal of the rear suspension and disassembly of all the parts, the first thing I did was remove
1984 to 1989 300ZX (Z31) Rear Camber Modification Gary Molitor, March 1, 2009 Step 1: Bushing Removal After removal of the rear suspension and disassembly of all the parts, the first thing I did was remove
Legacy Classic Twist Pencil Kit
 Legacy Pencil Kit Description: The pencil is great kit and has features to make it a step-up pen. It is slightly more difficult to make, but still very easy if you follow these instructions carefully.
Two Panel Frameless Bypass Door
 INSTALLATION INSTRUCTIONS Two Frameless Bypass Door Series 00 Please Record Model Number From Carton Label Here Please read these instructions carefully to familiarize yourself with the required tools,
Metal Shapers Forums and Tech Rodding Roundtable Home Forums Events Members Webring Tech Merchandise Contact Chat Services Links Want Ads Advertising
 Metal Shapers Forums and Tech Home Forums Members Webring Tech Contact Chat Services On the following pages your will find detailed instructions on the parts needed and assembly instructions for a 12"
15 Dovetail Jig. Instruction Manual. Part # 3452
 15 Dovetail Jig Instruction Manual Part # 3452 CAUTION: Please read, understand, and follow all manufacturers instructions, guidelines and owners manuals that come with your power tools. Peachtree Woodworking
END FRAMES. End frames built using pressure treated 2x4 (1 1/2" x 3 1/2") 36" 34" 7/16" pilot hole. 5 1/2" x 1/2" lag bolt 8" wheel 23"
 36 34 7/16 pilot hole. 5 1/2 x 1/2 lag bolt 8 wheel 23") END FRAMES End frames built using pressure treated 2x4 (1 1/2" x 3 1/2") 23" 17 1/2" (B) (B) Measure from the bottom of your stone to 1" below the lip to get your measurement. 17 1/2"(B) 36" 34" 1/2" flat
END FRAMES End frames built using pressure treated 2x4 (1 1/2" x 3 1/2") 23" 17 1/2" (B) (B) Measure from the bottom of your stone to 1" below the lip to get your measurement. 17 1/2"(B) 36" 34" 1/2" flat
Bearing Overhaul Instructions for: Tallboy (.1) 2009
 2009") Bearing Overhaul Instructions for: Tallboy (.1) 2009 Tools Needed: 7900 Removal Tool 7902 Removal Tool 7900/7902/6902 Press Tool Grease Gun (included with frame) (2) ll/16" or adjustable wrenches 9/16"
Bearing Overhaul Instructions for: Tallboy (.1) 2009 Tools Needed: 7900 Removal Tool 7902 Removal Tool 7900/7902/6902 Press Tool Grease Gun (included with frame) (2) ll/16" or adjustable wrenches 9/16"
Legacy Hex Pencil Kit
 Description: The Hex pencil is a step-up kit, with similar features to a Slimline Pro Pencil. It has a click mechanism instead of a twist. It uses an 3/8 tube and 2MM pencil lead. It has a heavier feel
EllisSaw.com. EllisSaw.com P.O. Box Verona, WI
 P.O. Box 9019 Verona, WI 9-019 GENERAL OPERATING & SAFETY INSTRUCTIONS * READ INSTRUCTIONS BEFORE USE * CAUTION: Disconnect power supply cord from power source when doing repair work or changing belt.
All Terrain Flares 2014 Chevy Silverado
 Page 1/8 Components: 1. Front Flares (2) 2. Rear Flares (2) Tools required: - Utility knife - #2 Phillips driver - Socket wrench - 13 mm Socket - 6 mm Allen Wrench - T-15 Torx bit - Trim Removal Tool -
ARTS AND CRAFTS CHAIR
 ARTS AND CRAFTS CHAIR 491 MATERIALS LIST--DINING CHAIR Key No. Size and description (use) A 2 1-3/4 x 1-3/4 x 16-1/4'' oak (front leg) B 2 1-3/4 x 3-3/4 x 40-1/2'' oak (rear leg) C 1 1-3/4 x 3-3/16 x 15''
Motorized M3 AX7200 Rotary-Style Gasket Cutter Operating Instructions
 Motorized M3 AX7200 Rotary-Style Gasket Cutter Operating Instructions INTRODUCTION Congratulations! You are the owner of the finest rotary-style gasket cutter in the world. Originally developed and patented
Legacy Bullet Click Pen Kit
 Description: The Bullet Click pen is a step-up kit, with similar features to a Power Click Pen. It has a click mechanism instead of a twist. It uses an 8mm tube and a Parker style gel refill. It is popular
7x --Tailstock Cam Lock
 7x --Tailstock Cam Lock By Magic Brian magicbrian40@yahoo.com Probably the most pleasing mod to have, but often not done through lack of milling facility s This version does NOT require a mill. MATERIALS
1. Begin by rolling your window up all the way 2. Remove your door and window handles by unscrewing the flat head set screws behind each handle.
 1. Begin by rolling your window up all the way 2. Remove your door and window handles by unscrewing the flat head set screws behind each handle. 3. Remove the 12 screws that attach the steel interior door
Legacy Upgraded Junior Gentlemen s Pen Kit
 Description: The Upgraded Junior Gentlemen s model is a classic style pen which is easy to turn and uses a Roller Ball Refill which is highly desirable among pen enthusiasts The Upgraded Junior Gentlemen
Model: SCD430 SCD640. Installation & Operation Guide P/N SCD640-95
 Model: SCD430 SCD640 Installation & Operation Guide P/N SCD640-95 Model SCD430 and SCD640 Kurt has two Self-Centering vises, a four-inch jaw width (SCD430) and a six-inch jaw width (SCD640). Jaw opening
PROSTEER BALL JOINT REBUILD INSTRUCTIONS V1.0
 DYNATRAC PRODUCTS 2003-2010 4X4 DODGE 2500/3500 HEAVY DUTY BALL JOINT PROSTEER BALL JOINT REBUILD INSTRUCTIONS V1.0 WARNING: Improper use or installation of this product can cause major failures that could
Skybolt V2 Construction Manual
 Skybolt V2 Construction Manual Property of www.ppgplans.com Do not duplicate or make public. Warnings & Disclaimers. This product shows how to build a basic frame only for Powered Paragliding. It is the
Technicians of Terror. This is the air valve we make to use with our air
 These are pictures of our scissor prop. Technicians of Terror http://www.halloweenfear.com/scissorprop.html props. This is the air valve we make to use with our air This pictures the duel door closer cylinders
MODELS 49 RA 49 RAZ 49 RAC
 General Safety and Maintenance Manual MODEL grinder featuring a rear exhaust. Model Number Exhaust Direction REAR Throttle Type (L) Lever or (K) Safety Lever Speed 12000 to 14000 R.P.M (13500rpm is standard)
Late Spiders - Forming Bubble Flares on Brake Lines
 Late Spiders - Forming Bubble Flares on Brake Lines Brake lines on 30 year old cars often require replacement. In addition to the inevitable corrosion, the connections are damaged during multiple replacements
Invisible Clip Tutorial
 Invisible Clip Tutorial I first saw what I call the Invisible Clip in Russ Fairfield s PMG gallery and fell in love with it. I could not figure out how he made them so I sent him an e-mail and he was kind
Lumber Smith. Assembly Manual. If you are having problems assembling the saw and need assistance, please contact us at:
 Lumber Smith Assembly Manual If you are having problems assembling the saw and need assistance, please contact us at: 804-577-7398 info@lumbersmith.com 1 Step 1 Safety Carefully read the Owners Manual.
Make a Safe. Description. Lesson Objectives. Assumptions. Terminology
 Youth Explore Trades Skills Make a Safe Description Welding is a vast area in the metalworking field and a widely used joining process for metal. In this activity plan students will learn how to MIG weld
SCULL HANDLES AND GRIPS INSTRUCTION BOOKLET
 SCULL HANDLES AND GRIPS INSTRUCTION BOOKLET Contents Section I: Scull Grip Replacement: Fixed Handle or 10 cm Length Adjustment System Refer to this section if you need to replace the grips on your fixed
Side Winder R o u t e r L i f t.
 Woodpeckers PRECISION WOODWORKING TOOLS Side Winder R o u t e r L i f t. INSTALLATION INSTRUCTIONS The wrench handle must be pointing left in order to fully insert or remove it. Lift Wrench Once fully
BUILDING A STORM DOOR
 BUILDING A STORM DOOR BY NEAL BARRETT Illustrations by George Retseck If you're in the market for a storm door, you probably know that there are many styles and models available. However, most of them
Frameless Fixed Panel Slider QCI5279
 Frameless Fixed Panel Slider QCI5279 F AB GLASS AND MIRROR www.fabglassandmirror.com Call: +1 888-474-2221 Fax: (614)-334-4919 Office Timing: 8:30-18:00 EST info@fabglassandmirror.com Frameless Fixed Panel
All American Mower Blade Sharpener Mulching Blade Model Patent Pending
 All American Mower Blade Sharpener Mulching Blade Model 5000 Patent Pending Revised May 3, 2017 Attaching the guide pin to your grinder: Assembly and Use Locate the guide pin (included with the sharpener)
45PC. TAP AND DIE SET
 Model # 7560 7561 45PC. TAP AND DIE SET OPERATOR S MANUAL STORE THIS MANUAL IN A SAFE PLACE FOR FUTURE REFERENCE Wear eye protection Use proper lubrication WARNING: FOR HAND CUTTING APPLICATIONS ONLY.
An Improved Tool Support for a Harbor Freight Tool Grinder, version 2.2
 An Improved Tool Support for a Harbor Freight Tool Grinder, version 2.2 By R. G. Sparber Copyleft protects this document. 1 Advisory This article was written with a hobby machinist a bit above novice in
BODYGUARD 380 BIBLE VERSION 1 11/2011 GeorgiaShooter
 BODYGUARD 380 BIBLE VERSION 1 11/2011 GeorgiaShooter Locate a small punch or make one by grinding down the tip of a small finishing nail and smoothing any sharp edges. A great punch to keep in your portable
Extendable Large Dovetail Jig
 Extendable Large Dovetail Jig Instruction Manual Part # 3458 CAUTION: Please read, understand, and follow all manufacturers instructions, guidelines and owners manuals that come with your power tools.
Replacing the Reciprocator on the SWF Compact Series Machine (601C and 1201C)
") Follow the instructions below to replace the reciprocator in the SWF Compact series machines. The tools required can be found in the tool kit that came with the machine. Preparation 1. First, place the
Follow the instructions below to replace the reciprocator in the SWF Compact series machines. The tools required can be found in the tool kit that came with the machine. Preparation 1. First, place the
Regulator installation guide Air Arms S4xx/S5xx
 Welcome to Huma-Air. We design and manufacture brand- and model specific precision regulators for PCP air rifles. By using only the highest quality materials such as aircraft grade aluminum, aluminumbronze,
F-F-Fiddle Assembly Instructions
 F-F-Fiddle Assembly Instructions Bout Bridge Neck Machine Heads/Tuners Truss Rod Strings An open-source FFF 3d-printable electric violin. 1. Assemble materials 5 3 8 1 9,10, 11 7 4 2 6 PARTS 1. Bout part
Castle Frame Assembly Table AT-8. Diagnostics Manual. Castle, Inc. Petaluma, CA
 Castle Frame Assembly Table AT-8 Diagnostics Manual Castle, Inc. Petaluma, CA 800-282-8338 Solutions Index Adjusting the Tabletop.. 8.01 Adjusting the Fence... 8.02 Aligning the Arm... 8.10 Adjusting Bracket..
APACHE HINGE REPLACEMENT PROJECT
 APACHE HINGE REPLACEMENT PROJECT MATERIALS: Aluminum Extrusion, custom lengths Setscrew, stainless steel, 7mm x 10mm hex socket *(optional) Pop Rivets, 3/16", long, aluminum Back Up Spacers, 3/16" (Pop
Caution: Always use safety glasses or a full face shield when turning anything on a lathe.
 May 26, 2009 Making a 6 Peppermill Page 1 Acknowledgment is given to Jackie Johnson from Nashville, TN for providing the original instructions and method for this article. The design of this mill can be
The NorCal Paddle Kit
 The NorCal Paddle Kit designed by Wayne Smith, K8FF Winner of the 1997 NorCal Design Contest Kitted by the NorCal QRP Club Copyright 1997 All Rights Reserved. This manual is copyrighted by Doug Hendricks
Place Precision Lathe Chuck Reference, Version 1.0
 A Machined In Place Precision Lathe Chuck Reference, Version 1.0 By R. G. Sparber Protected by Creative Commons. 1 Ever heard of Joe Pieczynski? If not and you enjoy learning new metal working skills,
SHOWERGLIDE 600B, 690B, 692B, SERIES
 Installation Instructions SHOWERGLIDE SERIES 600B, 60B, 6B, 6B, 65B, 67B IMPORTANT: You should check with your local plumbing or building code agency about this product for compliance before it is installed.
DYNATRAC BALL JOINT REBUILD INSTRUCTIONS V4.0
 DYNATRAC PRODUCTS 2007-2016 4X4 JEEP JK HEAVY DUTY BALL JOINT JP44-2X3050-C DYNATRAC BALL JOINT REBUILD INSTRUCTIONS V4.0 WARNING: Improper use or installation of this product can cause major failures
Cross Peen Hammer. Introduction. Lesson Objectives. Assumptions
 Introduction In this activity plan students will develop various machining and metalworking skills by building a two-piece steel hammer. This project will introduce basic operations for initial familiarization
REPAIR INSTRUCTIONS. Cat. No Cat. No MILWAUKEE ELECTRIC TOOL CORPORATION. SDS Max Demolition Hammer. SDS Max Rotary Hammer
 Cat. No. 9-0 SDS Max Demolition Hammer Cat. No. -0 SDS Max Rotary Hammer MILWAUKEE ELECTRIC TOOL CORPORATION W. LISBON ROAD BROOKFIELD, WISCONSIN 00-0 8-9-0 d 000 8-9-0 d Special Tools Require Forcing
Tackling America s To- Do List: Project Steps
 Tackling America s To- Do List: Installing Shoe Molding Living Room/ Bedroom - Dremel 8200 Rotary Tool - 2500-01 Multi- Vise - 407 Sanding Drum - 430 Sanding Drum (optional) - Wall adhesive - 2500-01 Multi-
INSTALLATION INSTRUCTIONS 8554 DODGE TRACK BAR CONVERSION BRACKET
 SYNERGY MFG. 870 INDUSTRIAL WAY, SAN LUIS OBISPO, CA (805) 242-0397 INSTALLATION INSTRUCTIONS 8554 DODGE TRACK BAR CONVERSION BRACKET Version 2.0 GENERAL NOTES: These instructions are also available on
Al & Gary's Illusionist Heart
 Al & Gary's Illusionist Heart Plans and Instructions by: Albert Herwig and Gary A. Emerich Al & Gary's Illusionist Heart As Al Would Say: It's a pendant Now it's a heart Our pictures are in there My children'
Ball-Joint Scrapers Steel Blade Carbide Blade 05K K21.04
 Ball-Joint Scrapers Steel Blade Carbide Blade 05K21.01 05K21.04 The Veritas Ball-Joint Scraper is based on a tool originally made by L.S. Starrett Tool Company but out of production for many years. Originally
Legacy Magnet Pen Kit
 Description: The Magnet pen model is a variation of the Slimline pen and considered one of the most basic pen kits and is a great starter kit for those new to pen turning. Sometimes called the Refrigerator
TURNING TOOLS CARVING TOOLS
 Multi Jig SVS-50 (37592) TURNING TOOLS Square and skew chisels with straight or curved edges. Max width 32 mm (1¼"). Parting tools Beading tools Roughing gouges Max width 50 mm (2"). CARVING TOOLS Gouges,
WESTERN PISTOL.22 CALIBER SINGLE SHOT. Entire pamphlet Copyrighted by JACO Designs 1972
 WESTERN PISTOL.22 CALIBER SINGLE SHOT Entire pamphlet Copyrighted by JACO Designs 1972 This pamphlet contains the plans and instructions necessary to construct the Western pistol. This pistol breaks open
Bearing Overhaul Instructions for: Nickel (0.1) and Butcher (0.1) a) Using a 6mm Allen wrench, remove the two bolts attaching the shock.
 and Butcher (0.1) a) Using a 6mm Allen wrench, remove the two bolts attaching the shock.") Bearing Overhaul Instructions for: Nickel (0.1) and Butcher (0.1) 2010 Tools Needed: 6902/7902/7900 Press Tool 6902 Removal Tool 7902 Bearing Removal Tool 7900 Removal Tool (2) ll/16" or adjustable wrenches
Bearing Overhaul Instructions for: Nickel (0.1) and Butcher (0.1) 2010 Tools Needed: 6902/7902/7900 Press Tool 6902 Removal Tool 7902 Bearing Removal Tool 7900 Removal Tool (2) ll/16" or adjustable wrenches
Tail Vise. Installation Instructions. (revised 10/11/2017)
") Tail Vise Installation Instructions (revised 10/11/2017) Lie-Nielsen Tail Vise Instructions Table of Contents page About Your Tail Vise 3 Parts List 4 step 1. Prepare Your Bench Top 5 step 2. Prepare the
Tail Vise Installation Instructions (revised 10/11/2017) Lie-Nielsen Tail Vise Instructions Table of Contents page About Your Tail Vise 3 Parts List 4 step 1. Prepare Your Bench Top 5 step 2. Prepare the
DYNATRAC BALL JOINT REBUILD INSTRUCTIONS V5.0
 DYNATRAC PRODUCTS 2007-2018 JEEP JK HEAVY DUTY BALL JOINT JP44-2X3050-C DYNATRAC BALL JOINT REBUILD INSTRUCTIONS V5.0 WARNING: Improper use or installation of this product can cause major failures that
PLEASE READ THIS NOTICE BEFORE BEGINNING ANY PHASE OF INSTALLATION!!!!
 PLEASE READ THIS NOTICE BEFORE BEGINNING ANY PHASE OF INSTALLATION!!!! This kit is designed to be installed by someone with a fair amount of mechanical aptitude. However, if you are not comfortable making
B B B
 Stock with Scorpion Recoil Pad B..0.0 B..0.0 B..0.0 Removable/Adjustable Tactical Cheekrests X Scorpion Recoil Pad Dual Sided QD Attachment Point Six Position Adjustable Stock Slim Line Rear Aluminum Receiver
Type 316SS Backed Conveyor Strip Brush Nylon Bristles, 6" O'all HT, 2' Lg, 3/16" Backing
 How to modify your MK101. First off, the MK101 tile saw is a fantastic tile saw, without any modifications what so ever. That being said, all tile saws tend to have a significant amount of overspray which
Coil Winder Instructions.
 Page Coil Winder Instructions. Before we can build our wind turbine there are a few tools we need to make. We ll need to make moulds for the magnet rotors and the stator, and we need to make a coil winder.
Hose Hanger Cold Metal Work
 Hose Hanger Cold Metal Work Name: Date: Description: A cold metal project that gives students practice sheering, bending, drilling, and fastening steel. The hose hanger can be used for proper storage of
SAFETY INSTRUCTIONS. Wear protective clothing, including safety glasses and steel toe boots.
 SAFETY INSTRUCTIONS Wear protective clothing, including safety glasses and steel toe boots. DO NOT allow loose clothing or long hair near machine operations. Keep work site and machine clean. Use brush
SUPER PRO GUN & SUPER PRO GUN II
 MAGNUM VENUS PRODUCTS Maintenance & Repair Manual Part No. M6707-1-1 Revision 04.14.01 Maintenance & Repair Corporate HQ & Mfg. Phone: (727) 573-2955 Fax: (727) 571-3636 Email: info@magind.com Web: www.magind.com
HOW TO TUNE A QB SERIES CO2 AIRGUN FOR NOOBS.
 THE UK CHINESE AIRGUN FORUM PRESENTS... HOW TO TUNE A QB SERIES CO2 AIRGUN FOR NOOBS. DISCLAIMER: THE FOLLOWING GUIDE WILL IMPROVE THE PERFORMANCE AND SMOOTHNESS OF THESE AIRGUNS, IT IS ESSENTIAL THAT
Installation Instructions for FC2 & FC15 Forward Controls for the Super Magna
 Installation Instructions for FC2 & FC15 Forward Controls for the Super Magna It is highly recommended that you use a thread lock compound such as Loctite brand on all threads to keep them from vibrating
HURST COMP STICK KIT DODGE CHARGER, MAGNUM, AND CHRYSLER 300 (with AUTO-STICK) Catalog # & by Hurst Performance
 Catalog # & by Hurst Performance") HURST COMP STICK KIT 2005-2007 DODGE CHARGER, MAGNUM, AND CHRYSLER 300 (with AUTO-STICK) Catalog #538 0410 & 538 0411 2009 by Hurst Performance FORM 159 0410 03/09 Thank you for purchasing the Hurst Comp
HURST COMP STICK KIT 2005-2007 DODGE CHARGER, MAGNUM, AND CHRYSLER 300 (with AUTO-STICK) Catalog #538 0410 & 538 0411 2009 by Hurst Performance FORM 159 0410 03/09 Thank you for purchasing the Hurst Comp
Overview. Linear Motion and Assembly Technologies /11 Aluminum Framing. Bosch Rexroth Corp. Section 15: Tools
 8981 500 201 08/11 Aluminum Framing Linear Motion and Assembly Technologies 1 Section : Tools Overview With Bosch Rexroth aluminum structural framing, you can either specify profiles square cut to length,
Sink BULL INSTRUCTION MANUAL. with Rapid Z -CUT & Rapid Z -DRUM
 Sink BULL with Rapid Z -CUT & Rapid Z -DRUM INSTRUCTION MANUAL Please read this instruction manual thoroughly to ensure safety and the correct use of this tool. Keep this manual in a place where operators
Fortress Fe Posts must always be secured to the deck framing. Fortress Fe Posts should never be attached to only the deck boards.
 Installation Instructions for Fortress Horizontal Cable Panel System with UB-05 Brackets and Fe Posts It is the responsibility of the installer to meet all code and safety requirements, and to obtain all
Jeep Wrangler JK & 4-Door Front Pair Part # Revision H
 Jeep Wrangler JK 2007 2 & 4-Door Front Pair Part # 10045 Revision H 03-25-09 Step 1: Prior to Installation: A) Bushwacker only approves installing the flares according to these written instructions with
I specifically did this for my 1980 Suzuki GS450L which uses the Mikuni BS34SS.
 This is a carburetor cleaning guide for the Mikuni BS34SS which is used on the Suzuki GS450 E, L, and S models. Confirm that you have the same carburetors by looking at the pictures provided on the next
Kwik-Lock. Installation Instructions. Attention Dealers: Please give this owners manual to the customer when the product is delivered.
 Serving the Truck & Trailer Industry Since 1944 Installation Instructions Attention Dealers: Please give this owners manual to the customer when the product is delivered. Call 800-535-9545 www.aeroindustries.com
FENDER FLARE. KIT CONTAINS Qty Part Description Qty Part Description
 ` FENDER FLARE Part No: FFC3002S TO AVOID BEING SCRATCHED, PLEASE PROTECT THE SURFACE OF THE FENDER FLARE CAREFULLY. REMOVE CONTENTS FROM BOX. VERIFY ALL PARTS ARE PRESENT. 60-180 min Cutting Not Required
General Lathe Set Up. Lathe Manual JH compilation
 General Lathe Set Up Lathe Manual JH compilation 3.3.06 1 Machine Shop Safety... 2 General Lathe Set-Up... 4 Facing, Turning, and Shouldering:... 4 Three things matter with your tool bit position:... 5
Lab 2: Machining Innovation Fellows Program Bootcamp Prof. Steven S. Saliterman
 Lab 2: Machining Innovation Fellows Program Bootcamp Prof. Steven S. Saliterman The following exercises are meant to familiarize you with the capabilities of the Earl Bakken Medical Devices Center (MDC).
INSTRUCTIONS
 IMPORTANT: THIS IS A HIGH PERFORMANCE PART AND IMPROPER INSTALLATION COULD RESULT IN INJURY OR DEATH! NEVER WORK UNDER AN AUTOMOBILE THAT IS NOT PROPERLY SUPPORTED AND BLOCKED FROM ROLLING. NO CREDIT OR