Replacing Original Starwind 19 Ports with Plexiglass:
|
|
|
- Adele Powers
- 6 years ago
- Views:
Transcription


1 Replacing Original Starwind 19 Ports with Plexiglass: The OEM Beckson ports on my 1983 Starwind 19 were trashed they leaked excessively and the frames inside and out were cracked from a previous owner who simply tried to over tighten the fasteners to stop the leaks, rather than rebed the ports properly. After pricing new ports (and hearing a rumor that they would need to be modified in order to fit the hul of the Starwind 19, I decided to fabricate my own ports out of ¼ dark smoke plexiglass. Step 1: Remove Old Ports this was fairly easy as the ports were install in 1983 and I seriously doubt they had been removed/rebedded since their original installation. I simply loosened the nuts from inside and remove the inside frame. Then I used a putty knife to gently pry the external port and frame away from the hull of the boat. After removing the port, I used a razor blade scraper to carefully remove the sealant that was used to bed the port in place, and cleaned the area inside and out with a little MEK on a rag.

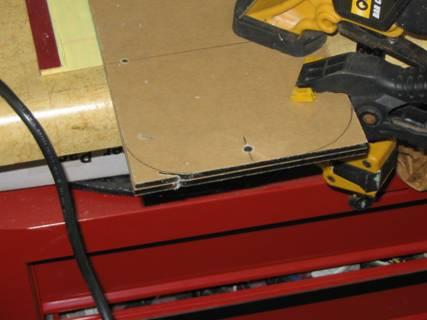
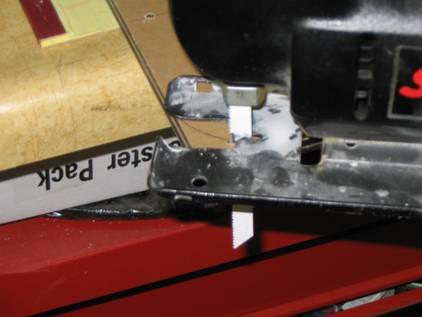
2 Step 2: Clean Up the Original Port Cutout: It s kind of hard to see in the photos here, but whoever cut the openings for the ports at the factory did a somewhat shoddy job. It really didn t matter, since the original ports have an interior frame that covers the rough opening. The ports I built wouldn t have this frame (it was too cracked to salvage), and I knew I would see the rough opening from the inside, so I used a sidegrinder and Dremel tool to straighten out the rough opening a bit so that it wouldn t look so ragged from the inside. Step 3: Fabricate Ports: I used ¼ smoke plexiglass from a local plastics dealer the two rectangle blanks cost me roughly $27 (MUCH less than the $80/port I would have paid for replacement Beckson ports.) I made the plexiglass ports an exact copy of the original port frame including the mounting hole locations. The steps are shown in the photos below I first cut the plexiglass blank to the correct width and length using my table saw and rip fence for a perfectly straight cut. I then traced the curve of the port corner (from a cardboard template that I made from the original port frame) onto the blank, clamped the blanks together (I wanted a perfect mirror image) and drilled the mounting holes. The holes are oversized by one bit measurement to prevent the port from cracking as it expands and contracts in the sun. I used small clamps and two temporary screws through a couple the mounting holes to keep the blanks from sliding apart while I cut the rounded edges. I used a Skill saw with a fine tooth blade to rough out the rounded corners.
3


4 As you can see in the last photo above (although a little out of focus), the corners are pretty rough after cutting them out. To smooth the rounded corners, I mounted my belt sander in my bench vise and carefully sanded the corners smooth. Use a light touch, pay attention to the pattern line you ve traced onto the blank, and you ll be fine. If you push too hard against the sander, the plexiglass will melt and drag, so take your time it s not that hard. Once you ve got the shape the way you want it, take one more very light pass over the sander to ensure the smoothest edge possible. I was really worried about this step, but it worked very well and I was very satisfied with the results. The corners turned out symmetrical and very smooth

5 Finally, I used a hand sanding block to lightly relieve the outside edge of each port. I had originally planned on rounding over the outside edge with a router, but after experiment on a couple of pieces of scrap, I couldn t keep the plexiglass from melting under the friction of the router blade, so I decided to just hand sand the outside edges a bit to take off the sharp edge. Step 4: Install the Ports: I use a method for bedding all hardware suggested by Don Casey (see After masking off the port location on each side of the hull and tearing the protective paper from the inside of the port and just around the mounting holes on the outside, I dry fit the port to the hull, inserted the bolts (without nuts), and ran a knife around the port to score the masking tape. I then removed the port and removed the making that was underneath the port, leaving a perfectly masked hull surrounding each port. I then bedded each port in 100% black silicone. 100% silicone (don t skimp) to provide the seal and flexibility as the port expands and contracts in the sun, black to hide the white hull where the port overlaps the hull. Silicone also has less bonding ability than polysulfide sealant, which will make the ports easier to remove and rebed in the future (although hopefully not for another 5 years or so).
.")

6 The ports are held in place with stainless #8 pan-head bolts with finish washers on the outside and washers and nuts on the inside (actually, I just reused the hardware from the original ports and added finish washers under the heads of each bolt). I tightened each bolt until the port had just drawn up to the hull, then let the silicone set up for a day or two before I snugged up each nut. Allowing the silicone to dry and then tightening the bolts ensured a good gasket around the entire port.

, and an literally 3-4 hours of work was all it")
7 I am very pleased with how the finished products look. Although the lack of an interior trim ring bothered me at first, I barely notice the hull cutout from inside the boat anymore the new ports look far better than the old cracked ports and more importantly, they DON T LEAK anymore!! This was a far more simple project than I had imagined, so if you re at all handy, don t hesitate to try it! Twenty seven bucks, a few hand-tools (have your plexiglass supplier cut the blanks to the exact length and width you need if you don t have a table saw), and an literally 3-4 hours of work was all it took to fabricate these replacement ports. Replacement ports from Beckson were over $80 a port, and would still need modification to fit the thin walls of the Starwind 19 cabin. This is money well banked for other toys, in my opinion.. Good Luck!!
 www.wildmanconstruction.com Changing your toilet is an easy project that should take half a day or less. The most common toilet has a separate tank that mounts on top of the bowl. These instructions apply
Traditional Undermount: S Method (Undermount):
:") TOOLS REQUIRED 15.1 TOOLS REQUIRED The installation of Corian shape product must be a precise and exacting process to ensure that a good fit is always created. Using the correct tools is essential. In
TOOLS REQUIRED 15.1 TOOLS REQUIRED The installation of Corian shape product must be a precise and exacting process to ensure that a good fit is always created. Using the correct tools is essential. In
Installing your new Bevella Top. L Shaped Countertop with Joints No Finished Ends (Fits Between Four Walls)
") Installing your new Bevella Top L Shaped Countertop with Joints No Finished Ends (Fits Between Four Walls) Bevella RTI Countertops are engineered and manufactured to the highest quality standards, built
Installing your new Bevella Top L Shaped Countertop with Joints No Finished Ends (Fits Between Four Walls) Bevella RTI Countertops are engineered and manufactured to the highest quality standards, built
REVISION LIST CHAPTER 25: AFT WINDOWS. The following list of revisions will allow you to update the Legacy construction manual chapter listed above.
 REVISION LIST CHAPTER 25: The following list of revisions will allow you to update the Legacy construction manual chapter listed above. Under the Action column, R&R directs you to remove and replace the
Installation Guide 1
 1 2 Contents Before you begin Storage & preparation Tools & materials you may need Getting started Sink & cooktop cut-outs Cabinet Joins for 20mm benchtops Joining & installation of 20mm benchtops Joining
With a little time and effort, you can increase the performance of your engine by going from THIS.
 How-To Modify The V6 & V8 Throttle Body This modifying procedure is for the 5.2 and 5.9 V8 and the 3.9 V6 TB''s. With a little time and effort, you can increase the performance of your engine by going
Clocking a TD-04 Turbo Compressor Housing. Appendix A : AWIC Silicone and Tubing Fitting
 Clocking a TD-04 Turbo Compressor Housing Appendix A : AWIC Silicone and Tubing Fitting Revision A: 7-13-2015 Tools: Metric Sockets (10, 12, 14, 17mm) 5mm Hex Key Large Internal Snap Ring Pliers 3/8 Socket
MMD Convertible Styling Bar Customer Installation Guide
 MMD Convertible Styling Bar Customer Installation Guide TOOLS REQUIRED/RECOMMENDED: Electric Drill 1 Forstner Bit (Hole Saw) 1 3/8 Hole Saw (manual calls for 1 ¾ ) 1/8, 3/8 & ¾ Drill Bits Rivet Gun Trim
Standard Kit #1 (3-way switch)
") Standard Kit #1 (3-way switch) Please Read All Instructions Before Beginning. Tools you will need: Soldering Iron (35 watt preferably) Solder Wet Sponge Wire Clippers 3/8 Drill Bit 1/4 Drill Bit Variable
Standard Kit #1 (3-way switch) Please Read All Instructions Before Beginning. Tools you will need: Soldering Iron (35 watt preferably) Solder Wet Sponge Wire Clippers 3/8 Drill Bit 1/4 Drill Bit Variable
RH-412 STEEL DOORS INSTALLATION INSTRUCTIONS
 RH-412 STEEL DOORS INSTALLATION INSTRUCTIONS By following the steps outlined below, the assembly, installation and adjustment of the steel doors, will be a simple process. Let s start with the Driver Side.
BSM, GSM & GSS. Joint Kit Instruction. (Modified for IMPACT) (NSF Certified) Curved Glass Fresh Meat Delicatessen and Seafood Merchandisers
 (NSF Certified) Curved Glass Fresh Meat Delicatessen and Seafood Merchandisers") BSM, GSM & GSS Joint Kit Instruction (Modified for IMPACT) (NSF Certified) Curved Glass Fresh Meat Delicatessen and Seafood Merchandisers February, 1999 JOINT ASSEMBLY PARTS LIST Item Quantity Description
BSM, GSM & GSS Joint Kit Instruction (Modified for IMPACT) (NSF Certified) Curved Glass Fresh Meat Delicatessen and Seafood Merchandisers February, 1999 JOINT ASSEMBLY PARTS LIST Item Quantity Description
Refurbishing Your Lincoln Mark VII Dew Wipes
 By Rick One_Way Eckenrode Refurbishing Your Lincoln Mark VII Dew Wipes A common flaw among Lincoln Mark VII s can be found at the top of both doors. The dew wipes (rubber weatherstrip that rests against
Cutless Bearing Removal and Replacement for a Watkins 27 By John Everson
 Cutless Bearing Removal and Replacement for a Watkins 27 By John Everson This is a fairly difficult job, but if you are mechanically inclined and want to save a significant amount of cash, you might want
Installation Guide. Pionite Decorative Surfaces One Pionite Road, Auburn, Maine PIONITE ( )
") Installation Guide A Subsidiary of Panolam Surface Systems SMPBRO00-012 6/14 Pionite decorative laminates are designed for finished interior surfaces which require high impact, wear and stain resistance
Installation Guide A Subsidiary of Panolam Surface Systems SMPBRO00-012 6/14 Pionite decorative laminates are designed for finished interior surfaces which require high impact, wear and stain resistance
Safety First! Use eye protection, always! Use ear protection with loud power tools. Stay with children while they work!
 TM TM ART TABLE Safety First! Use eye protection, always! Use ear protection with loud power tools Stay with children while they work! Follow tool manufacturers safety guidelines Page 1 ART TABLE Page
Contents. pages 20-24: Installing Edge sinks into. custom laminate countertops page 8: Installing Edge sinks into postform laminate countertops
 Contents pages 2-8: Installing Edge sinks into custom laminate countertops page 8: Installing Edge sinks into postform laminate countertops pages 9-14: Installing Acrylic sinks into custom laminate countertops
INSTALLATION INSTRUCTIONS RH 412 STEEL DOORS
 By following the steps outlined below, the assembly, installation and adjustment of the steel doors, will be a simple process. Let s start with the Driver Side. Note: Having the hood open makes the job
Hinge Mortising Jig. One of the make it or break it parts of building a. 6 ShopNotes No. 74
 Hinge Mortising Jig A Mortise for a Hinge. Quick, clean, and accurate that s the only way to describe the mortise you get with a trim router and this hinge mortising jig. One of the make it or break it
Cabinet is 90% assembled, all you need to do is to attach the legs, lay the glass top on the cabinet, connect the faucet, drains & ptrap.
 Things you might need for the installation: vessel sink, plumber's putty(home depot), liquid nails(home depot), Bucket silicone caulk(home depot), Putty knife Plumber's putty Pipe wrench Channel-lock pliers
More Storage Space Under Yacht Bed
 More Storage Space Under Yacht Bed Open up storage space under your bed! Convert your bed deck to a Lifting Hatch with Gas Spring assist! Many bed decks on boats and RV s have two or three pieces of plywood
Grade 11 Woods Lift Lid Coffee Table. Based on Under the big Top from Popular Mechanics Website
 Grade 11 Woods Lift Lid Coffee Table Based on Under the big Top from Popular Mechanics Website TABLE TOP 1. Select enough lumber to construct a top that is between 22 ½ and 24 wide after jointing. Ensure
Two Panel Frameless Bypass Door
 INSTALLATION INSTRUCTIONS Two Frameless Bypass Door Series 00 Please Record Model Number From Carton Label Here Please read these instructions carefully to familiarize yourself with the required tools,
Ways to get the most out of your
 5 Ways to get the most out of your router table When you mount a router on a table, you expand your shop s potential. To help you take advantage of this potential, we assembled five router table techniques
Pick-up Truck. Four Ferry-Boat Vehicles 135 FULL-SIZE PATTERNS
 2MA.PAG_2MA.PAG /20/ :9 PM Page Pick-up Truck The main body can be made in two sections; the location of the joint is indicated in the drawing. Glue these sections together before adding the Pick-up s
Thank you for purchasing these easel plans. I think you will find this to be a fun, easy to build project that will serve you for years to come.
 Construction Plans for The Basic Wooden Easel Updated August, 2002 Thank you for purchasing these easel plans. I think you will find this to be a fun, easy to build project that will serve you for years
How to correctly install and level a 3-piece slate.
 How to correctly install and level a 3-piece slate. Basic steps to leveling a 3 piece slate. First of all, we re going to have to break this down into sections, as leveling a 3 piece slate is more like
WOOD TOY NEWS SANDING DRUMS & JIGS ISSUE
 WOOD TOY NEWS SANDING DRUMS & JIGS ISSUE toymakingplans.com June 11, 2014 Wednesday How to Make a Sanding Drum Jig for Smarter Toymaking. By Imants Udris Udie Our discussion begins based on the 5 piece
Instructables Butcher Block Top
 Instructables Butcher Block Top Project Overview: This project requires basic woodworking skills and access to woodworking machines. Woodworking machines have sharp cutting edges and are NOT forgiving.
Oakland II POCKET BILLIARD TABLE INSTALLATION MANUAL
 TM Oakland II POCKET BILLIARD TABLE INSTALLATION MANUAL www.brunswickbilliards.com SERVICE DEPARTMENT P.O. BOX 68 BRISTOL, WI 53104 EMAIL: BRUNSWICKSERVICE@BRUNSWICKBILLIADS.COM 51-906253-000 OCTOBER 2016
Tools and Tips: ( 1 )
") Tools and Tips: As you build instructions will show in my many picture manual how to assemble. You can use your own methods as you desire, my results are very good. A smooth, flat work surface is very
Tools and Tips: As you build instructions will show in my many picture manual how to assemble. You can use your own methods as you desire, my results are very good. A smooth, flat work surface is very
The Festival Assembly Instructions
 The Festival Assembly Instructions Toll Free: 866.768.8465 Hours: 9-5 Monday-Friday EST www.homeplacestructures.com Package ships as shown CONTACT INFORMATION: HomePlace Structures 301 Commerce Drive New
Router Table. Construction
 Router Table A router table is an invaluable tool. The problem, however, is that ready-built router tables are usually relatively expensive and too narrow for many projects. This router table provides
Balustrade Systems / Installation Instructions
 A. PARTS AND SUPPLIES NEEDED FOR INSTALLATION Hardware included for each 10 section of rail: 2 3 x 1-1/2 L-brackets 4 1-3/4 x 3/16 Blue hex-head screws for anchoring the L-brackets to the newel cap, column
Questions? Call us at or us at
 Questions? Call us at 610-345-9044 or email us at admin@selectincrements.com CAUTION: 1) Don t let the banana plug prongs touch any metal when the pod is unhooked, you could damage your amplifier. 2) Never
ProLine PL60 HEAVY FRAMELESS BYPASS BATH ENCLOSURE
 INSTALLATION INSTRUCTIONS ProLine PL60 HEAVY FRAMELESS BYPASS BATH ENCLOSURE Copyright Alumax Bath Enclosures 2013. All rights reserved. G03980847 5-1-13 !WARNINGS! INSTALLATION WARNINGS a) Alumax Bath
Applications: Section 1: Getting Started Tools Needed: BEFORE
 Installation of KBD Body Kits Porsche GT 3 Look/Style 2 Piece Polyurethane Front Bumper & Lip Applications: Porsche 996: 1999-2001 Porsche Boxster 986: 1997-2004 Page 1 Tools Needed: Philips Head Screwdriver
R2C Performance Products 7550 Industrial Drive Forest Park, IL Ph: (708)
") Congratulations on your purchase of the finest Sprint Car Filter and stack sealing system available. This system has been designed for unparalleled ease of assembly, disassembly and cleaning while providing
Congratulations on your purchase of the finest Sprint Car Filter and stack sealing system available. This system has been designed for unparalleled ease of assembly, disassembly and cleaning while providing
Tools and Tips: ( 1 )
") Tools and Tips: As you build instructions will show in my many picture manual how to assemble. You can use your own methods as you desire, my results are very good. A smooth, flat work surface is very
Tools and Tips: As you build instructions will show in my many picture manual how to assemble. You can use your own methods as you desire, my results are very good. A smooth, flat work surface is very
ARTS AND CRAFTS CHAIR
 ARTS AND CRAFTS CHAIR 491 MATERIALS LIST--DINING CHAIR Key No. Size and description (use) A 2 1-3/4 x 1-3/4 x 16-1/4'' oak (front leg) B 2 1-3/4 x 3-3/4 x 40-1/2'' oak (rear leg) C 1 1-3/4 x 3-3/16 x 15''
For Barrel Tapers. Installation and Operating Instructions for use with table saws and large disk sanders
 Tim s Taper Tool For Barrel Tapers Installation and Operating Instructions for use with table saws and large disk sanders Your taper tool is capable of making barrel tapered shafts. The term barrel is
Adjustable Box Joint Jig. Richard Hicks on 8/24/2015. Box or Finger Joints
 Adjustable Box Joint Jig Richard Hicks on 8/24/2015 Box or Finger Joints Adjustable Box Joint Jig Richard Hicks on 8/24/2015 Box Joints are also called Finger Joints Because they have interlocking fingers
ADULT. Adirondack / Muskoka Chair Plans
 ADULT Adirondack / Muskoka Chair Plans Materials List 3/4" x 9 1/2" (1.9cm x 24.1cm) redwood, cedar or pine boards. Six, 8' (2.44m) boards should make one chair depending on knots and layout. You can also
PLEASE READ THIS NOTICE BEFORE BEGINNING ANY PHASE OF INSTALLATION!!!!
 PLEASE READ THIS NOTICE BEFORE BEGINNING ANY PHASE OF INSTALLATION!!!! This kit is designed to be installed by someone with a fair amount of mechanical aptitude. However, if you are not comfortable making
INSTALLATION INSTRUCTIONS FOR REPLACEMENT FORGENT WOOD GLASTRA WINDOWS RECOMMENDATIONS FOR COMMON INSTALLATION OF ALL REPLACEMENT WINDOWS.
 INSTALLATION INSTRUCTIONS FOR REPLACEMENT FORGENT WOOD GLASTRA WINDOWS RECOMMENDATIONS FOR COMMON INSTALLATION OF ALL REPLACEMENT WINDOWS. Installer: DO NOT DISCARD Please leave the Installation Guide
SINKS AND LAVATORIES. Steps to completion: These items are essential for installing all sinks:
 DUPONT CORIAN SOLID SURFACE FABRICATION/INSTALLATION FUNDAMENTALS NA/ENGLISH SINKS AND LAVATORIES INTRODUCTION This bulletin discusses installing DuPont Corian solid surface sinks and lavatories. OVERVIEW
Standard Kit #1 (5-way switch)
") Standard Kit #1 (5-way switch) Please Read All Instructions Before Beginning. Tools you will need: Soldering Iron (35 watt preferably) Solder Wet Sponge Wire Clippers 3/8 Drill Bit 1/4 Drill Bit Variable
Standard Kit #1 (5-way switch) Please Read All Instructions Before Beginning. Tools you will need: Soldering Iron (35 watt preferably) Solder Wet Sponge Wire Clippers 3/8 Drill Bit 1/4 Drill Bit Variable
Chapter 6 Frame And Lens Repairs
 Chapter 6 Frame And Lens Repairs 6.1 General Information All maintenance on the frame of the EXO Full-Face mask can be accomplished with common hand tools. 6.2 Lens Replacement Tools required: Dow DC-111
Build the Spitfire: Step-By-step. Pack 7 Stages 61-71
 Pack 7 Stages 61-71 1 Stage Contents Page Number 61 212-215 62 216-218 63 219-221 64 222-224 65 225-228 66 229-231 67 232-235 68 236-238 69 239-241 70 242-245 71 246-249 Editorial and design by Continuo
Shoulder Plane. dovetailed. fine tools. Make an heirloom tool and learn the secret to creating double dovetails in metal it s easier than you think.
 fine tools dovetailed Shoulder Plane Make an heirloom tool and learn the secret to creating double dovetails in metal it s easier than you think. I ve always been fascinated by old, metal hand planes.
JK Rear Crusher Flares
 INSTALLATION INSTRUCTIONS INST-17-05-010_A JK Rear Crusher Flares IMPORTANT: Thank you for purchasing this Poison Spyder product. Please read through this entire document before proceeding with installation.
Plexidor Pet Door Wall Kit Instruction for All Sizes Plexidor : S, M, L, XL; BiteGuard KennelPlex TM 1113,1418, 1419 & 1825 and Plexidor Electronic LG
 Plexidor Pet Door Wall Kit Instruction for All Sizes Plexidor : S, M, L, XL; BiteGuard KennelPlex TM 1113,1418, 1419 & 1825 and Plexidor Electronic LG Congratulations on your purchase of the Plexidor Pet
Greene & Greene. Mailbox. by Seth Keller. Signature details create an elegant box. 2 AmericanWoodworker.com
 Greene & Greene Mailbox by Seth Keller Signature details create an elegant box. 2 AmericanWoodworker.com We needed a new mailbox, but I couldn t find an off-the-shelf version that I liked. So I decided
Rubber Grommet, 36 pcs. 3/4 Screw, 10 pcs. Nut, 10 pcs
 Jeep Cherokee ZJ Set Part #10916-07 Rev-2 03-11-10 THESE INSTRUCTIONS INVOLVE CUTTING THE FENDERS OF THE VEHICLE. IT IS IMPORTANT TO READ ALL INSTRUCTIONS PRIOR TO THE CUTTING AND INSTALLATION OF THESE
How to make climbing grips. By,
 How to make climbing grips By, Items needed: * Items may be needed depending on your preference. - Carving Foam - Level Table - Cardboard - Pen - Ruler - Straight Edge - Box cutter - Hot melt glue gun
1. TOOLS + MATERIALS REQUIRED
 R INSTALLATION INSTRUCTIONS PRODUCT: BALDUR + ODEN CONFIGURATION: BI-PARTING DOOR MOUNT: TOP MOUNT Product is covered by U.S. patents. For more information visit www.krownlab.com. TOOLS + MATERIALS REQUIRED
WPS crew Doors Installation instructions
 WPS-132-133 crew Doors Installation instructions ORDER OF INSTALLATION FOR A COMPLETE ENCLOSURE OF A CREW WPS (Weather Protection System) IS AS FOLLOWS: 1. Heater 2. Rear Thresholds - Right Hand & Left
IMPORTANT: PLEASE RETAIN THIS INSTRUCTION MANUAL FOR FUTURE REFERENCE
 IMPORTANT: PLEASE RETAIN THIS INSTRUCTION MANUAL FOR FUTURE REFERENCE 005-07 Cadillac STS Classic 3D Z, Classic Dual Weave, Classic Mesh & Classic Black Mesh Grilles B 7 HR 3 STS Classic 3D Z Grille Part
VYTEX PREMIUM SLIDING GLASS DOOR. Table of Contents. Precautions and Safety 2. Tools Required...3. Inspect and Prepare Door...4
 VYTEX PREMIUM SLIDING GLASS DOOR Table of Contents Precautions and Safety 2 Tools Required...3 Inspect and Prepare Door...4 Hardware and Parts Check List....4 Master Frame Assembly 5 Master Frame Installation..7
Chevy Colorado. INSTALLATION GUIDE Front Bumper
 Chevy Colorado INSTALLATION GUIDE Front Bumper FIG 1A First, we ll start by removing the small allen bolts from the inside fender wells that hold the stock front bumper in place. FIG 1B You will also need
INSTALLATION INSTRUCTIONS FOR D'SHANNON AVIATION LEFT AND RIGHT FORWARD SIDE WINDOWS
 INSTALLATION INSTRUCTIONS FOR D'SHANNON AVIATION LEFT AND RIGHT FORWARD SIDE WINDOWS 1. a.) Remove plastic moldings by removing #2 trim screws (Late Model) b.) Remove small #1 trim screws and remove metal
Making a Cement Upper Molding Surface for Compression Molding of Shape&Roll Prosthetic Foot Cores
 Making a Cement Upper Molding Surface for Compression Molding of Shape&Roll Prosthetic Foot Cores Andrew Hansen, PhD Steven Steer, MS Kerice Tucker Elizabeth Klodd Craig Heckathorne, MS Northwestern University
Half Door Installation Instructions
 Half Door Installation Instructions For: CJ7, CJ8/Scrambler and Wrangler/YJ Part Number: 53028 Note: Wrangler/YJ Use of this product may not allow use of factory side mirrors. Note: Wrangler/YJ Use of
Build your own Drawer unit. D3 / D4
 Page1 Build your own Drawer unit. D3 / D4 1: Introduction. This guide will give you the plans, materials and how to information to build your own drawer unit. The dimensions given will fit a D3 or D4,
PRODUCT: LOKI INSTALLATION INSTRUCTIONS. Product is covered by U.S. patents. For more information visit
 R INSTALLATION INSTRUCTIONS PRODUCT: LOKI CONFIGURATION: SINGLE DOOR MOUNT: GLASS MOUNT Product is covered by U.S. patents. For more information visit www.krownlab.com . TOOLS + MATERIALS REQUIRED TOOLS
B A T H R O O M G L A S S
 mistley B A T H R O O M G L A S S vaug16 Page 2 Thank you for purchasing this Trinity shower screen. Please study these instructions carefully before assembly and installation and check all supplied parts
Pump Replacement Manual. Bill Wallace by Wallace Marine Services, Inc.
 by Wallace Marine Services, Inc. Maintain Your Equipment The Easy Way Bill Wallace 843-693-4336 info@willyvac.com www.willyvac.com Pump Replacement Manual 1 How to change the water pump on the Willy Vac
Explorer Wiring Kit (assembled)
") Explorer Wiring Kit (assembled) For Vintage, Firestorm & Standard Series Please Read All Instructions Before Beginning. Tools you will need: Soldering Iron (35 watt preferably) Solder Wet Sponge Wire Clippers
Explorer Wiring Kit (assembled) For Vintage, Firestorm & Standard Series Please Read All Instructions Before Beginning. Tools you will need: Soldering Iron (35 watt preferably) Solder Wet Sponge Wire Clippers
INSTALLATION GUIDE VERSION 11/14
 INSTALLATION GUIDE VERSION 11/14 In this guide we will demonstrate effective techniques and methods for installing EDGE stainless steel sinks seamlessly in both laminate and solid surface. These techniques
PAUL DAUNNO ADDS TOYMAKING TO HIS
 WOOD TOY NEWS Monday January 26, 2015 PAUL DAUNNO ADDS TOYMAKING TO HIS VAST ARRAY OF WOODWORKING SKILLS. toymakingplans.com Meet Toymaker Paul Daunno I was born and raised in New Jersey and my father
Curium 19H Installation Instructions & Parts List
 Curium 19H Installation Instructions & Parts List Illustration Curium 19H Right Hand Page 1 of 15 01/07/2016 Revision 2.1 IMPORTANT This shower screen / enclosure must be installed by suitably qualified
Serving Tray. When some good friends got married recently, An exercise in template-making yields a great gift project that s easy to duplicate
 Serving Tray An exercise in template-making yields a great gift project that s easy to duplicate END Create from 3 8 2 8" piece. By Geoff Noden When some good friends got married recently, I decided to
Included in Hardware Kit. Jeep Cut-Out Fender Flare Set of 4 Set Part # Rev STEP 1 PRIOR TO INSTALLATION
 Jeep Cut-Out Fender Flare Set of 4 Set Part #10926-07 Rev-01 09-11-12 STEP 1 PRIOR TO INSTALLATION A) Bushwacker only approves installing the flares according to these written instructions with the hardware
JK Front Crusher Flares
 INSTALLATION INSTRUCTIONS INST-17-03-030_A JK Front Crusher Flares IMPORTANT: Thank you for purchasing this Poison Spyder product. Please read through this entire document before proceeding with installation.
JK Crusher Corners. *Includes ONE of the Hardware Kits (not both)
") INSTALLATION INSTRUCTIONS INST-18-05-020_A JK Crusher Corners IMPORTANT: Thank you for purchasing this Poison Spyder product. Please read through this entire document before proceeding with installation.
INSTALLATION INSTRUCTIONS INST-18-05-020_A JK Crusher Corners IMPORTANT: Thank you for purchasing this Poison Spyder product. Please read through this entire document before proceeding with installation.
For Barrel Tapers. Installation and Operating Instructions For use with small combination belt & disk sanders. Assembled Taper Tool
 Tim s Taper Tool For Barrel Tapers Installation and Operating Instructions For use with small combination belt & disk sanders Assembled Taper Tool Your taper tool is capable of making barrel tapered shafts.
END FRAMES. End frames built using pressure treated 2x4 (1 1/2" x 3 1/2") 36" 34" 7/16" pilot hole. 5 1/2" x 1/2" lag bolt 8" wheel 23"
 36 34 7/16 pilot hole. 5 1/2 x 1/2 lag bolt 8 wheel 23") END FRAMES End frames built using pressure treated 2x4 (1 1/2" x 3 1/2") 23" 17 1/2" (B) (B) Measure from the bottom of your stone to 1" below the lip to get your measurement. 17 1/2"(B) 36" 34" 1/2" flat
END FRAMES End frames built using pressure treated 2x4 (1 1/2" x 3 1/2") 23" 17 1/2" (B) (B) Measure from the bottom of your stone to 1" below the lip to get your measurement. 17 1/2"(B) 36" 34" 1/2" flat
Curium 19.4H Installation Instructions & Parts List
 Curium 19.4H Installation Instructions & Parts List Illustration Curium 19.4H Right Hand Page 1 of 21 30/06/2016 Revision 1.0 IMPORTANT This shower screen / enclosure must be installed by suitably qualified
T he Double-Hung Replacement System replaces the sash and balance system of an older double-hung window. The
 Double-Hung Replacement System Installation The Pozzi Collection PID001 (12/03) T he Double-Hung Replacement System replaces the sash and balance system of an older double-hung window. The frame of the
Baba 30 Butterfly Hatch Repair in 17 or so not-so-easy steps Part I. Rick Beddoe s/v Soñadora
 Baba 30 Butterfly Hatch Repair in 17 or so not-so-easy steps Part I Rick Beddoe s/v Soñadora Introduction Butterfly hatches on any boat are notorious for leaks. However, they are also noted for their attractiveness.
TRUE TECHNICAL SERVICE MANUAL - ALL MODELS. DOORS/DRAWERS/LIDS
 DOORS/DRAWERS/LIDS 55 56 NOTES DOORS/DRAWERS/LIDS Swing s 73 74 NOTES INSTALLATION OF A GDM-SWING DOOR Phillips Head Screwdriver (2) - 1/8" Drift Punches (forged) Top Bracket NOTE: It may be necessary
SIDE SLIDING/ FIXED WINDOWS
 SIDE SLIDING/ FIXED WINDOWS ILLUSTRATED FITTING MANUAL You will need: General workshop tools Cloths and a mild cleaning agent Latex gloves, eye and ear protection An electric drill with an appropriate
All Terrain Flares 2014 Chevy Silverado
 Page 1/8 Components: 1. Front Flares (2) 2. Rear Flares (2) Tools required: - Utility knife - #2 Phillips driver - Socket wrench - 13 mm Socket - 6 mm Allen Wrench - T-15 Torx bit - Trim Removal Tool -
UNIT No FRAMELESS PIVOT SHOWER DOOR
 INSTALLATION INSTRUCTIONS UNIT No. 3600 FRAMELESS PIVOT SHOWER DOOR NEED INSTALLATION HELP? Call 1-800-45-BASCO (452-2726) Monday - Friday 8:00 A.M. - 4:30 P.M. Eastern Time QCI0020 Rev. 3 Page 1 of 8
 America s leading woodworking authority To download these plans, you will need Adobe Reader installed on your computer. If you want to get a free copy, visit: http://adobe.com/ reader. Having trouble downloading
gently pry up all your door switches.. disconnect them.. same with the mirror control on the drivers side..
 How To Recover Door Panels By: Crispy SUPPLY/TOOL LIST NEEDED Dremel with drill cutter attachment (or drill with drill bit) contact cement 1/2 inch self tapping screws Carpet/Headliner spray on glue Phillips
Redwood strips are tacked to the templates, and edge-glued. Drive brads through into the templates before putting on fiberglass doth.
 1 Make the building form and attach templates to the crosspieces. Nail a strip down the center to hold the stems and templates in position. prototype canoe took about three weekends to build. She's broad
Fig2: The Sliding Glue Block from the back.
 Ornament Stand Introduction It was one of those forehead smacking moments. I was taking the #2 jaws off my Stronghold chuck, to put on my homemade wooden two jaw chuck set-up. For some reason instead of
BILL OF MATERIELS & TOOLS
 The Trunk Scope Invasive Plant Patroller Ross Wescott, dissatisfied with the limitations of the bucket scope (e.g., not well shielded from backlighting; limited view area) set out to make improvements.
Hand Tool Identification Worksheet. Name: Screw driver. Purpose: To turn the screws. Name: chisels. Purpose: To remove/chip away materials
 Hand Tool Identification Worksheet Name: Screw driver Purpose: To turn the screws Safety Facts: Don t use for prying or as a chisel Name: chisels Purpose: To remove/chip away materials Safety Facts: Always
(2) 25mm x 20mm x 5mm Adhesive Backed Foam Pads. 100mm x 50mm x 1.0mm Adhesive Backed Foam. (2) Spacer Plates. Passenger/Right Side Frame Mounting
 25mm x 20mm x 5mm Adhesive Backed Foam Pads. 100mm x 50mm x 1.0mm Adhesive Backed Foam. (2) Spacer Plates. Passenger/Right Side Frame Mounting") PARTS LIST: 1 Grille Guard 10 12mm Lock Washers 1 Driver/Left Frame Mounting 16 12mm x 32mm OD x 3mm Flat Washers 1 Passenger/Right Frame Mounting 8 12mm Hex Nuts 1 Driver/Left Side Top Support 2 10-1.50mm
PARTS LIST: 1 Grille Guard 10 12mm Lock Washers 1 Driver/Left Frame Mounting 16 12mm x 32mm OD x 3mm Flat Washers 1 Passenger/Right Frame Mounting 8 12mm Hex Nuts 1 Driver/Left Side Top Support 2 10-1.50mm
Cabinetry Installation
 Cabinetry Installation Easy to follow step-by-step kitchen cabinet installation Hammer Pry bar Screwdriver Phillips Flathead Level TOOL AND MATERIAL LIST Tape measure Pencil Straight edge Drill 3/16" drill
Radon 07 Installation Instructions & Parts List
 Radon 07 Installation Instructions & Parts List Illustration Radon 07, H1 Handle Right Hand: Open Out 14/06/2016 Revision 1.1 Page 1 of 21 IMPORTANT This shower screen / enclosure must be installed by
COMPLIMENTARY WOODWORKING PLAN
 COMPLIMENTARY WOODWORKING PLAN Bookcase This downloadable plan is copyrighted. Please do not share or redistribute this plan in any way. It has been created for Wilton Tools, a division of WMH Tool Group.
Metal Aircraft Landing Light Installation Instructions
 Metal Aircraft Landing Light Installation Instructions This landing light kit was designed for the Thorp T-18 as a method of installing a halogen landing light in the leading edge of the outer bay of the
Installation Instructions
 Please read all instructions before installing products. STORAGE: Keep crates in the upright position. When unpacking, store panels flat in a clean dry place. BEFORE INSTALLATION: Check for damage that
Allora ALCOVE ENCLOSURE INSTALLATION BEFORE INSTALLATION CHECK THAT YOUR ALLORA SHOWER ENCLOSURE SYSTEM IS UNDAMAGED
 Allora ALCOVE ENCLOSURE INSTALLATION BEFORE INSTALLATION CHECK THAT YOUR ALLORA SHOWER ENCLOSURE SYSTEM IS UNDAMAGED ALCOVE SHOWER Your shower can be installed to open Left hand or Right hand by rotating
FORD INTERCEPTOR SEDAN READY BUCKLE
 INSTALLATION MANUAL FORD INTERCEPTOR SEDAN READY BUCKLE PART# FT3501RB We recommend you read through the installation guide prior to installation, if you have any questions please call us at 800-516-2322
(Toll Free); 7am-7pm Pacific Time, Monday-Saturday. Assembly instructions for: SUN GAZEBO WITH SLIDING DOORS
; 7am-7pm Pacific Time, Monday-Saturday. Assembly instructions for: SUN GAZEBO WITH SLIDING DOORS") 866.332.2403 (Toll Free); 7am-7pm Pacific Time, Monday-Saturday Assembly instructions for: SUN GAZEBO WITH SLIDING DOORS CONTENT OF BOXES QUANTITY DESCRIPTION DRAWING Quantity will vary Window wall panels
866.332.2403 (Toll Free); 7am-7pm Pacific Time, Monday-Saturday Assembly instructions for: SUN GAZEBO WITH SLIDING DOORS CONTENT OF BOXES QUANTITY DESCRIPTION DRAWING Quantity will vary Window wall panels
Cardo DOOR & RETURN SHOWER ENCLOSURE INSTALLATION PLEASE READ THESE INSTRUCTIONS CAREFULLY.
 Cardo DOOR & RETURN SHOWER ENCLOSURE INSTALLATION PLEASE READ THESE INSTRUCTIONS CAREFULLY. IT IS RECOMMENDED TO USE A TRAINED SHOWER INSTALLER FOR THIS SHOWER TO OBTAIN THE BEST INSTALLATION. D Square
Half Door Installation Instructions
 Half Door Installation Instructions For: CJ5 (1955-1975), CJ6 (All), M38-A1 (1955-1971) Part Number: 53025 WARNING This product is designed primarily to enhance the appearance of the vehicle and to shield