Instruction Manual. LSV36108A 3600# Vertical Lift LAKESHORE PRODUCTS, INC.
|
|
|
- Shawn Matthews
- 5 years ago
- Views:
Transcription
1 LAKESHORE PRODUCTS, INC. Quincy. MI tel LSV36108A 3600# Vertical Lift Instruction Manual Read carefully. Failure to follow the instructions and safety rules could result in severe injury or death! LSV36108A LS5001A LS5002A LS3003 LS4004 LS5005A LS2005
2
3
4 LSV36108A 3600# Ver ertical Lift Thank you for purchasing a Lakeshore Vertical Lift. With proper care and maintenance, this lift will provide you with years of trouble free service. Please follow these instructions carefully. Each bolt pack is labeled to correspond to the steps listed in this manual. We have made assembly of your new lift as simple as possible. Below is a list of the components included in your accessory package. WARNING Do not over tighten the nuts and bolts on your lift. Doing so may cause the lift to fail. When tightening against a tube, tighten until the aluminum just dimples. Lock nuts should be tightened until at least one thread of the bolt is showing through the nut. If you crush the tube, it may crack and fail under normal use. tools needed 1/2 wrenches 2 9/16 wrenches 2 15/16 or adjustable wrench 1 tape measure 1 step ladder 1 grease accessory packa kage bolt package with steps aluminum winch 1 bunk socket 4 bunk socket plates 4" x 6.5" 4 cradle rollers 8 short mainframe plates 6 long mainframe plates 2 3.5" x 3.5" red plastisol caps 4 1.5" x 4.5" red plastisol caps 3 4


5 1. legs Insert the legs into the posts using: 4-3/8 x 4 clevis pins 4 - hairpin cotters mainframe posts 4 legs 4 bolt package step mainframe spreaders and cables les Bolt the mainframe spreader tubes between the posts using: 14-5/16 x 2-1/2 hex bolts 14-5/16 nylon lock nuts Insert bolts in cable attachment holes using: 2-5/16 x 3 hex bolts 2-5/16 flat washers 2-1/2 flat washers 2-5/16 nylon lock nuts the cables will be attached here in step 7. winch post mainframe spreaders 4 short mf plates 6 long mf plates 2 bolt package step 2 1 front note: the long mf plates fit here with the extra hole to the bottom 120" tube 108" tube 108" tube 120" tube place long bolts here rear 5
6 3. angle braces Attach the long angle braces to the sides of the lift and the short angle braces to the front and rear of the lift. At the tops of the braces, use: 8-3/8 x 4-1/2 hex bolts 8-3/8 flat washers 8-3/8 nylon lock nuts long angle brace 4 short angle brace 4 bolt package step 3 1 At the bottoms of the braces, use: 8-5/16 x 2-1/2 hex bolts 8-5/16 flat washers 8-5/16 nylon lock nuts Square the mainframe by measuring its diagonals. The diagonals must be equal. If they are not, adjust the mainframe until they are. Once this is accomplished, tighten all of the bolts except the 5/16 x 3 hex bolts. The cables in the rear cradle will attach to these cradle Bolt the cradle spreaders onto the cradles using: 12-5/16 x 5-1/2 hex bolts 12-5/16 nylon lock nuts Square the cradle and tighten all of the bolts. 6 cradle spreaders 2 cradles - front & rear 2 bolt package step 4 1
7 5. roller ollers Install cradle rollers using: 8-3/8 x 2 hex bolts 8-3/8 nylon lock nuts cradle rollers 8 bolt package step winch With a ladder, attach the winch using: 2-3/8 x 5 hex bolts 2-3/8 flat washers 2 - large aluminum washers 2-3/8 nylon lock nuts One washer belongs under the head of each bolt. The aluminum washer and the other washer go under the nut on the outside of the lift. Make certain that the large drum inside the winch is on the bottom of the winch. Tighten these bolts. Carefully thread the wheel onto the winch shaft and then place the washer and jam nut onto the winch shaft. Tighten the jam nut until the threads of the shaft just show through. Further tightening may keep the winch from working properly. winch 1 41" red wheel 1 bolt package step 6 1 7
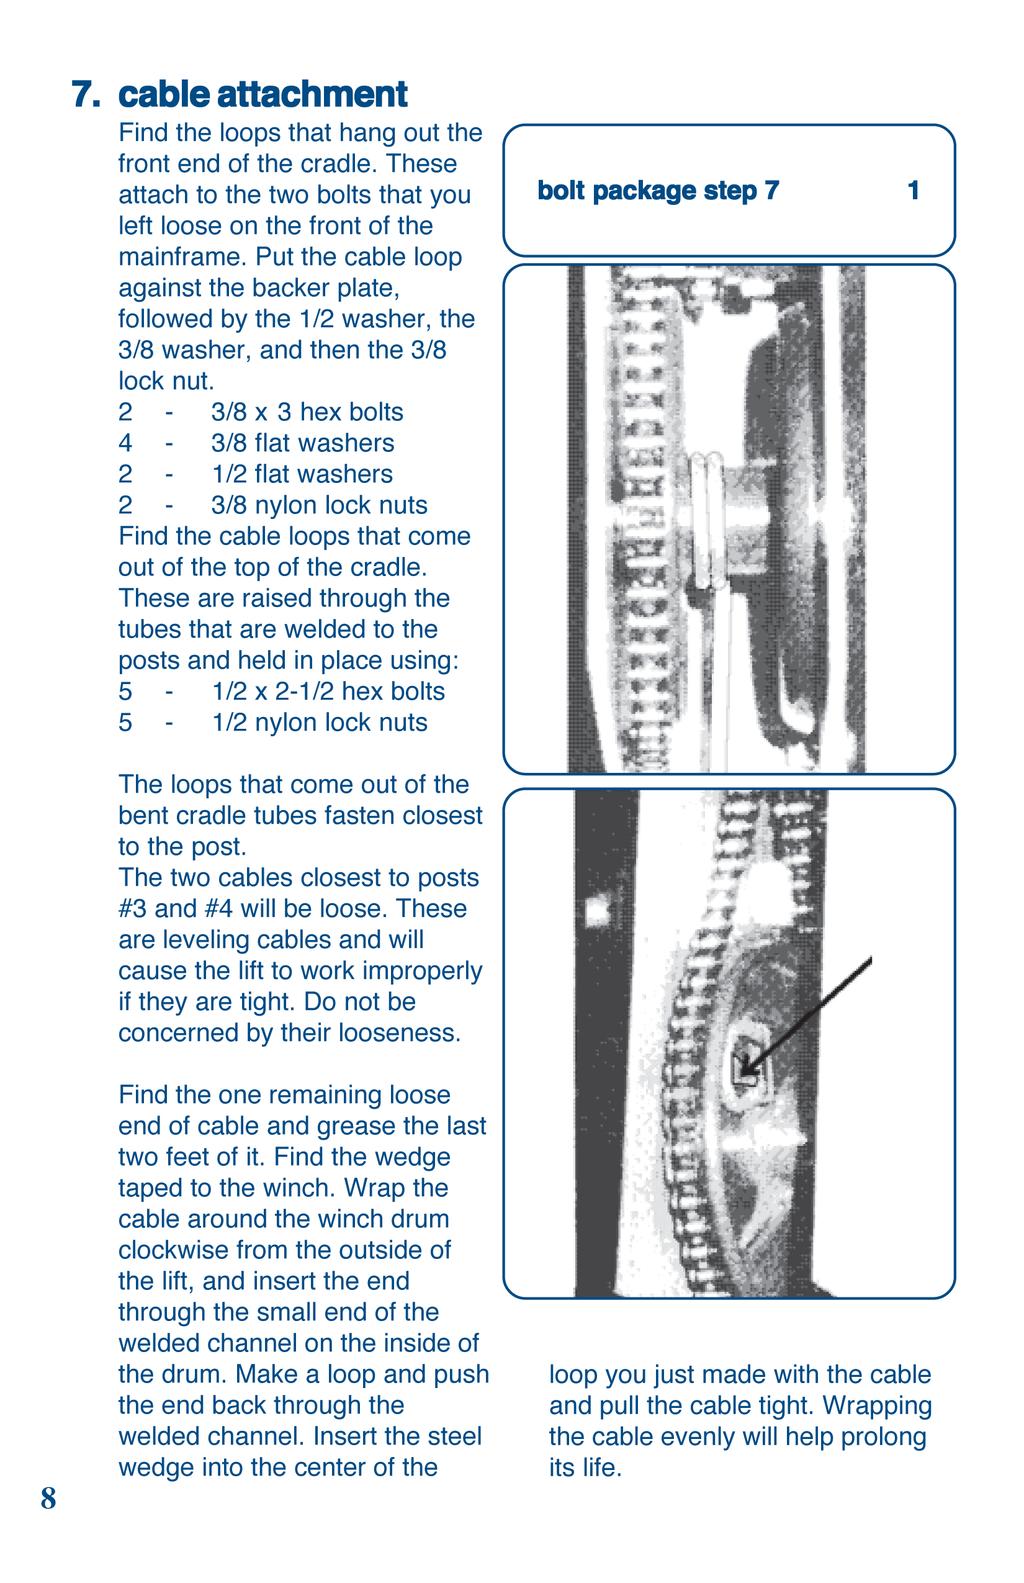
8
9 8. bunks Attach the Bunk Sockets directly to the Front and Rear Cradle Assemblies using the Bunk Plates and 16-3/8 x 2-1/2 hex bolts 16-3/8 nylon lock nuts The Sockets should be on the inside of the cradle. Do not tighten these now as they will need to be adjusted to fit your boat. bunk sockets 4 bunk socket plates 4 bolt package step 8 1 Slide the Carpeted Wood Bunks down into these sockets and fasten in place with: 4-3/8 x 2-1/2 clevis pins 4 - hairpin cotters final touches Place the Winch Cover on the winch. Place the 3.5 x 3.5 red plastisol caps on the tops of the posts. Place the 1.5 x 4.5 red plastisol caps on the welded stubs that the cables bolt to. Move the lift to where it is to be used. Adjust the leg height so that the lift is level. Do this by removing the clevis pin of the lowest leg, lifting that corner of the lift to level and replacing the clevis pin. Don't forget the hairpin cotter. Adjust the positions of the Carpeted Wood Bunks to fit your boat. 3.5" x 3.5" red caps 4 1.5" x 4.5" red caps 3 CHECK YOUR LIFT Raise and lower the cradle several times while looking for any problems. Now is a much better time to fix these than after the lift is in the water. Here are some general guidelines: 1- The cradle should move smoothly up and down. 2- All cables should ride in pulleys. 3- No two cables should cross outside of a tube. 4- No cable should ride directly on a tube. 9

10 IMPORTANT Occasionally check the cables for fraying and make cer- tain that all cables are riding properly. This will guarantee years of trouble-free operation. When transporting the lift assembled, tie the cradle unit to the lower mainframe and use the winch to put tension on the cables. Once you've reached your destination, check that all of the cables are still riding in their pulleys. At the beginning of each season, you should check your lift before entrusting your boat to it: -Check that your winch turns easily without any weight on it. -Check that the braking mechanism works with weight on the lift. -Check your cables for fraying. -Check that your pulleys turn freely. -Check that the cables are riding in pulleys and not against aluminum. 10
11 10/2 Year Limited Warranty Lakeshore Products, Inc. (Seller) warrants the aluminum structure on docks and lifts of its manufacture to be free from defects caused by faulty material or poor workmanship. Seller will, at its option, repair or replace any such goods found on examination by Seller, to be defective under normal use and service within ten years from date of purchase. Upon discovery of any such defect, Buyer must notify Seller in writing of defect and provide proof of purchase. Seller warrants cast aluminum parts, mechanical components, and hardware for two years. Components obtained from other manufacturers and used in Seller's products will be covered under the manufacturer's warranty and shall not be the responsibility of the Seller. Seller's responsibility under this warranty shall be the repair or replacement of defective items. Seller is not liable for incidental or consequential damages of any kind. Seller shall not be held responsible for repairs or modifications to its docks or lifts unless authorization has been obtained from Seller. This warranty does not cover damage caused by incorrect assembly or adjustments, overloading, improper use, neglected maintenance, alterations, or damage caused by accident, ice, salt water, or acts of God. 11
12 Your Waterfront Specialists 855 Chicago Road Quincy, Michigan tel fax A-99.p
750# Double Jet Lift Instruction Manual
 LAKESHORE PRODUCTS, INC. Quincy. MI. 49082. tel 517.639.3815 750# Double Jet Lift Instruction Manual Read carefully. Failure to follo ollow the instructions and safety rules could result in severe injury
Owner s Manual LSV1364
 Owner s Manual LSV1364 1300 lb, 64" Beam Vertical Lift READ CAREFULLY - FAILURE TO FOLLOW INSTRUCTIONS AND SAFETY RULES MAY RESULT IN SERIOUS INJURY Manufacturers of Lakeshore Products 855 East Chicago
Owner s Manual LSC1576
 Owner s Manual LSC1576 1500 lb, 76" Beam Jet Lift READ CAREFULLY - FAILURE TO FOLLOW INSTRUCTIONS AND SAFETY RULES MAY RESULT IN SERIOUS INJURY Manufacturers of Lakeshore Products 855 East Chicago Road,
Owner s Manual LSC964
 Owner s Manual LSC964 900 lb, 64" Beam Jet Lift READ CAREFULLY - FAILURE TO FOLLOW INSTRUCTIONS AND SAFETY RULES MAY RESULT IN SERIOUS INJURY Manufacturers of Lakeshore Products 855 East Chicago Road,
READ CAREFULLY - FAILURE TO FOLLOW INSTRUCTIONS AND SAFETY RULES MAY RESULT IN SERIOUS INJURY
 Owner s Manual LSV50120B LS5000B leg bundle LS5021B post bundle LS5022B cradle bundle V50120B straight LS5003B spreader bundle LS5004B bunk bundle LS4005B accessory box LS2005B wheel LS5007B diag bundle
READ CAREFULLY - FAILURE TO FOLLOW INSTRUCTIONS AND SAFETY RULES MAY RESULT IN SERIOUS INJURY
 Owner s Manual LSV50120B LS5000B leg bundle LS5021B post bundle LS5022B cradle bundle V50120B straight LS5003B spreader bundle LS5004B bunk bundle LS4005B accessory box LS2005B wheel LS5007B diag bundle
READ CAREFULLY - FAILURE TO FOLLOW INSTRUCTIONS AND SAFETY RULES MAY RESULT IN SERIOUS INJURY
 LSV30108C LS5002C cradle bundle 108 LS5004B bunk bundle LSV40108C LS5002C cradle bundle 108 LS5004B bunk bundle LS5007B diagonal bundle LSV30120C LS5012C cradle bundle 120 LS5004B bunk bundle LSV40120C
READ CAREFULLY - FAILURE TO FOLLOW INSTRUCTIONS AND SAFETY RULES MAY RESULT IN SERIOUS INJURY
 LSV30108B LS5002B cradle bundle 108 LS5004B bunk bundle LSV40108B LS5002B cradle bundle 108 LS5004B bunk bundle LS5007B diagonal bundle LSV30120B LS5012B cradle bundle 120 LS5004B bunk bundle LSV40120B
LSP inc. READ CAREFULLY - FAILURE TO FOLLOW INSTRUCTIONS AND SAFETY RULES MAY RESULT IN SERIOUS INJURY
 LSP inc. Canopy Frame Owner s Manual 14AF64 14' Canopy Frame LS311 bent tube bundle 14' LS321 rail bundle 14' LS310 leg bundle 16AF64 16' Canopy Frame LS311 bent tube bundle 14' LS321 rail bundle 14' LS310
Thank you for purchasing our product! *Please read these instructions and follow them step by step.*
 07/07/08.rev1 PAGE 1 OF 11 601AL VERTICAL 60120VL LIFT W/CHAIN DRIVE WINCH Thank you for purchasing our product! *Please read these instructions and follow them step by step.* Step 1. Separate and group
400A 40113V, 401A 40120V, & 401AL 40120VL ALUMINUM VERTICAL 4000 LB LIFT INCLUDES SCREW LEG ASSEMBLY INSTRUCTIONS
 12/11/07 PAGE 1 OF 12 400A 40113V, 401A 40120V, & 401AL 40120VL ALUMINUM VERTICAL 4000 LB LIFT INCLUDES SCREW LEG ASSEMBLY INSTRUCTIONS Thank you for purchasing our product! *Please read these instructions
1-CYLINDER TORNADO LIFT INSTALLATION MANUAL
 1-CYLINDER TORNADO LIFT INSTALLATION MANUAL Model: TORNADO LIFT 2K 2018 Edition PROVIDED FOR ASSEMBLY Foot Pads 12 sq. Square Tube Legs (optional) Cross Beams Side Beams 2.5 Dia. Cylinders (with hoses
6-CYLINDER TORNADO LIFT INSTALLATION MANUAL
 6-CYLINDER TORNADO LIFT INSTALLATION MANUAL Model: TORNADO LIFT 18K 2018 Edition PROVIDED FOR ASSEMBLY (4) Foot Pads 16 sq. (4) Square Tube Legs (optional) (2) Cross Beams (2) Side Beams 2.5 Dia. Cylinders
200A FLB VERTICAL 22113V LIFT W/CHAIN DRIVE WINCH
 PG. 1 OF 11 PORTA-DOCK, INC. 200A FLB VERTICAL 22113V LIFT W/CHAIN DRIVE WINCH STEP 1. Separate and group like parts and fasteners together. Locate the winch side member with the longer upright tube and
3,500/4,500lb. Vertical Cable Feighner Lift
 3,500/4,500lb. Vertical Cable Feighner Lift CAUTION - PUT SAFETY FIRST 1. Before attempting to install or operate this lift, study and fully understand the proper operating procedures and safety precautions
MODEL 83 Pail Handler
 MORSE MFG. CO., INC. 727 West Manlius Street P.O. Box 518 East Syracuse, NY 13057-0518 Phone: 315-437-8475 Fax: 315-437-1029 Email: service@morsemfgco.com Website: www.morsemfgco.com COPYRIGHT 2005 MORSE
SawStop. Contractor Fence Assembly OWNER S MANUAL. Model CNS-SFA
 Contractor Fence Assembly OWNER S MANUAL Model CNS-SFA Warranty warrants to the original retail purchaser of the Contractor Fence Assembly accompanying this manual that the fence assembly will be free
TABLE OF CONTENTS DESCRIPTION. Safety Instructions Assembly Operation... 7
 TABLE OF CONTENTS DESCRIPTION PAGE Warranty... 1 Safety Instructions... 2 Assembly... 3 Operation... 7 #360 Grain Cleaner Drawings... 8 #360 Grain Cleaner Parts List... 10 Utility Auger Option Drawing...
PO BOX 130 CLEAR LAKE, MN
 WWW.WALKSONWATER.COM PO BOX 130 CLEAR LAKE, MN 55319 320-743-3333 PARTS LIST FOR 30115# VERTICAL BOAT LIFT 2-Back Leg Uprights 1 right, 1 left (BL) 1-Front Leg Upright (FL) 1-Winch Leg Upright (WU) 2-Bottom
SS1062, SS10621 & SS10621E Free Standing PWC & Fishing Boat Hoist SS1062 SS10621 SS10621E
 SS1062, SS10621 & SS10621E Free Standing PWC & Fishing Boat Hoist SS1062 SS10621 SS10621E Midwest Industries, Inc. Page 1 Ida Grove, IA 51445 800.859.3028 www.shorestation.com 0003231 REV A 1/25/05 Bundles
Owner s Manual AE PLUG AERATOR MANUFACTURING QUALITY LAWN CARE EQUIPMENT SINCE Made In CHINA REV
 MANUFACTURING QUALITY LAWN CARE EQUIPMENT SINCE 1945 Owner s Manual AE-48 48 PLUG AERATOR IMPORTANT Read and follow all Safety Precautions and Instructions Before Operating this Equipment. Made In CHINA
Hollywood Swing Away 2 and 4 Bike Racks Assembly and Installation Guide
 Hollywood Swing Away 2 and 4 Bike Racks Assembly and Installation Guide Tools Required: two adjustable wrenches, pliers, ¾ socket wrench recommended Note: please do assembly near your vehicle as you Can
LifeGear G1 /HOME GYM ITEM NO.: 63100
 LifeGear G1 /HOME GYM ITEM NO.: 63100 OWNER S MANUAL IMPORTANT: Read all instructions carefully before using this product. Retain this owner s manual for future reference. The specifications of this product
INSTALLATION INSTRUCTIONS
 INSTALLATION INSTRUCTIONS SELF LEVELING RADAR ANTENNA MOUNT MODEL 400G QUESTUS MARINE, INC. PO BOX 9 MARBLEHEAD, MA 01945 1-800-RADAR66 TEL 781.639.1900 FAX 781.639.1905 www.questusmarine.com INSTALLATION
A59 APD & A86 CPD 5'X 16' SW ALUMINUM PORTA-DOCK
 Page 1 of 5 PORTA-DOCK, INC. A59 APD & A86 CPD 5'X 16' SW ALUMINUM PORTA-DOCK *For Beige Decking Add the Letter B to model* Thank you for purchasing our product! *Please read these instructions and follow
Thank you for purchasing out product! *Please read these instructions and follow them step by step. *
 Page 1 of 7 AD17 AA DS 4 X 16 T12 Thank you for purchasing out product! *Please read these instructions and follow them step by step. * STEP 1. Slide two support posts (REF. # 24) into the two outside
COMPETITOR CB-610 STANDARD BENCH
 NOTE: Please read all instructions carefully before using this product Table of Contents Safety Notice COMPETITOR CB-610 STANDARD BENCH Hardware Identifier Assembly Instruction Exploded Diagram Parts List
RESIDENTIAL MOTORIZED STORAGE UNIT
 BY V-BRO PRODUCTS RESIDENTIAL MOTORIZED STORAGE UNIT Model: GGR220 INSTALLATION AND OPERATING INSTRUCTIONS Distributed Exclusively by V-BRO PRODUCTS For technical questions and replacement parts, please
TABLE OF CONTENTS DESCRIPTION. Safety Instructions Assembly Operation... 7
 TABLE OF CONTENTS DESCRIPTION PAGE Warranty... 1 Safety Instructions... 2 Assembly... 3 Operation... 7 #360 Grain Cleaner Drawings... 8 #360 Grain Cleaner Parts List... 10 Utility Auger Option Drawing...
PORTA-DOCK, INC. AP17 APD DS 4 X 16 T12 AW17 CPD DS 4 X 16 T12
 Page 1 of 7 PORTA-DOCK, INC. AP17 APD DS 4 X 16 T12 AW17 CPD DS 4 X 16 T12 *For Beige Decking Add the Letter B to Model* Thank you for purchasing out product! *Please read these instructions and follow
VAN STORAGE SOLUTIONS FOR THE WAY YOU WORK
 WWW.WEATHERGUARD.COM VAN STORAGE SOLUTIONS FOR THE WAY YOU WORK Weather Guard / KNAACK 420 E. Terra Cotta Ave. Crystal Lake, IL 60014 USA 800-456-7865 (Toll Free) 800-334-2981 (Fax) Knaack.OrderEntry@wernerco,.com
31082 INSTALLATION INSTRUCTIONS
 08 INSTALLATION INSTRUCTIONS Safety glasses should be worn at all times while installing this product. YEARS: 07-CURRENT MAKE: HONDA MODEL: RIDGELINE STYLE: TRUCK WARNING: NEVER EXCEED YOUR VEHICLE MANUFACTURER'S
Installation Manual Roof Zone Ladder Rack
 Installation Manual Roof Zone Ladder Rack 102113,E1346 Installation Time: About 90 minutes. Depending on truck and Do-it-Yourself experience level Tools Required: Electric Drill with 1/2 Chuck 1/2 & 7/32
Operating Instructions and Parts Manual SLT-1100 Jumbo Scissor Lift Table
 Operating Instructions and Parts Manual SLT-1100 Jumbo Scissor Lift Table JET 427 New Sanford Road LaVergne, Tennessee 37086 Part No. M-140780 Ph.: 800-274-6848 Revision B1 05/2014 www.jettools.com Copyright
Tilting & Swiveling Plasma/LCD Flat Panel Wall Mount Installation Guide Model: A380SM
 Tilting & Swiveling Plasma/LCD Flat Panel Wall Mount Installation Guide Model: A380SM Easy installation Built-in level for easy positioning Corrective leveling adjustments after installation Forward /
EA-04a: Repair McGuire Dock (Lift Roller)
") Page 1 of 6 EA-04a: Repair McGuire Dock (Lift Roller) SAFETY FIRST o Follow all Caterpillar facility safety standards when performing this task. o Place orange cones at the entrance to the dock to let
Page 1 of 6 EA-04a: Repair McGuire Dock (Lift Roller) SAFETY FIRST o Follow all Caterpillar facility safety standards when performing this task. o Place orange cones at the entrance to the dock to let
Please read and understand the OnBoard Timpani Cart Owner s Manual before using the Timpani Cart.
 Assembly and Owner s Manual OnBoard Timpani Cart Performance Position Towing Position CONTENTS Important User Information...........................2 General......................................2 Manufacturer.................................2
ASSEMBLY INSTRUCTIONS FOR SERVICE BODY A MOUNT RACKS
 ASSEMBLY INSTRUCTIONS FOR SERVICE BODY A MOUNT RACKS T12 Service Body A shown with optional middle crossbar Package Contents: HARDWARE KIT PARTS (8) 3/8-16 x 3 CARRAIGE BOLTS (1) RAIL DRIVER S SIDE ASSEMBLIES
Parts list Instruction guide Warnings Please read carefully before assembling and using product.
 Parts list Instruction guide Warnings Please read carefully before assembling and using product. Jet Rail XL Part Number 27377 Tools required for assembly Hammer 9/16 Wrench 3/4 Wrench Ratchet 9/16 Socket
Record the serial number and date of purchase in your manual for future reference.
 10 Woodworking Bandsaw Model: 10-305 Parts List Record the serial number and date of purchase in your manual for future reference. Serial number: Date of purchase: Part # 10-305PL1 For more information:
Loading Dock Safety Gate
 Installation Instructions/Operation and Maintenance Manual Models LDSG-120-PCY LDSG-144-PCY Table of Contents Product Information...2 Parts List...3 Installation Instructions...5 Operation...13 Inspection
ASSEMBLY INSTRUCTIONS FOR HAULER II SERVICE BODY A RACK
 ASSEMBLY INSTRUCTIONS FOR HAULER II SERVICE BODY A RACK T12USBA-1 shown above Package Contents: HARDWARE KIT PARTS (4) 3/8-16 x 3 CARRAIGE BOLTS (1) RAIL DRIVER S SIDE ASSEMBLY (20) 3/8-16 x 2 CARRAIGE
Installation Instructions BestRail Ladder Rack Must be used with BestRail Accessories: Overhead Rack
 Installation Instructions BestRail Ladder Rack Must be used with Accessories: 42791 Can be used with Accessories: 42793 Tie Down 42794 Retractable Tie Down The channels in the Ladder Rack are the same
INSTALLATION QUICK ADJUST RELOCATOR FOR TOUR-PAK 8973
 FOR TOUR-PAK 8973 PARTS INCLUDED 1 Base Plate Assembly 1 Right Side Extruded Slider Assembly 1 Left Side Extruded Slider Assembly 1 Filler Panel 1 Hardware Kit 1 Stop Block 2 1/4-20 x 1/2" Hex Head Cap
Installation Instructions. Monitor Roll Stand
 Installation Instructions Monitor Roll Stand w w w. a m i c o. c o m Preface Important, Please Read Carefully Thank you for your purchase with Amico. This unit is designed for long lasting performance,
Assembly Instructions and Parts Manual JPSF-1 Fence and JPSR Rail Set #
 Assembly Instructions and Parts Manual JPSF-1 Fence and JPSR Rail Set #1002493 JET 427 New Sanford Road LaVergne, Tennessee 37086 Part No. M-708482 Ph.: 800-274-6848 Revision C3 02/2014 www.jettools.com
By SP Partners, LLC. INSTALLATION GUIDE. ProTech-12
 By SP Partners, LLC www.rainbowatticstair.com INSTALLATION GUIDE ProTech-12 IMPORTANT READ THIS FIRST Inspect stair for any damage prior to installation. Stair is NOT to be installed while home is under
USER MANUAL. Cart, Mast & Boom. Assembly & Installation
 Cart, Mast & Boom Assembly & Installation USER MANUAL 5845 WEST 82ND STREET INDIANAPOLIS, INDIANA 46278 U.S.A. Phone (317) 875-5592 Fax (317) 875-5456 Email gcisales@glascraft.com Web www.glascraft.com
Please Do Not Return This Product To The Store!
 MODEL NOS. T81 TABLE TENNIS TABLE OWNER'S MANUAL 1. Read this manual carefully before starting assembly. Read each step completely before beginning each step.. Some smaller parts may be shipped inside
ALUMINUM HEADKNOCKER RACK P/N HKRS4-1 / HKRS5-1
 ALUMINUM HEADKNOCKER RACK P/N HKRS4-1 / HKRS5-1 Package Contents: PARTS (1) CROSS BAR (2) LEGS WITH FEET (2) T BRACKETS (1) SCREEN ASSEMBLY (2) SCREEN L MOUNTS (2) LOWER SCREEN MOUNTS (2) LOAD SECURE POSTS
MODEL T28000 HEAVY-DUTY MOBILE BASE INSTRUCTIONS
 MODEL T28000 HEAVY-DUTY MOBILE BASE INSTRUCTIONS For questions or help with this product contact Tech Support at (570) 546-9663 or techsupport@grizzly.com Introduction Your new Model T28000 Heavy-Duty
OWNER'S MANUAL. Please Do Not Return This Product To The Store!
 MODEL NO. T8190SA TABLE TENNIS TABLE OWNER'S MANUAL 1. Read this manual carefully before starting assembly. Read each step completely before beginning each step.. Some smaller parts may be shipped inside
COMPETITOR WM-203 COMBO BENCH
 NOTE: Please read all instructions carefully before using this product Table of Contents Safety Notice Hardware Identifier COMPETITOR WM-203 COMBO BENCH Assembly Instruction Exploded Diagram Parts List
PATRIOT DOCKS ASSEMBLY INSTRUCTIONS
 6/1/2008 PATRIOT DOCKS ASSEMBLY INSTRUCTIONS Congratulations on your new Patriot Dock purchase. This manual contains instructions to assemble basic dock configurations for use at typical shoreline application.
Owner s Manual ODYSSEY BENCH MODEL. O4100B shown REV E. Southern Avenue, Phoenix, AZ USA Workhorseproducts.
 Owner s Manual ODYSSEY BENCH MODEL O4100B shown 67-1375 REV 218 3730 E. Southern Avenue, Phoenix, AZ 85040 USA 800-778-8779 Workhorseproducts.com 1 Table of Contents I. Introduction & Safety Information.
ASSEMBLY INSTRUCTIONS FOR HAULER II UNIVERSAL CAMPER SERIES RACKS
 ASSEMBLY INSTRUCTIONS FOR HAULER II UNIVERSAL CAMPER SERIES RACKS C11U2873-1 shown above Package Contents: HARDWARE KIT PARTS (4) 3/8-16 x 3 CARRAIGE BOLTS (1) RAIL DRIVER S SIDE ASSEMBLY (20) 3/8-16 x
INSTALLATION INSTRUCTIONS
 TEL:1-866-XANATOS INSTALLATION INSTRUCTIONS PART # RN-FOF1SCC-09-91 CUTLASS RUNNING BOARDS PARTS LIST: 5 STAINLESS AND ALUMINUM SIDEBARS 2 Left or right Sidebars 10 8-1.25mm x 30mm Hex Bolts 2 Driver/Left
Please Do Not Return This Product To The Store!
 MODEL NOS. T8512 TOURNAMENT SERIES 3 TABLE TENNIS TABLE OWNER'S MANUAL 1. Read this manual carefully before starting assembly. Read each step completely before beginning each step. 2. Some smaller parts
GlideRite Retractable Cover System For Hot Spot Spas (SE & SLX only)
") List of Contents Quantity Description 12 #10 x 1 ½ Flat Head Phillips Screw (see pg. 2) 2 #10 x ½ Pan Head Phillips Screw (see pg. 2) 8 ¼ x 2 ½ Lag Bolt (see pg. 2) 7 ¼ 20 x 5 / 8 Hex Head Bolt (see pg.
List of Contents Quantity Description 12 #10 x 1 ½ Flat Head Phillips Screw (see pg. 2) 2 #10 x ½ Pan Head Phillips Screw (see pg. 2) 8 ¼ x 2 ½ Lag Bolt (see pg. 2) 7 ¼ 20 x 5 / 8 Hex Head Bolt (see pg.
Tow-Behind Spreader. 175 lb Capacity MODEL NUMBER SP-175TB Rev
 Tow-Behind Spreader 175 lb Capacity IMPORTANT Read and follow all Safety Precautions and Instructions Before Operating this Equipment. MODEL NUMBER SP-175TB Made In CHINA 15912 Rev.08-273 LIMITED WARRANTY
Save time! Read the entire manual before beginning Hoister installation.
 7801BSZ: 60 (27 kg) System 7802BSZ: 90 (41 kg) System 7803BSZ: 145 (66 kg) System 7806BSZ: 200 (91 kg)system Suspenz 8725 Roswell Road, Suite O-220, Atlanta, GA USA 30350 Tel: 866-SUSPENZ or 770-518-0045
KD VERTICAL BOAT LIFT ASSEMBLY MANUAL Models: KDV315, KDV415, KDV515
 KD VERTICL BOT LIFT SSEMBLY MNUL Models: DK Corporation 955 Industrial St. N.E. Pine City, Minnesota 55063 Phone: 320-629-6737 Fax 320-629-3677 www.dakadock.com Page 1 of 20 THIS PGE INTENTIONLLY LEFT
MARCY CLASSIC MCB-252 COMBO BENCH W/120 lbs Weight Set
 NOTE: Please read all instructions carefully before using this product Table of Contents Safety Notice Hardware Identifier Assembly Instruction MARCY CLASSIC MCB-252 COMBO BENCH W/120 lbs Weight Set Exploded
Installation Instructions Kit, Base Rail Bracket Part # 31413
 Installation Instructions Kit, Base Rail Bracket Part # 31413 Dealer / Installer: End User: Provide a copy of these Instructions to the end user of this product. These Instructions provide important operating
4" Oval Nerf Bar. Part No. A1007S/B. PARTS LIST: Qty Part Description Qty Part Description
 4" Oval Nerf Bar Part No. A1007S/B Fits: 2009 - Current Dodge Ram 1500 Crew Cab 2001 - Current Dodge Ram 2500/3500 Crew Cab REMOVE CONTENTS FROM BOX. VERIFY ALL PARTS ARE PRESENT. 60-180 min Cutting Not
OnBoard Bass Drum/Gong Cart
 Assembly and Owner s Manual OnBoard Bass Drum/Gong Cart CONTENTS Important User Information...................................................................2 Safety...................................................................................3
GlideRite Retractable Cover System For HotSpring & Tiger River Spas (except Classic & pre-2000 Landmark Spas)
") List of Contents Quantity Description 12 #10 x 1 ½ Flat Head Phillips Screw (see pg. 2) 2 #10 x ½ Pan Head Phillips Screw (see pg. 2) 8 ¼ x 2 ½ Lag Bolt (see pg. 2) 7 ¼ 20 x 5 / 8 Hex Head Bolt (see pg.
List of Contents Quantity Description 12 #10 x 1 ½ Flat Head Phillips Screw (see pg. 2) 2 #10 x ½ Pan Head Phillips Screw (see pg. 2) 8 ¼ x 2 ½ Lag Bolt (see pg. 2) 7 ¼ 20 x 5 / 8 Hex Head Bolt (see pg.
48in. Plug Aerator. Owner s Manual
 48in. Plug Aerator Owner s Manual WARNING: Read carefully and understand all ASSEMBLY AND OPERATION INSTRUCTIONS before operating. Failure to follow the safety rules and other basic safety precautions
SawStop. T-GlideTM. Fence System- Professional Series II OWNER S MANUAL
 SawStop T-GlideTM Fence System- Professional Series II OWNER S MANUAL Warranty SawStop warrants to the original retail purchaser of a new T-Glide Fence System - Professional Series II from an authorized
ShorePort PWC Lift Instructions " x 138" Sandstone ShorePort " x 138" White ShorePort " x 138" Tan ShorePort
 ShorePort PWC Lift Instructions 00-8" x 8" Sandstone ShorePort 009-8" x 8" White ShorePort 090-8" x 8" Tan ShorePort....... - PUT SAFETY FIRST To avoid the risk of personal injury or death, study and fully
PRORAC CONTRACTOR SERIES UNIVERSIAL STEEL TRUCK / CAP RACK INSTALLATION INSTRUCTIONS
 PRORAC CONTRACTOR SERIES UNIVERSIAL STEEL TRUCK / CAP RACK INSTALLATION INSTRUCTIONS 1000 Lb. Capacity Bed Mount 750 Lb. Capacity Cap Mount Package Contents: Parts Hardware (4) Legs (12) 3/8-16 x 1-1/4
Please Do Not Return This Product To The Store!
 MODEL NO. T8176 QUICK SERVE 3000 TABLE TENNIS TABLE OWNER'S MANUAL 1. Read this manual carefully before starting assembly. Read each step completely before beginning each step. 2. Some smaller parts may
Sunset Swings By Health in Motion, LLC
 Sunset Swings By Health in Motion, LLC Model 421 Lounge Swing Assembly and Operation Manual Record Serial Number Here www.sunsetswings.com by Health In Motion, LLC. 11/6/2009 421 Owners Assembly and Operation
MFJ-1835K34 40,30 METER ADD ON KIT FOR THE MFJ-1835 COBWEB ANTENNA INSTRUCTION MANUAL. CAUTION: Read All Instructions Before Operating Equipment
 MFJ-1835K34 40,30 METER ADD ON KIT FOR THE MFJ-1835 COBWEB ANTENNA INSTRUCTION MANUAL CAUTION: Read All Instructions Before Operating Equipment 300 Industrial Park Road Starkville, MS 39759 USA Tel: 662-323-5869
SCS-WB INSPIRE ASSEMBLY AND OPERATION MANUAL
 SCS-WB INSPIRE ASSEMBLY AND OPERATION MANUAL SCS-PC PREACHER CURL OPTION SCS-LE LEG EXTENSION OPTION SCS-WB WEIGHT BENCH RECORD SERIAL NUMBER HERE (SCS-PC and SCS-LE sold separately) www.inspirefitness.net
OPERATORS MANUAL WEEKENDER STEEL LADDER RACK
 OPERATORS MANUAL WEEKENDER STEEL LADDER RACK WWW.WEATHERGUARD.COM MODELS 1450 & 1475 1475 Shown INSTALLATION TIME Approximate installation time: 60 minutes (depending on truck equipment installation experience
INCLUDES BENCH MODELS:
 SHOOTING BENCH OWNERS MANUAL & USAGE INSTRUCTIONS INCLUDES BENCH MODELS: AR02-B The Deluxe Shooting Bench AR03-B The Swivel Action Shooting Bench AR02-B DELUXE SHOOTING BENCH WARNING: Do not use without
INSTALLATION & OPERATING INSTRUCTIONS. REDCO LETTUCE KING I and LETTUCE KING IV
 INSTALLATION & OPERATING INSTRUCTIONS for REDCO LETTUCE KING I and LETTUCE KING IV Lettuce King I Shown with optional Drum Ring Lettuce King IV TO BE SERVICED ONLY BY AUTHORIZED PERSONS P/N: 2802381 REV:
VL GUIDE ON & BOW STOP INSTRUCTIONS
 VL GUIDE ON & BOW STOP INSTRUCTIONS REIMANN & GEORGER CORPORATION MARINE PRODUCTS BUFFALO, NY P/N 6112087 07/18/08 TABLE OF CONTENTS CHAPTER TITLE PAGE 1 SAFETY... 1 1.1 Introduction... 1 1.2 Safety Definitions...
CTTR Tire Rack Required tools
 CTTR Tire Rack Required tools Torque wrench, ratchet, 9/16 socket, tape measure, and square edge. ASSEMBLY REQUIREMENTS *Torque all T-bolt nuts to 35-40 foot pounds. Failure to follow the assembly instructions
HUSTLER 7' & 8' POOL TABLE ASSEMBLY INSTRUCTIONS
 HUSTLER 7' & 8' POOL TABLE ASSEMBLY INSTRUCTIONS Please Do Not Hesitate to Contact Our Consumer Hotline at 800-759-0977 with Any Questions That May Arise During Assembly or Use of This Product! NG2515PB/NG2520PB
M ACS Instructions
 APPLICABLE MODELS: Nissan Frontier 2005 and up short bed with Utili-Trak mounting rails PACKAGE CONTENTS 00-0060-M-01-1205 ACS Instructions Leitner Designs 25675 Taladro Circle Unit E Mission Viejo, CA
PRIMO 56" FOOSBALL TABLE ASSEMBLY INSTRUCTIONS
 PRIMO 56" FOOSBALL TABLE ASSEMBLY INSTRUCTIONS NG1035 THANK YOU! Thank you for purchasing this product. We work around the clock and around the globe to ensure that our products maintain the highest possible
Owner s Manual LSP38 38 Lawn Sweeper
 Owner s Manual LSP38 38 Lawn Sweeper Manual Contents Safety Instructions Assembly Operation Maintenance Parts Warranty 2 4-13 2 11 14-15 16 Your Lawn Sweeper Congratulations on your purchase of a new Precision
Assembly Instructions and Parts Manual JPSF-1 Fence and JPSR Rail Set
 Assembly Instructions and Parts Manual JPSF-1 Fence and JPSR Rail Set WALTER MEIER (Manufacturing) Inc. 427 New Sanford Road LaVergne, Tennessee 37086 Part No. M-708482 Ph.: 800-274-6848 Revision C2 02/2013
Please visit for the latest version of these installation instructions.
 Please visit www.blueox.com for the latest version of these installation instructions. BX3785 Attachment Tab Height: 14-1/2 Serial Number Attachment Tab Width: 21 Please read BOTH these and the General
Select Lab Adjustable Height Workstation
 Assembly Instructions Select Lab Adjustable Height Workstation Mobile version is shown. Also available without casters. Contents Important User Information.............................. 2 Safety Precautions....................................
KDV VERTICAL BOAT LIFT ASSEMBLY MANUAL DAKA Models: KDV3120, KDV4120, KDV5120
 KDV VERTICL BOT LIFT SSEMBLY MNUL DK Models: KDV3120, KDV4120, KDV5120 DK Corporation 955 Industrial St NE Pine City, Minnesota 55063 Phone: 320.629.6737 Fax 320.629.3677 www.dakadock.com DK KDV Vertical
Models 2230 and 2240
 Models 2230 and 2240 Overview... 2 Tools Needed... 2 Hardware...3 Assembly... 4-13 Installation... 14 Drawer Removal... 15 Operation... 15 Maintenance... 15 Accessories... 16 Limited Warranty... 16 Perform
Swoop Classic. Please read and understand all instructions before beginning installation. Any Questions?
 Version 1.1 4/27/2004 1 Top Section (1) 2 Mid Sections (2) 3 Lower Support Arms (2) 4 3/8-16 x 1 1/4 SS Socket Head Cap Screw (8) 5 1 1/2 Quick Release Knobs (2) 6 1/2-20 SS Heim Joints (2) 7 1/4 Neopreme
RPR-265. Power Rack (Cage)
") ASSEMBLY INSTRUCTIONS 3 3/4" RPR-5 50 3/4" 51 1/4" Power Rack (Cage) TuffStuff Fitness Equipment, Inc. 15 E. Franklin Avenue Pomona, CA 9166, USA Ph: 909-6-1600 Fax: 909-6-496 E-mail: service@tuffstuff.net
ASSEMBLY INSTRUCTIONS 3 3/4" RPR-5 50 3/4" 51 1/4" Power Rack (Cage) TuffStuff Fitness Equipment, Inc. 15 E. Franklin Avenue Pomona, CA 9166, USA Ph: 909-6-1600 Fax: 909-6-496 E-mail: service@tuffstuff.net
Record the serial number and date of purchase on your parts list for future reference.
 Jointer Model: 0-0 Parts List Record the serial number and date of purchase on your parts list for future reference. Serial number: Date of purchase: Part # 0-0PL For more information: www.rikontools.com
Models 2030 and 2040
 Models 2030 and 2040 Overview... 2 Tools Needed... 2 Hardware... 2 Assembly... 3-8 Installation... 9 Operation... 9 Maintenance... 10 Accessories... 10 Limited Warranty... 10 Document # 101290 0607 Printed
Planishing hammer stand For use with SKU Planishing hammer
 Planishing hammer stand For use with SKU 94847 Planishing hammer Model 96300 Assembly And Operation Instructions Please Note: Planishing Hammer not included with Stand. Due to continuing improvements,
IN-BED FRAME MOUNT INSTALLATION INSTRUCTIONS
 Lit. No. 13666, Rev. 05 December 5, 2005 IN-BED FRAME MOUNT INSTALLATION INSTRUCTIONS FOR SINGLE-STAGE AND TWO-STAGE TAILGATE SPREADERS Read Owner's Manual before operating or servicing spreader. Empty
Gared Pro-S Portable Backstop
 Models: 9616 & 9618 Installation, Operation and Maintenance Instructions Please read all instructions before attempting installation or operation of these units SAVE THESE INSTRUCTIONS FOR FUTURE USE PUBLICATION
Section 1 Safety working at height
 Contents Section 1 Safety working at height. Section 2 Hi-Step package contents & parts identification. Section 3 Assembly. Section 4 Operation. Section 5 Maintenance. Section 6 Extender package contents
Installation Instructions HOSS Hardtop Organized Storage System
 Installation Instructions HOSS Hardtop Organized Storage System Application: Hard Top and Doors Storage System Part Number: 42801 www.bestop.com - We re here to help! Visit our web site and click on Ask
Fletcher F-3000 / F-3100 Accessory Laser Kit
 Fletcher F-3000 / F-3100 Accessory Laser Kit Shown Assembled on F-3000 Machine Product Warranty The Fletcher-Terry Company warrants the product purchased to be free from defects in parts and workmanship
15 Planer Stand. Model Due to continuing improvements, actual product may differ slightly from the product described herein.
 15 Planer Stand Model 96316 Assembly And Operation Instructions Due to continuing improvements, actual product may differ slightly from the product described herein. 3491 Mission Oaks Blvd., Camarillo,