Patio door. Installation guide
|
|
|
- Allan Richard
- 5 years ago
- Views:
Transcription

1 Patio door Installation guide

2 The following installation guide is designed to show you the best way to fit the Liniar sliding patio door. y following the details within you will be able to give your customer peace of mind that their new door will operate and perform exactly as it is designed to do. 2


3 Patio Installation Guide Survey and Installation Installation must comply with all elements of S Code of Practice for the survey and installation of windows and external doorsets. There should be a solid structure to fix the frame jambs to, and there must be a lintel above the frame aperture. Check the aperture s height, width and diagonals to ensure the opening is equal on all sides and square. To ensure the correct functioning of Liniar patio doors, it is imperative that the instructions in this guide are followed, in the correct order. No load is to be transferred to any part of the frame. Prepare the aperture by making sure it is clean remove any old silicone and brush down the threshold. 3


4 Step by Step guide To ensure the correct functioning of any Liniar patio door it is imperative that the following instructions are followed. Threshold and cill Use a spirit level and a string line to assess the level of the threshold you are working from. Temporarily place the required packers on the threshold and dry fit the cill. This will help to assess the finished level of the cill. Once level, double check that the door will still have enough clearance on height when it is installed Install the cill in place and tap down onto the packers gently using a plastic mallet. Check the level again before fixing the cill into place using Spax bolts or equivalent, at a maximum of 600mm centres. Ensure the fixings are not over-tightened causing unnecessary distortion, and check the level and bow at each step of the process. 4 efore fixing the cill to the brick threshold, it must be supported along its full length. Use a bed of mortar along the full cill length between the required packers

5 Patio Installation Guide 5


6 Fit the frame 8 9 Ensure that all the threshold and drainage cover trims have been removed from the frame. Run a silicone bead along the outer edges of each side of the cill, joining the rear upstand to Liniar s unique middle up-stand. This will ensure a weather tight seal for the doors. 13! With the packers in place, fix both outer jambs in place with appropriate fixings. Fixings should be no closer than 150mm from corners and at 600mm maximum centres, with a minimum of 3 fixings per side. A shield must be used to prevent damage from screwdrivers Cover the top of any fixings in the cill with silicone to avoid any water ingress. Lift the outer frame into position in the opening. To hold the door in place temporarily whilst you level it, loosely pack out the jambs. Keep checking they are level as you go along, as this will help to avoid any potential issues in later steps. 14! Packers must be used at either side of each fixing to help prevent distortion. Continue to check for any bows, as well as for plumbness and squareness. Make sure the screws are fully fixed so that they do not interfere with the refitting of the threshold cover. There should be no twist or distortion in the jambs and they should be plumb. 8a8 8b


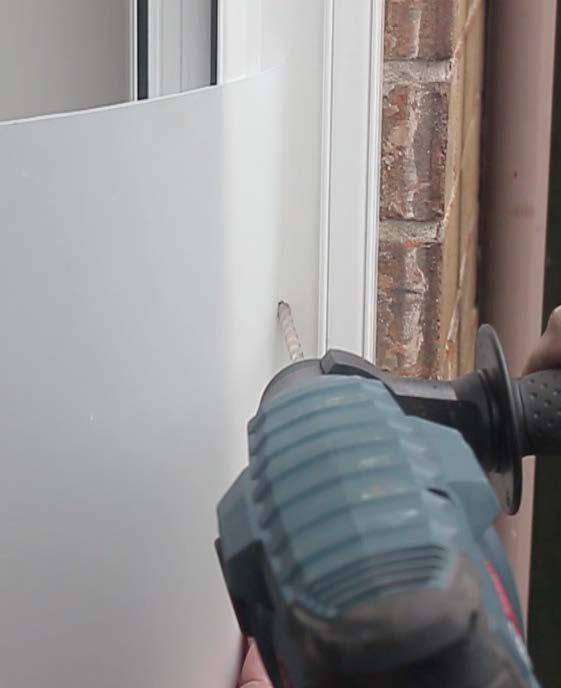
7 Patio Installation Guide 13! A shield must be used to prevent damage 14 7


8 Fix threshold and head 15 Push the threshold against the cill s rear up-stand and fix into place. 18 Fix the head into place, completing the outer frame installation. 16 Use appropriate fixings to secure down through the centre channel of the PVCu outer frame. Use silicone in conjunction with each fixing. 19 Perform a final check of the doors level, plumb and squareness again. 17 Pack the head parallel to the cill. A timber lat can be used to help ensure it is parallel

9 Patio Installation Guide Ensure level across two points indicated 16 Supporting packers along frame width 9


10 Glaze door panels All glazing must fall in line with the requirements of S6262 and any recommendations of the glass manufacturers efore glazing, remove all beads from the sliding sash, taking care to note where the beads are removed from. Fit the Liniar glazing platforms in preparation for glazing. Add silicone between each vertical platform to help keep them in place and ensure that none of the platforms obstruct any drainage holes Once the glass is in place, the beading can be replaced, starting with the shortest piece first. Use a plastic mallet to tap each piece into place. We recommend starting in the corners, and working towards the middle. Repeat the glazing process for the fixed sash. Replace the handle along with the threshold cover and drainage cover trims. 23 efore glazing, it is recommended to remove the door handle using a 4mm allen key. 24 Fit the glass onto the Liniar glazing platforms from the inside, and pack it appropriately
11 Patio Installation Guide L Liniar load bearing platforms must be used to keep door square and level. racing platforms to prevent movement and provide rigidity to the door L L L L 11


12 Check operation and adjust Check the finished doors to make sure the operation is perfect. The rolling mechanism should be smooth. If the sliding door requires adjustment, this is performed at either corner of the bottom sash by adjusting the wheels with a 4mm allen key (these must be adjusted equally so that the door is parallel with the jam) 30 If necessary, the shootbolt can be adjusted by reinstalling with either the round or elongated hole facing towards the jamb. Turn allen key: Clockwise = Lift door Anti-Clockwise = Lower door Doors are supplied at the lowest postion setting and should only require a clockwise adjustment if applicable to raise the door


 and leave it with the homeowner so they know exactly how")
13 Perform final checks and hand over Patio Installation Guide Check that the handles and locking mechanisms operate smoothly on the door Check the sliding action is smooth and free running Check that the locks operate correctly when closed. The rolling mechanism won t work smoothly if there is any debris in the door track, so make sure you clean it properly with a soft brush. Tear out the Patio Maintenance (page 17) and leave it with the homeowner so they know exactly how to look after their new patio doors. Make sure you complete your details on the reverse


14 Removal of sliding sash for maintenance If it is necessary to remove the sliding sash after installation, please follow the following steps:! 1 Ensure the sliding sash is in its fully open position before continuing with these steps. Remove the threshold trim from the base of the door and the blanking and drainage covers from the head of the frame. 4 5 Lift the sash out of the frame by lifting upwards and rotating the bottom of the door off the track. Reverse all steps to re-install the sliding sash in place. 2 3 Remove the de-accelerator arm from the head of the frame. Remove the centre seal from the central PVCu chamber on both the top and bottom of the frame. 6 Check the rolling and locking operation of the door to ensure all parts are in good working order. 1a 1b

15 Patio Installation Guide 15
16 Patio Operation 2 Pane - Style OX/XO 3 Pane - Style XOO/OOX 3 Pane - Style OXO L/R 3 Pane - Style XOO/OOX Optional 4 Pane - Style OXXO 16
17 Patio Maintenance Patio Installation Guide PVCu To ensure frames are free of dirt, clean regularly with soap and water. Drainage holes are to be checked and any blockages removed. Wood grain frames with minor scratches can be repaired using a wood grain marker pen. Locks Door locking mechanisms should be cleaned and any moving parts should be lubricated with light machine oil at least once per year, and more frequently if required. The door locks are fitted with anti-mishandling devices and cannot be operated until the door is in the closed position. Other Roller mechanisms operating the door(s) are fitted with acetal bearings and are self-lubricating, therefore need no maintenance. Ensure all tracks are kept free from debris or other obstructions which may impair the correct functioning of the product. Due to the high energy efficiency of glass fitted to patio doors, it may be common to have condensation may form on the external face of the glazed unit. This is normal and demonstrates how effective your doors are at keeping heat inside your home PLEASE DETATCH AND LEAVE WITH YOUR CUSTOMER 17
18 Your Liniar patio doors were installed by On: 18
19 Installation notes Patio Installation Guide 19
20 7 great reasons to choose Liniar Innovative the only entirely new PVCu window and door profile system to be developed in the last 10 years Energy efficient designed from scratch to achieve the pinnacle of thermal performance and retain more heat in your property Safe and secure engineered with built-in security features and approved by independent testing facilities ritish made manufactured in our state-of-the-art factory in the heart of Derbyshire Lead free all Liniar profiles are extruded using materials that are 100% lead free Quality assured backed with ISO 9001 accreditation for your peace of mind Guaranteed all Liniar frames are guaranteed to not warp, split or discolour for a minimum of 10 years Liniar Flamstead House Denby Hall usiness Park Denby Derbyshire DE5 8JX Tel: +44 (0) Fax: +44 (0) sales@liniar.co.uk GI/001
Liniar Window. installation guide
 Liniar Window installation guide This installation guide is designed to show you the best way to fit Liniar windows, and covers all styles of window made from Liniar s lead-free 70mm PVCu profile. Not
SMART SYSTEMS VISOGLIDE+ INSTALLTION GUIDE
 SMART SYSTEMS VISOGLIDE+ INSTALLTION GUIDE Please read guide before beginning any installation. Instructions/Guides Keys & Handle Screw Covers Interlock Covers Anti-Lift & Rubber Stops Anti-Lift for Slim
Folding Sliding door system
 Folding Sliding door system Installation guide V1.1 Nov 2014 p2 This document is offered as guidance for WarmCore folding sliding door installations - for full survey and installation guidelines please
Installation Guide. WarmCore. Folding Sliding door system. Glass Packing. Pre-Installation. Removing the Existing Door.
 WarmCore Installation Guide Pre-Installation Glass Packing p5 Removing the Existing Door Glazing Sequence p6 Preparing the Opening Glass Packing Locations for Toe & Heel p6 Door Alignment Sill Options
Installation Guide. Evolve bi-fold. 8. Door restrictor- optional p9. 1. Before you start p2. 9. Adjustment. 2. Measuring and surveying p2
 Evolve bi-fold Installation Guide 1. Before you start p2 8. Door restrictor- optional p9 2. Measuring and surveying p2 3. Configuration details p4 4. Installation p5 5. Glazing p5 6. Glazing packer details
patio door installation guide
 patio door installation guide Measuring & surveying p2 Mechanical jointing p5 Installation p5 Hardware adjustment p7 Sealing of outer frame p7 Cleaning p7 Walk through clearances p8 Minimum and maximum
Installation Guide. Bi-fold Doors
 Installation Guide Bi-fold Doors Installation Guide Components box 1. 6. 2. 3. 7. 5. 4. 8. Contents 1. Fixing plugs 2. Wedge gasket 3. Bottom trolley 4. Top trolley 5. Magnetic keep (x 2 if door height
Pvcu Bi Folding Doors Fitting Instructions.
 Pvcu Bi Folding Doors Fitting Instructions. THE FOLLOWING INSTRUCTIONS ARE GIVEN IN GOOD FAITH AND ARE FOR GUIDANCE ONLY. NO RESPONSIBILITY WILL BE ACCEPTED FOR ANY MIS- INTERPRETATION. WHEN INSTALLING
INSTALLATION INSTRUCTIONS FOR A&L PRODUCTS
 INSTALLATION INSTRUCTIONS FOR A&L PRODUCTS AUGUST 2017 1 RECOMMENDED BUILDING IN-DETAIL Should you require further information, please contact A&L Windows on 1800 441 414 2 IMPORTANT IMPORTANT Allow Vinyl
Installation - Sub Cills
 Installation - Sub Cills Fitting of Subcill Drainage paths through the sub-cill can be seen on the illustration alongside so care must be taken to ensure they are not obstructed and that screw fixings
How to operate (folding)
") How to operate (folding) LEFT HAND STACKING OUTWARD OPENING How to operate (folding) RIGHT HAND STACKING OUTWARD OPENING LOCK BOTH LEVER HANDLE AND FLAT HANDLE UTILISING THE D-HANDLE LOCATED ABOVE THE
How to operate (folding) LEFT HAND STACKING OUTWARD OPENING How to operate (folding) RIGHT HAND STACKING OUTWARD OPENING LOCK BOTH LEVER HANDLE AND FLAT HANDLE UTILISING THE D-HANDLE LOCATED ABOVE THE
VYTEX PREMIUM SLIDING GLASS DOOR. Table of Contents. Precautions and Safety 2. Tools Required...3. Inspect and Prepare Door...4
 VYTEX PREMIUM SLIDING GLASS DOOR Table of Contents Precautions and Safety 2 Tools Required...3 Inspect and Prepare Door...4 Hardware and Parts Check List....4 Master Frame Assembly 5 Master Frame Installation..7
ASS 70 FD folding / sliding door. Installation Guide
 ASS 70 FD folding / sliding door Installation Guide IMPORTANT! These doors should be fitted by competent and trained installers. Please read these instructions thoroughly before beginning the installation.
PVCu FOLD & SLIDE DOOR OUTWARD OPENING
 PVCu FOLD & SLIDE DOOR OUTWARD OPENING STEP-BY-STEP FULLY ILLUSTRATED ASSEMBLY INSTRUCTIONS This product is covered by a 10 year manufacturer s guarantee. Should any part of it become defective due to
6400, 8400 and 9400 Series Sliding Patio Door
 Contemporary 3 Panel Classic 5 Panel French Panel 6400, 8400 and 9400 Series Sliding Patio Door (O) Fixed Panel Left (X) Operating / Mullion Panel Right (X) Operating / Lock Panel Left (O) Fixed Panel
ASS 70 FD folding/sliding door installation guide
 ASS 70 FD folding/sliding door installation guide 2 Preparation IMPORTANT These doors should be fitted by competent and trained installers. Please read these instructions thoroughly before beginning the
4-lite Patio Door. Installation Instructions
 4-lite Patio Door Installation Instructions IMPORTANT: Read the instructions and familiarize yourself with the door parts and pieces before beginning assembly and installation. Note: Only the 5-0 x 6-8
In-line Patio Fabrication & Installation
 In-line Patio Fabrication & Installation Instructions 2 Pane Patio p2 Cutting and Preparation p2 Welding and Cleaning p2 Assembly p2 Fabrication Instructions for 3/4 Pane Lock Style p3 Installation (removable
ASS 70.HI Lift/Sliding and Sliding Doors Installation Guide
 ASS 70.HI Lift/Sliding and Sliding Doors Installation Guide 2 Schueco ASS 70.HI Lift/Sliding and Sliding Doors Installation Guide Installation guide IMPORTANT The ASS 70.HI door should be fitted by competent
wellington french patio doorset fitting & fixing guidelines
 wellington french patio doorset fitting & fixing guidelines CAUTION SAFETY: Large windows and glass units are heavy and may be hazardous. Great care MUST be taken to avoid injury during manual handling
1200 SERIES 2 PANEL DOOR rev.1 DETAILED INSTALLATION INTRUCTIONS
 1200 SERIES 2 PANEL DOOR 10.2013 rev.1 DETAILED INSTALLATION INTRUCTIONS GENERAL: Door elevations shown in these instructions are as viewed from the outside. X denotes the active or moving panel(s). O
Contemporary 3 Panel Classic 5 Panel French Panel
 Contemporary 3 Panel Classic 5 Panel French Panel (X) Operating / Lock Panel Left (O) Fixed Panel Right Note : Glazing Beads For All Panel Face To The Exterior 2 Panel XO Left Is Shown Above Opposite =
For Installer. Duration Windows. Assembly Guide Durafold 1000
 For Installer Assembly Guide Durafold 1000 Contents Title Page Number Handling Manual Blinds 4 Handling Electronic Blinds 5 Drainage 63 Outer Frame Assembly (Kit Form Door Only) 7 15mm Low Threshold Assembly
XL JOINERY LTD LA PORTE VISTA MODULAR 3 ASSEMBLY INSTRUCTIONS
 XL JOINERY LTD LA PORTE VISTA MODULAR 3 2090mm High x 4687mm Wide ASSEMBLY INSTRUCTIONS READ AND UNDERSTAND THESE INSTRUCTIONS FULLY PRIOR TO STARTING INSTALLATION. IT IS STRONGLY RECOMMENDED THAT A COMPETENT
3-LITE PATIO DOOR INSTALLATION INSTRUCTIONS
 3-LITE PATIO DOOR INSTALLATION INSTRUCTIONS IMPORTANT: Read the instructions and familiarize yourself with the door parts and pieces before beginning assembly and installation. TOOLS NEEDED: Tape Measure
Sliding Folding Patio 6 Door Set
 54 Sliding Folding Patio 6 Door Set T14 Set - (Approx. 14ft) T16 Set - (Approx. 16ft) Assembly Instructions About your patio door set All products must be installed in accordance with accepted good trade
WELLINGTON FOLDING SLIDING PATIO FITTING & FIXING GUIDELINES
 WELLINGTON FOLDING SLIDING PATIO FITTING & FIXING GUIDELINES CAUTION SAFETY: This product needs to be installed by a competent tradesperson with assistance. Two people are required to carry out the installation,
3 BRACKET TO GUIDE ATTACHMENT. RIGHT END Figure 1. EXTENDED BRACKET (for doors taller than 8-8 ) SERIES 650. RIGHT END COTTER PIN Figure 6
 SERIES 650. RIGHT END COTTER PIN Figure 6") 2 DOOR ARRANGEMENT. A Lay door on a clean floor inside of building and in front of opening (see Figure 1). NOTE: Door can be damaged if laid on unclean surface. B Distribute parts bags, guides, stops and
2 DOOR ARRANGEMENT. A Lay door on a clean floor inside of building and in front of opening (see Figure 1). NOTE: Door can be damaged if laid on unclean surface. B Distribute parts bags, guides, stops and
Flashing Materials. Rough Opening Preparation
 Installation Instructions for CertainTeed New Construction Windows Handling vinyl windows CAUTION: Always store vinyl windows and doors in an upright position on a slight angle. Never lay them flat or
Panoramic Door Block Frame Installation Manual
 Units 5 & 6 Park House Lane Sheffield S9 1XA 01142 439593 Panoramic Door Block Frame Installation Manual Panoramic Door Block Frame Door Installation Guide 10-10-17 1 of 1 Thank you for choosing Panoramic
Important Notice. CAUTION: Use proper lifting equipment and correct procedures to avoid injury.
 Integrity. Partnership. Quality. SELF-STORAGE DOOR INSTALLATION INSTRUCTIONS SERIES 690 Important Notice In the following text, the word: Warning: Indicates that serious injury or death can result from
window installation TECHNICAL GUIDE Everbrite House, Greenway, Harlow Business Park, Harlow, Essex CM19 5QJ
 TECHNICAL GUIDE window installation Everbrite House, Greenway, Harlow Business Park, Harlow, Essex CM19 5QJ T: 0845 4567668 F: 01279 629924 E: info@everbritedirect.com PART OF THE EVERBRITE GROUP CMS 1065*
SUPREME. Sliding Folding Patio 6 Door Set. Assembly Instructions. T14 Set - (Approx. 14ft) T16 Set - (Approx. 16ft)
 T16 Set - (Approx. 16ft)") SUPREME Sliding Folding Patio 6 Door Set T14 Set - (Approx. 14ft) T16 Set - (Approx. 16ft) Assembly Instructions About your patio door set All products must be installed in accordance with accepted good
SUPREME Sliding Folding Patio 6 Door Set T14 Set - (Approx. 14ft) T16 Set - (Approx. 16ft) Assembly Instructions About your patio door set All products must be installed in accordance with accepted good
INFINITY-Z SHOWER DOOR / TUB DOOR INSTALLATION INSTRUCTION. MODEL #s 01-Chrome
 INFINITY-Z SHOWER DOOR / TUB DOOR INSTALLATION INSTRUCTION IMPORTANT DreamLine reserves the right to alter, modify or redesign products at any time without prior notice. For the latest up-to-date technical
Side Light Frame Pack Assembly Instructions
 Please read this complete set of assembly instructions before starting the installation and only when you understand the construction method start to follow the step by step guide. IDENTIFY THE PACK CONTENTS
Knock Down Patio Door Assembly Instructions Regular & Impact
 Knock Down Patio Door Assembly Instructions Regular & Impact 72 x 80 72 x 82 72 x 96 96 x 80 96 x 82 96 x 96 Impress the Weather KD Patio Door Regular & Impact Sizes 72 x 80 72 x 82 72 x 96 96 x 80 96
VisioGlide 100 System W4F Four doors 2 fixed, 2 sliding
 Balcony Systems 2011 Visio Glide W4-F Curved Sliding Doors 4 doors: 2 fixed, and 2 sliding Installation guide 1. Insert silicone into the two bottom corners before closing the frame. 1 2. Connect top and
Side Light Frame Pack Assembly Instructions
 Side Light Frame Pack Assembly Instructions Please read this complete set of assembly instructions before starting the installation and only when you understand the construction method start to follow
ROOM FOLD SLIDING FOLDING INTERNAL DOORSET FITTING & FIXING GUIDELINES
 EDITION 7 ROOM FOLD SLIDING FOLDING INTERNAL DOORSET IMPORTANT You can only assemble these door configurations by using the frame provided. Your warranty will be invalid if other alternatives are used.
PRODUCT GUIDE Aluminum Patio Doors (JPG004)
") This guide contains procedures for common user serviceable repair tasks found on aluminum patio doors. If a condition arises that is not covered in this guide, please contact us for professional help.
This guide contains procedures for common user serviceable repair tasks found on aluminum patio doors. If a condition arises that is not covered in this guide, please contact us for professional help.
Installation and Glazing Guide
 Installation and Glazing Guide Effective January 2013 Contents Before you start Door Set installation Fixing positions Fitting sidepanel into an installed frame Fixing decorative hardware 3D adjustable
LEGENDS RETRACTABLE DOOR SCREENS
 LEGENDS RETRACTABLE DOOR SCREENS MAGNETIC LATCHING DESIGN SYSTEM 42 I N S T A L L A T I O N I N S T R U C T I O N S 1 MOUNTING OPTIONS Recess : Mount the Screen Cassette using Recess Mounting Clips Recess
Greenhouse Assembly Instructions
 Greenhouse Assembly Instructions Our Help Line provides support and advice to customers of Summer Garden Buildings after ordering. For advice before you buy you can phone us free 7 days a week on 0800
Fig. 2 DORMA-Glas Stand/Issue 02/03 Seite/Page 1/7
 FSW Installation instructions Track rail 75 x 72 mm 1. Ceiling substructure and installation of the track rail (Fig. 1): The track rail must be bolted over its entire length (including the stacking track
Stage 2: Preparing the door (read in conjunction with Hole Drilling Options on back of Template).
.") There are three stages to fitting the CL100 mortise case: Stage 1: Marking out the position of the lock. Stage 2: Preparing the door by mortising and drilling holes. Stage 3: Fitting lock, door furniture,
There are three stages to fitting the CL100 mortise case: Stage 1: Marking out the position of the lock. Stage 2: Preparing the door by mortising and drilling holes. Stage 3: Fitting lock, door furniture,
8/7/ HP SWING DOOR INSTALLATION INSTRUCTIONS
 8/7/17 1200 HP SWING DOOR INSTALLATION INSTRUCTIONS Installation Instructions for Typical Construction These instructions were developed and tested for use with typical construction in a wall system designed
Rolling Curtain door Manual
 Rolling Curtain door Manual Installation Maintenance parts Model 944 PHONE 800 448 8979 FAX 800 236 8722 website www.tracrite.com EMAIL tr@tracrite.com ADDRESS 216 Wilburn Road Sun Prairie, WI 53590 This
HENDERSON. Securefold Bottom Rolling. Fitting Instructions For Bottom Rolling External Doors with Morticed hinges SYSTEM CAPACITY.
 1 HERSON Securefold Bottom Rolling HEADBOARD LINTEL 9X4 Diagram 1 2,7 25 19 Fitting Instructions For Bottom Rolling External Doors with Morticed hinges 94SC SUPPORT CHANNEL 94P CHANNEL 14 2 SYSTEM CAPACITY
Vinyl Windows Manufactured by VPI Quality Windows
 Vinyl Windows Manufactured by VPI Quality Windows Part Number: 531&591 Installation 531 & 591 SERIES SLIDING AND HUNG WINDOW INSTALLATION INSTRUCTIONS Installation Instructions for Typical Construction.
SLIDING GLASS DOOR ASSEMBLY INSTRUCTION Series 680/780
 10/07 M0200030 GENERAL NOTICE READING THESE INSTRUCTIONS FIRST AND FOLLOWING THE PROCEDURES IN PROPER SEQUENCE WILL REDUCE FRUSTRATION, COSTLY MISTAKES AND WASTED TIME. Protect main frame only with light
INSTALLATION MANUAL STOREFRONT DOORS
 INSTALLATION MANUAL STOREFRONT DOORS www.aluflam-usa.com SYSTEM DESCRIPTION - Extruded and filled aluminum framing, tested and approved by UL - 3-3/8 frame depth - Clear, fire-rated safety glazing - Door
INSTALLATION MANUAL FORTRESS SERIES
 Guardian Security Structures TEL 1-406-212-2334 EMAIL rg@gssdoors.com WEB www.gssdoors.com FORTRESS SERIES GENERAL INSTALLATION GUIDELINES 1. The door frame is installed using 16 bolt screws 7,5 mm in
Frameless Quadrant Enclosure. These instructions must be left with the user. Installation Guide W2-B
 Frameless Quadrant Enclosure These instructions must be left with the user Installation Guide 1 1317134-W2-B Introduction Thank you for purchasing a quality Mira product. To enjoy the full potential of
Sliding Glass Door Assembly and Installation Guide
 Sliding Glass Door Assembly and Installation Guide Index Door System Components and Hardware The following components are needed to complete the installation of your Sliding Patio Door unit. Check all
Installation Materials Required: Tools Required: 6" self-adhesive flashing. Shims. 3-foot level 6-foot level Tape measure 1/8" drill bit
 installation instructions for CUSTOM WOOD & FIBERGLASS EXTERIOR FOLDING DOOR SYSTEMs (JII101) Thank you for selecting JELD-WEN products. Attached are JELD-WEN s recommended installation instructions for
Vanity Installation Instructions
 Vanity Installation Instructions Segments of these instructions will relate to your vanity. Please read these instructions thoroughly and ensure the appropriate instructions are used during the installation
Phone # La Jolla Doors. Block Frame Installation Manual Aluminum Frame with either Vinyl or Aluminum Panels
 Phone # 800-440-8785 www.lajolladoors.com La Jolla Doors Block Frame Installation Manual Aluminum Frame with either Vinyl or Aluminum Panels Thank you for choosing La Jolla Doors In this manual you will
MIRAGE-X / BELLA. Shower Door Installation Instructions
 MIRAGE-X / BELLA Shower Door Installation Instructions IMPORTANT DreamLine reserves the right to alter, modify or redesign products at any time without prior notice. For the latest up-to-date technical
FITTING INSTRUCTIONS FOR FOLDING SLIDING DOOR SYSTEM SF55 & SF75 WITH WEATHERED OR FLUSH TRACK
 FITTING INSTRUCTIONS FOR FOLDING SLIDING DOOR SYSTEM SF55 & SF75 WITH WEATHERED OR FLUSH TRACK Please refer to your order or detailed sectional drawing (if requested) to assist you with the configuration
GROWING BETTER THROUGH DESIGN. 6ft Lean-To LEAN-TO. Assembly Instructions 04/02
 GROWING BETTER THROUGH DESIGN 6ft Lean-To LEAN-TO Assembly Instructions 04/02 6ft Lean-To Greenhouse Base Plan Introduction/Tools/Contents / / Contents This is a copy of our Lean-To greenhouse base plan.
Wall Profiles 2 Pozi Screwdriver. Wall Profile Covers 4 Sealant. Large Panel and Thin Panel Assemblies Sealant Gun
 Decem Sliding Door (Corner Fitting) Instruction Manual DXT Important Information Toughened glass is completely safe for use in our shower enclosures and bath screens; providing our products are installed
INSTALLATION GUIDE. 1. Overview. 2. Measuring. 3. Tools & fixings you will need B C. Opening Width. Opening Height
 INSTALLATION GUIDE Please take a few minutes to read through this guide before getting started. 1. Overview A Typical Sliding Wardrobe Door Layout A Frame - Top Liner (optional) B Top Track C Frame - Strike
PVC-u Product Installation Guidelines
 PVC-u Product Installation Guidelines All upvc Window, Door and Conservatory products must be fitted in accordance with current codes of practice. Current Codes of Practice British Plastics Window Federation
Gardman Lean-to Greenhouse Assembly Instructions
 Page 1 Gardman Lean-to Greenhouse Assembly Instructions Our Help Line provides support and advice to customers of Summer Garden Buildings after ordering. For advice before you buy you can phone us free
OPERATION, MAINTENANCE & INSTALLATION MANUAL
 OPERATION, MAINTENANCE & INSTALLATION MANUAL OPERATION, MAINTENANCE & INSTALLATION MANUAL CONTENTS NORDAN QUALITY AND SERVICE 3 TAKING CARE OF YOUR NORDAN PRODUCTS 4 IDENTIFYING YOUR NORDAN PRODUCTS 5
INOVO 4-LITE SLIDING PATIO DOOR ASSEMBLY AND INSTALLATION INSTRUCTIONS
 INOVO 4-LITE SLIDING PATIO DOOR ASSEMBLY AND INSTALLATION INSTRUCTIONS IMPORTANT: READ THE INSTRUCTIONS AND FAMILIARIZE YOURSELF WITH THE DOOR PARTS AND PIECES BEFORE BEGINNING ASSEMBLY AND INSTALLATION.
INSTALLATION INSTRUCTIONS IMPERVIA SLIDING PATIO DOOR WITH FINS
 2008 Pella Corporation Part Number: 803V0101 INSTALLATION INSTRUCTIONS IMPERVIA SLIDING PATIO DOOR WITH FINS Installation Instructions for Typical Wood Frame Construction. These instructions were developed
Installation Instructions
 by Precision Screen & Security s 27040 San Bernardino Ave, Redlands, CA 92374 www.precision-screens.com TM Installation Instructions NOTE: Prior to Permanently mounting the BacTrac, insure the handle and
CoFold Non-Mortice. Fitting Instructions for top hung exterior folding doors SYSTEM CAPACITY. Diagram 1. Diagram 2. Diagram 3.
 1 CoFold Non-Mortice Fitting Instructions for top hung exterior folding doors Diagram 1 SYSTEM CAPACITY Maximum leaf height Maximum leaf weight Maximum leaf width Maximum leaf thickness - 3300mm - 100kg
Heavy Wall Applied Stop Tube Frame and Door Installation
 INSTALLATION INSTRUCTIONS Heavy Wall Applied Stop Tube Frame and Door Installation Read all instructions before beginning installation. These instructions are provided to help prevent installation problems
Vertical Slider Section Detail
 Vertical Slider Section Detail PRODUCT GUIDE Main & Bead Profiles 128 42 69 VS01 - Outer frame 150 139 210 189 60 52 52 52 48 30 42 60 18 72 90 18 60 VS02 - Cill VS14 - Cill 18 VS03 - Top Sash VS04 - Standard
Panoramic Door. Block Frame Installation Manual Aluminum top and bottom track with either aluminum or vinyl panels
 2515 Industry St. Oceanside, CA 92058 760-722-1250 www.panoramicdoors.com Panoramic Door Block Frame Installation Manual Aluminum top and bottom track with either aluminum or vinyl panels Signature Aluminum
Step-by-Step Installation Instructions for
 Step-by-Step Installation Instructions for Customer helpline number: 01604 633607 8892_Step_By_Step_900_Quad_V5.indd 1 1/9/10 18:01:22 Before Starting: Please read and understand these instructions. Not
Please read and understand all instructions before beginning. These instructions cover the non-impact aluminum sliding glass door.
 The performance and proper operation of a door is only as good as the installation. By following these instructions, the probability of a good installation greatly increases. Please read and understand
Vinyl Windows and Doors
 Vinyl Windows and Doors Manufactured by Pella Corporation Installation Instructions for Replacement of Aluminum Sliding Doors in Hard Coat Stucco Applications. Part Number: V981555 2009 Pella Corporation
Retractable Screen Installation Instructions For Vinyl and Aluminum Clad and Wood In-Swing Hinged Doors (See separate instructions for sliding doors)
") Retractable Screen Installation Instructions For Vinyl and Aluminum Clad and Wood In-Swing Hinged Doors (See separate instructions for sliding doors) IMPORTANT: Please read before you begin. Table of Contents
Retractable Screen Installation Instructions For Vinyl and Aluminum Clad and Wood In-Swing Hinged Doors (See separate instructions for sliding doors) IMPORTANT: Please read before you begin. Table of Contents
LEGENDS RETRACTABLE DOOR SCREENS
 I N S T A L L A T I O N I N S T R U C T I O N S 1 MOUNTING OPTIONS Recess : Mount the Screen Cassette using Recess Mounting Clips Recess within the door jamb area. Recess installations are the most typically
ELEGANCE SHOWER DOOR/ENCLOSURE INSTALLATION INSTRUCTIONS. Style A Style B Style C Style D
 ELEGANCE SHOWER DOOR/ENCLOSURE INSTALLATION INSTRUCTIONS IMPORTANT DreamLine reserves the right to alter, modify or redesign products at any time without prior notice. For the latest up-to-date technical
Vinyl Windows and Doors
 Vinyl Windows and Doors Part Number: V983571 2011 Pella Corporation INSTALLATION INSTRUCTION - INSTRUCCIONES DE INSTALACION 350 SERIES WINDOW INTO EXISTING WOOD FRAME WINDOW Lea las instrucciones en español
FOLDING DOOR - FOR FACTORY ASSEMBLED JAMBS WITH APPLIED SILL
 FOLDING DOOR - FOR FACTORY ASSEMBLED JAMBS WITH APPLIED SILL READ SPECIFIC INSTALLATION INSTRUCTIONS COMPLETELY BEFORE STARTING ANY INSTALLATION Failure to install and maintain our product according to
FITTING INSTRUCTIONS FOR FOLDING SLIDING DOOR SYSTEM SF75H
 FITTING INSTRUCTIONS FOR FOLDING SLIDING DOOR SYSTEM SF75H 01603 424434 Please refer to your order or detailed sectional drawing (if requested) to assist you with the configuration of the system supplied
INSTALLATION INSTRUCTIONS DANUBE ACRYLIC NEO ANGLE
 INSTALLATION INSTRUCTIONS DANUBE ACRYLIC NEO ANGLE March 2013 DOOR 2 Page 1 of 5 INSTALLATION INSTRUCTIONS NEO ANGLE 6MM FRAMELESS AND 4MM FRAMED SHOWER DOOR DANUBE, DELTA, SIGNATURE, OCEANIA, CASCADE
Hinge Door + Inline Panel + Return Panel
 Hinge Door + Inline Panel + Return Panel Instruction Manual DXL2HDR + DXL2HR + DXR Important Information Toughened glass is completely safe for use in our shower enclosures and bath screens; providing
Atrium Patio Door Field Service Manual
 Atrium Patio Door Field Service Manual December 2005 Table of contents Service Agreement Pg 2 Release Agreement Pg 5 Inspection form Pg 6 Warranty Pg 8 Replacing swing panel Pg 12 Replacing sliding panel
VEKA GROUP PATIO DOOR PATIO DOOR PATIO DOOR UNCONTROLLED DOCUMENT AUTHOR PHIL GREGORY VEKA _IMAGINE PATIO_INSTALLER AID
 VEKA GROUP VEKA _IMAGINE PATIO_INSTALLER AID UNCONTROLLED DOCUMENT VEKA GROUP USE OF THIS MANUAL Guidelines Advice & General Information. Although it is possible to manufacture a five metre four pane patio
Euro Series Product Installation Guide
 Euro Series Product Installation Guide Introduction... 3 Tools Required... 4 Installation Instructions... 5 Operation and Maintenance... 7 Hinge Adjustments... 10 Door Hinge & Locking Point Adjustments...
HR175 Sash Replacement Kit Installation Instructions
 HR175 Sash Replacement Kit Installation Instructions IMPORTANT: Please read before you begin. Weather Shield HR175 Sash Replacement Kits Important: Thoroughly read and follow these instructions, failure
SLIDING SASH WINDOWS fitting & fixing guidelines
 SLIDING SASH WINDOWS fitting & fixing guidelines CAUTION SAFETY: Large windows and glass units are heavy and may be hazardous. Great care MUST be taken to avoid injury during manual handling and particular
Sector Shower Enclosure Installation Instructions
 Sector Shower Enclosure Installation Instructions IMPORTANT Please read carefully the following instructions before installing your shower enclosure. If you have any questions on this shower enclosure
INSTALLATION GUIDE WOOD PIVOTING CIRCLE/ OVAL
 WOOD PIVOTING CIRCLE/ OVAL READ SPECIFIC INSTALLATION INSTRUCTIONS COMPLETELY BEFORE STARTING ANY INSTALLATION Failure to install and maintain our product according to these instructions will VOID any
PRIME SHOWER ENCLOSURE INSTALLATION INSTRUCTIONS
 PRIME SHOWER ENCLOSURE INSTALLATION INSTRUCTIONS IMPORTANT DreamLine reserves the right to alter, modify or redesign products at any time without prior notice. For the latest up-to-date technical drawings,
VITREO X SHOWER / TUB DOOR INSTALLATION INSTRUCTIONS
 VITREO X SHOWER / TUB DOOR INSTALLATION INSTRUCTIONS IMPORTANT DreamLine reserves the right to alter, modify or redesign products at any time without prior notice. For the latest up-to-date technical drawings,
ICU TRACKLESS SLIDING DOOR
 Interior View 0 Installation Instructions Tools Required: Screwdrivers Small Straight (Flat Blade) - for Terminal Block wiring # Phillips (Crosspoint) - for various #8, #0, and #4 screws Wrenches / Sockets
Installation Instructions
 Supafold Slide Aside System Three Fold Room Divider Installation Instructions Distinctive Doors Ltd Supafold Slide Aside Internal Folding System IMPORTANT: Before proceeding with the installation, and
ENIGMA AIR ENCLOSURE
 ENIGMA AIR ENCLOSURE SHOWER ENCLOSURE INSTALLATION INSTRUCTION IMPORTANT DreamLine reserves the right to alter, modify or redesign products at any time without prior notice. For the latest up-to-date technical
YSD 400 Sliding Door System Installation Manual
 System Installation Manual 2006 YKK AP America Inc. is a subsidiary of YKK Corporation of America. TABLE OF CONTENTS Installation Notes........................................ Page ii PARTS DESCRIPTION
I n s t a l l a t i o n I n s t r u c t i o n s S E N T I N E L S E R I E S 1 50 SLIDING GLASS DOORS
 I n s t a l l a t i o n I n s t r u c t i o n s S E N T I N E L S E R I E S 1 50 SLIDING GLASS DOORS Page 2-9: Installation Instructions, Figures 1, 2, & 3 Page 10-12: Figures A-1, A-2, & A-3: Installation
INOVO 2-LITE SLIDING PATIO DOOR
 INOVO 2-LITE SLIDING PATIO DOOR ASSEMBLY AND INSTALLATION INSTRUCTIONS IMPORTANT: READ THE INSTRUCTIONS AND FAMILIARIZE YOURSELF WITH THE DOOR PARTS AND PIECES BEFORE BEGINNING ASSEMBLY AND INSTALLATION.
ESA-300 Full Breakout
 Interior View 0 Installation Instructions For use with ESA II Controler DORMA AUTOMATICS, Inc. 94 Sherwood Drive Toll-Free: 877-67-6 DL844-00 Lake Bluff, IL 60044 Fax: 877-4-7999 Rev. /07 Tools Required:
Stile. Fixed Sash. Side Jamb. Lock. Frame
 This guide contains procedures for common user serviceable repair tasks found on vinyl horizontal operating windows. If a condition arises that is not covered in this guide, please contact us for professional