Please read and understand all instructions before beginning. These instructions cover the non-impact aluminum sliding glass door.
|
|
|
- Iris Spencer
- 6 years ago
- Views:
Transcription
1 The performance and proper operation of a door is only as good as the installation. By following these instructions, the probability of a good installation greatly increases. Please read and understand all instructions before beginning. These instructions cover the non-impact aluminum sliding glass door. Notice / Important / Warning Due to structure design, construction methods, and the variety of products that can be assembled and installed, PGT strongly recommends consultation with an architect or structural engineer prior to the installation of any PGT product. PGT disclaims any and all liability associated with the use and /or provision of these instructions. For sealant type and application see job specifications for individual job. These instructions were developed for the use of PGT Independent Distributors and other industry professionals working with PGT products. PGT strongly recommends homeowners consult with a PGT Independent Distributor for the installation of any PGT product. Flashing and/or sill pan methods shall be determined by the contractor or engineer, and should be incorporated into the following instructions. TABLE OF CONTENTS Safety... Inspection of Product... 2 Opening Inspection and Preparation... 2 Buck installation... 2 Main frame Assembly and Installation... 3 Panel installation... 4 Screen Installation... 6 Parts and pieces... 6 SAFETY To avoid personal injury when working with doors, PGT recommends at least two people for installation. Use caution when handling glass. Broken or cracked glass can cause serious injury. Wear protective gear as necessary. Read and fully understand ALL manufacturer's instructions before beginning. pgtindustries.com
 Note: If there is any damage to the product, or missing parts, an assessment should be made as whether or not to install the product.")
2 INSPECTION OF PRODUCT. Inspect the product and take inventory of all parts and pieces prior to installation. (ex. panels, paint, glass, etc.) Note: If there is any damage to the product, or missing parts, an assessment should be made as whether or not to install the product. OPENING INSPECTION AND PREPARATION Ensure bucks are of proper material according to job specifications. Once the opening and door have been inspected, remove any additional shipping materials and proceed with the installation of the product. Bucks shall be attached and sealed to job specifications. If bucks are already installed inspect for damage and replace as needed. (ex. split or rotting wood) Bucks shall be continuous. If gaps are present in corners and greater than /8", the bucks will need to be replaced. (See figure ) Figure Bucks shall be as wide as the main frame width of the door, providing full support for the frame. Inspect concrete for cracks. Cracked or damaged concrete should be repaired prior to installation. Opening sill must be smooth and level. Correct any imperfections prior to installation. Contact your local building department regarding buck anchorage. If your local building department does not provide specifications on buck attachment, then you will have to provide appropriate engineering. Block openings should be a clean surface, free of dust and debris. 2 pgtindustries.com
3 3
4 4
, then the header, sill, and jambs must be installed flush against each other.")
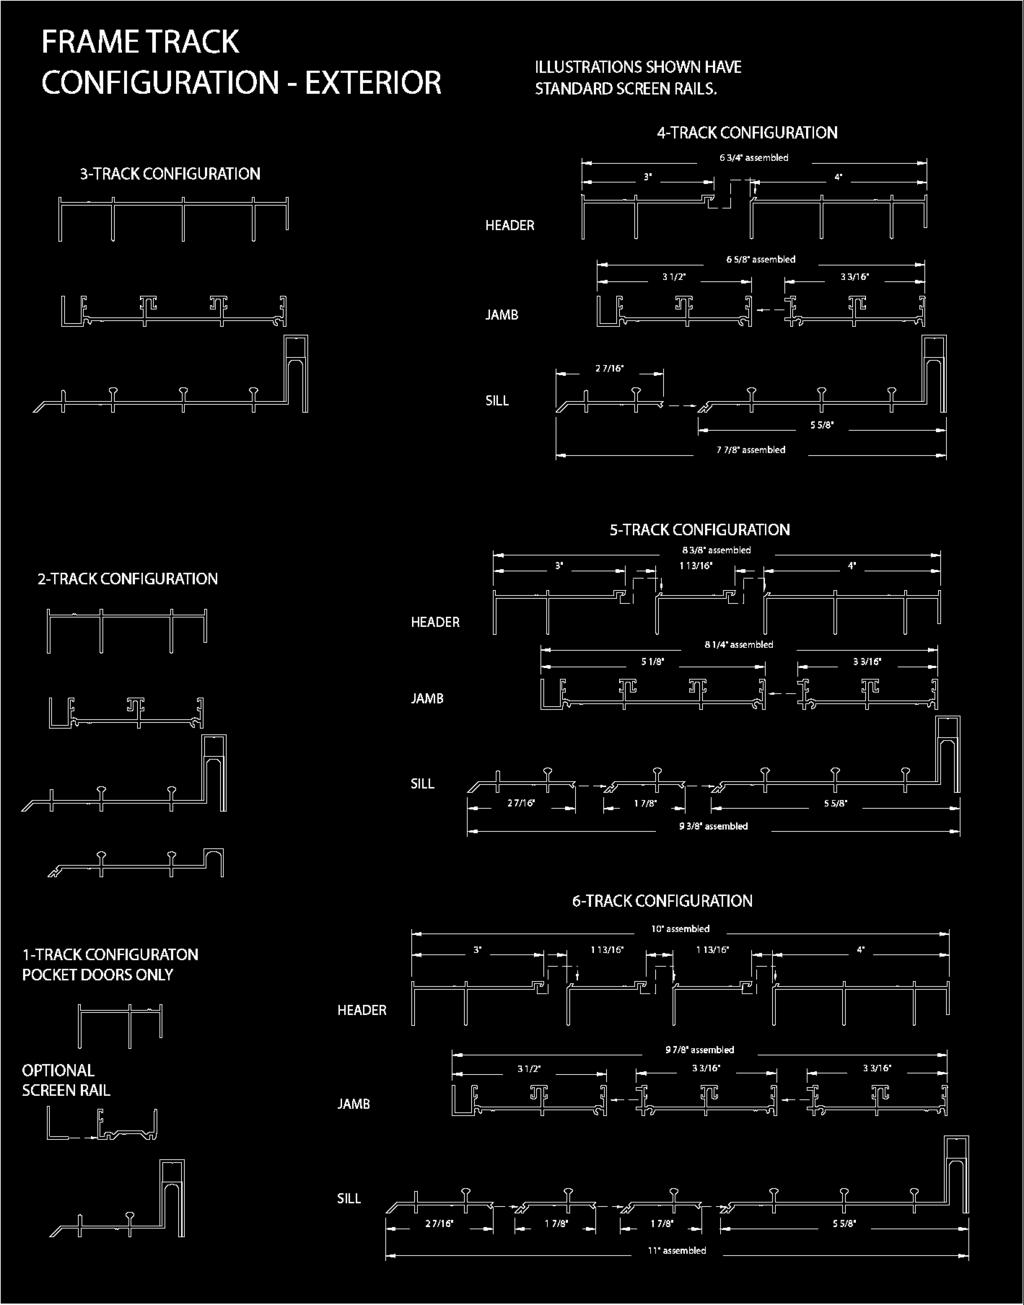
 Figure 3 Note: Main frames that accommodate more than three (3) tracks and a screen frame, should be assembled in accordance with frame layouts on page 5.")
5 MAIN FRAME ASSEMBLY It is recommended when possible to assemble the main frame prior to installation. In pocket applications, one or both jambs may be eliminated. Important: If main frame is installed in pieces (not assembled), then the header, sill, and jambs must be installed flush against each other.. Trace the top and bottom edge of jamb(s) with sealant where they will meet the header and sill. (See figure 3) 2. Attach the header and sill to the jambs with #6 x /2" pan head screws. (See figure 4) Figure 3 Note: Main frames that accommodate more than three (3) tracks and a screen frame, should be assembled in accordance with frame layouts on page 5. Figure 4 DRYFITTING THE MAIN FRAME. Dry fit the main frame into the opening and shim to level, plumb, square and true. Maximum shim space is ¼" around the entire perimeter of the main frame. If shims are needed, they should be placed at screw anchor locations. Shims shall fully support the depth of the main frame. Do not over shim, as this may bow the frame. It is acceptable to not shim at an anchor location if the main frame is tight against the opening. Shims placed under the main frame sill should be of high compression material. 5 pgtindustries.com

6 MAIN FRAME INSTALLATION Note: When shimming under the main frame sill of a sliding glass door, place shims at anchor locations as needed, as well as in between anchor locations to avoid the weight of the panels from bending the sill. A main frame should never be forced into an opening. If optional screen main frame is to be used, leave adequate room for it to be fully supported.. Mark anchor locations, trace interior and exterior of main frame, remove frame, and drill main frame as required. 2. Using a clean dry cloth, clean all areas where sealant will be applied to the opening and the door. Be careful not to scratch the main frame. Figure 5 3. Set main frame into the opening. Ensure install and predrilled holes are in alignment. Ensure door is level, plumb, square, and true. Shim as needed. (See figure 5) Note: Remember to seal to job specifications. 4. Attach frame to the opening per PGT's specifications and in compliance with all local code requirements, Notices of Acceptances (NOAs) or test reports. Note: When required to use a masonry fastener, you will need an anchor with a #2 head to allow the anchor to sit flush in the frame. ¼" x #2 head are available from PGT. From the interior, measure the overall main frame a minimum of four (4) places (width and height) to be certain frame is not bowed. Repeat the same measurements on the exterior. PANEL INSTALLATION Shipping labels on panels will have designated panel numbers and letters. The panels will be labeled starting on the left to the right. Please see the configuration page for the proper track. Note: Always start with the inside panel. Notched double interlocks are to be installed with the notch facing the interior. Some panels may require field notching. Different height notches may be required depending on the configuration, as well as the sill riser needed.. Position panel so the top rail slides onto the appropriate main frame header rail when lifted up Then swing the bottom of the panel toward the inside until it is centered over the appropriate track. Lower the panel on to the rollers. 2. Repeat step one with next outer panel(s). Note: Panels with astragals are installed on the same track. The "projected side of the extrusion" of the astragal will always be installed to the left side of the assembly viewed from the exterior. 6 pgtindustries.com


7 PANEL INSTALLATION 3. Panel height adjustments are made by raising and lowering the wheels. You will find holes that lead to the wheel adjustment at the bottom on the sides of the panel. Adjust the panel height using a #2 Philips head screwdriver. When raising the wheels, lift that side of the panel to relieve the wheels of the panel weight. (See figure 6) To raise the panels, turn the screw clockwise. To lower the panels, turn the screws counter clockwise. Warning: Screw guns can strip the adjustment screw and therefore, are not recommended for the adjustment of rollers. Adjustments should be made until the panel rolls freely and panel stile and frame jambs are parallel. Check operation of all panels. 4. Install the latch keeper by placing a # 8 x 5/6 Tr. Ph. B. into both the top and bottom slotted opening in the main frame keeper. Raise or lower the keeper until the latch can be properly locked. Figure 6 5. For fixed panels, secure panel with "fixed panel brackets", as well as fixed panel clip and a # 0 X Ph. Pan TEK screw provided. Warning: Use of longer screws may damage the glass. TRACK CLIP ASSEMBLY INSTALLATION Caution: Installation of the track clip assembly should only be done after all panels have been properly adjusted. 6. The track clip assembly is to be installed at the bottom of each active panel on interlocking stiles. Remove the /4"x 20" panel assembly screw located at the bottom of the operable door panels (interlock side). 7. Install the track clip guide of the assembly by sliding it over the end of the appropriate track at the weep notch. 8. Set the cover onto the guide, reinstall and tighten the ¼" x 20 attachment screw through the track clip assembly and into the interlocking stile. Single (or double) interlock Important: Be sure the track clip assembly is positioned vertically and is aligned with the panel after tightening the attachment. Track clip cover Patented track clip guide 7 pgtindustries.com
8 HIGH PILE DUST PLUG DUST PLUG INSTALLED WHERE INTERLOCKS MEET. BETWEEN FINS ON THE FRAME HEADER. MAIN FRAME AND PARTS ASSEMBLY INTERLOCK ELEVATION INTERIOR TRACK CLIP BUMPER TOP FIXED PANEL CLIP SEE FRAME ASSEMBLY INFORMATION NOTE. FRAME JAMB BUMPER, BUMPER SPACER PANEL JAMB KEEPER, LATCH SPACER SET FIXED PANEL BRACKET VIEWED FROM INSIDE HOOKSTRIP USED ON POCKET DOOR IN PLACE OF MAIN FRAME JAMB. STANDARD SCREEN KEEPER LOW PILE DUST PLUG DUST PLUG INSTALLED WHERE INTERLOCKS MEET. BETWEEN RAILS ON THE FRAME SILL. EXTERIOR BOTTOM FIXED PANEL CLIP TRACK CLIP ASSEMBLY OPERABLE INTERLOCK STILE TOP VIEW OF HOOKSTRIP TO PANEL ATTACHMENT. HOOKSTRIP GETS NOTCHED BY THE INSTALLER OR IS CUT ON SITE POCKET DOOR BUMPER 8
9 9. Using one of the holes in the track clip as a guide, predrill a small hole using a 3/32" drill bit into the panel. This is for the anti-rotation screw. 0. Install the #6 x 3/8 anti-rotation screw into the predrilled hole as indicated. Note: Further vertical adjustment to the panel is prevented due to the installation of the anti-rotation screw.. Repeat steps for all active panels. STANDARD SCREEN INSTALLATION. Loosen all wheel adjustment screws. 2. Release rollers from shipping location on the bottom and top of the screen panel. 3. Place screen on outside main frame header and sill rails. It may be necessary to lift the screen rollers over the sill screen rail. 4. Adjust both rollers on bottom to level screen at desired height. Use a # Philips head screw driver. 5. Adjust top rollers to sufficient tensions to prevent track jump. 6. Slide screen full length of track and readjust as necessary to allow smooth, easy movement. 7. When screen is properly adjusted, nylon keeper on main frame jamb may be raised or lowered for proper latching. BOX SCREEN INSTALLATION Box screens are installed in the same manor as glass panels. Refer to panel installation instructions. 9 pgtindustries.com
10 PARTS PAR T# AND DESCRIPTION BUMPER SPACER SET.030 &.060 THICK PARTS BAG QT Y. set (TOP ) PAR T# AND DESCRIPTION FIXED PANE L CLIPS ( TOP ) FIXED PANE L CLIPS (BOTTOM) PARTS BAG QT Y. set per fixed panel Allows an additional.030 to.060 to the jamb bumpe r, to match the jamb keeper spacers. (Only used if needed.) (BO T.) L-shaped aluminum bracket used to secure fixed "O" panel to the track. (Only sent with units having fixed panels.) LATCH S PACER SET /6 & /8 THICK set FIXED PANE L BRACKE T 3 per fixed panel Allows an additional /6 to /8 shim to the jamb keeper. (Only used if needed.) Reinforced vinyl clip that attaches to the panel lockstile and the main frame jamb. (Only sent with units having fixed panels.) PANEL JAMB KEEPER 2 ASTRAGAL SCREEN KEEPER per screen astragal Keeper for the standard interior/exterior panel pull. Attaches to the main frame jamb. The keeper that is used in the standard screen astragal for locking. (Only sent with screens that lock togethe r.) DUS T PLUG (HIGH ) Placed in main frame header between the rails where the interlocks meet, to weather seal the air space. at each interlock STANDARD SCREEN KEEPER The keeper for locking the standard screen into the main frame jamb. (Only sent when Standard Screens are used.) per standard screen DUS T PLUG (LOW ) Placed in the main frame sill track between the rails where interlocks meet, to weather seal the air space. POCKE T DOOR BUMPE R Installed between the track rails to prevent the pocket panel from rolling off the track. (Only included in pocket doors.) at each inter- lock per panel #6 x /2 Pn. Ph. AB 5 *(Use is OPTIONAL)* Main frame assembly & screen keeper screw. When used on the main frame only, not applicable for doors exceeding 3 tracks. FRAME JAMB BUMPER 2 Applied to the main frame jamb. It keeps the aluminum panel from making contact with the aluminum main frame. TRACK CLI P BUMPE R 2 Applied to the main frame jamb, as needed, to stop the track clip from rolling off the rail. #8 x 5/6 Tr. Ph. B Frame jamb keeper scre w. Attaches jamb keeper to the main frame. 4 per clip #0 x Ph. Pan TEK 2 per bracket Fixed bracket/clip screw. Attaches fixed panel clips & brackets to main frame. 2 #6 x 3/8 Pn. Ph. AB 2 #8 x /2 Pn. Ph. B PER BUMPER Screw used on the frame jamb bumper to attach the frame bumper to the frame jamb. TRACK CLI P BUMPER SCREW Screw to attach the track clip bumper to the main frame jamb. 0
Vinyl Sliding Glass Door Assembly Instructions
 Vinyl Sliding Glass Door Assembly Instructions SERIES SGD 5470/5570 Para instrucciones en español, visite: http://bit.ly/pgtassemblyinstructions Parts List ITEM 4 5 6 7 8 9 0 4 5 6 7 8 SGD 5470/5570 PARTS
Please read and understand all instructions before beginning. These instructions cover the non-impact aluminum French Door 101.
 The performance and proper operation of a door is only as good as the installation. By following these instructions, the probability of a good installation greatly increases. Please read and understand
SLIDING GLASS DOOR ASSEMBLY INSTRUCTION Series 680/780
 10/07 M0200030 GENERAL NOTICE READING THESE INSTRUCTIONS FIRST AND FOLLOWING THE PROCEDURES IN PROPER SEQUENCE WILL REDUCE FRUSTRATION, COSTLY MISTAKES AND WASTED TIME. Protect main frame only with light
Please read and understand all instructions before beginning. These instructions cover impact and non-impact aluminum French Door 650/750.
 The performance and proper operation of a door is only as good as the installation. By following these instructions, the probability of a good installation greatly increases. Please read and understand
3-LITE PATIO DOOR INSTALLATION INSTRUCTIONS
 3-LITE PATIO DOOR INSTALLATION INSTRUCTIONS IMPORTANT: Read the instructions and familiarize yourself with the door parts and pieces before beginning assembly and installation. TOOLS NEEDED: Tape Measure
SGD 2000/2500 Assembly
 S 2000/2500 ssembly 03/05 0200330 S 2000/2500 SSEY ENER Protect mainframe only with light coating of oil, grease or soap. ction of lime in plaster can destroy finish. Sill must be smooth...buff edges and
4-lite Patio Door. Installation Instructions
 4-lite Patio Door Installation Instructions IMPORTANT: Read the instructions and familiarize yourself with the door parts and pieces before beginning assembly and installation. Note: Only the 5-0 x 6-8
1200 SERIES 2 PANEL DOOR rev.1 DETAILED INSTALLATION INTRUCTIONS
 1200 SERIES 2 PANEL DOOR 10.2013 rev.1 DETAILED INSTALLATION INTRUCTIONS GENERAL: Door elevations shown in these instructions are as viewed from the outside. X denotes the active or moving panel(s). O
INOVO 4-LITE SLIDING PATIO DOOR ASSEMBLY AND INSTALLATION INSTRUCTIONS
 INOVO 4-LITE SLIDING PATIO DOOR ASSEMBLY AND INSTALLATION INSTRUCTIONS IMPORTANT: READ THE INSTRUCTIONS AND FAMILIARIZE YOURSELF WITH THE DOOR PARTS AND PIECES BEFORE BEGINNING ASSEMBLY AND INSTALLATION.
VYTEX PREMIUM SLIDING GLASS DOOR. Table of Contents. Precautions and Safety 2. Tools Required...3. Inspect and Prepare Door...4
 VYTEX PREMIUM SLIDING GLASS DOOR Table of Contents Precautions and Safety 2 Tools Required...3 Inspect and Prepare Door...4 Hardware and Parts Check List....4 Master Frame Assembly 5 Master Frame Installation..7
Sliding Glass Door Assembly and Installation Guide
 Sliding Glass Door Assembly and Installation Guide Index Door System Components and Hardware The following components are needed to complete the installation of your Sliding Patio Door unit. Check all
INOVO 2-LITE SLIDING PATIO DOOR
 INOVO 2-LITE SLIDING PATIO DOOR ASSEMBLY AND INSTALLATION INSTRUCTIONS IMPORTANT: READ THE INSTRUCTIONS AND FAMILIARIZE YOURSELF WITH THE DOOR PARTS AND PIECES BEFORE BEGINNING ASSEMBLY AND INSTALLATION.
Series 7600 Installation Instructions Aluminum Multi-Slide Door (Pocketing)
") Series 7600 Installation Instructions Aluminum Multi-Slide Door (Pocketing) Things to Know Before You Start Things to Know Before You Start Removal of Old Fenestration Products Ensure any old fenestration
Series 7600 Installation Instructions Aluminum Multi-Slide Door (Pocketing) Things to Know Before You Start Things to Know Before You Start Removal of Old Fenestration Products Ensure any old fenestration
I n s t a l l a t i o n I n s t r u c t i o n s S E N T I N E L S E R I E S 1 50 SLIDING GLASS DOORS
 I n s t a l l a t i o n I n s t r u c t i o n s S E N T I N E L S E R I E S 1 50 SLIDING GLASS DOORS Page 2-9: Installation Instructions, Figures 1, 2, & 3 Page 10-12: Figures A-1, A-2, & A-3: Installation
STACKING MULTI-SLIDE DOOR SYSTEM INSTALLATION INSTRUCTIONS
 STACKING MULTI-SLIDE DOOR SYSTEM INSTALLATION INSTRUCTIONS 1290363 Revision 1 12/16 Page 1 Weather Shield Mfg., Inc. NOTICE CAUTION! Failure to install and maintain our product according to these instructions
western window systems westernwindowsystems.com installation instructions non-pocket 2-1/4 panels
 series 2600 multi-slide non-pocket 2-1/4 panels windowsystems.com windowsystems.com movement, which can cause warping and other problems. Frame kit components: Each door will have a head assembly, a threshold
Pocket Door Installation Instructions
 Installation Instructions Before getting started: Read instructions thoroughly. Be sure that you have the necessary tools and materials before starting the installation. Consult your local building code
Vinyl Windows and Doors
 Vinyl Windows and Doors Manufactured by Pella Corporation Installation Instructions for Replacement of Aluminum Sliding Doors in Hard Coat Stucco Applications. Part Number: V981555 2009 Pella Corporation
Phone # La Jolla Doors. Block Frame Installation Manual Aluminum Frame with either Vinyl or Aluminum Panels
 Phone # 800-440-8785 www.lajolladoors.com La Jolla Doors Block Frame Installation Manual Aluminum Frame with either Vinyl or Aluminum Panels Thank you for choosing La Jolla Doors In this manual you will
ASSEMBLY AND INSTALLATION INSTRUCTIONS for Premium Aluminum and Premium Atlantic Aluminum Sliding Patio Doors (JII020)
") for Premium Aluminum and Premium Atlantic Aluminum Sliding Patio Doors (JII020) Thank you for selecting jeld-wen products. Attached are jeld-wen s recommended installation instructions for Premium Aluminum
for Premium Aluminum and Premium Atlantic Aluminum Sliding Patio Doors (JII020) Thank you for selecting jeld-wen products. Attached are jeld-wen s recommended installation instructions for Premium Aluminum
InSTallaTIon InSTruCTIonS For 4-lITe PaTIo Door unassembled
 InSTallaTIon InSTruCTIonS For 4-lITe PaTIo Door unassembled Measuring Tape Pencil Shims Drill & Drill bits: 6", 8", 5 6", 7 6" Tools & materials You Will need: Square Hammer or Mallet Level Stiff Putty
How To Install Windows: Nail-Fin Application
 How To Install Windows: Nail-Fin Application Required Tools & Materials: Materials: 1 3/4" galvanized roofing nails. Nails must penetrate at least 1" into framing For mulled and/or DP50 or above units:
Installation Recommendations for Finless Frame Doors
 Installation Recommendations for Finless Frame Doors These installation recommendations are made available by MI Windows and Doors, LLC (MI) to assist with the integration of finless or flange sliding
InstallatIon InstructIons for 2-lIte PatIo Door unassembled
 InstallatIon InstructIons for -lite PatIo Door unassembled tools & materials You will need: Measuring Tape Pencil Shims Drill & Drill bits: 6", 8", 5 6", 7 6" Utility Knife High-Performance Premium Silicone
6400, 8400 and 9400 Series Sliding Patio Door
 Contemporary 3 Panel Classic 5 Panel French Panel 6400, 8400 and 9400 Series Sliding Patio Door (O) Fixed Panel Left (X) Operating / Mullion Panel Right (X) Operating / Lock Panel Left (O) Fixed Panel
SERIES 4070-T GENERAL ASSEMBLY AND INSTALLATION INSTRUCTIONS
 Table of Contents I. Care and Maintenance... 2 II. Tools / Materials, Sealant Requirements, & Anchor Instructions... 2 III. Structure Verification & Sub-Sillpan Installation... 3 1. Opening Verification...3
PRODUCT GUIDE Aluminum Patio Doors (JPG004)
") This guide contains procedures for common user serviceable repair tasks found on aluminum patio doors. If a condition arises that is not covered in this guide, please contact us for professional help.
This guide contains procedures for common user serviceable repair tasks found on aluminum patio doors. If a condition arises that is not covered in this guide, please contact us for professional help.
Panel Assembly and Installation
 Assembly and Installation Assembly and Installation for Andersen 400 Series Frenchwood, 200 Series Narroline, 200 Series Perma-Shield Gliding Patio Doors and 400 Series Perma-Shield Gliding Patio Doors
YSD 400 Sliding Door System Installation Manual
 System Installation Manual 2006 YKK AP America Inc. is a subsidiary of YKK Corporation of America. TABLE OF CONTENTS Installation Notes........................................ Page ii PARTS DESCRIPTION
PREMIER V Picture Window Cast In Place
 PREMIER V Picture Window Cast In Place 28972 R. Ave Adel, Iowa 50003 800-343-9370 1850 West Adriatic Place Englewood, Colorado 80110 303-935-4679 Visit Monarch Materials Group, Inc. at www.monmatgrp.com
(773) INSTALLATION INSTRUCTIONS for Vinyl Windows with Integral Nailing Fin (JII001) IMPORTANT INFORMATION & GL OSSARY ROUGH OPENINGS
 INSTALLATION INSTRUCTIONS for Vinyl Windows with Integral Nailing Fin (JII001) IMPORTANT INFORMATION & GL OSSARY ROUGH OPENINGS") Thank you for selecting C l i m a t e G u a r d products. Attached are our recommended installation instructions for Vinyl windows with an integral (2400-02) will not affect application of the ClimateGuard
Thank you for selecting C l i m a t e G u a r d products. Attached are our recommended installation instructions for Vinyl windows with an integral (2400-02) will not affect application of the ClimateGuard
ICU TRACKLESS SLIDING DOOR
 Interior View 0 Installation Instructions Tools Required: Screwdrivers Small Straight (Flat Blade) - for Terminal Block wiring # Phillips (Crosspoint) - for various #8, #0, and #4 screws Wrenches / Sockets
SERIES 5001 SLIDING GLASS DOOR PATIO DOORS INSTALLATION GUIDE
 PATIO DOORS INSTALLATION GUIDE These instructions cover general installation conditions. Improper installation could affect your doors operation and warranty. Deviations from these instructions should
INSTALLATION INSTRUCTIONS for Vinyl Windows with Integral Nailing Fin (JII001)
") Thank you for selecting JELD-WEN products. Attached are JELD-WEN s recommended installation instructions for Vinyl windows with an integral nailing fin. While the use of these installation instructions
Thank you for selecting JELD-WEN products. Attached are JELD-WEN s recommended installation instructions for Vinyl windows with an integral nailing fin. While the use of these installation instructions
INSTALLATION INSTRUCTIONS for Wood Bay or Bow Windows with Nailing Fin or Exterior Trim (JII032)
") for Wood Bay or Bow Windows with Nailing Fin or Exterior Trim (JII0) Thank you for selecting JELD-WEN products. Attached are JELD-WEN s recommended installation instructions for wood and clad wood bay
for Wood Bay or Bow Windows with Nailing Fin or Exterior Trim (JII0) Thank you for selecting JELD-WEN products. Attached are JELD-WEN s recommended installation instructions for wood and clad wood bay
Assembled Patio Door Installation Guide 2-Panel Patio Door with Non-Welded Frame
 Assembled Patio Door Installation Guide 2-Panel Patio Door with Non-Welded Frame americancraftsmanwindows.com American Craftsman and all other marks where denoted are trademarks of Andersen Corporation
NEW CONSTRUCTION PATIO DOOR INSTALLATION INSTRUCTIONS (WITH NAILING FLANGE)
") NEW CONSTRUCTION PATIO DOOR INSTALLATION INSTRUCTIONS (WITH NAILING FLANGE) Slim Line & Classic French Style Patio Doors Materials included: (2) #10 x 2-1/2" Phillips Pan head keeper s (2) 3/8" Hole plugs
NEW CONSTRUCTION PATIO DOOR INSTALLATION INSTRUCTIONS (WITH NAILING FLANGE) Slim Line & Classic French Style Patio Doors Materials included: (2) #10 x 2-1/2" Phillips Pan head keeper s (2) 3/8" Hole plugs
INSTALLATION INSTRUCTIONS for Wood/Clad Wood Windows without Exterior Trim or Nailing Fin (JII025) ImpOrTaNT INFOrmaTION & GlOssary.
 ImpOrTaNT INFOrmaTION & GlOssary.") for Wood/Clad Wood Windows without Exterior Trim or Nailing Fin (JII025) Thank you for selecting JELD -WEN products. Attached are JELD-WEN s recommended installation instructions for metal clad wood windows
for Wood/Clad Wood Windows without Exterior Trim or Nailing Fin (JII025) Thank you for selecting JELD -WEN products. Attached are JELD-WEN s recommended installation instructions for metal clad wood windows
STACKING MULTI-SLIDE DOOR SYSTEM
 SMSD STACKING MULTI-SLIDE DOOR SYSTEM INSTALLATION INSTRUCTIONS READ THESE INSTRUCTIONS COMPLETELY BEFORE STARTING ANY INSTALLATION! CAUTION Lead-based paint may be present in older homes, and the removal
INSTALLATION INSTRUCTIONS for Vinyl Projecting Windows with Integral Nailing Fin (JII023)
") Thank you for selecting JELD-WEN products. Attached are JELD-WEN s recommended installation instructions for vinyl bay, bow and garden windows which incorporate an integral nailing fin. While the use of
Thank you for selecting JELD-WEN products. Attached are JELD-WEN s recommended installation instructions for vinyl bay, bow and garden windows which incorporate an integral nailing fin. While the use of
Rolling Curtain door Manual
 Rolling Curtain door Manual Installation Maintenance parts Model 944 PHONE 800 448 8979 FAX 800 236 8722 website www.tracrite.com EMAIL tr@tracrite.com ADDRESS 216 Wilburn Road Sun Prairie, WI 53590 This
INSTALLATION INSTRUCTIONS for Vinyl Windows with Integral Nailing Fin (JII001) IMPORTANT INFORMATION & GLOSSARY ROUGH OPENINGS
 IMPORTANT INFORMATION & GLOSSARY ROUGH OPENINGS") Thank you for selecting JELD-WEN products. Attached are JELD-WEN s recommended installation instructions for Vinyl windows with an integral nailing fin. While the use of these installation instructions
Thank you for selecting JELD-WEN products. Attached are JELD-WEN s recommended installation instructions for Vinyl windows with an integral nailing fin. While the use of these installation instructions
FOLDING DOOR - FOR FACTORY ASSEMBLED JAMBS WITH APPLIED SILL
 FOLDING DOOR - FOR FACTORY ASSEMBLED JAMBS WITH APPLIED SILL READ SPECIFIC INSTALLATION INSTRUCTIONS COMPLETELY BEFORE STARTING ANY INSTALLATION Failure to install and maintain our product according to
ICU TRACK SLIDING DOOR
 Interior View 0 Installation Instructions Tools Required: Screwdrivers Small Straight (Flat Blade) - for Terminal Block wiring # Phillips (Crosspoint) - for various #8, #0, and # screws Wrenches / Sockets
POCKETING MULTI-SLIDE DOOR SYSTEM
 PMSD POCKETING MULTI-SLIDE DOOR SYSTEM INSTALLATION INSTRUCTIONS READ THESE INSTRUCTIONS COMPLETELY BEFORE STARTING ANY INSTALLATION! CAUTION Lead-based paint may be present in older homes, and the removal
Contemporary 3 Panel Classic 5 Panel French Panel
 Contemporary 3 Panel Classic 5 Panel French Panel (X) Operating / Lock Panel Left (O) Fixed Panel Right Note : Glazing Beads For All Panel Face To The Exterior 2 Panel XO Left Is Shown Above Opposite =
Installation Guidelines For ALUMINUM M-SERIES 3 PANEL SLIDING DOOR
 www.quakerwindows.comv www.quakercommercialwindows.com PO Box 128 504 Highway 63 South Freeburg, MO 65035 800-347-0438 573-469-4151 (fax) Installation Guidelines For ALUMINUM M-SERIES 3 PANEL SLIDING DOOR
Series 7650 Installation Instructions Sliding Glass Door
 Series 7650 Installation Instructions Sliding Glass Door Things to Know Before You Start Things to Know Before You Start Removal of Old Fenestration Products Ensure any old fenestration products are removed
Installation Instructions
 For Medium (15-18.5K) + Heavy duty (22-28.5K) Air Conditioner READ BEFORE INSTALLING UNIT To avoid risk of personal injury, property damage, or product damage due to the weight of this device and sharp
Magnaline Systems Block Frame Installation Manual
 2515 Industry St. Oceanside, CA 92058 Magnaline Systems Block Frame Installation Manual Aluminum top and bottom track with either aluminum or vinyl panels Thank you for choosing Magnaline Systems! Congratulations!
INSTALLATION INSTRUCTIONS FOR REPLACEMENT FORGENT WOOD GLASTRA WINDOWS RECOMMENDATIONS FOR COMMON INSTALLATION OF ALL REPLACEMENT WINDOWS.
 INSTALLATION INSTRUCTIONS FOR REPLACEMENT FORGENT WOOD GLASTRA WINDOWS RECOMMENDATIONS FOR COMMON INSTALLATION OF ALL REPLACEMENT WINDOWS. Installer: DO NOT DISCARD Please leave the Installation Guide
Installation Instructions Double-Hung, Single-Hung, Casement, Awning, Sliding, Picture & Shapes Non-Impact & Impact Resistant Nailing Fin Windows
 Installation Instructions Double-Hung, Single-Hung, Casement, Awning, Sliding, Picture & Shapes Non-Impact & Impact Resistant Nailing Fin Windows americancraftsmanwindows.com Project Requirements: Read
INSTALLATION INSTRUCTIONS IMPERVIA SLIDING PATIO DOOR WITH FINS
 2008 Pella Corporation Part Number: 803V0101 INSTALLATION INSTRUCTIONS IMPERVIA SLIDING PATIO DOOR WITH FINS Installation Instructions for Typical Wood Frame Construction. These instructions were developed
Vinyl Windows Manufactured by VPI Quality Windows
 Vinyl Windows Manufactured by VPI Quality Windows Part Number: 531&591 Installation 531 & 591 SERIES SLIDING AND HUNG WINDOW INSTALLATION INSTRUCTIONS Installation Instructions for Typical Construction.
CGI Series 560 SGD Installation Instructions
 CGI Series 560 SGD Installation Instructions Read these instructions completely before beginning to install. Become familiar with what type of installation will be required. This door can be installed
(Non Handed Kits) Slotted Hand Screwdriver. Power Driver & Bits. Work Gloves
 Slotted Hand Screwdriver. Power Driver & Bits. Work Gloves") Patio Door Kit Assembly Instructions -- 2-Panel Patio Door with Non-Assembled Frame and Assembled Sash Panels. (Non Handed Kits) Project Requirements: ~ This door was manufactured for installation into
Patio Door Kit Assembly Instructions -- 2-Panel Patio Door with Non-Assembled Frame and Assembled Sash Panels. (Non Handed Kits) Project Requirements: ~ This door was manufactured for installation into
INSTALLATION INSTRUCTIONS for Wood/Clad Wood Windows with Exterior Trim or Nail Fin (JII024)
") Thank you for selecting JELD-WEN products. Attached are JELD-WEN s recommended installation instructions for metal clad wood windows with nailing fin or primed wood windows with exterior trim. While the
Thank you for selecting JELD-WEN products. Attached are JELD-WEN s recommended installation instructions for metal clad wood windows with nailing fin or primed wood windows with exterior trim. While the
Vinyl Windows and Doors
 Vinyl Windows and Doors Part Number: V983571 2011 Pella Corporation INSTALLATION INSTRUCTION - INSTRUCCIONES DE INSTALACION 350 SERIES WINDOW INTO EXISTING WOOD FRAME WINDOW Lea las instrucciones en español
INSTALLATION INSTRUCTIONS FOR FORGENT SLIDING PATIO DOORS RECOMMENDATIONS FOR COMMON INSTALLATION OF SLIDING PATIO DOORS.
 INSTALLATION INSTRUCTIONS FOR FORGENT SLIDING PATIO DOORS RECOMMENDATIONS FOR COMMON INSTALLATION OF SLIDING PATIO DOORS. Installer: DO NOT DISCARD Please leave the Installation Guide with the home owner
VINYL REPLACEMENT WINDOW INSTALLATION STANDARDS
 VINYL REPLACEMENT WINDOW INSTALLATION STANDARDS BEFORE you start to remove the existing windows Place clean drop cloths in all work areas. Re-measure the opening to ensure the new window will fit. Remove
Installation Instructions
 by Precision Screen & Security s 27040 San Bernardino Ave, Redlands, CA 92374 www.precision-screens.com TM Installation Instructions NOTE: Prior to Permanently mounting the BacTrac, insure the handle and
2300 BI-FOLD INSTALLATION GUIDE
 2300 BI-FOLD INSTALLATION GUIDE INSTALLATION INSTRUCTIONS OF MAIN FRAME Header #8 x 2½ zinc coated screws 2 1 2 Jamb Jamb 1 1 3 #8 x 2½ zinc coated screws 4 1 4 3 #8 x 2½ zinc coated screws 5 Threshold
SWINGING SCREEN DOOR FIELD INSTALLATION INSTRUCTIONS
 SWINGING SCREEN DOOR FIELD INSTALLATION INSTRUCTIONS TABLE OF CONTENTS 1: Measuring the Opening for the Storm Door... 4 2: Securing Storm Door Hinge Side Frame into Door Frame... 6 3: Securing Storm Door
Retractable Screen Installation Instructions For Vinyl and Aluminum Clad and Wood In-Swing Hinged Doors (See separate instructions for sliding doors)
") Retractable Screen Installation Instructions For Vinyl and Aluminum Clad and Wood In-Swing Hinged Doors (See separate instructions for sliding doors) IMPORTANT: Please read before you begin. Table of Contents
Retractable Screen Installation Instructions For Vinyl and Aluminum Clad and Wood In-Swing Hinged Doors (See separate instructions for sliding doors) IMPORTANT: Please read before you begin. Table of Contents
Installation Instructions
 edium + Heavy duty READ BEFORE INSTALLING UNIT Preliminary instructions: 1. Check window opening size: the mounting parts furnished with this air conditioner are made to install in a wooden sill double-hung
READ BEFORE INSTALLING UNIT INSTALLATION WARNINGS AND CAUTION
 edium + Heavy duty READ BEFORE INSTALLING UNIT INSTALLATION WARNINGS AND CAUTION Carefully read the installation manual before beginning. Pay attention to danger and safety notices. be exposed: Carefully
INSTALLATION INSTRUCTIONS
 INSTALLATION INSTRUCTIONS Thank You, for your recent purchase with TrimLine Windows, Inc. This is a quality product and deserves a quality installation. Please follow the attached instructions for a quick
PRODUCT GUIDE Vinyl Patio Doors (JPG008)
") This guide contains procedures for common user serviceable repair tasks found on vinyl patio doors. If a condition arises that is not covered in this guide, please contact us for professional help. This
This guide contains procedures for common user serviceable repair tasks found on vinyl patio doors. If a condition arises that is not covered in this guide, please contact us for professional help. This
C.R. LAURENCE CO. INC Installation Instructions
 IMPORTANT: PLEASE READ BEFORE INSTALLING THE WINDOW The following instructions will reduce your chances of experiencing problems during installation, and ensure smooth, trouble-free operation of these
Panoramic Door. Block Frame Installation Manual Aluminum top and bottom track with either aluminum or vinyl panels
 2515 Industry St. Oceanside, CA 92058 760-722-1250 www.panoramicdoors.com Panoramic Door Block Frame Installation Manual Aluminum top and bottom track with either aluminum or vinyl panels Signature Aluminum
INSTALLATION INSTRUCTIONS for Custom and Premium Pocket Windows (JII022) IMPORTANT INFORMATION AND GLOSSARY SAFETY AND HANDLING
 IMPORTANT INFORMATION AND GLOSSARY SAFETY AND HANDLING") Thank you for selecting JELD-WEN products. Attached are JELD-WEN s recommended installation instructions for pocket (replacement) double-hung, casement, awning, picture or transom windows, designed to
Thank you for selecting JELD-WEN products. Attached are JELD-WEN s recommended installation instructions for pocket (replacement) double-hung, casement, awning, picture or transom windows, designed to
Keltic Series QUANTITY. 4 Each. 8 Each. 60 Each. Door Latch Keeper. Sill Bumper (Intermediate) Collector for Track 2. Stainless Steel Track
 Collector for Track 2. Stainless Steel Track") Keltic Series Series 7800 Multi-Slide and Pocket Patio Door Installation Instructions Installation Requires Knowledge of: AAMA Installation Instructions. Applicable Federal, State, Local Codes and Regulations.
Keltic Series Series 7800 Multi-Slide and Pocket Patio Door Installation Instructions Installation Requires Knowledge of: AAMA Installation Instructions. Applicable Federal, State, Local Codes and Regulations.
INSTALLATION INSTRUCTIONS
 INSTALLATION INSTRUCTIONS BUILDERS CHOICE FRAMED Shower Height Swing Door Model: L533 Rev. 09.03.13 MAINTENANCE: Two primary materials are used to manufacture your new Aquatic enclosure; tempered glass
INSTALLATION GUIDE WOOD PIVOTING CIRCLE/ OVAL
 WOOD PIVOTING CIRCLE/ OVAL READ SPECIFIC INSTALLATION INSTRUCTIONS COMPLETELY BEFORE STARTING ANY INSTALLATION Failure to install and maintain our product according to these instructions will VOID any
InStallatIon InStruCtIonS for vinyl 2-lIte PatIo door assembled
 InStallatIon InStruCtIonS for vinyl -lite PatIo door assembled tools & materials you Will need: Measuring Tape Pencil Shims Square Hammer or Mallet Level Drill & Drill bits: 6", 8", 5 6", 7 6" Utility
TARGA 7200 HORIZONTAL ROLLER INSTALLATION INSTRUCTIONS NOTE: Read instructions completely before attempting any installation.
 TARGA 7200 HORIZONTAL ROLLER INSTALLATION INSTRUCTIONS NOTE: Read instructions completely before attempting any installation. These instructions are provided as a general guide in the installation of CGI
Installation Instructions for Vista Air Vertically Folding Walls
 Installation Instructions for Vista Air Vertically Folding Walls Use these instructions in conjunction with your shop drawings to see the specifics that are particular to the model you are installing.
ASSEMBLY AND INSTALLATION INSTRUCTIONS for Premium Atlantic Vinyl Patio Doors (JII018) ImPortAnt InformAtIon & glossary
 ImPortAnt InformAtIon & glossary") ASSEMBLY AND INSTALLATION INSTRUCTIONS Thank you for selecting JELD-WEN products. Attached are JELD-WEN s recommended installation instructions for Premium Atlantic vinyl sliding patio doors. Read these
ASSEMBLY AND INSTALLATION INSTRUCTIONS Thank you for selecting JELD-WEN products. Attached are JELD-WEN s recommended installation instructions for Premium Atlantic vinyl sliding patio doors. Read these
Passive Panel Replacement Guide
 Replacement Guide for Andersen 200 Series d Patio Doors - Inswing For questions call 1-888-888-7020. For more information and/or guides visit andersenwindows.com. Please leave this guide with building
INSTALLATION INSTRUCTIONS. Thermal Entrances AA 250/AA 425 THERMAL DOOR WITH TRIFAB 601/601T FRAMING
 JANUARY, 2014 1 INSTALLATION Thermal Entrances AA 250/AA 425 THERMAL DOOR WITH TRIFAB 601/601T FRAMING INSTRUCTIONS 2 FRAME ASSEMBLY JANUARY, 2014 601442 SHEAR BLOCK BALL BEARING NRP BUTT (FACTORY APPLIED
WOOD OUT SWING AWNING, CASEMENT, & HOPPER WINDOW
 WOOD OUT SWING AWNING, CASEMENT, & HOPPER WINDOW INSTALLATION GUIDE READ SPECIFIC INSTALLATION INSTRUCTIONS COMPLETELY BEFORE STARTING ANY INSTALLATION Failure to install and maintain our product according
Fold-A-Way Patio Door ASSEMBLY & INSTALLATION GUIDE
 Fold-A-Way Patio Door ASSEMBLY & INSTALLATION GUIDE This instruction guide provides the minimum recommended procedures to correctly prepare the rough opening, install a fold-a-way patio door unit and apply
Atrium Patio Door Field Service Manual
 Atrium Patio Door Field Service Manual December 2005 Table of contents Service Agreement Pg 2 Release Agreement Pg 5 Inspection form Pg 6 Warranty Pg 8 Replacing swing panel Pg 12 Replacing sliding panel
INSTALLATION INSTRUCTIONS
 INSTALLATION INSTRUCTIONS Thermally Broken Framing and Door Installation SL-450TB (2" x 4-1/2" with 1" Glazing) & SL-600TB (2" x 6" with 1" Glazing) IMPORTANT: Read all instructions before beginning installation.
SENTINEL SERIES 110 SINGLE HUNG WINDOWS
 Installation Instructions SENTINEL SERIES 110 SINGLE HUNG WINDOWS Page 2: Opening Preparation, Wood Buck Installation and Figure 1 Page 3-6: Installation Instructions and Figure 2 Page 7: Figure 3: Installation
SERIES 360. Single Hung Windows. NOTE: Read instructions completely before attempting any installation.
 Installation Instructions SERIES 360 Single Hung Windows Page 2: Opening Preparation and Wood Buck Installation and Figure 1 Page 3-5: Installation Instructions for Series 360 WINDOWS Page 6: Figure 2:
Important Notice. caution: Use proper lifting equipment and correct procedures to avoid injury.
 Integrity. Partnership. Quality. COMMERCIAL DOOR INSTALLATION INSTRUCTIONS SERIES 1900, 1950, 2000, 2250, 2500, 2750 Important Notice In the following text, the word: Warning: Indicates that serious injury
HR175 Sash Replacement Kit Installation Instructions
 HR175 Sash Replacement Kit Installation Instructions IMPORTANT: Please read before you begin. Weather Shield HR175 Sash Replacement Kits Important: Thoroughly read and follow these instructions, failure
Steel Reinforced Joining Thank you for choosing Andersen. Please leave this guide with building owner.
 Steel Reinforced Joining (Horizontal/Vertical) for Andersen 400 Series Woodwright & Tilt-Wash Double-Hung, Picture, and Transom Windows and 400 Series Double-Hung Half Circle and Flexiframe Specialty Windows
INSTALLATION INSTRUCTIONS. UNIT No. 160/760 THIN-LINE SHOWER ENCLOSURE
 INSTALLATION INSTRUCTIONS UNIT No. 160/760 THIN-LINE SHOWER ENCLOSURE QCI0011 Rev. 0 Page 1of 10 Certified 10/18/2006 MAINTENANCE: Two primary materials are used to manufacture your new Basco enclosure;
Thermally Broken Framing and Door Installation
 INSTALLATION INSTRUCTIONS Thermally Broken Framing and Door Installation IMPORTANT: Read all instructions before beginning installation. These instructions are provided to help prevent installation problems
Heavy Wall Applied Stop Tube Frame and Door Installation
 INSTALLATION INSTRUCTIONS Heavy Wall Applied Stop Tube Frame and Door Installation Read all instructions before beginning installation. These instructions are provided to help prevent installation problems
Sash and/or Hinge Replacement Guide for Andersen 200 Series Basement/Utility Windows
 and/or Hinge Replacement Guide for Andersen 200 Series Basement/Utility Windows Please read this guide completely before starting. For questions about this and other Andersen products, call 1-888-888-7020.
SERIES 3070-T MULTI-SLIDE ASSEMBLY & INSTALLATION INSTRUCTIONS
 Table of Contents I. Care and Maintenance...2 II. Tools / Material & Sealant Requirements...2 III. Assembly and Installation...2 IV. Glazing Assembly...3 V. Panel Assembly...3 1. X Panel...3 2. O Panel...4
Wood Hinged Patio Door Installation Instructions
 Wood Hinged Patio Door Installation Instructions #1029970 / 1029971 / 1182557 (12/05) Rev 4 IMPORTANT: Please read before you begin installation. Wood Hinged Patio Door Door Installation Instructions IMPORTANT:
Frameless Bypass Slider
 INSTALLATION INSTRUCTIONS Frameless Bypass Slider QCI-5301 Heavy Glass Bypass Slider with Exposed Rollers QCI5301 Rev 0 Page 1 Certified 11/1/2016 Tools: To install your New Shower Enclosure, you may need
8/7/ HP SWING DOOR INSTALLATION INSTRUCTIONS
 8/7/17 1200 HP SWING DOOR INSTALLATION INSTRUCTIONS Installation Instructions for Typical Construction These instructions were developed and tested for use with typical construction in a wall system designed
Installation Instructions
 For Medium (15-18.5K) + Heavy duty (-8.5K) Air Conditioner READ BEFORE INSTALLING UNIT To avoid risk of personal injury, property damage, or product damage due to the weight of this device and sharp edges
tile redi redi DOOR Redi Redi Swing Slide g TM TM...Opening Doors to Stunning Showers! TM TM SERIES: CONFIGURATION: MOUNTING PACKAGE:
 redi DOOR INSTALLATION INSTRUCTIONS tile redi Redi Redi Swing Slide g TM TM...Opening Doors to Stunning Showers! TM TM SERIES: CONFIGURATION: MOUNTING PACKAGE: 3000 Door-Door Header, sliding doors RDQCI5301
ESA-300 Full Breakout
 Interior View 0 Installation Instructions For use with ESA II Controler DORMA AUTOMATICS, Inc. 94 Sherwood Drive Toll-Free: 877-67-6 DL844-00 Lake Bluff, IL 60044 Fax: 877-4-7999 Rev. /07 Tools Required: