3 BRACKET TO GUIDE ATTACHMENT. RIGHT END Figure 1. EXTENDED BRACKET (for doors taller than 8-8 ) SERIES 650. RIGHT END COTTER PIN Figure 6
|
|
|
- Timothy McCarthy
- 5 years ago
- Views:
Transcription
1
.")

.")

.")
 Attach each extended bracket to guide with")


.")

2 2 DOOR ARRANGEMENT. A Lay door on a clean floor inside of building and in front of opening (see Figure 1). NOTE: Door can be damaged if laid on unclean surface. B Distribute parts bags, guides, stops and brackets. 3 BRACKET TO GUIDE ATTACHMENT. NEW SNAP-ON STANDARD BRACKET Attach each snap on bracket to top of guide by inserting the three bracket hooks into the three rear guide slots (as shown in Figure 2). Strike top of bracket (as shown in Figure 3) until the locking tab in the guide fully engages and secures the bracket. Place one 1/4-20 UNF x ¾ long carriage bolt and one 1/4-20 UNF KEPS nut into the guide where the head stop will be attached later in Section 9 (see Figure 2). Note: Do not attach head stop at this time. EXTENDED BRACKET (for doors taller than 8-8 ) Attach each extended bracket to guide with two 1/4-20UNF x 3/4 long carriage bolts and 1/4-20UNF KEPS nuts (see Figure 4). Temporarily install one 1/4-14UNC x 1 long TEK screw through the lowest extended bracket angle hole into the back of the guide. (After bracket is installed on jamb, this TEK fastener will be removed.) Also, place one 1/4-20UNF x 3/4 long carriage bolt and 1/4-20UNF KEPS nut into the guide where the head stop will be attached later, in Section 9 (see Figure 5). Note: Do not attach head stop at this time. RIGHT END Figure 1 GUIDE 1/4-20 UNF x 3/4 CARRIAGE BOLT 1/4-20 UNF KEPS NUT SNAP-ON BRACKET NEW SNAP-ON STANDARD BRACKET Figure 2 1/4-20 UNF x 3/4 CARRIAGE BOLTS EXTENDED BRACKET EXTENDED BRACKET ANGLE TEMPORARY 1/4-14 UNC x 1 TEK SCREW RIGHT GUIDE AND EXTENDED BRACKET Figure 4 RIGHT GUIDE AND STANDARD BRACKET Figure 3 1/4-20 UNF KEPS NUT 1/4-20 UNF KEPS NUTS 1/4-20 UNF x 3/4 CARRIAGE BOLT HEAD STOP PREPARATION Figure 5 2) RIGHT END COTTER PIN Figure 6
3 4 BRACKET TO AXLE ATTACHMENT. Slide brackets onto axle and secure each side with a cotter pin through the holes at each end of the axle. (See Figure 6) NOTE: The bearing may fit snugly around the axle. Tap lightly on the bearing s inner race to move it along the length of the axle. Only the Left Bracket will include the 650 Tensioner Assembly. 5 SPRING ATTACHMENT. Place the left spring hook over the left end tensioner tang as shown in Figure 7B. Ensure that the spring hook fully engages the tensioner tang. The spring alignment sleeve (Figure 7A) must be inside spring. Tensioner Tang Alignment Sleeve Hook Hook Bolt LEFT END (SPRING ATTACHMENT) Figure 7B NOTE: FOR OPENING HEIGHTS OVER 8-8 THRU 10-0 WITH AN OPENING WIDTH OVER 6-0 THRU 9-0, AND ANY HEIGHT DOOR WITH AN OPENING WIDTH GREATER THAN 9-0 WILL BE SUPPLIED WITH 2 SPRINGS. BOTH SPRINGS MUST BE PROPERLY ATTACHED TO ENSURE PROPER OPERATION OF DOOR! FOR SECOND SPRING ATTACHMENT SEE FIGURE 7C. RIGHT END SPRING MAY USE ANY OF THE FOUR HOLES AT EACH CORNER. 6 RAISING DOOR ASSEMBLY. Using two people, move the curtain assembly close to the door jambs, lift it vertically at the areas indicated by the arrows in Figure 8. Lean the curtain assembly against the door jambs, and after ensuring that the guides are the correct width, one person holds the assembly in place. The second person attaches the door bracket by installing a fastener in the bottom hole of the door bracket. RIGHT END SPRING ATTACHMENT Figure 7C JAMB TENSIONER WITHOUT SPRING Figure 7A JAMB Tensioner Tang SLAB TWO MAN TILT UP Figure 8 DO NOT LEAVE DOOR UNATTENDED! GUIDES ARE NOT DESIGNED TO SUPPORT CURTAIN WEIGHT DURING A ONE-MAN TILT UP INSTALLATION. ATTEMPTING A ONE-MAN TILT-UP INSTALLATION CAN RESULT IN SERIOUS BODILY INJURY AND/OR DAMAGE TO THE DOOR. 7 LEFT GUIDE AND BRACKET INSTALLATION TO JAMB. Attach left guide and bracket to jamb with fasteners provided (see Table B). Make sure guide is plumb. 3) TOP VIEW Figure 9
4 NOTE: The bottom and middle guide anchor positions must be the correct width. The top anchoring position should be approximately 1/4 wider on each side of the top and flush on each side of the bottom, to ensure ease of entry by the curtain as it descends into the guide rails (see Figure 9). ITEMS JAMB Brackets Guides Concrete or Filled Block Concrete or Filled Block Brackets and Guides Steel-Structural Steel-Rollup Frame Wood FASTENERS DRILL SIZE 5/16 x 1-1/2 Sleeve Anchor 5/16 Dia. 5/16 x 1-1/2 Sleeve Anchor or 1/4 x 1-1/4 Masonry Screw 1/4-14 UNF x 1 TEK Screw 1/4-14 UNF x 1 TEK Screw 1/4-14 UNC x 1 Lag Screw 5/16 Dia. None None None NOTE: Three fasteners are provided for each extended bracket.three fasteners are provided for each guide for doors thru 8-8 tall and four for doors over 8-8 tall. TABLE B DOOR CAN FALL IF NOT SECURELY FASTENED TO JAMBS. ALL FASTENERS ATTACHING BRACKET TO JAMB MUST FIT SECURELY INTO A STRUCTURAL MEMBER OR SURFACE. IF DOOR FALLS, SERIOUS INJURY AND/OR DAMAGE TO DOOR CAN RESULT. NOTE: The welding of guides to jambs is NOT recommended. 8 RIGHT GUIDE AND BRACKET INSTALLATION TO JAMB. Attach right guide and bracket to jamb. Use a tape measure at the locations indicated in Figure 10 to set the proper guide to curtain end clearance. See example below. EXAMPLE If your curtain measures 8-3 in width, then the distance from the outside of the left guide to the outside of the right guide should be 8-3 3/4 to 8-4 at measuring point A and 8-3 1/2 at measuring point B. NOTE: If extended brackets are used, remove the temporary TEK screw from the bottom hole of both extended bracket angles at this time. 9 SETTING SPRING TENSION. After the door is completely secured to the building, it is time to tension the spring. INSIDE VIEW Figure 10 HIGH TENSION SPRING INSTALLATION, REPAIRS AND ADJUSTMENTS MUST BE MADE BY A TRAINED SERVICE PERSON USING PROPER TOOLS, METHODS AND INSTRUCTIONS. Rotate the door in the direction indicated two full rotations (see Figure 11). WHILE FIRMLY HOLDING THE DOOR AT THE BOTTOM BAR, cut the tape and plastic which holds the door in a coil. Roll the curtain down into the guides and secure. Install head stops by using the bolts and nuts that were previously attached to the guides in Section 3. 4)
5

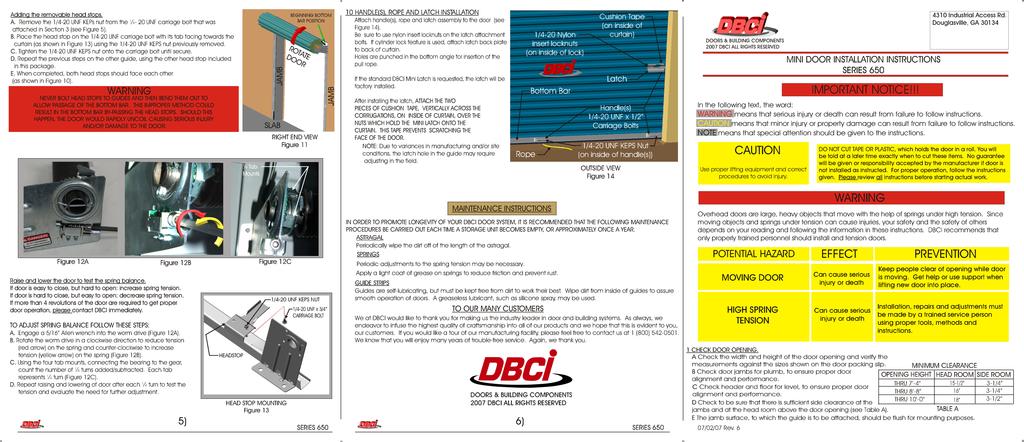
6 10 HANDLE(S), ROPE AND LATCH INSTALLATION Attach handle(s), rope and latch assembly to the door (see Figure 14). Be sure to use nylon insert locknuts on the latch attachment bolts. If cylinder lock feature is used, attach latch back plate to back of curtain. Holes are punched in the bottom angle for insertion of the pull rope. 1/4-20 Nylon insert locknuts (on inside of lock) Cushion Tape (on inside of curtain) If the standard DBCI Mini Latch is requested, the latch will be factory installed. If installing a non-standard latch, ATTACH THE TWO PIECES OF CUSHION TAPE, VERTICALLY ACROSS THE CORRUGATIONS, ON INSIDE OF CURTAIN, OVER THE NUTS WHICH HOLD THE MINI LATCH ONTO THE CURTAIN. THIS TAPE PREVENTS SCRATCHING THE FACE OF THE DOOR. NOTE: Due to variances in manufacturing and/or site conditions, the latch hole in the guide may require adjusting in the field. Rope Bottom Bar Latch Handle(s) 1/4-20 UNF x 1/2 Carriage Bolts 1/4-20 UNF KEPS Nut (on inside of handle(s)) OUTSIDE VIEW Figure 14 MAINTENANCE INSTRUCTIONS IN ORDER TO PROMOTE LONGEVITY OF YOUR DBCI DOOR SYSTEM, IT IS RECOMMENDED THAT THE FOLLOWING MAINTENANCE PROCEDURES BE CARRIED OUT EACH TIME A STORAGE UNIT BECOMES EMPTY, OR APPROXIMATELY ONCE A YEAR. ASTRAGAL Periodically wipe the dirt off of the length of the astragal. SPRINGS Periodic adjustments to the spring tension may be necessary. Apply a light coat of grease on springs to reduce friction and prevent rust. GUIDE STRIPS Guides are self-lubricating, but must be kept free from dirt to work their best. Wipe dirt from inside of guides to assure smooth operation of doors. A greaseless lubricant, such as silicone spray, may be used. TO OUR MANY CUSTOMERS We at DBCI would like to thank you for making us the industry leader in door and building systems. As always, we endeavor to infuse the highest quality of craftsmanship into all of our products and we hope that this is evident to you, our customers. If you would like a tour of our manufacturing facility, please feel free to contact us at 1 (800) We know that you will enjoy many years of trouble-free service. Again, we thank you. 6)
Important Notice. CAUTION: Use proper lifting equipment and correct procedures to avoid injury.
 Integrity. Partnership. Quality. SELF-STORAGE DOOR INSTALLATION INSTRUCTIONS SERIES 690 Important Notice In the following text, the word: Warning: Indicates that serious injury or death can result from
Important Notice. caution: Use proper lifting equipment and correct procedures to avoid injury.
 Integrity. Partnership. Quality. COMMERCIAL DOOR INSTALLATION INSTRUCTIONS SERIES 1900, 1950, 2000, 2250, 2500, 2750 Important Notice In the following text, the word: Warning: Indicates that serious injury
Rolling Curtain door Manual
 Rolling Curtain door Manual Installation Maintenance parts Model 944 PHONE 800 448 8979 FAX 800 236 8722 website www.tracrite.com EMAIL tr@tracrite.com ADDRESS 216 Wilburn Road Sun Prairie, WI 53590 This
HD installation guide
 JANUS INTERNATIONAL 1 866 562 2580 www.janusintl.c o m 1950 1950HD installation guide RIGHT DRIVE END SHOWN LH OPPOSITE LEFT TENSION END SHOWN RH OPPOSITE PUSH-UP OPERATION 1950 1950HD SHOWN A rolling
installation guide
 JANUS INTERNATIONAL 1 866 562 2580 w w w. j a n u s i n t l. c o m 2000 2500 3000 installation guide RIGHT DRIVE END SHOWN LH OPPOSITE LEFT TENSION END SHOWN RH OPPOSITE PUSH-UP OPERATION 2000 2500 3000
N35 ALUMINIUM ROLL-UP DOOR INSTALLATION MANUAL
 N35 ALUMINIUM ROLL-UP DOOR INSTALLATION MANUAL DOVER ROLLER SHUTTERS 295 COMMERCE WAY P.O. BOX 420 UPPER SANDUSKY, OH 43351 Dover Roller Shutters wants to THANK YOU for your purchase of the N35 Aluminum
MODEL 2EA/2EB DOOR INSTALLATION INSTUCTIONS
 Dover Roller Shutters wants to THANK YOU for your purchase of the 2EA/2EB Aluminum Roll-Up Door! BEFORE INSTALLATION Please carefully read the instruction manual completely. Carefully unpack the contents
1200 SERIES 2 PANEL DOOR rev.1 DETAILED INSTALLATION INTRUCTIONS
 1200 SERIES 2 PANEL DOOR 10.2013 rev.1 DETAILED INSTALLATION INTRUCTIONS GENERAL: Door elevations shown in these instructions are as viewed from the outside. X denotes the active or moving panel(s). O
FOR PROFESSIONAL GARAGE DOOR INSTALLERS
 Composite Garage Doors Installation Instructions FOR PROFESSIONAL GARAGE DOOR INSTALLERS Tools required Screwdriver Claw Hammer Locking Pliers Power Drill Level with a 3/32" Drill Bit Utility Knife 9/16",
Installation Instructions - Model V4JSD 1
 Installation Instructions - Model V4JSD 1 Support Assemblies: Parts list: (Note see enclosed cut sheet for quantities and dimensional information) A vertical structural member (1 ½ x 1 ½ modular frame)
REVIEW ALL INSTRUCTIONS COMPLETELY BEFORE ATTEMPTING INSTALLATION
 INSTALLATION INSTRUCTIONS Service Doors, Counter Service Doors & Grilles REVIEW ALL INSTRUCTIONS COMPLETELY BEFORE ATTEMPTING INSTALLATION GENERAL NOTES: Instructions are intended for qualified door mechanics
installation guide
 2000 2500 3000 installation guide RIGHT DRIVE END SHOWN LH OPPOSITE LEFT TENSION END SHOWN RH OPPOSITE PUSH-UP OPERATION 2000 2500 3000 SHOWN 3000 MODEL A rolling d oor is a la rge heavy obje ct that moves
400A 40113V, 401A 40120V, & 401AL 40120VL ALUMINUM VERTICAL 4000 LB LIFT INCLUDES SCREW LEG ASSEMBLY INSTRUCTIONS
 12/11/07 PAGE 1 OF 12 400A 40113V, 401A 40120V, & 401AL 40120VL ALUMINUM VERTICAL 4000 LB LIFT INCLUDES SCREW LEG ASSEMBLY INSTRUCTIONS Thank you for purchasing our product! *Please read these instructions
Spring Loaded SCREEN-PRO. All Season Roll-Up Doors IN-JAMB MOUNTING METHOD INSTALLATION INSTRUCTIONS READ THIS FIRST
 Spring Loaded SCREEN-PRO All Season Roll-Up Doors IN-JAMB MOUNTING METHOD INSTALLATION INSTRUCTIONS READ THIS FIRST Carefully examine the crate(s) for damage before opening. If the carton is damaged, immediately
How To Measure Your Finished Opening
 3000 Series Bifold Doors How To Measure Your Finished Opening MEASURE FROM RIGHT TO LEFT 2 PLACES (WIDTH) MEASURE FROM TOP TO BOTTOM 2 PLACES (HEIGHT) Tools Required for Assembly: Tools Needed: Phillips
INOVO 4-LITE SLIDING PATIO DOOR ASSEMBLY AND INSTALLATION INSTRUCTIONS
 INOVO 4-LITE SLIDING PATIO DOOR ASSEMBLY AND INSTALLATION INSTRUCTIONS IMPORTANT: READ THE INSTRUCTIONS AND FAMILIARIZE YOURSELF WITH THE DOOR PARTS AND PIECES BEFORE BEGINNING ASSEMBLY AND INSTALLATION.
INSTALL INSTRUCTIONS WELCOME TO THE NEWAGE PERFORMANCE CABINETRY SERIES NEWAGE STEEL WELDED CABINETRY
 NEWAGE STEEL WELDED CABINETRY WELCOME TO THE NEWAGE PERFORMANCE CABINETRY SERIES ALL CABINETS MUST BE MOUNTED TO STUDS ON A SECURE WALL, AS PER THESE INSTRUCTIONS. FAILURE TO DO SO MAY RESULT IN SERIOUS
N. 15th Street, Middlesboro, KY FLIP TARP DUMP BODY INSTALLATION INSTRUCTIONS
 1-800-248-7717 1002 N. 15th Street, Middlesboro, KY 40965 FLIP TARP DUMP BODY INSTALLATION INSTRUCTIONS Congratulations on your purchase of a Mountain Flip Tarp Dump Body tarping system. With tarping systems
PRE-ENGINEERED HORSE STALL SYSTEMS 4884 HSD STANDARD SLIDING DOOR. & Assembly. Installation Instructions
 PRE-ENGINEERED HORSE STALL SYSTEMS 4884 HSD STANDARD SLIDING DOOR & Assembly Installation Instructions 4884 HSD Standard Sliding Door Components Some Considerations When Choosing Your Stall System - 1
Spring Loaded All Season Roll-Up Doors
 Spring Loaded All Season Roll-Up Doors STAND-OFF MOUNTING METHOD INSTALLATION INSTRUCTIONS READ THIS FIRST Carefully examine the crate(s) for damage before opening. If the carton is damaged, immediately
Retractable Screen Installation Instructions For Vinyl and Aluminum Clad and Wood In-Swing Hinged Doors (See separate instructions for sliding doors)
") Retractable Screen Installation Instructions For Vinyl and Aluminum Clad and Wood In-Swing Hinged Doors (See separate instructions for sliding doors) IMPORTANT: Please read before you begin. Table of Contents
Retractable Screen Installation Instructions For Vinyl and Aluminum Clad and Wood In-Swing Hinged Doors (See separate instructions for sliding doors) IMPORTANT: Please read before you begin. Table of Contents
PRE-ENGINEERED HORSE STALL SYSTEMS SDFD SLIDING DOOR c/w FOLD-DOWN GRILL. & Assembly. Installation Instructions
 PRE-ENGINEERED HORSE STALL SYSTEMS 4800 SDFD SLIDING DOOR c/w FOLD-DOWN GRILL & Assembly Installation Instructions 4800 SDFD Sliding Door c/w Fold-Down Grill Components - 1 3 /4" x 2" x 88" channels (2)
ICU TRACKLESS SLIDING DOOR
 Interior View 0 Installation Instructions Tools Required: Screwdrivers Small Straight (Flat Blade) - for Terminal Block wiring # Phillips (Crosspoint) - for various #8, #0, and #4 screws Wrenches / Sockets
How to Install Custom Real Wood and Faux Wood Blinds
 Before you begin your installation: READ ALL INSTALLATION INSTRUCTIONS! Make sure that you have all tools and hardware needed for installation. Check the installation surface (wall, ceiling, or window
INSTALLATION INSTRUCTIONS FRAMELESS CONTINUOUS HINGE SHOWER ENCLOSURE QCI5233
 INSTALLATION INSTRUCTIONS FRAMELESS CONTINUOUS HINGE SHOWER ENCLOSURE QCI5233 QCI5233 Rev 0 Page 1 Certified 06/20/2016 INSTALLATION NOTES: Unpack your unit carefully and inspect for freight damage. Lay
Baby Grande with Crank, Housing, and Side Rails Installation Instructions
 Baby Grande with Crank, Housing, and Side Rails Installation Instructions Tools Needed Hardware Provided (per shade) Hardware Needed Drill 3/8 Metal Drill Bit ¼ Masonry Drill Bit Measuring Tape Pencil
Oxford Stalls Installation Instructions
 Oxford Stalls Installation Instructions RAMM Horse Fencing and Stalls 13150 Airport Hwy. Swanton, OH 43558-9615 1-800-434-8456 Rev. 8/15/17 Before You Start Typical stall sizes are 10 x 10, 12 x 12 or
Installation Instructions
 For Medium (15-18.5K) + Heavy duty (-8.5K) Air Conditioner READ BEFORE INSTALLING UNIT To avoid risk of personal injury, property damage, or product damage due to the weight of this device and sharp edges
Installation Instructions. Oakmont Folding Doors
 Before You Start For quick and easy installation of your Oakmont folding door, read these instructions thoroughly. A few minutes of prior planning will make the job easier and ensure years of trouble-free
Installation and Assembly - Universal Articulating Swivel Double-Arm for 42" - 60" Plasma Screens
 Installation and Assembly - Universal Articulating Swivel Double-Arm for 42" - 60" Plasma Screens Models: PLAV 70-UNL, PLAV 70-UNL-S PLAV 70-UNLP, PLAV 70-UNLP-S R This product is UL Listed. It must be
Install Instructions. NewAge Steel Welded Tall Locker
 Kit Contains Full Width Adjustable Steel Shelves (4) Height-Adjustable Steel Leveling Legs (4) Aluminum Door Trim (2) 2.5 x ¼ Cabinet Mounting Lag Bolts (4) Large Zinc Plated Mounting Washers (4) 5/8 x
Dublin Stalls Installation Instructions
 Dublin Stalls Installation Instructions RAMM Horse Fencing and Stalls 13150 Airport Hwy. Swanton, OH 43558-9615 1-800-434-8456 Rev. 9/13/17 Part Identification Round Track Bracket (4) (Not Painted) Round
Unit No. 4400, 4500 Classic Frameless Sliding Tub/Shower Enclosure INSTALLATION INSTRUCTIONS
 Unit No. 4400, 4500 Classic Frameless Sliding Tub/Shower Enclosure INSTALLATION INSTRUCTIONS MAINTENANCE: Two primary materials are used to manufacture your new Basco enclosure: tempered glass and anodized
Arctic Equipment Manufacturing Corporation Arctic LD-P. Table of Contents
 Arctic LD-P Table of Contents Arctic Light Duty Poly Blade 78 & 84" (Blade, Quadrant & T-frame)....2 Installation of the Optional Spring...6 Installation of the Shoe Bracket...10 Power Angling Installation..........13
Sliding Door Kit
 YOU MUST READ THIS DOCUMENT BEFORE YOU BEGIN TO ASSEMBLE THE DOOR KIT. Thank you for purchasing this GrowSpan door kit. When properly assembled and maintained, this product will provide years of reliable
Installation Instructions
 For Medium (15-18.5K) + Heavy duty (22-28.5K) Air Conditioner READ BEFORE INSTALLING UNIT To avoid risk of personal injury, property damage, or product damage due to the weight of this device and sharp
AWNING / PATIO COVER INSTALLATION INSTRUCTIONS
 AWNING / PATIO COVER INSTALLATION INSTRUCTIONS Before You Begin Read the installation instructions thoroughly before beginning the installation procedure. Perspective In the Awning Instructions, Back means
Installation and Assembly - Universal Articulating Swivel Double-Arm for 42" - 60" Plasma Screens
 Installation and Assembly - Universal Articulating Swivel Double-Arm for 42" - 60" Plasma Screens Models: PLAV 70-UNL, PLAV 70-UNL-S PLAV 70-UNLP, PLAV 70-UNLP-S R This product is UL Listed. It must be
Installation Instructions
 READ BEFORE INSTALLING UNIT INSTALLATION WARNINGS AND CAUTION Carefully read the installation manual before beginning. Follow each step as shown. Observe all local, state, and national electrical codes
Franklin Mills Stackable Movable Lateral Instructions
 Franklin Mills Stackable Movable Lateral Instructions Table of Contents: Table of contents...1 Tools Required...2 Stationary Shelving Assembly...3-7 Mobile Shelving Assembly...8-16 Rail Assembly...8-11
End of Row Doors. Revision Number 1
 End of Row Doors Single Swing Door Café Style Doors Revision Number 1 Wright Line LLC 160 Gold Star Boulevard Worcester, MA 01606 Tel: 800-225-7348 508-852-4300 Fax: 508-365-6178 www.wrightline.com info@wrightline.com
Shetland Stalls Installation Instructions
 Shetland Stalls Installation Instructions RAMM Horse Fencing and Stalls 13150 Airport Hwy. Swanton, OH 43558-9615 1-800-434-8456 Rev. 1/9/18 Before you start Kit can accommodate up to 12 wide stall front
TOOLS REQUIRED FOR ASSEMBLY. Rubber Mallet or Plastic Tip Hammer PARTS REQUIRED FOR ASSEMBLY OF SINGLE ENTRY STARTER.
 TOOLS REQUIRED FOR ASSEMBLY Rubber Mallet or Plastic Tip Hammer Top Cover Support PARTS REQUIRED FOR ASSEMBLY OF SINGLE ENTRY STARTER Back Stop Divider Closed 'L' Upright Slotted Reinforcement Support
OWNERS MANUAL. Model No UTILITY CART
 OWNERS MANUAL Model No. 45-00 UTILITY CART CAUTION: Read Rules for Safe Operation and Instructions Carefully Assembly Operation Maintenance Repair Parts PRINTED IN USA FORM NO. 46274 LOOSE PARTS IN CARTON
FLIP TARP SINGLE & DOUBLE UNDERBODY TRAILERS
 1-800-248-7717 1002 N. 15th Street, Middlesboro, KY 40965 FLIP TARP SINGLE & DOUBLE UNDERBODY TRAILERS INSTALLATION INSTRUCTIONS Congratulations on your purchase of a Mountain Flip Tarp Trailer system.
Assembly Instructions 10 X 10 Aluminum Frame Building
 Assembly Instructions 10 X 10 Aluminum Frame Building 27 97 9 8 47 36 74 52 10 10 X 10 Square Building W/ Dome Includes: The Steel Entry Door with a Dead Bolt Lock assembly and Aluminum Door Frame. Metal
Installation Instructions
 edium + Heavy duty READ BEFORE INSTALLING UNIT Preliminary instructions: 1. Check window opening size: the mounting parts furnished with this air conditioner are made to install in a wooden sill double-hung
READ BEFORE INSTALLING UNIT INSTALLATION WARNINGS AND CAUTION
 edium + Heavy duty READ BEFORE INSTALLING UNIT INSTALLATION WARNINGS AND CAUTION Carefully read the installation manual before beginning. Pay attention to danger and safety notices. be exposed: Carefully
INSTALLATION TORSION SPRING FRONT OR REAR MOUNT LOW HEADROOM. 1 Cutting Vertical Track. 2 Fully Adjustable Jamb Brackets
 TORSION SPRING FRONT OR REAR MOUNT LOW HEADROOM Wayne Dalton, a division of Overhead Door Corporation P.O. Box 67, Mt. Hope, OH., 44660 Supplemental insert Copyright 2015 Wayne Dalton, a division of Part
MM540 Installation Instructions IMPORTANT SAFETY INSTRUCTIONS - SAVE THESE INSTRUCTIONS
 MM50 Installation Instructions IMPORTANT SAFETY INSTRUCTIONS - SAVE THESE INSTRUCTIONS Please read this entire manual before you begin. Do not unpack any contents until you verify all requirements on PAGE.
TOOLS REQUIRED Metal Wood Wood and Metal Screws. #16 Drill #12-24 Tap. 1/8 Drill
 DEVICES COVERED IN THIS DOCUMENT: 4700S Surface Vertical Rod Device 4700SF Fire Exit Surface Vertical Rod Device TOOLS REQUIRED Metal Wood Wood and Metal Screws Sex Bolts #7 Drill ¼ -20 Tap #16 Drill #12-24
owners manual CAUTION: Read Rules for Safe Operation and Instructions Carefully Safety Assembly Operation Maintenance Parts
 owners manual Model No. 45-0350 (ATV) 45-0351 (FARM) (45-0350 SHOWN) TANDEM AXLE CART CAUTION: Read Rules for Safe Operation and Instructions Carefully IMPORTANT! The wheel bearings are not pre lubricated.
TrendWall Floor-To-Ceiling Panels Installation Instruction
 TrendWall Floor-To-Ceiling Panels Installation Instruction TrendWall Components Covered by this Instruction: Crown (and accessories) Floor Plate Solid Panel Filler Panel Wall Channel Door Section Pilaster
INSTALLATION INSTRUCTIONS
 www.marwincompany.com Kit Number Door Height Rough Opening Height KD200BB68 80 84 ½ KD200BB70 84 88 ½ KD200BB80 96 100 ½ INSTALLATION INSTRUCTIONS 200BB SERIES KD POCKET DOOR FRAME FOR 2 X 4 STUD WALLS
ALDoor DOUBLE DOOR INSTALLATION
 Assembly Top Jamb Side Jamb Horizontal Vertical Vertical Jamb Brackets General Layout 15-20 mm Red (LHS) Cable Drum Red Cone Black Cone Black (RHS) Cable Drum 75 mm Minimum Left Hand Side Bearing Plate
PORCH-LOC INSTALLATION INSTRUCTIONS
 PORCH-LOC INSTALLATION INSTRUCTIONS 2017 HB&G Building Products, Inc. Porch-Loc Installation Instructions NOTE: DISCARD THE INSTALLATION INSTRUCTIONS AND HARDWARE THAT CAME IN YOUR PERMAPOST PACKAGING
Assembly Instructions 10 X 10 Aluminum Roof Support
 Assembly Instructions 10 X 10 Aluminum Roof Support Aluminum Roof Support Bolt Package 16-5/16 X 2 ¼ SS Bolt 24-5/16 X 1 SS Bolt 40-5/16 SS Nylon Lock Nuts 16-5/16 SS Flat Washers 28-4 ½ Wood Screws 36-1
Please read and understand all instructions before beginning. These instructions cover impact and non-impact aluminum French Door 650/750.
 The performance and proper operation of a door is only as good as the installation. By following these instructions, the probability of a good installation greatly increases. Please read and understand
INSTALLATION MANUAL FORTRESS SERIES
 Guardian Security Structures TEL 1-406-212-2334 EMAIL rg@gssdoors.com WEB www.gssdoors.com FORTRESS SERIES GENERAL INSTALLATION GUIDELINES 1. The door frame is installed using 16 bolt screws 7,5 mm in
1/4 FRAMELESS SLIDING DOOR FOR TUB OR SHOWER
 1/4 FRAMELESS SLIDING DOOR FOR OR SHOWER INSTALLATION INSTRUCTIONS NEED INSTALLATION HELP? Call 1-800-45-BASCO (452-2726) M onda y - Friday 8 :00 A.M. - 4:30 P.M. Eastern Time MAINTENANCE: Two primary
Before Assembling the Storage Wall
 Chapter 1 Assembling the Lista Storage Wall Lista provides two types of standard Storage Walls: B251 and B255. The design, construction, assembly, and quality are identical for both types, however, B251
Clopay Models 835/837 Sliding Door System Installation Guide
 Clopay Models 835/837 Sliding Door System Installation Guide The aim of this instruction is to guide you through the process of construction and fitting of Sliding Doors. Due to the number of sizes available
DOCK WEDGE - STANDARD
 DOCK WEDGE - STANDARD INSTALLATION INSTRUCTIONS WOOD HEADER READ ALL INSTRUCTIONS BEFORE INSTALLING SEAL. SUPER SEAL MFG. LTD. WILL NOT BE HELD RESPONSIBLE FOR IMPROPER INSTALLATION OF ANCHORING DEVICES,
LORON SERVICE MANUAL / PARTS LIST SINGLE DOUBLE PALLET HANDLER CONTENTS: PAGE 1 Lift Truck Requirements General Installation Procedures
 LORON SERVICE MANUAL / PARTS LIST SINGLE DOUBLE PALLET HANDLER CONTENTS: PAGE 1 Lift Truck Requirements General Installation Procedures 2 Mounting Options Stop Block Adjustments 3 General Weekly Inspection
Step by Step Installation Instructions. Poly Shutters. Customer Service or visit us online at smithandnoble.com
 Step by Step Installation Instructions Poly Shutters Customer Service 800.248.8888 or visit us online at smithandnoble.com Thank you for purchasing from smith+noble. Your new window treatments have been
Fig. 2 DORMA-Glas Stand/Issue 02/03 Seite/Page 1/7
 FSW Installation instructions Track rail 75 x 72 mm 1. Ceiling substructure and installation of the track rail (Fig. 1): The track rail must be bolted over its entire length (including the stacking track
1/4 FRAMELESS SLIDING DOOR FOR TUB OR SHOWER 4400A-4500A
 1/4 FRAMELESS SLIDING DOOR FOR TUB OR SHOWER 4400A-4500A F AB GLASS AND MIRROR www.fabglassandmirror.com Call: +1 888-474-2221 Fax: (614)-334-4919 Office Timing: 8:30-18:00 EST info@fabglassandmirror.com
Installation Manual for Metal Emperor Lockers
 P a g e 1 Table of Contents Page General Notes and Tools Required 2-3 Assemble Shelves with Coat Hooks/Coat Rods 4 Fastening Chart 5 Knock Down Locker Assembly (Banks of Three) 6-12 Appendix A: Dress End
Sliding Door Kit
 YOU MUST READ THIS DOCUMENT BEFORE YOU BEGIN TO ASSEMBLE THE DOOR KIT. Thank you for purchasing this GrowSpan door kit. When properly assembled and maintained, this product will provide years of reliable
INSTALLATION INSTRUCTIONS FRAMELESS CONTINUOUS HINGE SHOWER ENCLOSURE QCI5232
 INSTALLATION INSTRUCTIONS FRAMELESS CONTINUOUS HINGE SHOWER ENCLOSURE QCI5232 QCI5232 Rev 0 Page 1 Certified 06/20/2016 INSTALLATION NOTES: Unpack your unit carefully and inspect for freight damage. Lay
Installation Instructions for the S-2000 Renlita Door
 ESTCODE ESTCODE Installation Instructions for the S-2000 Renlita Door Refer to the shop drawings to see the specifics that are particular to the door you are installing because we custom design our doors
In-Tube Motorized SCREEN-PRO. All Season Roll-Up Doors IN-JAMB MOUNTING METHOD INSTALLATION INSTRUCTIONS READ THIS FIRST
 In-Tube Motorized SCREEN-PRO All Season Roll-Up Doors IN-JAMB MOUNTING METHOD INSTALLATION INSTRUCTIONS READ THIS FIRST Carefully examine the crate(s) for damage before opening. If the carton is damaged,
Murphy Door DIY Hardware Installation Manual
 Murphy Door DIY Hardware Installation Manual The Murphy Door Bi-Folding Bookshelf was designed to install IN FRONT of existing door ways, replacing the door or doors while concealing the door way. In MOST
GARAGE DOOR WITH TORSION SPRING
 GARAGE DOOR WITH TORSION SPRING DIMENSIONS 9 WIDTH X 7 HEIGHT (2.74m x 2.13m) IMPORTANT SAFETY INSTRUCTIONS WARNING: Read all instructions and warnings before use. Failure to follow all instructions may
Ford Pick Up Rear leaf Spring Kit Installation Instructions
 1948-1956 Ford Pick Up Rear leaf Spring Kit Installation Instructions 1-800-984-6259 www.totalcostinvolved.com Parts 48 inch leaf (2) springs (4) U-bolts 3/8-24 x l 1/4bolts (16) & nuts (2) 1/2-20 x 4
UNIT No FRAMELESS PIVOT SHOWER DOOR
 INSTALLATION INSTRUCTIONS UNIT No. 3600 FRAMELESS PIVOT SHOWER DOOR NEED INSTALLATION HELP? Call 1-800-45-BASCO (452-2726) Monday - Friday 8:00 A.M. - 4:30 P.M. Eastern Time QCI0020 Rev. 3 Page 1 of 8
INSTALLATION INSTRUCTIONS
 INSTALLATION INSTRUCTIONS INSTALLATION INSTRUCTIONS THESE INSTRUCTIONS COVER THE INSTALLATION OF THE FOLLOWING REAR DOORS WITH OUTSIDE CABLES AND MAXIMUM SECURITY LOCK: 3/4" DryFreight 1-1/8" PolarGuard
Modular Drawer & Door Systems Installation Instructions Locking Drawers and Receding Doors
 Modular Drawer & Door Systems Installation Instructions ocking Drawers and Receding Doors Pre-Installation Before you begin installation: 1. Read through the installation procedure before starting the
EXIT DEVICE OPERATION FIRE DOOR LABELS, STRIKES AND FRAME SCREWS FOR INFORMATION CALL OR VISIT RITEDOOR.COM
 RECORD & LABELS WHAT THIS OWNER'S CAN DO FOR YOU It explains exactly how The Rite Door operates. It explains periodic maintenance requirements necessary to assure reliable operation. It explains simple
Standard Lift IMPORTANT NOTICES!
 GARAGE DOORS & OPENERS 6100 T o r s i o n Standard Lift MH installation instructions and owner s manual T a b l e O f C o n t e n t s Parts Breakdown 2 Pre-Installation 3 Important Safety Instructions
Installation and Assembly - Articulating Swivel Double-Arm for 42" - 71" Plasma Screens
 Installation and ssembly - rticulating Swivel Double-rm for 42" - 71" Plasma Screens Models: PLV 70, PLV 70-S R This product is UL Listed. It must be installed by a qualified professional installer. Maximum
6400, 8400 and 9400 Series Sliding Patio Door
 Contemporary 3 Panel Classic 5 Panel French Panel 6400, 8400 and 9400 Series Sliding Patio Door (O) Fixed Panel Left (X) Operating / Mullion Panel Right (X) Operating / Lock Panel Left (O) Fixed Panel
Please read and understand all instructions before beginning. These instructions cover the non-impact aluminum sliding glass door.
 The performance and proper operation of a door is only as good as the installation. By following these instructions, the probability of a good installation greatly increases. Please read and understand
Thank you for purchasing out product! *Please read these instructions and follow them step by step. *
 Page 1 of 7 AD17 AA DS 4 X 16 T12 Thank you for purchasing out product! *Please read these instructions and follow them step by step. * STEP 1. Slide two support posts (REF. # 24) into the two outside
Assembly Instructions
 Assembly Instructions * Pro Version shown Platform - Safety Rail Assembly Platform - Safety Rail Assembly IMPORTANT: To avoid assembly problems follow these instructions exactly. Note: If assembling the
MM340 Installation Instructions IMPORTANT SAFETY INSTRUCTIONS - SAVE THESE INSTRUCTIONS
 MM30 Installation Instructions IMPORTANT SAFETY INSTRUCTIONS - SAVE THESE INSTRUCTIONS Please read this entire manual before you begin. Do not unpack any contents until you verify all requirements on PAGE.
BARLOW TYRIE quality since Ref: x 3m - 12 x 10 Pavilion with Cabrio Folding Roof Step by Step Assembly Instructions
 Pavilions 3.66 x 4.5m - Step 12 x by 15 Step Pavilion Assembly Shelter Instructions with Double Rail Beams Ref: 9011215 3.66 x 3m - 12 x 10 Pavilion with Cabrio Folding Roof Step by Step Assembly Instructions
Privacy Wall Glass Selections - Polished Edge Slider Door
 Privacy Wall Glass Selections - Polished Edge Slider Door 3/6" HEX BIT PUTTY KNIFE #2 ACR BIT SUCTION CUP HOLDERS DOOR LEAF: Satin Tempered Clear Tempered LOCTITE 425 SIDE LIGHT ETCHED GLASS STYLES: Satin
Assembly Instructions
 Unite Panel System Hinge Door July 2016 #12 x / slotted hex washer head bolt Figure 1 threshold bracket frame Detail F threshold bracket threshold bracket (installed) #12 x / slotted hex washer head bolt
INSTALLATION INSTRUCTIONS
 INSTALLATION INSTRUCTIONS BUILDERS CHOICE FRAMED Bypass Door Model: L0516 (Tub Height), L0517 (Shower Height) Rev. 09.20.13 INSTALLATION NOTES: Unpack your unit carefully and inspect for freight damage.
Insolroll Clutch Operated Shades Installation Instructions Installation Instructions
 All clutch operated shades are shipped fully assembled and ready for installation. Mounting screws are not provided. Screws for chain guide installation to meet the child safety standards are provided.
1/4 FRAMELESS SLIDING DOOR FOR TUB OR SHOWER
 1/4 FRAMELESS SLIDING DOOR FOR OR SHOWER INSTALLATION INSTRUCTIONS NEED INSTALLATION HELP? Call 1-800-45-BASCO (452-2726) M onda y - Friday 8 :00 A.M. - 4:30 P.M. Eastern Time MAINTENANCE: Two primary
INSTALLATION INSTRUCTIONS
 INSTALLATION INSTRUCTIONS SOLID PHENOLIC TOILET PARTITIONS 1080 DuraLineSeries Class-A Fire Rated Includes Institutional Hardware Option.67 IMPORTANT: Storage and Handling Information on last page. Review
RAMPAGE P R O D U C T S. INSTALLATION INSTRUCTIONS BRONCO ZIPPER FASTRACK TOP PART #984xx BRONCO TOOLS REQUIRED
 RAMPAGE P R O D U C T S 84 (+/- 1/4 ) INSTALLATION INSTRUCTIONS BRONCO ZIPPER FASTRACK TOP PART #984xx BRONCO 1966-1977 TOOLS REQUIRED 3/8 WRENCH 7/16 WRENCH ½ WRENCH #2 PHILLIPS SCREWDRIVER 1/8 DRILL
Model No.'s B
 owners manual Model No.'s 45-01012 190-653B UTILITY CARTS (SEE SPECIFICATIONS ON PAGE 7) CAUTION: Read Rules for Safe Operation and Instructions Carefully Assembly Operation Maintenance Repair Parts the
Agri-Fab. Model No "ATV" DUMP CART H.D. 17 CU. FT. CAUTION: Read Rules for Safe Operation and Instructions Carefully
 Agri-Fab owners manual Model No. 45-02172 190-521-100 "ATV" DUMP CART H.D. 17 CU. FT. CAUTION: Read Rules for Safe Operation and Instructions Carefully Assembly Operation Maintenance Repair Parts the fastest
Hardware and Components:
 Hardware and Components: (A) 5/16 x 2 Hex Bolt (B) 5/16 x 2-1/4 Hex Bolt (C) 5/16 x 2-1/2 Hex Bolt (D) 4X 5/16 x 3/4 Hex Bolt (E) 4X 5/16 x 1-1/4 Hex Bolt (F) 11X 5/16 Flat Washer (G) 12X 5/16 Nylock Nut
Sliding Glass Door Assembly and Installation Guide
 Sliding Glass Door Assembly and Installation Guide Index Door System Components and Hardware The following components are needed to complete the installation of your Sliding Patio Door unit. Check all
TITAN INDUSTRIAL RACK 6-FOOT TALL / 4-SHELF
 TITAN INDUSTRIAL RACK 6-FOOT TALL / 4-SHELF DXST10000 IMPORTANT: Please read this manual carefully before assembling this storage rack and save it for reference INSTRUCTION MANUAL 3 TABLE OF CONTENTS
ICU TRACK SLIDING DOOR
 Interior View 0 Installation Instructions Tools Required: Screwdrivers Small Straight (Flat Blade) - for Terminal Block wiring # Phillips (Crosspoint) - for various #8, #0, and # screws Wrenches / Sockets