Washington Wing CAP. Airborne Photography Class
|
|
|
- Barry Nichols
- 6 years ago
- Views:
Transcription
1 Washington Wing CAP Airborne Photography Class
2 Civil Air Patrol is increasingly being tasked to provide photographic support to Federal and State agencies responding to natural disasters and other emergencies: Tropical Storm Sandy Oklahoma tornadoes Colorado floods Deepwater Horizon Gulf of Mexico oil spill Other possible disasters for Washington State: Earthquake Puget Sound oil spill Tsunami Radiation contamination Terrorism
3 Airborne Photographer Videography Information Technology Specialist For these Specialties, Civil Air Patrol requires completion of an extensive list of Specialty Qualification Training Records (SQTR): Cameras Exposure and settings Composition Camcorders Computer requirements Transferring, organizing and renaming Photos Viewing and editing photos Sending photos to the customer Printing photos Batteries, lenses, filters and other accessories This class will not teach all these SQTR s
4 What this class will teach: Use of the Nikon D90 and D5200 camera kits Washington Wing photo methodology Airborne photo techniques Post mission duties Post processing Aircrew coordination Distribution of kneeboard cards Six of nineteen AP SQTR tasks photography
5 WAWG Photo Training Goals All WAWG aircrew (pilots, observers and scanners) need to attend formal ground school to ensure quality, consistency and efficiency of the WAWG photo mission 1.Learn how to operate the current WAWG camera system Nikon D90 with the GP 1 hotshoe GPS; AMOD GPS Photo Tracker 2.Learn how to operate the current WSDOT camera system Nikon D5200 with Holux Blue Tooth GPS Logger and AOKA Blue Tooth Receiver 3.Learn simple airborne photo techniques; observe good and bad photos, what the customer wants and what he doesn t 4.Learn how to perform an initial post flight review of photos to select the best photos to meet specific mission requirements 5.Ensure delivery of photos to the I/C or directly to the customer within an expedited timeframe.

6 D90 Camera Kit

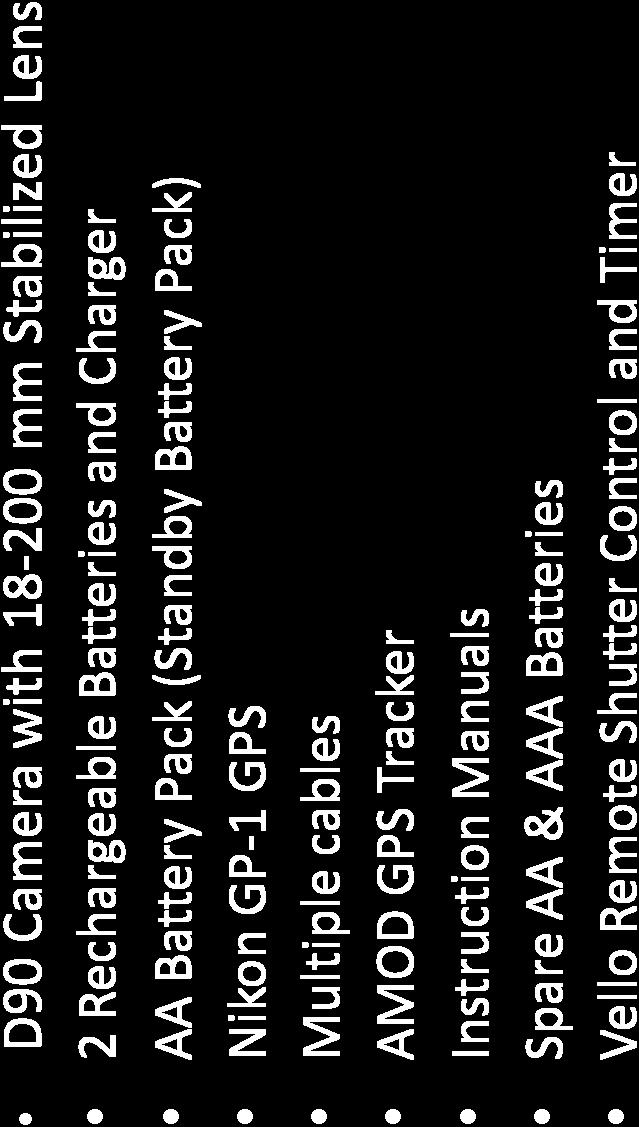
7 Equipment List
 Install the Garmin GP1")

8 Nikon D 90 Pre mission Check (Cont) Install the Garmin GP1 Hot Shoe Mounted GPS Install camera batteries (either 1 or 2)

9 Nikon D 90 Pre mission Check (Cont) m Reset Camera Press both the +/ and AF buttons. Hold them pressed for four seconds. The two buttons have green dots next to them. The Control Panel Display will flash to confirm reset has been completed. It is not necessary to continually reset the camera, as user settings are retained after camera shutdown. The two button reset returns the camera to CAP usable settings except for ISO, which changes to 200.
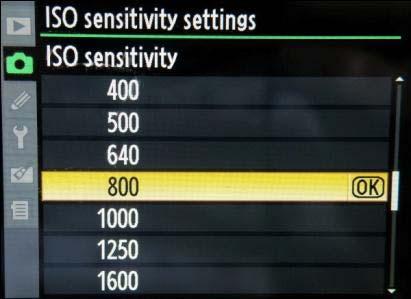
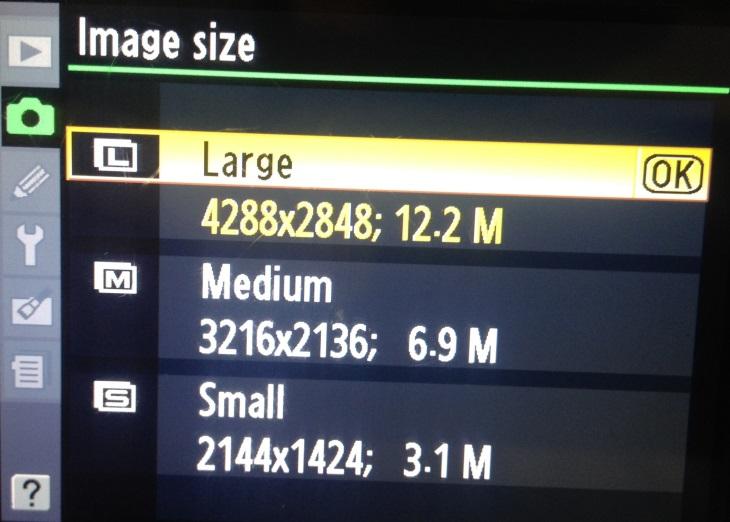
10 Reset Settings Image Quality Normal Image Size L Release mode Single frame ISO o Auto modes Auto o Manual modes 200 Should be manually set to 800 White balance Auto o Fine tuning 0 o Color temp 5000 K Picture control modifications None Autofocus mode AF A (Shutter can only be released if camera is able to focus) Focus point center Metering Matrix AE/AF lock hold off Exposure compensation off
11 Nikon D 90 Pre mission Check (Cont) Remove lens cap Turn on camera Check battery condition To check condition of batteries when 2 batteries are installed press the Information button to turn on the Monitor

12 Nikon D 90 Pre mission Check (Cont) Monitor Showing Condition of Both Batteries
13 Nikon D90 Lens

14 Nikon D90 Pre mission Check Verify that 8 Gb Memory Card is Installed Set Lens Autofocus Switch to AF Set Camera Autofocus Switch to AF Set Lens Optical Stabilizer Switch to On
 Rotate Mode Switch to")

15 Nikon D 90 Pre mission Check (Cont) Rotate Mode Switch to S Rotate command dial to set speed to 1/200 in viewer LCD
16 Nikon D 90 Pre mission Check (Cont) Changing Camera Settings Press Menu Button to open Menu Of Setting Options. Use the Multi Selector to Scroll Through the Setting Options. Use The OK Button to Make a Selection and OK Push Button to Make a Selection


17 Nikon D 90 Pre mission Check (Cont) Clear Memory Card Press Menu Button to bring up Monitor Use Navigation Buttons to Select Delete Option and Press the Ok Button to Delete all photos on Memory Card Note If unable to pull up the delete option use Format Memory Card which will delete all photos from Memory Card


18 Nikon D 90 Pre mission Check (Cont)


19 Nikon D 90 Pre mission Check (Cont)
20 Nikon D 90 Pre mission Check (Cont) Sync D 90 Camera Time With Naval Observatory Atomic Clock (NASO) Press menu Scroll to the Tools Icon Scroll to World Clock and Press OK button Confirm Date is correct Set clock to 20 seconds ahead of the NASO time and press OK when the NASO time and Camera time match


21 Nikon D 90 Pre mission Check (Cont) Check Camera Settings Mode set to S Battery Condition Large Picture Size ISO Set to 800 JPEG Setting to JPEG Normal GPS Active and Locked Onto the Network Memory Capable of Storing 760 additional photos

22 Nikon D 90 Pre mission Check (Cont) m m m m m m m Perform a Photo Check Take Camera, GP 1 and AMOD Tracker Best if done outside Take Photo Check Results Press Playback Button picture will appear on the Monitor
 Push Multi Selector up to see shooting data display Push Multi")

23 Nikon D 90 Pre mission Check (Cont) Check results (cont.) Push Multi Selector up to see shooting data display Push Multi Selector one more time to view the Latitude, Longitude, Altitude, Time and Date. Presence of this data shows that the GP 1 GPS is working correctly.

24 Nikon D 90 Pre mission Check (Cont) Delete photo Press the Delete Button TWICE to delete the photo just taken

25 Lens Focal Length Setting The Focal Length Rotate the lens focal length ring

26 AMOD AGL 3080 Tracker Summary: Operation Time: 15+ hrs with 3 x AAA standard batteries. Memory capacity = 128 Mbyte = 240 sorties of 2 hours each, with data logging of 1 point per sec.

, Green (GPS Status), and Amber")
27 AMOD AGL 3080 Tracker Log GPS Data Turn the AGL3080 ON by pressing the Power ON/OFF button until all three LED s blink Both buttons simultaneously There are three status LED s on AGL3080 Red (Storage Full), Green (GPS Status), and Amber (Battery Power)
28 AMOD AGL 3080 Tracker AMOD Tracker Status When the Green LED is blinking, indicating it has started tracking the GPS satellites and logging the GPS data During normal operation, if you see the Green LED not blinking (i.e., constant ON), adjust the orientation and position of AGL3080 until the Green LED is blinking again to ensure good reception of GPS signals When the Red Storage LED is on the Storage is full and no additional GPS info will be stored The only way to erase the storage disc inside the AMOD AGL 3080 is through the computer. When the Amber LED is on steady the battery power is full When the Amber LED starts to blink the battery power is below 20%

29 AMOD AGL 3080 Tracker AMOD AGL 3080 Special Functions Position Mark Press Position Mark button firmly The RED Storage Full LED will be on insert a Mark tag to the logged GPS position data» If pressed right after a photo is taken the photo GPS position will be also be tagged GPS Reset Press the Mark button for 3 to 4 seconds to reset the GPS The AGL 3080 will re start the GPS satellites searching without using satellite information already on hand and stored internally» Using this process will enable the AMOD AGL 3080 to acquire satellite position quicker than when the last GPS position is used
30 AMOD AGL 3080 Tracker Set up Mode 6 Logging Modes Available in Set up Mode With the AMOD Tracker Off Press and Hold both the Power On and Mark buttons until the 3 LEDs flash 5 times and release the buttons the Tracker is now in Set up Mode Press the Mark button once to enter each of the 6 Logging Modes Recommended mode is #2 (RMC=1 sec)
31 AMOD AGL 3080 Tracker Set up Mode (cont.) Mode 1 Memory Full LED On Steady Mode 2 Memory Full LED Flashing Mode 3 GPS LED On Steady Mode 4 GPS LED Flashing Mode 5 Battery Low LED On Steady Mode 6 Battery Low LED Flashing
32 AMOD AGL 3080 Tracker Set up Mode (cont.) Set up Mode Table
33 Washington Wing Photo Methodology Critical Elements Airborne photography is an Aircrew Activity A clear understanding of the customer s requirements must be obtained prior to launch The Mission is to position the airborne photographer so that the best possible photos can be taken Every member of the aircrew is responsible for the success of the mission Training as an airborne photography aircrew is essential
34 Washington Wing Photo Methodology (cont.) Problems to avoid Customers usually don t want photos of cows in flooded fields Ensure that GPS data is available in the EXIF header Customers don t want a dozen photos if one or two will suffice. Don t overload the customer with too much data, especially useless or unnecessary data Time is a critical factor get the photos delivered to the customer quickly Meet the mission parameters
35 Imaging Flight Patterns m The 4-Square imaging pattern is the standard imaging pattern for most missions, as it is the simplest and most stable pattern that results in very good images m The Bird s Eye (Overview) pattern is used to show an overview of a target or when images need to show detail between structures (e.g., between buildings or between trees) m The Circling pattern is more difficult to master, particularly if the Airborne Photographer is shooting out the right-side window. This pattern is good for taking quick shots of multiple targets, and can be used if a quick survey of widespread damage is needed by staff to determine resource needs and plan more detailed sorties m The 45 Angle to Target pattern is used when the customer specifically asks for these types of images
36 Imaging Flight Patterns m Both the Mission Pilot and the photographer must be familiar with how any particular imaging pattern will be approached and flown; that s why planning is so essential to a successful mission m Once you decide on which type of pattern to use, fill in all the data you need (e.g., lat/long of all entry and turning points) to fly the pattern using the GPS and/or VOR m How the Mission Pilot maneuvers the aircraft into the proper position for each shot is very important. m The approach to the imaging pattern should be stable, and the photographer must be given enough time to analyze current conditions and set up for the photo or video imaging run
37 Imaging Flight Patterns If you are performing damage assessment and didn t know the extent or type of damage to expect when you left on the sortie, the ID Pass will be followed by an assessment survey The circling flight pattern is a good pattern to use Also, you may want to sketch the damage to help you decide what images you need and what imaging flight patterns to use You may need a combination of flight patterns and/or need to make several runs to capture all the damage
38 Imaging Flight Patterns m Aerial Imaging flight patterns are always flown at 1000' AGL or higher, and never at speeds below V x m Every imaging pattern starts with an ID Pass that allows you to verify the target and note its coordinates Examine the target and its surroundings, and decide how to frame your photos in the upcoming passes Also ensure you are at the right altitude to get the desired video or photo
39 Circling Imaging Flight Pattern
40 4-Square Imaging Flight Pattern
41 Bird s s Eye Imaging Flight Pattern 1 Factory Circle target to find the altitude that will permit horizontal framing and determine the best direction from which to take the imaging photo 2 Factory Shooting from right window at best altitude and direction Approximately 75 knots (not V x ), 10 flaps, 10 bank and full opposite rudder
42 Crew Communications m The first pass by the target is very important m This is the time to determine: You are at the correct altitude (angle) for best results You are looking in the right direction for best results You are at the correct distance from the target You are flying at the correct speed Whether or not you need to (and can) use the zoom to properly frame the photo m If any of these conditions aren t met, have the pilot turn around, correct the problem, and redo the first pass
43 Crew Communications m The Mission Pilot must always strive to put the photographer in the proper position for a shot m Small adjustments, not obvious to the pilot, must often be made to get the right angle or position Lifting the wing, moving the strut out of the frame or making minor course (heading) changes are the most common adjustments
44 Crew Communications m The pilot must be aware these maneuvers may be necessary, and the photographer must know how to direct the pilot Keep the directions clear and simple: Lift your wing or Move the strut forward or Left 10 tells the pilot all he needs to know The pilot also needs positive feedback, especially if you are shooting out of the right-side windows. Use simple words such as Good, good to let the pilot know they re on the right track and speed Finally, tell the pilot when the adjustments are no longer required by saying something like OK, I have the shots
45 Crew Communications m The photographer must decide whether the pictures satisfy all mission requirements m Don t be afraid to admit that you didn t get a particular shot, and ask the Mission Pilot to reposition for another try. Never hesitate to make another pass or to reposition the aircraft to ensure a good photo, and don t let any other crewmember rush you. m Remember, you should take as many photos as you think you need to fulfill mission requirements There s plenty of room on your storage media, and the extra time you spend doing this on-scene is much less expensive and timeconsuming than having another sortie go back to the target because you didn t get the right images
46 Factors Affecting Success m Vibration comes from the airplane, its engine and air turbulence m To reduce the effects of vibration, hold your camera properly and don't rest any part of the camera or your body against the airframe In particular, keep your arms and elbows from coming in contact with the window sill or armrest. Ideally, the only part of the airframe that will be in contact with your body is the seat cushion
47 Factors Affecting Success m It s best to wait for the best visibility instead of shooting through haze or other obscuring conditions Even on clear days visibility is rarely unlimited, so you always have to adjust to actual conditions over the target m Haze and fog are the most likely limits to visibility you have to deal with m Ways to deal with haze and fog: When you fly over the target during the ID pass (discussed below), see if there is a difference between looking straight down at the target and looking at a slant angle. With haze, lower angles to the target are often better. With fog, the reverse may be true
48 Factors Affecting Success m Focus. Even though you re flying at 90 knots your distance from the ground (altitude) stays roughly the same m When using Autofocus (AF), the camera shutter will not activate until the shot is in focus; this will cause a short pause; proper procedure is to press the shutter down halfway, wait for a beep tone and then press all shutter all the way down. m Focus each shot perfectly, even if you change the zoom setting m If you re using Manual focus, set the lens at the Infinity stop unless you're using a lens longer than 200 mm or are at less than 1,000' AGL Most AF lenses can focus past infinity and have to be focused with the AF system
49 Prepare the Aircraft m Clean the aircraft windows before you leave, and make sure you have cleaning supplies on board m If you will be shooting out the right front window of the aircraft, remove the window holding screw m Enter any waypoints into the GPS before takeoff m Set up and test the Audio Panel and Intercom m Check the imaging equipment Note: A shot of the aircraft N number with the camera or camcorder provides a good starting image for the sortie, particularly if there are images on your media card or tape from a previous sortie m Arrange your equipment for easy access, but ensure lightweight objects such as charts and logs are not lying loose where they can be blown about the cabin when you open a window to take pictures
50 The ID Pass m Known Location The Mission Pilot or Mission Observer should enter the coordinates into the GPS as a User Waypoint, and display this waypoint on the MFD (G-1000) When you pass over the target, verify you have the right target m Unknown Location The Mission Pilot or Mission Observer should enter a grid or search box of coordinates into the GPS as User Waypoints, and display the waypoints on the MFD (G-1000) When you pass a target, log the coordinates to match to photos and as a back up to the GP-1.
51 The ID Pass m If needed, perform a damage survey and plan the imaging pattern (s) necessary to fully document the damage May need to sketch the damage area as an aid to planning May need more than one run to fully capture the damage May need to take photos from different altitudes and angles Reassess your fuel status and plan a refueling stop if needed Update Mission Base on your new sortie time assumptions
52 Prepare to Enter the Pattern m Fly at least 1000' AGL during daylight and at least 2000' AGL at night, and no slower than V x m Ensure you re flying slowly enough to allow the Airborne Photographer to get several photos from each angle or side of the imaging pattern (usually kts)
53 Prepare to Enter the Pattern m Check that the camera is on; it may have automatically turned itself off Don t confuse this with the sleep mode where the camera turns off the LCD to conserve power; a quick tap of the shutter, info button or two taps of menu button will wake the camera m The third crewmember readies the Photo Log (CAPF 104b) and/or Recon Sketch Sheet m Secure loose items (e.g., charts) in the cabin and then open the window
54 Taking Photos m Steady the camera m As the aircraft closely approaches the point where you intend to shoot, begin framing the shot m When you near the shot point, you should prefocus on the target for faster camera response Focus on an object that is currently the same distance away as the target will be once you are lined up (i.e., in the same plane as the target) m Once the target moves into frame, press the shutter button the rest of the way down to take the picture
55 Taking Photos m Take several photos on each leg of the pattern m Keep the Photo Log keeper aware of what you are shooting It is easier on the log keeper if you tell them when you will be taking several photos per leg On each leg, tell the log keeper the following photos will be taken looking east or looking northeast or looking between the northern-most buildings, then call out shot 1, shot 2,.. This allows the log keeper to quickly and accurately log the photos
56 Using the Telephoto Lens m Let the zoom improve your position, either by bringing the target a little closer or backing off a bit m Zoom in until you get the frame you want or until the image begins to shake; if the image starts shaking, zoom out until the image becomes steady
57 CAP Form 104b

58 Examples of Mistakes m Glare from closed window m Wing included in photo

59 Examples of Mistakes m Angle and Glare m Strut included in photo

60 Examples of Mistakes m Lower window sill included


61 Examples of Mistakes m Strut included

62 Examples of Mistakes m Haze m Strut included

63 Examples of Mistakes m Haze

64 Examples of Mistakes m Focus

65 Examples of Mistakes m Too far, too much sky

66 Examples of Mistakes m Wheel (in turn)

67 Examples of Mistakes m Wing and strut in turn

68 Examples of Mistakes m Overhead too low

69 Examples of Mistakes m Overhead too low, too close, wheel
 m Too close")
70 Examples of Mistakes m Overhead holding camera vertically (note the falling away effect) m Too close m Wheel

71 Examples of Mistakes m Angle too low, not centered

72 Examples of Mistakes m Overhead not centered
73 Determine Success or Failure m You must check and make sure you have good photos and GPS data because you don t want to fly all the way back to mission base and then discover that you missed a shot, that your shots weren t framed properly or you don t have coordinates m Review photos in the camera before returning to base m Plan and re-shoot as necessary
74 After The Sortie m m m m m m Turn off the camera and the tracker Disconnect cables as required Replace the lens cover Make sure you have all your equipment before you leave the aircraft Clean the windows for the next sortie If no more imaging sorties will be flown in the aircraft, replace the aircraft window screw (and bushing or washer) if it was removed for your flight
75 After the Sortie (cont.) m Transfer your photos to a computer in mission base as soon as possible. Delete bad photos and superfluous photos m Ensure that the photo properties file contains GPS data m Upload photos to a designated Dropbox file, web site, or to the WMIRS sortie as directed by the AOBD m Some mission bases will just have you give them the media card. In this case, transfer images back to the SIM card and be sure to put one of your spare cards back in the camera, check that it is empty, and put the camera back in its bag.
76 Debrief m Check in with Debriefing Officer, Photo Analyst or AOBD: THE CREW REPORTS AS A TEAM At the mission briefing you would have received a timeframe for sortie deliverables. Remember that time is an important factor in most photo missions Deliver SIM card or report location of uploaded photos; deliver AMOD GPS Photo Tracker Tell how you did your job and what you saw Report whether all photos have GPS data; Photo Analyst may need to use alternative methods to geotag photos Complete CAPF 104, including written description of photo activity and survey results Charge both camera batteries and the AMOD GPS if necessary Account for all components and place in Pelican case
77 Post-Sortie Photo Processing The mission base Photo Analyst will need to perform a number of steps to complete the photo sorties 1.Create computer files to transfer sortie deliverables a. Title should be the name, date and other mission description b. Create computer subfolders 1) Raw photos 2) GPS track 3) Stamped photos 4) KMZ file 2.Transfer photos from camera, SIM card, Dropbox or other location to raw photos file 3.Transfer aircraft track from tracker, Dropbox or other location to GPS track folder
78 4. Using RoboGeo: Post-Sortie Photo Processing (cont.) a) Start RoboGeo b) Skip step #1 c) Step #2 import photos from raw photos computer folder d) Step #3 Import tracklog file from GPS track computer folder. Save project e) Step #4 Stamp the location data onto the photos. Save to the mission folder. Do not specify north arrows unless the crew can provide info for each photo. Wait approx. one minute for RoboGeo to complete f) Step #4 cont. - export to Google Earth create KMZ file, then close
79 Airborne Photography Training and Evaluation Beginning April 1 and through the end of April there will be funded training sorties for aircrew to practice aerial photo techniques. Each training sortie must meet the requirements of USAF/CAP training exercises, including an evaluation of aerial photographs and flight tracks. mclass attendees need to team up in two or three man crews and contact a designated FRO/Photo Mission Manager for a mission assignment. meach class attendee will be given a sortie to deliver mission deliverables as a photographer 1. Geotagged photos using the Nikon D90 or similar DSLR 2. Output file from the AMOD AGL 3080 tracker 3. Upload to a designated Dropbox file
80 Airborne Photography Training and Evaluation (cont.) m The FRO/Mission Manager will assign several targets to be photographed and geotagged as a mission objective. The targets will be in the general vicinity of the crew s takeoff airfield. m The minimum deliverables to satisfy USAF/CAP training funding requirements are: Photographs of the proper target Each photo geotagged to the photo EXIF header with correct latitude/longitude GPS track of the flight Written photo log that correlates to the photos delivered, uploaded in PDF format All items uploaded to a designated Dropbox location
81 Airborne Photography Training and Evaluation (cont.) m The crew will be graded on the following parameters: 1. Quality of photos (distance, framing, angle, focus, exposure) - 20pts 2. Number of photos with EXIF GPS coding - 30pts 3. Accuracy of EXIF coding (proper lat/long) - 20pts 4. Time needed to deliver photos to Dropbox folder 30pts 5. All sortie deliverables provided (photos, GPX file, manual log) 20 pts m Photographers will be debriefed by the evaluator and grades will be reported to the WAWG Director of Operations for documentation of training completed
82 Specialty Qualification Training AP Airborne Photographer m Task O-2204: Discuss consideration variables to Imagine Composition and Compose an Image o Composition Focal point main subject of an image; deliver what the customer wants Rule of Thirds sweet spots are the four corners where the lines intersect; place a subject in any of these corners Fill the frame Target should fill the frame but be < 75% of frame No parts of aircraft in picture Frame the target with minimal zoom
83 Specialty Qualification Training AP Airborne Photographer m Task O-2201: Discuss Digital Camera Features o Two types of zoom o Optical zoom glass lens forms the image through a range of magnification o Digital zoom zoom performed by camera software o Larger image than can be produced by a physical glass lens o Viewfinder will not frame image, must use camera LCD to frame photo o Not recommended because more difficult to control and poorer image o Viewfinders generally show 85 95% of actual image o LCD screens make poor viewfinders; faster battery drain o Deleting images usually several ways to accomplish o Button on rear of camera o Camera menu option o Format SD card
84 Specialty Qualification Training AP Airborne Photographer m Task O-2201: Discuss Digital Camera Features (cont.) o Media card corruption many ways o Turning off camera before image completely written to card o Removing SD card before image completely written to card o Removing SD card while reading from a computer o Formatting SD card on a computer instead of in the camera o Taking photos with weak batteries o Continually shooting and deleting images when the card is full o Exposing SD cards to strong electrical currents (e.g. airport x-ray scanners o Others
85 Specialty Qualification Training AP Airborne Photographer m Task O-2201: Discuss Digital Camera Features (cont.) o Compression forms o Lossless compression generally large files after extraction by WinZip, PKZIP, etc. otif oraw o Lossy compression some information discarded to reduce file size after extraction ojpeg usually adequate for CAP o EXIF Exchangeable Image File shutter speed, aperture, date, time, latitude/longitude, altitude, etc. may be recorded to the photo file to be read by various Web browsers, photo editors, etc. This is what allows CAP photos to be geotagged o Two ways to geotag real-time and post-processing
86 Specialty Qualification Training AP Airborne Photographer m Task O-2202: Select Camera Settings o Light interacts with a light-sensitive photo-receptor CCD Charge Coupled Device CMOS Complementary Metal Oxide Semiconductor o ISO Camera s sensitivity to light; higher numbers are more sensitive o Shutter speed CAP recommends 1/250 th second o Aperture also known as F-Stop o Exposure lock press shutter release down halfway o Camera focuses o Sets the exposure o Viewfinder indication and often an aural tone o Press the shutter down the rest of the way to release shutter
87 Specialty Qualification Training AP Airborne Photographer m Task O-2202: Select Camera Settings (cont.) o Modes Automatic point and shoot, compromise of all parameters Program User selects either aperture or shutter speed Manual User selects all photo parameters Shutter priority software will vary aperture any ISO setting Aperture priority software will vary shutter and ISO setting Scene modes portrait, sports, nighttime, beach, landscape, etc. camera varies aperture, shutter speed and other parameters based on software program
88 Specialty Qualification Training AP Airborne Photographer m Task O-2202: Select Camera Settings (cont.) o Delay between shots as camera performs various procedures Charge the sensor, copy image to RAM, compress the image, write the image to SD card, reset camera settings o Resolution pixels capture light, greater number of pixels increases resolution o Quality different from resolution; usually refers to amount of compression used to create image; RAW is highest quality but eats up memory and usually not needed for CAP; use JPEG o Histogram graph of photo brightness levels from left to right; can be seen in viewfinder or LCD after picture is taken beyond the scope of this ground training
89 Specialty Qualification Training AP Airborne Photographer m Task O-2203: Keeping the Camera & Accessories & GPS System Mission Ready o Lens cap on when not is use o Batteries charged and spares handy; do not leave in charger; remove batteries from camera when not in use; do not mix NiMH, Nicad, lithium or alkaline o Media cards formatted, spares available o UV filter o Store in hard case or bag
90 Specialty Qualification Training AP Airborne Photographer m Task O-2218: Synchronize Camera Clock and GPS Time Verify Start of Tracking o Most GPS trackers set their internal clock to GPS time. o Most cameras set their clock to whatever time the user specifies o Cameras with internal, hot-shoe GPS or Blue Tooth connected GPS trackers allow the user to choose o A five second difference between the camera time and GPS time equals approximately 733 feet at 90 knots. A 9 second difference is approximately ¼ mile
91 Specialty Qualification Training AP Airborne Photographer m Task O-2208: Describe Imaging Patterns and Communications o Patterns 4-Square Imaging Bird s Eye (Overview or Look Down Circling Pattern 45 degree Angle o Duties of pilot, observer and third crewmember split between flying, navigation, communications, photo taking and log recording
Nikon D7000 Camera Kit
 Nikon D7000 Camera Kit -Checklist and Operations Manual- July 31, 2013 SRQ Composite Squadron, FLWG, Civil Air Patrol Page 1 of 30 1.0 Equipment Pre-Mission Check 1.1 Open the camera case and verify the
Nikon D7100 Camera Kit. -Checklist and Operations Manual-
 Airborne Digital Reconnaissance System (ADRS) Nikon D7100 Camera Kit -Checklist and Operations Manual- V4.2 October 21, 2014 National Headquarters, Civil Air Patrol 2 1.0 Equipment Pre-Mission Check 1.1
Nikon D90 Camera Kit -Checklist and Operations Manual-
 Airborne Digital Reconnaissance System (ADRS) Nikon D90 Camera Kit -Checklist and Operations Manual- V2.2 April 26, 2012 National Headquarters, Civil Air Patrol Advanced Technology Group 2 1.0 Equipment
DSLR Essentials: Class Notes
 DSLR Essentials: Class Notes The digital SLR has seen a surge in popularity in recent years. Many are enjoying the superior photographic experiences provided by these feature packed cameras. Interchangeable
KNOW YOUR CAMERA LEARNING ACTIVITY - WEEK 9
 LEARNING ACTIVITY - WEEK 9 KNOW YOUR CAMERA Tina Konradsen GRA1 QUESTION 1 After reading the appropriate section in your prescribed textbook From Snapshots to Great Shots, please answer the following questions:
Basic Camera Craft. Roy Killen, GMAPS, EFIAP, MPSA. (c) 2016 Roy Killen Basic Camera Craft, Page 1
 2016 Roy Killen Basic Camera Craft, Page 1") Basic Camera Craft Roy Killen, GMAPS, EFIAP, MPSA (c) 2016 Roy Killen Basic Camera Craft, Page 1 Basic Camera Craft Whether you use a camera that cost $100 or one that cost $10,000, you need to be able
Basic Camera Craft Roy Killen, GMAPS, EFIAP, MPSA (c) 2016 Roy Killen Basic Camera Craft, Page 1 Basic Camera Craft Whether you use a camera that cost $100 or one that cost $10,000, you need to be able
This has given you a good introduction to the world of photography, however there are other important and fundamental camera functions and skills
 THE DSLR CAMERA Before we Begin For those of you who have studied photography the chances are that in most cases you have been using a digital compact camera. This has probably involved you turning the
AF Area Mode. Face Priority
 Chapter 4: The Shooting Menu 71 AF Area Mode This next option on the second screen of the Shooting menu gives you several options for controlling how the autofocus frame is set up when the camera is in
Winston C Hall Tuner Photography
 D4s Custom Banks Settings Shooting and Custom Setting Menus Created by: Winston C Hall Tuner Photography 714 D4s Shooting and Custom Settings Banks This guide is an outline of my recommendations for the
Digital Matrix User s Guide
 Digital Matrix User s Guide Dear Legacy2Digital Customers: Our hope is that you fully enjoy using your modified manual focus Nikon or third party lens on your DSLR camera and that our conversion meets
Table of Contents. 1. High-Resolution Images with the D800E Aperture and Complex Subjects Color Aliasing and Moiré...
 Technical Guide Introduction This Technical Guide details the principal techniques used to create two of the more technically advanced photographs in the D800/D800E brochure. Take this opportunity to admire
Technical Guide Technical Guide
 Technical Guide Technical Guide Introduction This Technical Guide details the principal techniques used to create two of the more technically advanced photographs in the D800/D800E catalog. Enjoy this
Specifications for Fujifilm FinePix S MP Digital Camera
 Specifications for Fujifilm FinePix S8200 16.2MP Digital Camera Model name FinePix S8200, S8300 Number of effective pixels *1 16.2 million pixels Image sensor 1/2.3-inch CMOS with primary color filter
Autofocus Problems The Camera Lens
 NEWHorenstein.04.Lens.32-55 3/11/05 11:53 AM Page 36 36 4 The Camera Lens Autofocus Problems Autofocus can be a powerful aid when it works, but frustrating when it doesn t. And there are some situations
Creating Stitched Panoramas
 Creating Stitched Panoramas Here are the topics that we ll cover 1. What is a stitched panorama? 2. What equipment will I need? 3. What settings & techniques do I use? 4. How do I stitch my images together
BASIC IMAGE RECORDING
 BASIC IMAGE RECORDING BASIC IMAGE RECORDING This section describes the basic procedure for recording an image. Recording an Image Aiming the Camera Use both hands to hold the camera still when shooting
One Week to Better Photography
 One Week to Better Photography Glossary Adobe Bridge Useful application packaged with Adobe Photoshop that previews, organizes and renames digital image files and creates digital contact sheets Adobe Photoshop
Improve Your Photography by using Simple Camera Settings and Techniques
 Improve Your Photography by using Simple Camera Settings and Techniques Francis J Pullen 2012 +44 (0)7768 364 567 images@francispullen.co.uk www.francispullen.co.uk Introduction Digital Cameras offer tremendous
Intro to Digital SLR and ILC Photography Week 1 The Camera Body
 Intro to Digital SLR and ILC Photography Week 1 The Camera Body Instructor: Roger Buchanan Class notes are available at www.thenerdworks.com Course Outline: Week 1 Camera Body; Week 2 Lenses; Week 3 Accessories,
Take Control of Your Camera
 Take Control of Your Camera With all of the technology packed into our cameras, it is easy to hand over control & blame our equipment when our images don t meet our expectations.. In this workshop we will
Exploring the Nikon D3200
 C HAP T E R 1 AL Exploring the Nikon D3200 T CO PY RI GH TE D MA TE RI he Nikon D3200 is an amazing piece of machinery. It has features and specifications that surpass the top-end professional camera models
Exploring the Nikon D5300
 CHAPTER 1 Exploring the Nikon D5300 Nikon s 5000 series of cameras occupy a special niche within the Nikon line of cameras. The D5300 is the only camera in Nikon s current lineup to feature the articulating
Nikon D300 Custom Functions
 Nikon D300 Custom Functions This spreadsheet allows you to record the custom functions saved in each menu and bank on the camera. I've carefully laid out the tabs and menus to match the camera as exactly
L I F E L O N G L E A R N I N G C O L L A B O R AT I V E - FA L L S N A P I X : P H O T O G R A P H Y
 L I F E L O N G L E A R N I N G C O L L A B O R AT I V E - F A L L 2 0 1 8 SNAPIX: PHOTOGRAPHY SNAPIX OVERVIEW Introductions Course Overview 2 classes on technical training 3 photo shoots Other classes
Chapter 2-Digital Components
 Chapter 2-Digital Components What Makes Digital Cameras Work? This is how the D-SLR (Digital Single Lens Reflex) Camera works. The sensor This is the light sensitive part of your camera There are two basic
Module 1 Lighting. Lesson 1 Light, Your First Decision. What s the first thing you should think about when choosing a location?
 Module 1 Lighting Lesson 1 Light, Your First Decision What s the first thing you should think about when choosing a location? We want to be: -Centered Photographers Three priorities for choosing light
Digital camera modes explained: choose the best shooting mode for your subject
 Digital camera modes explained: choose the best shooting mode for your subject On most DSLRs, the Mode dial is split into three sections: Scene modes (for doing point-and-shoot photography in specific
1 This chapter covers the key components of the Nikon
 Exploring the Nikon D5000 1 C H A P T E R This chapter covers the key components of the Nikon D5000. These are the features that are most readily accessible because they are situated on the outside of
Drive Mode. Details for each of these Drive Mode settings are discussed below.
 Chapter 4: Shooting Menu 67 When you highlight this option and press the Center button, a menu appears at the left of the screen as shown in Figure 4-20, with 9 choices represented by icons: Single Shooting,
1. This paper contains 45 multiple-choice-questions (MCQ) in 6 pages. 2. All questions carry equal marks. 3. You can take 1 hour for answering.
 in 6 pages. 2. All questions carry equal marks. 3. You can take 1 hour for answering.") UNIVERSITY OF MORATUWA, SRI LANKA FACULTY OF ENGINEERING END OF SEMESTER EXAMINATION 2007/2008 (Held in Aug 2008) B.Sc. ENGINEERING LEVEL 2, JUNE TERM DE 2290 PHOTOGRAPHY Answer ALL questions in the answer
UNIVERSITY OF MORATUWA, SRI LANKA FACULTY OF ENGINEERING END OF SEMESTER EXAMINATION 2007/2008 (Held in Aug 2008) B.Sc. ENGINEERING LEVEL 2, JUNE TERM DE 2290 PHOTOGRAPHY Answer ALL questions in the answer
Nikon Z6 / Z7 Settings
 Nikon Z6 / Z7 Settings 11.22.2018 PLAYBACK MENU Delete Playback folder ALL Playback display options > Additional photo info > Highlights Shooting data Overview None Image review - OFF After delete > Continue
So far, I have discussed setting up the camera for
 Chapter 3: The Shooting Modes So far, I have discussed setting up the camera for quick shots, relying on features such as Auto mode for taking pictures with settings controlled mostly by the camera s automation.
Digital 1! Course Notes.
 Digital 1 Course Notes Anatomy of a DSLR Light' Enters' Camera 1. Lenshood: Used to control additional light entering the lens. 2. UV filter that is purchased separately from the lens. Screws onto the
Presented to you today by the Fort Collins Digital Camera Club
 Presented to you today by the Fort Collins Digital Camera Club www.fcdcc.com Photography: February 19, 2011 Fort Collins Digital Camera Club 2 Film Photography: Photography using light sensitive chemicals
<Motion Panorama> 180 Vertical : 2160 x 9600 Horizontal : 9600 x Vertical : 2160 x 6400 Horizontal : 6400 x 1440
 FUJIFILM X-T10 Spec Sheet Model name FUJIFILM X-T10 Number of effective pixels 16.3 million pixels Image sensor 23.6mm x 15.6mm (APS-C) X-Trans CMOS II with primary color filter Total number of pixels:
Great (Focal) Lengths Assignment #2. Due 5:30PM on Monday, October 19, 2009.
 Lengths Assignment #2. Due 5:30PM on Monday, October 19, 2009.") Great (Focal) Lengths Assignment #2. Due 5:30PM on Monday, October 19, 2009. Part I. Pick Your Brain! (50 points) Type your answers for the following questions in a word processor; we will accept Word
Great (Focal) Lengths Assignment #2. Due 5:30PM on Monday, October 19, 2009. Part I. Pick Your Brain! (50 points) Type your answers for the following questions in a word processor; we will accept Word
BASIC IMAGE RECORDING
 BASIC IMAGE RECORDING BASIC IMAGE RECORDING This section describes the basic procedure for recording an image. Recording a Simple Snapshot The camera s Program AE Mode (P Mode) is for simple snapshots.
First Things First 1) Charge the Battery
 Charge the Battery") 1 First Things First 1) Charge the Battery 2) Turn Off Notification Sounds Recommended: Canon BP-828 Optional 3-4hr Battery Touch FUNC Touch MENU Touch Wrench Folder Scroll to Notification Sounds & Touch
1 First Things First 1) Charge the Battery 2) Turn Off Notification Sounds Recommended: Canon BP-828 Optional 3-4hr Battery Touch FUNC Touch MENU Touch Wrench Folder Scroll to Notification Sounds & Touch
FOCUS, EXPOSURE (& METERING) BVCC May 2018
 BVCC May 2018") FOCUS, EXPOSURE (& METERING) BVCC May 2018 SUMMARY Metering in digital cameras. Metering modes. Exposure, quick recap. Exposure settings and modes. Focus system(s) and camera controls. Challenges & Experiments.
FOCUS, EXPOSURE (& METERING) BVCC May 2018 SUMMARY Metering in digital cameras. Metering modes. Exposure, quick recap. Exposure settings and modes. Focus system(s) and camera controls. Challenges & Experiments.
This chapter covers the key components of the Nikon
 Exploring the Nikon D300 1 C H A P T E R This chapter covers the key components of the Nikon D300. These are the features that are most readily accessible because they are situated on the outside of the
D850 Settings
 D850 Settings 10.03.17 PLAYBACK MENU Delete Playback folder ALL Hide image Playback display options > Additional photo info > None Highlights Shooting data Overview Copy images(s) Image review - OFF After
Focus Stacking Tutorial (Rev. 1.)
") Focus Stacking Tutorial (Rev. 1.) Written by Gerry Gerling Focus stacking is a method used to dramatically increase the depth of field (DOF) by incrementally changing the focus distance while taking multiple
Focus Stacking Tutorial (Rev. 1.) Written by Gerry Gerling Focus stacking is a method used to dramatically increase the depth of field (DOF) by incrementally changing the focus distance while taking multiple
Embargo: January 24, 2008
 Embargo: January 24, 2008 PENTAX Optio S12 A stylish compact digital camera that pursues higher image quality with an increased approximately 12.0 effective megapixels PENTAX Corporation is pleased to
Geotagger N3. User Manual (V1.0) Revised by Geosolve.be (Pol F. Gillard) with personal updates and help. Solmeta Technology Co.
 Revised by Geosolve.be (Pol F. Gillard) with personal updates and help. Solmeta Technology Co.") Geotagger N3 User Manual (V1.0) Revised by Geosolve.be (Pol F. Gillard) with personal updates and help Solmeta Technology Co., Ltd Copyright 2011 Solmeta Technology Co., Ltd. All Rights Reserved 1 Contents
Geotagger N3 User Manual (V1.0) Revised by Geosolve.be (Pol F. Gillard) with personal updates and help Solmeta Technology Co., Ltd Copyright 2011 Solmeta Technology Co., Ltd. All Rights Reserved 1 Contents
DIGITAL PHOTOGRAPHY CAMERA MANUAL
 DIGITAL PHOTOGRAPHY CAMERA MANUAL TABLE OF CONTENTS KNOW YOUR CAMERA...1 SETTINGS SHUTTER SPEED...2 WHITE BALANCE...3 ISO SPEED...4 APERTURE...5 DEPTH OF FIELD...6 WORKING WITH LIGHT CAMERA SETUP...7 LIGHTING
Digital Director Troubleshooting
 Digital Director Troubleshooting Please find below the most common FAQs to assist in the understanding and use of the product. For details related to each specific camera model, refer to the Compatibility
CTE BASIC DIGITAL PHOTOGRAPHY STUDY GUIDE
 CTE BASIC DIGITAL PHOTOGRAPHY STUDY GUIDE VOCABULARY Histogram a graph of all tones in an image Image/adjust (hue/saturation, brightness/contrast) hue: color name (like green), saturation: how opaque (rich
Nikon Launches All-New, Advanced Nikon 1 V2 And Speedlight SB-N7. 24/10/2012 Share
 Nikon Launches All-New, Advanced Nikon 1 V2 And Speedlight SB-N7 24/10/2012 Share Email TOKYO - Nikon Corporation released the Nikon 1 V2 today, the latest addition to its popular Nikon 1 V series of advanced
Aperture & Shutter Speed Review
 Aperture & Shutter Speed Review Light Meters Your camera s light meter measures the available light in a scene. It does so by averaging all of the reflected light in the image to find 18% gray. By metering
SER-FL-051 Charlotte County Composite Squadron Punta Gorda, Florida Major Dick Morrell/Capt Neil Heisner
 CAP Aerial Photography Image Upload Overview January 2017 SER-FL-051 Charlotte County Composite Squadron Punta Gorda, Florida Major Dick Morrell/Capt Neil Heisner Discussion Items General AP Image Upload
OTHER RECORDING FUNCTIONS
 OTHER RECORDING FUNCTIONS This chapter describes the other powerful features and functions that are available for recording. Exposure Compensation (EV Shift) Exposure compensation lets you change the exposure
The Essential Guide To Advanced EOS Features. Written by Nina Bailey. Especially for Canon EOS cameras
 The Essential Guide To Advanced EOS Features Written by Nina Bailey Especially for Canon EOS cameras Introduction 2 Written, designed and images by Nina Bailey www.eos-magazine.com/ebooks/es/ Produced
D750 Settings
 D750 Settings 12.04.14 PLAYBACK MENU Delete Playback folder ALL Hide image Playback display options > Additional photo info > Highlights Shooting data Overview Copy images(s) Image review - OFF After delete
TOS STANDARD OPERATING PROCEDURE (SOP): DSLR Configuration
: DSLR Configuration") TOS STANDARD OPERATING PROCEDURE (SOP): DSLR Configuration PREPARED BY ORGANIZATION DATE Courtney Meier SCI 02/15/2017 Oliver Smith SCI 12/04/2015 APPROVALS ORGANIZATION APPROVAL DATE Andrea Thorpe SCI
TOS STANDARD OPERATING PROCEDURE (SOP): DSLR Configuration PREPARED BY ORGANIZATION DATE Courtney Meier SCI 02/15/2017 Oliver Smith SCI 12/04/2015 APPROVALS ORGANIZATION APPROVAL DATE Andrea Thorpe SCI
User Manual. This User Manual will guide you through the steps to set up your Spike and take measurements.
 User Manual (of Spike ios version 1.14.6 and Android version 1.7.2) This User Manual will guide you through the steps to set up your Spike and take measurements. 1 Mounting Your Spike 5 2 Installing the
CAMERA BASICS. Stops of light
 CAMERA BASICS Stops of light A stop of light isn t a quantifiable measurement it s a relative measurement. A stop of light is defined as a doubling or halving of any quantity of light. The word stop is
Specifications for Fujifilm FinePix F850EXR 16MP Digital Camera
 Specifications for Fujifilm FinePix F850EXR 16MP Digital Camera Model name FinePix F850EXR Number of effective pixels 16.0 million pixels Image sensor 1/2-inch EXR CMOS with primary color filter Storage
ON YOUR VIDEO DISC. Aerial photography
 Skills Aerial Photography Masterclass ON YOUR VIDEO DISC Your guide Jeff Morgan Discover the PhotoPlus method for Aerial photography Enjoy an exciting airborne ride while you capture some unique images
DSLR FOCUS MODES. Single/ One shot Area Continuous/ AI Servo Manual
 DSLR FOCUS MODES Single/ One shot Area Continuous/ AI Servo Manual Single Area Focus Mode The Single Area AF, also known as AF-S for Nikon or One shot AF for Canon. A pretty straightforward way to acquire
Name Digital Imaging I Chapters 9 12 Review Material
 Name Digital Imaging I Chapters 9 12 Review Material Chapter 9 Filters A filter is a glass or plastic lens attachment that you put on the front of your lens to protect the lens or alter the image as you
CANON EOS REBEL T3I/600D FOR DUMMIES
 Page 1 of 10 PHOTOGRAPHY CAMERAS CANON CAMERA CANON EOS REBEL T3I/600D FOR DUMMIES CHEAT SHEET CANON EOS REBEL T3I/600D FOR DUMMIES From Canon EOS Rebel T3i / 600D For Dummies By Julie Adair King Your
Basic Digital Photography
 EXAM INFORMATION Items 60 Points 66 Prerequisites NONE Grade Level 10-12 Course Length ONE SEMESTER DESCRIPTION This course is and introduction to the field of commercial photography. This course will
Advanced Manual D-630 ZOOM FE-5500 X-600 DIGITAL CAMERA. Detailed explanations of all the functions for getting the most out of your camera.
 DIGITAL CAMERA D-630 ZOOM FE-5500 X-600 Advanced Manual Detailed explanations of all the functions for getting the most out of your camera. Basic Operation Shooting Playing Back Printing Online Pictures
OUTDOOR PORTRAITURE WORKSHOP
 OUTDOOR PORTRAITURE WORKSHOP SECOND EDITION Copyright Bryan A. Thompson, 2012 bryan@rollaphoto.com Goals The goals of this workshop are to present various techniques for creating portraits in an outdoor
Chapter 11-Shooting Action
 Chapter 11-Shooting Action Interpreting Action There are three basic ways of interpreting action in a still photograph: Stopping action (42) Blurring movement Combining both in the same image Any
A Beginner s Guide To Exposure
 A Beginner s Guide To Exposure What is exposure? A Beginner s Guide to Exposure What is exposure? According to Wikipedia: In photography, exposure is the amount of light per unit area (the image plane
for Canon/ Nikon digital SLR cameras INSTRUCTION MANUAL
 for Canon/ Nikon digital SLR cameras INSTRUCTION MANUAL Thank you for purchasing a Nissin product Before using this flash unit, please read this instruction manual and refer your camera owner s manual
TOS STANDARD OPERATING PROCEDURE (SOP): DSLR Configuration
: DSLR Configuration") TOS STANDARD OPERATING PROCEDURE (SOP): DSLR Configuration PREPARED BY ORGANIZATION DATE Courtney Meier SCI 12/04/2015 Oliver Smith SCI 12/04/2015 APPROVALS ORGANIZATION APPROVAL DATE Kate Thibault SCI
TOS STANDARD OPERATING PROCEDURE (SOP): DSLR Configuration PREPARED BY ORGANIZATION DATE Courtney Meier SCI 12/04/2015 Oliver Smith SCI 12/04/2015 APPROVALS ORGANIZATION APPROVAL DATE Kate Thibault SCI
DIGITAL PHOTOGRAPHY FOR OBJECT DOCUMENTATION GOOD, BETTER, BEST
 DIGITAL PHOTOGRAPHY FOR OBJECT DOCUMENTATION GOOD, BETTER, BEST INTRODUCTION This document will introduce participants in the techniques and procedures of collection documentation without the necessity
9/19/16. A Closer Look. Danae Wolfe. What We ll Cover. Basics of photography & your camera. Technical. Macro & close-up techniques.
 A Closer Look Danae Wolfe What We ll Cover Basics of photography & your camera Technical Macro & close-up techniques Creative 1 What is Photography? Photography: the art, science, & practice of creating
232 Photographer s Guide to the Nikon Coolpix P900. LumoPro LP using with Coolpix P Yongnuo YN560 III 221 Eye sensor 114
 Index A AC adapter Nikon model EH-67A 219 220 Active D-Lighting menu option 100 101 incompatibility with other settings 102 Adobe Bridge CC software reading location data with 165 Adobe Photoshop Elements
Acknowledgments 13 Introduction 14 Chapter 1: Preliminary Setup Chapter 2: Basic Operations Chapter 3: Th e Shooting Modes
 Contents Acknowledgments 13 Introduction 14 Chapter 1: Preliminary Setup 17 Setting Up the Camera 17 Charging and Inserting the Battery 17 Inserting the Memory Card 19 Setting the Language, Date, and Time
memories made easy Innovative features and a brilliantly easy format make beautiful memories sweet and simple.
 memories made easy Innovative features and a brilliantly easy format make beautiful memories sweet and simple. Nikon s Exclusive Feature System Makes taking great pictures effortless. D-Lighting Compensates
E-520. Built-in image stabiliser for all lenses. Comfortable Live View thanks to high speed contrast AF** 100% D-SLR quality
 E-520 Built-in image stabiliser for all lenses Excellent dust reduction system Professional functions 10 Megapixel Live MOS sensor Comfortable Live View thanks to high speed contrast AF** 100% D-SLR quality
Aperture & Shutter Speed Review
 Aperture & Shutter Speed Review Light Meters Your camera s light meter measures the available light in a scene. It does so by averaging all of the reflected light in the image to find 18% gray. By metering
Mapping with the Phantom 4 Advanced & Pix4Dcapture Jerry Davis, Institute for Geographic Information Science, San Francisco State University
 Mapping with the Phantom 4 Advanced & Pix4Dcapture Jerry Davis, Institute for Geographic Information Science, San Francisco State University The DJI Phantom 4 is a popular, easy to fly UAS that integrates
Capturing God s Creation Through The Lens. Session 3 From Snap Shots to Great Shots January 20, 2013 Donald Jin
 Capturing God s Creation Through The Lens Session 3 From Snap Shots to Great Shots January 20, 2013 Donald Jin donjin@comcast.net Course Overview Jan 6 Setting The Foundation Jan 13 Building Your Craft
230 Photographer s Guide to the Nikon Coolpix P610. GPS log creating Grid displaying in shooting mode 114,
 Index A AC adapter Nikon model EH-67A 218 219 Active D-Lighting menu option 99 100 incompatibility with other settings 101 Adobe Bridge CC software reading location data with 164 Adobe Photoshop Elements
MEASURE Evaluation. Global Positioning System Toolkit
 Global Positioning System Toolkit Global Positioning System Toolkit This tool was made possible by support from the U.S. Agency for International Development (USAID) under terms of Cooperative Agreement
Introduction... 1 Part I: Fast Track to Super Snaps Part II: Taking Creative Control Part III: After the Shot
 Contents at a Glance Introduction... 1 Part I: Fast Track to Super Snaps... 5 Chapter 1: Getting Up and Running...7 Chapter 2: Reviewing Five Essential Picture-Taking Options...39 Part II: Taking Creative
CUSTOM SETTINGS MENU. Focus Tracking with lock-on-normal. AF Activation-off (AF-on only) Focus point wrap around-off. Built-in AF-assist illuminator
 Focus point wrap around-off. Built-in AF-assist illuminator") 1 van 5 29-09-13 23:24 Home (http://www.michaeltraining.com) Equipment List /about/) Digital Photography Workshops /workshops/) Nikon Camera Settings /camera-settings/) Private Consulting /private-consulting/)
1 van 5 29-09-13 23:24 Home (http://www.michaeltraining.com) Equipment List /about/) Digital Photography Workshops /workshops/) Nikon Camera Settings /camera-settings/) Private Consulting /private-consulting/)
E-420. Exceptional ease of use. 100% D-SLR quality. 10 Megapixel Live MOS sensor Shadow Adjustment Technology
 E-420 World's most compact D- SLR* Comfortable viewing with Autofocus Live View 6.9cm / 2.7'' HyperCrystal II LCD Face Detection for perfectly focused and exposed faces Exceptional ease of use 100% D-SLR
A Digital Camera Glossary. Ashley Rodriguez, Charlie Serrano, Luis Martinez, Anderson Guatemala PERIOD 6
 A Digital Camera Glossary Ashley Rodriguez, Charlie Serrano, Luis Martinez, Anderson Guatemala PERIOD 6 A digital Camera Glossary Ivan Encinias, Sebastian Limas, Amir Cal Ivan encinias Image sensor A silicon
E-420. Exceptional ease of use. 100% D-SLR quality. 10 Megapixel Live MOS sensor Shadow Adjustment Technology
 E-420 World's most compact D- SLR* Comfortable viewing with Autofocus Live View 6.9cm / 2.7'' HyperCrystal II LCD Face Detection for perfectly focused and exposed faces Exceptional ease of use 100% D-SLR
Funded from the Scottish Hydro Gordonbush Community Fund. Metering exposure
 Funded from the Scottish Hydro Gordonbush Community Fund Metering exposure We have looked at the three components of exposure: Shutter speed time light allowed in. Aperture size of hole through which light
Dusk Photography. The Blue 15 minutes. Presented to Charlottesville Camera Club June 29, 2011 Deb Snelson 2011
 Dusk Photography The Blue 15 minutes Presented to Charlottesville Camera Club June 29, 2011 Deb Snelson 2011 It s All about When Gorgeous Blue sky Only lasts about 15 minutes Cannot be seen by the naked
Mastering Y our Your Digital Camera
 Mastering Your Digital Camera The Exposure Triangle The ISO setting on your camera defines how sensitive it is to light. Normally ISO 100 is the least sensitive setting on your camera and as the ISO numbers
14.6 M Pixels. GX-20 - cameras. With the GX-20, experience a more beautiful world. "My Settings" function makes operations easier and more convenient.
 GX-20 - cameras 14.6 M Pixels Advanced digital SLR camera with 14.6 mega pixel image CMOS sensor (Powered by SAMSUNG) Optical Image Stabilization with Image Sensor Shift Mechanism Resistant to water and
Camera controls. Aperture Priority, Shutter Priority & Manual
 Camera controls Aperture Priority, Shutter Priority & Manual Aperture Priority In aperture priority mode, the camera automatically selects the shutter speed while you select the f-stop, f remember the
THE DIFFERENCE MAKER COMPARISON GUIDE
 THE DIFFERENCE MAKER D850 vs D810 Feature Set D850 Resolution 45.7 Megapixels D810 ISO Range 99 Cross Type AF Points Cross type AF points +++++++++++++++++++++++++++++++++++ +++++++++++++++++++++++++++++++++++
D-555 ZOOM. Advanced Manual DIGITAL CAMERA. Detailed explanations of all the functions for getting the most out of your camera.
 DIGITAL CAMERA D-555 ZOOM Advanced Manual Detailed explanations of all the functions for getting the most out of your camera. Basic Operation Shooting Playing Back Printing Online Pictures Camera Settings
CIVIL AIR PATROL U.S. Air Force Auxiliary. Mission Aircrew Reference Text. Volume III Airborne Photographer
 CIVIL AIR PATROL U.S. Air Force Auxiliary Mission Aircrew Reference Text Volume III Airborne Photographer Revision December 2017 This text is designed to provide the minimum academic knowledge required
TAKING GREAT PICTURES. A Modest Introduction
 TAKING GREAT PICTURES A Modest Introduction HOW TO CHOOSE THE RIGHT CAMERA EQUIPMENT WE ARE NOW LIVING THROUGH THE GOLDEN AGE OF PHOTOGRAPHY Rapid innovation gives us much better cameras and photo software...
Photographer... and you can too.
 Izzy Learned to be a Photographer... and you can too. A story about photography basics by Bruce Philpott My granddaughter, Izzy, was visiting us when she was eleven years old and she looked at a photo
FE-110/X-705 FE-100/X-710
 DIGITAL CAMERA FE-110/X-705 FE-100/X-710 Advanced Manual Detailed explanations of all the functions for getting the most out of your camera. Basic Operation Shooting Playing Back Printing Online Pictures
Aperture & Shutter Speed. Review
 Aperture & Shutter Speed Review Light Meters Your camera s light meter measures the available light in a scene. It does so by averaging all of the reflected light in the image to find 18% gray. By metering
3D Capture. Using Fujifilm 3D Camera. Copyright Apis Footwear
 3D Capture Using Fujifilm 3D Camera Copyright 201 4 Apis Footwear Camera Settings Before shooting 3D images, please make sure the camera is set as follows: a. Rotate the upper dial to position the red
gfm-app.com User Manual
 gfm-app.com User Manual 03.07.16 CONTENTS 1. MAIN CONTROLS Main interface 3 Control panel 3 Gesture controls 3-6 2. CAMERA FUNCTIONS Exposure 7 Focus 8 White balance 9 Zoom 10 Memory 11 3. AUTOMATED SEQUENCES
Until now, I have discussed the basics of setting
 Chapter 3: Shooting Modes for Still Images Until now, I have discussed the basics of setting up the camera for quick shots, using Intelligent Auto mode to take pictures with settings controlled mostly
OBJECT PHOTOGRAPHY. iskills Workshop October 12, :30 6:30pm
 OBJECT PHOTOGRAPHY iskills Workshop October 12, 2017 4:30 6:30pm INTRODUCTION WORKSHOP OVERVIEW 1. Introduction to Object Photography 2. Brief orientation to the Canon Rebel 3. Automatic 4. Manual Mode