The Essential Guide To Advanced EOS Features. Written by Nina Bailey. Especially for Canon EOS cameras
|
|
|
- Rosemary Wright
- 6 years ago
- Views:
Transcription


1 The Essential Guide To Advanced EOS Features Written by Nina Bailey Especially for Canon EOS cameras

2 Introduction 2 Written, designed and images by Nina Bailey Produced by Nina Bailey Nina Bailey. All rights reserved. Unauthorised copying, reproduction, hiring, lending prohibited.

3 Foreword by the author The Canon EOS cameras have some fantastic technology and features, which allow you to push the boundaries of photography. Over the years these features have really changed how we approach photography and also expanded the range of subjects that we can tackle. Many of these features not going to be used in day-to-day photography however when they are needed they can be the difference between getting a good and a poor result. The one thing they ll have in common is the need for the photographer to understand what they are doing and also when to apply them. There are a few features which will only be found on the higher level models however you may be surprised at how many of the features are found on every single camera within the Canon EOS range. True you sometimes get a few more setting options on the higher level models, but even the most basic EOS cameras can take very good pictures providing you understand and utilise the features that they have appropriately. I have worked with the EOS range since it first appeared on the market, both selling in the retail environment and also working on the technical side whilst at Canon. The original models that appeared on the market were film based models, and had very few innovative features on them with the possible exception of the evaluative metering and the autofocus. As time went by, the later film models began to develop some additional options, but it was not until the introduction of the digital models, that we started to see a much wider range of functionality on the cameras. The digital models introduce the concept of menu driven settings onto the EOS range, and many of the features that I will be looking at in this ebook will be found within the menu system. Once mastered, the menu system is simple and intuitive to use. However for the newcomer to photography and those who have fairly recently switched from film it can be a very steep and difficult learning curve to get to grips with all the cameras features and functions. So in this book I set out to help explain some of the features that you will really find useful once you have mastered them. Nina

4 Contents 4 Introduction 6 Introductory model navigation 8 Advanced model navigation 10 Menu navigation - all models 12 Chapter 01 Image processing overrides 13 Why start with image processing 14 What does image processing do 15 How the format you shoot affects these options 16 Understanding picture styles 17 Setting picture styles 18 Standard picture style 19 Portrait picture style 20 Landscape picture style 21 Neutral picture style 22 Faithful picture style 23 Monochrome picture style 24 Customising picture styles 25 What can be customised in the picture styles 26 Using monochrome picture style options 30 Downloadable picture styles 33 Picture style editor 35 Long exposure noise reduction 36 High ISO noise reduction 38 Auto lighting optimizer 41 Highlight tone priority 43 Lens aberration correction 45 HDR mode 48 Using DPP to produce HDR images 50 Multiple exposure 53 Chapter 02 Exposure and metering overrides 54 About exposure and metering overrides 55 What is metering 55 Advanced exposure overrides 56 What is a correct exposure 57 AE lock 58 Exposure compensation 61 Auto exposure bracketing - AEB 63 Bracketing auto cancel 64 Exposure bracketing sequence 64 Number of bracketed shots 65 Other exposure overrides 66 Exposure level increments 66 ISO speed setting increments 66 Safety shift 66 Understanding metering 68 What we see versus what we get 70 How focusing and metering interact 72 Tools to help you assess correct exposure 73 Highlight warning 73 Histogram display 74 How to set the metering 75 Understanding evaluative metering 76 When to use evaluative metering 77 Understanding partial metering 78 Understanding spot metering 80 Understanding centreweighted metering 81 Chapter 03 Focusing overrides 82 Camera selection and focusing 83 Focusing system and overrides 84 Focus lock 84 How focusing works and thinks 85 Why focusing sometimes does not work 86 Easy images for the camera to focus upon 87 Difficult images for the camera to focus upon 88 How the camera actually focuses 89 Maximising focusing speed 90 The effects of maximum apertures on focusing speed 92 Things that can cause focusing problems 93 Focusing modes 94 One shot AF 95 AI servo AF 96 Getting the best from AI servo AF 98 AI focus AF 99
5 Contents 5 Manual focus 100 Focusing point selection - most EOS models 101 Focusing customisations - most EOS models 102 Focusing point selection - 70D 103 Focusing customisations - 70D 104 Tracking sensitivity 104 Acceleration/deceleration tracking 105 AI servo 1st image priority 106 AI servo 2nd image priority 106 Focusing point selection - 7D 107 Which 7D focusing option works best 108 Focusing customisation - 7D 109 AI servo tracking sensitivity 109 AI servo 1st/2nd image priority 110 AI servo tracking method 110 Focusing point selection 5D Mark III & 1DX models 111 Single point spot AF (manual selection) 111 AF point expansion 4 additional points 112 AF point expansion surrounding points 112 Zone AF 113 Which mode is best 113 Case settings - 5D Mark III & 1DX 114 What the options are which case settings change 117 Focusing customisations for 5D Mark III & 1DX 118 AI servo 1st image priority 119 AI servo 2nd image priority 119 Focusing and drive selection 120 Focusing summary 121 Chapter 04 White balance overrides 122 White balance system and overrides 123 About the K values 124 How important are these settings 125 Why is white balance needed 126 How to set the white balance options 128 Auto white balance 129 White balance presets 130 Daylight preset 131 Shady preset 132 Cloudy preset 133 Artificial lighting types 134 Using live view to assess the white balance 135 Tungsten preset 136 Fluorescent preset 137 Flash preset 138 White balance and the new 600 EX RT flash unit 139 Custom white balance 140 K setting 142 White balance bracketing 143 White balance shift 144 Chapter 05 Useful menu option overrides 145 The menu system 146 Image quality 147 Viewfinder grid display 149 Release shutter without card 149 Image review 149 Flash control 150 Mirror lock up 150 Colour space 150 ISO speed settings 151 Protect images 152 Erase images 153 RAW image processing 153 Resize 154 Rating 154 Slide show 155 Image jump 156 AF point display 156 Playback grid 156 Select folder 157 File numbering 158 Auto rotate 158 Format card 158 Auto power off 159 LCD brightness 159 Feature guide 159 Info button display options 160 Sensor cleaning 160 Clear all camera settings 160 Copyright information 161 My Menu settings 162 Menu summary 163 Chapter 06 Understanding the custom modes 164 Custom shooting modes 165 What is saved within the custom modes 168 Chapter 07 Live view usage 169 About live view 170 When live view works best 171 Basic operation of live view 172 Live view menus 173 AF modes when using live view - pre 2012 models 174 AF modes when using live view - post 2012 models 175 Manual focus - all models 177 Grid display 177 Exposure simulation 178 Other uses of live view shooting 179 Chapter 08 The thought process in photography 180 ESP - Evaluate, Set up, Produce 181 Final hints and tips 183 ebook range 184

6 Introduction 6 Introduction
7 Introduction 7 Introduction The EOS camera range has a vast range of features, and is not possible to go through every single one in this book. What I have tried to concentrate on are the ones that either cause confusion, or are particularly useful to some groups of photographers. I have also tried to concentrate mostly on features that are on every single model. Although there are a handful that will be found on the more advanced models only. This is especially the case with the focusing settings which vary a lot on the higher level models. I am not going to cover the modes, or what the photographic settings, apertures, shutter speed or ISO do as they have been amply covered in The Essential Guide To EOS Photography. However I will expand on some of the overrides that were covered towards the end of that book and talk about their use in much more depth. To avoid listing all of the models I have tended to refer to the cameras in the groups that they are normally found in. Introductory models are ones such as EOS 500D, 550D, 600D, 650D and 700D. The EOS 100, 1100 and 1200 also fall into this range but are missing some of features found as standard on the rest. Advanced models are ones such as EOS 50D, 60D and 70D. The EOS 7D, 6D, 5D Mark II also for practical purposes fit into this category. The professional models are the EOS 5D Mark III and the EOS 1DX. The models launched before the ones listed above will not have a number of the features that we look at in this book. Also some of the ones that they still do feature may work in a slightly different way due to the much earlier processing circuitry within the cameras. Models that come out after this book was published which was in Autumn 2014 will have most of the features in the ebook. If you are not sure if your camera has a feature then look in the index in your camera manual. If your camera has that feature, it will be listed there. The LCD screens that I photograph to illustrate some of the features will either be from the EOS 700D, 70D or the 5D Mark III. I have chosen these cameras deliberately as between them they all have, the most features, and are three of the latest models within the range. I have made the assumption that most photographers reading this book will have a workable knowledge of how to navigate around the menu system and the main camera controls. However I have put a quick guide to navigation of the cameras and the menu system in the next few pages. You will also see the main layout differences between the introductory and more advanced models.

8 Introduction 8 Introductory model navigation Live view button Cross keys and set button AE Lock button Focusing point selection button Mode dial AE Lock button Info button/ DISP on some models Menu button Main dial Focusing point selection button
9 Introduction 9 Introductory model navigation Q button Q screen Cross keys and set button Touch control Q button The Q screen only appears like this if the camera is set to one of the creative modes. That s P, TV, AV or M on the introductory models. If you are in one of the basic zone modes, or the PIC or SCN controls then few of the overrides we look at in this ebook will work. When you press the Q button on the rear of the camera a highlighted box appears on the Q screen. On a touch screen camera you can also just touch the Q on the Quick screen. To navigate around the screen touch controls can be used or the up, down, left and right cross keys can be used. If your camera supports touch controls and you are used to using touch devices such as a smart phone it is well worth using the touch controls. Once the item is highlighted then you set the feature using the main dial on the top of the camera. To see what options you have press the set button or tap the icon again if using touch controls. If you go into the tools menu, you simply select the item you want to set either using the main dial or the touch controls. To get out of the setting screen either wait a few seconds, or touch the shutter button which will return the camera to its normal shooting operation. On the very latest models 2012 onwards, there are also playback functions available via the Q button. When playing back an image, simply press the Q button on the rear of the camera and the menu options will be listed down the side. Navigation through the menu items is via the cross keys and to change the settings it is the main dial on the top of the camera. These controls also work through the touch controls if your camera has them.


10 Introduction 10 Advanced model navigation Multi controller - may look like this on some models Set button Main dial Function buttons Live view button Quick control dial AE Lock button Focusing point selection button Info button/ DISP on some models Mode dial Menu button AE Lock button Focusing point selection button
11 Introduction 11 Advanced model navigation Q screen Touch control Q button Q button outside quick control dial, innner ring multi controller, centre set button The Q screen only appears like this if the camera is set to one of the creative modes. That s P, TV, AV, M, B or C modes on the advanced models. If you are in one of the basic zone modes, or the PIC or SCN controls then few of the overrides we look at in this ebook will work. When you press the Q button on the rear of the camera a highlighted box appears on the Q screen. On a touch screen camera you can also just touch the Q on the Quick screen. To navigate around the screen touch controls can be used or the multi controller can be used. If your camera supports touch controls and you are used to using touch devices such as a smart phone it is well worth using the touch controls. Once the item is highlighted then you set the feature using the main dial on the top or for most controls the quick control dial on the rear of the camera also works. To see what options you have press the set button or tap the icon again if using touch controls. If you go into the tools menu, you simply select the item you want to set either using the quick control dial, multi controller or the touch controls. On some features the main dial may also operate some options. To get out of the setting screen either wait a few seconds, or touch the shutter button which will return the camera to its normal shooting operation. On the very latest models 2012 onwards, there are also playback functions available via the Q button. When playing back an image, simply press the Q button on the rear of the camera and the menu options will be listed down the side. Navigation through the menu items is via the cross keys and to change the settings it is the main dial on the top of the camera. These controls also work through the touch controls if your camera has them.


12 Introduction 12 Menu navigation - all models The menu is always entered by pressing the menu button on the rear of the camera. All the functions I m describing can also be set by touch controls if your camera has them. Once a menu appears on the rear of the camera you need to navigate to the menu tab that contains the commands that you want to use. On all models this can be done by turning the main dial on the top of the camera. It can also be done using the left and right cross keys on the introductory models or the multi controller on the advanced models. Once you re in the menu tab that you want you navigate up and down the menu using the cross keys on the introductory model or the quick control dial or multicontroller on the advanced models. To enter the menu you simply pressed the set button. If you re using the touch control the act of tapping the menu item will take you into the menu. Some menus are very simple and simply have a normal, off or enable, disable option. Others are more complex such as the ISO speed setting options on some of the more advanced models. Once the main menu item is entered you are effectively presented with another menu and the navigation on this is the same and when you enter the menu item you want to set it gives you a third menu with the options on it. Regardless of the menu, once you have selected the item you wish to set, it is important to press set or if you re using the touch controls, touch the menu icon at the bottom of the screen and this will apply the item. If you do not apply the item it will revert to how it was previously set. Some menus are slightly more involved as the examples I m showing to the left. If you look at the bottom of the screen the options are displayed and if there are patterns that need to be pressed it will show you these graphically, normally at the bottom of the screen. Just follow the onscreen prompts and you ll be able to set the feature. To quit out of the menu either keep pressing the menu button or just touch the shutter button and it will revert to the camera s normal shooting operation.

13 Introduction 13 Chapter 01 Image processing overrides


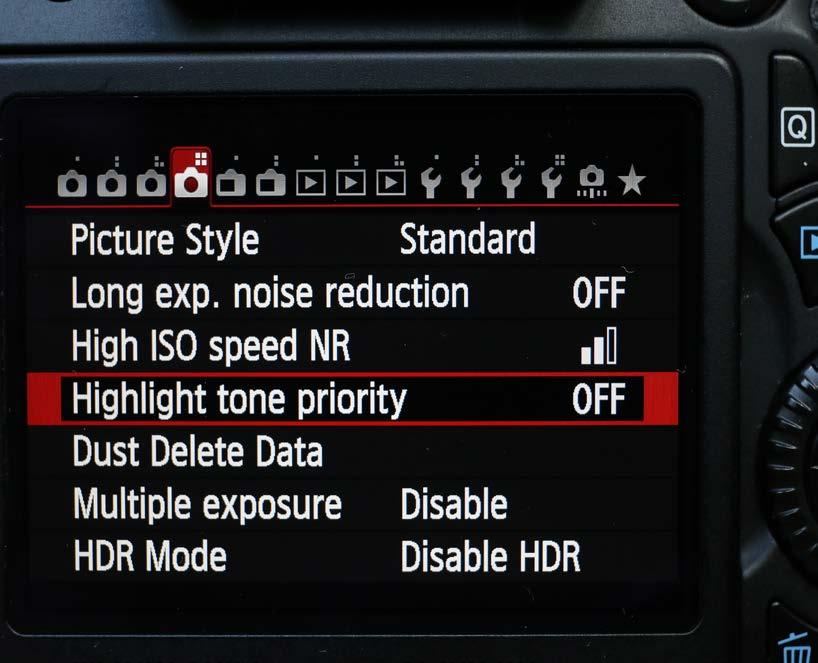
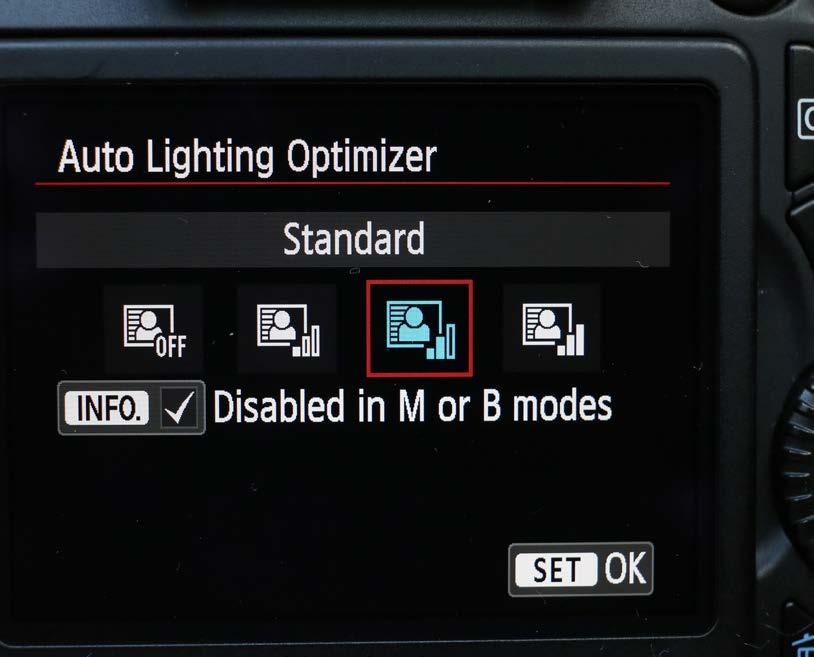
14 Chapter 1: Image processing overrides 14 Why start with image processing? Over the last four or five years, image processing has become one of the most important features that the camera has. It s an area that has expanded rapidly as the camera s processing circuitry has significantly increased in both capacity and speed. The reason I m starting off this book with image processing is that the systems here are the things that are going to affect all the images that you take. The choices you make on the image processing options can affect many of the other features that we are going to be looking at within this ebook. The image processing options are also important to understand as even if you have never set them, many of the options are already set and working upon the images that you shoot. All of the features within this section are going to be set within the camera s menu system. However where they are set within the menu system has changed over the last two or three years. The very latest models have many of these options within the camera or shoot menu. This makes them very visible to the photographer and therefore they are now explored more regularly. However on the earlier models they were mostly found within the camera s custom function menu. This is a menu that is rarely explored by the majority of photographers and as a result the awareness of these features is generally very low. Auto lighting optimizer - Off Standard picture style Standard picture style Auto lighting optimizer - Strong Landscape picture style Monochrome picture style

15 Chapter 1: Image processing overrides 15 What does image processing do? Image processing is all about how the camera handles and processes the images that you take. These options are becoming increasingly important, as they are now more responsible for the stunning quality results that the camera can give. Some of these options will decide for you how finished the image is by the camera or how much flexibility you have to do post production work to the images that you take. Others can ensure that you get the very best optical quality on the images you shoot. There are also options to capture better highlight detail, and optimise the image you shoot for the best tones. One of the major improvements on the latest cameras is the ability to use ISO settings up to ISO and even higher on the professional models. The ability to do this relies heavily on the image processing options. This image has been processed in Canon s Digital Photo Professional Software to show the result with the image processing for noise reduction on the left hand side and without on the right hand side, to show the difference that it can produce. This image was taken on the EOS 5D Mark II at 6400 ISO. How important these options are will depend on the workflow you have, how finished you want the images, and whether you shoot JPEG or RAW images.


16 Chapter 1: Image processing overrides 16 How the format you shoot affects these options If shooting JPEG, then what is set on the camera is applied to the image in the camera and therefore will control the look of the final image. Therefore these settings are important to understand and apply correctly. Once the image is captured as a JPEG they can be used as they are or have adjustments performed in any software without the setting applied in camera being affected. If shooting RAW images the data about these settings is stored as data with the RAW file. It is then applied by Canon Digital Photo Professional software that is supplied with the camera at the time that you process the RAW file. Canon s Digital Photo Professional which is supplied free with the camera, is the only RAW conversion software that will 100% support all the functions that we are looking at here. I always recommend that you only use Digital Photo Professional software to handle the Canon RAW files as then you will get all the benefits offered by the camera, or of course shoot JPEGs as I do, rather than RAW. Using third party software, can produce results that do not have all the image processing that is produced by Canon s software, as some of these corrections are either ignored, or applied differently as the software cannot use the same algorithms as Canon patent them. A good test to see how much your images are being affected by this is to shoot a large fine If you open a RAW image taken as monochrome in DPP you get a monochrome image. JPEG and RAW at the same time and then open both in your non Canon software. If the JPEG file looks better, or more noise free, then it is the software that is causing the difference. If the software is working correctly they should look identical when opened and viewed at 100% without any adjustments needed. Through this chapter we will look at how the features work on the camera at the time of If you open a RAW image in third party software it generally opens as a colour image. shooting and look at the options that exist within Digital Photo Professional when processing RAW images within the computer. The disc that came with your camera may not be the latest version of DPP, so you may need to update it, to get all of the features that I am showing. This is easily done by visiting the Canon web site.

17 Chapter 1: Image processing overrides 17 Understanding Picture Styles The first image processing topic I am going to look at are the picture style. Picture styles control the way that the camera processes the image. The symbol indicating picture style is shown below. Therefore, they mainly affect photographers that shoot JPEG images with their cameras. That said, for photographers that shoot RAW who use Canon s Digital Photo Professional it offers them the ability to minimise the work that needs to be done be to the image. Often just needing to be batched processed to get them into a more usable file format. They offer JPEG users the option to produce an image that the camera has processed and adjusted, so that the image can just be printed. Although these images are designed to be finished, they can still have adjustments applied if required. Alternatively, images can be produced that are much flatter and less impressive to look at but which will give the photographer much more flexibility when they process the images within a post production programme such as Photoshop. The latest cameras have an additional picture style to the normal group of six settings. This is an auto setting that will detect the scene and decide on the best picture style for the scene. In the auto setting the colours will look vivid and will have the contrast enhanced. This is designed to produce a finished image that can just be printed as it is with no further adjustments being necessary. If this is not giving the images as required there are 6 overrides that can be selected within the creative modes. On all the creative modes the auto picture style is the default option. The auto setting adapts to the type of image that is being taken based upon data being sensed by the camera, distance, lens type etc and will give what it believes to be the best image processing for the scene being taken. The auto mode assumes that minimal post production is required by the photographer. If more control is required, there are six picture style override settings available as shown above. Three of these are designed to produce a finished image that can just be printed. These are the standard, landscape and portrait settings. There are then two styles that are designed for photographers that wish to do post production to their images. These are neutral and faithful. There is also a monochrome setting.


18 Chapter 1: Image processing overrides 18 Setting picture styles The picture styles can be set within the creative modes from two places on most cameras. They can be set from the LCD panel on the rear of the camera by pressing the Q button and navigating to the picture style setting. The touch controls if you have them on your camera can also be used on the Q screen or within the menu system. The settings can then be selected by the multi controller or the cross keys depending on the model you own. If you press the set button this then takes you into the picture style menu where there are more options, which are selected in the normal way. There is also an option in the shooting or camera menu. The first item on this menu is the picture style option. Selecting this takes you into a menu where all the options are listed and where you can view any customisations that are applied. Pressing the info button in this screen will take you to the customisation options, which I will look at once I have explained how the picture styles vary. The auto mode works for most images, I am very familiar with these controls and tend to set up the picture style according to what I am shooting and the conditions on the day. The standard and landscape picture styles are the ones that I generally use. I do sometimes modify the settings on the picture styles which I will explain a little later.


19 Chapter 1: Image processing overrides 19 Standard picture style The standard picture style is one of the three key settings that can be picked by the Auto + mode, it is also the default mode on the earlier cameras that do not have the Auto + mode. It provides an image that is ready to print with good contrast, good saturation and has been sharpened. The image is designed to look good without doing anything to it and this picture style will work for most images that you are likely to shoot. The samples above compare the standard picture style on the left with the landscape picture style and the neutral picture style on the right. I tend to prefer the landscape picture style when shooting landscapes and travel scenes, however it does take the contrast up and this can give problems with shadow details on very bright sunny days. The neutral picture style is much more muted and will need a reasonable amount of adjustment including the image being sharpened before the image looks good.


20 Chapter 1: Image processing overrides 20 Portrait picture style The portrait picture style is designed for when shooting portraits and you want an image that is ready to print. The image that this produces has less contrast, sharpening, and saturation than an image produced on the standard picture style as we see from the two examples above. The reds in the image are also enhanced, which can be seen quite significantly in the image above left. This is especially obvious when compared to the neutral setting above right, which is more muted. Although this can be beneficial for some skin types, it is not going to be beneficial for the paler skin colours, and so for some portraits the standard picture style may well give better results. If the contrast and saturation proves to be a problem then these can be reduced and I will show how this is done a little later in this chapter. There are also two downloadable portrait picture styles that can be added onto the camera s user defined options, or used within RAW processing, again I will look at these shortly.
Mastering the EOS 800D
 Especially written for Canon EOS users A simple, modern approach to mastering all the advanced features on your Canon EOS 800D camera which allows you to take even better images Mastering the EOS 800D
Mastering the EOS 7D. Especially written for Canon EOS users. Written by Nina Bailey
 Mastering the EOS 7D Especially written for Canon EOS users A simple, modern approach to mastering all the advanced features on your Canon EOS 7D camera which allows you to take even better images Written
Mastering the EOS 80D
 Mastering the EOS 80D Especially written for Canon EOS users A simple, modern approach to mastering all the advanced features on your Canon EOS 80D camera which allows you to take even better images Written
Mastering the EOS 1300D
 Mastering the EOS 1300D Especially written for Canon EOS users A simple, modern approach to mastering all the advanced features on your Canon EOS 1300D camera which allows you to take even better images
Mastering the EOS 700D
 Mastering the EOS 700D Especially written for Canon EOS users A simple, modern approach to mastering all the advanced features on your Canon EOS 700D camera which allows you to take even better images
Upgrading to the EOS 70D
 Upgrading to the EOS 70D A fast track guide to get you up to speed and shooting Includes detailed explanations of Differences in camera layout The menu system Configuring the camera The focusing system
Understanding the EOS-1DX
 Understanding the EOS-1DX Especially written for Canon EOS users A fast track guide to understanding how to use the EOS-1DX s key controls and functions Contents include: Exposure modes Camera layout Menu
Mastering the EOS 760D
 Mastering the EOS 760D Especially written for Canon EOS users A simple, modern approach to mastering all the advanced features on your Canon EOS 760D camera which allows you to take even better images
Mastering the EOS 750D
 Especially written for Canon EOS users A simple, modern approach to mastering all the advanced features on your Canon EOS 750D camera which allows you to take even better images Mastering the EOS 750D
Introduction to Digital Photography
 Introduction to Digital Photography with Nick Davison Photography is The mastering of the technical aspects of the camera combined with, The artistic vision and creative know how to produce an interesting
Acknowledgments 13 Introduction 14 Chapter 1: Preliminary Setup Chapter 2: Basic Operations Chapter 3: Th e Shooting Modes
 Contents Acknowledgments 13 Introduction 14 Chapter 1: Preliminary Setup 17 Setting Up the Camera 17 Charging and Inserting the Battery 17 Inserting the Memory Card 19 Setting the Language, Date, and Time
Getting started with the EOS 6D Mark II
 Getting started with the EOS 6D Mark II Especially written for Canon EOS users A simple, modern and non technical approach to learn how to use your Canon EOS 6D Mark II camera to take great images Written
The Essential Guide To Capturing Birds In Flight
 The Essential Guide To Capturing Birds In Flight Written by Nina Bailey Especially for Canon EOS cameras Chapter 01: Introduction to photographing birds in flight 2 Written, designed and images by Nina
CANON EOS REBEL T3I/600D FOR DUMMIES
 Page 1 of 10 PHOTOGRAPHY CAMERAS CANON CAMERA CANON EOS REBEL T3I/600D FOR DUMMIES CHEAT SHEET CANON EOS REBEL T3I/600D FOR DUMMIES From Canon EOS Rebel T3i / 600D For Dummies By Julie Adair King Your
Getting started with the EOS 200D
 Getting started with the EOS 200D Especially written for Canon EOS users A simple, modern and non technical approach to learn how to use your Canon EOS 200D camera to take great images Written by Nina
Winston C Hall Tuner Photography
 D4s Custom Banks Settings Shooting and Custom Setting Menus Created by: Winston C Hall Tuner Photography 714 D4s Shooting and Custom Settings Banks This guide is an outline of my recommendations for the
FOCUS, EXPOSURE (& METERING) BVCC May 2018
 BVCC May 2018") FOCUS, EXPOSURE (& METERING) BVCC May 2018 SUMMARY Metering in digital cameras. Metering modes. Exposure, quick recap. Exposure settings and modes. Focus system(s) and camera controls. Challenges & Experiments.
FOCUS, EXPOSURE (& METERING) BVCC May 2018 SUMMARY Metering in digital cameras. Metering modes. Exposure, quick recap. Exposure settings and modes. Focus system(s) and camera controls. Challenges & Experiments.
The Essential Guide To EOS Flash Learn to understand EOS flash and Speedlite flashguns. Written by Nina Bailey
 The Essential Guide To EOS Flash Learn to understand EOS flash and Speedlite flashguns Written by Nina Bailey Introduction 2 Written, designed and images by Nina Bailey Produced by Nina Bailey 2015. All
Take Control of Your Camera
 Take Control of Your Camera With all of the technology packed into our cameras, it is easy to hand over control & blame our equipment when our images don t meet our expectations.. In this workshop we will
>--- UnSorted Tag Reference [ExifTool -a -m -u -G -sort ] ExifTool Ver: 10.07
![>--- UnSorted Tag Reference [ExifTool -a -m -u -G -sort ] ExifTool Ver: 10.07](/thumbs/96/126583196.jpg ">--- UnSorted Tag Reference [ExifTool -a -m -u -G -sort ] ExifTool Ver: 10.07") From Image File C:\AEB\RAW_Test\_MG_4376.CR2 Total Tags = 433 (Includes Composite Tags) and Duplicate Tags >------ SORTED Tag Position >--- UnSorted Tag Reference [ExifTool -a -m -u -G -sort ] ExifTool
From Image File C:\AEB\RAW_Test\_MG_4376.CR2 Total Tags = 433 (Includes Composite Tags) and Duplicate Tags >------ SORTED Tag Position >--- UnSorted Tag Reference [ExifTool -a -m -u -G -sort ] ExifTool
Getting started with the EOS 750D
 Getting started with the EOS 750D Especially written for Canon EOS users A simple, modern and non technical approach to learn how to use your Canon EOS 750D camera to take great images. Written by Nina
Love Your Camera (Introduction to D-SLR)
") Love Your Camera (Introduction to D-SLR) Photography Workshops and Tours in New York City Phone: (646) 736-3231 Email: info@rememberforever.co Web: www.rememberforever.co Copyright 2009-2013 - Remember
Love Your Camera (Introduction to D-SLR) Photography Workshops and Tours in New York City Phone: (646) 736-3231 Email: info@rememberforever.co Web: www.rememberforever.co Copyright 2009-2013 - Remember
E-420. Exceptional ease of use. 100% D-SLR quality. 10 Megapixel Live MOS sensor Shadow Adjustment Technology
 E-420 World's most compact D- SLR* Comfortable viewing with Autofocus Live View 6.9cm / 2.7'' HyperCrystal II LCD Face Detection for perfectly focused and exposed faces Exceptional ease of use 100% D-SLR
The Pro Masterpiece with world's fastest AF* and built-in IS.
 E-30 Art Filters, Multi Exposure, Wireless flash, Multiaspect Fully biaxial high-speed 11 point AF system High Speed 12.3 Megapixel Live MOS sensor Live View with multi-angle LCD 5fps sequential shooting
Your World 60D. The Still Photographer s Guide to Operation and Image Creation with the Canon EOS 60D. by Douglas J. Klostermann
 0 Your World 60D The Still Photographer s Guide to Operation and Image Creation with the Canon EOS 60D by Douglas J. Klostermann Full Stop. good writing for better photography 1 All rights reserved. This
AF Area Mode. Face Priority
 Chapter 4: The Shooting Menu 71 AF Area Mode This next option on the second screen of the Shooting menu gives you several options for controlling how the autofocus frame is set up when the camera is in
Nikon D300 Custom Functions
 Nikon D300 Custom Functions This spreadsheet allows you to record the custom functions saved in each menu and bank on the camera. I've carefully laid out the tabs and menus to match the camera as exactly
E-520. Built-in image stabiliser for all lenses. Comfortable Live View thanks to high speed contrast AF** 100% D-SLR quality
 E-520 Built-in image stabiliser for all lenses Excellent dust reduction system Professional functions 10 Megapixel Live MOS sensor Comfortable Live View thanks to high speed contrast AF** 100% D-SLR quality
Sony A6000. Custom Setup Suggestions A professional s perspective
 Sony A6000 Custom Setup Suggestions A professional s perspective Community Support Facebook Google+ Flickr Contents Meet the Author Why customise your A6000 camera? Getting Started Camera Settings Drive
Basic Camera Craft. Roy Killen, GMAPS, EFIAP, MPSA. (c) 2016 Roy Killen Basic Camera Craft, Page 1
 2016 Roy Killen Basic Camera Craft, Page 1") Basic Camera Craft Roy Killen, GMAPS, EFIAP, MPSA (c) 2016 Roy Killen Basic Camera Craft, Page 1 Basic Camera Craft Whether you use a camera that cost $100 or one that cost $10,000, you need to be able
Basic Camera Craft Roy Killen, GMAPS, EFIAP, MPSA (c) 2016 Roy Killen Basic Camera Craft, Page 1 Basic Camera Craft Whether you use a camera that cost $100 or one that cost $10,000, you need to be able
Introduction... 1 Part I: Fast Track to Super Snaps Part II: Taking Creative Control Part III: After the Shot
 Contents at a Glance Introduction... 1 Part I: Fast Track to Super Snaps... 5 Chapter 1: Getting Up and Running...7 Chapter 2: Reviewing Five Essential Picture-Taking Options...39 Part II: Taking Creative
Understanding the Controls and Settings on your Digital Camera
 Understanding the Controls and Settings on your Digital Camera This is a brief guide to the basic controls and settings on a modern DSLR or bridge camera. It cannot possibly cover all the settings and
Aperture & Shutter Speed Review
 Aperture & Shutter Speed Review Light Meters Your camera s light meter measures the available light in a scene. It does so by averaging all of the reflected light in the image to find 18% gray. By metering
The A6000 is one of Sony's best selling mirrorless cameras, even with its successor
 Introduction The A6000 is one of Sony's best selling mirrorless cameras, even with its successor the A6300 now in the market. The compact E-mount camera is a diminutive powerhouse, with its 24mp sensor
KNOW YOUR CAMERA LEARNING ACTIVITY - WEEK 9
 LEARNING ACTIVITY - WEEK 9 KNOW YOUR CAMERA Tina Konradsen GRA1 QUESTION 1 After reading the appropriate section in your prescribed textbook From Snapshots to Great Shots, please answer the following questions:
D750 Settings
 D750 Settings 12.04.14 PLAYBACK MENU Delete Playback folder ALL Hide image Playback display options > Additional photo info > Highlights Shooting data Overview Copy images(s) Image review - OFF After delete
The Essential Guide To Photography With EOS Cameras. Written by Nina Bailey. Especially for Canon EOS cameras
 The Essential Guide To Photography With EOS Cameras Written by Nina Bailey Especially for Canon EOS cameras Introduction 2 PR ED EV ITI IEW O N Written, designed and images by Nina Bailey www.eos-magazine.com/ebooks/es/
! 1! Digital Photography! 2! 1!
 ! 1! Digital Photography! 2! 1! Summary of results! Field of view at a distance of 5 meters Focal length! 20mm! 55mm! 200mm! Field of view! 6 meters! 2.2 meters! 0.6 meters! 3! 4! 2! ! 5! Which Lens?!
Funded from the Scottish Hydro Gordonbush Community Fund. Metering exposure
 Funded from the Scottish Hydro Gordonbush Community Fund Metering exposure We have looked at the three components of exposure: Shutter speed time light allowed in. Aperture size of hole through which light
Capturing Realistic HDR Images. Dave Curtin Nassau County Camera Club February 24 th, 2016
 Capturing Realistic HDR Images Dave Curtin Nassau County Camera Club February 24 th, 2016 Capturing Realistic HDR Images Topics: What is HDR? In Camera. Post-Processing. Sample Workflow. Q & A. Capturing
Aperture & Shutter Speed. Review
 Aperture & Shutter Speed Review Light Meters Your camera s light meter measures the available light in a scene. It does so by averaging all of the reflected light in the image to find 18% gray. By metering
Chapter 11-Shooting Action
 Chapter 11-Shooting Action Interpreting Action There are three basic ways of interpreting action in a still photograph: Stopping action (42) Blurring movement Combining both in the same image Any
Picture Style Editor Ver Instruction Manual
 ENGLISH Picture Style File Creating Software Picture Style Editor Ver. 1.15 Instruction Manual Content of this Instruction Manual PSE stands for Picture Style Editor. indicates the selection procedure
HDR ~ The Possibilities
 HDR ~ The Possibilities Dooleys Camera Club 14th March 2014!1 HDR - The Possibilities Steve Mullarkey email: stevemul@ozemail.com.au website: http://www.stevemul.com.au/! A PDF copy of this presentation
DSLR Essentials: Class Notes
 DSLR Essentials: Class Notes The digital SLR has seen a surge in popularity in recent years. Many are enjoying the superior photographic experiences provided by these feature packed cameras. Interchangeable
1. This paper contains 45 multiple-choice-questions (MCQ) in 6 pages. 2. All questions carry equal marks. 3. You can take 1 hour for answering.
 in 6 pages. 2. All questions carry equal marks. 3. You can take 1 hour for answering.") UNIVERSITY OF MORATUWA, SRI LANKA FACULTY OF ENGINEERING END OF SEMESTER EXAMINATION 2007/2008 (Held in Aug 2008) B.Sc. ENGINEERING LEVEL 2, JUNE TERM DE 2290 PHOTOGRAPHY Answer ALL questions in the answer
UNIVERSITY OF MORATUWA, SRI LANKA FACULTY OF ENGINEERING END OF SEMESTER EXAMINATION 2007/2008 (Held in Aug 2008) B.Sc. ENGINEERING LEVEL 2, JUNE TERM DE 2290 PHOTOGRAPHY Answer ALL questions in the answer
CAMERA BASICS. Stops of light
 CAMERA BASICS Stops of light A stop of light isn t a quantifiable measurement it s a relative measurement. A stop of light is defined as a doubling or halving of any quantity of light. The word stop is
3 Exposure Techniques for Beginners By Gary Tindale
 3 Exposure Techniques for Beginners By Gary Tindale Introduction You are the proud owner of a DSLR, and it s full of features that can be disconcerting, several of which are geared towards controlling
Creating Stitched Panoramas
 Creating Stitched Panoramas Here are the topics that we ll cover 1. What is a stitched panorama? 2. What equipment will I need? 3. What settings & techniques do I use? 4. How do I stitch my images together
Aperture & Shutter Speed Review
 Aperture & Shutter Speed Review Light Meters Your camera s light meter measures the available light in a scene. It does so by averaging all of the reflected light in the image to find 18% gray. By metering
Dust reduction filter. Live View
 E P2 Art Filters, Multi Exposure, Multi aspect Tiltable, high contrast and high resolution electronic viewfinder* Accessory Port High Speed 12.3 Megapixel Live MOS sensor High performance built in Real
PHOTOGRAPHER S GUIDE TO THE PANASONIC LUMIX LX7
 PHOTOGRAPHER S GUIDE TO THE PANASONIC LUMIX LX7 In Intelligent Auto, Creative Control, and Scene shooting modes, ISO is set to Auto and the ISO button has no effect for controlling this setting. You also
Picture Style Editor Ver Instruction Manual
 ENGLISH Picture Style File Creating Software Picture Style Editor Ver. 1.18 Instruction Manual Content of this Instruction Manual PSE stands for Picture Style Editor. In this manual, the windows used in
èõ Changing Recording Modes Text Mode Continuous Shooting Mode Changing Flash Modes Flash Off Mode Auto Mode...
 3 ADVANCED SHOOTING Chapter ëêå@å@ èõ Changing Recording Modes... 52 Text Mode... 52 Continuous Shooting Mode... 53 Changing Flash Modes... 55 Flash Off Mode... 56 Auto Mode... 57 Forced Flash Mode...
Index COPYRIGHTED MATERIAL NUMERICS
 NUMERICS 1.4x setting, using with zoom, 33 2-10 seconds setting, using with Review option, 44 2nd-curtain sync, using, 155 2.3x setting, using with zoom, 33 2.8-inch PureColor II VA LCD. See LCD monitor
system* 5fps sequential shooting with 17 image RAW buffer High Speed 10.1 Megapixel Live MOS sensor Excellent variety of digital lenses Live View
 E-3 Professional working tool Fully biaxial high-speed 11 point AF system High-performance built-in image stabiliser Qualified image processing with new TruePic III World's fastest auto focus system* 5fps
Art Filters, Multi Exposure, Wireless flash, Multiaspect
 E-620 The world s smallest and lightest D-SLR* with Builtin Image Stabilisation and a portable creative studio! High Speed 12.3 Megapixel Live MOS sensor 7 point AF system High-performance built-in image
Digital Matrix User s Guide
 Digital Matrix User s Guide Dear Legacy2Digital Customers: Our hope is that you fully enjoy using your modified manual focus Nikon or third party lens on your DSLR camera and that our conversion meets
Dust reduction filter. Live View
 E P1 14-42mm Kit Art Filters, Multi Exposure, Multi aspect High performance built in image stabiliser Real time effect monitoring Multiple exposure function with LCD monitor display of current view on
Movie 7. Merge to HDR Pro
 Movie 7 Merge to HDR Pro 1 Merge to HDR Pro When shooting photographs with the intention of using Merge to HDR Pro to merge them I suggest you choose an easy subject to shoot first and follow the advice
Picture Style Editor Ver Instruction Manual
 ENGLISH Picture Style File Creating Software Picture Style Editor Ver. 1.12 Instruction Manual Content of this Instruction Manual PSE is used for Picture Style Editor. In this manual, the windows used
D-Movie Setting Guide
 D-Movie Setting Guide En Table of Contents Workflow Making Movies: Workflow...4 Buttons and Icons Frequently-Used Controls...6 The Live View Display...7 The Live View Display... 7 The Information Display:
OBJECT PHOTOGRAPHY. iskills Workshop October 12, :30 6:30pm
 OBJECT PHOTOGRAPHY iskills Workshop October 12, 2017 4:30 6:30pm INTRODUCTION WORKSHOP OVERVIEW 1. Introduction to Object Photography 2. Brief orientation to the Canon Rebel 3. Automatic 4. Manual Mode
ACTION AND PEOPLE PHOTOGRAPHY
 ACTION AND PEOPLE PHOTOGRAPHY These notes are written to complement the material presented in the Nikon School of Photography Action and People Photography class. Helpful websites: Nikon USA Nikon Learn
Nikon Z6 / Z7 Settings
 Nikon Z6 / Z7 Settings 11.22.2018 PLAYBACK MENU Delete Playback folder ALL Playback display options > Additional photo info > Highlights Shooting data Overview None Image review - OFF After delete > Continue
Art Filters, Multi Exposure, Wireless flash, Multiaspect. Filter
 E-620 The world s smallest and lightest D-SLR* with Builtin Image Stabilisation and a portable creative studio! High Speed 12.3 Megapixel Live MOS sensor 7 point AF system High-performance built-in image
PHIL MORGAN PHOTOGRAPHY
 Including: Creative shooting Manual mode Editing PHIL MORGAN PHOTOGRAPHY A free e-book to help you get the most from your camera. Many photographers begin with the naïve idea of instantly making money
Canon 5d Mark Ii User Manual Video Exposure Exposure Compensation
 Canon 5d Mark Ii User Manual Video Exposure Exposure Compensation E. INSTRUCTION. MANUAL. This manual is for the EOS 5D Mark II installed with firmware Canon cannot be held liable for any loss or inconvenience
Professional photographers know that the most important
 Exploring and Setting Up the Digital Rebel XTi/400D Professional photographers know that the most important first step in photography is learning the camera so thoroughly that he or she can operate it
ONE OF THE MOST IMPORTANT SETTINGS ON YOUR CAMERA!
 Chapter 4-Exposure ONE OF THE MOST IMPORTANT SETTINGS ON YOUR CAMERA! Exposure Basics The amount of light reaching the film or digital sensor. Each digital image requires a specific amount of light to
D850 Settings
 D850 Settings 10.03.17 PLAYBACK MENU Delete Playback folder ALL Hide image Playback display options > Additional photo info > None Highlights Shooting data Overview Copy images(s) Image review - OFF After
Canon Log Instruction Manual
 EOS 5D Mark IV (WG) Canon Log Instruction Manual This manual assumes that the EOS 5D Mark IV s firmware has been upgraded for compatibility with Canon Log. This manual explains only the features relevant
Digital camera modes explained: choose the best shooting mode for your subject
 Digital camera modes explained: choose the best shooting mode for your subject On most DSLRs, the Mode dial is split into three sections: Scene modes (for doing point-and-shoot photography in specific
Photography Help Sheets
 Photography Help Sheets Phone: 01233 771915 Web: www.bigcatsanctuary.org Using your Digital SLR What is Exposure? Exposure is basically the process of recording light onto your digital sensor (or film).
Camera Exposure Modes
 What is Exposure? Exposure refers to how bright or dark your photo is. This is affected by the amount of light that is recorded by your camera s sensor. A properly exposed photo should typically resemble
Technical Guide Technical Guide
 Technical Guide Technical Guide Introduction This Technical Guide details the principal techniques used to create two of the more technically advanced photographs in the D800/D800E catalog. Enjoy this
PHOTOGRAPHER S GUIDE TO THE CANON POWERSHOT S110
 PHOTOGRAPHER S GUIDE TO THE CANON POWERSHOT S110 merical value. If you had it set to Auto before selecting Manual mode, the camera will reset it to ISO 80. And, as with Shutter Priority mode, if you set
9/19/16. A Closer Look. Danae Wolfe. What We ll Cover. Basics of photography & your camera. Technical. Macro & close-up techniques.
 A Closer Look Danae Wolfe What We ll Cover Basics of photography & your camera Technical Macro & close-up techniques Creative 1 What is Photography? Photography: the art, science, & practice of creating
Nikon Launches All-New, Advanced Nikon 1 V2 And Speedlight SB-N7. 24/10/2012 Share
 Nikon Launches All-New, Advanced Nikon 1 V2 And Speedlight SB-N7 24/10/2012 Share Email TOKYO - Nikon Corporation released the Nikon 1 V2 today, the latest addition to its popular Nikon 1 V series of advanced
Digitizing Film Using the D850 and ES-2 Negative Digitizer
 JULY 23, 2018 INTERMEDIATE Digitizing Film Using the D850 and ES-2 Negative Digitizer The ES 2 can be used with both strip film and mounted slides. Digitizing film is the process of creating digital data
TAKING GREAT PICTURES. A Modest Introduction
 TAKING GREAT PICTURES A Modest Introduction HOW TO CHOOSE THE RIGHT CAMERA EQUIPMENT WE ARE NOW LIVING THROUGH THE GOLDEN AGE OF PHOTOGRAPHY Rapid innovation gives us much better cameras and photo software...
OUTDOOR PORTRAITURE WORKSHOP
 OUTDOOR PORTRAITURE WORKSHOP SECOND EDITION Copyright Bryan A. Thompson, 2012 bryan@rollaphoto.com Goals The goals of this workshop are to present various techniques for creating portraits in an outdoor
One Week to Better Photography
 One Week to Better Photography Glossary Adobe Bridge Useful application packaged with Adobe Photoshop that previews, organizes and renames digital image files and creates digital contact sheets Adobe Photoshop
Professional. Technical Guide Useful Features
 Professional Technical Guide Useful Features En Table of Contents Live View: Pinpoint AF... 4 Focus Stacking (Focus Shift Photography)... 8 Focus Shift Shooting...10 Before Shooting...12 Focus Shift Photography...13
Lightroom System April 2018 Updates
 Lightroom System April 2018 Updates This April Adobe updated Lightroom Classic CC. This included a major update to profiles, making profile looks more prominent. Some essential interface tweaks and also
Photomatix Light 1.0 User Manual
 Photomatix Light 1.0 User Manual Table of Contents Introduction... iii Section 1: HDR...1 1.1 Taking Photos for HDR...2 1.1.1 Setting Up Your Camera...2 1.1.2 Taking the Photos...3 Section 2: Using Photomatix
High Dynamic Range Photography
 JUNE 13, 2018 ADVANCED High Dynamic Range Photography Featuring TONY SWEET Tony Sweet D3, AF-S NIKKOR 14-24mm f/2.8g ED. f/22, ISO 200, aperture priority, Matrix metering. Basically there are two reasons
SPOT METERING. Copyright Hairy Goat Ltd 2015 Ä
 How to fine tune your exposure with spot metering Metering is often something that leads to great confusion in newbie photographers (and often in more experienced ones, too). Basically, metering refers
Module 1 Lighting. Lesson 1 Light, Your First Decision. What s the first thing you should think about when choosing a location?
 Module 1 Lighting Lesson 1 Light, Your First Decision What s the first thing you should think about when choosing a location? We want to be: -Centered Photographers Three priorities for choosing light
L I F E L O N G L E A R N I N G C O L L A B O R AT I V E - FA L L S N A P I X : P H O T O G R A P H Y
 L I F E L O N G L E A R N I N G C O L L A B O R AT I V E - F A L L 2 0 1 8 SNAPIX: PHOTOGRAPHY SNAPIX OVERVIEW Introductions Course Overview 2 classes on technical training 3 photo shoots Other classes
Photographing Waterfalls
 Photographing Waterfalls Developed and presented by Harry O Connor oconnorhj@yahoo.com July 26, 2017* All photos by Harry O Connor * Based on May 2012 topic Introduction Waterfall photographs are landscapes
Working with your Camera
 Topic 1 Commanding the Mode Dial Learning Outcomes In this topic, you will learn more about how to control the functions on your mode dial. We touched on this before but I want to go through these in detail
Camera Modes Worksheet
 Tools and Program Needed: Digital C. Computer USB Drive Bridge PhotoShop Camera Modes Worksheet Targets 1. Students will create images demonstrating an understanding of Auto Scene Modes and Creative Zone
Focusing and Metering
 Focusing and Metering CS 478 Winter 2012 Slides mostly stolen by David Jacobs from Marc Levoy Focusing Outline Manual Focus Specialty Focus Autofocus Active AF Passive AF AF Modes Manual Focus - View Camera
Until now, I have discussed the basics of setting
 Chapter 3: Shooting Modes for Still Images Until now, I have discussed the basics of setting up the camera for quick shots, using Intelligent Auto mode to take pictures with settings controlled mostly
THE DIFFERENCE MAKER COMPARISON GUIDE
 THE DIFFERENCE MAKER D850 vs D810 Feature Set D850 Resolution 45.7 Megapixels D810 ISO Range 99 Cross Type AF Points Cross type AF points +++++++++++++++++++++++++++++++++++ +++++++++++++++++++++++++++++++++++
TAKING GREAT PICTURES. A Modest Introduction
 TAKING GREAT PICTURES A Modest Introduction 1 HOW TO CHOOSE THE RIGHT CAMERA EQUIPMENT 2 THE REALLY CONFUSING CAMERA MARKET Hundreds of models are now available Canon alone has 41 models 28 compacts and
BASIC IMAGE RECORDING
 BASIC IMAGE RECORDING BASIC IMAGE RECORDING This section describes the basic procedure for recording an image. Recording a Simple Snapshot The camera s Program AE Mode (P Mode) is for simple snapshots.
High Dynamic Range (HDR) photography is a combination of a specialized image capture technique and image processing.
 photography is a combination of a specialized image capture technique and image processing.") Introduction High Dynamic Range (HDR) photography is a combination of a specialized image capture technique and image processing. Photomatix Pro's HDR imaging processes combine several Low Dynamic Range
Introduction High Dynamic Range (HDR) photography is a combination of a specialized image capture technique and image processing. Photomatix Pro's HDR imaging processes combine several Low Dynamic Range