Movavi Photo DeNoise User Manual. Start here: Quick start guide Remove trial restrictions Remove noise from photos
|
|
|
- Terence Melton
- 6 years ago
- Views:
Transcription

1 Movavi Photo DeNoise User Manual Start here: Quick start guide Remove trial restrictions Remove noise from photos
2 Quick start guide How to edit an image and remove color noise Step 1: Open image Open Movavi Photo DeNoise and click Browse for Images to choose the image you want to edit. Other ways to open a picture How to use zoom and navigation Step 2: Remove noise 1. Click the Denoise button to open noise removal options. 2. Choose a noise removal preset under Presets. After you've selected a preset, an intensity slider will appear under its thumbnail. Use this slider if you want to reduce the intensity of the effect. 3. Click Adjustments and use the sliders to further improve the image. Learn more about noise removal

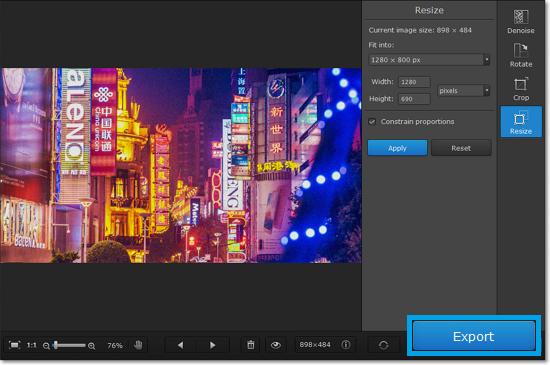
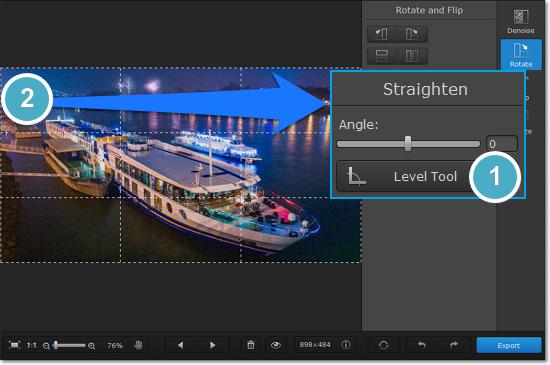
3 Step 3: Edit the photo dimensions The Rotate tab allows you to rotate the image by 90 degrees, mirror the image horizontally or vertically, and straighten out the horizon. The Crop tab allows you to cut off the edges of the photo. You can use this to crop the image to the necessary proportions or focus on the photo's subject. The Resize tab allows you to shrink the image to the necessary size in pixels. This can be useful for making avatars, or uploading images to the web. Learn how to rotate and straighten images Learn how to crop images Learn how to resize images Step 4: Export image When you're done, click the Export button to save your photo!
4

5 Removing trial restrictions When you first install a copy of Movavi Photo DeNoise, it will be running in trial mode, where you cannot save the edited images. To be able to use the program to its fullest, you will need to activate it using an activation key that you can purchase from our official website or any of our partners. Follow the instructions below to activate your copy of Movavi Photo DeNoise: Step 1: Buy activation key 1. Click the button below to go to the purchase page and click the Buy Now button there. 2. You will be taken to our web store. Fill in your billing information and payment options and proceed with the purchase form. IMPORTANT! Be sure to enter a valid address: it will be used to deliver your activation key. 3. Once you have placed your order, you will shortly receive a confirmation for your order and an from support@movavi.com containing your activation key. Step 2: Open the activation window 1. Open Movavi Photo DeNoise. 2. Open the Help menu and choose Activate Software. The activation window will appear. Step 3: Enter your activation key 1. Enter the activation key into the corresponding box. 2. Click Activate to complete the activation. Having problems with activation? If activation is not working as expected, try the following: Make sure that the activation key is entered correctly and is intended for the program you are activating. Try activating offline via . Contact us at support@movavi.com and we'll help you solve the problem!
6 Activating without Internet access If the computer you have installed Movavi Photo DeNoise on is not connected to the Internet, you can activate the program via .
7 Getting an activation key You can purchase an activation key from the official Movavi website or from any of our partners. To purchase a digital copy from the official website, follow the steps below: Step 1: Go to the purchase page To open the purchase page for Movavi Photo DeNoise: In the Help menu, choose Buy Activation Key, or Follow the link below... Step 2: Choose a license type If you plan to use Movavi Photo DeNoise at home, click Buy Now on the purchase page to proceed with buying the personal license. If you plan to use Movavi Photo DeNoise at work, in a government institution, or gain profit in any way, go to the Business license tab on the purchase page. After that, you will be redirected to an online store depending on your region and the available payment methods. All of our vendor partners are secure and completely safe. Step 3: Fill in your billing details 1. Choose any of the available payment methods. 2. Fill in the information required on the page. 3. Enter a valid address. This will be used to deliver your activation key. Step 4: Get your activation key After the purchase has been verified, you will receive a letter containing your activation key. Now you can use it to activate the program. Activation instructions Activating without Internet access If you haven't received your activation key within the hour: Check the Spam folder of your mailbox. Contact support.
8 Activating Photo DeNoise Activating Movavi Photo DeNoise will let you use the program forever and save your photos. Activation requires an Internet connection to verify your key. You will need: Movavi Photo DeNoise activation key. You should receive your key via right after your purchase is completed. Don't have a key? Buy now Internet access to verify your key. Don't have Internet access? See this guide on offline activation Step 1: Open the activation window 1. Launch Movavi Photo DeNoise. 2. Open the Help menu and select Activate Software. The activation window will open. Step 2: Enter your activation key 1. Enter or paste your activation key into the corresponding box of the Activation window. 2. Click Activate to verify your activation key. If you have entered the key correctly, you should see a message confirming successful activation. Click OK to complete the activation process and restart the program. Having problems with activation? Check that the activation key is entered correctly and is intended for the program you are activating. Try offline activation. Contact our support team.
9 Activating without Internet Activation requires Internet access to verify your activation key. If you don't have a working Internet connection on the computer that Movavi Photo DeNoise is installed on, you can activate the program via using any other computer or device. You will be asked to send us an automatically generated and then enter the reply into the program's Activation window. You will need: Movavi Photo DeNoise activation key. You should receive your key via right after your purchase is completed. Don't have a key? Buy now A device or another computer that can be used to send and receive . Step 1: Open the activation window 1. Launch Movavi Photo DeNoise. 2. Open the Help menu and select Activate Software. The activation window will open. Step 2: Enter the activation key 1. Enter or paste your activation key into the corresponding box of the Activation window. 2. Select the Activate offline option. 3. Click Activate to proceed to the next step. Step 3: Send an with the provided information The next window contains important activation information that you will need to send us via in order to activate your program.

10 1. Click the Copy button to copy the information in the window. If necessary, save or transfer this information to the computer or device that you will be sending the from. 2. On the computer with an Internet connection, open your mail client and compose a new . Paste the information you've copied earlier into the message body and send this to reg@movavi.com. The activation server will then verify your activation key and send you an automatic response containing a registration key, which you will need to enter into the Activation window. You should receive the server's reply within an hour. Step 4: Enter your registration key 1. When you have received your registration key, save it and go back to the Activation window. 2. Enter the registration key into the corresponding box. 3. Click Activate to submit the information.

11 Once activation is complete, you may be asked to restart the application. If you're having problems with offline activation: Make sure that the keys are entered correctly and are intended for your version of Movavi Photo DeNoise. Make sure you have administrator rights on your computer. Contact our support team.

12 Open images To begin editing an image, you will need to open it in Movavi Photo DeNoise. Drag-and-drop Find the necessary image in Windows Explorer and then drag it from Windows Explorer right onto the Photo DeNoise window. Browse On the start screen of Movavi Photo DeNoise, click the Browse for Images button. A Windows Explorer dialog box will appear. There, choose the file you want to edit and click Open. Recent file On the start screen of Movavi Photo DeNoise, click Open last edited file. The thumbnail next to it shows which image was opened last.
13 File menu Open the File menu and choose Open. A Windows Explorer dialog box will appear. There, choose the file you want to edit and click Open. See also: Saving images

14 Zoom and navigation Zoom When you open an image in Movavi Photo DeNoise, it will be fitted to the window size. Use the zoom and navigation tools at the bottom of the window to set a comfortable view. Fit to screen adjusts the zoom level so that the entire image can fit in the window. Actual size sets the zoom level to 100%, displaying the image as it is. Hand tool to move an image around while zoomed in, click the hand icon and hold the left mouse button to move the image. Then, click the hand icon again to go back into editing mode. You can also move the image at any time by holding the right mouse button. To magnify an image, use the zoom slider at the bottom of the window. You can also zoom in and out using the mouse wheel. When you zoom in or out, the current zoom level will be displayed to the right of the navigation controls. Navigation Now you can sort through entire photo folders and edit their contents on the fly. Use the file navigation buttons at the bottom of the window: Go to the previous image in the folder. Go to the next image in the folder. Delete the current image. Click and hold to view the original of this image before editing.
15 If you have made changes to the file before switching to the previous or next file, you will be asked to save or discard the changes.
16 Removing Noise Digital noise is random variations of brightness or color on the image. Most often, noise appears on photos taken in low-light conditions. While you can take certain measures to take pictures with less noise, you can also easily remove or reduce noise after taking the picture. Quick photography tips Use better lighting. No matter what camera you use, your pictures will be clearer if you take them in bright daylight. Don't use digital zoom. Unlike optical zoom, it yields poor image quality. Instead, crop the image afterwards. Know your camera. Set lower ISO and higher exposure for low-light photos. Step 1: Open the Denoise tab Click the Denoise button on the sidebar to open noise reduction options. Step 2: Choose a preset 1. Under Presets, choose one of the premade noise removal modes. Each has a different strength and noise removal method. Try a few to see which one works best for your specific image. 2. Once you've enabled a preset, a slider will appear under it. Use this slider to change the intensity of the selected preset, blending the output image with the original.
17 Step 3: Use fine adjustments 1. Click the Adjustments button to see fine adjustment options for the selected preset. 2. Use the sliders to further improve your photo. Light noise: use this to compensate for variations in brightness (Luminance or contrast noise). Color noise: use this to compensate for random specks of color (Chroma noise). Intensity: for some presets, you can modify the strength of the noise removal algorythm. Sharpness: use this to return some detail to the image if it looks too smooth. * Please note that very high values may cause distortions. That's it! Don't forget to save your image without noise!
18 Saving presets If you find a combination of adjustments that works best for your pictures, you can save it for later use. Step 1: Choose an existing preset Under Presets, choose one of the noise reduction methods. This will be the base for your new preset. Step 2: Modify adjustments 1. Click the Adjustments button to see the fine adjustment options. 2. Use the sliders to reach the desired effect. Step 3: Save preset 1. At the bottom of the Adjustments section, click Save preset. 2. A dialog box will appear. Enter a name for the new preset. 3. Click Save.

19 That's it! Your new preset will appear under Presets > Custom presets. Renaming custom presets 1. Open the list of Custom presets. 2. Right-click the preset that you want to edit and choose Rename Preset. 3. A dialog box will open. Enter a new name for the preset and click Save. Deleting custom presets 1. Open the list of Custom presets. 2. Right-click the preset that you want to edit and choose Delete Preset. 3. Click Yes in the dialog box to confirm deleting the preset.
20 Rotate and flip The Rotate and Flip tab allows you to flip, rotate, and straighten out images with slanted horizon levels. Click the Rotate button on the right-hand side of the window to open orientation options. Rotate and flip images Use the buttons on the Rotate and Flip tab to rotate the image by 90 degrees or to mirror the image. Rotates your photo 90 counterclockwise Flips your photo horizontally (left to right) Rotates your photo 90 clockwise Flips your photo vertically (upside-down) Straighten images A tilted horizon is a frequent problem for both beginner and experienced photographers when shooting from a handheld camera. This tool allows you to easily correct tilting in your photos, and you won't have to worry about horizon levels when taking your pictures. The Angle slider allows you to manually rotate the image up to 45 either way. Using the Level Tool: The Level Tool can help you automatically straighten out the image. 1. In your photo, find a straight horizontal or vertical line. This can be the horizon, the side of a building, or any other lines that are parallel or perpendicular to the horizon. 2. Now, click the Level Tool and trace that line on your image. Once you've traced the line, the image will be automatically rotated to make that line exactly horizontal or vertical.
21
22 Crop Cropping an image allows you to save it with a different aspect ratio, remove unwanted parts from the edges, and zoom in on objects inside the image. We recommend that you save a backup copy of the image before cropping, in case you need the original image later. Click the Crop button on the right-hand side of the window to open the Crop tab. Step 1: Open the Crop tab Click the Crop button on the right to open cropping options. Step 2: Define size Next, specify the size and proportions that you want. There are several ways to set the size: Crop frame A crop frame will be visible over the image. Drag inside the image to draw the cropping rectangle, or move the edges of the crop frame with your mouse. Pre-defined sizes Open the drop-down box and select a suitable size from the list. Here, you can find some commonly used sizes and presets for quickly changing the proportions of the image. Manual input If you need a specific size in pixels, you can manually enter the width and height into the corresponding boxes. To switch the width and height, click the Invert Proportions icon. Lock aspect ratio Selecting this option will maintain the selected width to height proportions. This way, when you change one dimension of the cropping rectangle (whether by drawing the cropping area or by entering a number for width or height), the other dimension will change accordingly to keep the selected aspect ratio.
23 Step 3: Apply changes Click the Apply button to accept the cropping changes. To discard the changes, click Reset. Don't forget to save your image!
24 Resize Resizing images allows you reduce an image's file size, prepare pictures for uploading to web albums, which often have a size limit, or prepare web-sized images for blogs and websites. Tips: If you intend to make other edits to the photo, it is best that you do them prior to resizing it, since the image quality will then be preserved better. Also, we recommend that you save a copy of the image before resizing in case you may need it later, especially if you plan on printing out the image. Step 1: Go to the Resize tab On the right-hand panel of the window, click the Resize button to switch to the Resize tab. Step 2: Enter new dimensions Select or enter the necessary image size: The Fit into box allows you to select from the most common image sizes, as well as presets for printing and exporting images. To enter a custom image size, enter the dimensions into the width and height boxes. You can change the measurement unit in the box on the right. The default unit is pixels. To avoid visual distortions of the image after resizing, keep the Constrain proportions option enabled.
25 Step 3: Apply changes Finally, click Apply to resize the image to the specified size. Don't forget to save the image when you're done!
26 Save images Step 1: Click the Export button in the bottom right-hand corner or open the File menu and click Save to rewrite the previous image, or click Save As to save the image under a different name. Step 2: In the Save File dialog box, choose where you want to save your image. Step 3: If you want to save the image in a different format, open the Save as type list and select the format you want. Step 4: Finally, click Save.
27 Changing image format Changing an image's format allows you to use your images in a wider variety of situations or compress the images to a smaller file size. Many websites only allow a limited number of formats for uploading, so having a tool to easily change image format becomes a must. Step 1: After you've opened and edited an image, click Export in the bottom right-hand corner of the window. The Save File dialog box will open. Step 2: To choose an image format, open the Save as type box and select the format you need. If the format lists multiple file extensions, such as *.jpg, *.jpeg and others for JPEG, you can type the necessary file extension in the file name field. Advanced: Some formats also allow you to set image quality and compression method. For these formats, click the Options button in the Save File dialog box to open these options. JPEG Quality Drag the slider to the necessary quality level and click OK. Lower quality allows you to compress the image to a smaller file size, but will probably not look as good. TIFF Compression Select the preferred compression method and click OK: Uncompressed: no compression method will be used. The image will be much larger in size than its compressed copies, but uncompressed images with large resolutions may be processed faster by some software. PackBits: offers less compression than LZW, but is the most widely supported compression method, especially on Apple software. LZW: compresses the image to about half size. ZIP: best for working with 16-bit images and average for 8-bit images.

28 Step 3: Choose where to save the new file and give your file a name. Step 4: Click Save. If you make any edits after saving the file in a different format, you will be working with the new file.

29 Image size and quality Even though image files rarely take up more disk space than videos or other media files, a large photo collection can quickly fill up your hard drive if you save all photos at the maximum size and quality. In this section, you will learn how to manage image file size. Image file size is defined by the following properties: Image size in pixels The larger the image, the more pixels it will be made up of, and the more data will need to be stored. The number of pixels also defines image resolution for printing, and affects the maximum level of detail you can achieve for a print of a certain size. To reduce file size, you can resize the image. However, this comes at a cost: the smaller copy will look just as good, but if you want to print out the image or use it as wallpaper, the smaller file will look considerably worse than its original. Let's see how much disk space you can save by resizing images. Below are the file sizes for one image (here, you see a scaled-down preview), and the difference is amazing, resizing a large image to a viewable 800x600 size makes the file size over a hundred times smaller. Dimensions File Size 7899x5924 px 27,6 MB 800x600 px 168 KB If you want to upload previews of your images to the web, or share photos in web albums, resizing the photos will most likely be a good idea: the upload times will be faster, and if you have a storage limit, it won't be filled up as fast as if you uploaded the images at their original size. Hint: Don't scale up small, low-quality images. An image with small dimensions does not have enough data in the file to allow any program to fully restructure the quality of a larger size image. If you size them up, you will only be wasting disk space without any improvement in quality. Read our resizing guide Image complexity Image complexity plays a large role in file size. Due to image compression specifics, images with different content but identical size and format will differ in file size because of the details that will need to be preserved. For example, if you save a large image of a purely blue background, some compression methods will only need to store which color fills the whole image, while for a picture of a flower, all the small details will be stored to avoid quality loss. Note the images below. They are of identical dimensions and are both saved in JPEG format. One image is a photo of a complex and colorful flower, while the other is a plain blue background. The second image's file size, having to encode less data, is 48 times smaller than the first! And while you can't simplify your photos to a single color, keep in mind that some images will naturally have larger file size than others.

30 425x282 pixels 144 KB 2,98 KB Format and compression method A compression method can be seen as a shorthand writing system for image editing software, where it can write all the data of your image into less space, and then decipher the shorthand to recreate the image on your screen when you open the file. Most image compression methods do not store all of the image's data pixel by pixel, since it would take significantly more disk space. Instead, the image compression algorythm finds a way to pack this information by finding identical parts and only recording those same parts once, or by throwing away some data that it finds less important. Different formats have different compression methods, and choosing the best format largely depends on the type and purpose of the images. Lossless formats: some formats can store the image without losing any data, meaning that the quality of the image will not decrease when you save it. These formats can store the image either at its full size, or use a lossless compression method, that will pack the image into a smaller file, yet retain the original quality. No matter the compression level, these files are rather large, but offer the benefit of higher quality and sharper images, which is especially important for text images and logos. Common lossless formats: PNG, TIFF, BMP 'Lossy' formats: other formats allow you to save the images into smaller files, but they compress images at the expense of some quality. For large photos, the trade-off is usually justified, as the human eye will probably not notice the difference at low compression levels. However, when manually adjusting quality of 'lossy' formats, such as JPEG, it is important not to set the quality too low to enjoy the image. The most common 'lossy' format: JPEG When you change an image's format, note that saving it to a lossless format will not improve its quality, but only preserve the existing data. Likewise, if you change an image from a lossless format to a 'lossy' one, some data will inevitably be lost to compression. Saving files in a different format
31 Print photos Printing the image To print out an image from Movavi Photo DeNoise: 1. Open the File menu and choose Print. 2. Choose the printer you want to use for printing the photo. 3. Click Settings to open the settings for the selected printer. The settings will vary depending on your printer's software, but generally you can choose paper size, orientation and color options. 4. Choose the number of copies that you want to print. If this is your first time printing a photo, you may want to first print only one sample copy to make sure you have set up everything right. 5. Click Print to begin printing! Image printing guidelines Follow these guidelines to ensure the best possible print quality: 1. Make sure the image is large enough for printing on the selected paper size, and conversely, choose the right paper size for your images. If you print out small images on large paper, you may find that you can see individual pixels or that the image is not smooth enough on print. Before taking the photos you want to print, use a camera with a high megapixel count, make sure that it is set to the highest available quality (some cameras allow you to shoot smaller images than the camera's maximum size), and provide good lighting conditions to minimize noise. The larger the original photo, the larger a print size you can afford without losing crispness and quality. The standard for printing images is to have at least 300 pixels per inch of the photo paper. The following table shows the correlation between image size and its printed size when printed at 300 pixels per inch (~118 pixels/cm). You can use it to match paper size to your image size and vice versa. Camera Megapixels 2 3 Image Size in Pixels 1600 x 1200 px 2048 x 1536 px Printed Size in Inches 5" x 4" 7" x 5" Printed Size in Centimeters 13 cm x 10 cm 17 cm x 13 cm x 1632 px 8.2" x 5.4" 21 cm x 14 cm x 1920 px 2816 x 2112 px 8" x 6" 9" x 7" 21 cm x 16 cm 24 cm x 18 cm x 2468 px 3872 x 2592 px 4000 x 3000 px 11" x 8" 12.1" x 9.1" 13" x 10" 28 cm x 21 cm 33 cm x 22 cm 34 cm x 25 cm If you didn't find the necessary size in the table, you can easily calculate the printed size in inches by dividing the width and height in pixels by 300. Likewise, to find out the minimum number of pixels for a certain print size, multiply the width and height in inches by 300 to get the image dimensions in pixels. 2. You do not need to downsize the image before printing: the software will automatically fit the image onto the selected paper size. Downsizing the image will only reduce quality. 3. If you need to crop unwanted parts of the image, make sure that the end result is not too small. If you have a very large image, you can use the crop function to zoom in on objects in the image, but keep in mind that the output image size must be large enough for printing. You can check the image size in pixels by clicking the File Information button on the bottom panel:. 4. Use a high quality printer for printing out your photos. These simple guidelines will help you choose a printer: Inkjet printers are much better at printing images than laser printers. Dye sublimation printers are considered the best for printing photos, however they are quite rare and can only be used for photo printing. Check the printer's dots per inch (DPI) resolution: the higher the DPI, the higher quality prints it will be able to produce. For photo printing, make sure that the printer has at least 300x300 DPI. Generally, a dedicated photo printer will produce better results than a general-purpose multifunction printer of the same price range. Some printers may produce colors different from the original because of the way they convert RGB color (the color scheme you see on your monitor) to CMYK color (used for printing).
32 Be aware of your printer's maximum print size; many consumer printers only print photos up to 8 by 10 inches (20.32 x 25.4 cm). You should find this information on the packaging or in the printer's user manual. 5. Use high quality photo paper. There are different kinds of photo paper that may work differently depending on the content of your image. For example, glossy paper is better at reproducing bright colors, while matte paper is more suitable for portraits. Also, make sure that the paper matches your printer type (i.e. laser or inkjet). Calibrating your Display The colors you see in print may be slightly different than those you see on your display due to LCD monitor specifics. You can try to calibrate your display for better previewing: 1. Open the Control Panel. 2. Type "Calibrate display" into the search box. 3. Click Calibrate display color. This requires administrator permissions. 4. Follow the onscreen instructions to calibrate your display.
33 Help and support If you have any questions or concerns regarding Movavi software, you are welcome to contact our support team. Write to us at or click the button on the right to ask a support specialist via live chat. Please describe your problem in as much detail as possible; any screenshots or log files will allow us to help you faster. Our support team specialists may ask you for additional information that is required to solve your problem: these may include your license key, log files, and files you were working with, but never personal information. We value your privacy! Have you checked the FAQ section? Your question may have already been answered! More questions: How to activate Movavi Photo DeNoise How to buy the software How to update the graphics card drivers
34 Supported formats Format BMP DPX EXR GIF (Non-animated) JPEG JPEG 2000 JPEG-LS PAM PCX PGM PNG PBM PPM SGI Sun Rasterfile TARGA TIFF WebP XBM XFace XWD Open Save
35 System requirements The minimum system requirements represent the lowest hardware specifications that are guaranteed to run Movavi Photo DeNoise. If your computer meets the recommended configuration, then Movavi Photo DeNoise is sure to run smoothly on your comptuer. Movavi Photo DeNoise may also run on slower machines, however, we cannot guarantee stable performance if the minimum requirements are not met. Minimum system requirements Operating system Processor Display resolution Recommended configuration Windows Vista/7/8/10 with latest service packs and patches Intel, AMD or compatible 2.2 GHz processor, 1 GHz 1024x768, 32-bit color 1280x1024 or higher RAM Windows Vista 256 MB Windows 7, 8, 10 1 GB 4 GB Available disk space 150 MB required for installation 500 MB recommended for ongoing operations
36 Updating graphics card drivers If you encounter an error message asking you to update your graphics drivers, you will need to download a new driver from your graphics card manufacturer's website and install it on your system. Some graphics card drivers also have a useful utility that notifies you when a driver update is available and updates the driver automatically. Keeping your graphics card drivers up-to-date will ensure stable performance of applications and games on your computer. Step 1: Find your graphics card manufacturer 1. Right-click your desktop and choose Screen Resolution. 2. In the Screen Resolution settings window, click Advanced settings. 3. This will open your graphics card properties. At the top of the window, your graphics card model will be listed under the Adapter Type section. Note the full name of the graphics card somewhere for later. Step 2: Download the new version Now that you've learned your graphics card manufacturer and model, go to the manufacturer's website and find driver downloads. There, look for the model or series that you've found earlier and download the driver installation file. Some manufacturers may also offer a utility that will automatically find the necessary driver. NVIDIA download center AMD download center Warning: Only download drivers from the official manufacturer's website. Thirdparty websites offering driver downloads may contain malware. Step 3: Install driver Once the file is completely downloaded, run the installation file and follow the onscreen instructions to install the driver on your system. Your display may blink several times in the process. After the installation has finished, it is advised that you restart the computer. Updating NVIDIA Driver Modern NVIDIA graphics cards come with a special application called NVIDIA GeForce Experience that monitors driver updates and allows you to optimize your computer's graphics performance. 1. Open the NVIDIA GeForce Experience application. It should already be installed on your system. If you cannot find the application, please try the method above. 2. In the Drivers section, click the Check for updates button to find the latest drivers. 3. When the application has found a newer driver, click the Download driver button. From here, the software will automatically download and install the necessary driver for your system.

37 Updating AMD or ATI Driver 1. If you have an AMD or ATI graphics card, go to the Driver Download Center on AMD's official website. AMD Driver Download Center 2. Download the auto detect utility and run it when the download has finished. Auto Detect Utility 3. The utility will then automatically find your graphics card and help you download and install the right driver for your system. If the utility fails to find a driver for you, you can manually select your graphics card model and operating system on the Driver Downloads page and download the driver. 4. After the driver has downloaded, run the installation file and follow the on-screen instructions to install it. 5. After the driver has been installed, it is recommended that you restart your computer. If none of the above steps have helped, feel free to contact our support team via support@movavi.com or live chat. If possible, please include the name of your graphics card model (see Step 1), as well as screenshots of any error messages you have encountered. This will help our support team specialists solve your problem quicker.
System Requirements These are the minimum system requirements needed to run Movavi Photo Editor:
 System Requirements These are the minimum system requirements needed to run Movavi Photo Editor: Intel-based Mac computer Mac OS X 10.6, 10.7, 10.8 or 10.9 Display graphics minimum resolution of 1024x768;
Movavi Photo Editor. User guide 2016
 Movavi Photo Editor User guide 2016 Activation When you first install a copy of Movavi Photo Editor, it will be running in trial mode, where you cannot save the edited images. To be able to use the program
Guidance on Using Scanning Software: Part 5. Epson Scan
 Guidance on Using Scanning Software: Part 5. Epson Scan Version of 4/29/2012 Epson Scan comes with Epson scanners and has simple manual adjustments, but requires vigilance to control the default settings
ID Photo Processor. Batch photo processing. User Guide
 ID Photo Processor Batch photo processing User Guide 2015 Akond company 197342, Russia, St.-Petersburg, Serdobolskaya, 65a Phone/fax: +7(812)384-6430 Cell: +7(921)757-8319 e-mail: info@akond.net http://www.akond.net
Go Daddy Online Photo Filer
 Getting Started and User Guide Discover an easier way to share, print and manage your photos online! Online Photo Filer gives you an online photo album site for sharing photos, as well as easy-to-use editing
PackshotCreator 3D User guide
 PackshotCreator 3D User guide 2011 PackshotCreator - Sysnext All rights reserved. Table of contents 4 4 7 8 11 15 18 19 20 20 23 23 24 25 26 27 27 28 28 34 35 36 36 36 39 42 43 44 46 47 Chapter 1 : Getting
1. What is SENSE Batch
 1. What is SENSE Batch 1.1. Introduction SENSE Batch is processing software for thermal images and sequences. It is a modern software which automates repetitive tasks with thermal images. The most important
Photoshop Elements Hints by Steve Miller
 2015 Elements 13 A brief tutorial for basic photo file processing To begin, click on the Elements 13 icon, click on Photo Editor in the first box that appears. We will not be discussing the Organizer portion
Digital Portable Overhead Document Camera LV-1010
 Digital Portable Overhead Document Camera LV-1010 Instruction Manual 1 Content I Product Introduction 1.1 Product appearance..3 1.2 Main functions and features of the product.3 1.3 Production specifications.4
For customers in USA This device complies with Part 15 of the FCC rules. Operation is subject to the following two conditions:
 User manual For customers in North and South America For customers in USA This device complies with Part 15 of the FCC rules. Operation is subject to the following two conditions: (1) This device may not
Kaleidoscope Kreator 2.0
 Kaleidoscope Kreator 2.0 Users Guide Revision 1.0 Table of Contents 1. Overview... 1 1.1 What is Kaleidoscope Kreator?... 1 1.2 Creative Uses for Kaleidoscope Kreator... 3 2. Quick Start Guide... 6 2.1
The student will: download an image from the Internet; and use Photoshop to straighten, crop, enhance, and resize a digital image.
 Basic Photoshop Overview: Photoshop is one of the most common computer programs used to work with digital images. In this lesson, students use Photoshop to enhance a photo of Brevig Mission School, so
User Manual Veterinary
 Veterinary Acquisition and diagnostic software Doc No.: Rev 1.0.1 Aug 2013 Part No.: CR-FPM-04-022-EN-S 3DISC, FireCR, Quantor and the 3D Cube are trademarks of 3D Imaging & Simulations Corp, South Korea,
Copyright Notice. Trademarks
 Copyright Notice All rights reserved. No part of this publication may be reproduced, stored in a retrieval system, or transmitted in any form or by any means, electronic, mechanical, photocopying, recording,
ScanGear CS-U 5.3 for CanoScan FB630U/FB636U Color Image Scanner User s Guide
 ScanGear CS-U 5.3 for CanoScan FB630U/FB636U Color Image Scanner User s Guide Copyright Notice 1999 Canon Inc. This manual is copyrighted with all rights reserved. Under the copyright laws, this manual
ImagesPlus Basic Interface Operation
 ImagesPlus Basic Interface Operation The basic interface operation menu options are located on the File, View, Open Images, Open Operators, and Help main menus. File Menu New The New command creates a
Introduction. Let s get started...
 Introduction Welcome to PanoramaPlus 2, Serif s fully-automatic 2D image stitcher. If you re looking for panorama-creating software that s quick and easy to use, but doesn t compromise on image quality,
IMAGE SIZING AND RESOLUTION. MyGraphicsLab: Adobe Photoshop CS6 ACA Certification Preparation for Visual Communication
 IMAGE SIZING AND RESOLUTION MyGraphicsLab: Adobe Photoshop CS6 ACA Certification Preparation for Visual Communication Copyright 2013 MyGraphicsLab / Pearson Education OBJECTIVES This presentation covers
Release Notes. Windows. v10.2
 Release Notes v10.2 Windows System requirements Intel Core 2 Duo, AMD Athlon 64 X2 or higher 4 GB of RAM (8 GB recommended) 2 GB of available disk space (6 GB recommended) Microsoft Windows 7 (64 bits),
SAQA. How to Submit an Online Entry. Art by Mary Kay Fosnacht
 SAQA KS MO OK How to Submit an Online Entry Art by Mary Kay Fosnacht Registration Process Locate and read the Prospectus Open the Registration Form Preview 1. About the Artist 2. About the Art 3. Upload
Sense. 3D scanning application for Intel RealSense 3D Cameras. Capture your world in 3D. User Guide. Original Instructions
 Sense 3D scanning application for Intel RealSense 3D Cameras Capture your world in 3D User Guide Original Instructions TABLE OF CONTENTS 1 INTRODUCTION.... 3 COPYRIGHT.... 3 2 SENSE SOFTWARE SETUP....
INTRODUCTION TO COMPUTER GRAPHICS
 INTRODUCTION TO COMPUTER GRAPHICS ITC 31012: GRAPHICAL DESIGN APPLICATIONS AJM HASMY hasmie@gmail.com WHAT CAN PS DO? - PHOTOSHOPPING CREATING IMAGE Custom icons, buttons, lines, balls or text art web
Getting Started Guide. Getting Started With Go Daddy Photo Album. Setting up and configuring your photo galleries.
 Getting Started Guide Getting Started With Go Daddy Photo Album Setting up and configuring your photo galleries. Getting Started with Go Daddy Photo Album Version 2.1 (08.28.08) Copyright 2007. All rights
SCANNING IMAGES - USER S GUIDE. Scanning Images with Epson Smart Panel and PhotoShop [for Epson 1670 scanners]
![SCANNING IMAGES - USER S GUIDE. Scanning Images with Epson Smart Panel and PhotoShop [for Epson 1670 scanners]](/thumbs/89/98942649.jpg "SCANNING IMAGES - USER S GUIDE. Scanning Images with Epson Smart Panel and PhotoShop [for Epson 1670 scanners]") University of Arizona Information Commons Training 1 SCANNING IMAGES - USER S GUIDE Scanning Images with Epson Smart Panel and PhotoShop [for Epson 1670 scanners] p.2 Introduction and Overview Differences
University of Arizona Information Commons Training 1 SCANNING IMAGES - USER S GUIDE Scanning Images with Epson Smart Panel and PhotoShop [for Epson 1670 scanners] p.2 Introduction and Overview Differences
March 31, Welcome to the Family Tree Maker Users Group!
 March 31, 2008 Welcome to the Family Tree Maker Users Group! Tonight s Agenda: FTM 2005/2006/v16 Photo Features 1. Saving digitized pictures 2. Using a scanner or digital camera to copy pictures and documents
Neat Image. User guide. standalone application (Mac) To make images look better. Document version 8.3, 27-September-2017
 To make images look better. Document version 8.3, 27-September-2017") Neat Image standalone application (Mac) To make images look better. User guide Document version 8.3, 27-September-2017 Neat Image 1999-2017 Neat Image team, ABSoft. All rights reserved. Table of contents
Neat Image standalone application (Mac) To make images look better. User guide Document version 8.3, 27-September-2017 Neat Image 1999-2017 Neat Image team, ABSoft. All rights reserved. Table of contents
inphoto ID Canon camera control software Automatic ID photography User Guide
 inphoto ID Canon camera control software Automatic ID photography User Guide 2008 Akond company 197342, Russia, St.-Petersburg, Serdobolskaya, 65A Phone/fax: +7(812)600-6918 Cell: +7(921)757-8319 e-mail:
ScanGear CS-U 6.0. for CanoScan D646U Color Scanner. User s Guide
 ScanGear CS-U 6.0 for CanoScan D646U Color Scanner User s Guide Copyright Notice Copyright 2000 Canon Inc. This manual is copyrighted with all rights reserved. Under the copyright laws, this manual may
Adobe Photoshop CC Part 1: The Basics
 CALIFORNIA STATE UNIVERSITY, LOS ANGELES INFORMATION TECHNOLOGY SERVICES Adobe Photoshop CC Part 1: The Basics Summer 2015, Version 1.0 Table of Contents Introduction...2 New Features of Photoshop CC...2
Kigamo Scanback which fits in your view camera in place of conventional film.
 What's included Kigamo Scanback which fits in your view camera in place of conventional film. SCSI Cable to connect your Scanback to the host computer. A 3-meter SCSI cable is standard. Kigamo also has
Apple Photos Quick Start Guide
 Apple Photos Quick Start Guide Photos is Apple s replacement for iphoto. It is a photograph organizational tool that allows users to view and make basic changes to photos, create slideshows, albums, photo
Neat Image. User guide. To make images look better. Document version 4.2, January 10, Copyright by ABSoft. All rights reserved.
 To make images look better. User guide Document version 4.2, January 10, 2005 Table of contents 1. Introduction...3 1.1. Overview...3 1.2. Features...3 1.3. Requirements...4 2. Key concepts...5 2.1. What
The next table shows the suitability of each format to particular applications.
 What are suitable file formats to use? The four most common file formats used are: TIF - Tagged Image File Format, uncompressed and compressed formats PNG - Portable Network Graphics, standardized compression
1/31/2010 Google's Picture Perfect Picasa
 The Picasa software lets you organize, edit, and upload your photos in quick, easy steps. Download Picasa at http://picasa.google.com You'll be prompted to accept the terms of agreement. Click I Agree.
Photoshop: a Beginner s course. by: Charina Ong Centre for Development of Teaching and Learning National University of Singapore
 Photoshop: a Beginner s course by: Charina Ong Centre for Development of Teaching and Learning National University of Singapore Table of Contents About the Workshop... 1 Prerequisites... 1 Workshop Objectives...
Resizing images for the web using. Version 1.3. WrightWay. Design.
 Resizing images for the web using Version 1.3 WrightWay Design www.wrightwaydesign.com.au Why would we need to re-size our images? Images taken with digital cameras are captured at very high levels of
Introduction to: Microsoft Photo Story 3. for Windows. Brevard County, Florida
 Introduction to: Microsoft Photo Story 3 for Windows Brevard County, Florida 1 Table of Contents Introduction... 3 Downloading Photo Story 3... 4 Adding Pictures to Your PC... 7 Launching Photo Story 3...
Digital Projection Entry Instructions
 The image must be a jpg file. Raw, Photoshop PSD, Tiff, bmp and all other file types cannot be used. There are file size limitations for competition. 1) The Height dimension can be no more than 1080 pixels.
Introduction to Photoshop: Basic Editing & Prepare Images for the Web
 Introduction to Photoshop: Basic Editing & Prepare Images for the Web 1 LEARNING OBJECTIVES Basic tools in Photoshop & Use of Bridge Prepare images for print and web use TOPICS COVERED Photoshop Interface
Digital Imaging - Photoshop
 Digital Imaging - Photoshop A digital image is a computer representation of a photograph. It is composed of a grid of tiny squares called pixels (picture elements). Each pixel has a position on the grid
 S4B Image Converter Soft4Boost Help S4B Image Converter www.sorentioapps.com Sorentio Systems, Ltd. All rights reserved Contact Us If you have any comments, suggestions or questions regarding S4B Image
Scanning Setup Guide for TWAIN Datasource
 Scanning Setup Guide for TWAIN Datasource Starting the Scan Validation Tool... 2 The Scan Validation Tool dialog box... 3 Using the TWAIN Datasource... 4 How do I begin?... 5 Selecting Image settings...
Adobe Photoshop CS2 Workshop
 COMMUNITY TECHNICAL SUPPORT Adobe Photoshop CS2 Workshop Photoshop CS2 Help For more technical assistance, open Photoshop CS2 and press the F1 key, or go to Help > Photoshop Help. Selection Tools - The
Mask Integrator. Manual. Mask Integrator. Manual
 Mask Integrator Mask Integrator Tooltips If you let your mouse hover above a specific feature in our software, a tooltip about this feature will appear. Load Image Load the image with the standard lighting
Quick Start Training Guide
 Quick Start Training Guide To begin, double-click the VisualTour icon on your Desktop. If you are using the software for the first time you will need to register. If you didn t receive your registration
Managing images with NewZapp
 Managing images with NewZapp This guide is for anyone using the NewZapp Fixed editor as opposed to the Drag and Drop editor. The Image Manager is where images are uploaded and stored in your NewZapp account
ISCapture User Guide. advanced CCD imaging. Opticstar
 advanced CCD imaging Opticstar I We always check the accuracy of the information in our promotional material. However, due to the continuous process of product development and improvement it is possible
For customers in Canada This Class B digital apparatus meets all requirements of the Canadian Interference-Causing Equipment Regulations.
 User manual For customers in North and South America For customers in USA This device complies with Part 15 of the FCC rules. Operation is subject to the following two conditions: (1) This device may not
How to generate different file formats
 How to generate different file formats Different mediums print, web, and video require different file formats. This guide describes how to generate appropriate file formats for these mediums by using Adobe
Chroma Mask. Manual. Chroma Mask. Manual
 Chroma Mask Chroma Mask Tooltips If you let your mouse hover above a specific feature in our software, a tooltip about this feature will appear. Load Image Here an image is loaded which has been shot in
Diploma in Photoshop
 Diploma in Photoshop Tabbed Window Document Workspace Options Options Bar Main Interface Tool Palette Active Image Stage Layers Palette Menu Bar Palettes Useful Tip Choose between pre-set workspace arrangements
VRS 4.2 Professional Key New Features
 Desktop Productivity You re in the middle of writing an email message when you realize that you need to scan and attach a document. What do you do? Today most workers must leave their email program to
CHROMACAL User Guide (v 1.1) User Guide
 User Guide") CHROMACAL User Guide (v 1.1) User Guide User Guide Notice Hello and welcome to the User Guide for the Datacolor CHROMACAL Color Calibration System for Optical Microscopy, a cross-platform solution that
CHROMACAL User Guide (v 1.1) User Guide User Guide Notice Hello and welcome to the User Guide for the Datacolor CHROMACAL Color Calibration System for Optical Microscopy, a cross-platform solution that
Version 4.2 For WINDOWS
 SIGMA Photo Pro User Guide Companion Processing Software for SIGMA Digital Cameras Version 4.2 For WINDOWS I M P O R T A N T : Please Read Before You Start Thank you very much for purchasing this SIGMA
CHAPTER1: QUICK START...3 CAMERA INSTALLATION... 3 SOFTWARE AND DRIVER INSTALLATION... 3 START TCAPTURE...4 TCAPTURE PARAMETER SETTINGS... 5 CHAPTER2:
 Image acquisition, managing and processing software TCapture Instruction Manual Key to the Instruction Manual TC is shortened name used for TCapture. Help Refer to [Help] >> [About TCapture] menu for software
Developing Multimedia Assets using Fireworks and Flash
 HO-2: IMAGE FORMATS Introduction As you will already have observed from browsing the web, it is possible to add a wide range of graphics to web pages, including: logos, animations, still photographs, roll-over
DOCUMENT SCANNER INSTRUCTIONS. Space. Backup. Count Only. New File. Scanner. Feeding Option Manual Auto Semi-Auto
 E FILM F Scanner A Space Count Only New File Feeding Option Manual Auto Semi-Auto Backup DOCUMENT SCANNER INSTRUCTIONS NOTICE q Copyright 2001 by CANON ELECTRONICS INC. All rights reserved. No part of
Quick Printable (And Online) Puzzles
 Puzzles") Quick Printable (And Online) Puzzles While making an online puzzle, I stumbled onto a way to make a printable puzzle at the same time! You can even make versions of the same puzzle with varying numbers
Quick Printable (And Online) Puzzles While making an online puzzle, I stumbled onto a way to make a printable puzzle at the same time! You can even make versions of the same puzzle with varying numbers
Photoshop CC 2018 Essential Skills
 Photoshop CC 2018 Essential Skills Adobe Photoshop Creative Cloud 2018 University Information Technology Services Learning Technology, Training, Audiovisual and Outreach Copyright 2018 KSU Division of
Resizing Images for Competition Entry
 Resizing Images for Competition Entry Dr Roy Killen, EFIAP, GMPSA, APSEM TABLE OF CONTENTS Some Basic Principles 1 An Simple Way to Resize and Save Files in Photoshop 5 An Alternative way to Resize Images
Image Optimization for Print and Web
 There are two distinct types of computer graphics: vector images and raster images. Vector Images Vector images are graphics that are rendered through a series of mathematical equations. These graphics
ScanPotter. Reference Manual
 ScanPotter Reference Manual Copyright 2014 by Microtek International, Inc. All rights reserved. Trademarks Microtek, ScanMaker, ArtixScan, ScanWizard, ScanPotter and ColoRescue are trademarks or registered
SKF TKTI. Thermal Camera Software. Instructions for use
 SKF TKTI Thermal Camera Software Instructions for use Table of contents 1. Introduction...4 1.1 Installing and starting the Software... 5 2. Usage Notes...6 3. Image Properties...7 3.1 Loading images
Picture Style Editor Ver Instruction Manual
 ENGLISH Picture Style File Creating Software Picture Style Editor Ver. 1.15 Instruction Manual Content of this Instruction Manual PSE stands for Picture Style Editor. indicates the selection procedure
Picture Style Editor Ver Instruction Manual
 ENGLISH Picture Style File Creating Software Picture Style Editor Ver. 1.12 Instruction Manual Content of this Instruction Manual PSE is used for Picture Style Editor. In this manual, the windows used
it.med.harvard.edu/ris UMAX PowerLook 1120 Flatbed Scanner WQGF
 it.med.harvard.edu/ris UMAX PowerLook 1120 WQGF Research Imaging Solutions RIS@hms.harvard.edu it.med.harvard.edu/ris Beth Beighlie Digital Imaging Coordinator Research Imaging Solutions Information Technology
Windows INSTRUCTION MANUAL
 Windows E INSTRUCTION MANUAL Contents About This Manual... 3 Main Features and Structure... 4 Operation Flow... 5 System Requirements... 8 Supported Image Formats... 8 1 Installing the Software... 1-1
ScanGear CS-U 5.8. for CanoScan D660U Color Scanner. User s Guide
 ScanGear CS-U 5.8 for CanoScan D660U Color Scanner User s Guide Copyright Notice Copyright 2000 Canon Inc. This manual is copyrighted with all rights reserved. Under the copyright laws, this manual may
Applying mathematics to digital image processing using a spreadsheet
 Jeff Waldock Applying mathematics to digital image processing using a spreadsheet Jeff Waldock Department of Engineering and Mathematics Sheffield Hallam University j.waldock@shu.ac.uk Introduction When
1-Touch Laser Photo. Operating Instructions
 1-Touch Laser Photo Operating Instructions INTRODUCTION Thank you for choosing 1-Touch Laser Photo software from Universal Laser Systems. 1-Touch Laser Photo is proprietary software that is designed to
Brightness and Contrast Control Reference Guide
 innovation Series Scanners Brightness and Contrast Control Reference Guide A-61506 Part No. 9E3722 CAT No. 137 0337 Using the Brightness and Contrast Control This Reference Guide provides information and
inphoto ID SLR Automatic ID photography With Canon SLR camera User Guide
 inphoto ID SLR Automatic ID photography With Canon SLR camera User Guide 2014 Akond company Phone/fax: +7(812)384-6430 Cell: +7(921)757-8319 e-mail: info@akond.net akondsales@gmail.com http://www.akond.net
PHOTOTUTOR.com.au Share the Knowledge
 THE DIGITAL WORKFLOW BY MICHAEL SMYTH This tutorial is designed to outline the necessary steps from digital capture, image editing and creating a final print. FIRSTLY, BE AWARE OF WHAT CAN AND CAN T BE
Service Bulletin
 Service Bulletin 09-094 Applies To: ALL October 30, 2010 Photos For Warranty Windshield Claims (Supersedes 09-094, dated February 23, 2010, to revise the information marked by the black bars) REVISION
Key Terms. Where is it Located Start > All Programs > Adobe Design Premium CS5> Adobe Photoshop CS5. Description
 Adobe Adobe Creative Suite (CS) is collection of video editing, graphic design, and web developing applications made by Adobe Systems. It includes Photoshop, InDesign, and Acrobat among other programs.
User Guide. Version 1.4. Copyright Favor Software. Revised:
 User Guide Version 1.4 Copyright 2009-2012 Favor Software Revised: 2012.02.06 Table of Contents Introduction... 4 Installation on Windows... 5 Installation on Macintosh... 6 Registering Intwined Pattern
BOOK BUILDING. for beginners. Lightroom Tutorial by Mark Galer
 BOOK BUILDING for beginners Lightroom Tutorial by Mark Galer Contents Part One: Preparing the Book Part Two: Page Layout Design Ideas Create a Collection Choose your Images Sequence your Images Title your
Mullingar Camera Club Basic introduction to Digital Printing using Photoshop CC.
 Mullingar Camera Club Basic introduction to Digital Printing using Photoshop CC. Table of Contents Course aims: 1 Course presentation notes: 1 Introducing Photoshop: 1 Adjusting the Brightness or Contrast
inphoto ID PS Automatic ID photography With Canon PowerShot camera User Guide
 inphoto ID PS Automatic ID photography With Canon PowerShot camera User Guide 2018 Akond company Phone/fax: +7(812)384-6430 Cell: +7(921)757-8319 e-mail: info@akond.net akondsales@gmail.com http://www.akond.net
CS 200 Assignment 3 Pixel Graphics Due Tuesday September 27th 2016, 9:00 am. Readings and Resources
 CS 200 Assignment 3 Pixel Graphics Due Tuesday September 27th 2016, 9:00 am Readings and Resources Texts: Suggested excerpts from Learning Web Design Files The required files are on Learn in the Week 3
Photomatix Light 1.0 User Manual
 Photomatix Light 1.0 User Manual Table of Contents Introduction... iii Section 1: HDR...1 1.1 Taking Photos for HDR...2 1.1.1 Setting Up Your Camera...2 1.1.2 Taking the Photos...3 Section 2: Using Photomatix
Picture Style Editor Ver Instruction Manual
 ENGLISH Picture Style File Creating Software Picture Style Editor Ver. 1.18 Instruction Manual Content of this Instruction Manual PSE stands for Picture Style Editor. In this manual, the windows used in
Understanding Image Formats And When to Use Them
 Understanding Image Formats And When to Use Them Are you familiar with the extensions after your images? There are so many image formats that it s so easy to get confused! File extensions like.jpeg,.bmp,.gif,
PackshotAlto range User guide
 PackshotAlto range User guide 2011 PackshotCreator - Sysnext All rights reserved. Table of contents 3 3 4 6 7 10 14 17 17 17 17 19 19 22 23 24 25 26 27 28 28 28 31 34 35 36 38 39 Chapter 1 : Getting started
Resizing for ACCC Competition. Rev 1.0 9/12/2011
 Resizing for ACCC Competition Rev 1.0 9/12/2011 This document contains instructions for resizing your images to comply with the new Digital Image Competition Guidelines. In this document we have attempted
Introducing Photo Story 3
 Introducing Photo Story 3 SAVE YOUR WORK OFTEN!!! Page: 2 of 22 Table of Contents 0. Prefix...4 I. Starting Photo Story 3...5 II. Welcome Screen...5 III. Import and Arrange...6 IV. Editing...8 V. Add a
What you can do with the Image Data Converter
 What you can do with the Image Data Converter Welcome to the Image Data Converter Ver.1.5, the application software that allows you to view and adjust a RAW (SRF) format still image file ( RAW file in
v nik Sharpener Pro 2.0 User Guide å nik multimedia, Inc.
 v2.03-050405 nik Sharpener Pro 2.0 User Guide å nik multimedia, Inc. II Table of Contents Minimum Requirements and Installation Filters...I Windows Operating System...I Macintosh Operating System...I Selective
KODAK Dental Imaging Software. Quick Start Guide
 KODAK Dental Imaging Software Quick Start Guide Notice Congratulations on your purchase of The KODAK Dental Imaging Software. Thank you for your confidence in our products and we will do all in our power
Neat Image. User guide. plug-in for Photoshop (Mac) To make images look better. Document version 8.3, 27-September-2017
 To make images look better. Document version 8.3, 27-September-2017") Neat Image plug-in for Photoshop (Mac) To make images look better. User guide Document version 8.3, 27-September-2017 Neat Image 1999-2018 Neat Image team, ABSoft. All rights reserved. Table of contents
Neat Image plug-in for Photoshop (Mac) To make images look better. User guide Document version 8.3, 27-September-2017 Neat Image 1999-2018 Neat Image team, ABSoft. All rights reserved. Table of contents
W i n d o w s. ScanGear CS-S 4.3 for CanoScan FB1200S Color Image Scanner. User's Guide
 f o r W i n d o w s ScanGear CS-S 4.3 for CanoScan FB1200S Color Image Scanner User's Guide How to Make Best Use of the Manuals 2 When you open the box Printed Manual CanoScan FB1200S Quick Start Guide
Working with Photos. Lesson 7 / Draft 20 Sept 2003
 Lesson 7 / Draft 20 Sept 2003 Working with Photos Flash allows you to import various types of images, and it distinguishes between two types: vector and bitmap. Photographs are always bitmaps. An image
Camera and monitor manufacturers commonly express the image resolution in a couple of different ways:
 Image Resolution By Bryan A. Thompson / Last Updated 01/15/2013 Resolution and Megapixels Image resolution describes the detail an image holds. The higher the resolution, the higher the detail in the image.
OBJECT PHOTOGRAPHY. iskills Workshop October 12, :30 6:30pm
 OBJECT PHOTOGRAPHY iskills Workshop October 12, 2017 4:30 6:30pm INTRODUCTION WORKSHOP OVERVIEW 1. Introduction to Object Photography 2. Brief orientation to the Canon Rebel 3. Automatic 4. Manual Mode
What is Photography?
 What is Photography? Photography is the art or job of taking or making photographs. It is the creation of images by exposing film or a computer chip to light inside a camera. The word photography comes
Digital Imaging and Image Editing
 Digital Imaging and Image Editing A digital image is a representation of a twodimensional image as a finite set of digital values, called picture elements or pixels. The digital image contains a fixed
Getting Started. with Easy Blue Print
 Getting Started with Easy Blue Print User Interface Overview Easy Blue Print is a simple drawing program that will allow you to create professional-looking 2D floor plan drawings. This guide covers the
Neat Image plug-in for Photoshop /Mac
 Neat Image plug-in for Photoshop /Mac To make images look better. User guide Document version 6.2, April 21, 2010 Table of contents 1. Introduction...3 1.1. Overview...3 1.2. Features...3 1.3. Requirements...4
Scanning Procedure Using SilverFast Ai Software (6.6.1r2b) 1
 1") last modified 6.16.2015 Scanning Procedure Using SilverFast Ai Software (6.6.1r2b) 1 PREP In scanner notebook, fill out Incoming Checklist column on a Scanner Equipment Checklist sheet. Use flash drive
last modified 6.16.2015 Scanning Procedure Using SilverFast Ai Software (6.6.1r2b) 1 PREP In scanner notebook, fill out Incoming Checklist column on a Scanner Equipment Checklist sheet. Use flash drive
HDR Darkroom 2 User Manual
 HDR Darkroom 2 User Manual Everimaging Ltd. 1 / 22 www.everimaging.com Cotent: 1. Introduction... 3 1.1 A Brief Introduction to HDR Photography... 3 1.2 Introduction to HDR Darkroom 2... 5 2. HDR Darkroom