ImageJ: Introduction to Image Analysis 3 May 2012 Jacqui Ross
|
|
|
- Constance Johns
- 6 years ago
- Views:
Transcription

1 Biomedical Imaging Research Unit School of Medical Sciences Faculty of Medical and Health Sciences The University of Auckland Private Bag Auckland 1142, NZ Ph: ext ImageJ: Introduction to Image Analysis 3 May 2012 Jacqui Ross Image analysis questions 1. What do you want to measure in order to get meaningful data? Area Number of particles (e.g. cells) Intensity Size/distribution of particles Colour Particle shape Orientation Colocalisation Distance, velocity, etc. 2. Do you need to work in colour or grayscale? RGB split channels Colour thresholding Convert to 8bit grayscale Colour deconvolution 3. Do you want to measure the whole image or specific regions? Do you need to select the regions using one image and apply it to another? Regions of Interest (ROI) and ROI Manager 4. Do you need to use processing filters to facilitate segmentation? Background subtraction Median filter Edge detection Unsharp Mask/Sharpen Enhance contrast 5. Do you need to fill holes or separate joining particles? Fill holes/erosion/dilation/open/close Watershed 1
2 AREA MEASUREMENTS Manual approach: measure the area of structures by drawing a region of interest (ROI) around them with one of the drawing tools, e.g. freehand, ellipse, rectangle tool. 1. Open the image. Draw the ROI. 2. Go to Analyze-ROI Manager. 3. Then go to Analyze-Set Measurements to select the parameters that you want to measure. 4. Click on Measure in the ROI Manager window. Results will appear in a Results window. These results can be saved and are.xls files, i.e. can be opened in Excel. If you go to Analyze Measure instead of using the ROI Manager, then you will get results for the entire image, not just the ROI. 5. You can draw multiple ROIs and add them to the ROI Manager. You can move the ROIs and update them, rename them, etc. You can also save the set of ROIs. This is a really good idea as a record of what you have measured. That allows you to reload them or use them on another image. You can also draw the ROIs onto the image and save it as a record. Note: measuring lines or angles manually works the same way except that you select one of the line tools or the angle tool. Threshold approach: use thresholding followed by binarising to segment the stained area which you wish to measure (for area measurements where you are not interested in intensity). 1. Open the image. Change to grayscale (Image Type 8bit) or go to Image Color - RGB Split. 2. Go to Image Adjust Threshold. You can select the Auto setting or alternatively move the sliders yourself until you have all the stained areas selected. You should select dark background if you have a fluorescence/confocal image. The threshold defines the objects that you want to measure (red overlay). Note that if the Auto setting works well for you, you could omit this step and go straight to Process Binary Make Binary). 2
3 3. Click Apply to make the image binary if you are not interested in intensity values. The areas overlaid with red will be changed to black. You should not change the defaults unless you want to measure the unstained areas. ImageJ regards the black areas as the areas/objects of interest. 4. Go to Analyze Set Measurements. Choose the parameters you want to measure. If you are interested in the proportion of area labelled, you may want to select Area Fraction in addition to Area. Make sure that you include Display Label. 3

4 5. Go to Analyze Measure. The Results table will come up and you can then save this. You can also save the binary image if you want to. 4

5 MEASUREMENT OF NUMBER OF PARTICLES/OBJECTS Manual approach: measure the number of objects by using the Point Selection tool. Necessary if you are unable to threshold your images or if you need to count cells but the cells are overlapping and will be measured as one object. 1. Click on the Point Selection tool. 2. If you have an RGB image, you can choose the colour that you want to use for the selections by going to Edit Options - Colors Selection. Make sure you choose a colour that stands out on your image. 3. You should also make the Foreground colour the same as your selection colour. This is because once you have made the selection and clicked on another object, the selection point will be filled with the foreground colour. 4. If you have a grayscale image, you will see the colour in gray so you should choose white/black as your selection and drawing colour. Alternatively, you could change the image to RGB colour so that the mark is in colour. If you want to measure intensities (grayscale) at each point, then you need to keep the image in grayscale. 5. Go to Edit Options Point Tool and turn on Auto-Measure. You can also choose the size of the point you want to make to label each object. This size required will depend on the resolution of your image. You just need it to be big enough to be able to see it. If you don t want to automatically label the points, you could select the option to Add to ROI Manager. In this case, each point selection is added to the ROI Manager and you can save the selections, etc. and make measurements as you can for any other ROIs. 5


6 6. Now every time you click on the image, a dot will appear and the data will be entered into the Results window. This includes the x, y z positions and the grayscale value. 7. Use the Magnifying tool if necessary to make the objects (cells) look bigger and the Hand tool to navigate. 8. When you have completed all your measurements, you can save the image with the marks on it. 6

7 Grids You can also use a grid if necessary by going to Plugins Analysis Grid. You can define the size of the grid and the points. A plugin for a Chalkley grid is also available (25 random spots). Threshold approach: use thresholding followed by binarising to segment the objects which you wish to measure. The first part of the procedure is the same as that detailed for Area measurements. 1. Open the image. Change to grayscale (Image Type 8bit) or go to Image Color - RGB Split. 2. Go to Image Adjust Threshold. You can select the Auto setting or alternatively move the sliders yourself until you have all the stained areas selected. You should select dark background if you have a fluorescence or confocal image. 3. Click Apply to binarise the image if you are not interested in intensity values. The stained areas which you want to measure will be black. You should not change the defaults unless you want to measure the unstained areas. ImageJ regards the black areas as the areas/objects of interest. 7


8 4. Go to Analyze Set Measurements. Choose the parameters you want to measure. You may be interested in Shape Descriptors or Feret s Diameter as well as the number of particles in the images. Make sure that you include Display Label. 8


9 5. Go to Analyze Analyze Particles. The success of this depends on the individual objects being able to be clearly distinguished. Note that you can exclude based on size and circularity. If you have calibrated your image, then this size will be in whatever unit you are using (e.g. microns squared). You can also Exclude on Edges, which is the usual approach since you won t have the whole particle in the image. Record Starts combined with Add to Manager, adds all the particle outlines into the ROI Manager. 6. Click on OK to run the analysis. 9


10 7. If you have holes in your particles as shown below, which will affect your measurements, you could fill these holes by going to Process Binary Fill Holes. There is also an option within the Particle Analyzer to Include Holes but filling the holes prior to analysis ensures that it is done correctly. Other binary operations such as opening and closing or dilation and erosion, can also be used and are found under Process - Binary menu. 8. If two particles are joined together, you can use processing filters such as Process Binary Watershed to separate them. 10

11 9. You can use enhancement tools such as Brightness/Contrast or Window/Level to make the particles easier to segment. There is also a large range of image processing filters and operations available in ImageJ that can help to enhance contrast, etc. to make the segmentation easier. Note: If you don t want the data for each individual particle, you can just save the Summary. The outline/mask image can also be saved as a record. Classify Particles Plugin: Gabriel Landini This is a plugin that works very well, which allows you to classify particles based on certain morphological attributes such as size, circularity, etc. This plugin and information about it are available here: 11
. 2. Go to Image Adjust Threshold.")
12 INTENSITY MEASUREMENTS FLUORESCENCE LABELLING ONLY Use thresholding to select the stained area which you wish to measure 1. Open the image. Change to grayscale if necessary (Image Type 8bit/16bit or Image Color Split Channels). 2. Go to Image Adjust Threshold. You can select the Auto setting or alternatively move the sliders yourself until you have all the stained areas selected. The displayed histogram gives you some assistance with this. There are a number of different methods available under the drop-down box. 3. Choose Dark background for fluorescence images. 12
.")
13 4. Click Set to set the threshold of the image. If you want to use a consistent threshold (e.g. based on your background value), you can type in values. 5. Go to Analyze Set Measurements. Choose the parameters you want to measure. Make sure that you select all the gray level measurements. You can change the number of decimal places if you think you need more than the default (3). You should also select Limit to Threshold. If you don t select Limit to Threshold, then the entire image will be measured, not just the selected area. In some cases, you do want the intensity measurements for entire image. 6. Go to Analyze Measure. The Results table will come up and you can then save this. 7. Intensity measurements can also be done within Regions Of Interest (ROIs), e.g. if you need to exclude an area or if you need to create a number of ROIs of the same size that you apply to multiple images. In this case, you add each ROI into the ROI Manager and then once they are all there, click Measure. Use thresholding to select the particles which you wish to measure Follow Steps 1-5 above then go to Analyze Analyze Particles as described earlier. In this case, the image is not converted to binary. 13
, that you then apply to a second image. 1. Open your first image (the one you want to use to create the ROIs). 2.")
14 USING PARTICLE ANALYSIS TO CREATE ROIS Use enhancement filters followed by binarising to segment the objects which you wish to measure. You can also use it to create regions of interest (ROI), that you then apply to a second image. 1. Open your first image (the one you want to use to create the ROIs). 2. Go to Image Type 8bit to change the image into grayscale or to Image Colour RGB Split and choose the image which has the most contrast. 3. Go to Image Adjust Brightness/Contrast to improve the differentiation between the edges of the objects and the background. You could also use Image Adjust Window/Level. 4. Remove any speckle/noise by using a filter, e.g. Process Filters Median. 5. Go to Process Find Edges to define the boundaries of the objects. (Various other options such as Process Enhance contrast can also be used prior to this operation). (You can also try Process Filters Variance, e.g. radius 2 pixels for a similar result). 14

15 6. Go to Process Binary Threshold to binarise the image or do it manually by going to Image Adjust Threshold and then clicking on Apply once you are satisfied with the selection. 15


16 7. Now go to Process Binary Fill Holes. If any are not filled as shown, it means that some boundaries were not complete. Don t worry about any objects that are on the image boundary. These should not be included in your analysis. 8. These gaps in the outlines of the objects can be filled by going to Process Binary Close. This performs a dilation and erosion operation to fill in the outline and small holes in objects. You can also do the operations separately, i.e. Process Binary Dilate. Then Fill Holes, followed by Process Binary Erode. You need to do the opposite operation, i.e. if you erode, you must then dilate. 16

17 9. You can change the options and preview the effect on your image by going to Process Binary Options. 10. If you are really struggling, then you can draw a small line using the pencil tool to fill in the gap in the boundary. Make sure that the Foreground colour selected is black. You can use the Magnifying tool to zoom up so that you can see the gap. 11. If you have lots of small particles or particles joined together, then you may want to use Open to remove these. 12. If you have an image like the one below, try Process Noise Remove Outliers as below. Note that this is the same image but in this case I have omitted the median filter step, which has resulted in all these small black particles (=noise). 17

18 13. Use the Preview option to show how this will affect the image. Select Dark for a binarised image. 18

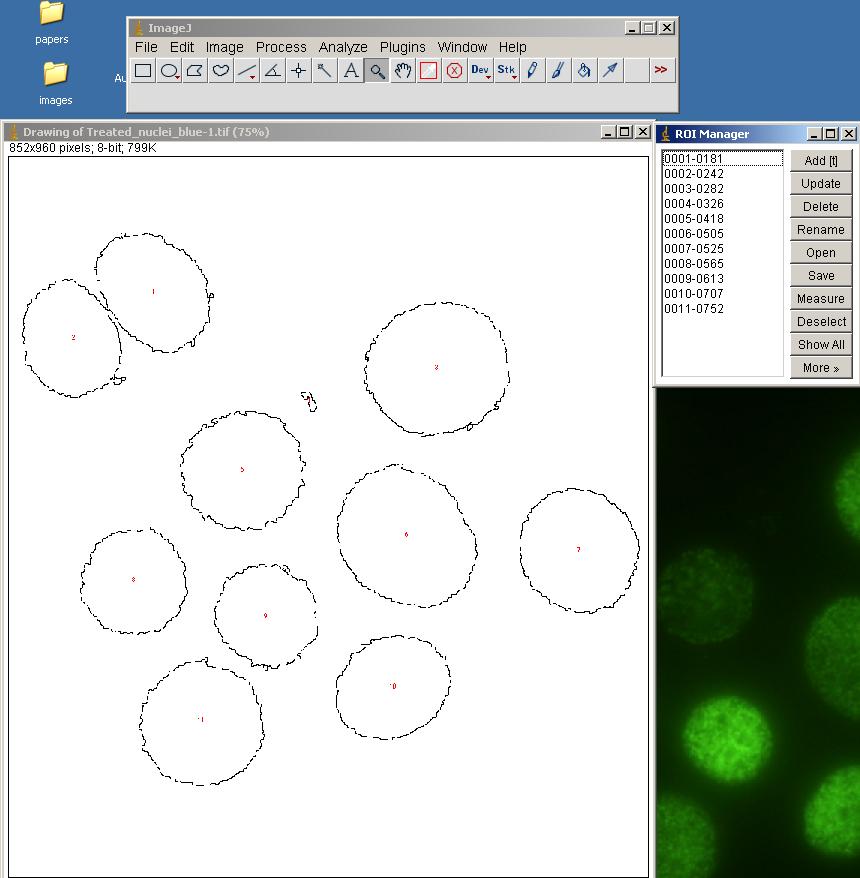
19 14. If you want to analyse the particles, go to Analyze Analyze Particles. This also will allow you to add the outline of each nucleus into the ROI Manager to use on the second image. 15. Now all the measured particles are outlined and each outline is added into the ROI Manager as a ROI. 16. Another option if you don t want to go through the Analyse Particles window is simply to go to Edit Selection Create Mask. You then go to Edit - Selection Create Selection and add that into the ROI Manager. However, in this case, you will only get one measurement, since the selection combines all the outlines. 19
20 20


21 17. Now go to your second image. Convert it to grayscale. 18. Click on Show All in the ROI Manager. You will see all the ROIs on your second image as shown below. 19. Make sure that you have all the grayscale measurement parameters selected in Analyze Set Measurements

22 21. Click Measure in the ROI Manager. 22. If you want to use a threshold within the ROIs to define the grayscale levels of interest, you can go to Image Adjust threshold. In this case, you need to select Limit to Threshold in the Set Measurements window. ROI MANAGER Manual Selections Draw a region by using the ROI tools or you specify a size by going to Edit Selection - Specify. All ROIs can be saved using the ROI Manager and applied to other images. Loading ROI Sets 1. Open your image. 2. Go to ROI Manager and click Open. 3. Select the roiset.zip file that you previously saved. These ROIs will then be inserted into the ROI Manager. 4. You can then measure, draw, move ROIs, etc. 22

23 Magic Wand Using the Magic Wand and ROI Manager. 1. Open up ROI Manager by going to Analyze Tools ROI Manager. 2. Using the binarised image that you have already created, go to the Wand Tool, and click on one of the filled in objects: The object should then be outlined. Click Add in the ROI Manager window. There is a tolerance value that you can alter to expand the selection more according to the 3. Continue until all the nuclei have had ROIs created for them. 4. Then click Save. The ROIs will be saved as a zip file called ROISet. You can change the name if you like. These ROIs can then be applied to your second image. 5. You can also use the Magic Wand to select grayscale values. There is a more flexible magic wand tool available at: There is another one which also works in 3D called YAWI at: 23
, and DAB with counterstains such as Haematoxylin or Methyl Green.")
24 COLOUR DECONVOLUTION Notes on BIRU website: Allows you to segment standard histological stain combinations such as Haematoxylin & Eosin (H & E), and DAB with counterstains such as Haematoxylin or Methyl Green. You can also create your own matrices using stained sections or sample areas of your stained section using a ROI to create the matrices. Following deconvolution, thresholding can be used to select the area of interest for measurements as described above or alternatively the image can be converted straight to a binary image. EXAMPLE 1. Open the image. Use Process Subtract Background if necessary to correct shadow or colour effects. 2. Go to Plugins Colour Colour Deconvolution (or wherever you have placed the Plugin). 24

 and")
25 3. Select the stain of interest, e.g. H & E. Then click OK. 4. The image will then be split into 3 components. If you have a 2 colour stain, then one image should be white. 5. You can then use thresholding (or make the images binary) and make your measurements. 25
Introduction to ImageJ 8 Sept 2009
 Biomedical Imaging Research Unit School of Medical Sciences Faculty of Medical and Health Sciences The University of Auckland Private Bag 92019 Auckland, NZ Ph: 373 7599 ext. 87438 http://www.auckland.ac.nz/biru/
Introduction to Image Analysis with
 Introduction to Image Analysis with PLEASE ENSURE FIJI IS INSTALLED CORRECTLY! WHAT DO WE HOPE TO ACHIEVE? Specifically, the workshop will cover the following topics: 1. Opening images with Bioformats
Batch Counting of Foci
 Batch Counting of Foci Getting results from Z stacks of images. 1. First it is necessary to determine suitable CHARM parameters to be used for batch counting. First drag a stack of images taken with the
EPFL BIOP Image Processing Practicals R. Guiet, O. Burri
 EPFL BIOP Image Processing Practicals 23-25.03.2015 R. Guiet, O. Burri Overview DAY 1 Intensity/Histogram Look up table (LUT) Contrast Image Depth RGB images Image Math File Formats Resizing Images Regions
IMAGE PROCESSING PRACTICALS
 EPFL PTBIOP IMAGE PROCESSING PRACTICALS 14.03.2011-16.03.2011 ACKNOWLEDGEMENTS This presentation and the exercises are based on the script CMCI Image processing & Analysis Course Series I which was kindly
FIJI/Image J for Quantification Hands on session
 FIJI/Image J for Quantification Hands on session Dr Paul McMillan Biological Optical Microscopy Platform Hands on demonstrations FIJI set up Line Profile Thresholding Area of stain Cell confluence Nuclei
IncuCyte ZOOM Scratch Wound Processing Overview
 IncuCyte ZOOM Scratch Wound Processing Overview The IncuCyte ZOOM Scratch Wound assay utilizes the WoundMaker-IncuCyte ZOOM-ImageLock Plate system to analyze both 2D-migration and 3D-invasion in label-free,
IncuCyte ZOOM Fluorescent Processing Overview
 IncuCyte ZOOM Fluorescent Processing Overview The IncuCyte ZOOM offers users the ability to acquire HD phase as well as dual wavelength fluorescent images of living cells producing multiplexed data that
ADOBE PHOTOSHOP CS TUTORIAL
 ADOBE PHOTOSHOP CS TUTORIAL A D O B E P H O T O S H O P C S Adobe Photoshop CS is a popular image editing software that provides a work environment consistent with Adobe Illustrator, Adobe InDesign, Adobe
Adobe Studio on Adobe Photoshop CS2 Enhance scientific and medical images. 2 Hide the original layer.
 1 Adobe Studio on Adobe Photoshop CS2 Light, shadow and detail interact in wild and mysterious ways in microscopic photography, posing special challenges for the researcher and educator. With Adobe Photoshop
Rendering a perspective drawing using Adobe Photoshop
 Rendering a perspective drawing using Adobe Photoshop This hand-out will take you through the steps to render a perspective line drawing using Adobe Photoshop. The first important element in this process
All Creative Suite Design documents are saved in the same way. Click the Save or Save As (if saving for the first time) command on the File menu to
 command on the File menu to") 1 The Application bar is new in the CS4 applications. It combines the menu bar with control buttons that allow you to perform tasks such as arranging multiple documents or changing the workspace view.
1 The Application bar is new in the CS4 applications. It combines the menu bar with control buttons that allow you to perform tasks such as arranging multiple documents or changing the workspace view.
How to blend, feather, and smooth
 How to blend, feather, and smooth Quite often, you need to select part of an image to modify it. When you select uniform geometric areas squares, circles, ovals, rectangles you don t need to worry too
DIGITAL-MICROSCOPY CAMERA SOLUTIONS USB 3.0
 DIGITAL-MICROSCOPY CAMERA SOLUTIONS USB 3.0 PixeLINK for Microscopy Applications PixeLINK will work with you to choose and integrate the optimal USB 3.0 camera for your microscopy project. Ideal for use
5 Masks and Channels
 5 Masks and Channels Adobe Photoshop uses masks to isolate and manipulate specific parts of an image. A mask is like a stencil. The cutout portion of the mask can be altered, but the area surrounding the
μscope Microscopy Software
 μscope Microscopy Software Pixelink μscope Essentials (ES) Software is an easy-to-use robust image capture tool optimized for productivity. Pixelink μscope Standard (SE) Software had added features, making
Using Binary Layers with NIS-Elements
 Using Binary Layers with NIS-Elements Overview This technical note describes the usage of Binary Layers with NIS-Elements. Binary layers form an extension of simple intensity thresholding technique, allowing
Project 8: Nice Close-Up
 ps7ie_p08_b.qxd 11/18/02 3:25 PM Page 74 ps7ie_p08_b.qxd 11/18/02 3:25 PM Page 75 Photoshop 7 Image Effects In this project, work with a picture that was taken at an angle for effect. Correct and crop
Adobe Photoshop CS5 Tutorial
 Adobe Photoshop CS5 Tutorial GETTING STARTED Adobe Photoshop CS5 is a popular image editing software that provides a work environment consistent with Adobe Illustrator, Adobe InDesign, Adobe Photoshop
Version 6. User Manual OBJECT
 Version 6 User Manual OBJECT 2006 BRUKER OPTIK GmbH, Rudolf-Plank-Str. 27, D-76275 Ettlingen, www.brukeroptics.com All rights reserved. No part of this publication may be reproduced or transmitted in any
Learning Photo Retouching techniques the simple way
 Learning Photo Retouching techniques the simple way Table of Contents About the Workshop... i Workshop Objectives... i Getting Started... 1 Photoshop Workspace... 1 Setting up the Preferences... 2 Retouching
Extreme Makeovers: Photoshop Retouching Techniques
 Extreme Makeovers: Table of Contents About the Workshop... 1 Workshop Objectives... 1 Getting Started... 1 Photoshop Workspace... 1 Retouching Tools... 2 General Steps... 2 Resolution and image size...
Table of Contents 1. Image processing Measurements System Tools...10
 Introduction Table of Contents 1 An Overview of ScopeImage Advanced...2 Features:...2 Function introduction...3 1. Image processing...3 1.1 Image Import and Export...3 1.1.1 Open image file...3 1.1.2 Import
Adobe Photoshop CC 2018 Tutorial
 Adobe Photoshop CC 2018 Tutorial GETTING STARTED Adobe Photoshop CC 2018 is a popular image editing software that provides a work environment consistent with Adobe Illustrator, Adobe InDesign, Adobe Photoshop,
By Washan Najat Nawi
 By Washan Najat Nawi how to get started how to use the interface how to modify images with basic editing skills Adobe Photoshop: is a popular image-editing software. Two general usage of Photoshop Creating
Using Adobe Photoshop
 Using Adobe Photoshop 6 One of the most useful features of applications like Photoshop is the ability to work with layers. allow you to have several pieces of images in the same file, which can be arranged
MIPAR. and so many more. We ve taken another step forward and can now detect the most challenging of bars! Show Feature as Line
 MIPAR Release Notes v1.4.0 Even Better Scale Bar Detection and so many more We ve taken another step forward and can now detect the most challenging of bars! Color-Coded Histograms Histograms Match Images
Cellular Bioengineering Boot Camp. Image Analysis
 Cellular Bioengineering Boot Camp Image Analysis Overview of the Lab Exercises Microscopy and Cellular Imaging The purpose of this laboratory exercise is to develop an understanding of the measurements
Manual. Cell Border Tracker. Jochen Seebach Institut für Anatomie und Vaskuläre Biologie, WWU Münster
 Manual Cell Border Tracker Jochen Seebach Institut für Anatomie und Vaskuläre Biologie, WWU Münster 1 Cell Border Tracker 1. System Requirements The software requires Windows XP operating system or higher
Introduction to Image Processing and Object Segmentation using Fiji/ImageJ
 Introduction to Image Processing and Object Segmentation using Fiji/ImageJ Verónica Labrador Cantarero Servicio de Microscopía Óptica y Confocal (SMOC) Centro de Biología Molecular Severo Ochoa (CSIC-UAM)
TotalLab Quant v12.3. Product Specification: 1D Analysis Module
 Product Specification: TotalLab Quant v12.3 1D Analysis Module General Fully automatic, single button press complete image analysis within area of interest if required Instant access to refinement of any
Source photo, sketchbook collage and digital collage
 Source photo, sketchbook collage and digital collage Develop a mixed media project using traditional media, digital camera, scanner and image manipulation software. This technique encourages a creative
Corel PHOTO-PAINT BERNINA Page 1 DL
 Corel PHOTO-PAINT 2018 BERNINA Page 1 Corel PHOTO-PAINT Corel PHOTO-PAINT is part of BERNINA Embroidery Software and gives users many tools for editing photos or bitmap artwork. Corel PHOTO- PAINT can
Scientific Imaging Image Analysis worksheet Page 1 of 8. Image Analysis
 Scientific Imaging Image Analysis worksheet Page 1 of 8 Image Analysis Part 1 - Data Analysis: We will Photoshop software to determine the area of leaves. Option 1: Open the file provided by your instructor.
Counting Sugar Crystals using Image Processing Techniques
 Counting Sugar Crystals using Image Processing Techniques Bill Seota, Netshiunda Emmanuel, GodsGift Uzor, Risuna Nkolele, Precious Makganoto, David Merand, Andrew Paskaramoorthy, Nouralden, Lucky Daniel
Digital Image Processing Face Detection Shrenik Lad Instructor: Dr. Jayanthi Sivaswamy
 Digital Image Processing Face Detection Shrenik Lad email: shrenik.lad@students.iiit.ac.in Instructor: Dr. Jayanthi Sivaswamy Problem Statement: To detect distinct face regions from the input images. Input
User Manual for HoloStudio M4 2.5 with HoloMonitor M4. Phase Holographic Imaging
 User Manual for HoloStudio M4 2.5 with HoloMonitor M4 Phase Holographic Imaging 1 2 HoloStudio M4 2.5 Software instruction manual 2013 Phase Holographic Imaging AB 3 Contact us: Phase Holographic Imaging
University Libraries ScanPro 3000 Microfilm Scanner
 University Libraries ScanPro 3000 Microfilm Scanner Help Guide Table of Contents Getting Started 3 Loading the Film 4-5 Viewing Your Film 6-7 Motorized Roll Film Control 6 Crop Box 7 Using the Toolbar
MRI Grid. The MRI Grid is a tool in MRI Cell Image Analyzer, that can be used to associate measurements with labeled positions on a board.
 Abstract The is a tool in MRI Cell Image Analyzer, that can be used to associate measurements with labeled positions on a board. Illustration 2: A grid on a binary image. Illustration 1: The interface
3) Start ImageJ, install CM Engine as a macro (instructions here:
 Start ImageJ, install CM Engine as a macro (instructions here:") Instructions for CM Engine use 1) Download CM Engine from SourceForge (http://cm- engine.sourceforge.net/) or from the Rothstein Lab website (http://www.rothsteinlab.com/cm- engine.zip ). 2) Download ImageJ
Instructions for CM Engine use 1) Download CM Engine from SourceForge (http://cm- engine.sourceforge.net/) or from the Rothstein Lab website (http://www.rothsteinlab.com/cm- engine.zip ). 2) Download ImageJ
Car Ad Photoshop Tutorial Miss Van Lenten Tools: Paint brush, Eraser, Quick Selection/Magic Wand, Quick Mask, Layer Mask
 Car Ad Photoshop Tutorial Miss Van Lenten Tools: Paint brush, Eraser, Quick Selection/Magic Wand, Quick Mask, Layer Mask Part One: Google image search for a car of your choosing. Make sure you go to tools
Appendix C: User manual for performing image analysis in experiment of monitoring E-coli growth. ImageJ user manual
 Appendix C: User manual for performing image analysis in experiment of monitoring E-coli growth ImageJ user manual A. Recommended Browser for ImageJ Browser Version Internet Explorer 5+ Google Chrome 3
MetaXpress Software: Cell Scoring Module
 MetaXpress Software: Cell Scoring Module Cell Scoring Module Overview The Cell Scoring module can be used to analyze cells imaged in 2 wavelengths W1 should be a stain for all nuclei (e.g. DAPI, Hoechst,
HISTOGRAMS. These notes are a basic introduction to using histograms to guide image capture and image processing.
 HISTOGRAMS Roy Killen, APSEM, EFIAP, GMPSA These notes are a basic introduction to using histograms to guide image capture and image processing. What are histograms? Histograms are graphs that show what
Digital Imaging - Photoshop
 Digital Imaging - Photoshop A digital image is a computer representation of a photograph. It is composed of a grid of tiny squares called pixels (picture elements). Each pixel has a position on the grid
Image segmentation applied to cytology
 Image segmentation applied to cytology Niels VAN VLIET LRDE seminar, May 14, 2003 Table of contents Table of contents Introduction... 2... 17 [1/4] Extraction of the background...
A lthough it may not seem so at first
 Photoshop Selections by Jeff The Wizard of Draws Bucchino www.wizardofdraws.com A lthough it may not seem so at first glance, learning to use Photoshop is largely about making selections. Knowing how to
Definiens. Tissue Studio 4.2. Tutorial 1: Composer and Nuclear Markers
 Definiens Tissue Studio 4.2 Tutorial 1: Composer and Nuclear Markers Tutorial 1: Composer and Nuclear Markers Imprint and Version Copyright 2015 Definiens AG. All rights reserved. This document may be
CS 547 Digital Imaging Lecture 2
 CS 547 Digital Imaging Lecture 2 Basic Photo Corrections & Retouching and Repairing Selection Tools Rectangular marquee tool Use to select rectangular images Elliptical Marque Tool Use to select elliptical
Introduction to BioImage Analysis using Fiji
 Introduction to BioImage Analysis using Fiji CellNetworks Math-Clinic core facility Qi Gao Carlo A. Beretta 12.05.2017 Math-Clinic core facility Data analysis services on bioinformatics & bioimage analysis:
Using Photoshop Elements
 Using Photoshop Elements Created By: Rick Williams August 2004 Table of Contents Photoshop Element Tools...Page 1 Tool Descriptions... Page 3 Starting Photoshop Elements... Page 7 Resizing an Image...
Image Viewing. with ImageScope
 Image Viewing with ImageScope ImageScope Components Use ImageScope to View These File Types: ScanScope Virtual Slides.SVS files created when the ScanScope scanner scans glass microscope slides. JPEG files
Adobe Photoshop. Levels
 How to correct color Once you ve opened an image in Photoshop, you may want to adjust color quality or light levels, convert it to black and white, or correct color or lens distortions. This can improve
User Reference Manual
 User Reference Manual IN SITU HYBRIDIZATION QUANTIFICATION (for research purposes only) Contents Overview... 3 System Requirements... 3 Compatible File Formats... 3 Input Parameters... 4 Output Parameters...
Image Pro Ultra. Tel:
 Image Pro Ultra www.ysctech.com info@ysctech.com Tel: 510.226.0889 Instructions for installing YSC VIC-USB and IPU For software and manual download, please go to below links. http://ysctech.com/support/ysc_imageproultra_20111010.zip
How to blur a background in Photoshop CS3, Elements 9 or later By Steve Zimic
 This is a technique I developed which allows blurring of the background without any bleeding of the main subject into the background. This technique does require a working knowledge of the various selection
Digimizer Copyright MedCalc Software bvba MedCalc Software Acacialaan Ostend Belgium
 MedCalc Software bvba. All rights reserved. No part of this package, neither the documentation nor the software may be reproduced, stored in a retrieval system, or transmitted in any form by electronic,
Photoshop CC Editing Images
 Photoshop CC Editing Images Rotate a Canvas A canvas can be rotated 90 degrees Clockwise, 90 degrees Counter Clockwise, or rotated 180 degrees. Navigate to the Image Menu, select Image Rotation and then
Digital Photography 1
 Digital Photography 1 Photoshop Lesson 3 Resizing and transforming images Name Date Create a new image 1. Choose File > New. 2. In the New dialog box, type a name for the image. 3. Choose document size
Unit 7 : Image Painting, Editing and Layers
 Unit 7 : Image Painting, Editing and Layers Introduction This Unit describes about various painting tools; such as selection, cropping and measuring tools, retouching, drawing and type tools, Navigation
Motic Live Imaging Module. Windows OS User Manual
 Motic Live Imaging Module Windows OS User Manual Motic Live Imaging Module Windows OS User Manual CONTENTS (Linked) Introduction 05 Menus, bars and tools 06 Title bar 06 Menu bar 06 Status bar 07 FPS 07
Color and More. Color basics
 Color and More In this lesson, you'll evaluate an image in terms of its overall tonal range (lightness, darkness, and contrast), its overall balance of color, and its overall appearance for areas that
IncuCyte ZOOM Scratch Wound Processing Overview
 IncuCyte ZOOM Scratch Wound Processing Overview The IncuCyte ZOOM Scratch Wound assay utilizes the WoundMaker-IncuCyte ZOOM-ImageLock Plate system to analyze both 2D-migration and 3D-invasion in label-free,
22B / NONDESTRUCTIVE EDITING - QUICK MASKS 1
 22B / NONDESTRUCTIVE EDITING - QUICK MASKS 1 The following sections will deal with photoshop more as an artists studio and not just as an extension of photography. You will work more with layers and using
The student will: download an image from the Internet; and use Photoshop to straighten, crop, enhance, and resize a digital image.
 Basic Photoshop Overview: Photoshop is one of the most common computer programs used to work with digital images. In this lesson, students use Photoshop to enhance a photo of Brevig Mission School, so
Downloaded From : Working with Photoshop 7.0
 Adobe Photoshop 1. Introduction What is Adobe Photoshop? Adobe Photoshop is a web designing software used for giving effects and filters to an image to make it more appealing and attractive. Brought out
Positive Pixel Count Algorithm. User s Guide
 Positive Pixel Count Algorithm User s Guide Copyright 2004, 2006 2008 Aperio Technologies, Inc. Part Number/Revision: MAN 0024, Revision B Date: December 9, 2008 This document applies to software versions
CONTENTS. Chapter I Introduction Package Includes Appearance System Requirements... 1
 User Manual CONTENTS Chapter I Introduction... 1 1.1 Package Includes... 1 1.2 Appearance... 1 1.3 System Requirements... 1 1.4 Main Functions and Features... 2 Chapter II System Installation... 3 2.1
Diploma in Photoshop
 Diploma in Photoshop Photoshop Selection Tools Selection Tools allow us to isolate areas of our image and apply adjustments to these selected areas only. A selection simply isolates one or more parts of
Guidance on Using Scanning Software: Part 5. Epson Scan
 Guidance on Using Scanning Software: Part 5. Epson Scan Version of 4/29/2012 Epson Scan comes with Epson scanners and has simple manual adjustments, but requires vigilance to control the default settings
Color Correction and Enhancement
 10 Approach to Color Correction 151 Color Correction and Enhancement The primary purpose of Photoshop is to act as a digital darkroom where images can be corrected, enhanced, and refined. How do you know
A guide to SalsaJ. This guide gives step-by-step instructions on how to use SalsaJ to carry out basic data analysis on astronomical data files.
 A guide to SalsaJ SalsaJ is free, student-friendly software developed originally for the European Hands- On Universe (EU-HOU) project. It is designed to be easy to install and use. It allows students to
Protocols. Graphical programming for Icy. a.k.a. programming, for the rest of us
 Protocols Graphical programming for Icy a.k.a. programming, for the rest of us Foreword: Reproducible Research Quote: "Results aren't much if they can t be reproduced!" (your boss, your reviewers, your
Manual: MasTracker for ImageJ
 Manual: MasTracker for ImageJ Martin Storath 3. Juli 2007 1 1 Introduction The following are instructions for the tracking plug-in MasTracker for ImageJ. MasTracker was implemented by Martin Storath as
IMAGE PROCESSING PROJECT REPORT NUCLEUS CLASIFICATION
 ABSTRACT : The Main agenda of this project is to segment and analyze the a stack of image, where it contains nucleus, nucleolus and heterochromatin. Find the volume, Density, Area and circularity of the
Basics of Quantitative Imaging and Image Processing Using ImageJ / Fiji. Dan White Nov 2008
 MPI-CBG LMF / IPF Basics of Quantitative Imaging and Image Processing Using ImageJ / Fiji Dan White Nov 2008 Before you start writing... Presentations soon available at: http://tu-dresden.de/med/ifn Light
IT154 Midterm Study Guide
 IT154 Midterm Study Guide These are facts about the Adobe Photoshop CS4 application. If you know these facts, you should be able to do well on your midterm. Photoshop CS4 is part of the Adobe Creative
MY ASTROPHOTOGRAPHY WORKFLOW Scott J. Davis June 21, 2012
 Table of Contents Image Acquisition Types 2 Image Acquisition Exposure 3 Image Acquisition Some Extra Notes 4 Stacking Setup 5 Stacking 7 Preparing for Post Processing 8 Preparing your Photoshop File 9
ISCapture User Guide. advanced CCD imaging. Opticstar
 advanced CCD imaging Opticstar I We always check the accuracy of the information in our promotional material. However, due to the continuous process of product development and improvement it is possible
Adobe Photoshop Chapter 5 Study Questions /50 Total Points
 Name: Class: Date: Adobe Photoshop Chapter 5 Study Questions /50 Total Points True/False Indicate whether the statement is true or false. 1. Bitmapped images are resolution-independent, maintaining their
GETTING STARTED. 0 P a g e B a s i c s o f A d o b e P h o t o s h o p A g a P r i v a t e I n s t i t u t e f o r c o m p u t e r s c i e n c e
 GETTING STARTED 0 P a g e B a s i c s o f A d o b e P h o t o s h o p Adobe Photoshop: is a popular image editing software that provides a work environment consistent with Adobe Illustrator, Adobe InDesign,
Digital Design and Communication Teaching (DiDACT) University of Sheffield Department of Landscape. Adobe Photoshop CS5 INTRODUCTION WORKSHOPS
 University of Sheffield Department of Landscape. Adobe Photoshop CS5 INTRODUCTION WORKSHOPS") Adobe INTRODUCTION WORKSHOPS WORKSHOP 1 - what is Photoshop + what does it do? Outcomes: What is Photoshop? Opening, importing and creating images. Basic knowledge of Photoshop tools. Examples of work.
Adobe INTRODUCTION WORKSHOPS WORKSHOP 1 - what is Photoshop + what does it do? Outcomes: What is Photoshop? Opening, importing and creating images. Basic knowledge of Photoshop tools. Examples of work.
ADOBE PHOTOSHOP CS 3 QUICK REFERENCE
 ADOBE PHOTOSHOP CS 3 QUICK REFERENCE INTRODUCTION Adobe PhotoShop CS 3 is a powerful software environment for editing, manipulating and creating images and other graphics. This reference guide provides
PixInsight Workflow. Revision 1.2 March 2017
 Revision 1.2 March 2017 Contents 1... 1 1.1 Calibration Workflow... 2 1.2 Create Master Calibration Frames... 3 1.2.1 Create Master Dark & Bias... 3 1.2.2 Create Master Flat... 5 1.3 Calibration... 8
11 Advanced Layer Techniques
 11 Advanced Layer Techniques After you ve learned basic layer techniques, you can create more complex effects in your artwork using layer masks, path groups, filters, adjustment layers, and more style
Recitation 2 Introduction to Photoshop
 Recitation 2 Introduction to Photoshop What is Adobe Photoshop? Adobe Photoshop is a tool for creating digital graphics either by starting with a scanned photograph or artwork or by creating the graphics
How to use advanced color techniques
 How to use advanced color techniques In Adobe Photoshop, you can adjust an image s colors in a variety of ways. Using the techniques described in this guide, you can take the raw material of your image
BacklightFly Manual.
 BacklightFly Manual http://www.febees.com/ Contents Start... 3 Installation... 3 Registration... 7 BacklightFly 1-2-3... 9 Overview... 10 Layers... 14 Layer Container... 14 Layer... 16 Density and Design
How to use advanced color techniques
 Adobe Photoshop CS5 Extended Project 6 guide How to use advanced color techniques In Adobe Photoshop CS5, you can adjust an image s colors in a variety of ways. Using the techniques described in this guide,
4 Use the adjustable Focus meter tool to take the subjectivity out of focusing the image, to get the best possible image
 Standard Edition VISIONx INC. www.visionxinc.com Real-Time Full Color Image Acquisition 4 Full support for NTSC and PAL cameras with Composite, Y/C (i.e. S-Video) and RGB video signal formats 4 Image display
Optimizing Images for Digital Projection A few of our Camera Club members have been disappointed that their digital images just don t look the same
 Optimizing Images for Digital Projection A few of our Camera Club members have been disappointed that their digital images just don t look the same when projected during a digital critique or a slide show.
][ R G [ Q] Y =[ a b c. d e f. g h I
![][ R G [ Q] Y =[ a b c. d e f. g h I](/thumbs/89/99401536.jpg "][ R G [ Q] Y =[ a b c. d e f. g h I") Abstract Unsupervised Thresholding and Morphological Processing for Automatic Fin-outline Extraction in DARWIN (Digital Analysis and Recognition of Whale Images on a Network) Scott Hale Eckerd College
Abstract Unsupervised Thresholding and Morphological Processing for Automatic Fin-outline Extraction in DARWIN (Digital Analysis and Recognition of Whale Images on a Network) Scott Hale Eckerd College
XXXX - ILLUSTRATING FROM SKETCHES IN PHOTOSHOP 1 N/08/08
 INTRODUCTION TO GRAPHICS Illustrating from sketches in Photoshop Information Sheet No. XXXX Creating illustrations from existing photography is an excellent method to create bold and sharp works of art
IMAGE CORRECTION. You can find this and more information with video tutorials at
 IMAGE CORRECTION You can find this and more information with video tutorials at http://www.adobe.com/support/photoshop/ P H O T O S H O P T O O L S CLONE STAMP TOOL The Clone Stamp tool paints one part
Tablet overrides: overrides current settings for opacity and size based on pen pressure.
 Photoshop 1 Painting Eye Dropper Tool Samples a color from an image source and makes it the foreground color. Brush Tool Paints brush strokes with anti-aliased (smooth) edges. Brush Presets Quickly access
Reveal the mystery of the mask
 Reveal the mystery of the mask Imagine you're participating in a group brainstorming session to generate new ideas for the design phase of a new project. The facilitator starts the brainstorming session
User Guide for TWAIN / DirectX interface for GRYPHAX USB 3.0 cameras
 User Guide for TWAIN / DirectX interface for GRYPHAX USB 3.0 cameras The TWAIN & DirectX driver for PROGRES GRYPHAX USB 3.0 cameras enables user to operate with TWAIN and DirectX supported 3 rd party software
Bristol Photographic Society Introduction to Digital Imaging
 Bristol Photographic Society Introduction to Digital Imaging Part 16 HDR an Introduction HDR stands for High Dynamic Range and is a method for capturing a scene that has a light range (light to dark) that
Photoshop CS2. Step by Step Instructions Using Layers. Adobe. About Layers:
 About Layers: Layers allow you to work on one element of an image without disturbing the others. Think of layers as sheets of acetate stacked one on top of the other. You can see through transparent areas
File menu. Open, close, save, print, place, import etc...
 File menu Open, close, save, print, place, import etc... This saves files under the same name and format. You will replace the original file with the new one. Once you have clicked the button and closed