Digimizer Copyright MedCalc Software bvba MedCalc Software Acacialaan Ostend Belgium
|
|
|
- Joella Davidson
- 6 years ago
- Views:
Transcription
1
2 MedCalc Software bvba. All rights reserved. No part of this package, neither the documentation nor the software may be reproduced, stored in a retrieval system, or transmitted in any form by electronic, mechanical, photocopying, or any other means without the prior written permission of the publisher. The author and the publisher make no representations or warrants with respect to the software and the documentation and specifically disclaim any implied warranties of fitness for any particular use. Microsoft, Excel, Windows and Windows Vista are trademarks or registered trademarks of Microsoft Corporation in the United States and/or other countries. Digimizer and MedCalc are registered trademarks. Version 5.1 Digimizer Copyright MedCalc Software bvba MedCalc Software Acacialaan Ostend Belgium info@medcalc.org
3 Contents Get started... 1 Software installation... 1 Digimizer application window... 2 The Measurements list and the Digimizer image file format DGZ... 3 Examples... 4 How to straighten an image... 4 How to calibrate measurements... 4 How to edit measurement objects... 5 How to select measurement objects... 5 Automatic measurement of leaf area... 6 Toolbar File controls Edit controls Rotate & Flip controls - Crop control Measurements toolbar Measurements tools Select tool Lock tool Unit tool Length tool Middle tool Angle tool Perpendicular line tool Path tool Area tool Center tool Circle tool Rectangle tool Marker/Counter tool Magic contour tool Color selection tool Brightness & Contrast controls Zoom controls Menu overview File menu Open Image Close New Image from Clipboard Save Save as Select Scanner Acquire Image from Scanner Grab Image from Camera Print Exit File - Measurements List menu New Open Save Save As Export i
4 Edit menu Undo Cut Copy Paste Delete Duplicate Select all View menu Measurements List Statistics Measurements List Columns Grid Zoom to Fit Zoom In Zoom Out Format menu Resize Crop Rotate Flip Reset Calibration Image menu Contrast Auto Fix Stretch Histogram Background Correction Despeckle Convert to Grayscale Invert Negative Adjust colors Selective color brightness Sharpen Filters Canny Edge Detector Emboss Filter Arithmetic Mean Filter Geometric Mean Filter Harmonic Mean Filter Median Filter Maximum Filter Minimum Filter Midpoint Filter Range Filter Yp Mean Filter Binary menu Binarization Overlay Binary Image Hide Binary Layer Morphological Dilate Morphological Erode Morphological Close Morphological Open Noise Reduction Analyze Objects Import Binary Layer Tools menu Scripts Edit script Options ii
5 Window menu Reset Window Layout Help menu Digimizer help What's new? About Digimizer Index iii
6 iv
7 Get started Software installation System requirements To run the Digimizer program you need a PC with Windows XP or later, with at least 1 GB RAM and about 8 Megabyte free space on the hard disk. Software installation If you have downloaded the software from the Internet, you should locate the setup file digimizersetup.exe on your hard disk and execute (double-click) it. If you have a program CD, locate the setup file digimizersetup.exe on the CD and execute it. Next follow the instructions of the installation procedure To setup Digimizer you must be logged on to your computer with administrator privileges. The digimizersetup.exe file is suitable for new installations as well as software updates. If you have previously installed Digimizer, you must close any open (running) copy of Digimizer first. When installation is complete, you start Digimizer by clicking the Start button and point to Programs, next click Digimizer. Sample data At first run, Digimizer creates a folder named "Digimizer" with a subfolder "Sample files" in the "(My) Documents)" map. The "Sample Images" folder contains the following sample files: leafs.png X-ray Dog.jpg What's new If you are already familiar with Digimizer, you can read about the latest changes and additions in Digimizer by selecting the option What's new in the Digimizer Help menu. Updated versions of the manual in PDF format can be downloaded from the Digimizer web site 1

8 Digimizer application window The different parts of the Digimizer application window are indicated in the following figure. Digimizer menu In the menu you select the different commands and options. See p. 22 for a complete overview of all menu commands. Toolbar The toolbar contains buttons for the most common commands. Inactive buttons are displayed in gray. When you hover the mouse over an active button, a short description of the corresponding command is displayed in a small popup window. See p. 10 for a short description for all buttons on the toolbar. Measurement tools The measurement tools toolbar contains the different tools for manual measurements in the image. For an overview of all measurements tools, see p. 11. Measurements list The measurements list contains the different measurements performed in one or more images. 2
9 Only the parameters selected in the Measurements List Columns options box (p. 35) are displayed in the Measurements list window. To close the Measurements list window, click the button When the Measurements list window is not visible, select the command View measurements list (p. 29). Click the button to obtain the following shortcut menu: New: starts a new measurements list. Open: opens an existing Measurements List file. Save: save the measurements list as a file. Save as: saves the measurements list as a new file. Export: allows to export the measurements list as an Excel spreadsheet file, or as a MedCalc file for statistical analysis. Print: print the information displayed in the Measurements list window Columns: select the columns visible in the Measurements list window (see p. 30). Statistics The statistics window displays summary statistics for the different measurements that are displayed in the measurements list. To close the Statistics window, click the button When the Statistics window is not visible, select the View statistics command (p. 30). Click the button to obtain the following shortcut menu: Select Print to print the information displayed in the Statistics window. The Measurements list and the Digimizer image file format DGZ In Digimizer, you can save image in a special file format with file extension DGZ. The files in this format do not only contain the image in a compressed format (without quality loss), but also the measurements performed in this image. When you re-open such file the measurements are added if not already there to the current measurements list, and you can add, delete or modify the measurements. All measurements performed in Digimizer have a global unique identifier number. These identifiers prevent that re-opening the file results in duplicates in the measurements list. 3
, and then click one end of that line. Click the other end of the line. The image is straightened.")
10 Examples How to straighten an image To straighten an image: Click the Straighten button. Identify a line in the image that should be straight (vertically or horizontally), and then click one end of that line. Click the other end of the line. The image is straightened. Example Before: Identify straight line: The image is rotated: How to calibrate measurements Click the Unit tool. Identify a line in the image of which the length is known, and then click one end of that line. Click the other end of the line. Enter the real length and select the unit in the dialog box that appears. Click OK. 4

11 How to edit measurement objects How to move points of a measurement object Click and drag a point of the object to a new location. Other modifications of a measurement object Right-click on an object. Make your selection in the popup menu. How to select measurement objects First click the Select button. To select a single object: Click on the object in the image. To select more objects: Click on different objects while holding down the Ctrl key. - or - Drag a rectangle over the different objects. To unselect objects: Click on the objects while holding down the Ctrl key. - or - Drag a rectangle over the objects while holding down the Ctrl key. 5


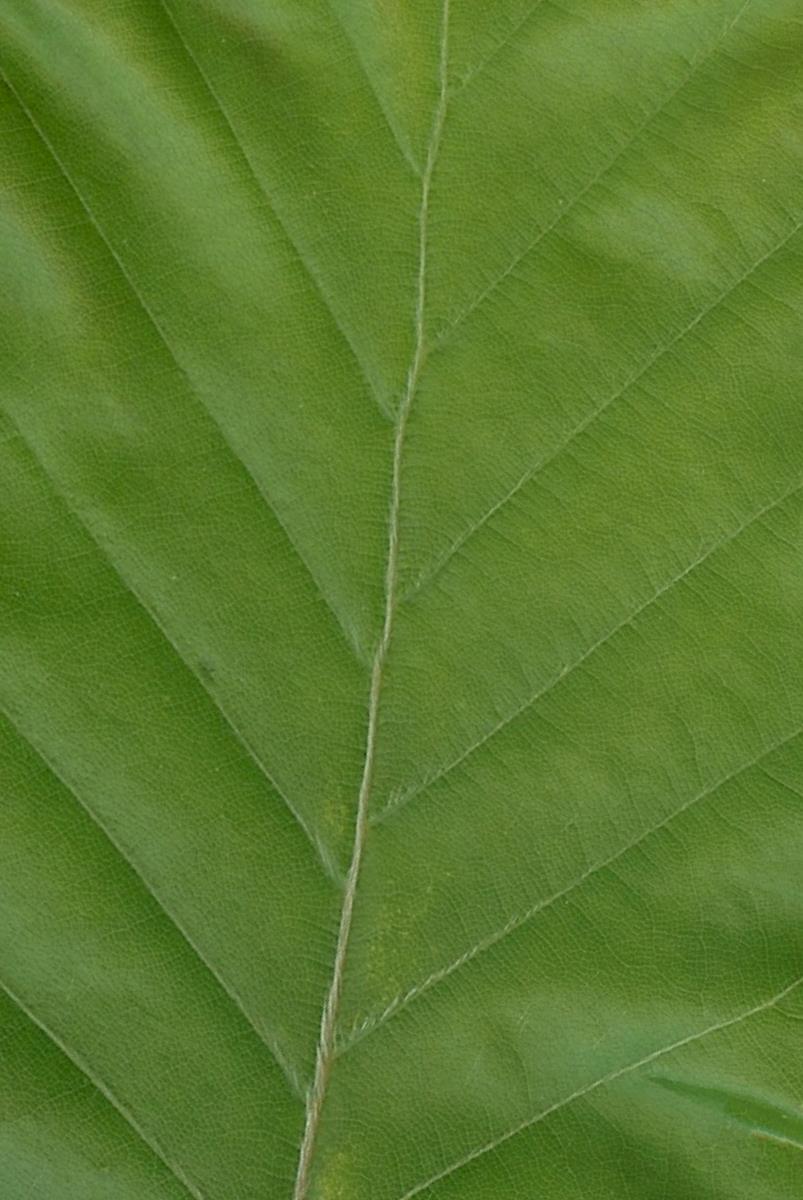
12 Automatic measurement of leaf area Open image file leafs.png, which is present in the Digimizer\Sample Images subfolder in the My Documents folder. Select Contrast autofix in the Image menu. This will automatically maximize the contrast in the image. The image contains a ruler which we will use to calibrate our measurements. Select the Zoom in tool. Drag a rectangle over the ruler so it is enlarged. Select the Unit tool. Click on the small vertical line above the value 0 and next click on the line above the value 10. A dialog box is displayed in which we enter the real length of the unit line: 10 cm. Click the Zoom to fit tool. Select Binarization in the Binary menu. The following dialog box is displayed: 6
13 The dialog box displays a histogram of gray levels. A red line indicates the default threshold value. Click Preview. All gray levels below the threshold value will become red (indicating an object), those above white (indicating background). Click OK to accept the threshold value. Select Analyze Objects in the Binary menu. Complete the dialog box as follows (a minimum area of 3 cm² is required for an object to be identified as a leaf): 7

14 The leafs are now outlined. The characteristics of the 6 leafs are displayed in the measurements list, and the mean area and perimeter are displayed in the statistics window: 8
15 Select Hide Binary layer in the Binary menu so you can judge how well the areas fit the leafs. 9
16 Toolbar File controls Open image file (p. 22) Save image (p. 23) Print (p. 24) Edit controls Cut (p. 27) Copy (p. 27) Paste (p. 28) Undo (p. 27) Rotate & Flip controls - Crop control Rotate counterclockwise (p. 34) Rotate clockwise (p. 34) Flip horizontally (p. 35) Flip vertically (p. 35) Straighten image (p. 4) Crop image (p. 33) 10
17 Measurements toolbar You can measure objects in the image using any of the following Measurement tools: Select (p. 12) Allows to select existing measurement objects in the image. Lock tool (p. 12) When the lock is Open, the program returns to Select mode after performing a measurement using any of the tools below. Close the lock when you need to perform several measurements with the same tool. Unit (p. 12) Draw line (click two points) to define the unit of measurement. Length (p. 13) Draw line to measure a length or distance. Middle (p. 13) Draw line and mark middle point. Angle (p. 14) Click 3 points to measure an angle. Perpendicular line (p. 14) First click 2 points to draw a line. Next click a 3rd point to draw a second line perpendicular on the first line. The middle point of the second line is shown. Path (p. 15) Click several points to obtain a path and calculate its total length. Area (p. 16) Click several points to obtain an area (closed path) and calculate its surface area and perimeter. Center (p. 17) Click several points and find their common center assuming they form a circle. Circle (p. 17) Click a point to define the circle, move the mouse to the center of the circle and click. Rectangle (p. 18) Measures a rectangle. Marker/Counter (p. 19) Click in the image to place a marker. Marker/Counter (p. 19) Click in the image to place a marker. Magic contour (p. 19) Finds the contour of objects automatically. Color selection tool (p. 20) Select color for measurement objects. 11
18 Measurements tools Select tool Button Use Select a measurement object by clicking on its outline. To select multiple objects: place the mouse pointer just outside (not on) the first object you want to select; hold down the left mouse button and drag the mouse pointer over the other objects; or click different objects whilst pressing the Ctrl key; or press Ctrl+A to select all objects. When multiple objects are selected, you can unselect one by clicking it whilst pressing the Ctrl key. Lock tool Buttons Use When the lock is Open, the program returns to Select mode after performing a measurement using any of the Measurement tools. Close the lock when you need to perform several measurements with the same tool. Unit tool Button Use Use this tool to calibrate your measurements. Click the Unit tool. Identify a line in the image of which the length is known, and then click one end of that line. Click the other end of the line. Enter the real length and select the unit in the dialog box that appears. 12
19 Click OK. The length (in pixels) is displayed in the Measurements list window. When the option Show result after finalizing measurement is selected, then the length is displayed in a small window next to the object. After you have defined the unit, all previous measurements are recalculated. Tip A default calibration can be defined in the options box (p. 62). Length tool Button Use To measure a length or a distance: click on one side of the object or distance to measure click on the other site of the object or distance to measure Tip: while you are moving the mouse to the second position, length and angles are displayed in the status bar at the bottom of the Digimizer window. Measurements The length is displayed in the Measurements list window (*). When the option Show result after finalizing measurement is selected, then the length is displayed in a small window next to the object. Summary statistics for all lengths measured with the Length tool are displayed in the Statistics window. * Only the parameters selected in the Measurements List Columns options box (p. 30) are displayed in the Measurements list window. Middle tool Button Use Use this tool to measure a length or a distance, and mark the middle point: click on one side of the object or total distance to measure 13
20 click on the other site of the object or total distance to measure Tip: while you are moving the mouse to the second position, total and half length and angles are displayed in the status bar at the bottom of the Digimizer window. Measurements The total length is displayed in the Measurements list window (*). When the option Show result after finalizing measurement is selected, then the length and half length are displayed in a small window next to the object. Summary statistics for all total lengths measured with the Middle tool are displayed in the Statistics window. * Only the parameters selected in the Measurements List Columns options box (p. 30) are displayed in the Measurements list window. Angle tool Button Use Click 3 points to measure the angle alpha: Tip: while you are moving the mouse to the second and third position, lengths and angles are displayed in the status bar at the bottom of the Digimizer window. Measurements The angle is displayed in the Measurements list window (*). When the option Show result after finalizing measurement is selected, then the angle is displayed in a small window next to the object. Summary statistics for all angles measured with the Angle tool are displayed in the Statistics window. * Only the parameters selected in the Measurements List Columns options box (p. 30) are displayed in the Measurements list window. Perpendicular line tool Button Use First click 2 points to draw a line. Next click a 3rd point to draw a second line perpendicular on the first line. The middle point of the second line is shown. 14
21 Tip: while you are moving the mouse to the second and third position, lengths and angles are displayed in the status bar at the bottom of the Digimizer window. Measurements The total length and angle are displayed in the Measurements list window (*). When the option Show result after finalizing measurement is selected, then the total length and angle are displayed in a small window next to the object. Summary statistics for all lengths and angles measured with the Perpendicular line tool are displayed in the Statistics window. * Only the parameters selected in the Measurements List Columns options box (p. 30) are displayed in the Measurements list window. Path tool Button Use Click several points to obtain a path and calculate its total length. Double-click the last point (point 5 in the example) to finish. Tips To undo a mouse click, press the Esc key. "Lasso" function: when using the path or area tools, the program will "sample" points when you press the Ctrl key whilst moving the mouse. While you are moving the mouse to the next position, lengths and angles are displayed in the status bar at the bottom of the Digimizer window. Measurements The total length is displayed in the Measurements list window (*). When the option Show result after finalizing measurement is selected, then the total length is displayed in a small window next to the object. Summary statistics for all lengths measured with the Path tool are displayed in the Statistics window. * Only the parameters selected in the Measurements List Columns options box (p. 30) are displayed in the Measurements list window. 15
22 Area tool Button Use Click several points to obtain an area (closed path). Double-click the last point (point 7 in the example) to close the path. Tips To undo a mouse click, press the Esc key. "Lasso" function: when using the path or area tools, the program will "sample" points when you press the Ctrl key whilst moving the mouse. While you are moving the mouse to the next position, lengths and angles are displayed in the status bar at the bottom of the Digimizer window. Measurements The surface area, perimeter, length, width, centroid (geometric center), roundness, average intensity and hue are displayed in the Measurements list window (*). Roundness is defined by (4*PI*Area) / (Perimeter*Perimeter) and is a number between 0 and 1. Values closer to 1 indicate a more 'round' object. A circle has a roundness of 1. Definition of length and width: Length is maximum distance between any 2 points on the object outline. Width is the sum of the two maximum perpendicular distances between length-axis and any point on the object outline, on both sides of the length-axis. When the option Show result after finalizing measurement is selected, then the area and perimeter are displayed in a small window next to the object. Summary statistics for all areas, perimeters, lengths, widths and average intensities measured with the Area tool are displayed in the Statistics window. * Only the parameters selected in the Measurements List Columns options box (p. 30) are displayed in the Measurements list window. 16
23 Center tool Button Use Click several points and find their common center assuming they form a circle. Double-click the last point (point 5 in the example) to finish. Tips To undo a mouse click, press the Esc key. "Lasso" function: when using this tool, the program will "sample" points when you press the Ctrl key whilst moving the mouse. While you are moving the mouse to the next position, lengths and angles are displayed in the status bar at the bottom of the Digimizer window. Measurements The radius is displayed in the Measurements list window (*). When the option Show result after finalizing measurement is selected, then the radius is displayed in a small window next to the object. Summary statistics for all radiuses measured with the Center tool are displayed in the Statistics window. * Only the parameters selected in the Measurements List Columns options box (p. 30) are displayed in the Measurements list window. Circle tool Button Use To measure a circle: click one point on the circle move the mouse to the center of the circle and click 17
24 Tips While you are moving the mouse to the center position, radius and angles are displayed in the status bar at the bottom of the Digimizer window. As an option, quadrants can be displayed in the circle (see Options, p. 62) Measurements The radius, perimeter, area, average intensity and hue are displayed in the Measurements list window (*). When the option Show result after finalizing measurement is selected, then the radius, diameter, perimeter and area are displayed in a small window next to the object. Summary statistics for all radiuses, areas, perimeters and average intensities measured with the Circle tool are displayed in the Statistics window. * Only the parameters selected in the Measurements List Columns options box (p. 30) are displayed in the Measurements list window. Rectangle tool Button Use To measure a rectangular shape: click one corner point of the rectangle move the mouse to the opposite corner point of the rectangle and click Measurements The area, perimeter, width, height, average intensity and hue are displayed in the Measurements list window (*). Width and height are measured on the vertical and horizontal axes respectively. When the option Show result after finalizing measurement is selected, then the perimeter, area, width and height are displayed in a small window next to the object. Summary statistics for all areas, perimeters, widths, lengths, and average intensities measured with the Rectangle tool are displayed in the Statistics window. * Only the parameters selected in the Measurements List Columns options box (p. 30) are displayed in the Measurements list window. 18
25 Marker/Counter tool Buttons Use Click in the image to place a marker. To count objects: click on the Lock tool so it shows the locked state select one of the two marker tools or click in the image on the different objects the number of objects is displayed in the Statistics window Measurements Digimizer counts the number of each marker. The totals are displayed in the Statistics window. Magic contour tool Button Use Finds the contour of objects automatically. Select the magic contour control Click inside the object (or drag a 'sampling' rectangle inside the object for increased precision) The program locates the contour of the object If the contour does not reach the actual border of the object: click on the contour and delete it, increase the tolerance and try again. If the contour goes beyond the actual border of the object: click on the contour and delete it, decrease the tolerance and try again. Measurements The surface area, perimeter, length, width and average intensity are displayed in the Measurements list window (*). When the option Show result after finalizing measurement is selected, then the area and perimeter are displayed in a small window next to the object. 19
 are displayed in the Measurements list window. Color selection tool Button Use Select color for measurement objects.")
26 Summary statistics for all areas, perimeters, lengths, widths and average intensities measured with the Magic contour tool are displayed together with those of other Areas in the Statistics window. Only the parameters selected in the Measurements List Columns options box (p. 30) are displayed in the Measurements list window. Color selection tool Button Use Select color for measurement objects. To change the color of existing objects, select these objects first and next select the new color. Brightness & Contrast controls Brightness Contrast To change the image brightness: enter a brightness value in the range -100 to 100 and press Enter, - or - use the up-down control to increase or decrease the brightness. To change the image contrast: enter a contrast value in the range -100 to 100 and press Enter, - or - use the up-down control to increase or decrease the contrast. Example Before: Increased brightness: Increased brightness and contrast: 20
27 Related items Contrast Auto Fix (p. 36) Stretch Histogram (p. 36) Zoom controls Zoom factor To change the zoom factor: enter the zoom factor in the range 1 to 2000 and press Enter, - or - use the up-down control to increase or decrease the zoom factor. Zoom in Click in the image to increase the zoom factor and show more detail. Zoom out Click in the image to decrease the zoom factor and show less detail. Fit Adjusts the zoom so that the image fits inside the window. Drag Move the image inside the window. Tip To zoom into a specific area: click a starting point and then move the mouse to drag the rectangle over the area of interest. Note Zooming only magnifies the image on your screen; it does not change the physical size of the picture. 21
28 Menu overview File menu Open Image File Open Image Loads an image file from disk. Digimizer can read image files in the following formats: Digimizer image format (*.dgz) JPEG Interchange format (*.jpg; *.jpeg) Tagged Image File Format (*.tif) Windows bitmap (*.bmp) Graphic Interchange Format (*.gif) Portable Network Graphics (*.png) Windows Metafile (*.wmf) and Enhanced Metafile (*.emf) DICOM file format (*.dic, *.dcm, *.dicom, or files without file extension) Shortcut Ctrl+O Close File Close Closes the image window. 22
29 New Image from Clipboard File New image from Clipboard Creates a new image from a bitmap image on the clipboard. You place an image on the clipboard for example by using the Copy command on a graphics object in other software. Save File Save Allows to save the image in Digimizer native format (file extension.dgz), or in JPG, GIF, PNG or TIFF format. If you want to save the image as a new file, use the command Save as. Shortcut Ctrl+S Save as File Save as Select Save as to save the image as a new file on disk, or to save a file on a different disk. You will have to enter a new name for the image in the file selector box. Digimizer can save files in the following formats: Digimizer image format (*.dgz) (see also p. 3) JPEG Interchange format (*.jpg) (minimal compression) Tagged Image File Format (*.tif) Windows bitmap (*.bmp) Graphic Interchange Format (*.gif) Portable Network Graphics (*.png) 23
30 Select Scanner File Select Scanner Allows to select a TWAIN compliant scanner or camera - if available. TWAIN defines a standardized way to provide communication between imaging devices, such as a scanners or digital cameras, to software applications. Digimizer supports most TWAIN-compliant devices, but compatibility with particular scanning devices is not guaranteed. Acquire Image from Scanner File Acquire Image from Scanner Allows to acquire an image from a TWAIN compliant scanner or camera - if available. If you have several TWAIN devices, you select the TWAIN device using the Select Scanner command (see above), before acquiring the image. In your imaging software, do not select a color depth higher than 24-bits. MedCalc does not support 48- bit images (optionally produced by some scanners). Grab Image from Camera File Grab Image from Camera Allows to acquire an image from a life camera feed. In the dialog box you can select the camera and the image format. The different formats are displayed as compression, size and bitcount, e.g. RGB x 960 (24). Print File Print... Allows to print the contents of the image window. 24
31 Shortcut Ctrl+P Exit File Exit Stops the program. If the latest changes have not been saved, then the program will display an appropriate warning. In this case you will have the option to save the data (Yes), or exit the program without saving the data (No), or cancel the Exit command and stay in the program (Cancel). Shortcut Alt+F4 File - Measurements List menu New File Measurements List New Starts a new measurements list. Open File Measurements List Open Opens an existing Measurements List file. 25
32 Save File Measurements List Save Save the measurements list as a file. Save As File Measurements List Save As Saves the measurements list as a new file. Export File Measurements List Export Allows to export the measurements list as an Excel spreadsheet file, or as a MedCalc file for statistical analysis. 26
33 Edit menu Undo Edit Undo With the Undo command (if available) you can undo your most recent actions. Shortcut Ctrl+Z Cut Edit Cut Removes the selection from the window and places it on the Clipboard. The selection can then be pasted at another location. Shortcut Ctrl+X Copy Edit Copy Copies the selection from the window and places it on the Clipboard. The selection can then be pasted at another location. Shortcut Ctrl+C 27
34 Paste Edit Paste The Paste command is used to paste the contents of the clipboard onto the active window. Shortcut Ctrl+V Delete Edit Delete Deletes the current selection (does not affect the clipboard). Shortcut Del (Delete key) Duplicate Edit Duplicate Duplicates the current selection. Shortcut Ctrl+D 28
35 Select all Edit Select all Selects the entire contents of the active window. Shortcut Ctrl+A View menu Measurements List View Measurements List Opens or closes the measurements list window. The measurements list displays measurements in the current image, but can also include measurements of several images. 29
36 Statistics View Statistics Opens or closes the statistics window. The statistics window displays summary statistics (n, mean, SD, minimum and maximum) of the measurements in the Measurements list. Measurements List Columns View Measurements List Columns Allows to select the columns or measurements that are visible in the Measurements List and Statistics window. Dialog box Select the columns corresponding to the measurements of interest. 30

37 Click OK to proceed. Grid View Grid Allows to display or hide a grid in the image window. Zoom to Fit View Zoom Zoom to Fit Adjusts the zoom so that the image fits inside the window. 31
38 Shortcut Ctrl+0 Note This command does not change the physical size of the picture. Zoom In View Zoom In Allows to increase the zoom factor and show more detail. Shortcut Note Ctrl+ + Zooming in only magnifies the image on your screen; it does not change the physical size of the picture. Zoom Out View Zoom Out Allows to decrease the zoom factor and show less detail. Shortcut Note Ctrl+ - Zooming out only reduces the magnification of the image on your screen; it does not change the physical size of the picture. 32


39 Format menu Resize Format Resize Allows to resize the image. Dialog box Width and Height: select the required width or height. Option Lock aspect ratio: when this option is selected the ratio width:height will remain unchanged. Click OK to proceed. Crop Format Crop Cropping an image is removing unwanted border areas from an image. To crop the image, you: Select Crop in the Format menu Click a starting point in the image and drag the new outline After dragging the outline, you can make corrections to the outline rectangle Click OK in the Crop dialog box Dialog box 33


40 Width and Height: select the exact required width and height of the cropped image. Click OK to proceed. Example Before cropping: The new image outline is defined by dragging the mouse over the area of interest: After cropping: Rotate Format Rotate Rotate Clockwise Rotate Counterclockwise Allows to rotate the image clockwise or counterclockwise. 34
41 Example Before: Rotate clockwise: Rotate counterclockwise: Flip Format Flip Flip Horizontal Flip Vertical Allows to flip the image horizontally or vertically. Example Before: Flip horizontal: Flip vertical: Reset Calibration Format Reset Calibration Allows to reset the calibration. Note: this command is not available when a unit line is present in the image. To reset the calibration, you first remove the unit line, if present. select Reset Calibration in the menu. 35
42 If a default calibration is defined in the Options box (p. 62), then the calibration is reset to this default calibration. Image menu Contrast Auto Fix Image Contrast Auto Fix Maximizes contrast automatically. Example Before: After: Stretch Histogram Image Stretch Histogram Allows to optimize contrast by selecting a lower and upper threshold value. Dialog box The dialog box displays a histogram of gray levels. The upper and lower threshold values are represented by vertical red lines. 36

43 You drag the red lines to the required threshold values. pixels with a gray value less than the lower threshold value will be black. pixels with a gray value higher than the upper threshold value will be white. the gray values between the two threshold values will be stretched over the full range of possible gray values. Click Preview to judge the results. Click OK to proceed. Example Before: After: Background Correction Image Background Correction Corrects image defects caused by uneven illumination (e.g. in microscopy). 37

44 Example Before: After: Despeckle Image Despeckle Removes noise from images without blurring edges. Example Before: After: Convert to Grayscale Image Convert to Grayscale Converts the image to a grayscale image. 38
45 Example Before: After: Invert Image Invert Creates a negative of the image. Example Before: After: Negative Image Negative Allows to invert selected colors planes (red, green or blue). 39


46 Dialog box Select the color channels you want to invert. Click OK to proceed. Example Before: Invert Blue: Invert Red: Adjust colors Image Adjust colors Allows to increase or decrease the intensity of the red, green and blue color components in the image. Dialog box Use the sliders to increase or decrease the intensity of the 3 color components. 40


47 Click OK to proceed. Example Before: After: Selective color brightness Image Selective color brightness Allows to increase or decrease the brightness of red, green and blue pixels in the image. Dialog box Use the sliders to increase or decrease the brightness of red, green and blue pixels. E.g. if you move the slider for the red color to the right, then pixels with a high red component will appear lighter. Click OK to proceed. 41


48 Example Before: After: Sharpen Image Sharpen Applies a sharpen filter to the image. Dialog box Filter Size: larger filter yields stronger effect. Filter Intensity: % filter intensity. Click OK to proceed. Example Before: After: 42
49 Filters Canny Edge Detector Image Filters Canny Edge Detector Applies a Canny Edge Detector to an image. Dialog box Sigma: Standard deviation of the Gaussian filter. Good values to start with are between 0.6 and 2.4. Smaller filters cause less blurring, and allow detection of small, sharp lines. A larger filter increases processing time and causes more blurring. Low and High thresholds: A threshold set too high can miss important information. On the other hand, a threshold set too low will falsely identify irrelevant information (such as noise) as important are good starting values for the low threshold; are good starting values for the high threshold. Click Preview to judge the results. Click OK to proceed. Examples Before: After: 43

50 Emboss Filter Image Filters Emboss Filter Generates an embossed image. Dialog box Filter Size: controls depth of effect. Option Color emboss: preserves color in the image. Click Preview to judge the results. Click OK to proceed. Example Before: After: Arithmetic Mean Filter Image Filters Arithmetic Mean Filter Applies an arithmetic mean filter to an image. An arithmetic mean filter operation on an image removes short tailed noise such as uniform and Gaussian type noise from the image at the cost of blurring the image. The arithmetic mean filter is defined as the average of all pixels within a local region of an image. 44
51 The arithmetic mean is defined as: Pixels that are included in the averaging operation are specified by a mask. The larger the filtering mask becomes the more predominant the blurring becomes and less high spatial frequency detail that remains in the image. Dialog box Filter Size: size of the filter mask; a larger filter yields stronger effect. Click Preview to judge the results. Click OK to proceed. Examples Before: After: 45
52 Geometric Mean Filter Image Filters Geometric Mean Filter Applies a geometric mean filter to an image. In the geometric mean method, the color value of each pixel is replaced with the geometric mean of color values of the pixels in a surrounding region. A larger region (filter size) yields a stronger filter effect with the drawback of some blurring. The geometric mean is defined as: The geometric mean filter is better at removing Gaussian type noise and preserving edge features than the arithmetic mean filter. The geometric mean filter is very susceptible to negative outliers. Dialog box Filter Size: larger filter yields stronger effect. Click Preview to judge the results. Click OK to proceed. Examples Before: After: 46
53 Harmonic Mean Filter Image Filters Harmonic Mean Filter Applies a harmonic mean filter to an image. In the harmonic mean method, the color value of each pixel is replaced with the harmonic mean of color values of the pixels in a surrounding region. The harmonic mean is defined as: A larger region (filter size) yields a stronger filter effect with the drawback of some blurring. The harmonic mean filter is better at removing Gaussian type noise and preserving edge features than the arithmetic mean filter. The harmonic mean filter is very good at removing positive outliers. Dialog box Filter Size: larger filter yields stronger effect. Click Preview to judge the results. Click OK to proceed. 47
54 Examples Before: After: Median Filter Image Filters Median Filter Applies a median filter to an image. The median filter is defined as the median of all pixels within a local region of an image. The median filter is normally used to reduce noise in an image, somewhat like the mean filter. However, it often does a better job than the mean filter of preserving useful detail in the image. Dialog box 48
55 Filter Size: larger filter yields stronger effect. Click Preview to judge the results. Click OK to proceed. Examples Before: After: Maximum Filter Image Filters Maximum Filter Applies a maximum filter to an image. The maximum filter is defined as the maximum of all pixels within a local region of an image. The maximum filter is typically applied to an image to remove negative outlier noise. 49
56 Dialog box Filter Size: larger filter yields stronger effect. Click Preview to judge the results. Click OK to proceed. Examples Before: After: 50
57 Minimum Filter Image Filters Minimum Filter Applies a minimum filter to an image. The minimum filter is defined as the minimum of all pixels within a local region of an image. The minimum filter is typically applied to an image to remove positive outlier noise. Dialog box Filter Size: larger filter yields stronger effect. Click Preview to judge the results. Click OK to proceed. Examples Before: After: 51
 yields a stronger effect. The midpoint filter is typically used to filter images containing short tailed noise such as Gaussian and uniform type noise.")
58 Midpoint Filter Image Filters Midpoint Filter Applies a midpoint filter to an image. In the midpoint method, the color value of each pixel is replaced with the average of maximum and minimum (i.e. the midpoint) of color values of the pixels in a surrounding region. A larger region (filter size) yields a stronger effect. The midpoint filter is typically used to filter images containing short tailed noise such as Gaussian and uniform type noise. Dialog box Filter Size: larger filter yields stronger effect. Click Preview to judge the results. Click OK to proceed. Examples Before: After: 52

59 Range Filter Image Filters Range Applies a Range filter to an image. In the range method, the color value of each pixel is replaced with the difference of maximum and minimum (i.e. the range) of color values of the pixels in a surrounding region. The range filter is used to find edges within an image. Dialog box Filter Size: larger filter yields stronger effect. Click Preview to judge the results. Click OK to proceed. Examples Before: After: 53

60 Yp Mean Filter Image Filters Yp Mean Filter Applies a Yp Mean filter to an image. The Yp mean filter is member of a set of nonlinear mean filters which are better removing Gaussian type noise and preserving edge features than the arithmetic mean filter. Yp mean filter is very good at removing positive outliers for negative values of P and negative outliers for positive values of P (Power, see below). Dialog box Filter Size: larger filter yields stronger effect. Power: controls power. P<0 removes positive outliers; P>0 removes negative outliers. Click Preview to judge the results. Click OK to proceed. Examples Before: After: 54
61 Binary menu Binarization Binary Binarization Converts an image to a binary image by converting all pixels below a user-selected threshold value to red and those above to white. Dialog box The dialog box displays a histogram of gray levels. In the histogram you drag the red line to the required threshold value. 55
62 All gray levels below the threshold value will become red (indicating an object), those above white (indicating background). Click Preview to judge the results. Click OK to proceed. Example Before: After: Overlay Binary Image Binary Overlay Binary Image Option to show the Binary Image as a semi-transparent layer over the original image. Example Overlay binary image Off: Overlay binary image On: Hide Binary Layer Binary Hide Binary Layer Option to hide or show the binary image layer. 56

63 Morphological Dilate Binary Morphological Operations Dilate This filter will morphologically dilate the binary image. Binary dilation of an object increases its geometrical area by setting the background pixels adjacent to an object s contour to the object s gray level value. The filter adds pixels at region boundaries and fills in holes. Example Before: After: Morphological Erode Binary Morphological Operations Erode This filter will morphologically erode the binary image. Binary dilation of an object reduces its geometrical area by setting the contour pixels of an object to the background value. The filter removes pixels at boundaries or regions and increases the size of holes. Example Before: After: 57
64 Morphological Close Binary Morphological Operations Close This filter will morphologically close the binary image. Morphological closing of a binary image is defined as the dilation of the image followed by the erosion of the dilated image. The closing filter operation will smooth boundaries, reduce small inward bumps, join narrow breaks and fill small holes caused by noise. Example Before: After: Morphological Open Binary Morphological Operations Open This filter will morphologically open the binary image. Morphological opening of a binary image is defined as the erosion of that image followed by the dilation of the eroded image. The opening filter operation will smooth boundaries, reduce small outward bumps and small narrow openings within the object. Example Before: After: 58
65 Noise Reduction Binary Noise Reduction Reduces noise in the binary image. Example Before: After: Analyze Objects Binary Analyze Objects Allows to automatically extract object contours from the binary image. Dialog box 59
66 Minimum and maximum object dimensions: the minimum and/or maximum area or length of an object. Objects with smaller or larger area or length will be ignored. Option Exclude objects on image border: when this option is selected, objects that are on the border of the image will be ignored (since the object is not completely 'visible', area and perimeter of the object cannot be calculated accurately). Option Objects van contain other objects: select this option when objects are hollow and can contain other objects. Click OK to proceed. Example Before (binarized image): After: Import Binary Layer Binary Import Binary Layer from Image File Allows to import the binary layer from a different Digimizer image file (file extension.dgz). To fix the placement of the imported binary layer in the image use Set coordinates origin on matching points in both images. To fix possible magnification differences, use the Unit tool (p. 12) in both images. Tools menu Scripts Tools Scripts Allows to create and manage scripts. A script is a text with a sequence of commands. A different shortcut key can be assigned to each script. 60
67 Dialog box The left panel lists the available scripts. Buttons New: create a new script. Edit: edit the selected script. See Edit script. Delete: delete the selected script. Execute: execute the selected script. Edit script Allows to edit a script. Required input Script name: each script requires a unique name. Shortcut key: assign a shortcut key to the script. You can select a character in the range A..Z or For example, when you select the letter A, you will be able to execute the script by pressing the key combination Shift + Ctrl + A Script commands: a list of commands that make up the script. Script commands AnalyzeObjects [include exclude] [minarea maxarea] Extract object contours from the binary image. Optional parameters: include exclude: include or exclude objects that are on the image border minarea: minimum area of objects maxarea: maximum area of objects BackgroundCorrection Correct image defects caused by uneven illumination. Binarize [threshold] Convert the image to a binary image by converting all pixels below a threshold value to red and those above to white. Optional parameter: threshold: a value in the range [0..255] ContrastAutoFix Despeckle Maximize contrast automatically. Remove noise from images without blurring edges. Flip vertical horizontal Grayscale Invert Flip the image vertically or horizontally. Convert the image to a grayscale image. Create a negative of the image. Rotate left right MorphDilate MorphErode Rotate the image left or right. Add pixels at region boundaries and fill in holes (Morphological Dilate operation). 61
68 MorphOpen MorphClose SelectAll Remove pixels at boundaries or regions and increase the size of holes (Morphological Erode operation). Smooth boundaries, break narrow isthmuses and eliminate small noise regions (Morphological Open operation). Smooth boundaries, join narrow breaks and fill small holes caused by noise (Morphological Close operation). Selects all measurement objects in the image window. Sharpen [filtersize] [intensity] Apply a sharpen filter to the image. Optional parameters: filtersize: larger filter size yields stronger effect intensity: % filter intensity Options Tools Options Allows to configure the software and select different options. Dialog box Default calibration: select this option to use a default calibration. The default calibration is entered as number of pixels per unit of length. Digimizer offers the following units of length: kilometer (km), hectometer (hm), decameter (dam), meter (m), centimeter (cm), millimeter (mm), micrometer (µm), nanometer (nm), picometer (pm), femtometer (fm), attometer (am), inch (in), foot (ft), yard (yd), mile (mi), degrees ( ), units (u) (this is an unnamed relative unit), or pixels. Show result after finalizing measurement: when this option is selected, a small results window will be displayed after each measurement. Show circle quadrants: show quadrants in circle measurement objects. Show area centroid: show the centroid of objects in the image window. Do not ask to save unnamed measurements lists: when a measurement is added to the measurements list, the list is marked as 'changed', and you will be prompted to save the measurements list before clearing the list, or before you exit the program. If you don't need this reminder, select this option. Default zoom: enter an optional default zoom (1 to 2000). Invert image after scanning: option to invert the image after acquiring it from the scanner (see Acquire Image from Scanner, p. 24). Click OK to proceed. 62
69 Window menu Reset Window Layout Window Reset Window Layout Resets the Digimizer window layout to a default layout. Help menu Digimizer help Help Digimizer help Displays help. You select Digimizer help or press F1 to browse the comprehensive on-line documentation. In Help, click one of the following tabs: Click the Contents tab to browse through topics by category. Click the Index tab to see a list of index entries, and then either type a word or scroll through the list. Click the Find tab to search for words or phrases that may be contained in a Help topic. What's new? This help page lists the more important changes and new features in recent versions of Digimizer. The most recent additions and changes are listed at the top. 63

70 About Digimizer Help About Digimizer Displays program version and copyright notice. Dialog box This dialog box displays: the Digimizer version number copyright notice link to the Digimizer website Click OK to close. 64
71 Index About Digimizer Acquire image from scanner Adjust colors Analyze objects Angle tool Application window... 2 Area Area tool Arithmetic Mean Filter Average hue Background correction Binarization Binary image Analyze objects Binarization Hide Binary Layer Import Binary Layer Morphological Close Morphological Dilate Morphological Erode Morphological Open Noise reduction Overlay Binary Image Binary menu Brightness & Contrast controls Calibration Default calibration How to calibrate measurements... 4 Reset Unit tool Camera Canny Edge Detector Center tool Centroid Circle tool Close image Color selection tool Contrast Auto Fix Convert to grayscale Copy Count Crop Cut Delete Despeckle Duplicate Edit menu Edit script Emboss Filter Everage intensity Exit Filters Arithmetic Mean Filter Canny Edge Detector Emboss Filter Geometric Mean Filter Harmonic Mean Filter Maximum Filter Median Filter Midpoint Filter Minimum Filter Range Filter Yp Mean Filter Flip image Format menu Geometric center Geometric Mean Filter Grab image from camera Grid Harmonic Mean Filter Help Hide Binary Layer Image menu Import Binary Layer Installation... 1 Invert Length tool Live camera feed Load image file Lock tool Magic contour tool Marker/counter tool Maximum Filter Measurement tools Angle tool Area tool Center tool Circle tool Length tool Lock tool Magic contour tool Marker/counter tool Middle tool Path tool Perpendicular line tool Rectangle tool Select tool Unit tool Measurements List Columns Export New Open Save Save as View Measurements List menu Measurements toolbar Median Filter Middle tool Midpoint Filter Minimum Filter
Table of Contents 1. Image processing Measurements System Tools...10
 Introduction Table of Contents 1 An Overview of ScopeImage Advanced...2 Features:...2 Function introduction...3 1. Image processing...3 1.1 Image Import and Export...3 1.1.1 Open image file...3 1.1.2 Import
Version 6. User Manual OBJECT
 Version 6 User Manual OBJECT 2006 BRUKER OPTIK GmbH, Rudolf-Plank-Str. 27, D-76275 Ettlingen, www.brukeroptics.com All rights reserved. No part of this publication may be reproduced or transmitted in any
Using Adobe Photoshop to enhance the image quality. Assistant course web site:
 Using Adobe Photoshop to enhance the image quality Assistant course web site: http://www.arches.uga.edu/~skwang/edit6170/course.htm Content Introduction 2 Unit1: Scan images 3 Lesson 1-1: Preparations
CONTENTS. Chapter I Introduction Package Includes Appearance System Requirements... 1
 User Manual CONTENTS Chapter I Introduction... 1 1.1 Package Includes... 1 1.2 Appearance... 1 1.3 System Requirements... 1 1.4 Main Functions and Features... 2 Chapter II System Installation... 3 2.1
ImagesPlus Basic Interface Operation
 ImagesPlus Basic Interface Operation The basic interface operation menu options are located on the File, View, Open Images, Open Operators, and Help main menus. File Menu New The New command creates a
Image Pro Ultra. Tel:
 Image Pro Ultra www.ysctech.com info@ysctech.com Tel: 510.226.0889 Instructions for installing YSC VIC-USB and IPU For software and manual download, please go to below links. http://ysctech.com/support/ysc_imageproultra_20111010.zip
Copyright Notice. Trademarks
 Copyright Notice All rights reserved. No part of this publication may be reproduced, stored in a retrieval system, or transmitted in any form or by any means, electronic, mechanical, photocopying, recording,
Key Terms. Where is it Located Start > All Programs > Adobe Design Premium CS5> Adobe Photoshop CS5. Description
 Adobe Adobe Creative Suite (CS) is collection of video editing, graphic design, and web developing applications made by Adobe Systems. It includes Photoshop, InDesign, and Acrobat among other programs.
Digital Portable Overhead Document Camera LV-1010
 Digital Portable Overhead Document Camera LV-1010 Instruction Manual 1 Content I Product Introduction 1.1 Product appearance..3 1.2 Main functions and features of the product.3 1.3 Production specifications.4
in the list below are available in the Pro version of Scan2CAD
 Scan2CAD features Features marked only. in the list below are available in the Pro version of Scan2CAD Scan Scan from inside Scan2CAD using TWAIN (Acquire). Use any TWAIN-compliant scanner of any size.
μscope Microscopy Software
 μscope Microscopy Software Pixelink μscope Essentials (ES) Software is an easy-to-use robust image capture tool optimized for productivity. Pixelink μscope Standard (SE) Software had added features, making
Photo/Image Controls
 Table of Contents Introduction... 2 Using Image Controls... 2 Using the Image Editor... 3 19 July 2017 TIP-2017-092 1 Introduction The Edge s photo controls now include image editing options. This document
ISCapture User Guide. advanced CCD imaging. Opticstar
 advanced CCD imaging Opticstar I We always check the accuracy of the information in our promotional material. However, due to the continuous process of product development and improvement it is possible
Photoshop CC 2018 Essential Skills
 Photoshop CC 2018 Essential Skills Adobe Photoshop Creative Cloud 2018 University Information Technology Services Learning Technology, Training, Audiovisual and Outreach Copyright 2018 KSU Division of
Welcome to Photoshop CS
 Chapter 1 Welcome to Photoshop CS COPYRIGHTED MATERIAL Photoshop CS is the latest version of Photoshop, Adobe s powerful image-editing program. It s part of Adobe s Creative Suite, a package of design
Digital Imaging - Photoshop
 Digital Imaging - Photoshop A digital image is a computer representation of a photograph. It is composed of a grid of tiny squares called pixels (picture elements). Each pixel has a position on the grid
ArcSoft PhotoImpression Table of Contents:
 ArcSoft PhotoImpression Table of Contents: 1. Welcome to PhotoImpression 2. Highlights of PhotoImpression 3. System Requirements 4. Installing PhotoImpression 5. Working with PhotoImpression Getting Started
ScanGear CS-U 5.3 for CanoScan FB630U/FB636U Color Image Scanner User s Guide
 ScanGear CS-U 5.3 for CanoScan FB630U/FB636U Color Image Scanner User s Guide Copyright Notice 1999 Canon Inc. This manual is copyrighted with all rights reserved. Under the copyright laws, this manual
Recitation 2 Introduction to Photoshop
 Recitation 2 Introduction to Photoshop What is Adobe Photoshop? Adobe Photoshop is a tool for creating digital graphics either by starting with a scanned photograph or artwork or by creating the graphics
Scanning Setup Guide for TWAIN Datasource
 Scanning Setup Guide for TWAIN Datasource Starting the Scan Validation Tool... 2 The Scan Validation Tool dialog box... 3 Using the TWAIN Datasource... 4 How do I begin?... 5 Selecting Image settings...
Digital Photography 1
 Digital Photography 1 Photoshop Lesson 3 Resizing and transforming images Name Date Create a new image 1. Choose File > New. 2. In the New dialog box, type a name for the image. 3. Choose document size
IT154 Midterm Study Guide
 IT154 Midterm Study Guide These are facts about the Adobe Photoshop CS4 application. If you know these facts, you should be able to do well on your midterm. Photoshop CS4 is part of the Adobe Creative
MEASUREMENT CAMERA USER GUIDE
 How to use your Aven camera s imaging and measurement tools Part 1 of this guide identifies software icons for on-screen functions, camera settings and measurement tools. Part 2 provides step-by-step operating
Lesson 4: Inserting and Modifying Clip Art and Photos
 CNET tech sites: Price comparisons Product reviews Tech news Downloads Site map Home Your Courses Your Profile Logout FAQ Contact Us About Lesson 4: Inserting and Modifying Clip Art and Photos PowerPoint
By Washan Najat Nawi
 By Washan Najat Nawi how to get started how to use the interface how to modify images with basic editing skills Adobe Photoshop: is a popular image-editing software. Two general usage of Photoshop Creating
User Manual Veterinary
 Veterinary Acquisition and diagnostic software Doc No.: Rev 1.0.1 Aug 2013 Part No.: CR-FPM-04-022-EN-S 3DISC, FireCR, Quantor and the 3D Cube are trademarks of 3D Imaging & Simulations Corp, South Korea,
Adobe Photoshop CC 2018 Tutorial
 Adobe Photoshop CC 2018 Tutorial GETTING STARTED Adobe Photoshop CC 2018 is a popular image editing software that provides a work environment consistent with Adobe Illustrator, Adobe InDesign, Adobe Photoshop,
Planmeca Romexis. quick guide. Viewer EN _2
 Planmeca Romexis Viewer quick guide EN 10029550_2 TABLE OF CONTENTS 1 START-UP OF PLANMECA ROMEXIS VIEWER...1 1.1 Selecting the interface language... 1 1.2 Selecting images...1 1.3 Starting the Planmeca
Chapter 14 Inserting Bitmapped Images
 Chapter 14 Inserting Bitmapped Images Introduction This chapter explains how to insert and size bitmapped images in R&R reports. This information is presented in the following sections: Importing an Image
ADOBE PHOTOSHOP CS TUTORIAL
 ADOBE PHOTOSHOP CS TUTORIAL A D O B E P H O T O S H O P C S Adobe Photoshop CS is a popular image editing software that provides a work environment consistent with Adobe Illustrator, Adobe InDesign, Adobe
Adobe Photoshop CC Part 1: The Basics
 CALIFORNIA STATE UNIVERSITY, LOS ANGELES INFORMATION TECHNOLOGY SERVICES Adobe Photoshop CC Part 1: The Basics Summer 2015, Version 1.0 Table of Contents Introduction...2 New Features of Photoshop CC...2
W i n d o w s. ScanGear CS-S 4.3 for CanoScan FB1200S Color Image Scanner. User's Guide
 f o r W i n d o w s ScanGear CS-S 4.3 for CanoScan FB1200S Color Image Scanner User's Guide How to Make Best Use of the Manuals 2 When you open the box Printed Manual CanoScan FB1200S Quick Start Guide
Introduction to Photoshop: Basic Editing & Prepare Images for the Web
 Introduction to Photoshop: Basic Editing & Prepare Images for the Web 1 LEARNING OBJECTIVES Basic tools in Photoshop & Use of Bridge Prepare images for print and web use TOPICS COVERED Photoshop Interface
Corel PHOTO-PAINT BERNINA Page 1 DL
 Corel PHOTO-PAINT 2018 BERNINA Page 1 Corel PHOTO-PAINT Corel PHOTO-PAINT is part of BERNINA Embroidery Software and gives users many tools for editing photos or bitmap artwork. Corel PHOTO- PAINT can
UN-SCAN-IT gel TM Version 6.3. User's Manual for. Macintosh (OS X)
") UN-SCAN-IT gel TM Version 6.3 User's Manual for Macintosh (OS X) Silk Scientific Inc. software and manuals are copyrighted, which means that your right to copy any part of them is limited by copyright
UN-SCAN-IT gel TM Version 6.3 User's Manual for Macintosh (OS X) Silk Scientific Inc. software and manuals are copyrighted, which means that your right to copy any part of them is limited by copyright
DOCUMENT SCANNER INSTRUCTIONS. Space. Backup. Count Only. New File. Scanner. Feeding Option Manual Auto Semi-Auto
 E FILM F Scanner A Space Count Only New File Feeding Option Manual Auto Semi-Auto Backup DOCUMENT SCANNER INSTRUCTIONS NOTICE q Copyright 2001 by CANON ELECTRONICS INC. All rights reserved. No part of
CONTENT INTRODUCTION BASIC CONCEPTS Creating an element of a black-and white line drawing DRAWING STROKES...
 USER MANUAL CONTENT INTRODUCTION... 3 1 BASIC CONCEPTS... 3 2 QUICK START... 7 2.1 Creating an element of a black-and white line drawing... 7 3 DRAWING STROKES... 15 3.1 Creating a group of strokes...
Adobe Photoshop CS5 Tutorial
 Adobe Photoshop CS5 Tutorial GETTING STARTED Adobe Photoshop CS5 is a popular image editing software that provides a work environment consistent with Adobe Illustrator, Adobe InDesign, Adobe Photoshop
DIGITAL-MICROSCOPY CAMERA SOLUTIONS USB 3.0
 DIGITAL-MICROSCOPY CAMERA SOLUTIONS USB 3.0 PixeLINK for Microscopy Applications PixeLINK will work with you to choose and integrate the optimal USB 3.0 camera for your microscopy project. Ideal for use
Using the TWAIN Datasource
 Using the TWAIN Datasource Starting the Scan Validation Tool... 2 The Scan Validation Tool dialog box... 2 Using the TWAIN Datasource... 4 How do I begin?... 4 Creating a new Setting Shortcut... 5 Changing
For customers in USA This device complies with Part 15 of the FCC rules. Operation is subject to the following two conditions:
 User manual For customers in North and South America For customers in USA This device complies with Part 15 of the FCC rules. Operation is subject to the following two conditions: (1) This device may not
ScanGear CS-U 6.0. for CanoScan D646U Color Scanner. User s Guide
 ScanGear CS-U 6.0 for CanoScan D646U Color Scanner User s Guide Copyright Notice Copyright 2000 Canon Inc. This manual is copyrighted with all rights reserved. Under the copyright laws, this manual may
INSTRUCTION MANUAL MM-A209
 E INSTRUCTION MANUAL 9222-7300-11 MM-A209 2 BEFORE YOU BEGIN Before installing the DiMAGE Viewer software, read the data-transfer section in the camera manual. This section details how to connect the camera
Learning Guide. ASR Automated Systems Research Inc. # Douglas Crescent, Langley, BC. V3A 4B6. Fax:
 Learning Guide ASR Automated Systems Research Inc. #1 20461 Douglas Crescent, Langley, BC. V3A 4B6 Toll free: 1-800-818-2051 e-mail: support@asrsoft.com Fax: 604-539-1334 www.asrsoft.com Copyright 1991-2013
CATEGORY SKILL SET REF. TASK ITEM
 ECDL / ICDL Image Editing This module sets out essential concepts and skills relating to the ability to understand the main concepts underlying digital images and to use an image editing application to
Photoshop CC Editing Images
 Photoshop CC Editing Images Rotate a Canvas A canvas can be rotated 90 degrees Clockwise, 90 degrees Counter Clockwise, or rotated 180 degrees. Navigate to the Image Menu, select Image Rotation and then
ScanGear CS-U 5.6. for CanoScan FB1210U Color Scanner. User s Guide
 ScanGear CS-U 5.6 for CanoScan FB1210U Color Scanner User s Guide Copyright Notice Copyright 2000 Canon Inc. This manual is copyrighted with all rights reserved. Under the copyright laws, this manual may
Motic Live Imaging Module. Windows OS User Manual
 Motic Live Imaging Module Windows OS User Manual Motic Live Imaging Module Windows OS User Manual CONTENTS (Linked) Introduction 05 Menus, bars and tools 06 Title bar 06 Menu bar 06 Status bar 07 FPS 07
Using the TWAIN Datasource
 Using the TWAIN Datasource Starting the Scan Validation Tool... 2 The Scan Validation Tool dialog box... 2 Using the TWAIN Datasource... 4 How do I begin?... 4 Creating a new Setting Shortcut... 5 Changing
User Guide of ISCapture
 User Guide of ISCapture For Windows2000/XP/Vista(32bit/64bit)/Win7(32bit/64bit) Xintu Photonics Co., Ltd. Version: 2.6 I All the users of Xintu please kindly note that the information and references in
ID Photo Processor. Batch photo processing. User Guide
 ID Photo Processor Batch photo processing User Guide 2015 Akond company 197342, Russia, St.-Petersburg, Serdobolskaya, 65a Phone/fax: +7(812)384-6430 Cell: +7(921)757-8319 e-mail: info@akond.net http://www.akond.net
Visioneer OneTouch Scanner. Installation Guide FOR WINDOWS
 Visioneer OneTouch Scanner Installation Guide FOR WINDOWS TABLE OF CONTENTS i TABLE OF CONTENTS Getting Started with your new Scanner....................... 1 Step 1: Installing the Scanner Software.......................
GETTING STARTED. 0 P a g e B a s i c s o f A d o b e P h o t o s h o p A g a P r i v a t e I n s t i t u t e f o r c o m p u t e r s c i e n c e
 GETTING STARTED 0 P a g e B a s i c s o f A d o b e P h o t o s h o p Adobe Photoshop: is a popular image editing software that provides a work environment consistent with Adobe Illustrator, Adobe InDesign,
Guidance on Using Scanning Software: Part 5. Epson Scan
 Guidance on Using Scanning Software: Part 5. Epson Scan Version of 4/29/2012 Epson Scan comes with Epson scanners and has simple manual adjustments, but requires vigilance to control the default settings
Using the TWAIN Datasource
 Using the TWAIN Datasource Starting the Scan Validation Tool... 2 The Scan Validation Tool dialog box... 3 Using the TWAIN Datasource... 5 How do I begin?... 5 Changing or creating a Setting Shortcut...
ToupView Help. ToupView help
 ToupView help ToupView is designed for UCMOS, UHCCD or other USB cameras. With ToupView, one can browse images, preview videos, capture images, and process captured images. ToupView has 4 main user GUIs,
Scanning Setup Guide for the TWAIN Datasource
 Scanning Setup Guide for the TWAIN Datasource Product overview... 2 Capture system... 2 Starting the Scan Validation Tool... 3 The Scan Validation Tool dialog box... 3 How do I begin?... 5 Selecting Image
Introduction. Introduction
 Introduction Introduction Thank you for purchasing this Canon Microfilm Scanner 800II. These instructions describe how to use the Scanning Utility 800 utility software to import an image projected on the
Photoshop: a Beginner s course. by: Charina Ong Centre for Development of Teaching and Learning National University of Singapore
 Photoshop: a Beginner s course by: Charina Ong Centre for Development of Teaching and Learning National University of Singapore Table of Contents About the Workshop... 1 Prerequisites... 1 Workshop Objectives...
Getting Started. with Easy Blue Print
 Getting Started with Easy Blue Print User Interface Overview Easy Blue Print is a simple drawing program that will allow you to create professional-looking 2D floor plan drawings. This guide covers the
Adobe Photoshop CC update: May 2013
 Adobe Photoshop CC update: May 2013 Welcome to the latest Adobe Photoshop CC bulletin update. This is provided free to ensure everyone can be kept upto-date with the latest changes that have taken place
Adobe Photoshop CS2 Workshop
 COMMUNITY TECHNICAL SUPPORT Adobe Photoshop CS2 Workshop Photoshop CS2 Help For more technical assistance, open Photoshop CS2 and press the F1 key, or go to Help > Photoshop Help. Selection Tools - The
Version 8 Tutorial
 Version 8 Tutorial 800-989-4243 214-340-9436 support@vertigraph.com www.vertigraph.com 1 Table of Contents A. Overview... 4 B. About the SiteWorx/OS Window... 4 C. File Types Raster, Vector and PDF...
U-MARQ Universal Engraving. Bitmap Function. Chapter 12 Bitmaps. Bitmap Menu. Insert Bitmap
 U-MARQ Universal Engraving Bitmap Function The GEM-RX supports the new and unique U-MARQ Picture Engraving (this is an optional extra and has to be purchased separately), This Dialogue box is not available
ScanPotter. Reference Manual
 ScanPotter Reference Manual Copyright 2014 by Microtek International, Inc. All rights reserved. Trademarks Microtek, ScanMaker, ArtixScan, ScanWizard, ScanPotter and ColoRescue are trademarks or registered
Drawing with precision
 Drawing with precision Welcome to Corel DESIGNER, a comprehensive vector-based drawing application for creating technical graphics. Precision is essential in creating technical graphics. This tutorial
4 Use the adjustable Focus meter tool to take the subjectivity out of focusing the image, to get the best possible image
 Standard Edition VISIONx INC. www.visionxinc.com Real-Time Full Color Image Acquisition 4 Full support for NTSC and PAL cameras with Composite, Y/C (i.e. S-Video) and RGB video signal formats 4 Image display
Tutorial: Correcting images
 Welcome to Corel PHOTO-PAINT, a powerful tool for editing photos and creating bitmaps. In this tutorial, you'll learn how to perform basic image corrections to a scanned photo. This is what the image looks
User Manual for HoloStudio M4 2.5 with HoloMonitor M4. Phase Holographic Imaging
 User Manual for HoloStudio M4 2.5 with HoloMonitor M4 Phase Holographic Imaging 1 2 HoloStudio M4 2.5 Software instruction manual 2013 Phase Holographic Imaging AB 3 Contact us: Phase Holographic Imaging
ADOBE PHOTOSHOP CS 3 QUICK REFERENCE
 ADOBE PHOTOSHOP CS 3 QUICK REFERENCE INTRODUCTION Adobe PhotoShop CS 3 is a powerful software environment for editing, manipulating and creating images and other graphics. This reference guide provides
The ideal K-12 science microscope solution. User Guide. for use with the Nova5000
 The ideal K-12 science microscope solution User Guide for use with the Nova5000 NovaScope User Guide Information in this document is subject to change without notice. 2009 Fourier Systems Ltd. All rights
Software Reference. FlexColor 4.0 for Camera Backs. by Hasselblad Imacon
 Software Reference FlexColor 4.0 for Camera Backs by Hasselblad Imacon 2 2004 Hasselblad A/S. All rights reserved., Part No 70030035 revision 1.0. The information in this manual is furnished for informational
ScanGear CS-U 5.8. for CanoScan D660U Color Scanner. User s Guide
 ScanGear CS-U 5.8 for CanoScan D660U Color Scanner User s Guide Copyright Notice Copyright 2000 Canon Inc. This manual is copyrighted with all rights reserved. Under the copyright laws, this manual may
Sante FFT Imaging Copyright 2018 Santesoft, all rights reserved
 Sante FFT Imaging Copyright 2018 Santesoft, all rights reserved Table of Contents About the program... 2 System Requirements... 2 The Fourier transform... 3 The user interface... 5 Customize the toolbar...
Version 9 Tutorial and User Guide
 Version 9 Tutorial and User Guide 800-989-4243 214-340-9436 support@vertigraph.com www.vertigraph.com 1 Table of Contents A. Overview... 4 B. About the SiteWorx/OS Window... 4 C. File Types Raster, Vector
House Design Tutorial
 House Design Tutorial This House Design Tutorial shows you how to get started on a design project. The tutorials that follow continue with the same plan. When you are finished, you will have created a
Chapter 4 Adding and Formatting Pictures
 Impress Guide Chapter 4 Adding and Formatting Pictures OpenOffice.org Copyright This document is Copyright 2007 by its contributors as listed in the section titled Authors. You can distribute it and/or
Impress Guide Chapter 4 Adding and Formatting Pictures
 Impress Guide Chapter 4 Adding and Formatting Pictures This PDF is designed to be read onscreen, two pages at a time. If you want to print a copy, your PDF viewer should have an option for printing two
inphoto ID PS Automatic ID photography With Canon PowerShot camera User Guide
 inphoto ID PS Automatic ID photography With Canon PowerShot camera User Guide 2018 Akond company Phone/fax: +7(812)384-6430 Cell: +7(921)757-8319 e-mail: info@akond.net akondsales@gmail.com http://www.akond.net
Windows INSTRUCTION MANUAL
 Windows E INSTRUCTION MANUAL Contents About This Manual... 3 Main Features and Structure... 4 Operation Flow... 5 System Requirements... 8 Supported Image Formats... 8 1 Installing the Software... 1-1
Instructions for Mapping * µarray Images using GenePix 5.0
 Instructions for Mapping * µarray Images using GenePix 5.0 Preliminary Information Make sure that the GenePix 5.0 software has been installed on your computer and you have the USB hardware dongle that
House Design Tutorial
 House Design Tutorial This House Design Tutorial shows you how to get started on a design project. The tutorials that follow continue with the same plan. When you are finished, you will have created a
March 31, Welcome to the Family Tree Maker Users Group!
 March 31, 2008 Welcome to the Family Tree Maker Users Group! Tonight s Agenda: FTM 2005/2006/v16 Photo Features 1. Saving digitized pictures 2. Using a scanner or digital camera to copy pictures and documents
Adobe Photoshop. Levels
 How to correct color Once you ve opened an image in Photoshop, you may want to adjust color quality or light levels, convert it to black and white, or correct color or lens distortions. This can improve
Index of Command Functions
 Index of Command Functions version 2.3 Command description [keyboard shortcut]:description including special instructions. Keyboard short for a Windows PC: the Control key AND the shortcut key. For a MacIntosh:
PhotoFiltre DEPARTMENT OF EDUCATION
 DEPARTMENT OF EDUCATION PhotoFiltre Updated on 20 February 2010 This resource is part of the resource collection available through the ecentre for teachers. www.ecentre.education.tas.gov.au PhotoFiltre
ScanMate. i920 Scanner. Scanning Setup Guide for TWAIN Applications A-61733
 ScanMate i920 Scanner Scanning Setup Guide for TWAIN Applications A-61733 Scanning Setup Guide for the TWAIN Datasource Starting the Scan Validation Tool... 2 The Scan Validation Tool dialog box... 3 Using
Extreme Makeovers: Photoshop Retouching Techniques
 Extreme Makeovers: Table of Contents About the Workshop... 1 Workshop Objectives... 1 Getting Started... 1 Photoshop Workspace... 1 Retouching Tools... 2 General Steps... 2 Resolution and image size...
USER GUIDE EDIT OBJECTS
 USER GUIDE EDIT OBJECTS COPYRIGHT Copyright 2016. Wilcom Pty Ltd, Wilcom International Pty Ltd. All Rights reserved. No parts of this publication or the accompanying software may be copied or distributed,
PhotoFiltre. Reverse foreground/background colors. Background & foreground colors. Set default foreground/background colors. Color choice palette
 PhotoFiltre BASIC TOOLS PALETTE Background & foreground colors Reverse foreground/background colors Set default foreground/background colors Color choice palette Toggle through color choice palettes Selection
For customers in Canada This Class B digital apparatus meets all requirements of the Canadian Interference-Causing Equipment Regulations.
 User manual For customers in North and South America For customers in USA This device complies with Part 15 of the FCC rules. Operation is subject to the following two conditions: (1) This device may not
inphoto ID SLR Automatic ID photography With Canon SLR camera User Guide
 inphoto ID SLR Automatic ID photography With Canon SLR camera User Guide 2014 Akond company Phone/fax: +7(812)384-6430 Cell: +7(921)757-8319 e-mail: info@akond.net akondsales@gmail.com http://www.akond.net
Introduction to: Microsoft Photo Story 3. for Windows. Brevard County, Florida
 Introduction to: Microsoft Photo Story 3 for Windows Brevard County, Florida 1 Table of Contents Introduction... 3 Downloading Photo Story 3... 4 Adding Pictures to Your PC... 7 Launching Photo Story 3...
Using the TWAIN Datasource
 Using the TWAIN Datasource Starting the Scan Validation Tool... 2 The Scan Validation Tool dialog box... 3 TWAIN Settings screen... 5 Using the TWAIN Datasource... 6 How do I begin?... 7 Creating a new
Adobe Photoshop CS5 ACE
 Adobe Photoshop CS5 ACE Number: A9A0-150 Passing Score: 800 Time Limit: 120 min File Version: 1.0 Sections 1. Selection Tools Exam A QUESTION 1 John creates a circular selection with Elliptical Marquee
Impress Guide. Chapter 4 Adding and Formatting Pictures
 Impress Guide Chapter 4 Adding and Formatting Pictures Copyright This document is Copyright 2005 2012 by its contributors as listed below. You may distribute it and/or modify it under the terms of either
Monaco ColorWorks User Guide
 Monaco ColorWorks User Guide Monaco ColorWorks User Guide Printed in the U.S.A. 2003 Monaco Systems, Inc. All rights reserved. This document contains proprietary information of Monaco Systems, Inc. No
Architecture 2012 Fundamentals
 Autodesk Revit Architecture 2012 Fundamentals Supplemental Files SDC PUBLICATIONS Schroff Development Corporation Better Textbooks. Lower Prices. www.sdcpublications.com Tutorial files on enclosed CD Visit
ThermaViz. Operating Manual. The Innovative Two-Wavelength Imaging Pyrometer
 ThermaViz The Innovative Two-Wavelength Imaging Pyrometer Operating Manual The integration of advanced optical diagnostics and intelligent materials processing for temperature measurement and process control.
Editing and Digitizing in EDS III
 Editing and Digitizing in EDS III Design Editing Tablet and On-Screen Digitizing Embroidery and Chenille Stitching Scanning Compatibilities Part Number 110282-01, Revision A A Saurer Group Company 1575