PixInsight Workflow. Revision 1.2 March 2017
|
|
|
- Gyles Rice
- 5 years ago
- Views:
Transcription
1 Revision 1.2 March 2017
2
3 Contents Calibration Workflow Create Master Calibration Frames Create Master Dark & Bias Create Master Flat Calibration Calibrate Lights Cosmetic Correction Defect List Creation Cosmetic Correction of Light Frames Registration Registration Process Post Registration Cleanup Integration Dynamic Crop Linear Noise Reduction (MURE) RGB Combine Color Calibration Setup Background Color Correction Background Extraction for Gradient Removal Option 1: Dynamic Background Extraction Option 2: Automatic Background Extraction Create Masks Duplicate Stretched Image Mask Star Mask Combine Star Masks Deconvolution Preparation: PSF Function Mask Dynamic PSF Deringing Mask Luminance Mask Deconvolution i
4 1.14 Morphological Transform Nonlinear Process Steps Histogram Stretch Screen Transfer Function Histogram Transformation Masked Stretch Curves LRGB Combine ii
5 1 1
6 1.1 Calibration Workflow The overall calibration workflow is shown below. The objective is: Create calibration masters for bias, dark and flat Calibrate dark with bias Calibrate flat with dark and bias Remove outliers caused by cosmic ray artifacts from bias, dark and flat Calibrate the lights with bias, dark and flat The calibration of calibration frames can take place either before or after integration. Performing calibration post integration simplifies the process, but means that integration cannot use any kind of scaling within the set of frames. Because we don t need to do scaling within the set of bias or darks, we just do integration with no pre-calibration, but include outlier rejection to get rid of cosmic rays. For flats, we may need to account for variations in brightness within the set, so we need to do calibration pre-integration. Integration will also include outlier rejection. Calibration of lights needs to include calibration of darks with bias, but no calibration of flats, because that will have already happened earlier in the process. 2

7 1.2 Create Master Calibration Frames Create Master Dark & Bias For cleanest results, experimentation may be required to find the best rejection algorithm and parameters. General recommendations for rejection algorithm: Percentile clipping for 3-6 images Averaged sigma clipping for 5-10 images Sigma clipping, Winsorized clipping or linear fit clipping for >10 images Winsorized clipping has been shown to work well for large calibration sets. Starting point for clipping parameters around 3.0 sigma for high pixels. Low parameter is not that important as there tend not to be low side outliers. Consider creating an experimental stack first with no rejection, and then using the Blink tool to compare the rejected and non-rejected versions to ensure that only outliers (cosmic rays) have been rejected. ImageIntegration->ImageIntegration This is purely an image integration task. Integration panel: Average combination No normalization Weights don t care Generate integrated image checked, everything else unchecked 3


8 Pixel rejection (1): Most likely best settings: Winsorized sigma clipping No normalization Both checked: Clip low pixels Clip high pixels This enables clipping based on the selected statistical rejection algorithm Both unchecked: Clip low range Clip high range This disables clipping of pixels based on absolute settings of brightness Pixel rejection (2): Likely best settings: Sigma low 4.0 Sigma high 3.0 Pixel rejection (3) panel is active only when CCD noise model rejection algorithm is selected Region of interest should be unchecked 4

9 1.2.2 Create Master Flat Calibrate Flats ImageIntegration->ImageCalibration Set prefix to Cal- and postfix to blank, check overwrite files Use bias and dark calibration. Calibrate box must be checked for master dark, because the dark is just a straight integration with no bias subtraction. Ensure that optimize is checked for the master dark frame, in order to ensure that the dark frame will be scaled appropriately. Also set CFA mode to Ignore CFA to disable the CFA detection algorithm. During the calibration process, there may be warning messages saying that no dark has been applied to some of the flats. This is not a problem; it just means that the optimization algorithm has determined that the optimum scaling factor for the dark component is zero. 5

10 Integrate Flats ImageIntegration->ImageIntegration Image Integration panel Combination: Average Normalization: Multiplicative Weights: Don t care The calibrated flats can be normalized for brightness by using the multiplicative setting. Pixel rejection first panel: Likely best rejection algorithm is Winsorized sigma clipping, but may be different if the number of frames in the set is small (see earlier notes). Use Equalize Fluxes setting for normalization. This ensures that the rejection algorithm takes into account the integration normalization. 6

11 Pixel Rejection (2) This will require experimentation to set, dependent on algorithm selected 7

12 1.3 Calibration Calibrate Lights ImageIntegration->ImageCalibration Remember to set output directory. Set prefix to Cal-, suffix blank Use master bias with no calibration Use master dark with calibration, optimization, ignore CFA Use master flat with no calibration This calibration step must take into account that the bias and dark frames are straight integration with no calibration, but the flat has already been calibrated. 8

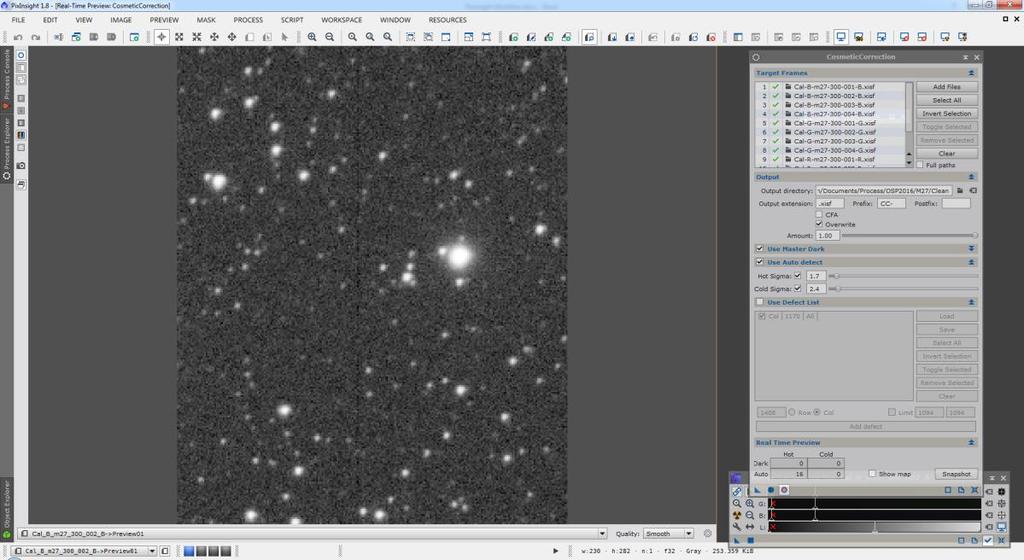
13 1.4 Cosmetic Correction Defect List Creation Open an ImageCalibration->CosmeticCorrection tool and open the Use Defect List panel. Locate defective pixels or columns that have escaped calibration by examining a calibrated master flat frame with strong screen stretching and high zoom level. 9

14 Clicking on a pixel populates the defect fields. Depending on whether row or column is selected, the text box at left will show the row or column index. Limit settings when enabled restrict the selection to a single pixel or a range of pixels from the same row or column. Deselect limit to select an entire row or column. Click the add defect button to add to the list, and then save for future use. 10
15 1.4.2 Cosmetic Correction of Light Frames ImageCalibration->CosmeticCorrection Open image to use as preview Use New Preview button or Alt+N to create new preview window with mouse Show cosmetic correction preview 11

16 Set output directory Set prefix to CC-, suffix blank Use master dark, enable hot and cold pixel detection Use auto-detect Adjust parameters, checking and unchecking Show Map to see effects Also select and load defect list if previously created. Use process global when done 12
17 13

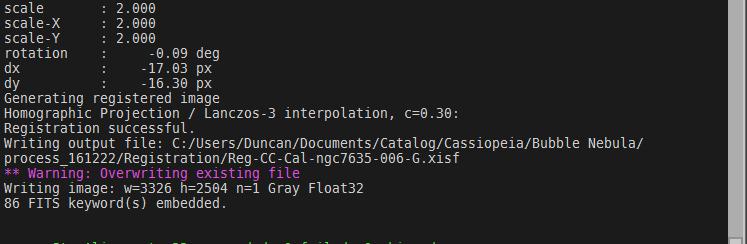
18 1.5 Registration Registration Process ImageRegistration->StarAlignment Set reference image to best available luminance image Set target images to remaining calibrated images (all channels) Create new folder for output directory Set prefix to Reg-, suffix blank Check overwrite existing images Star detection, matching, interpolation set to defaults Post Registration Cleanup Copy across reference image to target directory Note the interpolation method used, specified in process console window 14
19 15

20 1.6 Integration ImageIntegration->ImageIntegration Add files to input images panel Initial settings: Combination: Average Normalization: Additive Weights: Noise evaluation 16


21 Initial run with no rejection algorithm specified in Pixel Rejection (1) panel Note noise reduction factor ( shown) Experiment with different rejection algorithms, checking rejection maps and noise reduction. Likely optimum: Percentile clipping for 3-6 images Averaged sigma clipping for 5-10 images Sigma clipping, Winsorized clipping or linear fit clipping for >10 images 17

22 1.7 Dynamic Crop With all four planes open, use ColorSpaces->LRGBCombination to generate a temporary combined image. With all five images open, open Geometry->DynamicCrop. Select an area in the LRGB image that is covered by all four image planes. Apply the crop to the four individual color plane images using the new instance icon. 18

23 1.8 Linear Noise Reduction (MURE) Script->Noise Reduction->MureDenoise Select image Combination count set to number of images combined Interpolation method set to method used in integration and noted earlier Gain, Gaussian noise, offset set to parameters below Variance scale Cycle-spin count can be left at 8 Measure gain from EGAIN parameter in FITS header or script Image Analysis->FlatSNREstimator Measure Gaussian noise using script Image Analysis->DarkBiasNoiseEstimator Previously measured values: Gain: Gaussian Noise (1x1): Gaussian Noise (2x2):

24 1.9 RGB Combine ColorSpaces->LRGBCombination Uncheck L Check R, G, B Select open images for R, G, B channels Lightness Saturation Uncheck chrominance noise reduction 20

 as the reference image.")
25 1.10 Color Calibration Setup Create two previews (Ctrl-N) in the image. The first should contain only background, and the second should contain either an entire galaxy or a group of stars Background Color Correction Color Calibration->Background Neutralization Select first preview (containing no stars, just background) as the reference image. This will need to be reselected even if the image name appears correct Lower limit Upper limit

26 Color Calibration->ColorCalibration White reference image set to preview containing either stars or entire galaxy. Stars: check Structure Detection. This will assume that a population of stars has a mean white color. Galaxy: uncheck Structure Detection. This will assume that the starlight integrated across a galaxy is white. Background reference set to preview containing only background. 22

27 1.11 Background Extraction for Gradient Removal Option 1: Dynamic Background Extraction BackgroundModelization->DynamicBackgroundExtraction Much more sophisticated tool than automatic background extraction, with many configurable parameters, but more steps to make work. Will work on any image. Open DBE tool, select image (cross will appear in selected image) 23

28 Start by resetting everything to defaults to make sure there are no strange settings anywhere. Under Sample Generation click Generate to create a set of background samples. Depending on the image and other parameter settings, insufficient samples may be generated. To increase the number of samples, increase Tolerance (under Model Parameters (1) ) or decrease Minimum sample weight. Experimentation will be required. Any samples shown in the image in red will be excluded from the model. Increase Tolerance setting until the samples turn white. Reset to Defaults Samples should go all the way to the edges. Delete manually any samples that are in a DSO region as these will distort the background model. 24

29 Select type of correction. Typically should use subtract for light pollution gradients and division for uneven illumination. After generating and applying DBE on luminance channel, drag the new instance icon to the workspace and rename it. The DBE tool can be closed up, and then later recreated from the saved workspace icon for application to the RGB image. New Instance 25

30 Option 2: Automatic Background Extraction BackgroundModelization->AutomaticBackgroundExtractor ABE with default options can work well on images with large amounts of background and small deep sky objects such as a galaxy field. There may be benefit from applying DBE followed by ABE. Experimentation may be required. 26

31 1.12 Create Masks Duplicate Stretched Image Mask Create a duplicate of the grayscale integrated image using menu command Image->Duplicate. Adjust the duplicated image using screen transfer function to ensure a black background with high stretch to brighten stars and deep sky objects. Drag the new instance icon from the screen transfer function to the status bar of an Intensity Transformations->HistogramTransformation and drag the new instance icon of the histogram transformation onto the duplicate image, as for nonlinear stretch of main images (see section 2.1). Save the duplicate image as a mask. For subsequent processes, attach the mask to the main image by dragging the duplicate image tab onto the tab area of the main image. Areas in red are protected. 27


32 Invert Mask Enable Mask Show Mask 28
33 Star Mask MaskGeneration->StarMask Significant experimentation will be required to get good results. Reducing noise threshold from default value of 0.1 to 0.05 will improve detection of smaller stars. Set scale to different values to generate star mask for different scale stars. Typical range 4 6. Mask preprocessing will need to be set to apply a stretch to the linear image prior to star structure detection. Adjusting Midtones slider to should be a good starting point. After generating mask, rename mask by right clicking on image and selecting Identifier Name cannot contain spaces. 29
 function and renamed mask images.")
34 Combine Star Masks PixelMath->PixelMath Can use pixel math to combine two masks generated at different scales (or using different methods). Example here uses max(x,y) function and renamed mask images. Select Create New Image radio button and click square apply button to create a new combined mask. 30


35 1.13 Deconvolution Preparation: PSF Function Mask IntensityTransformations->Binarize PSF function is generated from a set of nonsaturated stars across the image. In preparation for generating the PSF, create a mask that will identify the saturated stars using the Binarize tool. Duplicate the luminance image and open the Binarize tool. Set the threshold to a high value such as 0.8 and apply to the duplicated image using the new instance icon. Drag the mask onto the luminance image, show it and invert it to highlight the saturated stars. 31


36 Dynamic PSF Image->DynamicPSF Open the dynamic PSF tool and select a set of about non-saturated stars from across the image. Make sure that all of the stars in the set are selected. Click on the camera Icon to generate the PSF image. Rename the generated image. 32
37 Deringing Mask MaskGeneration->StarMask Generate a deringing mask using the star mask tool. The deringing support mask needs to mask out the brightest stars. Recommend higher end settings for scale, depending on the image, and may also want to increase the large scale structure growth parameter to ensure that bright stars are fully covered Luminance Mask Luminance mask needs to protect the background from deconvolution. May be possible to use a luminance mask generated earlier. Generate from a duplicate of the luminance image, using histogram stretch tool. Set black point higher than normal to clip low pixel values. 33

38 Deconvolution Deconvolution->Deconvolution Apply the just generated luminance mask to the image. Select the external PSF tab in the PSF panel, and load the previously generated PSF. In the algorithm panel, start with Regularized Richardson-Lucy algorithm and experiment with others. To start with, set iterations low, but increase to 40 or 50 later. In the deringing panel, check local deringing and load the deringing mask image as local support. Very important: the global dark parameter will need adjustment, and the default is usually too high. Typical values When executing, too high a value will result in local divergence warnings (these have very bad consequences). Reduce the global dark parameter if you see this. 34

39 1.14 Morphological Transform Morphology->MorphologicalTransform Morphological transform tool can be used to reduce star sizes or correct globally misshapen stars. Significant experimentation with the iterations and structuring element will be required. Use a star mask to restrict application to stars only. A combined star mask that includes generated masks at multiple scales has worked well in many cases. 35
40 36
41 Nonlinear Process Steps 2 Nonlinear Process Steps 37

42 Nonlinear Process Steps 2.1 Histogram Stretch Screen Transfer Function Intensity Transformations->ScreenTransferFunction Use Screen Transfer Function to set intensity separately for RGB and Luminance images. In particular for images with lots of star background, default STF may be significantly overstretched. Zoom in on luminance setting and reduce stretch if necessary. RGB and L need to have similar stretch. 38
 5. Disable STF visualization Repeat for RGB and L images.")
43 Nonlinear Process Steps Histogram Transformation Intensity Transformations->HistogramTransformation 1. Select image 2. Display image histogram data in HistogramTransformation tool 3. Drag STF New Instance icon to bottom toolbar of HistogramTransformation 4. Apply histogram transformation (image will turn white) 5. Disable STF visualization Repeat for RGB and L images. Images are now nonlinear

44 Nonlinear Process Steps 2.2 Masked Stretch IntensityTransformations->MaskedStretch Alternative stretching method that results in smaller stars due to an iterative algorithm. Create a preview in the image containing only background. Check region of interest, and then click the From Preview button, selecting the background preview. Rest of the parameters can be defaults. The default target background value of should work, but can be experimented with. 40

45 Nonlinear Process Steps 2.3 Curves IntensityTransformations->CurvesTransformation Curves transformation can be used post initial stretch to increase contrast in areas of interest. With image selected, click the track view icon to load the histogram of the target image into the tool. Clicking and holding the left mouse button over the image shows the corresponding brightness level on the histogram. Use this to identify brightness ranges of interest and boost contrast. 41


46 Nonlinear Process Steps 2.4 LRGB Combine ColorSpaces->LRGBCombination Start with nonlinear RGB and L images open. Reset dialog to defaults. Unselect all planes except L. In view box, select the open luminance image. Under Transfer Functions saturation will need to be increased by reducing the value. Experimentation will be required, but a value of will be a good starting point. Enable Chrominance Noise Reduction. Default parameters are usually good. Apply by dragging New Instance icon onto RGB image. 42
Image Processing Tutorial Basic Concepts
 Image Processing Tutorial Basic Concepts CCDWare Publishing http://www.ccdware.com 2005 CCDWare Publishing Table of Contents Introduction... 3 Starting CCDStack... 4 Creating Calibration Frames... 5 Create
ImagesPlus Basic Interface Operation
 ImagesPlus Basic Interface Operation The basic interface operation menu options are located on the File, View, Open Images, Open Operators, and Help main menus. File Menu New The New command creates a
Inside. Warren Keller
 Inside Warren Keller Insight Pleiades Astrophoto - Juan Conejero - Valencia, Spain Pteam - Vicent Peris, Carlos Milovich, etc. PixInsight LE 2004 - PixInsight Core 2007-1.8 Ripley 2013 http://www.pixinsight.com
Chasing Faint Objects
 Chasing Faint Objects Image Processing Tips and Tricks Linz CEDIC 2015 Fabian Neyer 7. March 2015 www.starpointing.com Small Objects Large Objects RAW Data: Robert Pölzl usually around 1 usually > 1 Fabian
MY ASTROPHOTOGRAPHY WORKFLOW Scott J. Davis June 21, 2012
 Table of Contents Image Acquisition Types 2 Image Acquisition Exposure 3 Image Acquisition Some Extra Notes 4 Stacking Setup 5 Stacking 7 Preparing for Post Processing 8 Preparing your Photoshop File 9
Step 5) Split the red data using the Multi Scale Decomposition tool into a detail and residual background image.
 Split the red data using the Multi Scale Decomposition tool into a detail and residual background image.") Step 1) Press the Copy Portion toolbar button then left-click and drag a rectangle to crop the image. Press the Copy Portion button again to turn off cropping. Step 2) Scale the cropped image by 0.50 to
Step 1) Press the Copy Portion toolbar button then left-click and drag a rectangle to crop the image. Press the Copy Portion button again to turn off cropping. Step 2) Scale the cropped image by 0.50 to
General Workflow for Processing L, Ha, R, G, and B Components in ImagesPlus
 General Workflow for Processing L, Ha, R, G, and B Components in ImagesPlus This general workflow can be used with component images from a DSLR, one shot color CCD, or monochrome CCD with minor adjustment
Guidance on Using Scanning Software: Part 5. Epson Scan
 Guidance on Using Scanning Software: Part 5. Epson Scan Version of 4/29/2012 Epson Scan comes with Epson scanners and has simple manual adjustments, but requires vigilance to control the default settings
Contents: Bibliography:
 ( 2 ) Contents: Sizing an Image...4 RAW File Conversion...4 Selection Tools...5 Colour Range...5 Quick Mask...6 Extract Tool...7 Adding a Layer Style...7 Adjustment Layer...8 Adding a gradient to an Adjustment
Geometric Functions. The color channel toolbar buttons are disabled.
 Introduction to Geometric Transformations Geometric Functions The geometric transformation commands are used to shift, rotate, scale, and align images. For quick rotation by 90 or mirroring of an image,
Module All You Ever Need to Know About The Displace Filter
 Module 02-05 All You Ever Need to Know About The Displace Filter 02-05 All You Ever Need to Know About The Displace Filter [00:00:00] In this video, we're going to talk about the Displace Filter in Photoshop.
Color Correction and Enhancement
 10 Approach to Color Correction 151 Color Correction and Enhancement The primary purpose of Photoshop is to act as a digital darkroom where images can be corrected, enhanced, and refined. How do you know
Photoshop CC Editing Images
 Photoshop CC Editing Images Rotate a Canvas A canvas can be rotated 90 degrees Clockwise, 90 degrees Counter Clockwise, or rotated 180 degrees. Navigate to the Image Menu, select Image Rotation and then
Extreme Makeovers: Photoshop Retouching Techniques
 Extreme Makeovers: Table of Contents About the Workshop... 1 Workshop Objectives... 1 Getting Started... 1 Photoshop Workspace... 1 Retouching Tools... 2 General Steps... 2 Resolution and image size...
Ron Brecher. AstroCATS May 3-4, 2014
 Ron Brecher AstroCATS May 3-4, 2014 Observing since 1998 Imaging since 2006 Current imaging setup: Camera: SBIG STL-11000M with L, R, G, B and H-alpha filters Telescopes: 10 f/3.6 (or f/6.8) ASA reflector;
Struggling with the SNR
 Struggling with the SNR A walkthrough of techniques to reduce the noise from your captured data. Evangelos Souglakos celestialpixels.com Linz, CEDIC 2017 SNR Astrophotography of faint deep-sky objects
Adobe Photoshop. Levels
 How to correct color Once you ve opened an image in Photoshop, you may want to adjust color quality or light levels, convert it to black and white, or correct color or lens distortions. This can improve
This particular case study is an experimental trial
 C38 (Needle Galaxy) You live and learn. At any rate, you live. Douglas Adams First Light Assignments 213 Equipment: Refractor, 132 mm aperture, 916 mm focal length Reducer / flattener (0.8x) Starlight
Color and More. Color basics
 Color and More In this lesson, you'll evaluate an image in terms of its overall tonal range (lightness, darkness, and contrast), its overall balance of color, and its overall appearance for areas that
A Basic Guide to Photoshop Adjustment Layers
 A Basic Guide to Photoshop Adjustment Layers Photoshop has a Panel named Adjustments, based on the Adjustment Layers of previous versions. These adjustments can be used for non-destructive editing, can
Select your Image in Bridge. Make sure you are opening the RAW version of your image file!
 CO 3403: Photographic Communication Steps for Non-Destructive Image Adjustments in Photoshop Use the application Bridge to preview your images and open your files with Camera Raw Review the information
2. Picture Window Tutorial
 2. Picture Window Tutorial Copyright (c) Ken Deitcher, 1999 Original image Final image To get you started using Picture Window we present two short tutorials. Basic Image Editing This tutorial covers basic
SBIG ASTRONOMICAL INSTRUMENTS
 SBIG ASTRONOMICAL INSTRUMENTS SANTA BARBARA INSTRUMENT GROUP 147-A Castilian Drive Santa Barbara, CA 93117 Phone (805) 571-SBIG (571-7244) FAX (805) 571-1147 e-mail:sbig@sbig.com home page:www.sbig.com
5 Masks and Channels
 5 Masks and Channels Adobe Photoshop uses masks to isolate and manipulate specific parts of an image. A mask is like a stencil. The cutout portion of the mask can be altered, but the area surrounding the
Image Enhancement (from Chapter 13) (V6)
 (V6)") Image Enhancement (from Chapter 13) (V6) Astronomical images often span a wide range of brightness, while important features contained in them span a very narrow range of brightness. Alternatively, interesting
Image Enhancement (from Chapter 13) (V6) Astronomical images often span a wide range of brightness, while important features contained in them span a very narrow range of brightness. Alternatively, interesting
Adobe Studio on Adobe Photoshop CS2 Enhance scientific and medical images. 2 Hide the original layer.
 1 Adobe Studio on Adobe Photoshop CS2 Light, shadow and detail interact in wild and mysterious ways in microscopic photography, posing special challenges for the researcher and educator. With Adobe Photoshop
AstroImageJ User Guide
 AstroImageJ User Guide Introduction AstroImageJ (AIJ) is simply ImageJ (IJ) with some customizations to the base code and a packaged set of astronomy specific plugins. The plugins are based on the Astronomy
A Basic Guide to Photoshop CS Adjustment Layers
 A Basic Guide to Photoshop CS Adjustment Layers Alvaro Guzman Photoshop CS4 has a new Panel named Adjustments, based on the Adjustment Layers of previous versions. These adjustments can be used for non-destructive
All Creative Suite Design documents are saved in the same way. Click the Save or Save As (if saving for the first time) command on the File menu to
 command on the File menu to") 1 The Application bar is new in the CS4 applications. It combines the menu bar with control buttons that allow you to perform tasks such as arranging multiple documents or changing the workspace view.
1 The Application bar is new in the CS4 applications. It combines the menu bar with control buttons that allow you to perform tasks such as arranging multiple documents or changing the workspace view.
Black and White using Photoshop
 Topics to be covered: Methods for B&W conversion Improving the image Toning Printer color management Black and White using Photoshop Various ways to get to B&W Adobe Raw Converter (ACR) in from Bridge
Using the Advanced Sharpen Transformation
 Using the Advanced Sharpen Transformation Written by Jonathan Sachs Revised 10 Aug 2014 Copyright 2002-2014 Digital Light & Color Introduction Picture Window Pro s Advanced Sharpen transformation is a
ISIS A beginner s guide
 ISIS A beginner s guide Conceived of and written by Christian Buil, ISIS is a powerful astronomical spectral processing application that can appear daunting to first time users. While designed as a comprehensive
Color Balancing Techniques
 Written by Jonathan Sachs Copyright 1996-2007 Digital Light & Color Introduction Color balancing refers to the process of removing an overall color bias from an image. For example, if an image appears
Add Photoshop Masks and Adjustments to RAW Images
 Add Photoshop Masks and Adjustments to RAW Images Contributor: Seán Duggan n Specialty: Fine Art Primary Tool Used: Photoshop Masks The adjustments you make in Camera Raw are global in nature, meaning
Photoshop CS2. Step by Step Instructions Using Layers. Adobe. About Layers:
 About Layers: Layers allow you to work on one element of an image without disturbing the others. Think of layers as sheets of acetate stacked one on top of the other. You can see through transparent areas
Contents Technical background II. RUMBA technical specifications III. Hardware connection IV. Set-up of the instrument Laboratory set-up
 RUMBA User Manual Contents I. Technical background... 3 II. RUMBA technical specifications... 3 III. Hardware connection... 3 IV. Set-up of the instrument... 4 1. Laboratory set-up... 4 2. In-vivo set-up...
Transforming Your Photographs with Photoshop
 Transforming Your Photographs with Photoshop Jesús Ramirez PhotoshopTrainingChannel.com Contents Introduction 2 About the Instructor 2 Lab Project Files 2 Lab Objectives 2 Lab Description 2 Removing Distracting
Sheet Metal Punch ifeatures
 Lesson 5 Sheet Metal Punch ifeatures Overview This lesson describes punch ifeatures and their use in sheet metal parts. You use punch ifeatures to simplify the creation of common and specialty cut and
Reveal the mystery of the mask
 Reveal the mystery of the mask Imagine you're participating in a group brainstorming session to generate new ideas for the design phase of a new project. The facilitator starts the brainstorming session
Contents Foreword 1 Feedback 2 Legal information 3 Getting started 4 Installing the correct Capture One version 4 Changing the version type 5 Getting
 Contents Foreword 1 Feedback 2 Legal information 3 Getting started 4 Installing the correct Capture One version 4 Changing the version type 5 Getting to know Capture One Pro 6 The Grand Overview 6 The
Machinery HDR Effects 3
 1 Machinery HDR Effects 3 MACHINERY HDR is a photo editor that utilizes HDR technology. You do not need to be an expert to achieve dazzling effects even from a single image saved in JPG format! MACHINERY
Photoshop Techniques Digital Enhancement
 Photoshop Techniques Digital Enhancement A tremendous range of enhancement techniques are available to anyone shooting astrophotographs if they have access to a computer and can digitize their images.
Chroma Mask. Manual. Chroma Mask. Manual
 Chroma Mask Chroma Mask Tooltips If you let your mouse hover above a specific feature in our software, a tooltip about this feature will appear. Load Image Here an image is loaded which has been shot in
Adobe Photoshop CS5 Layers and Masks
 Adobe Photoshop CS5 Layers and Masks Email: training@health.ufl.edu Web Page: http://training.health.ufl.edu Adobe Photoshop CS5: Layers and Masks 2.0 Hours The workshop will cover creating and manipulating
We recommend downloading the latest core installer for our software from our website. This can be found at:
 Dusk Getting Started Installing the Software We recommend downloading the latest core installer for our software from our website. This can be found at: https://www.atik-cameras.com/downloads/ Locate and
Digimizer Copyright MedCalc Software bvba MedCalc Software Acacialaan Ostend Belgium
 MedCalc Software bvba. All rights reserved. No part of this package, neither the documentation nor the software may be reproduced, stored in a retrieval system, or transmitted in any form by electronic,
Rubbing your Nikon RAW file the Right Way
 Rubbing your Nikon RAW file the Right Way You can ignore reality, but you can t ignore the consequences of ignoring reality. Ayn Rand If you are a Nikon shooter, you will get the best result from processing
Contents STARTUP MICROSCOPE CONTROLS CAMERA CONTROLS SOFTWARE CONTROLS EXPOSURE AND CONTRAST MONOCHROME IMAGE HANDLING
 Operations Guide Contents STARTUP MICROSCOPE CONTROLS CAMERA CONTROLS SOFTWARE CONTROLS EXPOSURE AND CONTRAST MONOCHROME IMAGE HANDLING Nikon Eclipse 90i Operations Guide STARTUP Startup Powering Up Fluorescence
Using Adobe Photoshop
 Using Adobe Photoshop 6 One of the most useful features of applications like Photoshop is the ability to work with layers. allow you to have several pieces of images in the same file, which can be arranged
Index of Command Functions
 Index of Command Functions version 2.3 Command description [keyboard shortcut]:description including special instructions. Keyboard short for a Windows PC: the Control key AND the shortcut key. For a MacIntosh:
4.5.1 Mirroring Gain/Offset Registers GPIO CMV Snapshot Control... 14
 Thank you for choosing the MityCAM-C8000 from Critical Link. The MityCAM-C8000 MityViewer Quick Start Guide will guide you through the software installation process and the steps to acquire your first
Importing and processing gel images
 BioNumerics Tutorial: Importing and processing gel images 1 Aim Comprehensive tools for the processing of electrophoresis fingerprints, both from slab gels and capillary sequencers are incorporated into
Quick Mask Setting Up your Work Environment Setting Up the Quickmask Parameters
 Quick Mask Quickmask gets its name from the fact that as you create your selection area, Photoshop masks that area off, tinting it with a colored mask to show what has been selected. When you're finished
User Guide for TWAIN / DirectX interface for GRYPHAX USB 3.0 cameras
 User Guide for TWAIN / DirectX interface for GRYPHAX USB 3.0 cameras The TWAIN & DirectX driver for PROGRES GRYPHAX USB 3.0 cameras enables user to operate with TWAIN and DirectX supported 3 rd party software
Advanced Masking Tutorial
 Complete Digital Photography Seventh Edition Advanced Masking Tutorial by Ben Long In this tutorial, we re going to look at some more advanced masking concepts. This particular example is not a technique
User s Guide. Windows Lucis Pro Plug-in for Photoshop and Photoshop Elements
 User s Guide Windows Lucis Pro 6.1.1 Plug-in for Photoshop and Photoshop Elements The information contained in this manual is subject to change without notice. Microtechnics shall not be liable for errors
Extending the Dynamic Range of Film
 Written by Jonathan Sachs Copyright 1999-2003 Digital Light & Color Introduction Limited dynamic range is a common problem, especially with today s fine-grained slide films. When photographing contrasty
11 Advanced Layer Techniques
 11 Advanced Layer Techniques After you ve learned basic layer techniques, you can create more complex effects in your artwork using layer masks, path groups, filters, adjustment layers, and more style
Using Adobe Photoshop to enhance the image quality. Assistant course web site:
 Using Adobe Photoshop to enhance the image quality Assistant course web site: http://www.arches.uga.edu/~skwang/edit6170/course.htm Content Introduction 2 Unit1: Scan images 3 Lesson 1-1: Preparations
Create A Starry Night Sky In Photoshop
 Create A Starry Night Sky In Photoshop Written by Steve Patterson. In this Photoshop effects tutorial, we ll learn how to easily add a star-filled sky to a night time photo. I ll be using Photoshop CS5
Learning Photo Retouching techniques the simple way
 Learning Photo Retouching techniques the simple way Table of Contents About the Workshop... i Workshop Objectives... i Getting Started... 1 Photoshop Workspace... 1 Setting up the Preferences... 2 Retouching
Introduction Welcome to PhotoSweeper
 Introduction Welcome to Do you really need all 12 shots of that coffee table? helps you organize your photo collections by finding and grouping duplicate or similar photos using powerful comparison settings.
Lightroom CC. Welcome to Joshua Tree Workshops. Astro & Landscape Lightroom Workflow w/presets
 Welcome to My approach to teaching is to offer small workshops which allow you to explore and discover our amazing planet, while learning photography and timelapse techniques. Astro & Landscape Lightroom
CeleSTRoN ASTRoFX NIGHTSCAPe CAMeRA CoNTRol AND PRoCeSSING SoFTWARe
 CeleSTRoN ASTRoFX NIGHTSCAPe CAMeRA CoNTRol AND PRoCeSSING SoFTWARe Celestron AstroFX Nightscape Camera Control and Processing Software Table of Contents QUICK TOUR 2 The CCC Tabs 3 SNAP 3 STACK 6 STRETCH
ThermaViz. Operating Manual. The Innovative Two-Wavelength Imaging Pyrometer
 ThermaViz The Innovative Two-Wavelength Imaging Pyrometer Operating Manual The integration of advanced optical diagnostics and intelligent materials processing for temperature measurement and process control.
Converting and editing raw images
 Converting and editing raw images Raw v jpeg As we have found out, jpeg files are processed in the camera and much of the data is lost. Raw files are not. Raw file formats: General term for a variety of
CONVERTING AND EDITING RAW IMAGES
 CONVERTING AND EDITING RAW IMAGES RAW V JPEG As we have found out, jpeg files are processed in the camera and much of the data is lost. Raw files are not and so all of the data is preserved. RAW FILE FORMATS:
Photoshop Elements Hints by Steve Miller
 2015 Elements 13 A brief tutorial for basic photo file processing To begin, click on the Elements 13 icon, click on Photo Editor in the first box that appears. We will not be discussing the Organizer portion
Adobe PhotoShop Elements 3.0 Quick Start Tutorial
 Adobe PhotoShop Elements 3.0 Quick Start Tutorial Introduction When you open Photoshop Elements, you are greeted by the welcome screen which offers you several choices: 1. Product Overview Provides a quick
It makes sense to read this section first if new to Silkypix... How to Handle SILKYPIX Perfectly Silkypix Pro PDF Contents Page Index
 It makes sense to read this section first if new to Silkypix... How to Handle SILKYPIX Perfectly...145 Silkypix Pro PDF Contents Page Index 0. 0.Overview and Introduction...9 0.1. Section Names...9 0.1.1.
32 Float v3 Quick Start Guide. AUTHORED BY ANTHONY HERNANDEZ (415)
") 32 Float v3 Quick Start Guide 32 Float v3 Trademark/Copyright Information Copyright 2013 by United Color Technologies, LLC. All rights reserved. Unified Color Technologies, BeyondRGB, and HDR Expose are
32 Float v3 Quick Start Guide 32 Float v3 Trademark/Copyright Information Copyright 2013 by United Color Technologies, LLC. All rights reserved. Unified Color Technologies, BeyondRGB, and HDR Expose are
The AAVSO DSLR Observing Manual
 1 The AAVSO DSLR Observing Manual Supplemental Information Photometry Software Calibration and Photometry Tutorials AAVSO 49 Bay State Road Cambridge, MA 02138 email: aavso@aavso.org Version 1.0 Copyright
Creating Pastel Images and other effects in Photoshop
 Creating Pastel Images and other effects in Photoshop Martin Addison 2015 Creating pastel images Page 1 Martin Addison FRPS Using White Layers in Photoshop 1. Create a new empty Layer 2. Edit> Fill 3.
Creating a Watercolor Painting From a Photo. Open the photo you want to appear to be a watercolor painting. I am using the photo below:
 Creating a Watercolor Painting From a Photo Open the photo you want to appear to be a watercolor painting. I am using the photo below: Make any adjustments as needed like cropping the photo before preceding
BCC Glow Filter Glow Channels menu RGB Channels, Luminance, Lightness, Brightness, Red Green Blue Alpha RGB Channels
 BCC Glow Filter The Glow filter uses a blur to create a glowing effect, highlighting the edges in the chosen channel. This filter is different from the Glow filter included in earlier versions of BCC;
Guidance on Using Scanning Software: Part 6. Canon ScanGear
 Guidance on Using Scanning Software: Part 6. Canon ScanGear Version of 12/23/2012 The Canon ScanGear software that comes with Canon scanners has significant limitations for archival scanning. The documentation
A guide to SalsaJ. This guide gives step-by-step instructions on how to use SalsaJ to carry out basic data analysis on astronomical data files.
 A guide to SalsaJ SalsaJ is free, student-friendly software developed originally for the European Hands- On Universe (EU-HOU) project. It is designed to be easy to install and use. It allows students to
easyhdr 3.3 User Manual Bartłomiej Okonek
 User Manual 2006-2014 Bartłomiej Okonek 20.03.2014 Table of contents 1. Introduction...4 2. User interface...5 2.1. Workspace...6 2.2. Main tabbed panel...6 2.3. Additional tone mapping options panel...8
Capture NX-D Reference Manual for Version 1.5.0
 Capture NX-D Reference Manual for Version 1.5.0 Introduction What Capture NX-D Can Do for You... 2 Image Adjustments... 4 The Capture NX-D Window... 5 Palettes... 6 The Toolbar... 8 The Status Bar...10
IMAGE CORRECTION. You can find this and more information with video tutorials at
 IMAGE CORRECTION You can find this and more information with video tutorials at http://www.adobe.com/support/photoshop/ P H O T O S H O P T O O L S CLONE STAMP TOOL The Clone Stamp tool paints one part
INSTRUCTION MANUAL MM-A209
 E INSTRUCTION MANUAL 9222-7300-11 MM-A209 2 BEFORE YOU BEGIN Before installing the DiMAGE Viewer software, read the data-transfer section in the camera manual. This section details how to connect the camera
Reference Guide. Color Image Scanner
 Color Image Scanner All rights reserved. No part of this publication may be reproduced, stored in a retrieval system, or transmitted in any form or by any means, electronic, mechanical, photocopying, recording,
Image Pro Ultra. Tel:
 Image Pro Ultra www.ysctech.com info@ysctech.com Tel: 510.226.0889 Instructions for installing YSC VIC-USB and IPU For software and manual download, please go to below links. http://ysctech.com/support/ysc_imageproultra_20111010.zip
Adobe Photoshop CC 2018 Tutorial
 Adobe Photoshop CC 2018 Tutorial GETTING STARTED Adobe Photoshop CC 2018 is a popular image editing software that provides a work environment consistent with Adobe Illustrator, Adobe InDesign, Adobe Photoshop,
UNIVERSITY COLLEGE LONDON Department of Physics and Astronomy. An Introduction to Image Processing
 UNIVERSITY COLLEGE LONDON Department of Physics and Astronomy UCL Observatory PHAS2130 2015 16.2 An Introduction to Image Processing 1 Introduction Students will have submitted imaging requests to the
AIC Narrowband Imaging Things That Make a Difference Saturday, October 27, 2007 Neil Fleming. (
 AIC 2007 Narrowband Imaging Things That Make a Difference Saturday, October 27, 2007 Neil Fleming (www.flemingastrophotography.com) Agenda and Assumptions Agenda: Light pollution? Why even try? RGB and
Version 4.2 For WINDOWS
 SIGMA Photo Pro User Guide Companion Processing Software for SIGMA Digital Cameras Version 4.2 For WINDOWS I M P O R T A N T : Please Read Before You Start Thank you very much for purchasing this SIGMA
Table Of Contents. v Copyright by Richard Berry and James Burnell, All Rights Reserved.
 Table Of Contents Preface to the First Edition... xix Preface to the Second Edition... xxv 1 Basic Imaging... 1 1.1 Light... 1 1.2 Image Formation... 2 1.2.1 Pinhole Imaging... 2 1.2.2 Lens Cameras...
WHITE PAPER ONYX 11 Textile. Using ColorWays. onyxgfx.com
 WHITE PAPER ONYX 11 Textile Using ColorWays Introduction Colorways is a new tool for ONYX 11 and Thrive 11 Textile editions. Colorways is part of the Patterns tools in Job Editor. This tool makes it easy
ADDING RAIN TO A PHOTO
 ADDING RAIN TO A PHOTO Most of us would prefer to avoid being caught in the rain if possible, especially if we have our cameras with us. But what if you re one of a large number of people who enjoy taking
PHOTOSHOP: 3.3 CAMERA RAW
 1 PHOTOSHOP: 3.3 CAMERA RAW Raw image files are uncompressed images that contain all the information of the photo. Raw images give you flexibility in editing and allow you to achieve a better look because
Project 25 Page 1 ` JAZZ POSTCARD
 Project 25 Page 1 ` JAZZ POSTCARD Reset all tools! Create the Background 1. Create a new RGB document, 4.25 in. wide by 5.75 in. high at 100 dpi with a white background. 2. Click the foreground color swatch
PHOTOSHOP PUZZLE EFFECT
 PHOTOSHOP PUZZLE EFFECT In this Photoshop tutorial, we re going to look at how to easily create a puzzle effect, allowing us to turn any photo into a jigsaw puzzle! Or at least, we ll be creating the illusion
iq-led Software V2.1
 iq-led Software V2.1 User Manual 31. January 2018 Image Engineering GmbH & Co. KG Im Gleisdreieck 5 50169 Kerpen-Horrem Germany T +49 2273 99991-0 F +49 2273 99991-10 www.image-engineering.com CONTENT
Mask Integrator. Manual. Mask Integrator. Manual
 Mask Integrator Mask Integrator Tooltips If you let your mouse hover above a specific feature in our software, a tooltip about this feature will appear. Load Image Load the image with the standard lighting
Panoramas and the Info Palette By: Martin Kesselman 5/25/09
 Panoramas and the Info Palette By: Martin Kesselman 5/25/09 Any time you have a color you would like to copy exactly, use the info palette. When cropping to achieve a particular size, it is useful to use
User Manual. Lucis Pro 6 SA Windows. Stand Alone Application
 User Manual Lucis Pro 6 SA Windows Stand Alone Application The information contained in this manual is subject to change without notice. Neither Microtechnics nor Gary Gaugler shall be liable for errors
CHAPTER1: QUICK START...3 CAMERA INSTALLATION... 3 SOFTWARE AND DRIVER INSTALLATION... 3 START TCAPTURE...4 TCAPTURE PARAMETER SETTINGS... 5 CHAPTER2:
 Image acquisition, managing and processing software TCapture Instruction Manual Key to the Instruction Manual TC is shortened name used for TCapture. Help Refer to [Help] >> [About TCapture] menu for software
FLIR Tools for PC 7/21/2016
 FLIR Tools for PC 7/21/2016 1 2 Tools+ is an upgrade that adds the ability to create Microsoft Word templates and reports, create radiometric panorama images, and record sequences from compatible USB and
Table of Contents 1. Image processing Measurements System Tools...10
 Introduction Table of Contents 1 An Overview of ScopeImage Advanced...2 Features:...2 Function introduction...3 1. Image processing...3 1.1 Image Import and Export...3 1.1.1 Open image file...3 1.1.2 Import